

My allergies have been incredible this year, and by that I mean that they have been worse than they have ever been. (Please, please, please do not suggest medical advice here. Much appreciated.) I see an allergy specialist who gives me 2 shots, 2-3 times a week to help with my symptoms. They have helped a lot; however, Juniper Ash (Cedar Fever!) here in Austin is 6 times worse than average this year, and boy oh boy, do I feel it. She suggested that I wear a face mask when I go outside to help reduce the amount of pollen that is going into my lungs and sinuses. After going to a few different stores to purchase some, I found that many other Austinites had already bought them out. No worries, right? I know how to sew. I will just make one. When I finished, I had many requests for a tutorial, so here you go:
Materials needed:

- 1 piece of fabric measuring 8” x 14”. Until you get familiar with this tutorial, I would suggest a non-directional print. One that has a scattered image printed on the surface such as the one shown.
- 2 strips of fabric measuring 1.75” (1 3/4”) x 6”. This will be the accent edge piece. It can be the same fabric as the main piece or a small-scale print or solid.
- Two pieces of 1/4” width elastic. These will be about 6 1/2” long.
- Ruler
- Fabric marking tool.
- Pins
- Scissors
- Sewing machine, threaded.
Fold the main piece of fabric in half, right sides together. Sew along the 8 inch width edge, using a 1/4 inch seam allowance.
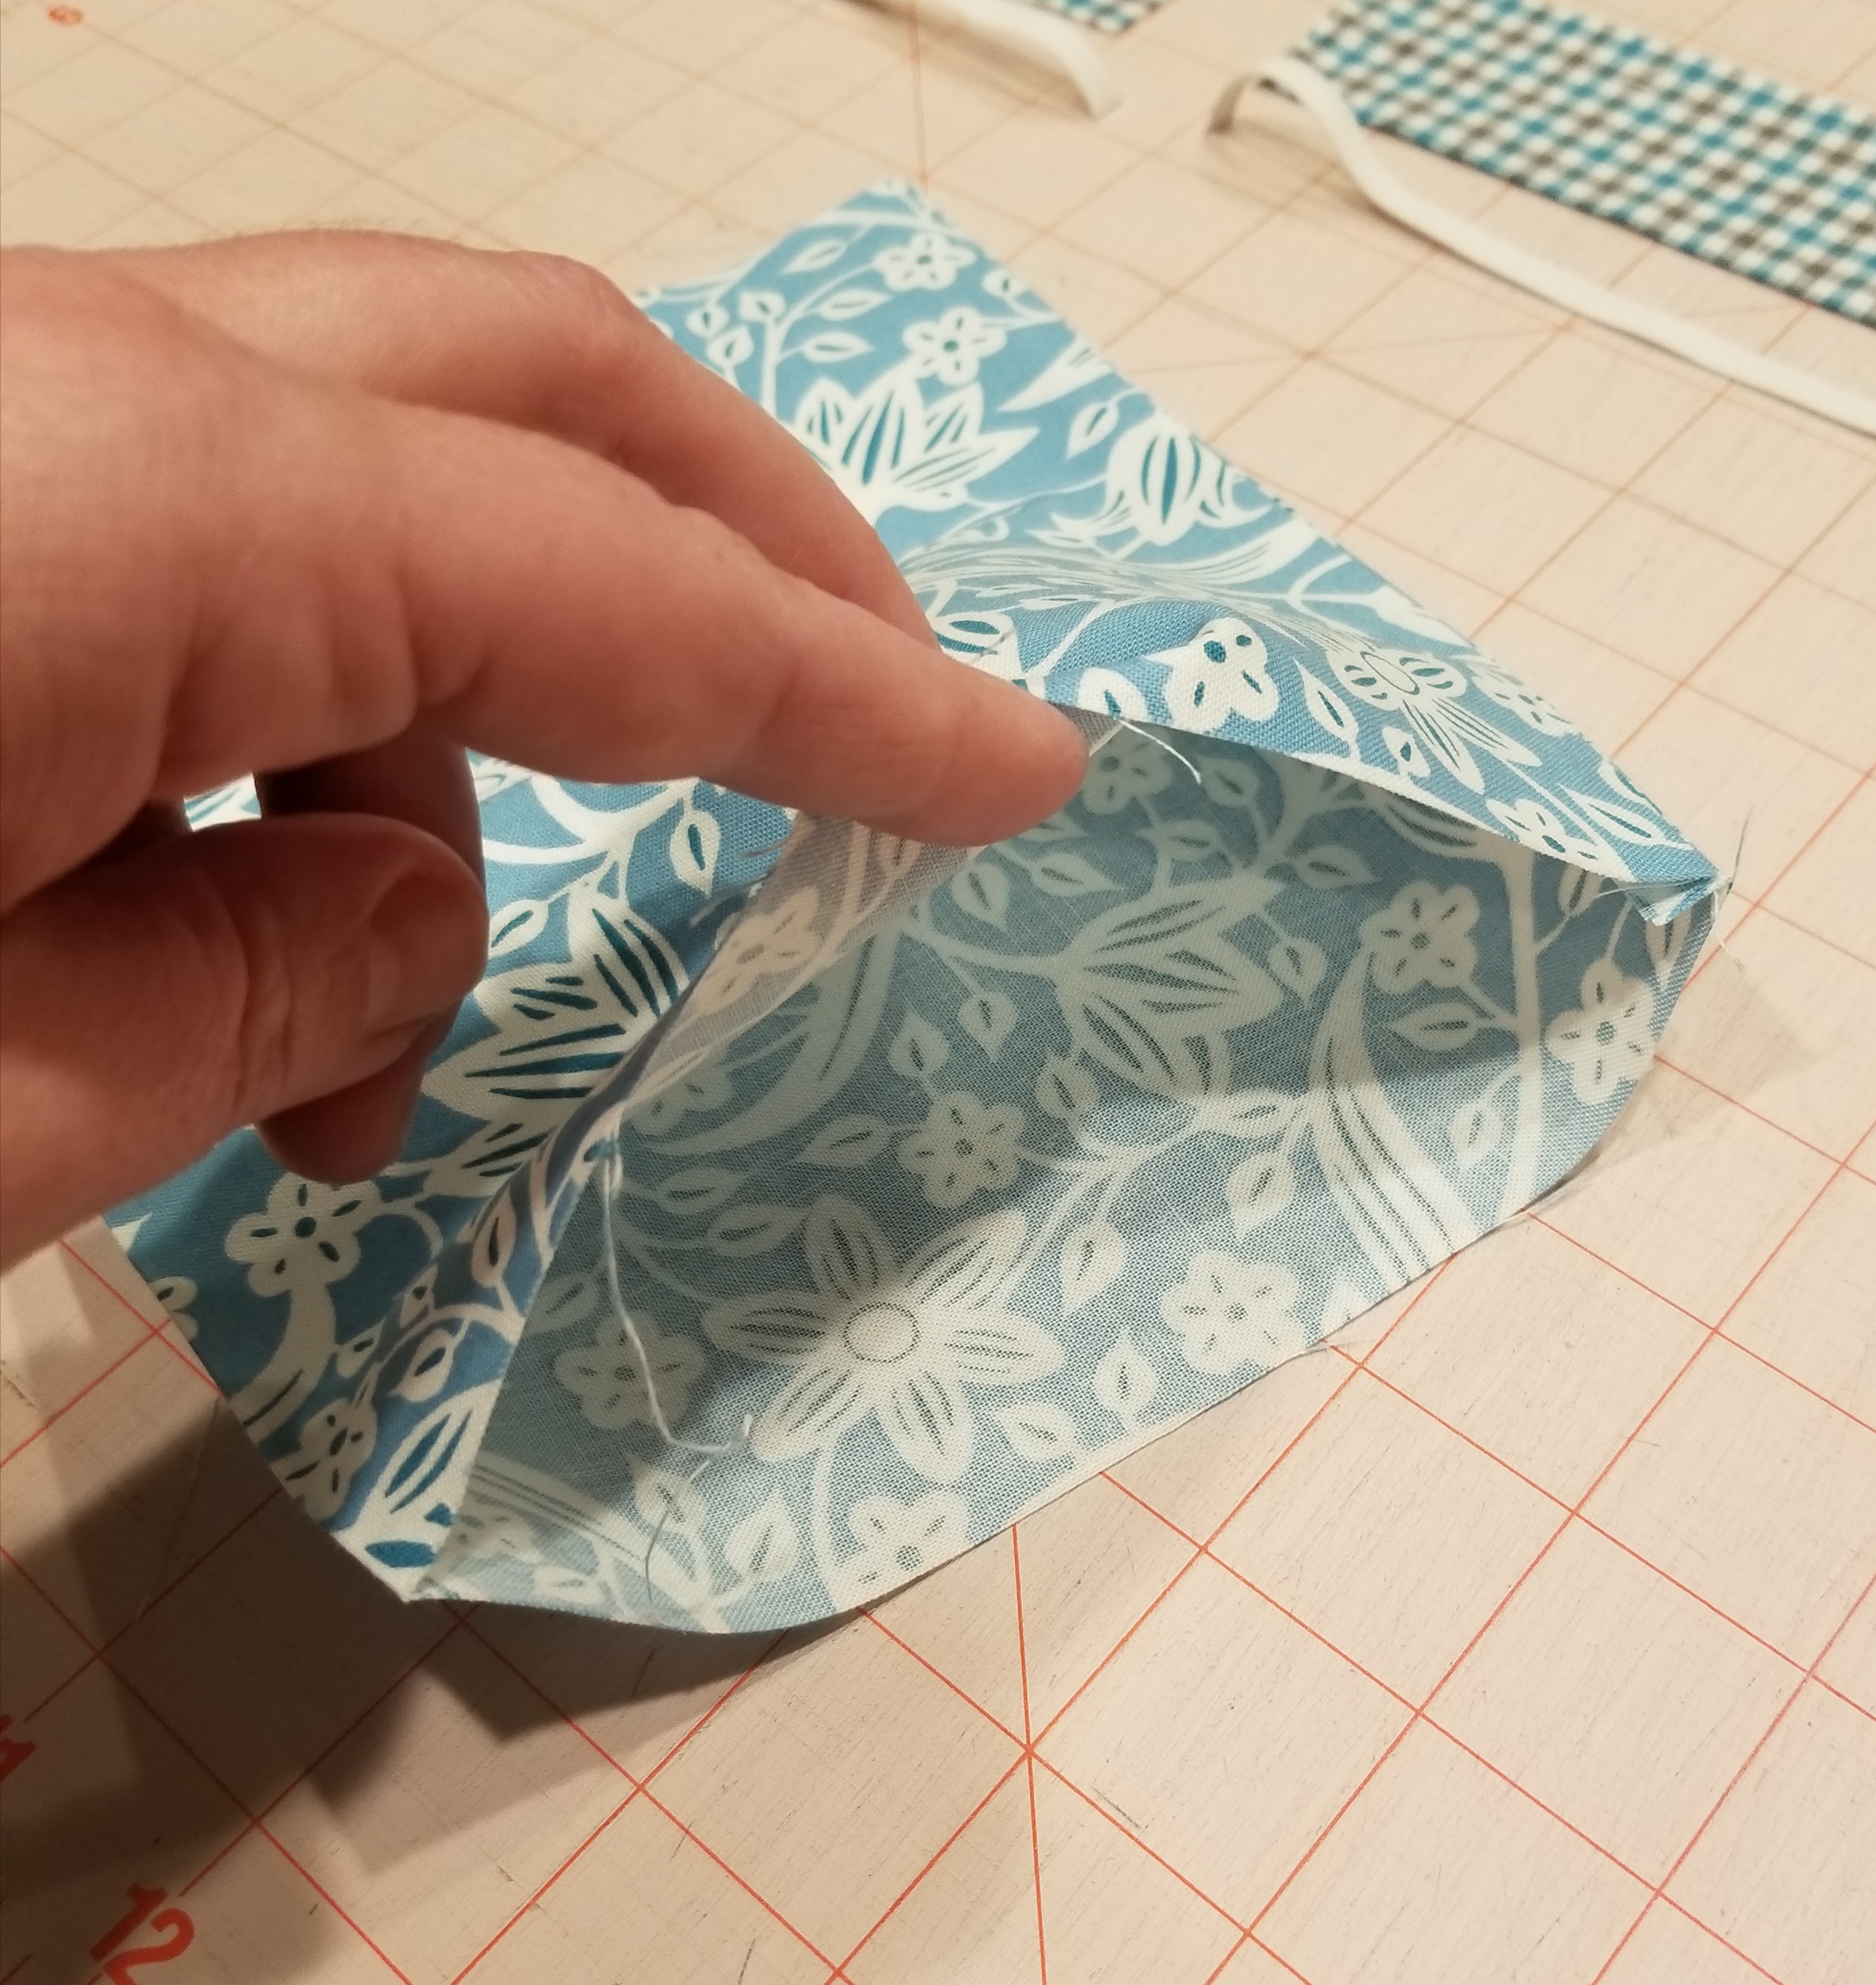
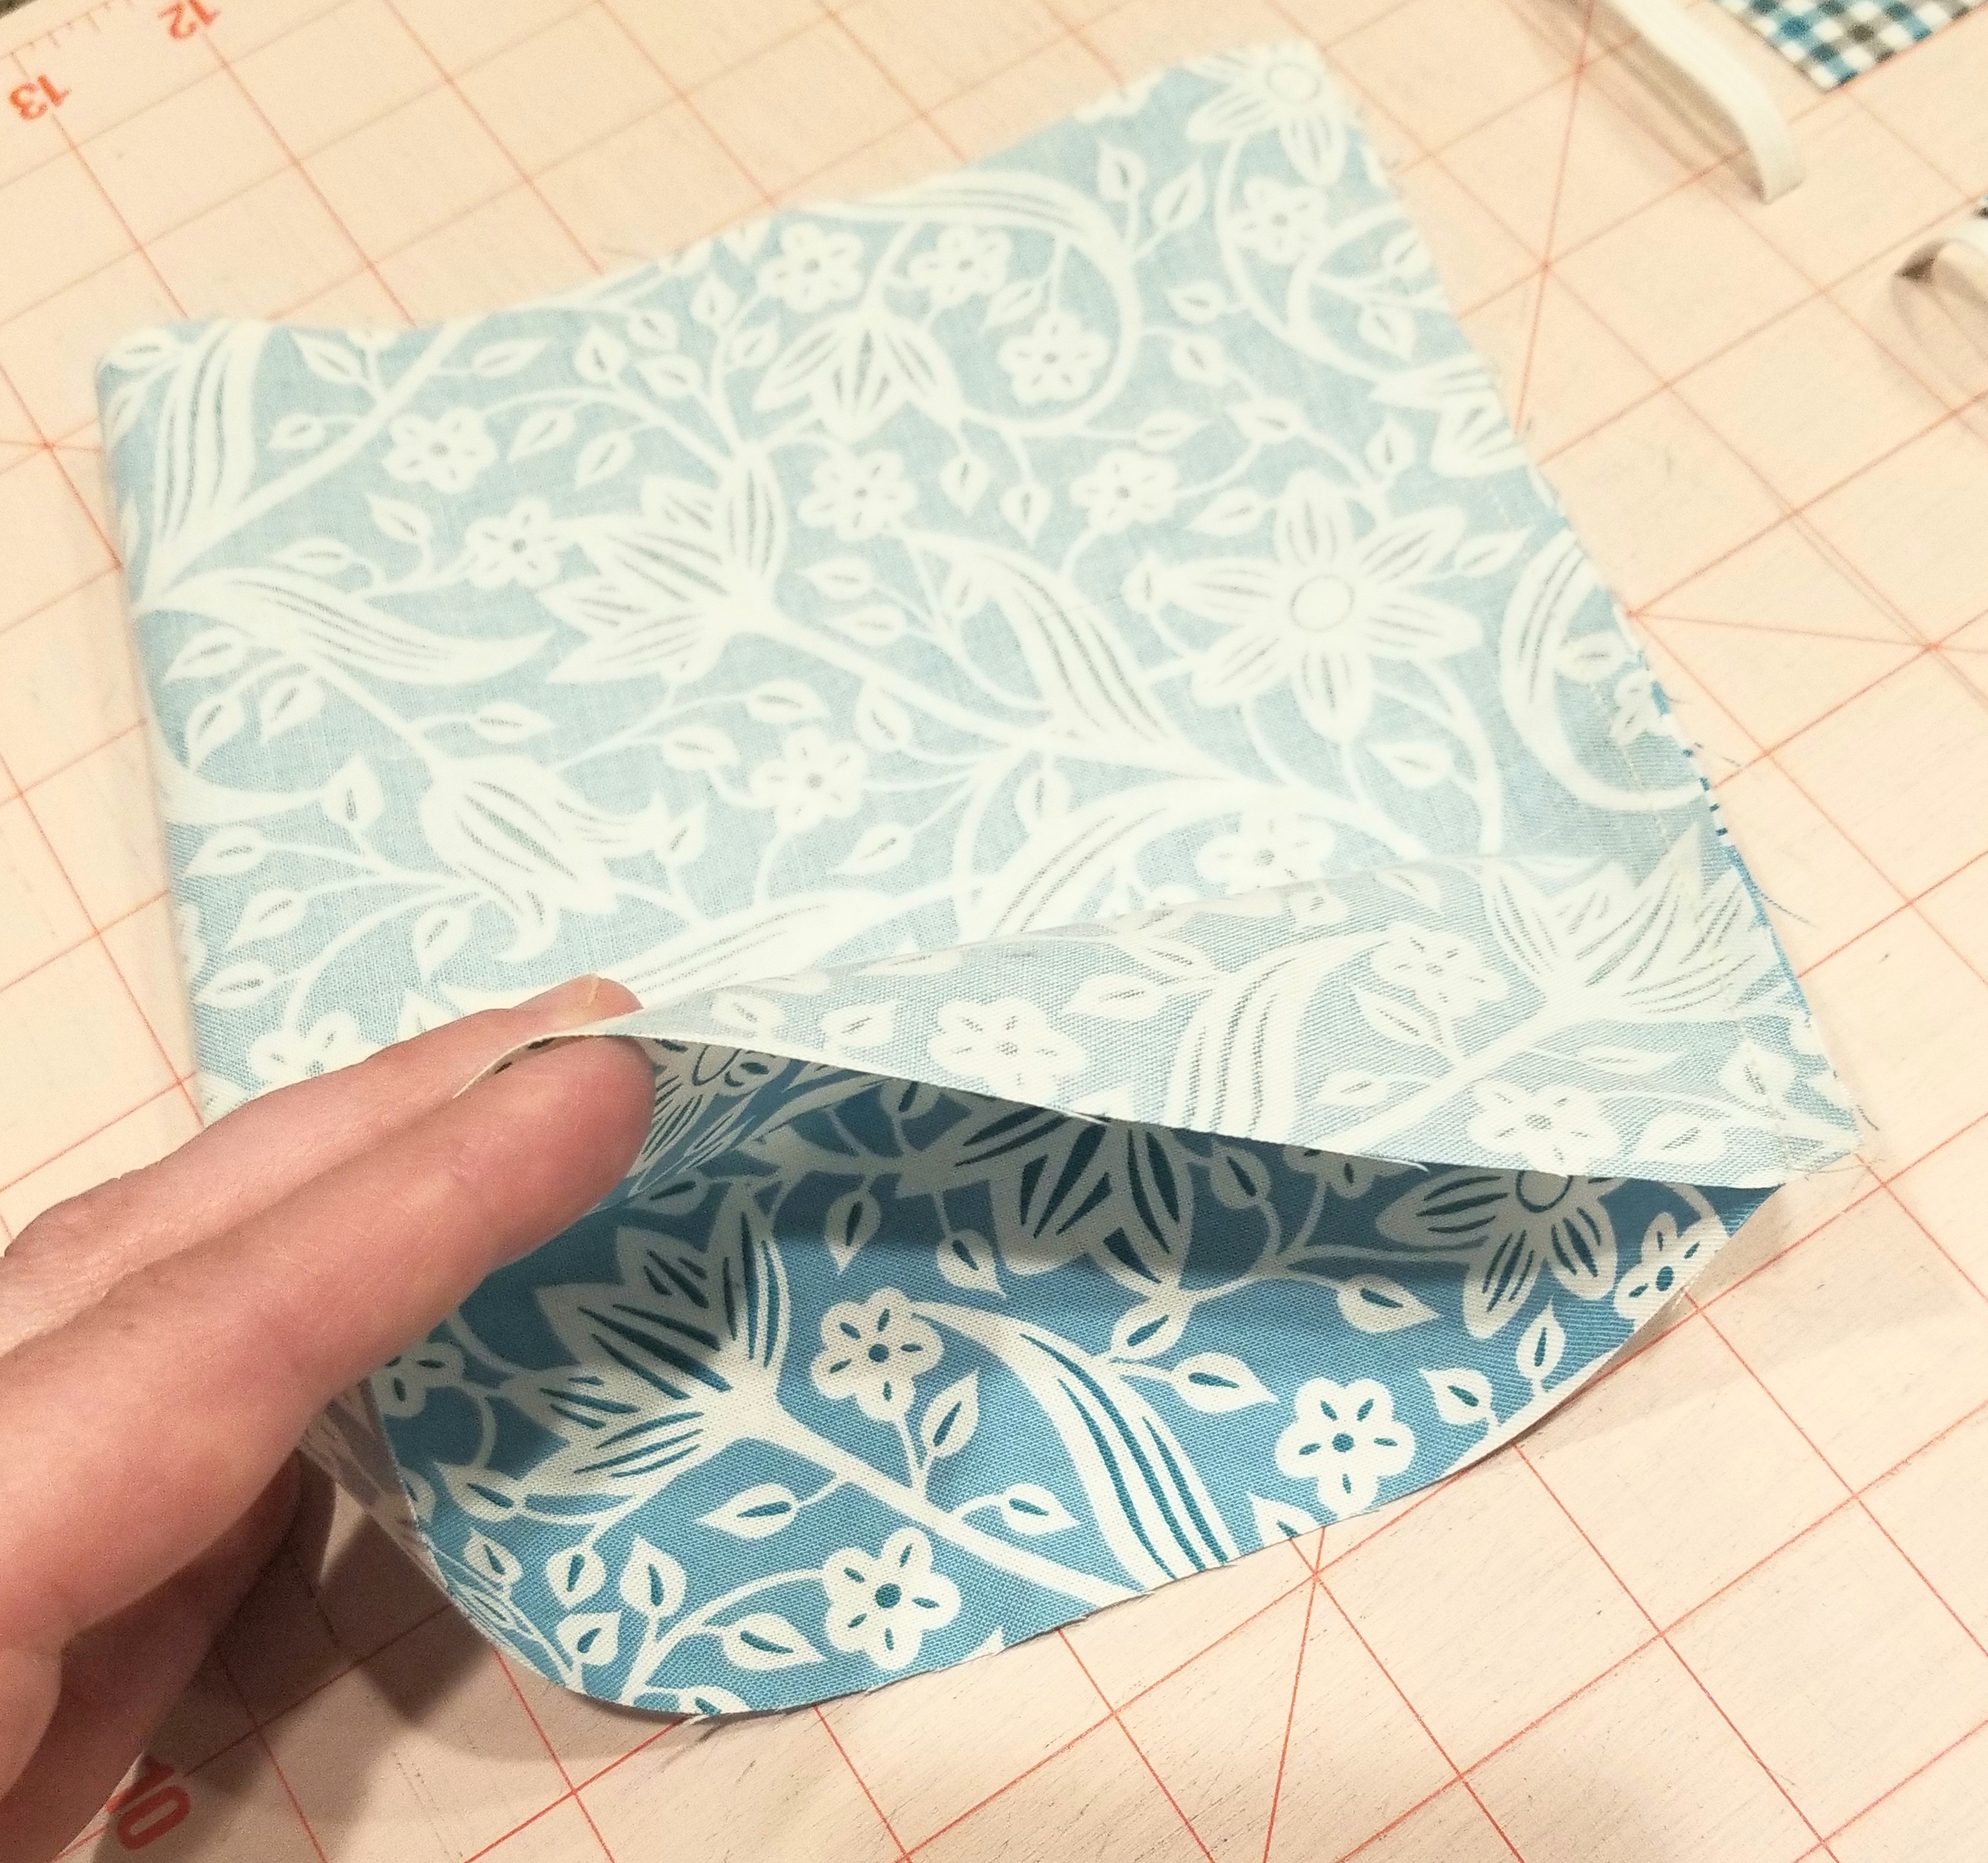
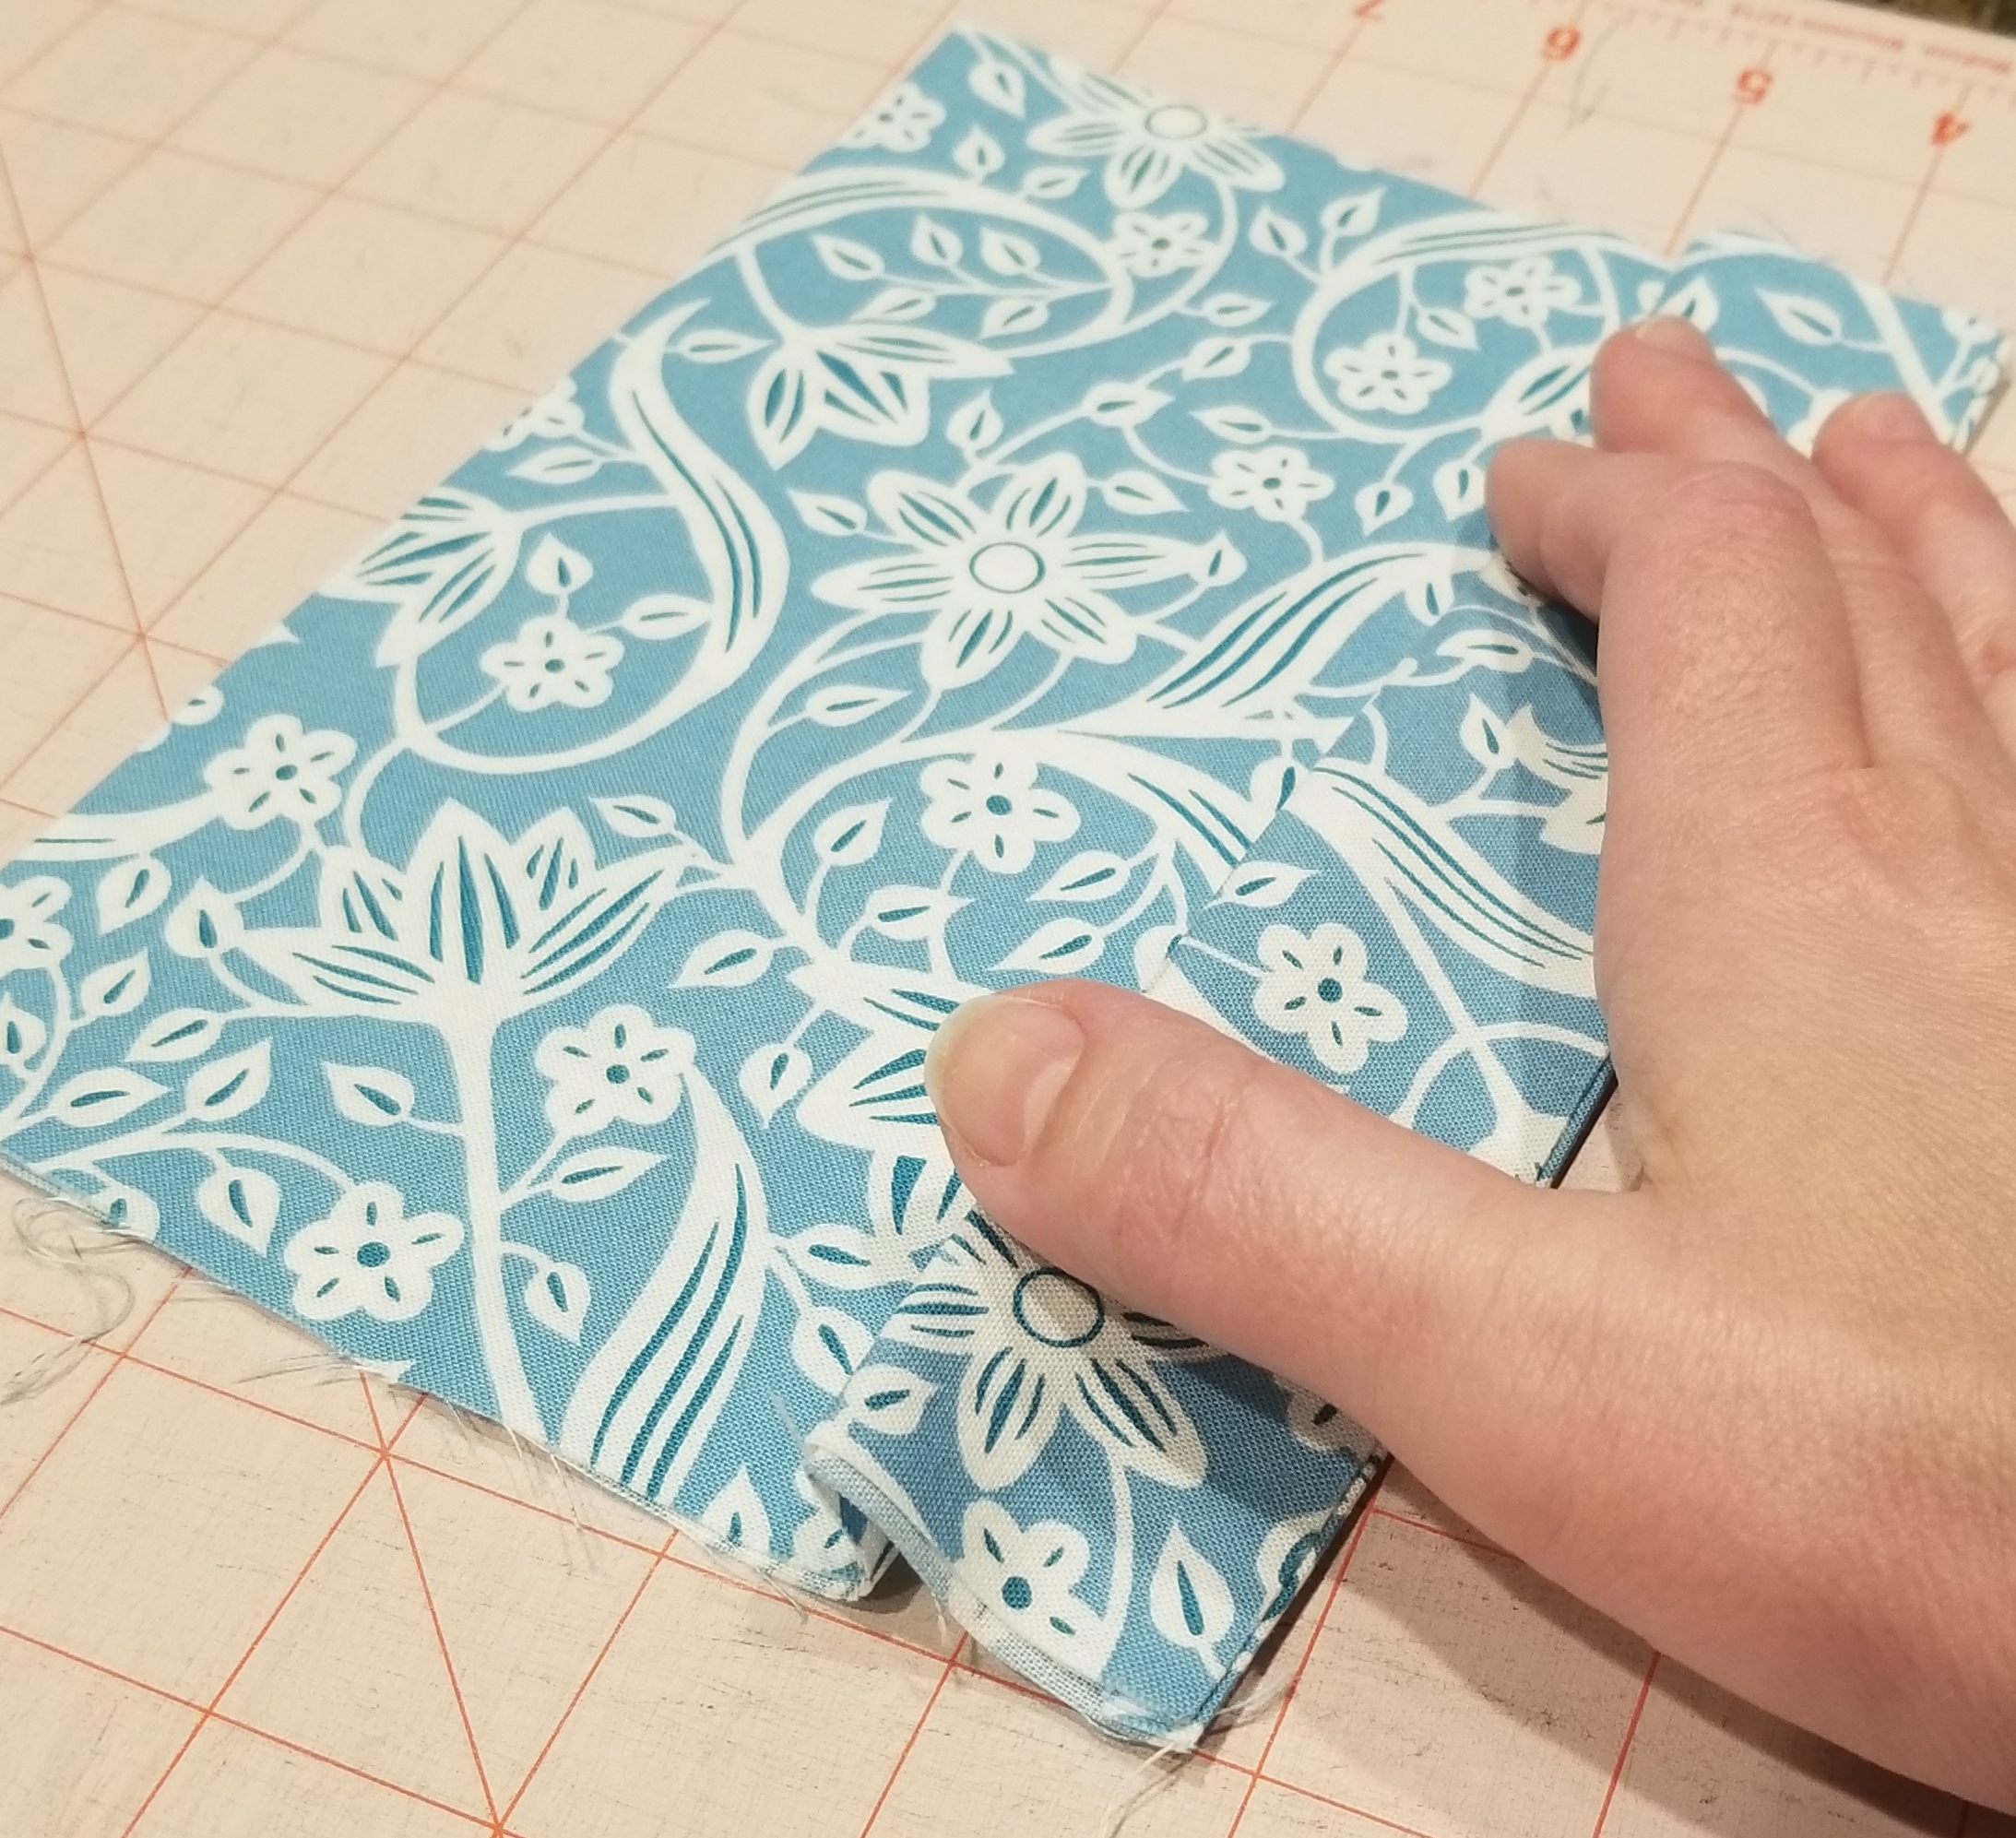
Turn this tube shape inside out, so that the right side of the fabric is now on the outside. Press this flat, keeping the seam to one end of the flattened tube.
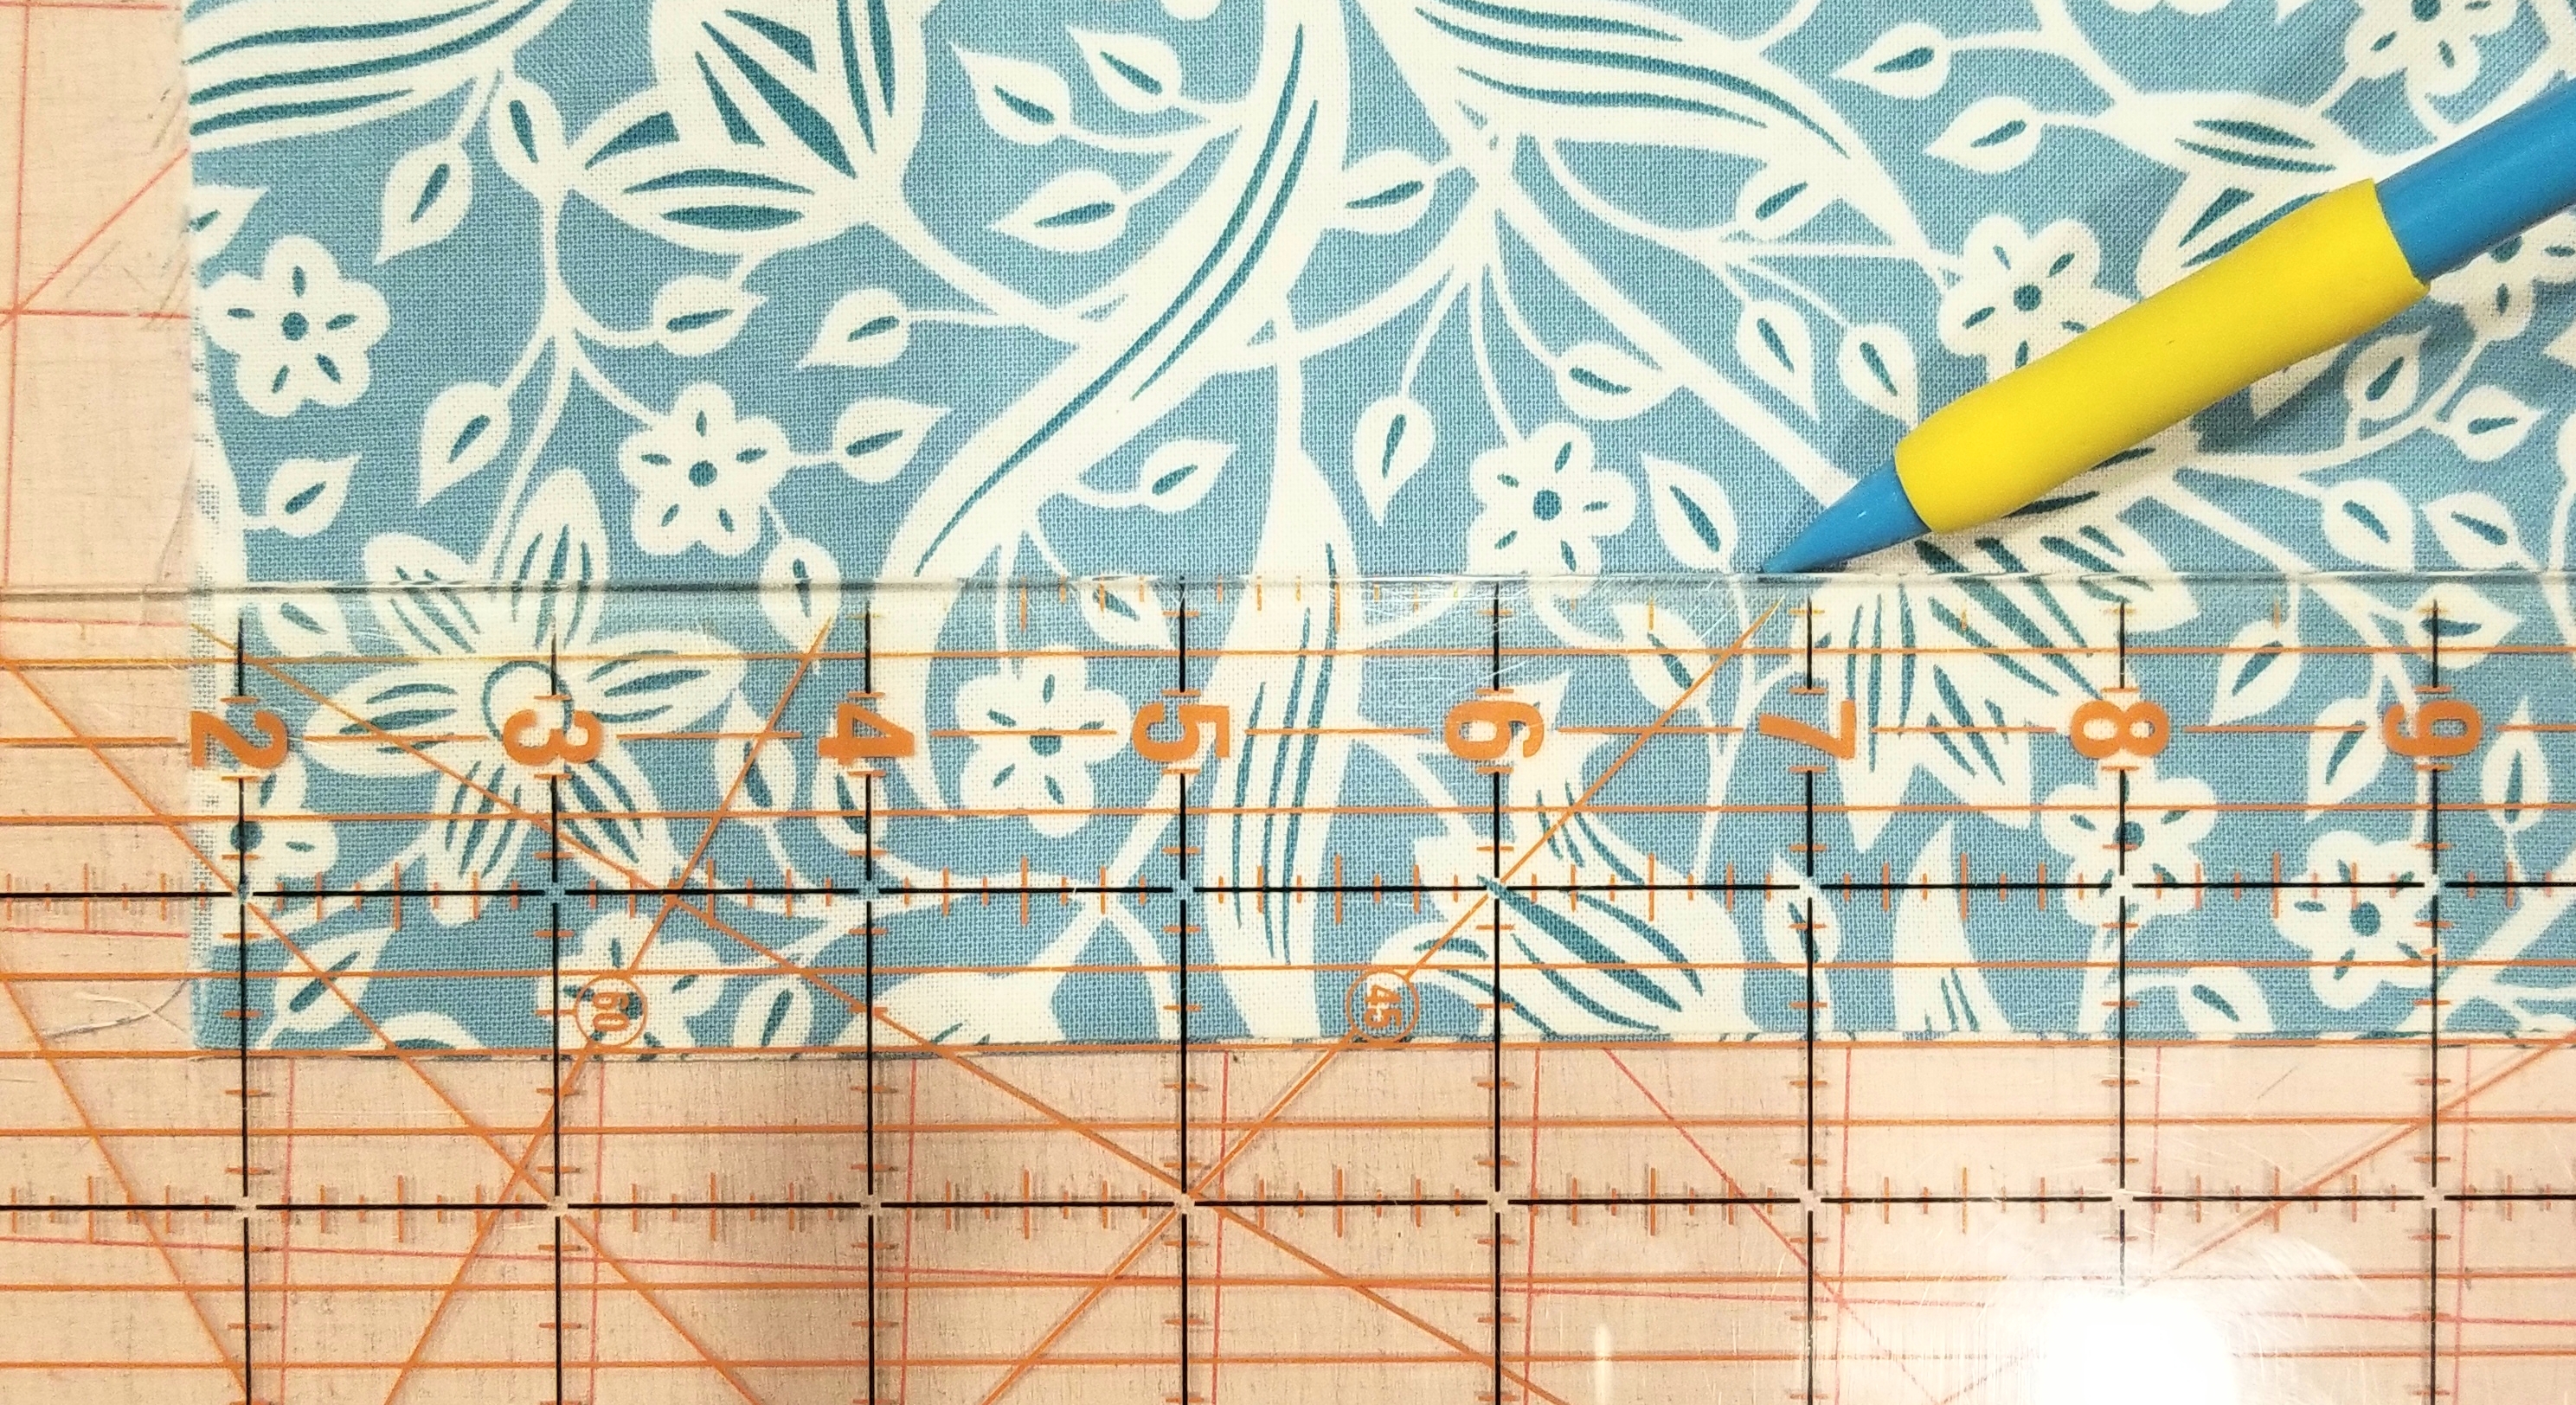
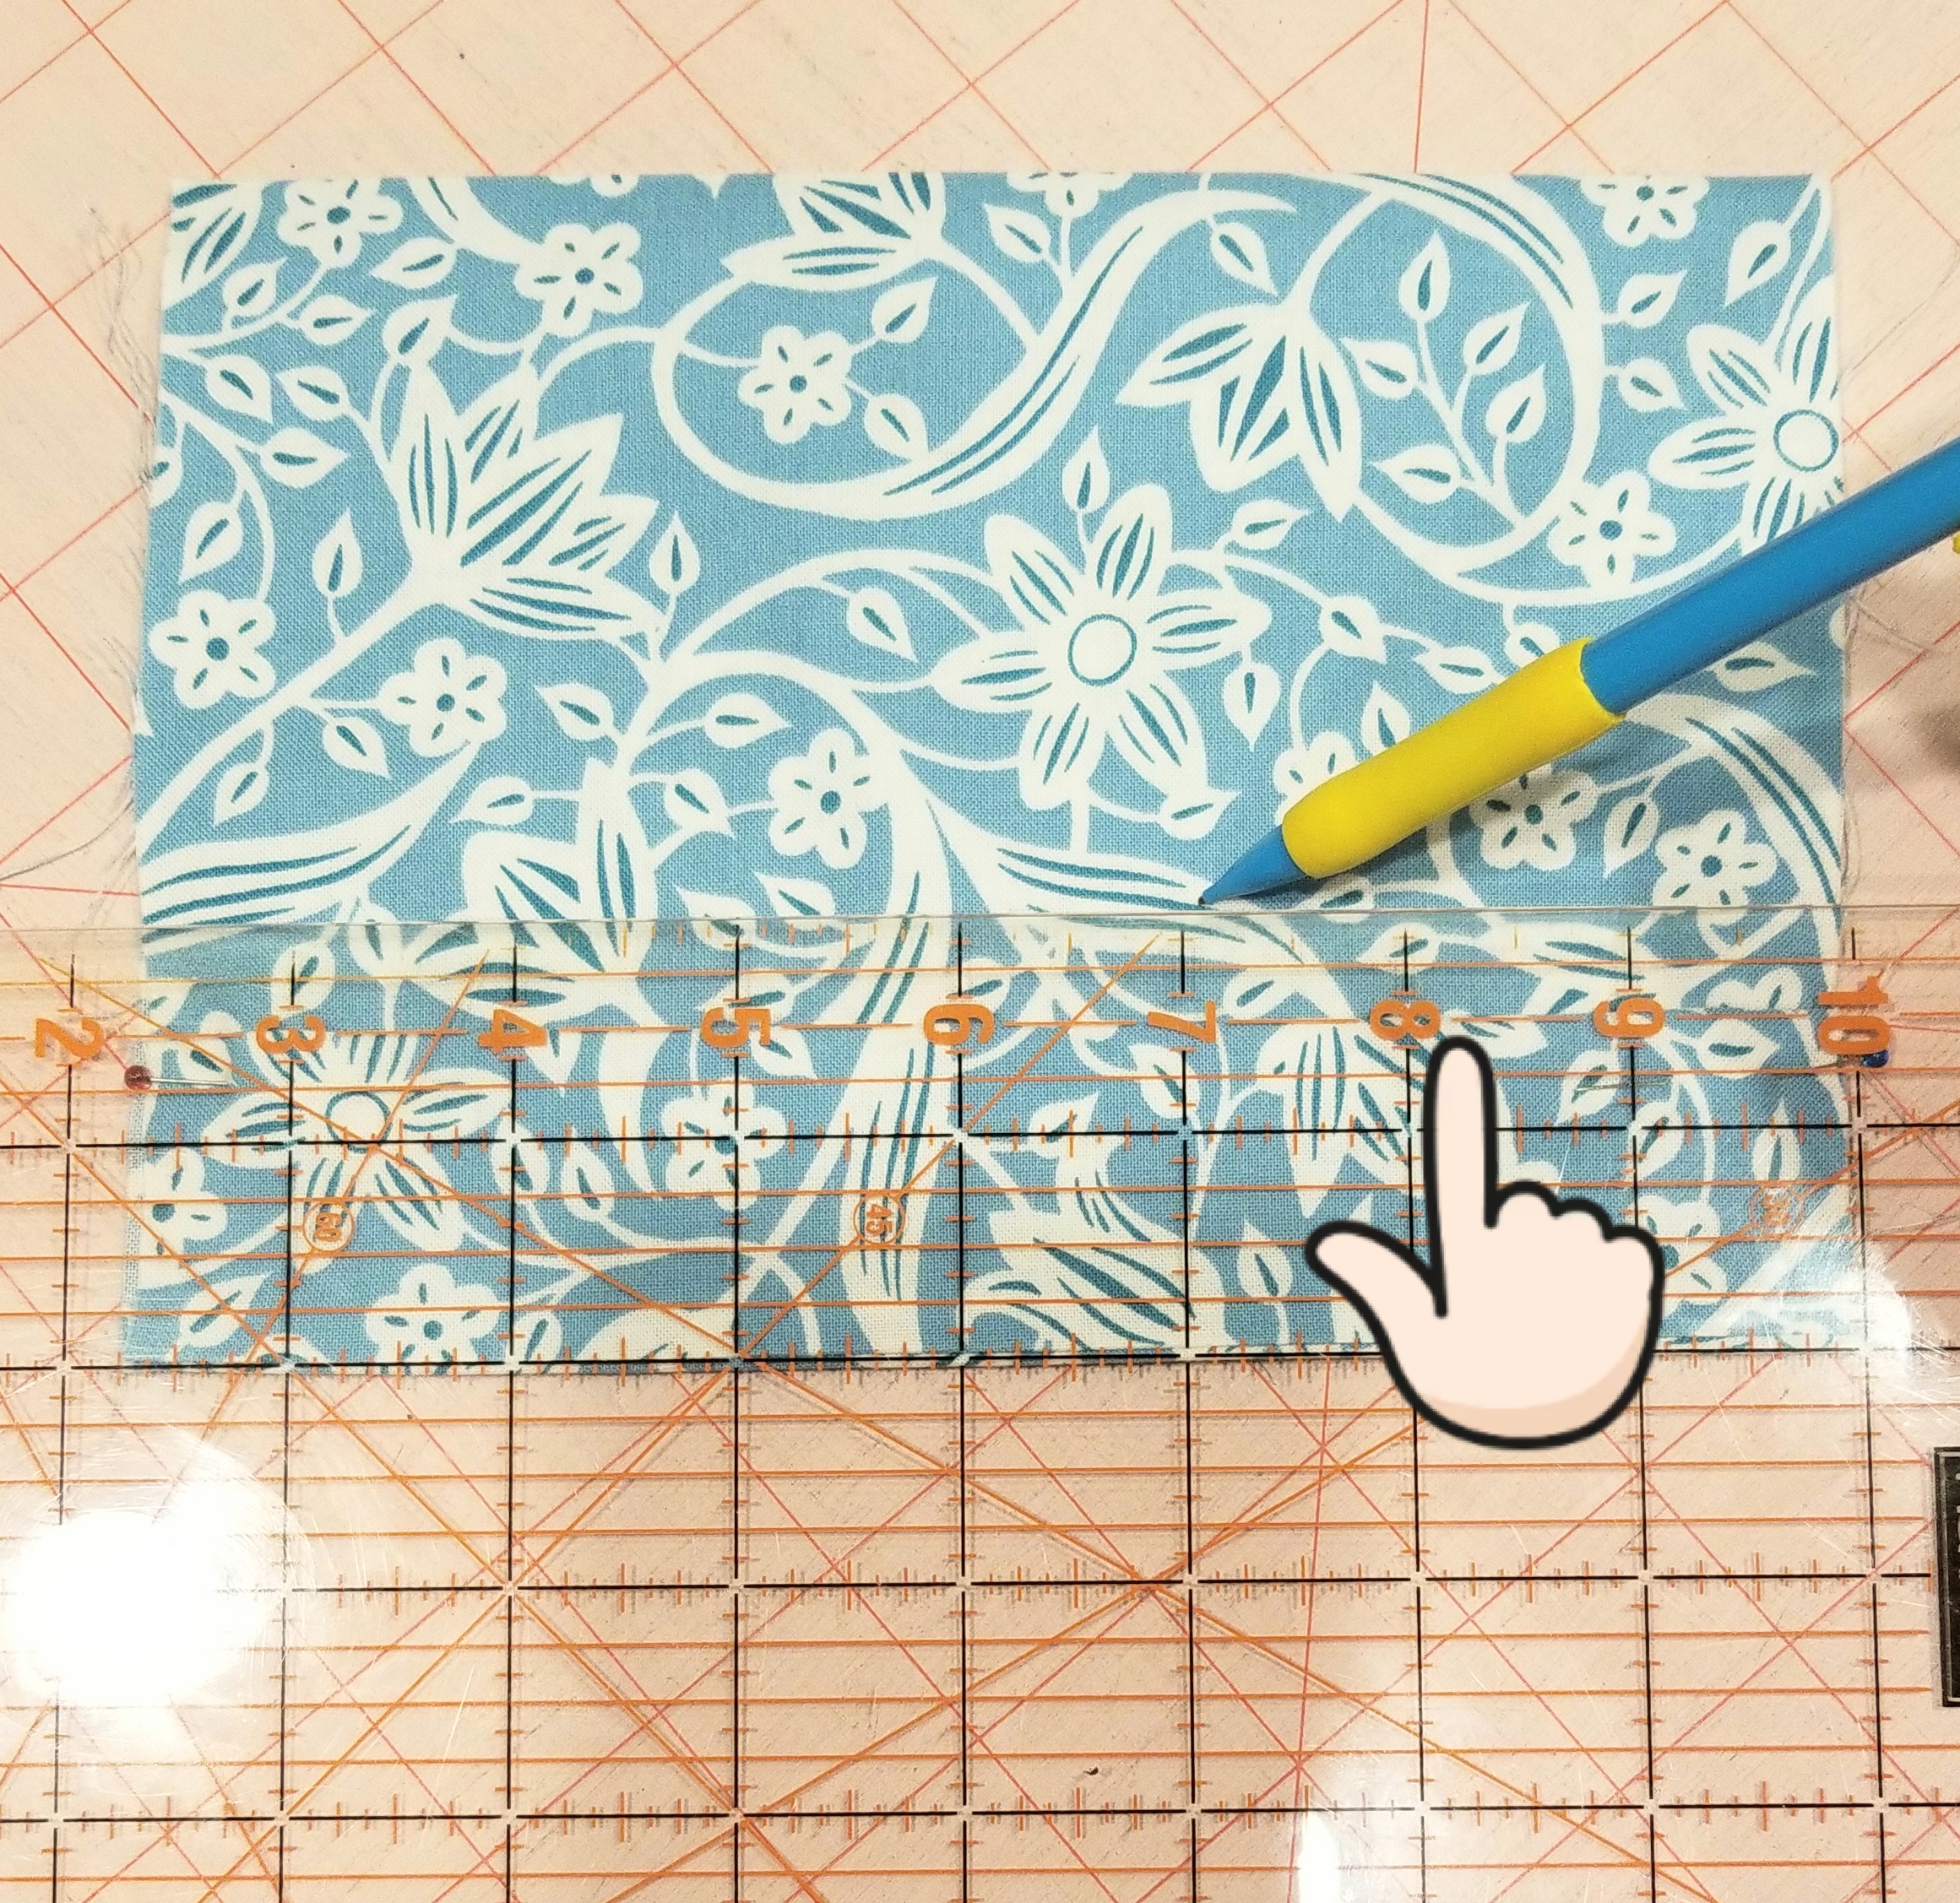
Place the tube of fabric so that the raw edges are on each side and the seam edge is at the bottom. Using a ruler, measure and mark a line 1 1/2 inches from the bottom edge. Make another line 1 inch above this line, or 2 1/2 inches from the seam edge. Don’t use a pencil as you see in the picture, use a fabric pen, or fabric chalk. I used a pencil for illustration purposes.
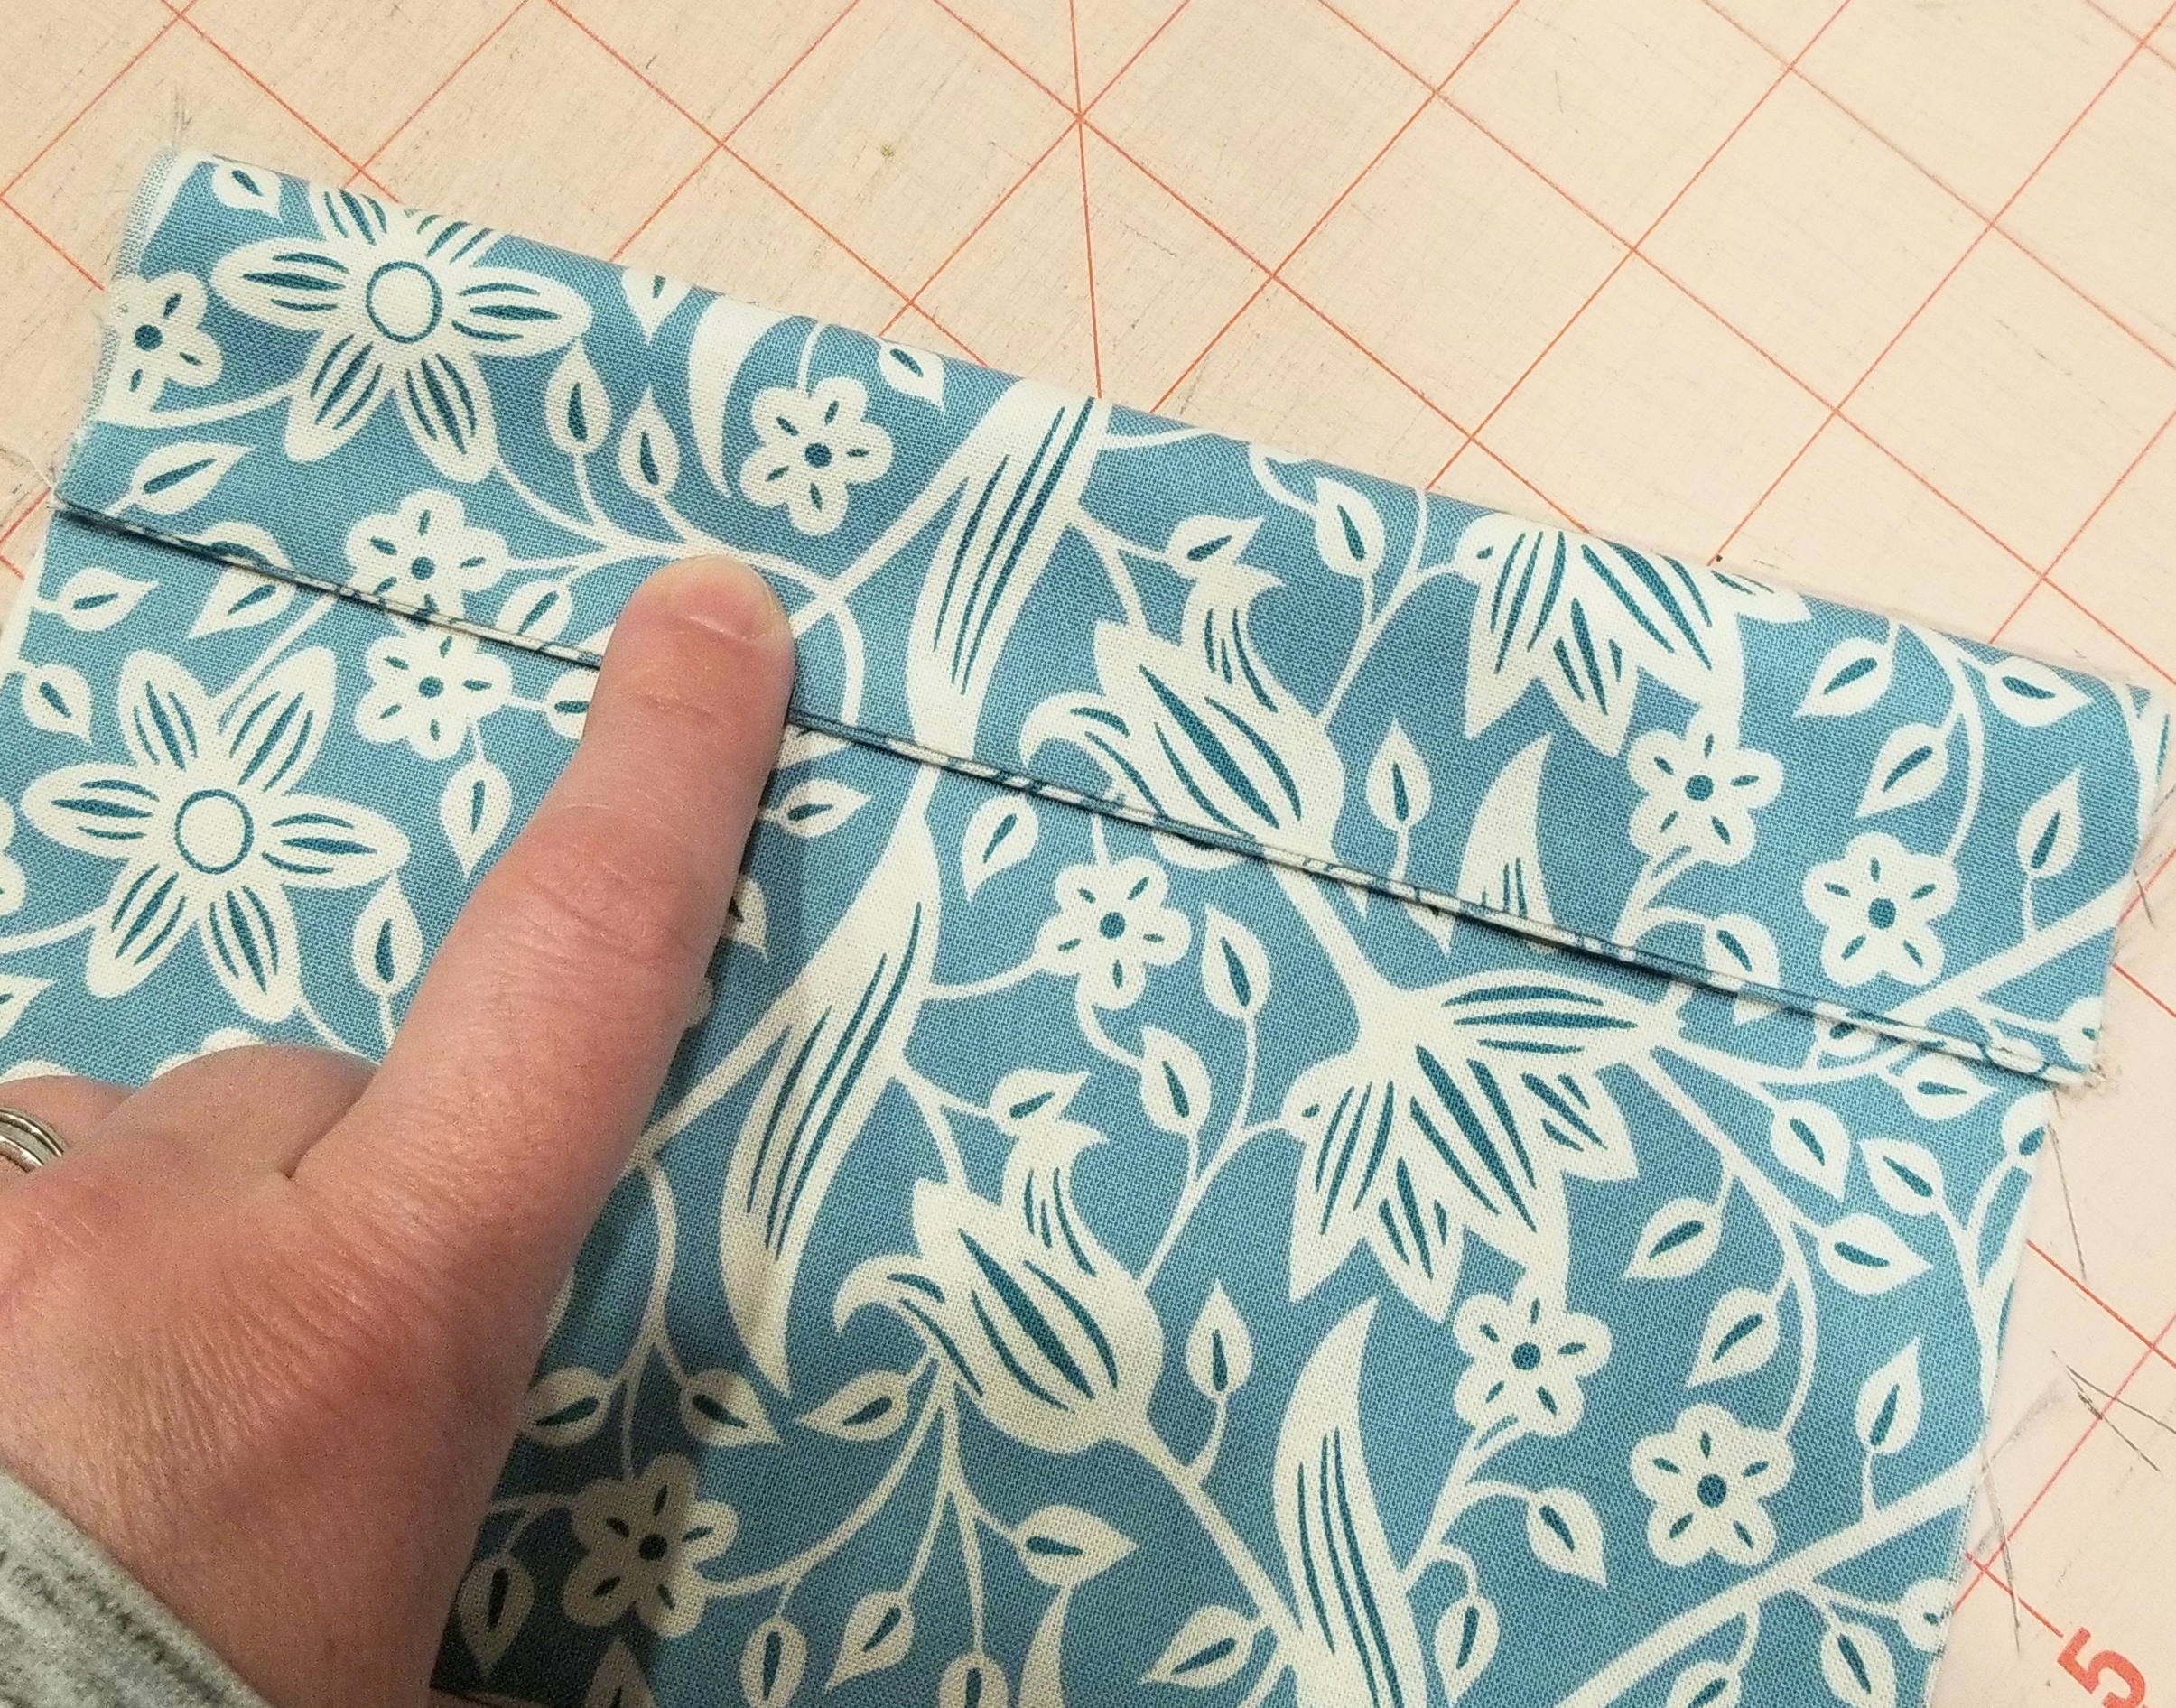
Fold the seam edge up (or down in this picture, as I turned it upside down…sorry) making the crease on the first line that you just marked. You should have 1 1/2 inch edge here.
Flip the tube piece over. Match the crease edge to the second line that you made earlier. Press. The pleat that you just created will be 1/2 inch deep. Pin the pleat down on each raw edge end.
Now you will mark the lines for the second pleat. Mark a line measuring 1/2” from the top crease of the last pleat, (or 2″ from the bottom seam edge). It was difficult to see the top of the crease in this picture, so look at the finger indicator above.
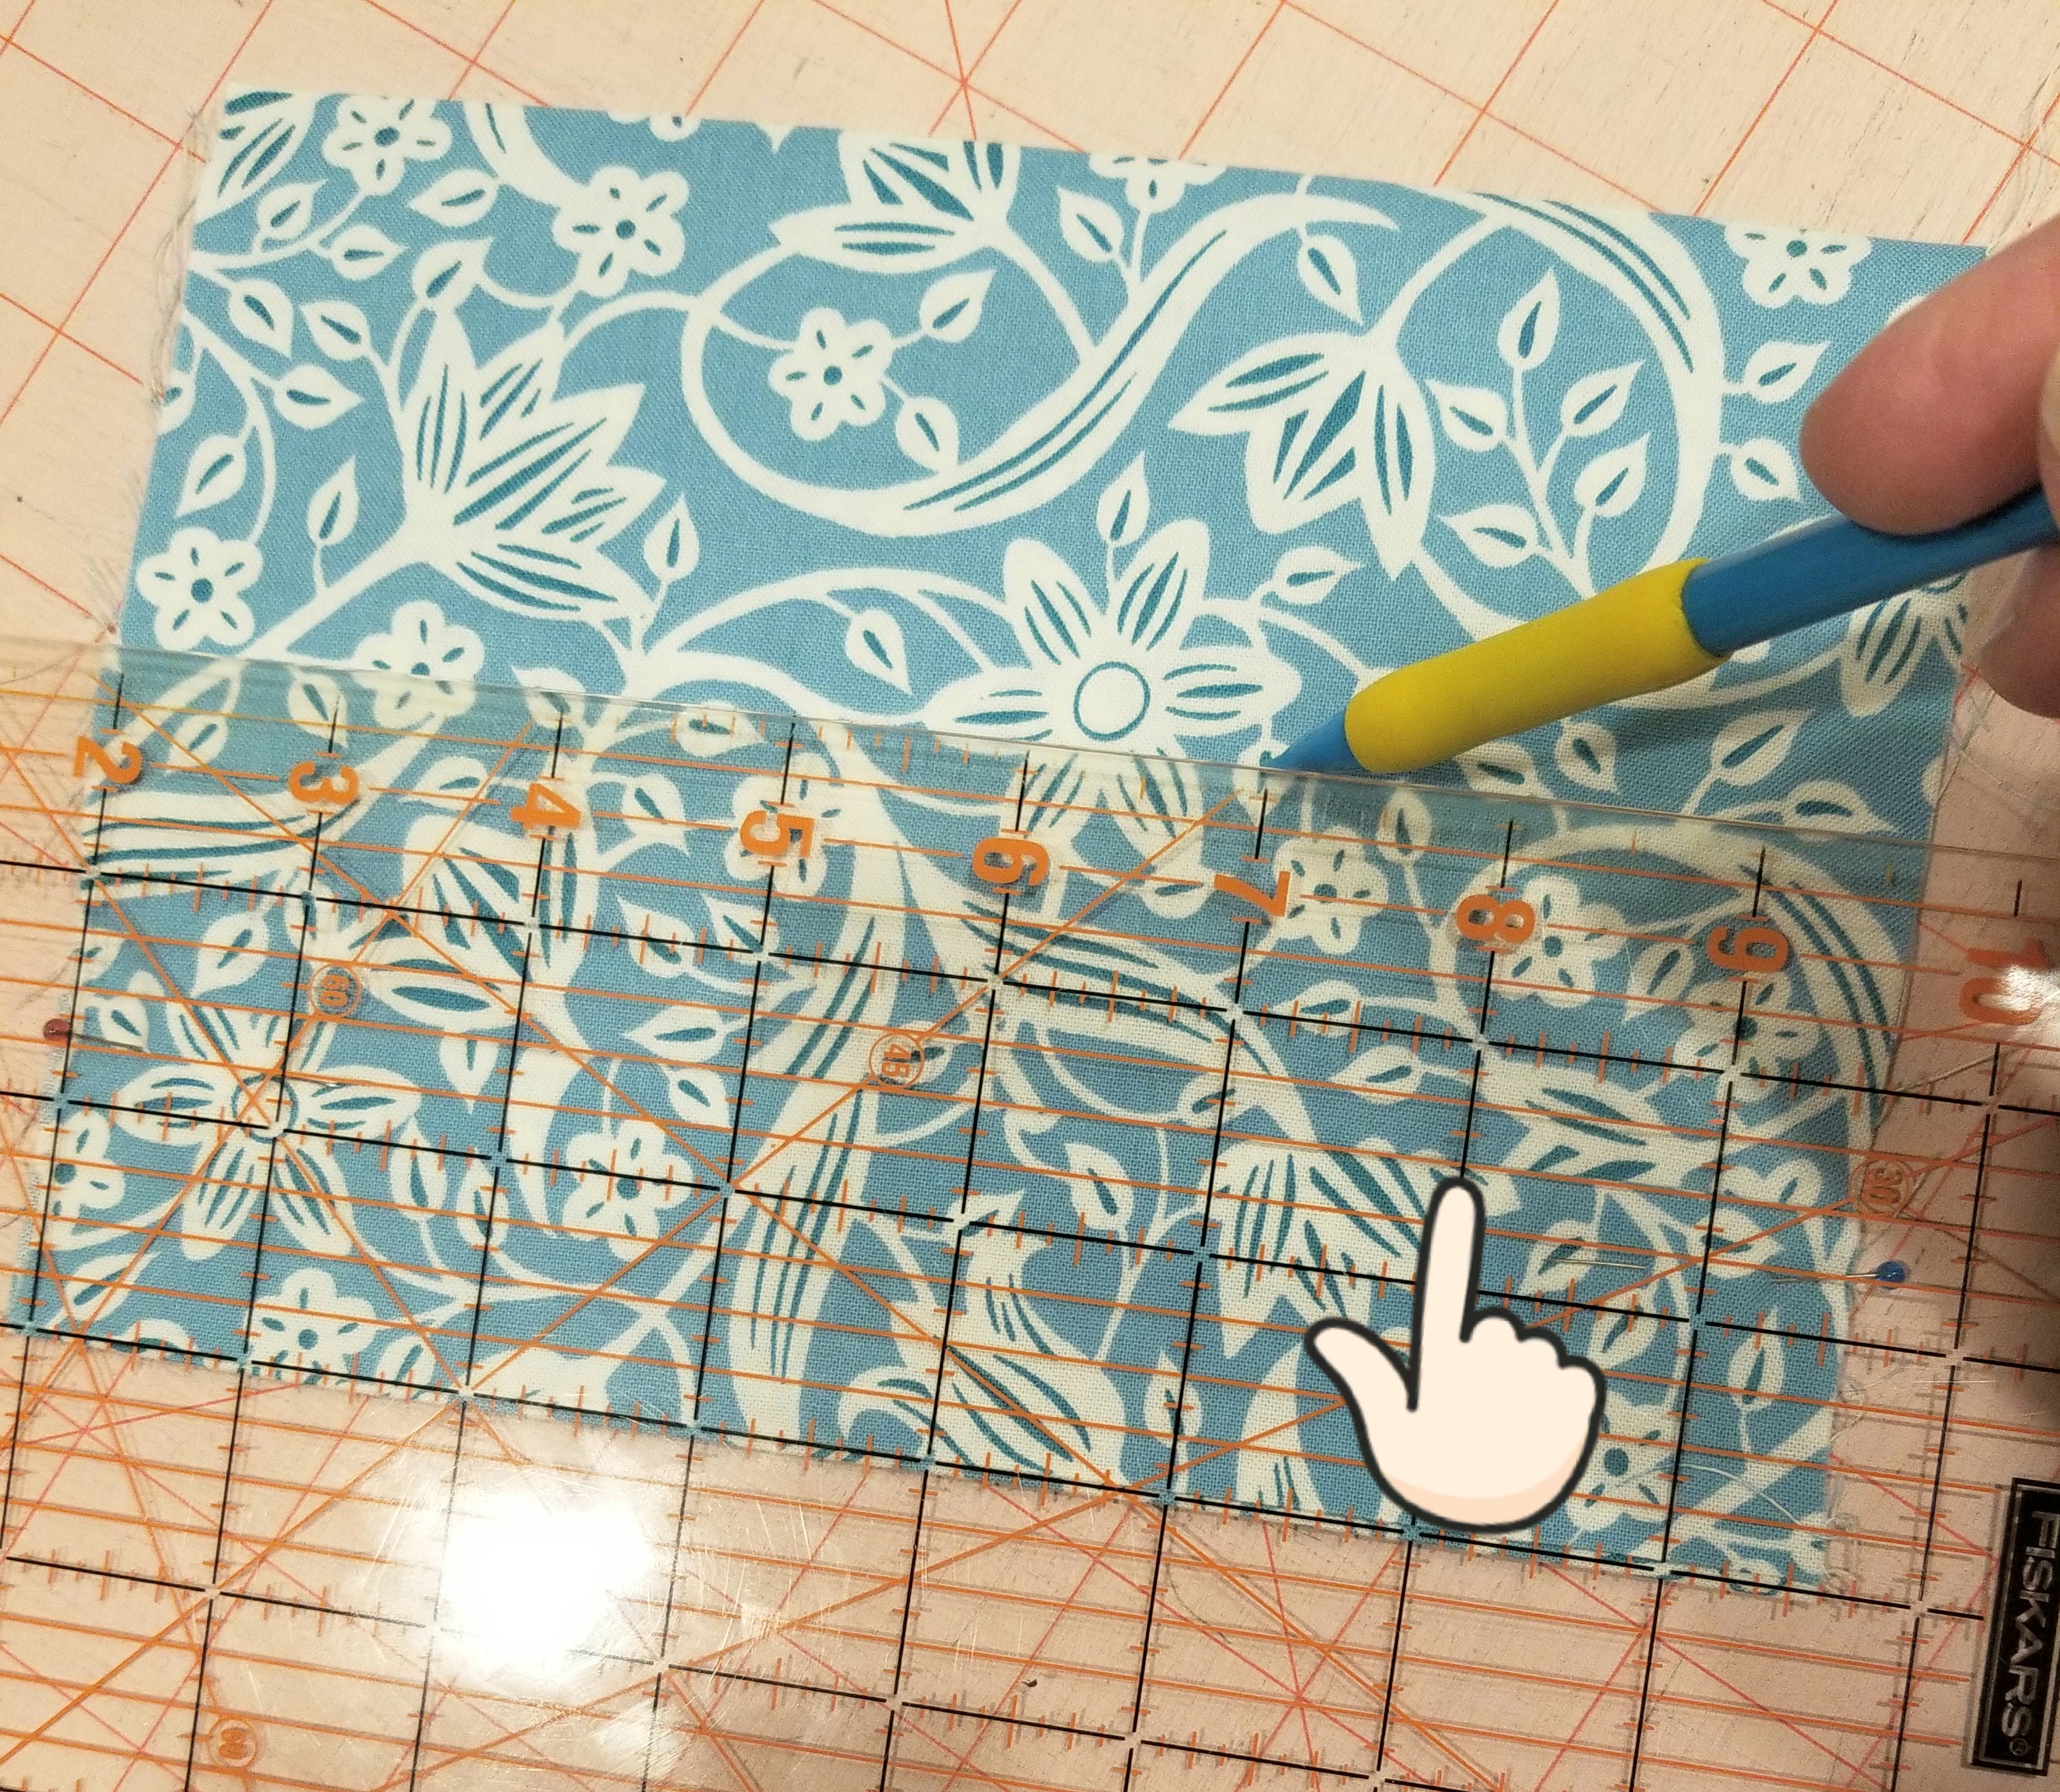
Now mark another line one inch above the last line that you made (or 3 inches above the seam edge). Using these lines as your guide, repeat the steps that you followed to make the first pleat.
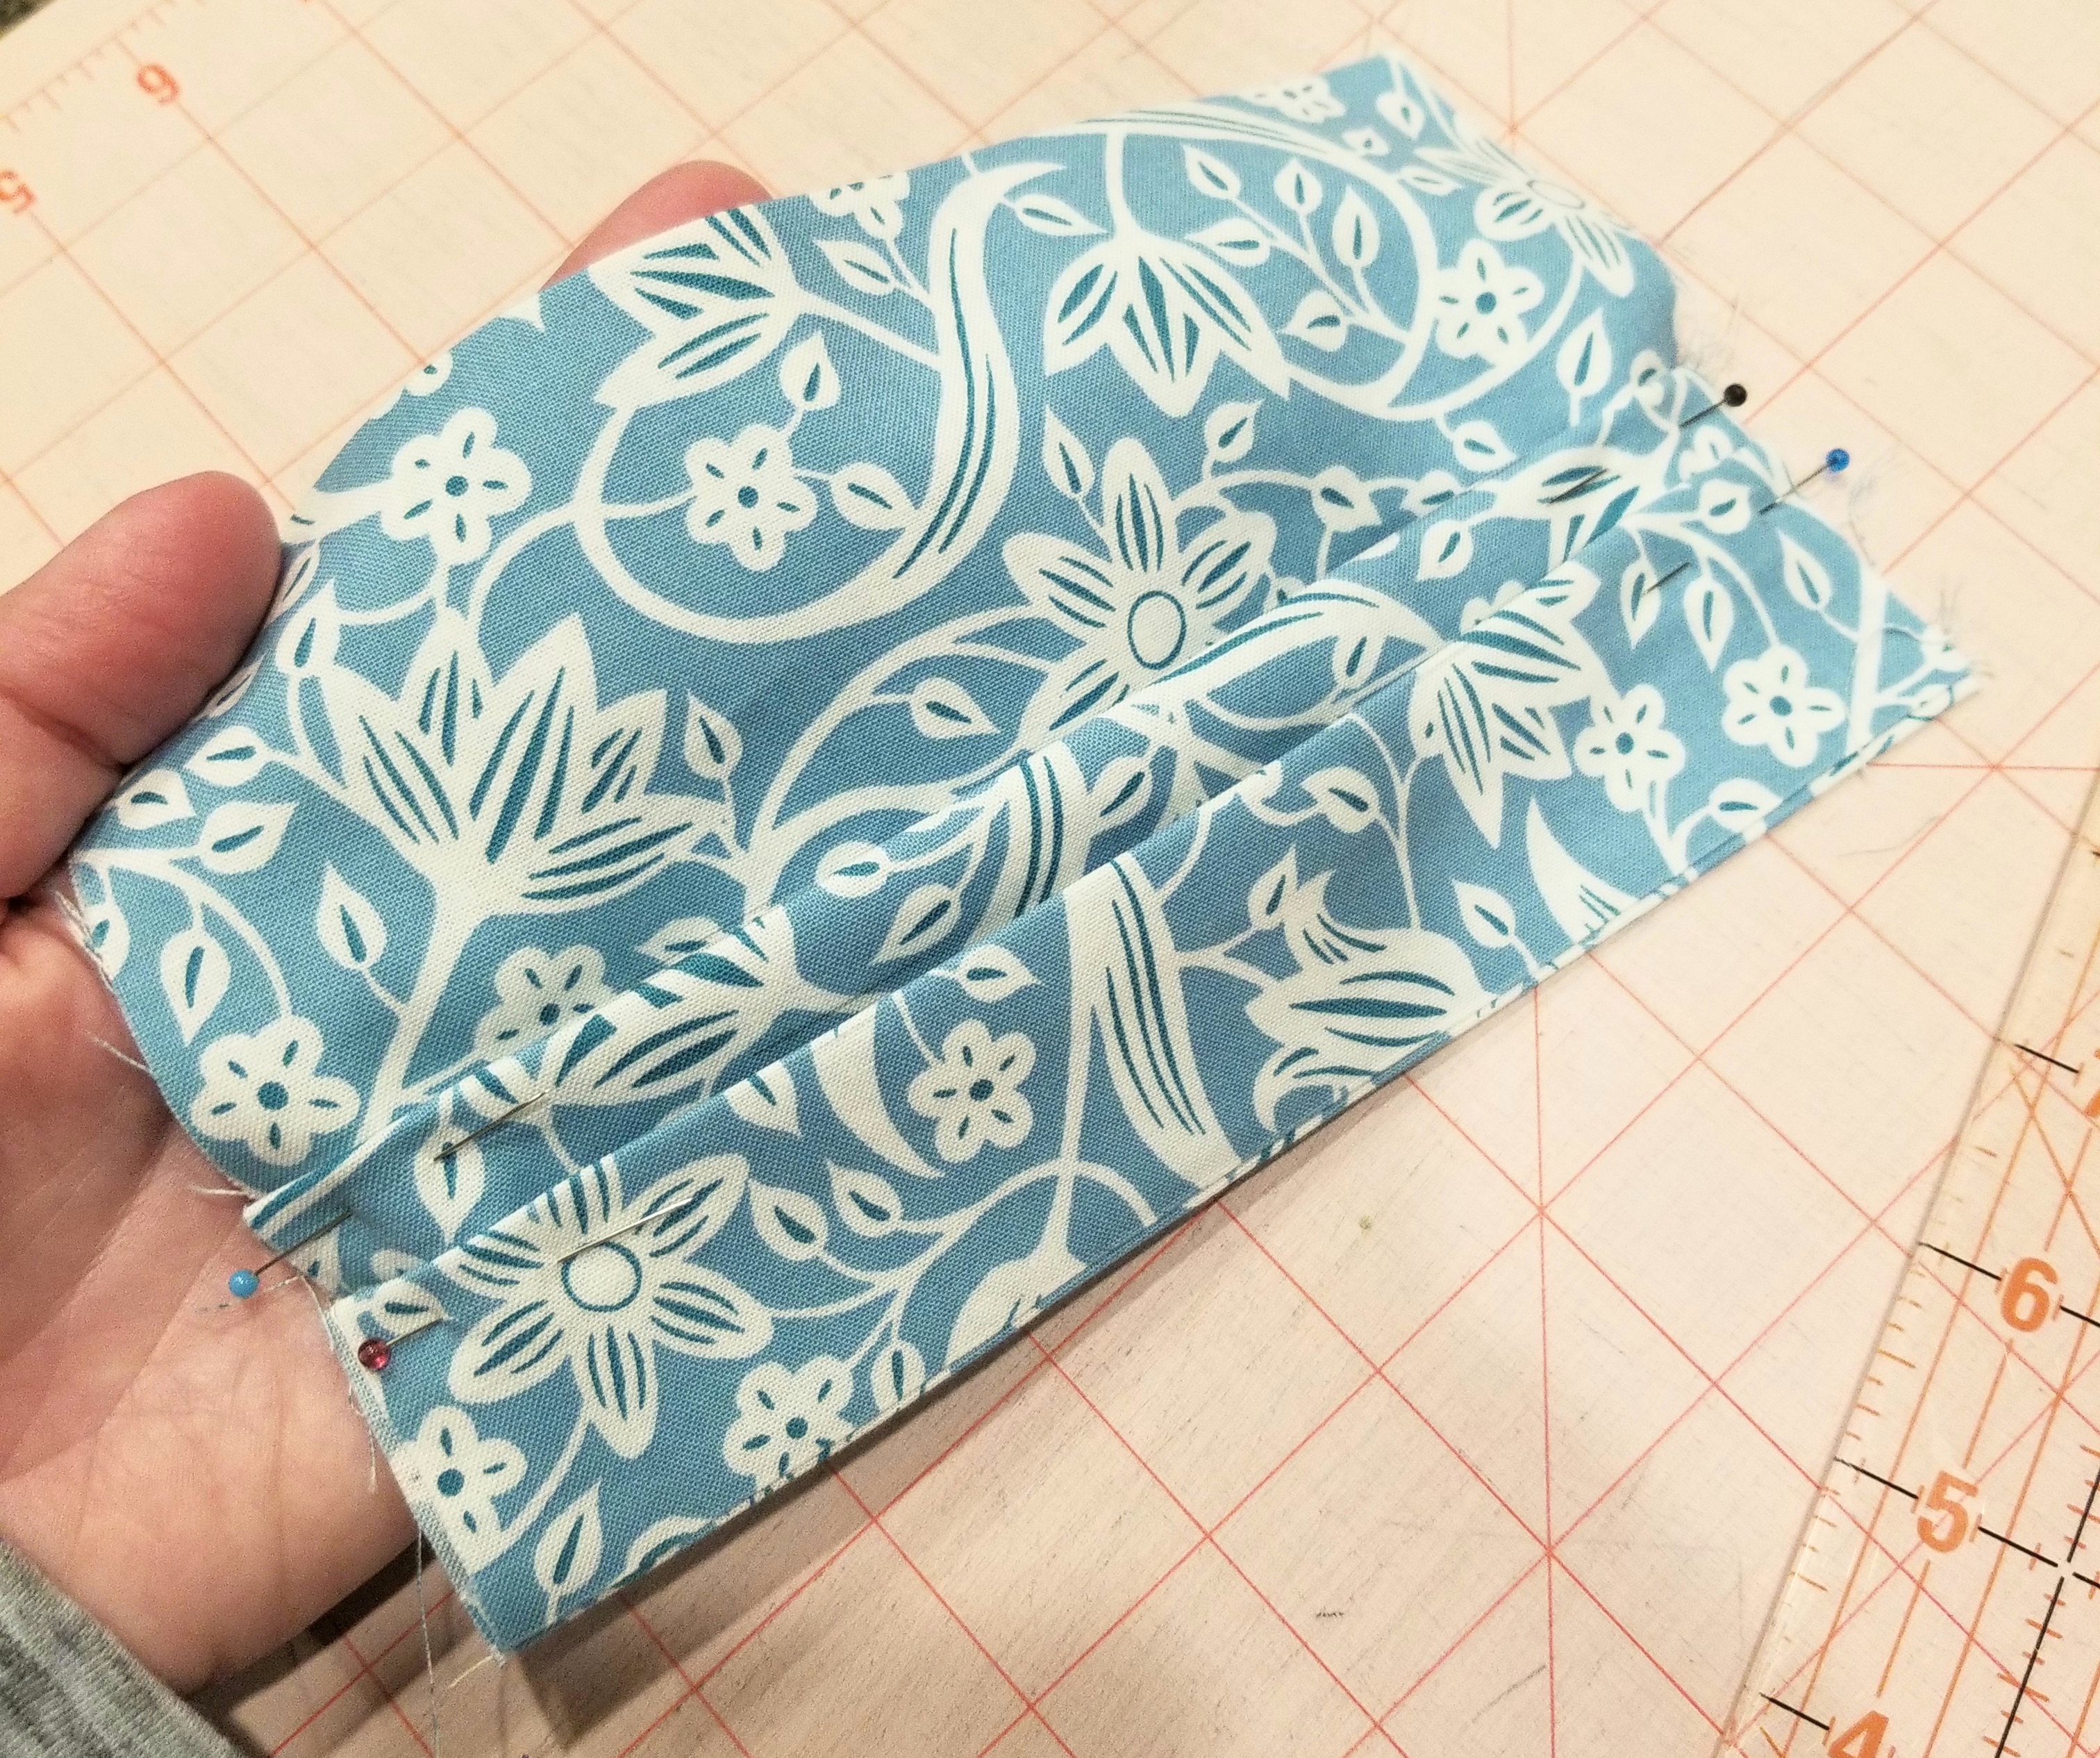
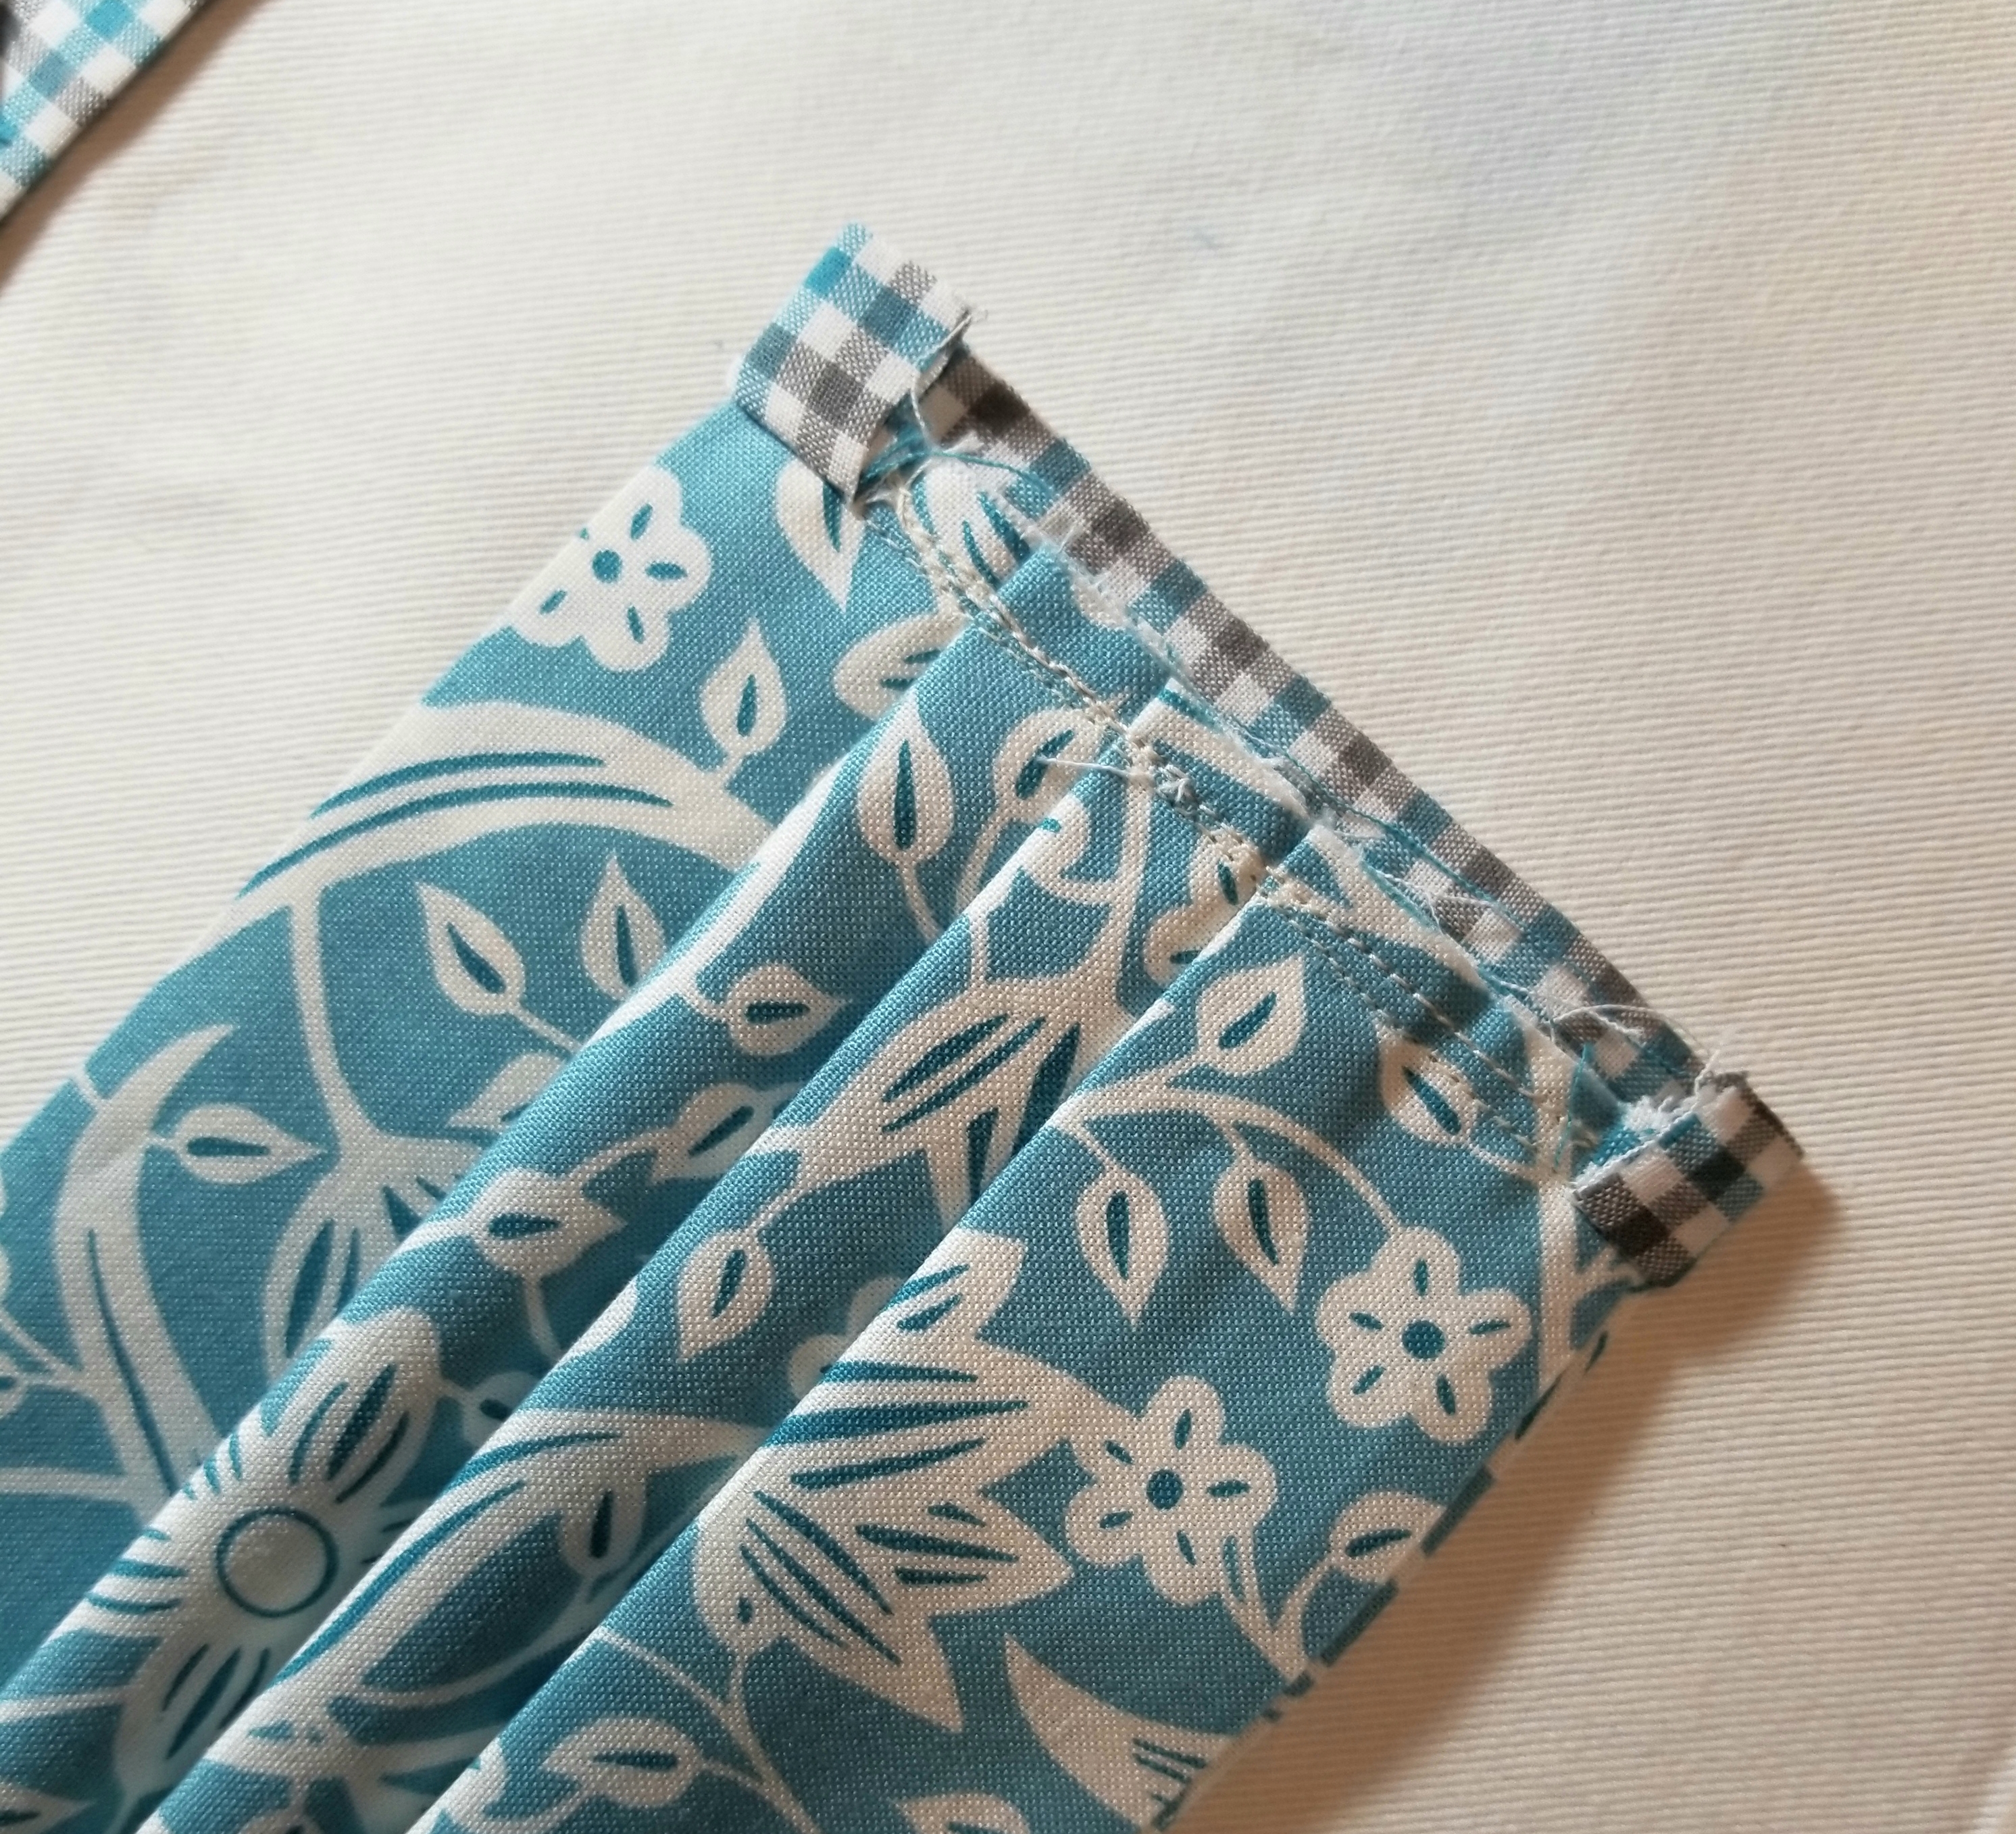
You should now have two pleats, each one being 1/2 inch deep. Repeat the steps you used to make the second pleat, so that you end up with three pleats total. Press.
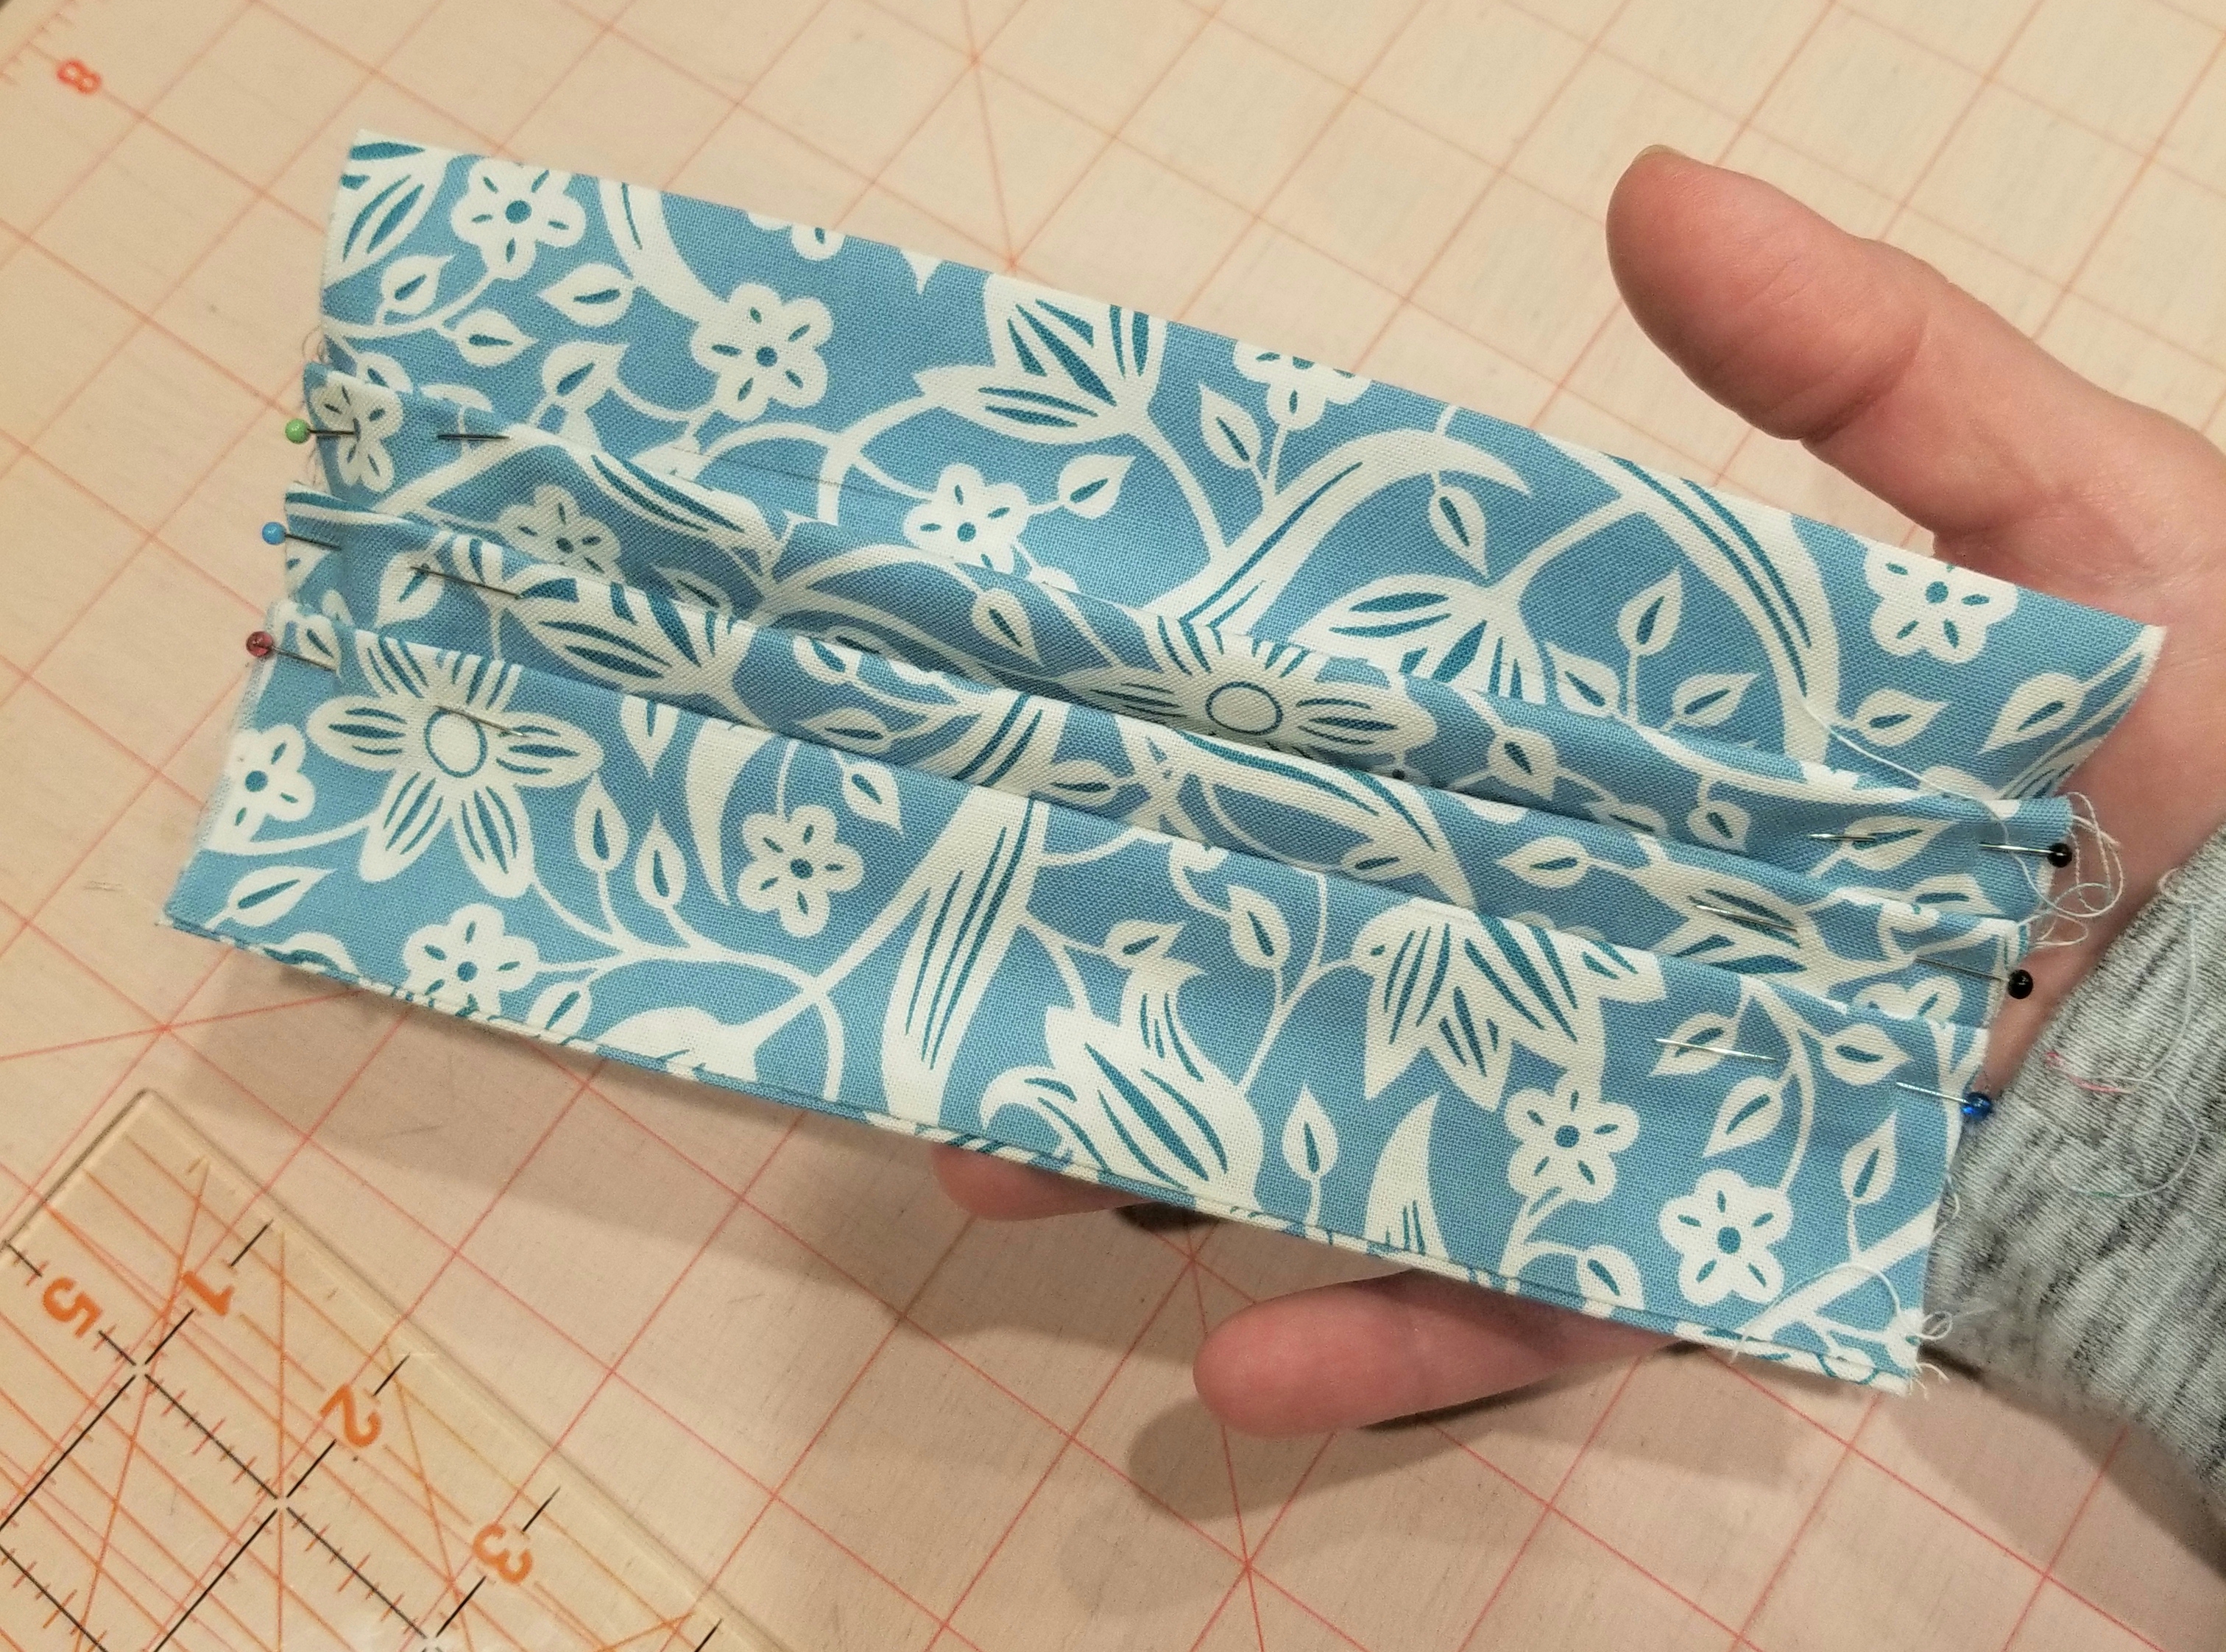
This is what your main piece should look like at this point.
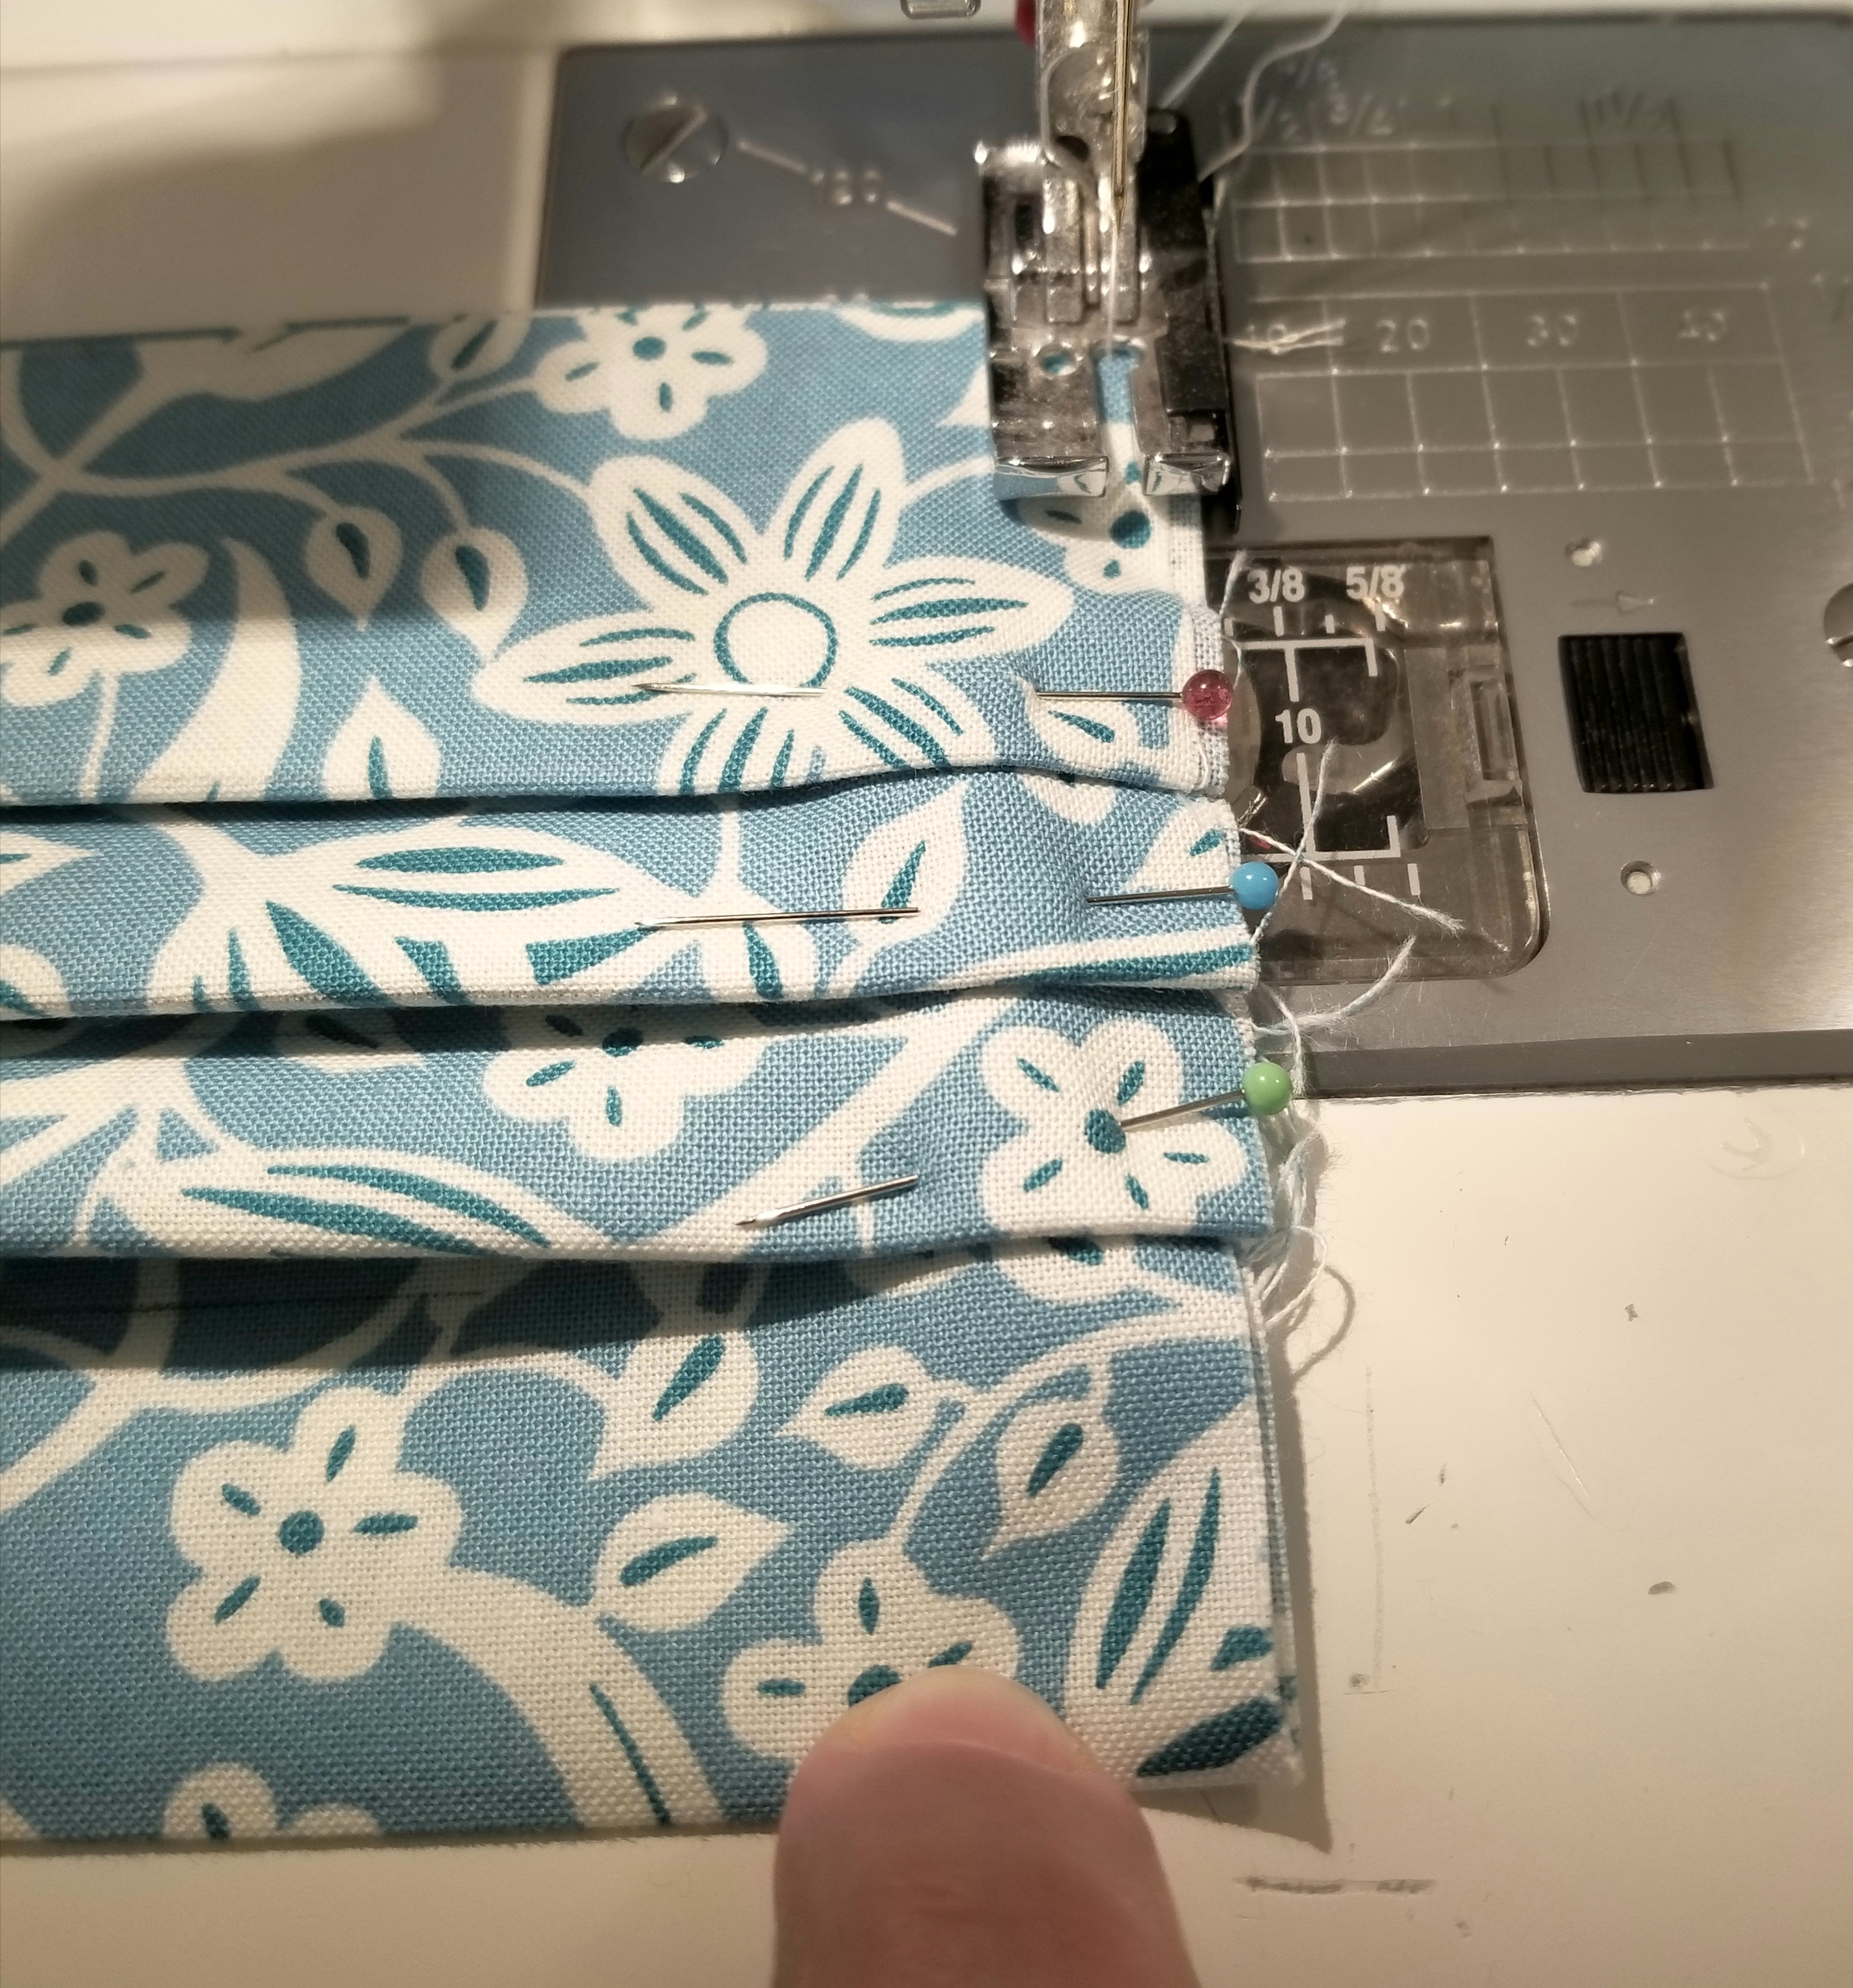
Using a 1/8” seam allowance, baste stitch the raw edges.
Repeat this step so that both raw edges are basted as shown in the picture above.
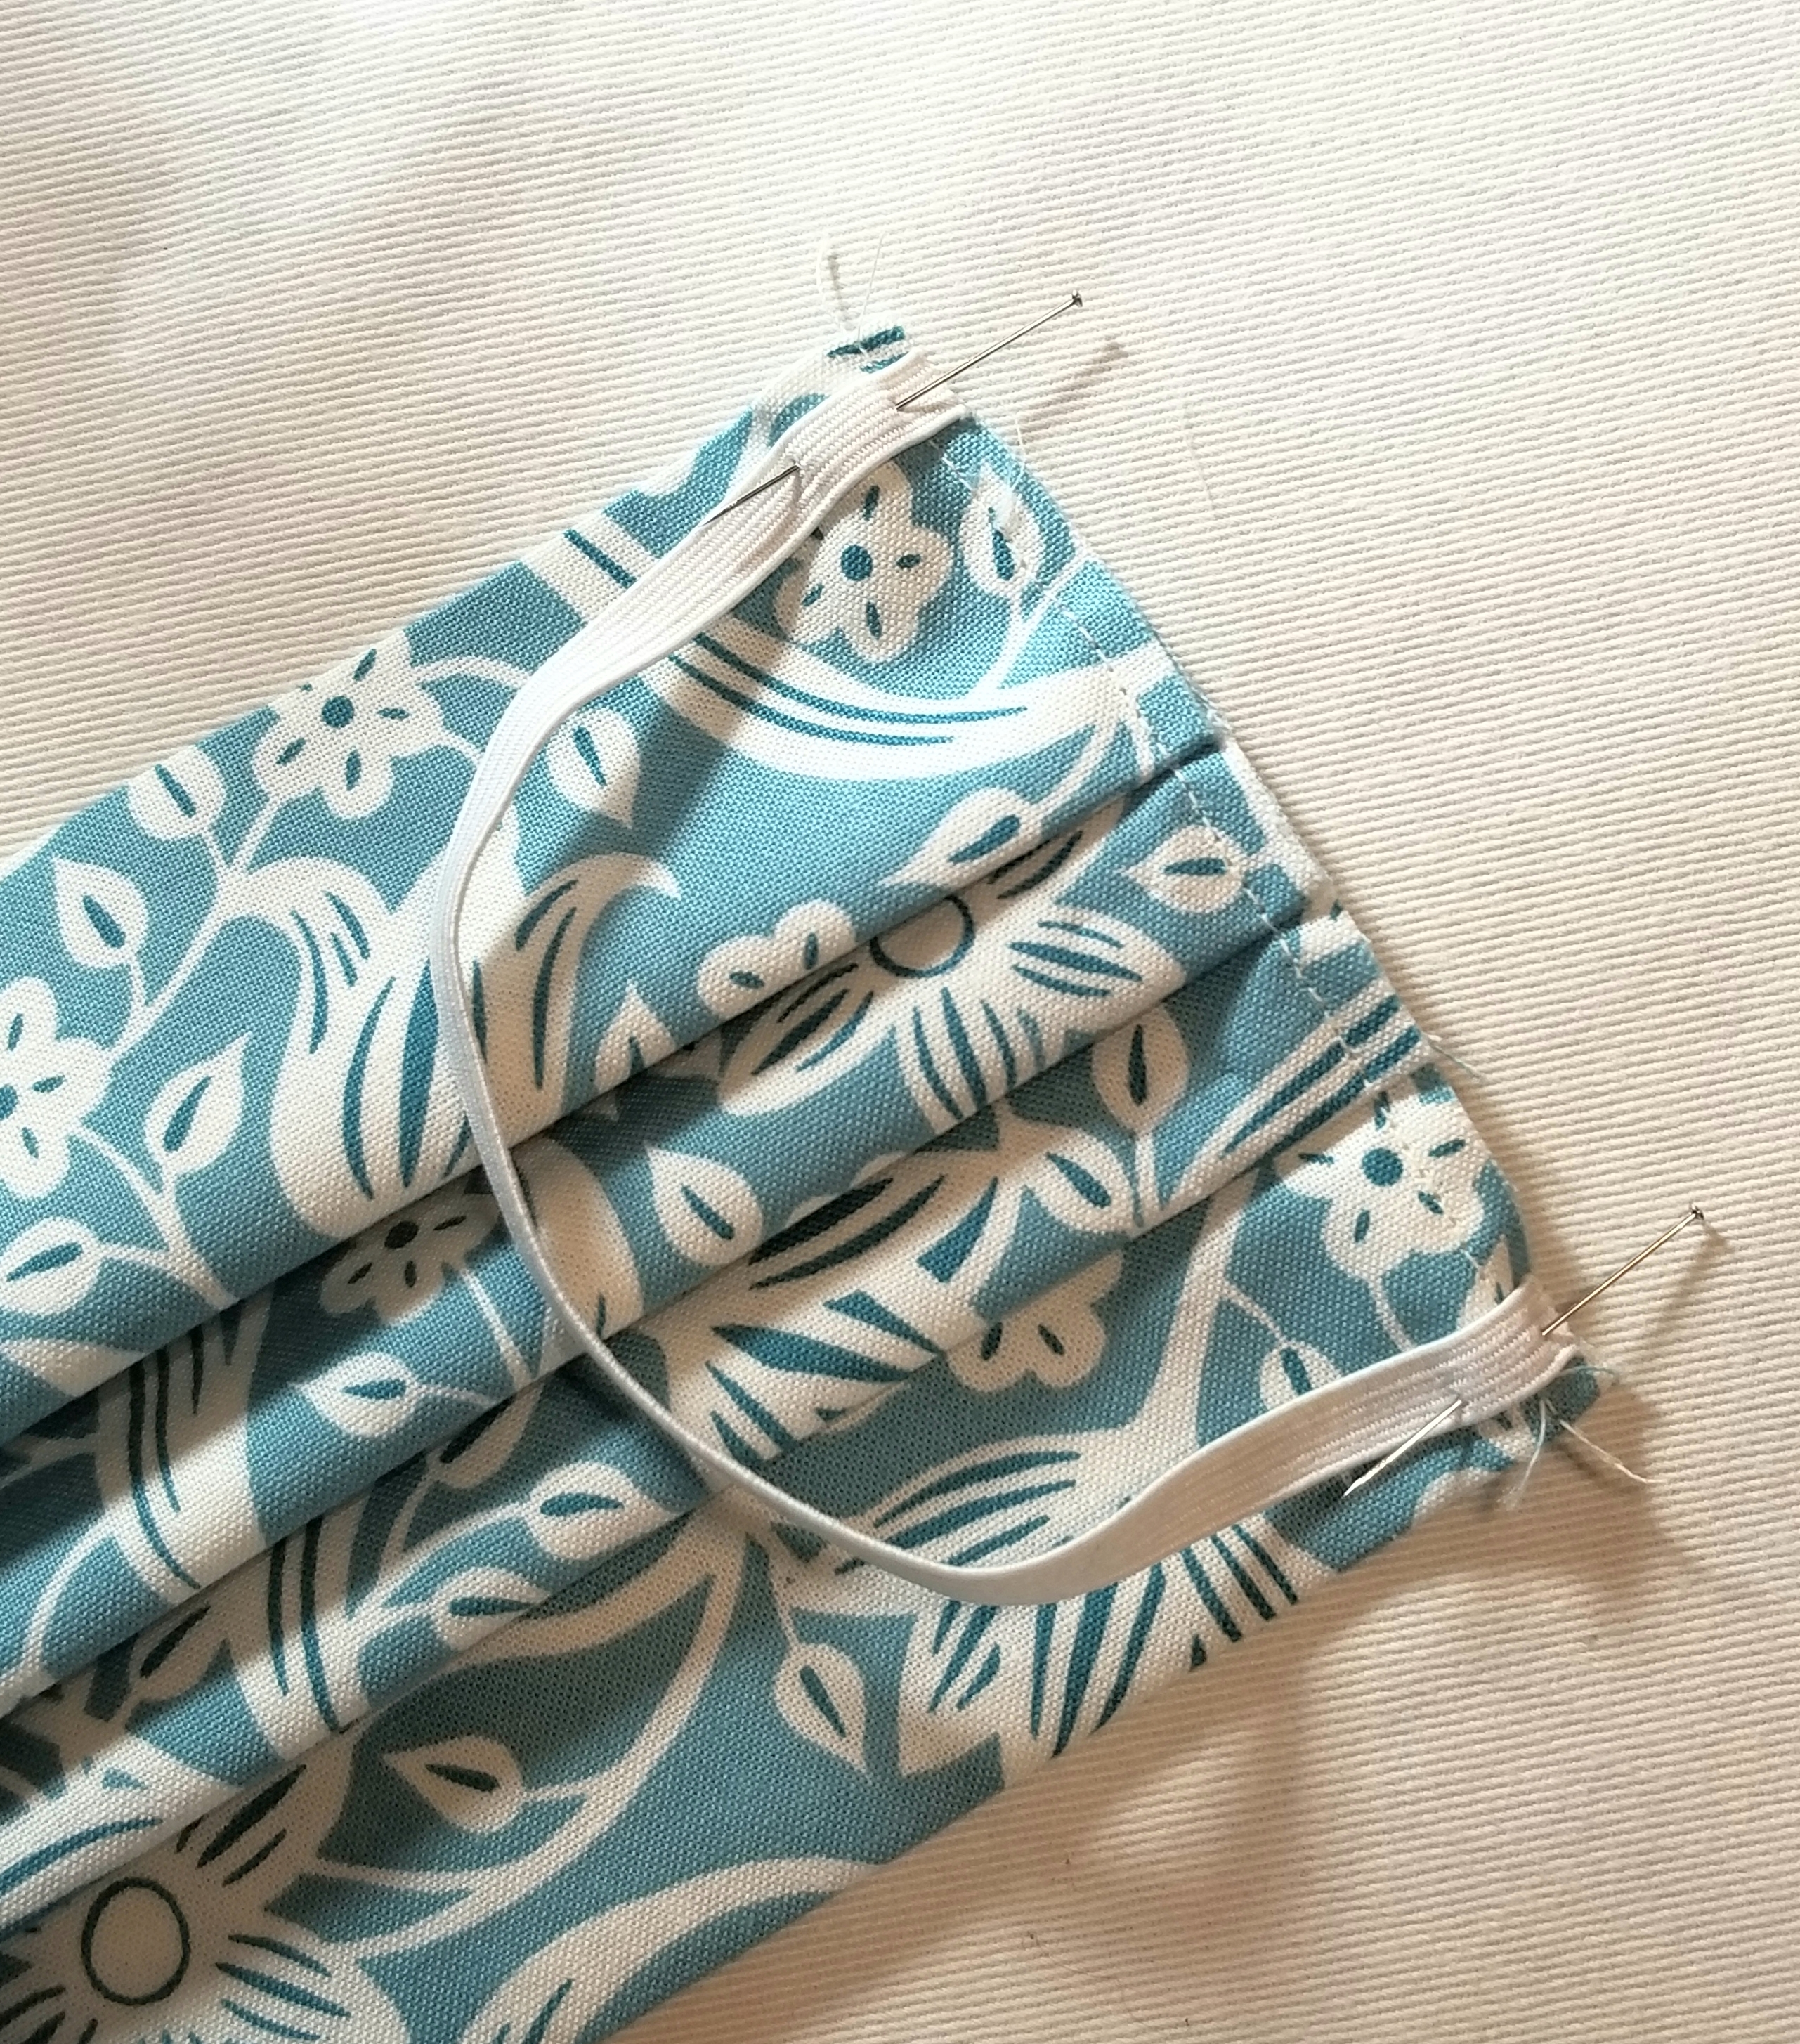
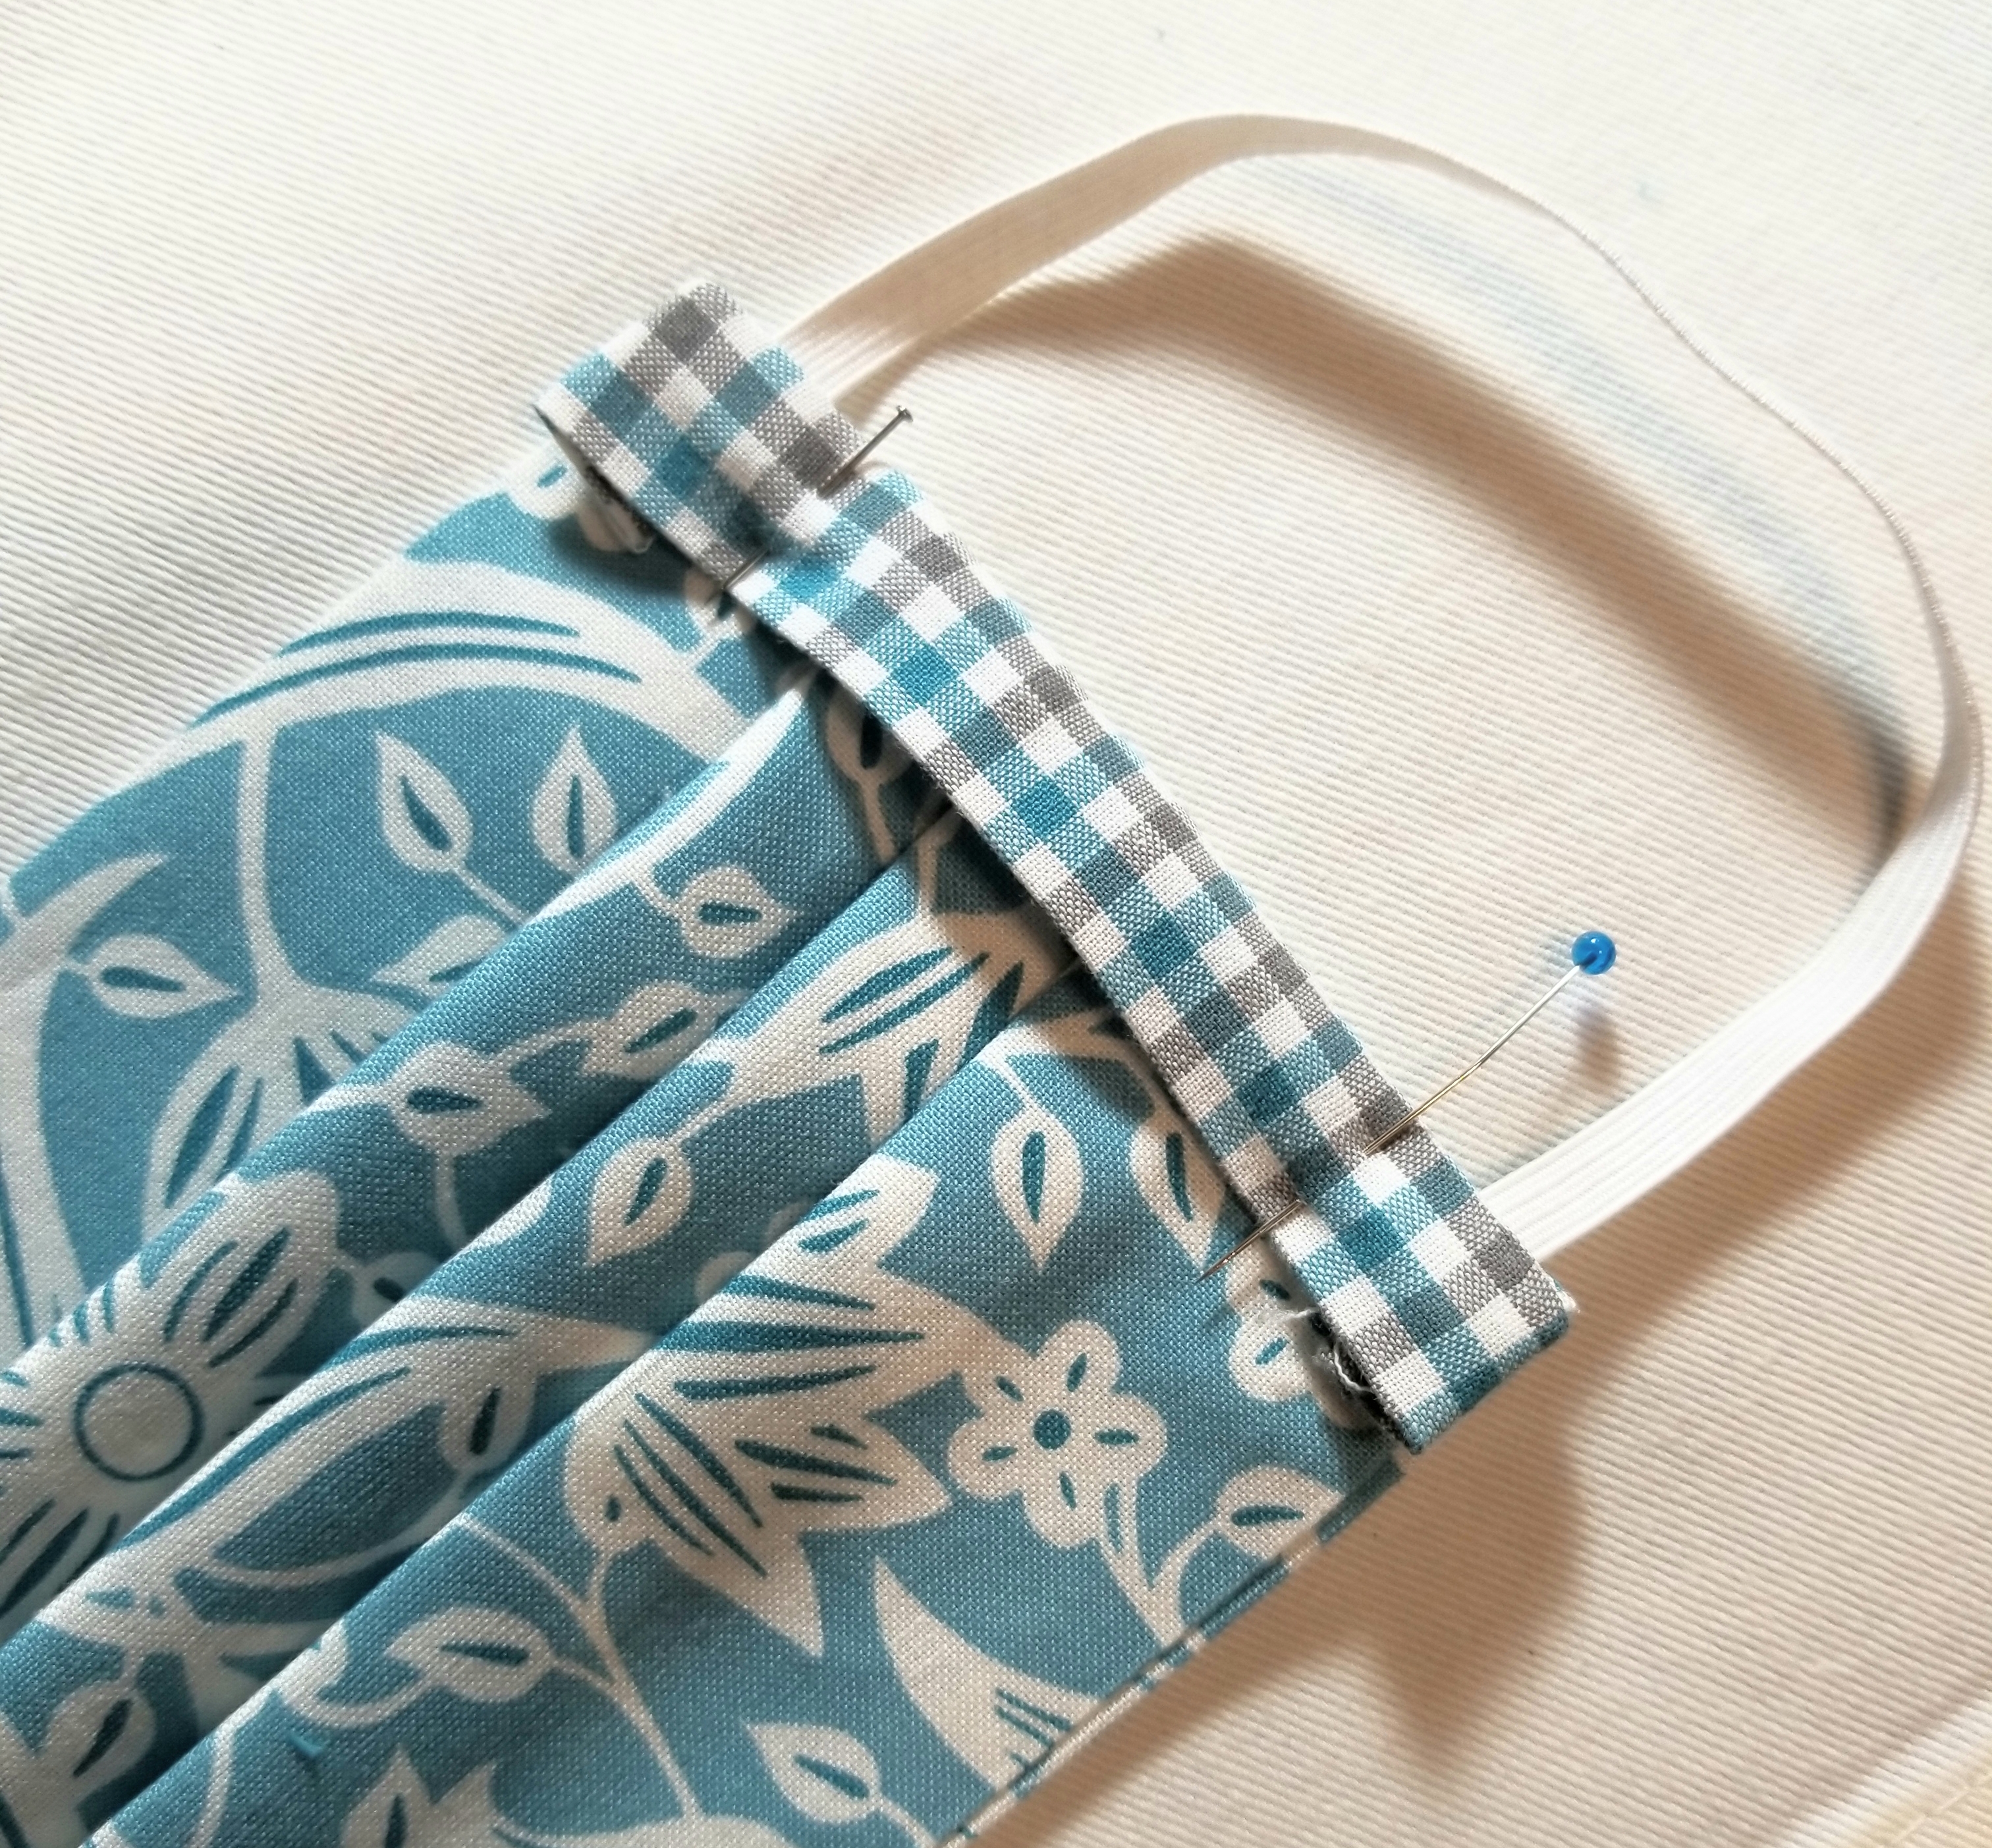
Pin one elastic piece to the raw edge, making sure not to twist it before baste stitching it to the edge at both ends. I placed mine 1/8” from the top and bottom edge of the main pleated piece. Baste elastic in place 1/8” inch from raw edge. Repeat, to attach remaining elastic piece to the other raw edge.
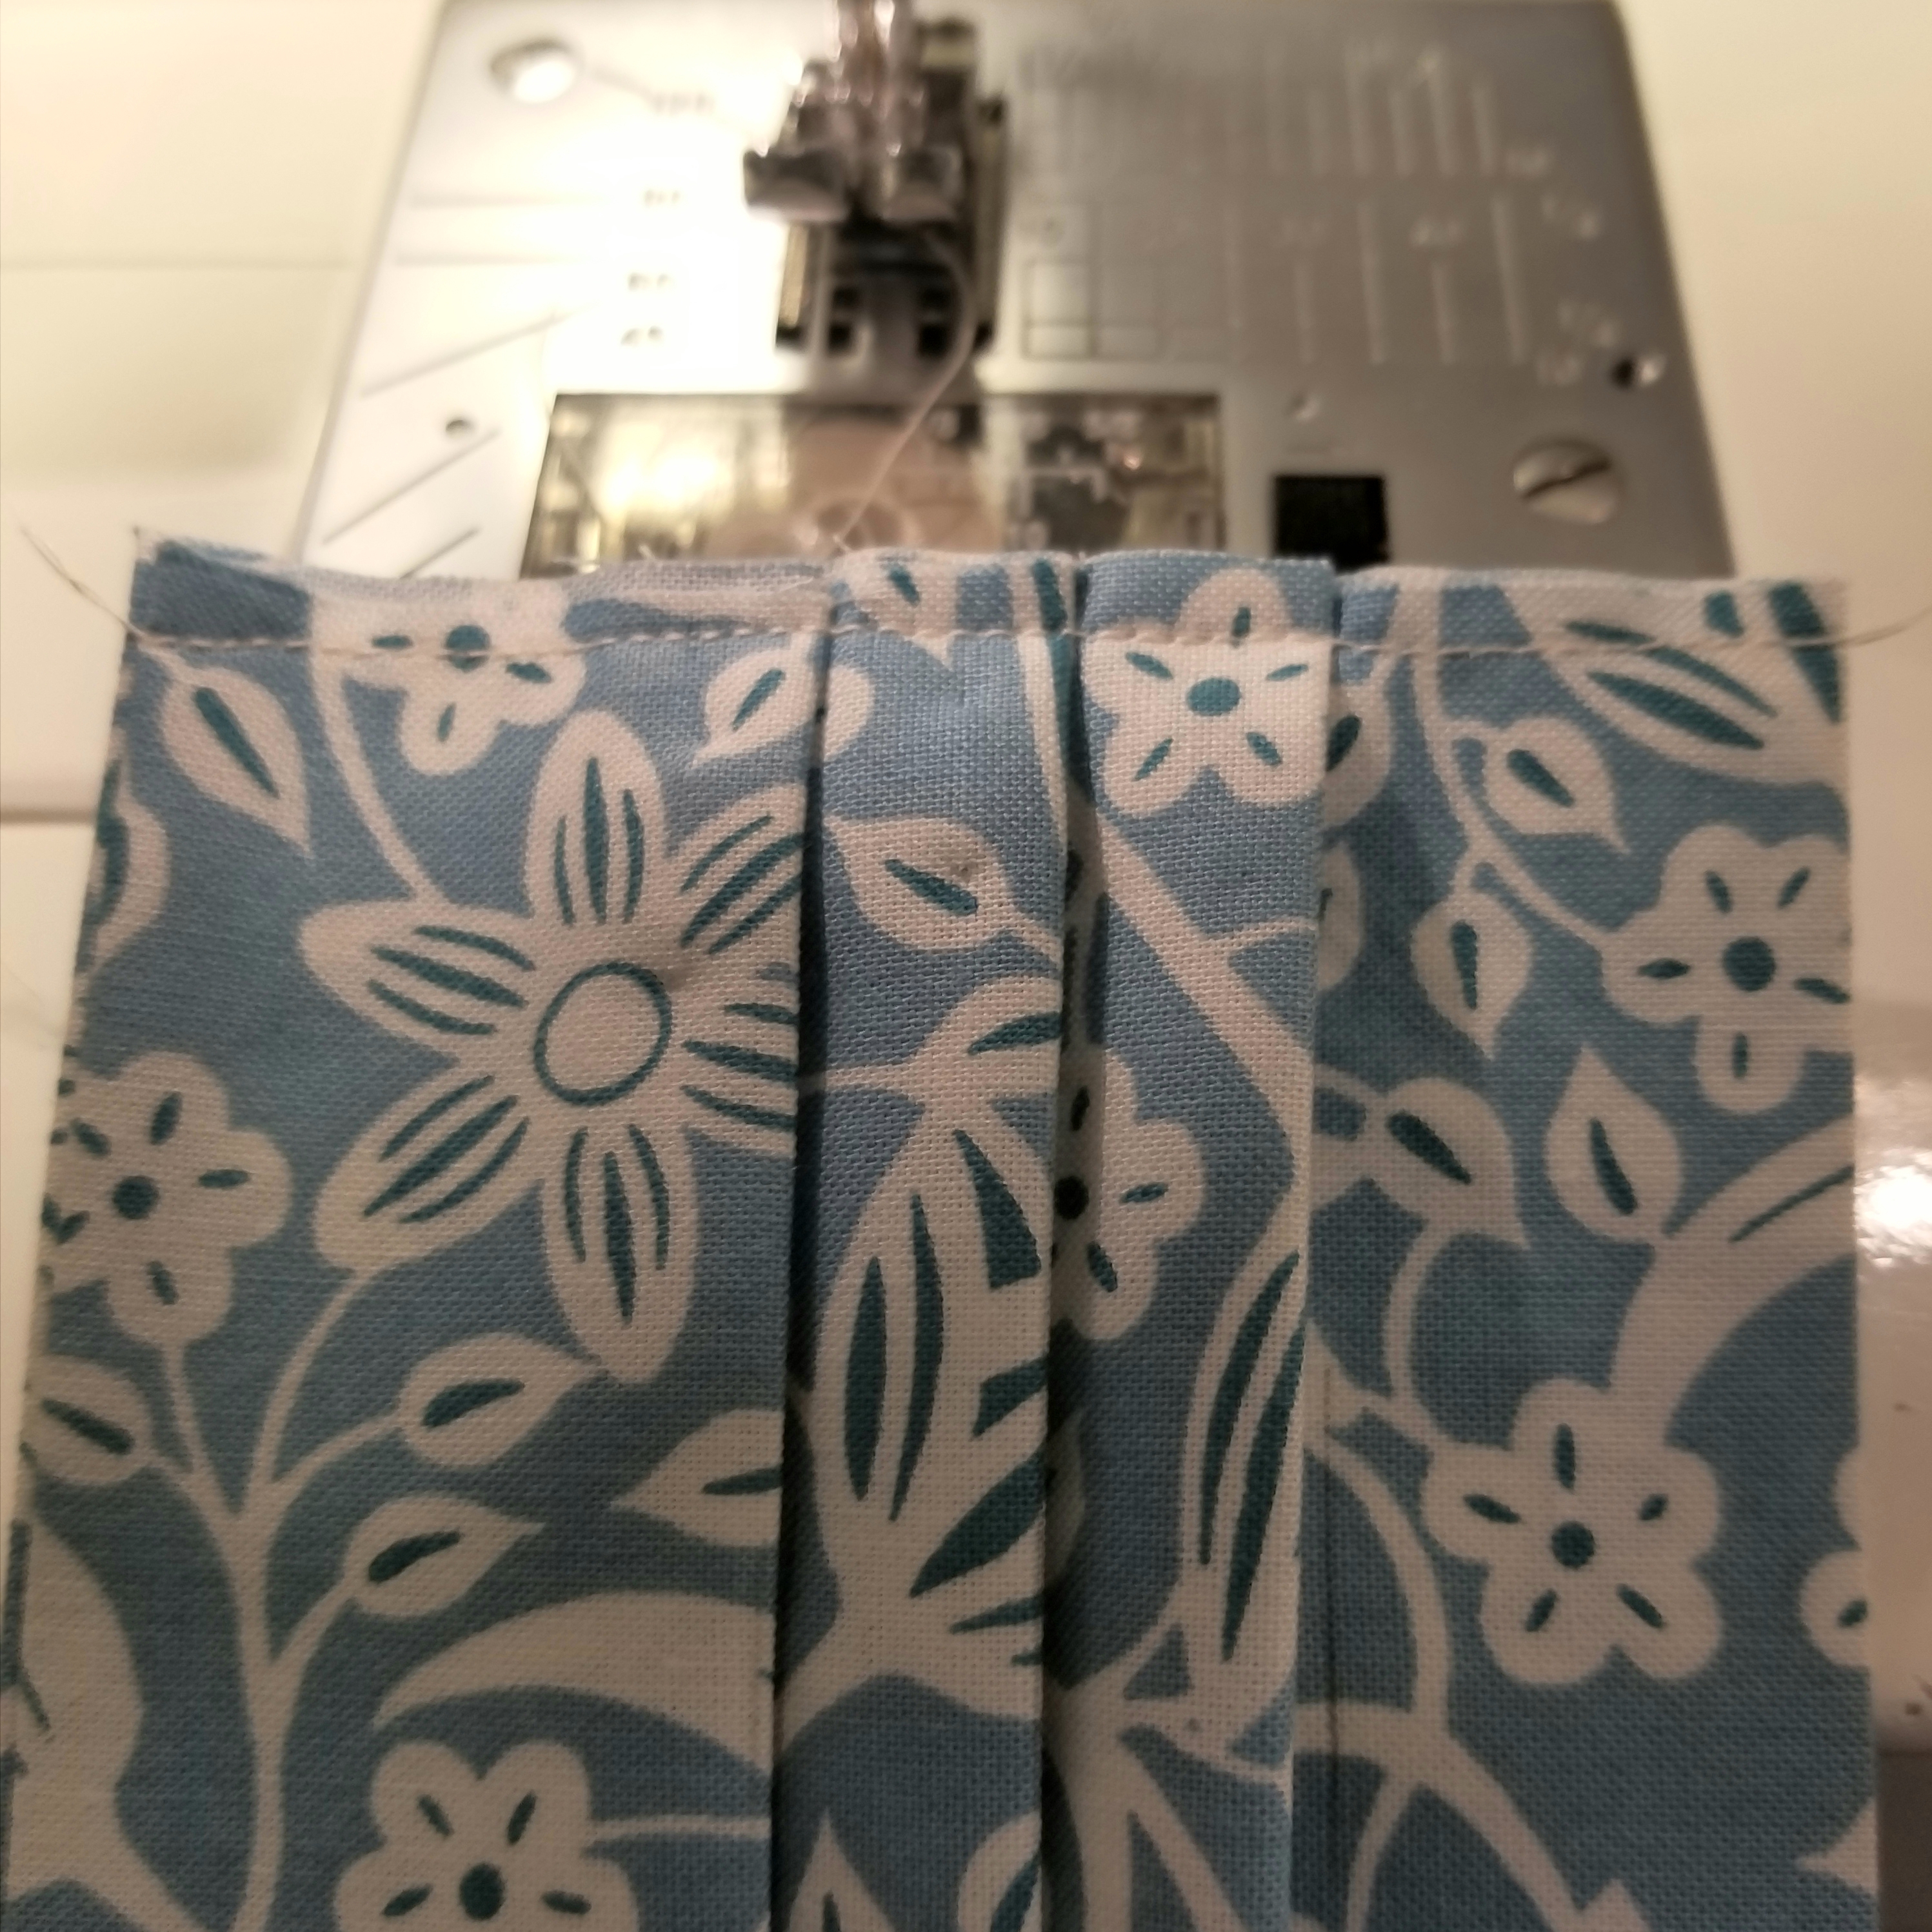
Your pleated piece should now resemble the picture above.
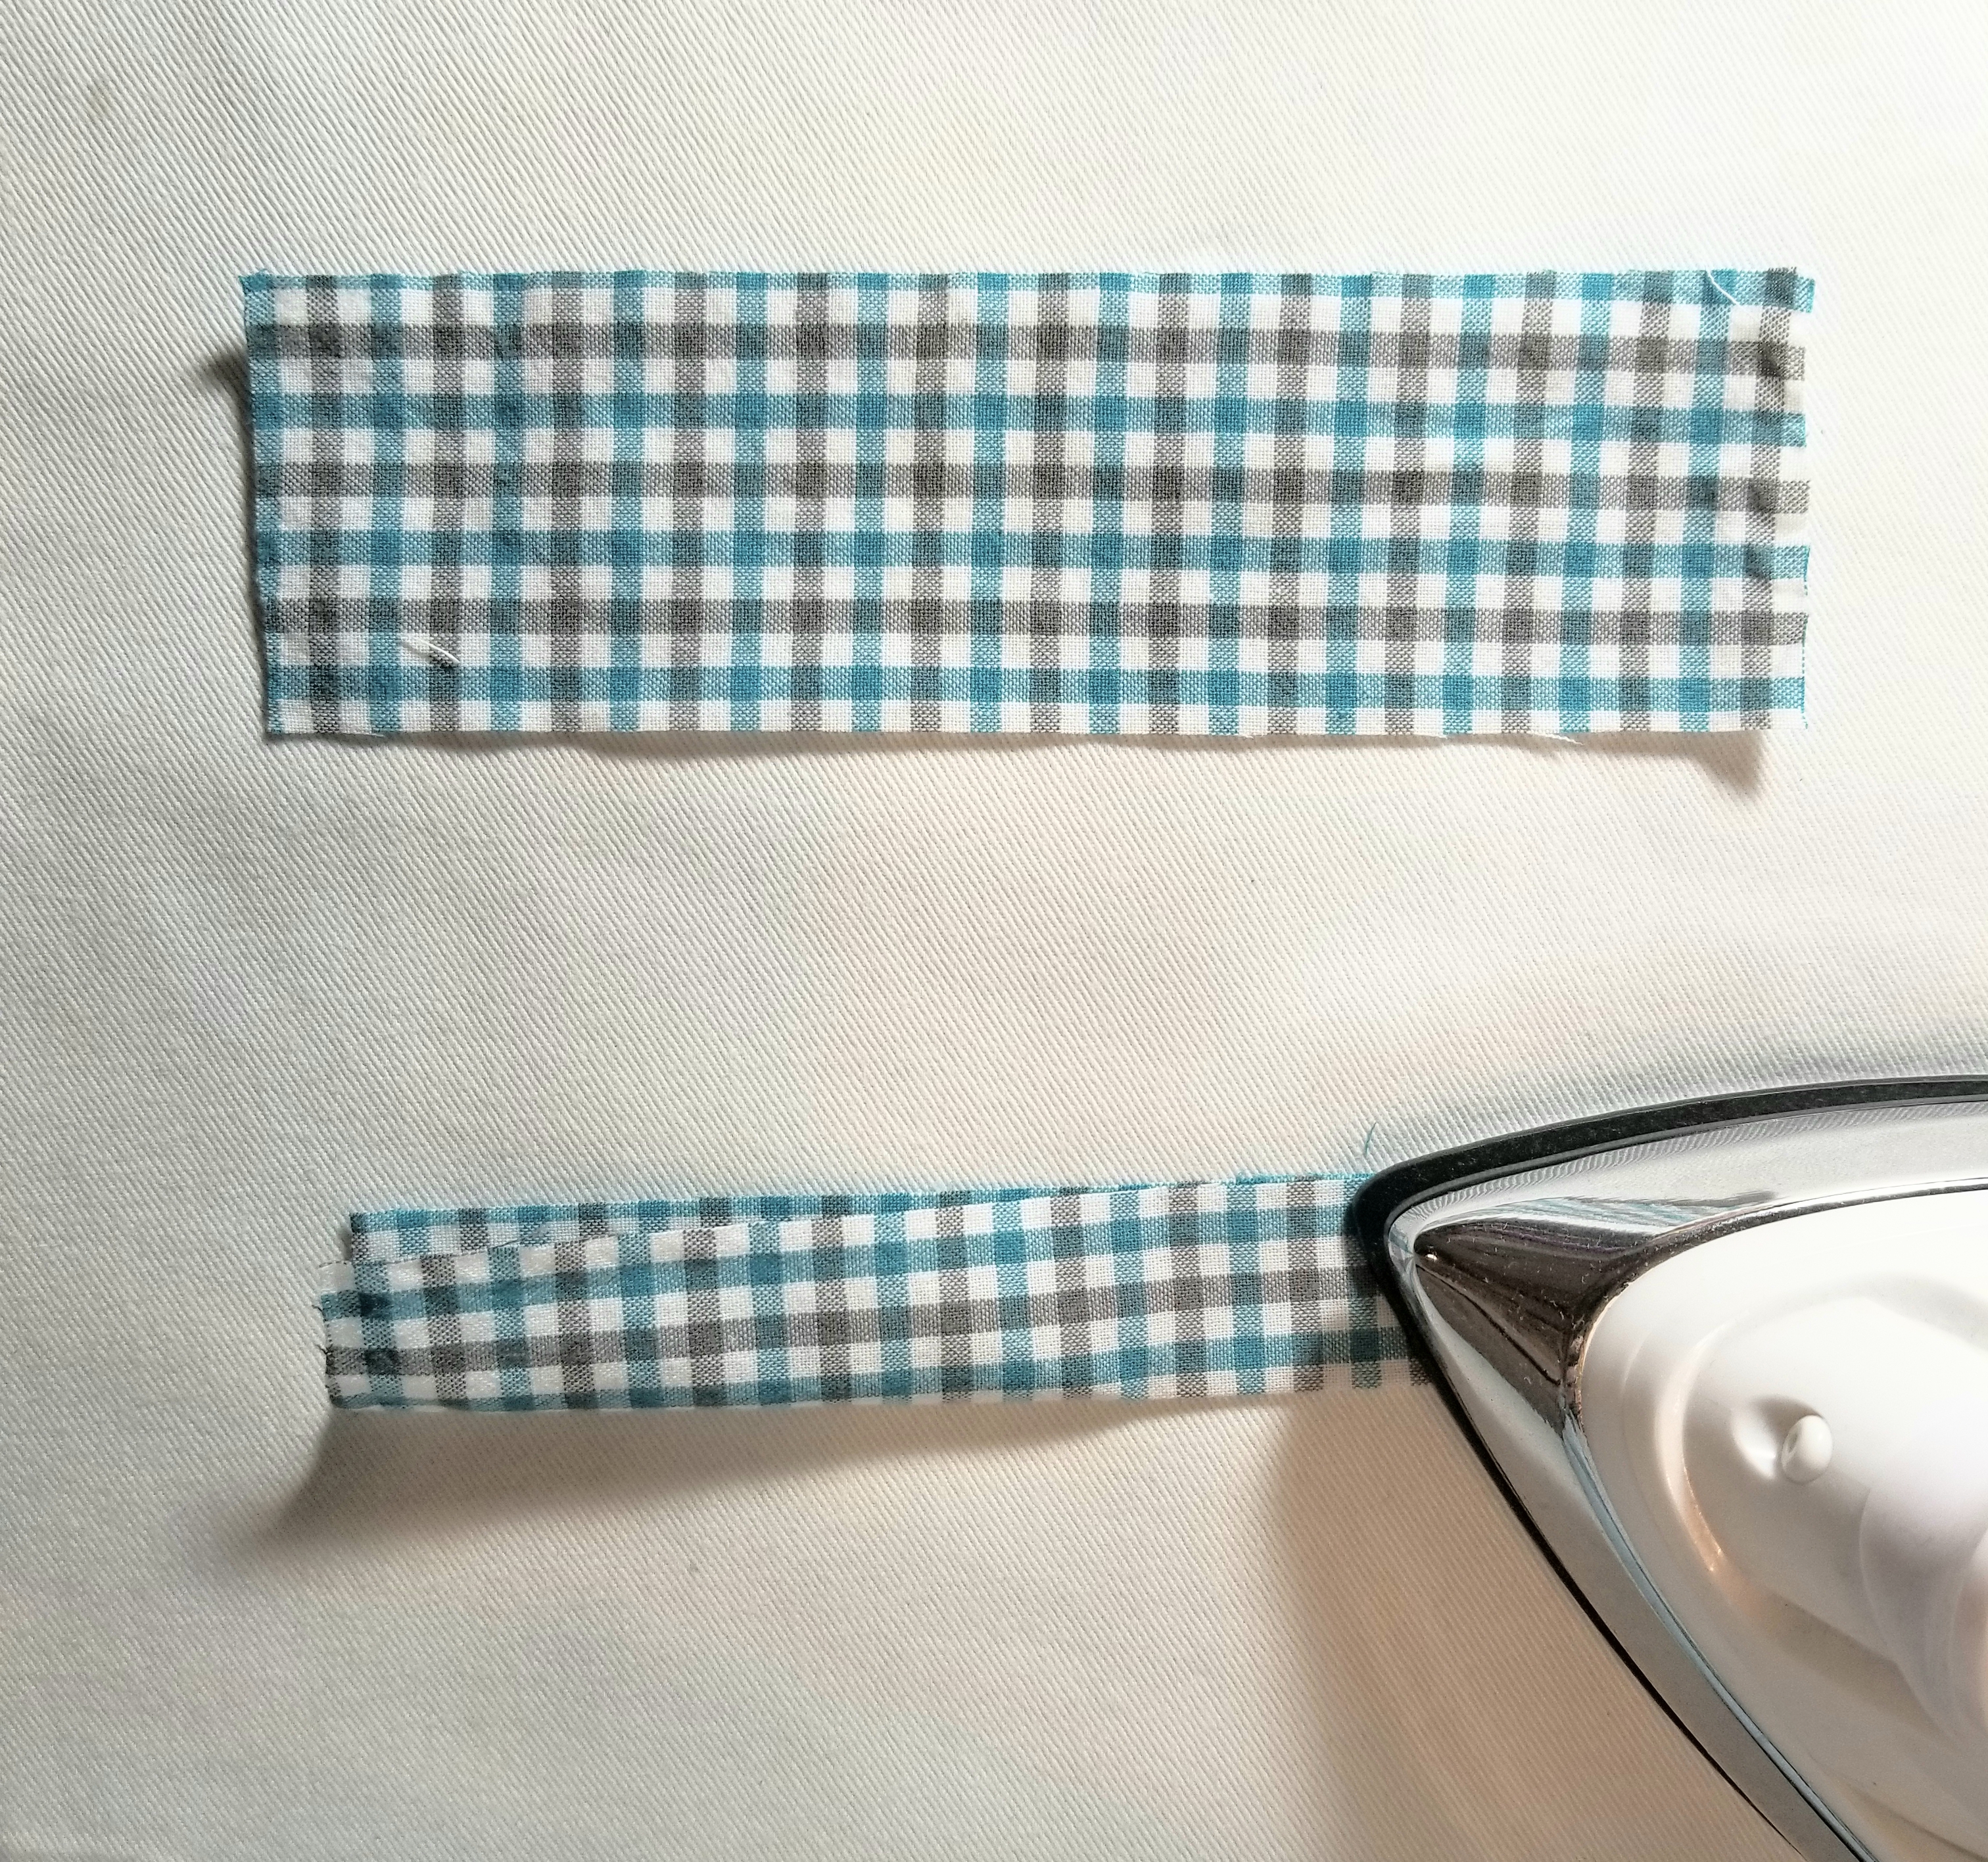
Fold each accent strip of fabric lengthwise in half, matching raw edges, as shown in the picture above. Press.
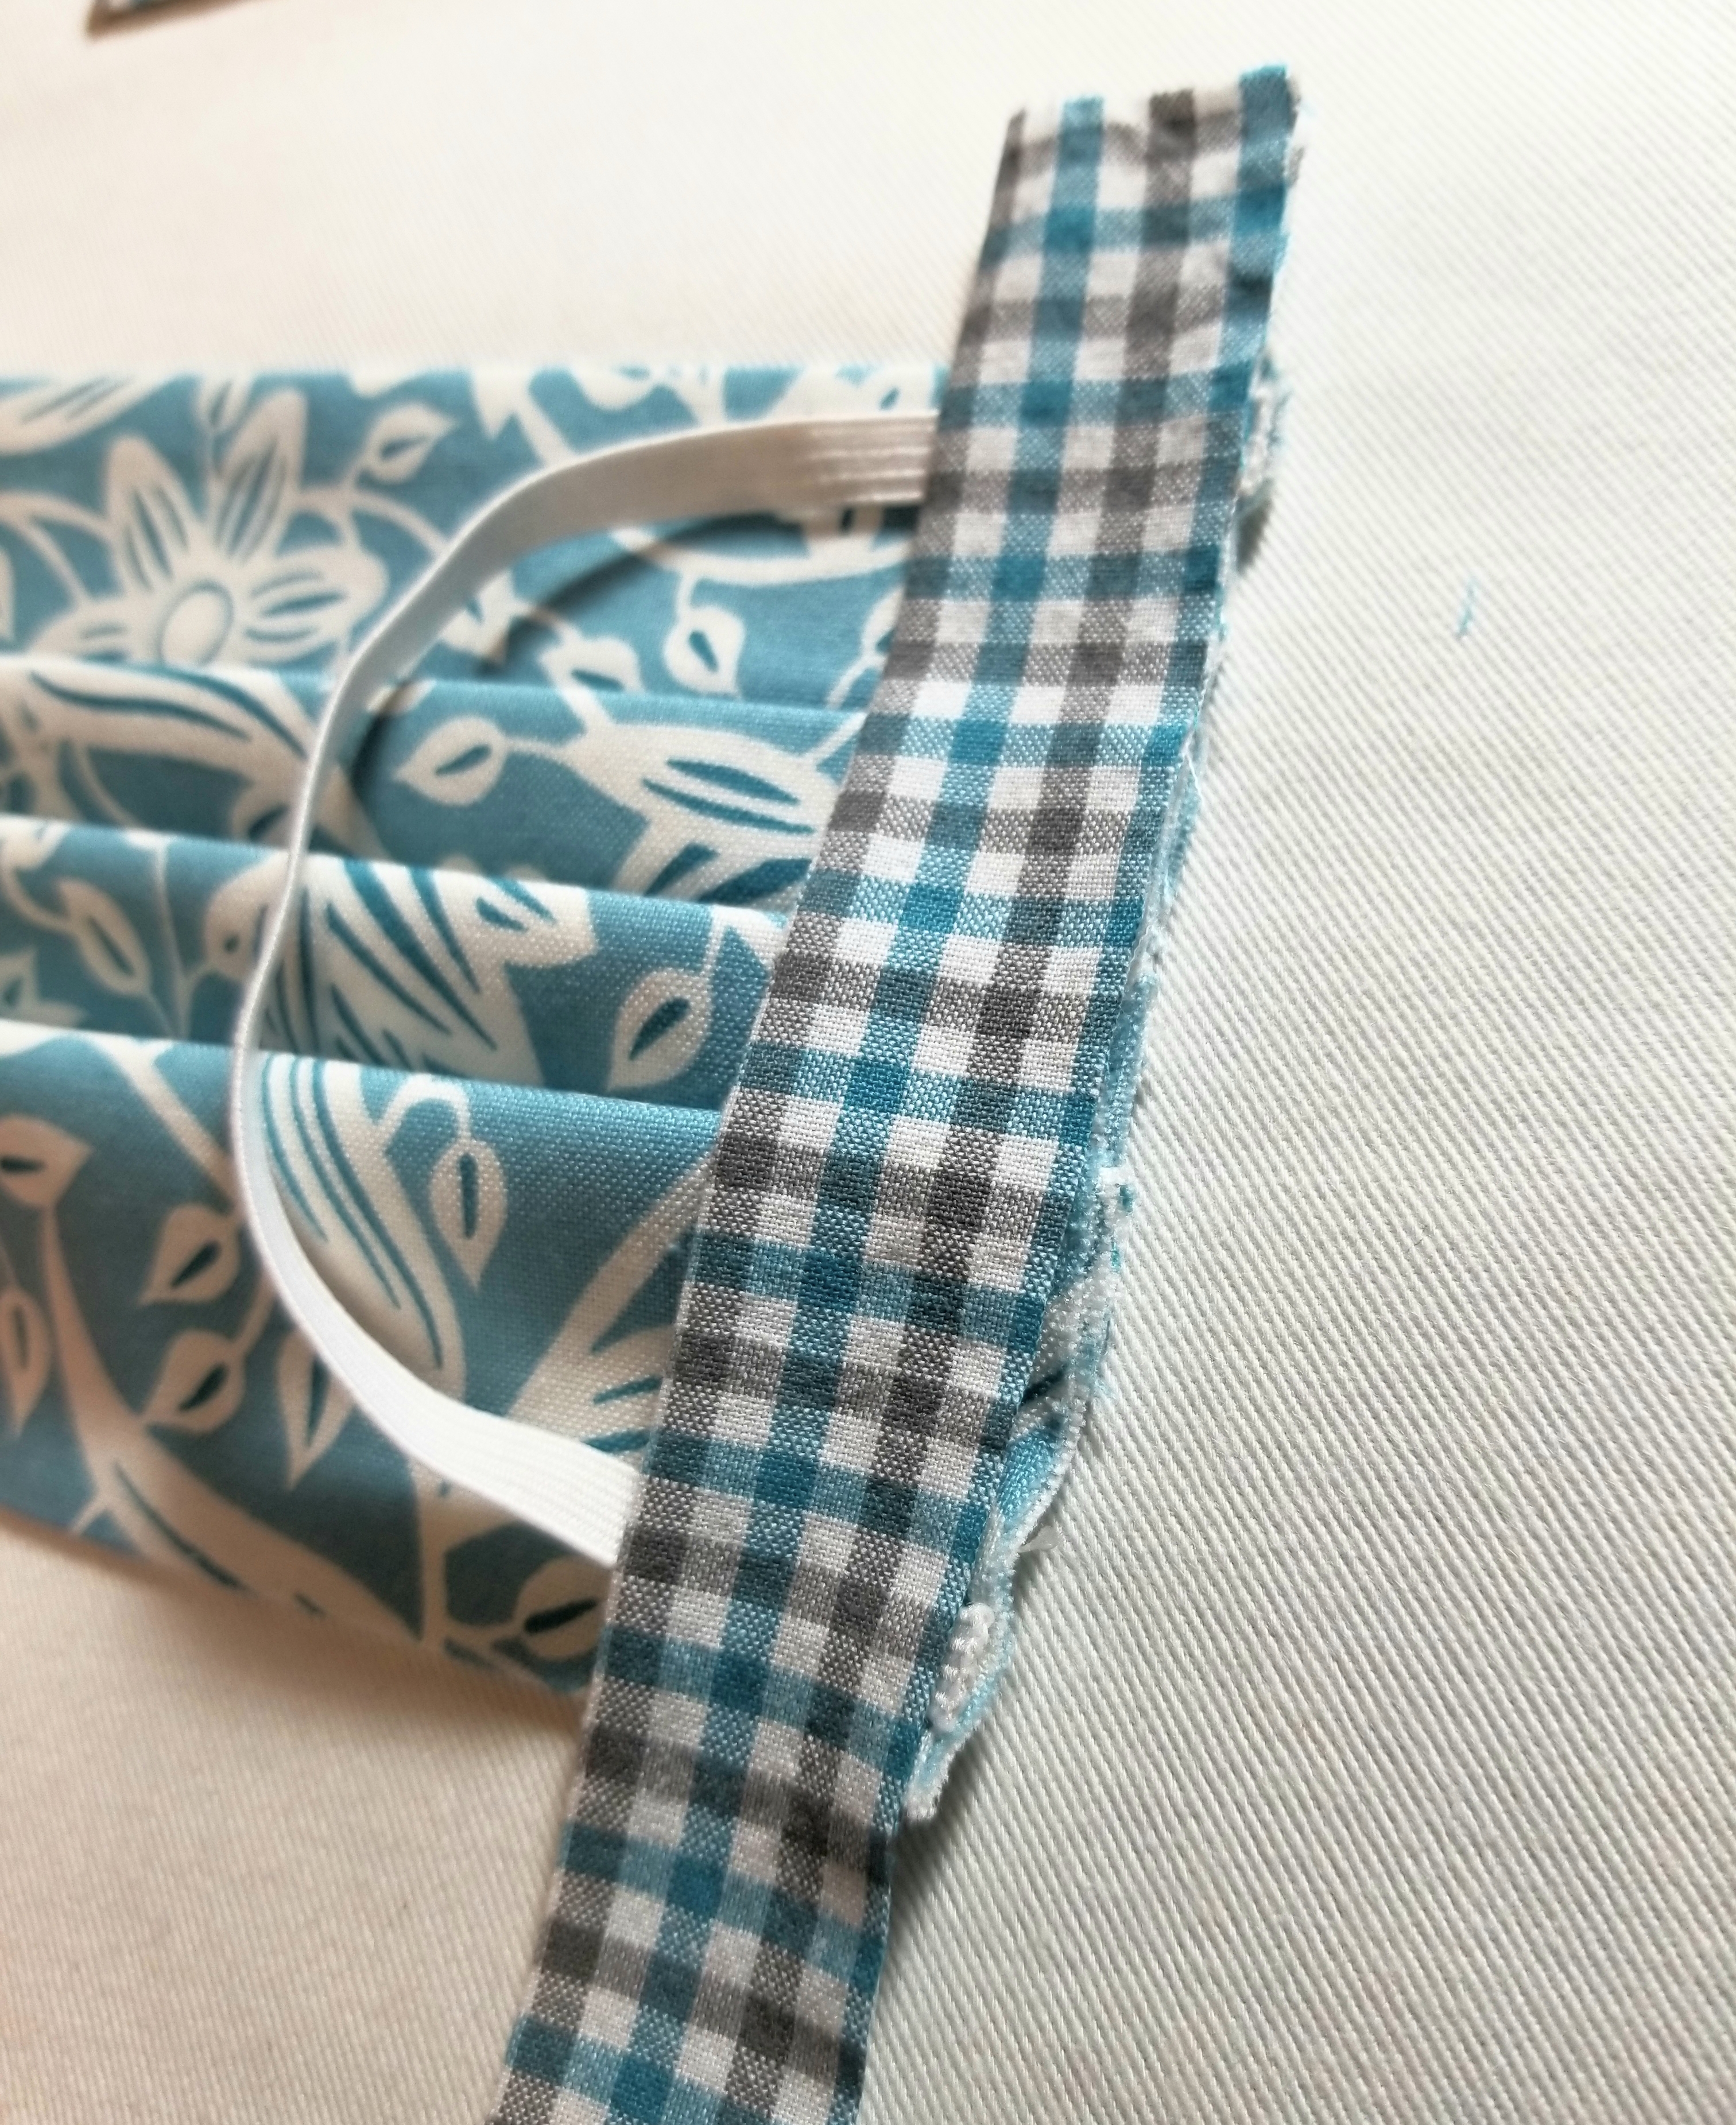
Place the strip on top of the elastic. Make sure the raw edge is facing outward, and the creased edge is facing the main body of the pleated piece. It will be a little longer on the top and bottom and that is okay, as we are going to fold some of that to the back.

Tuck about 1/2” of the top edge to the back as shown in the picture above.
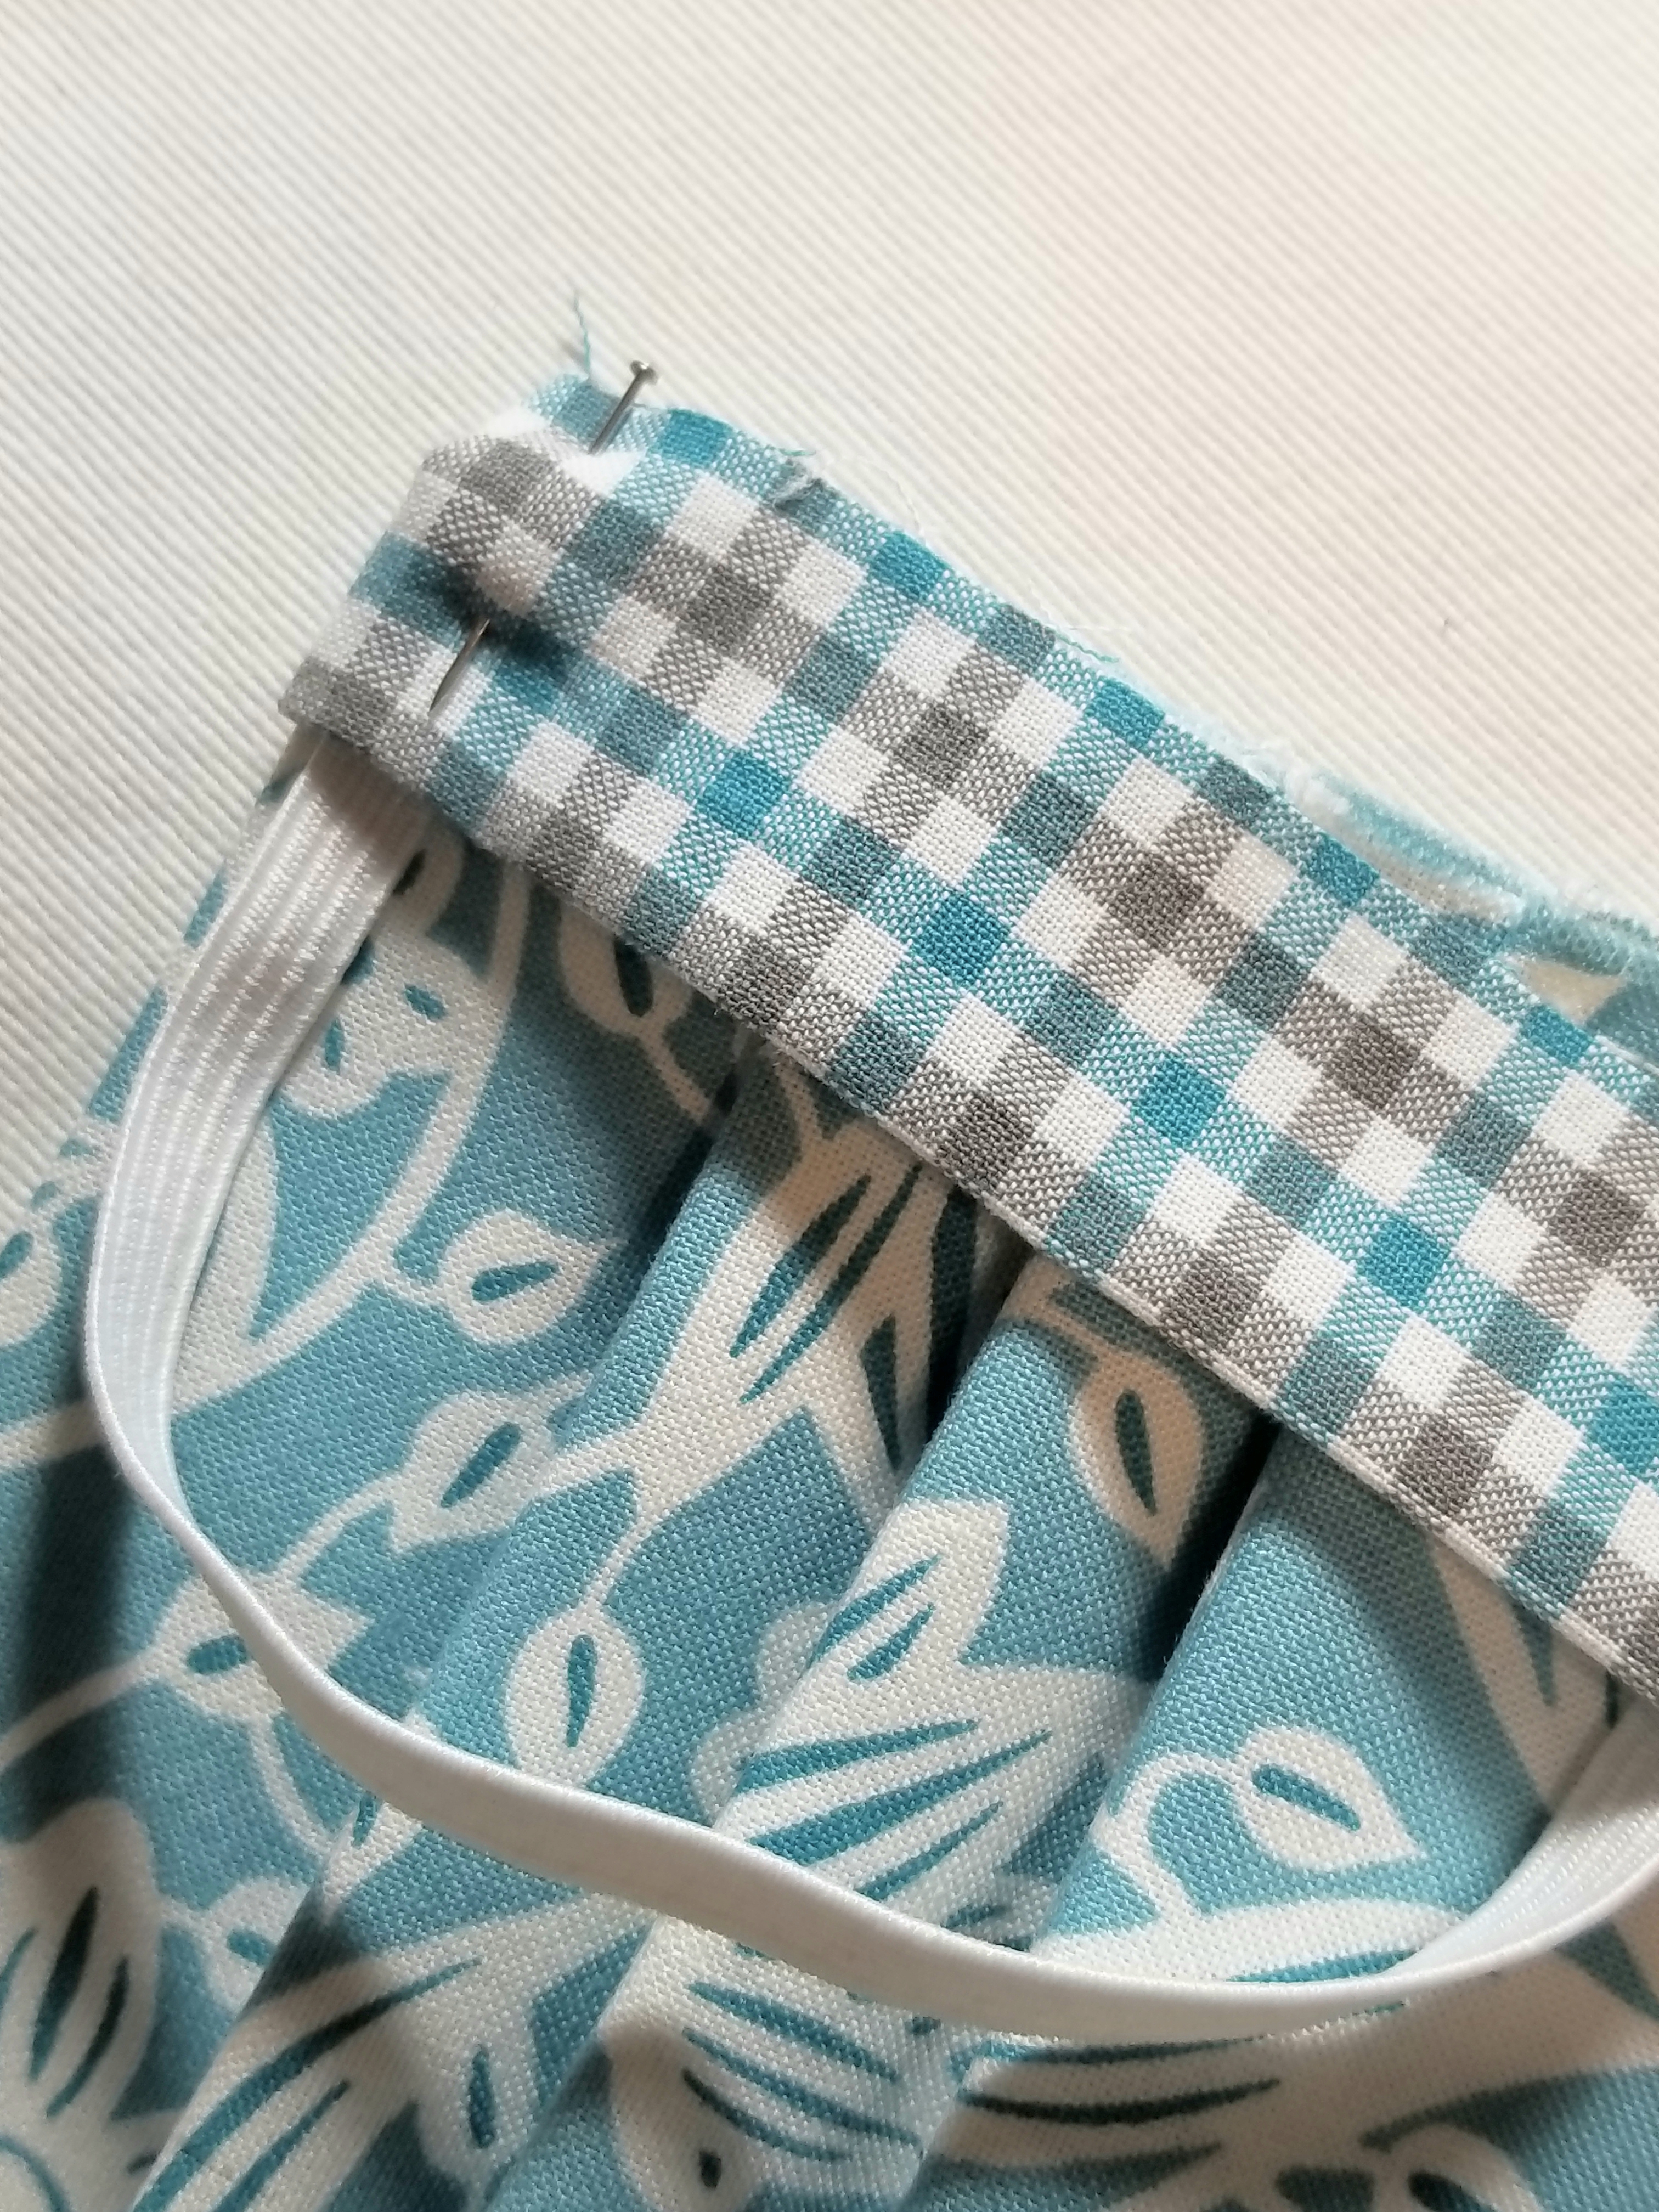
Pin all layers in place.
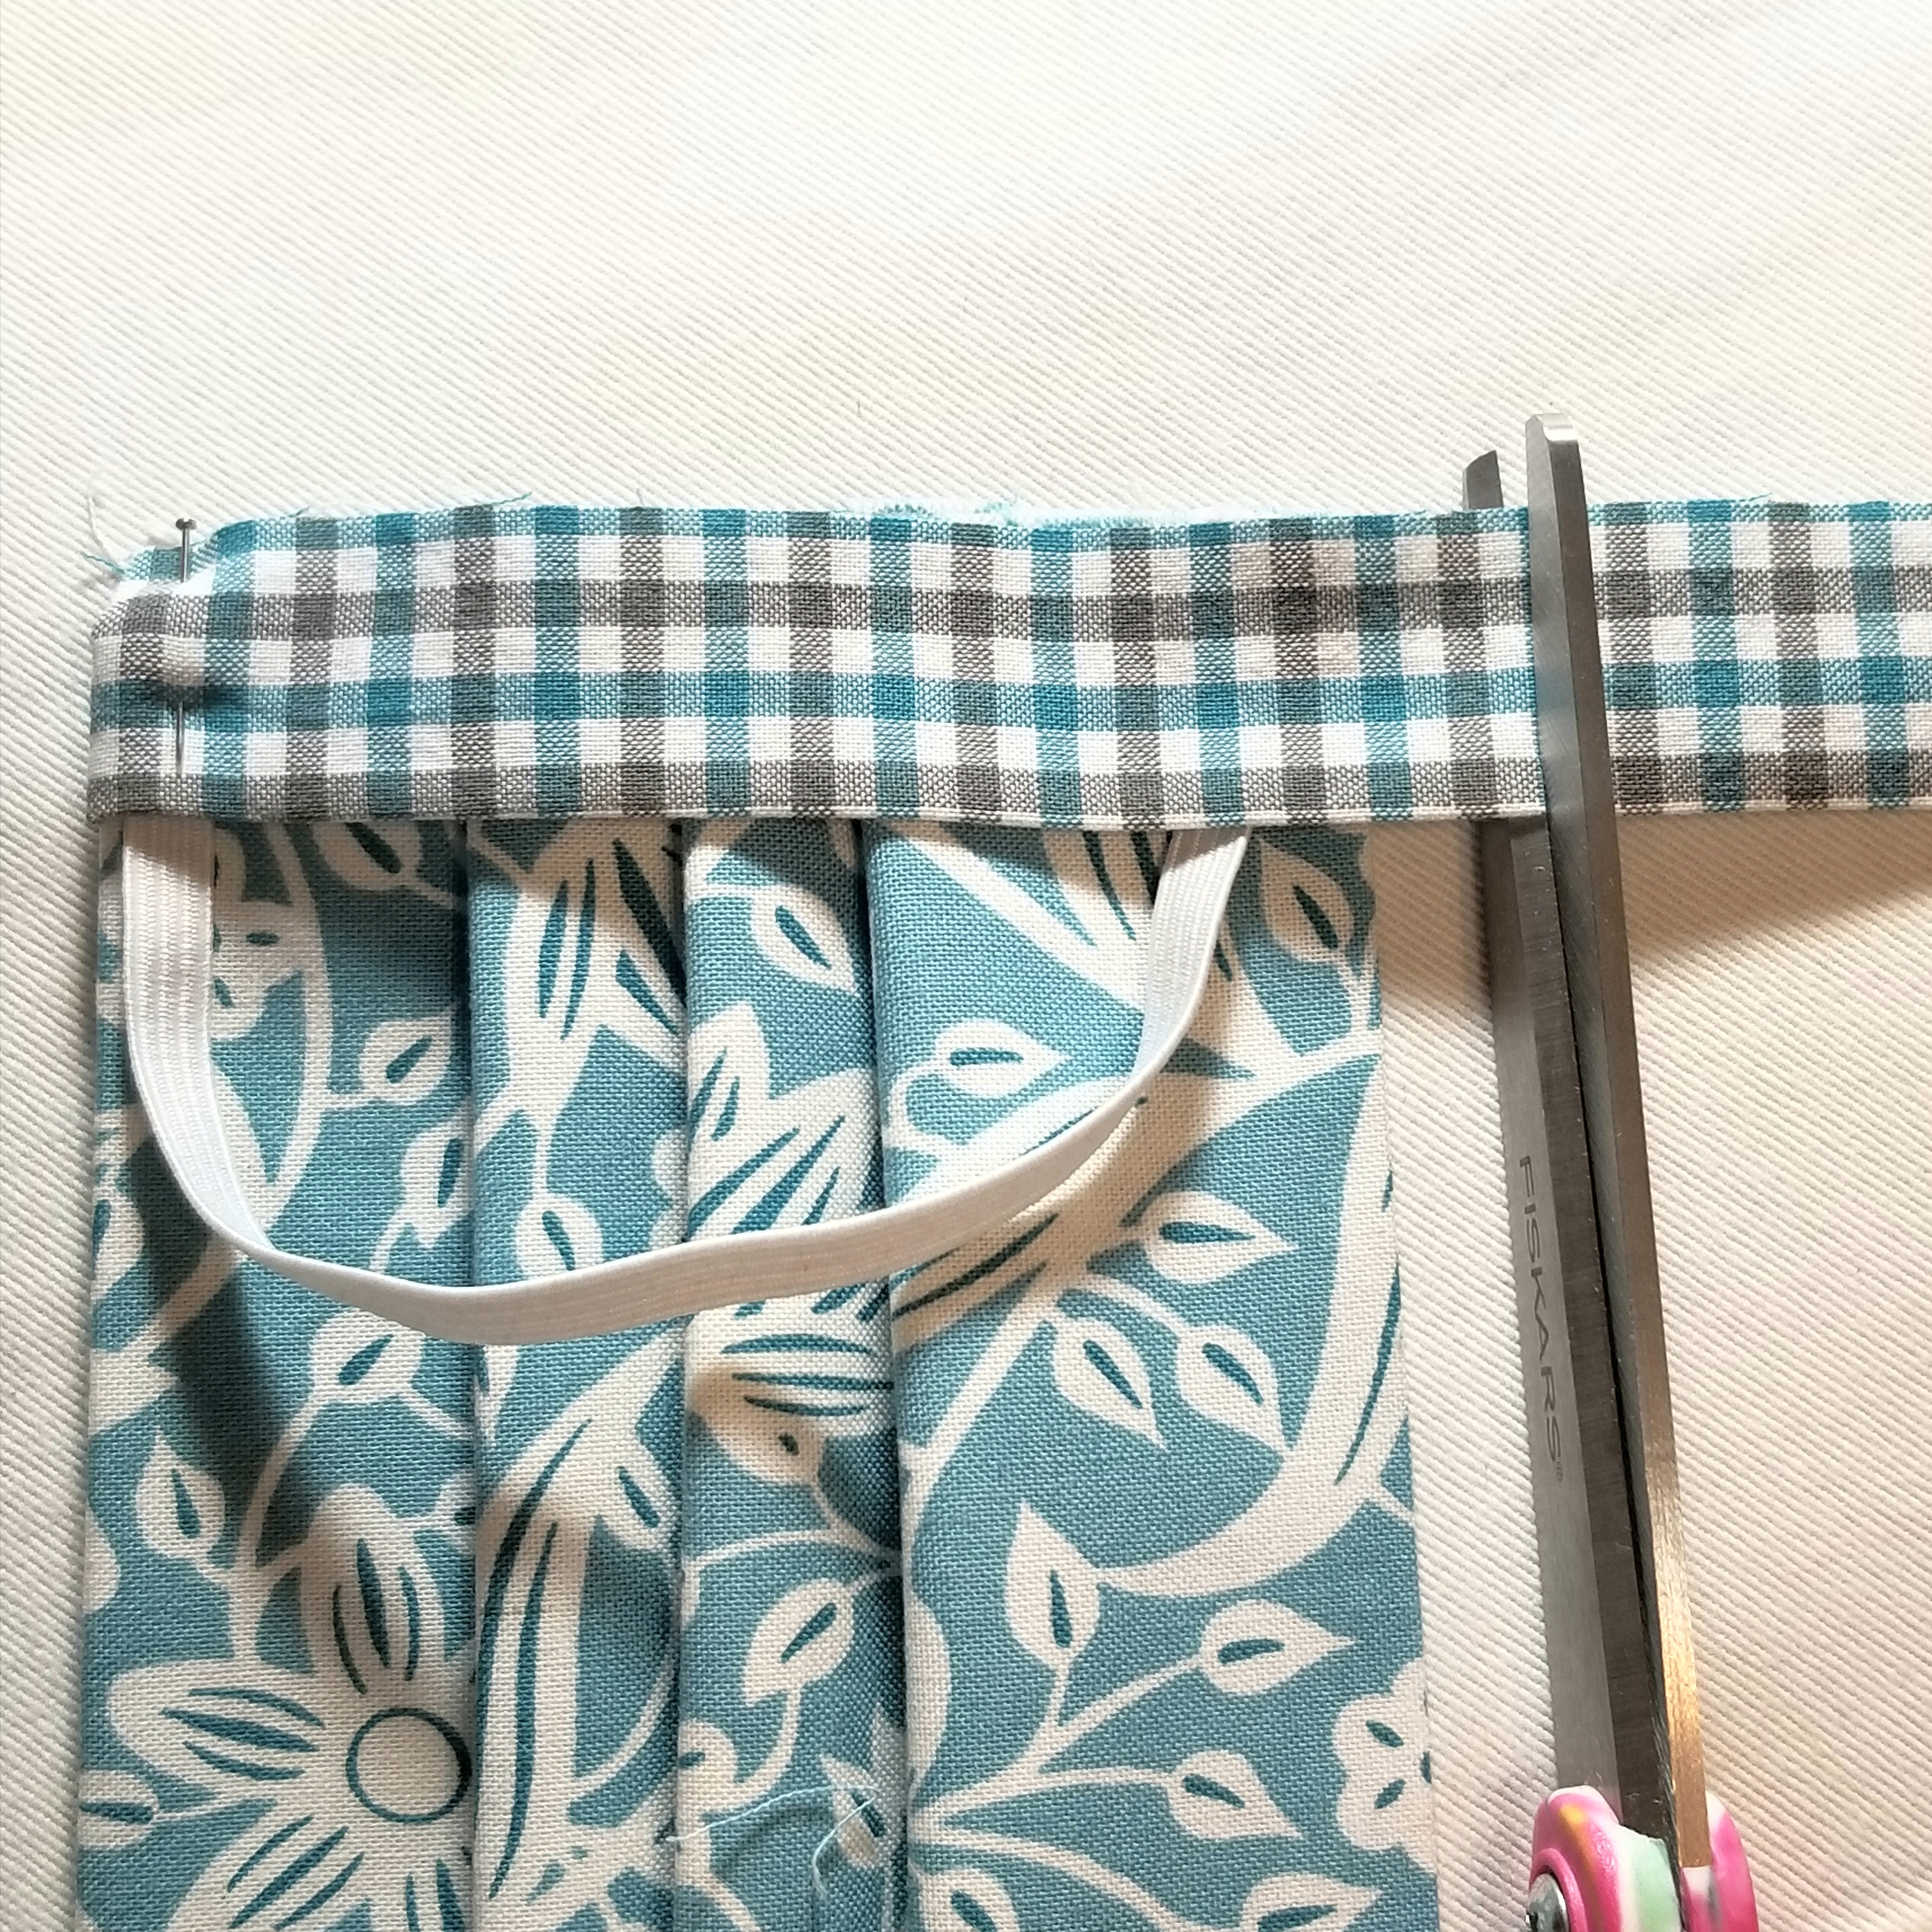
Trim the other end of the accent strip, so that it is about 1/2” longer than the bottom edge of the main pleated piece.

Fold the bottom edge of the accent fabric strip to the back, just as you did with the top edge.
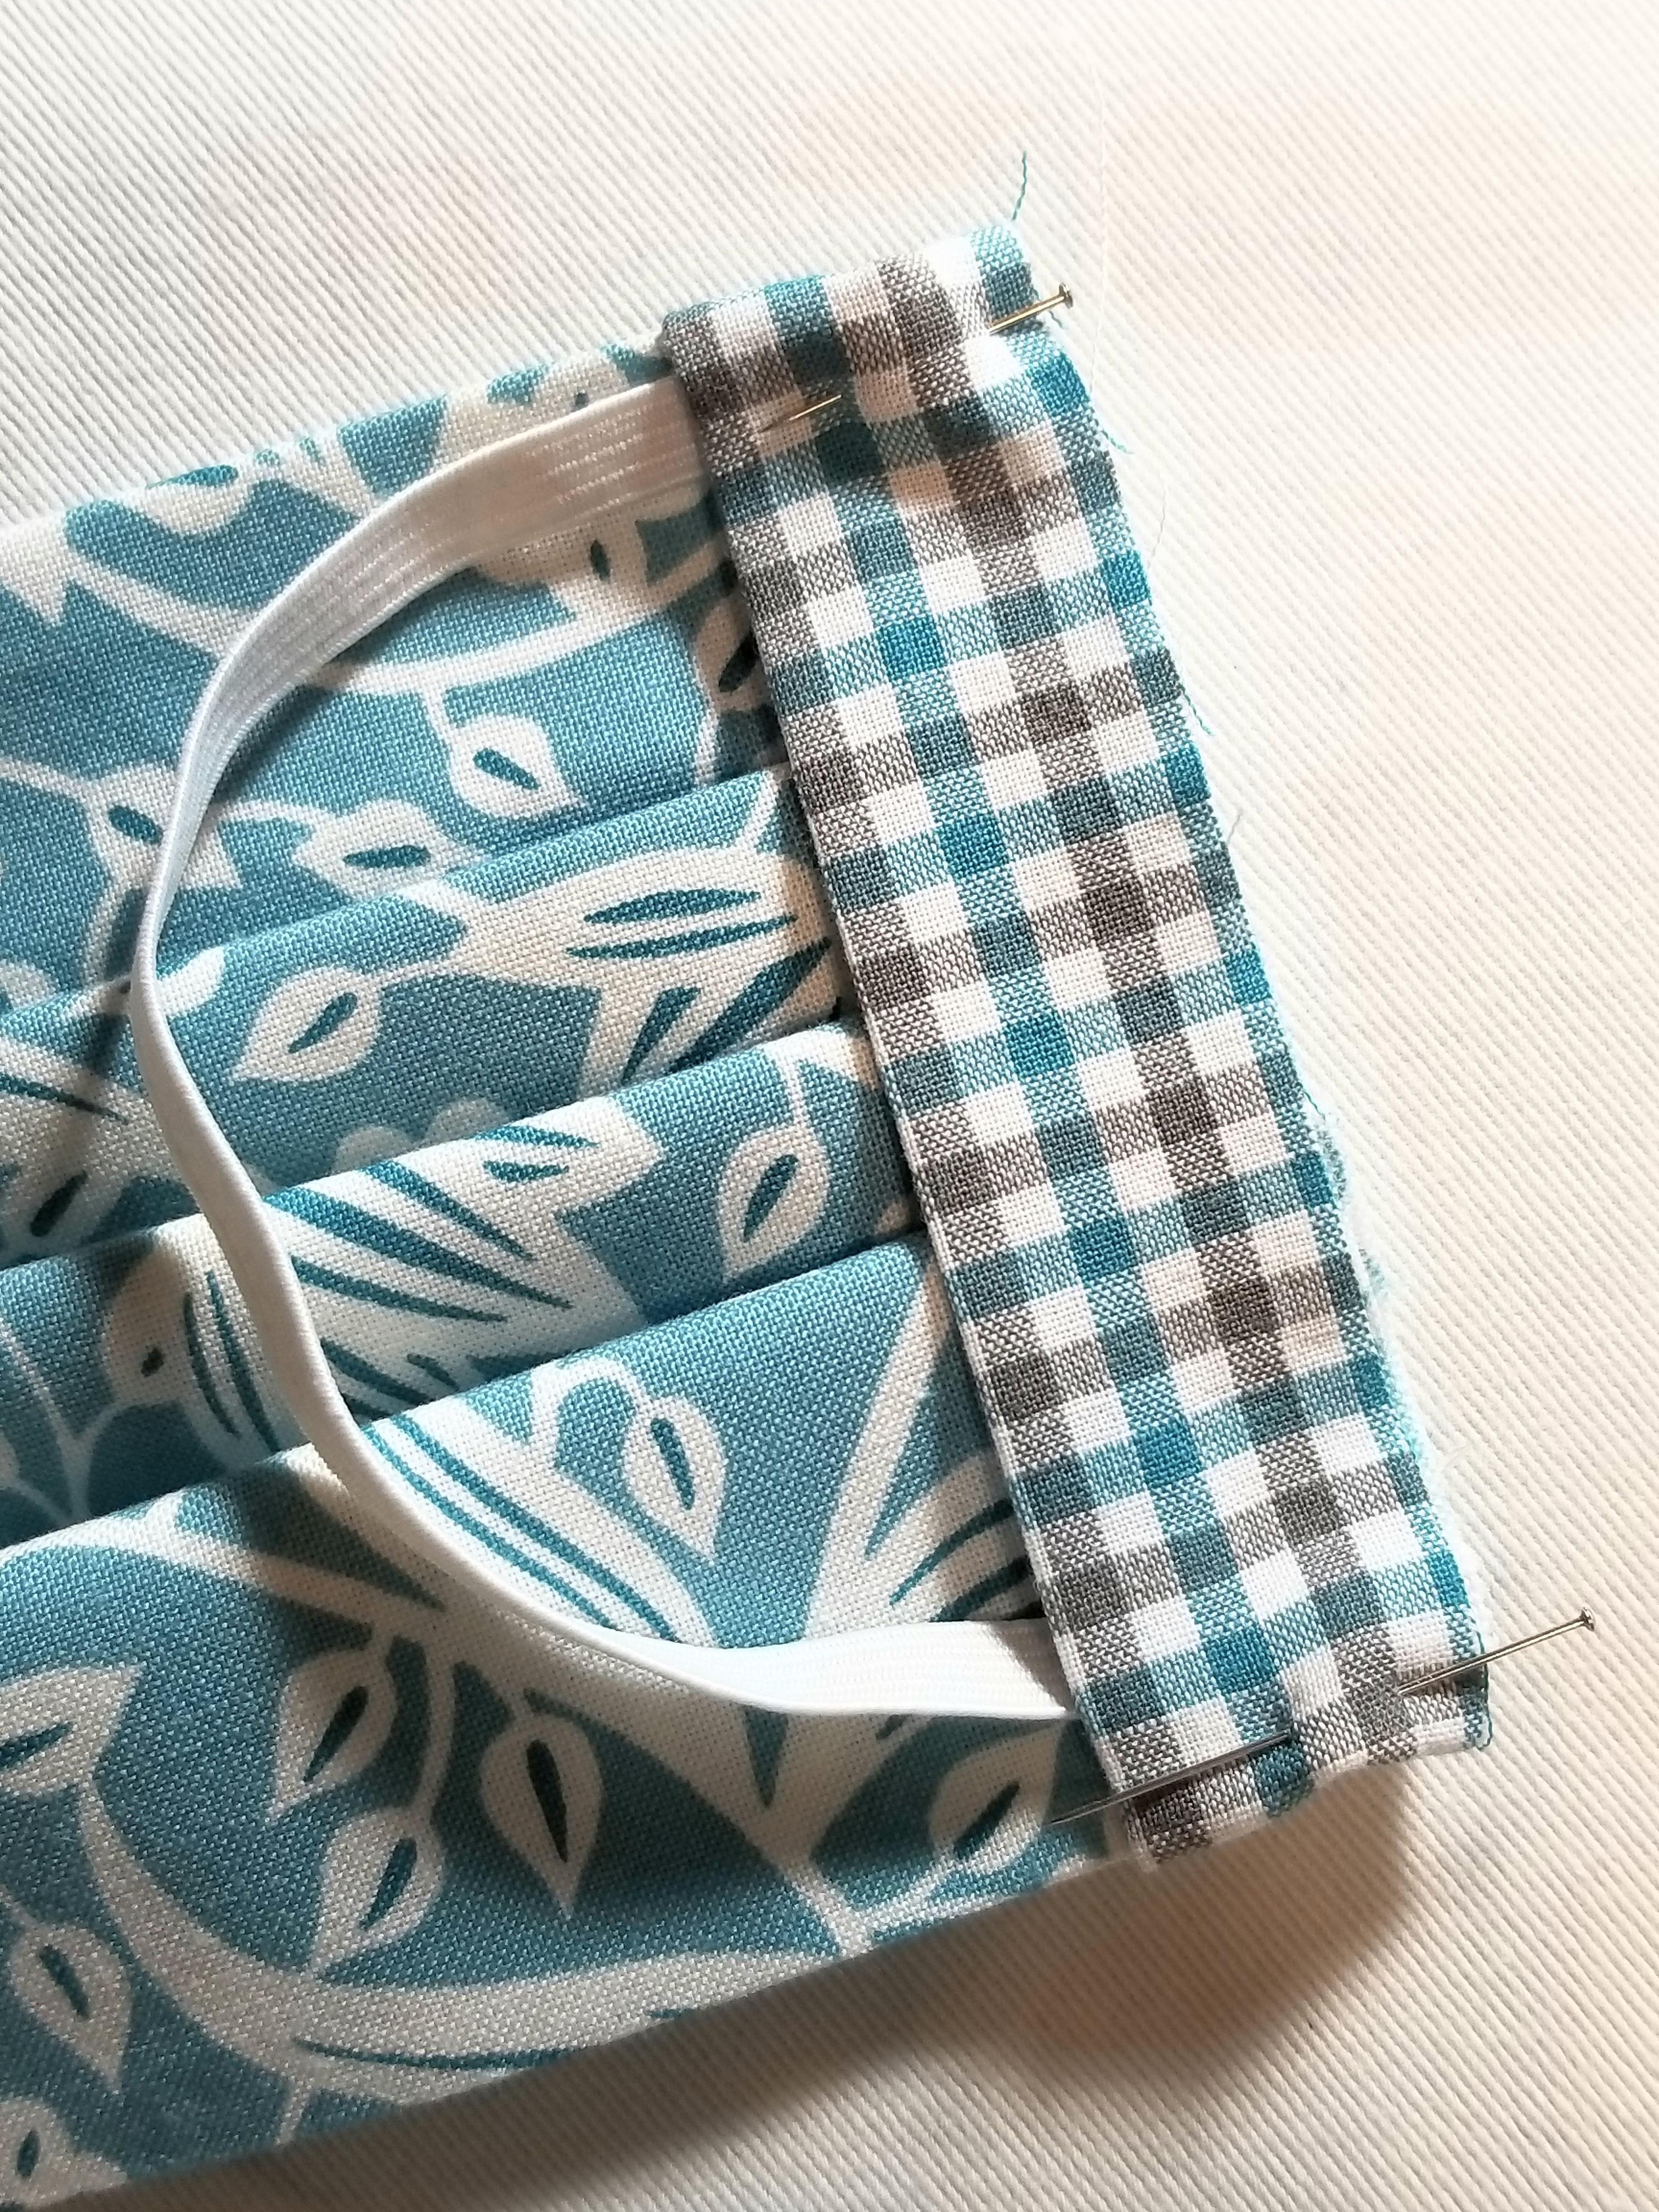
Pin both ends in place.
Using a 1/4 inch seam allowance, stitch the length of the entire edge, making sure to back stitch at the beginning and end.
Open the the accent fabric strip seam by flipping it outward away from the main pleated piece, then press.
This is what the mask should look like if you flip it over.
fold the ENTIRE accent piece down toward the main pleated piece, encasing the raw seam. You will now see the accent piece on this side, but not at all on the flip side. Press. Pin edge down.
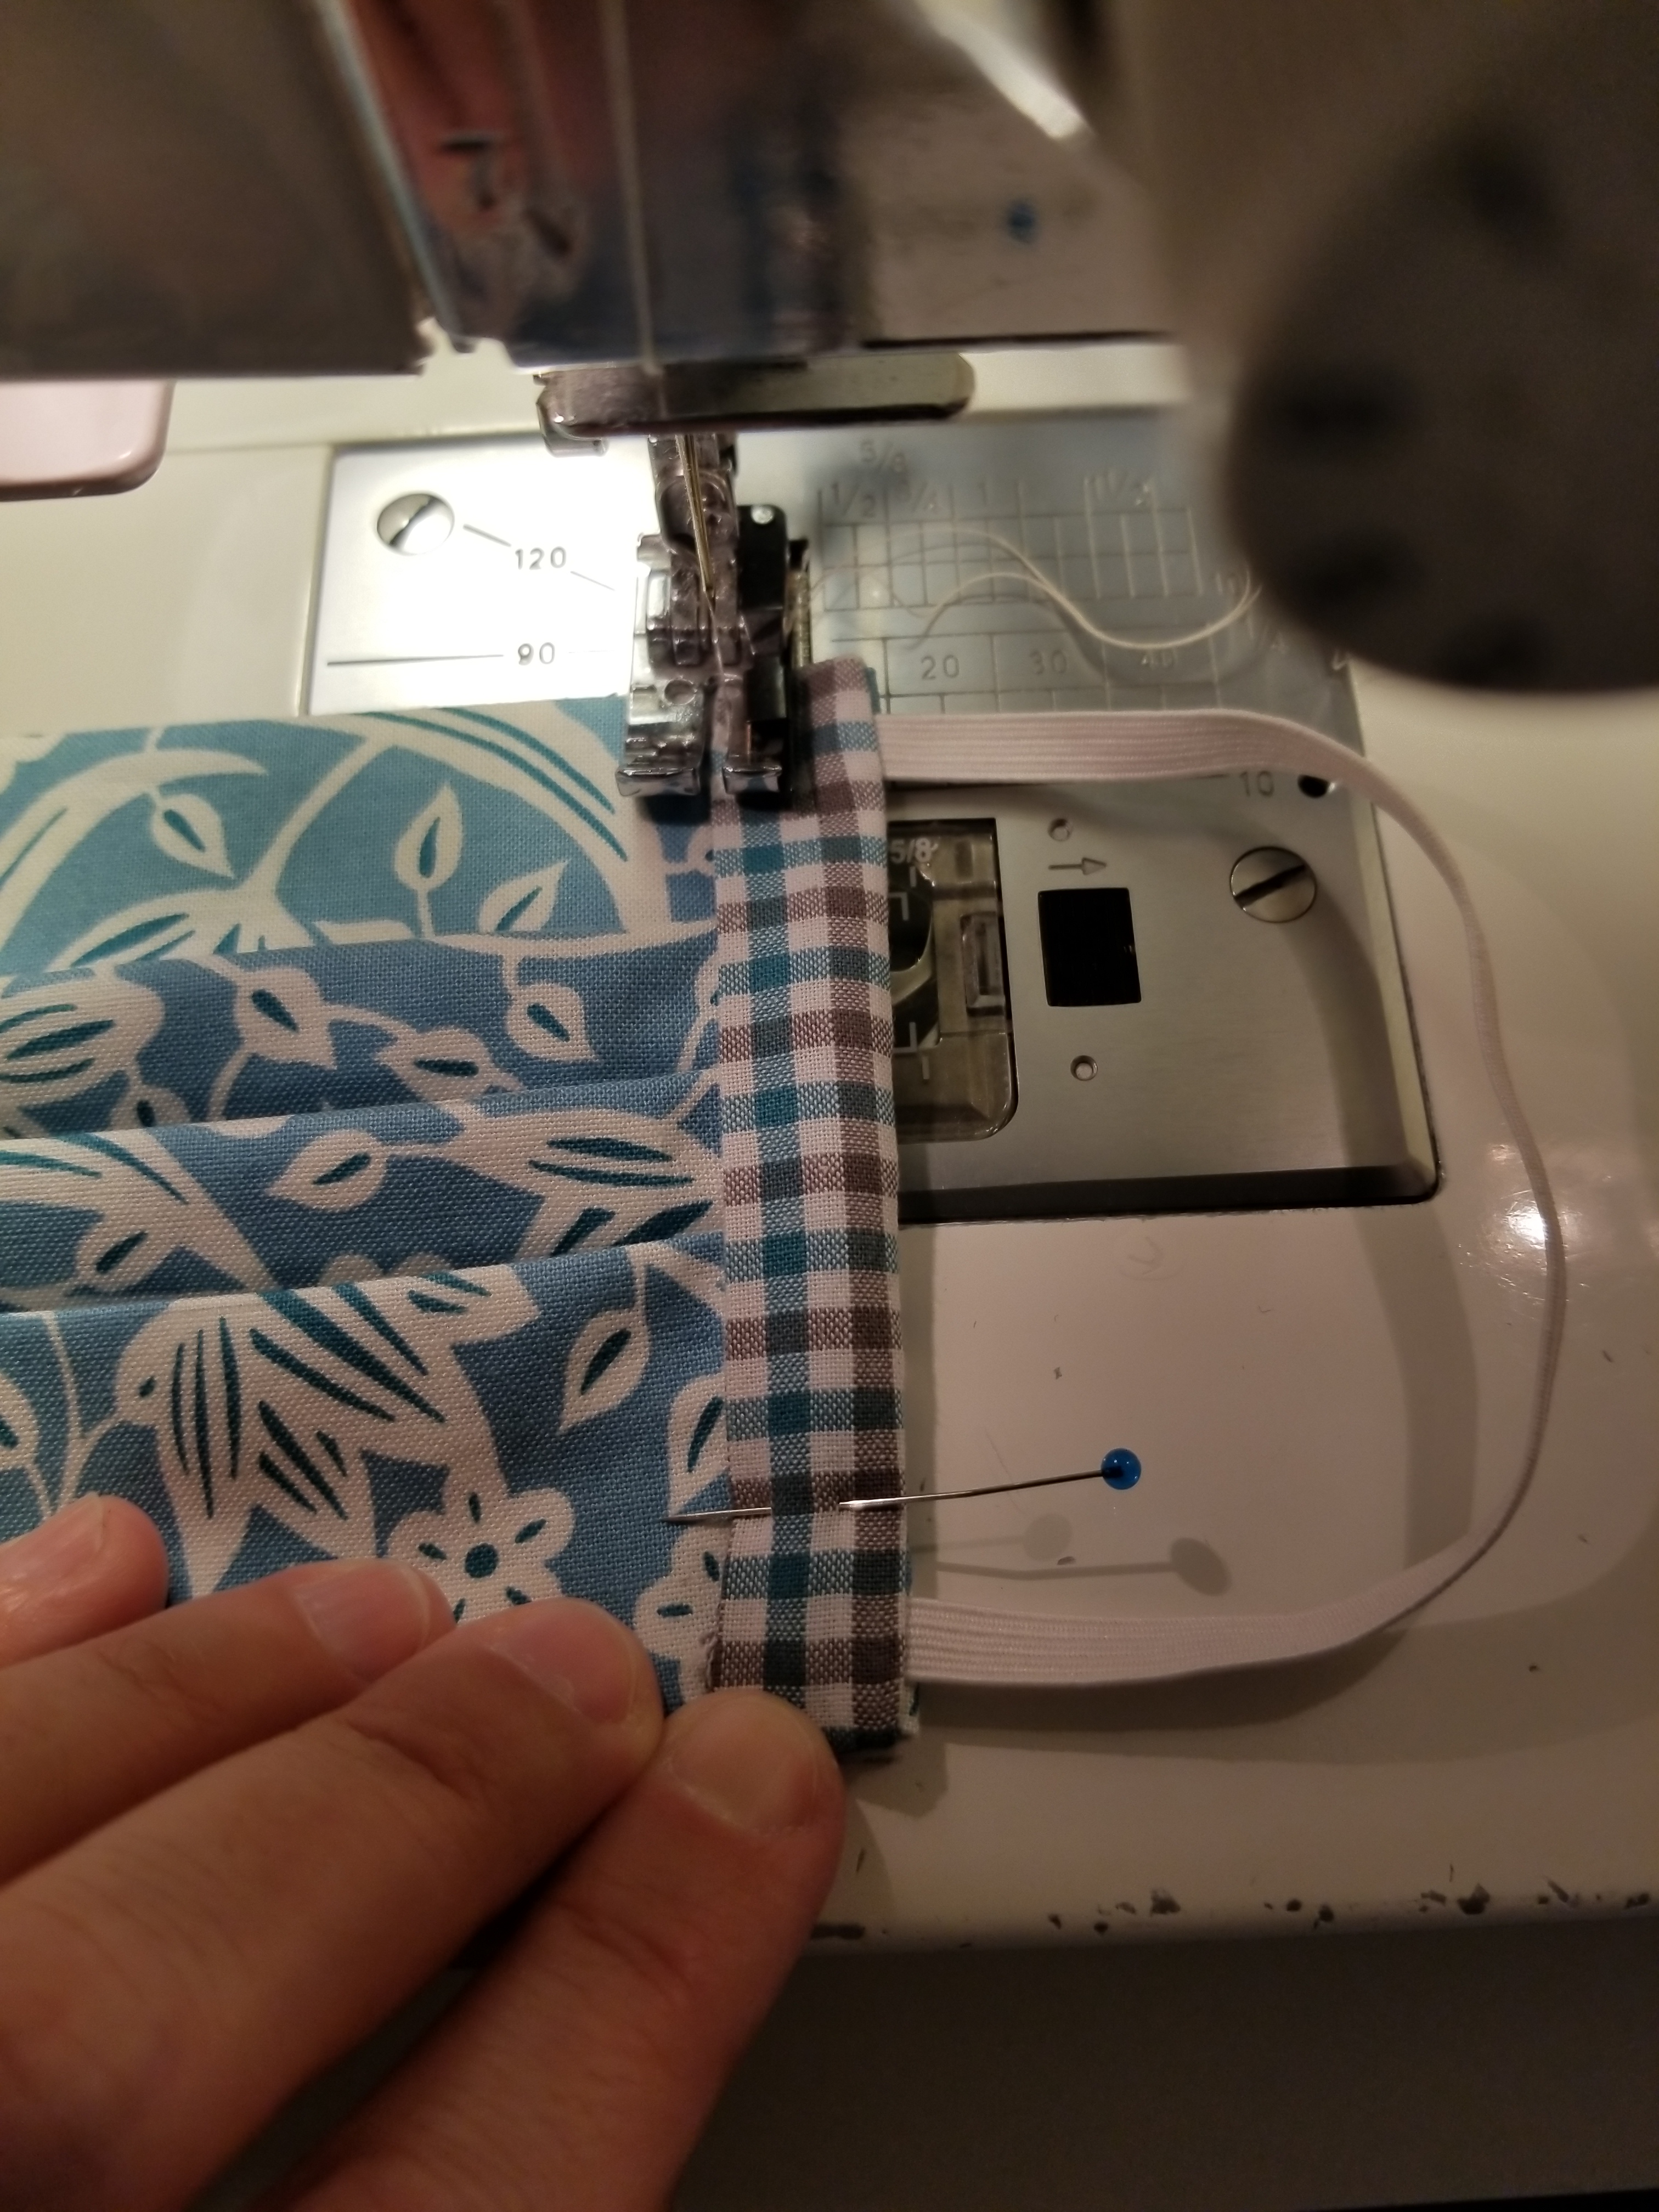
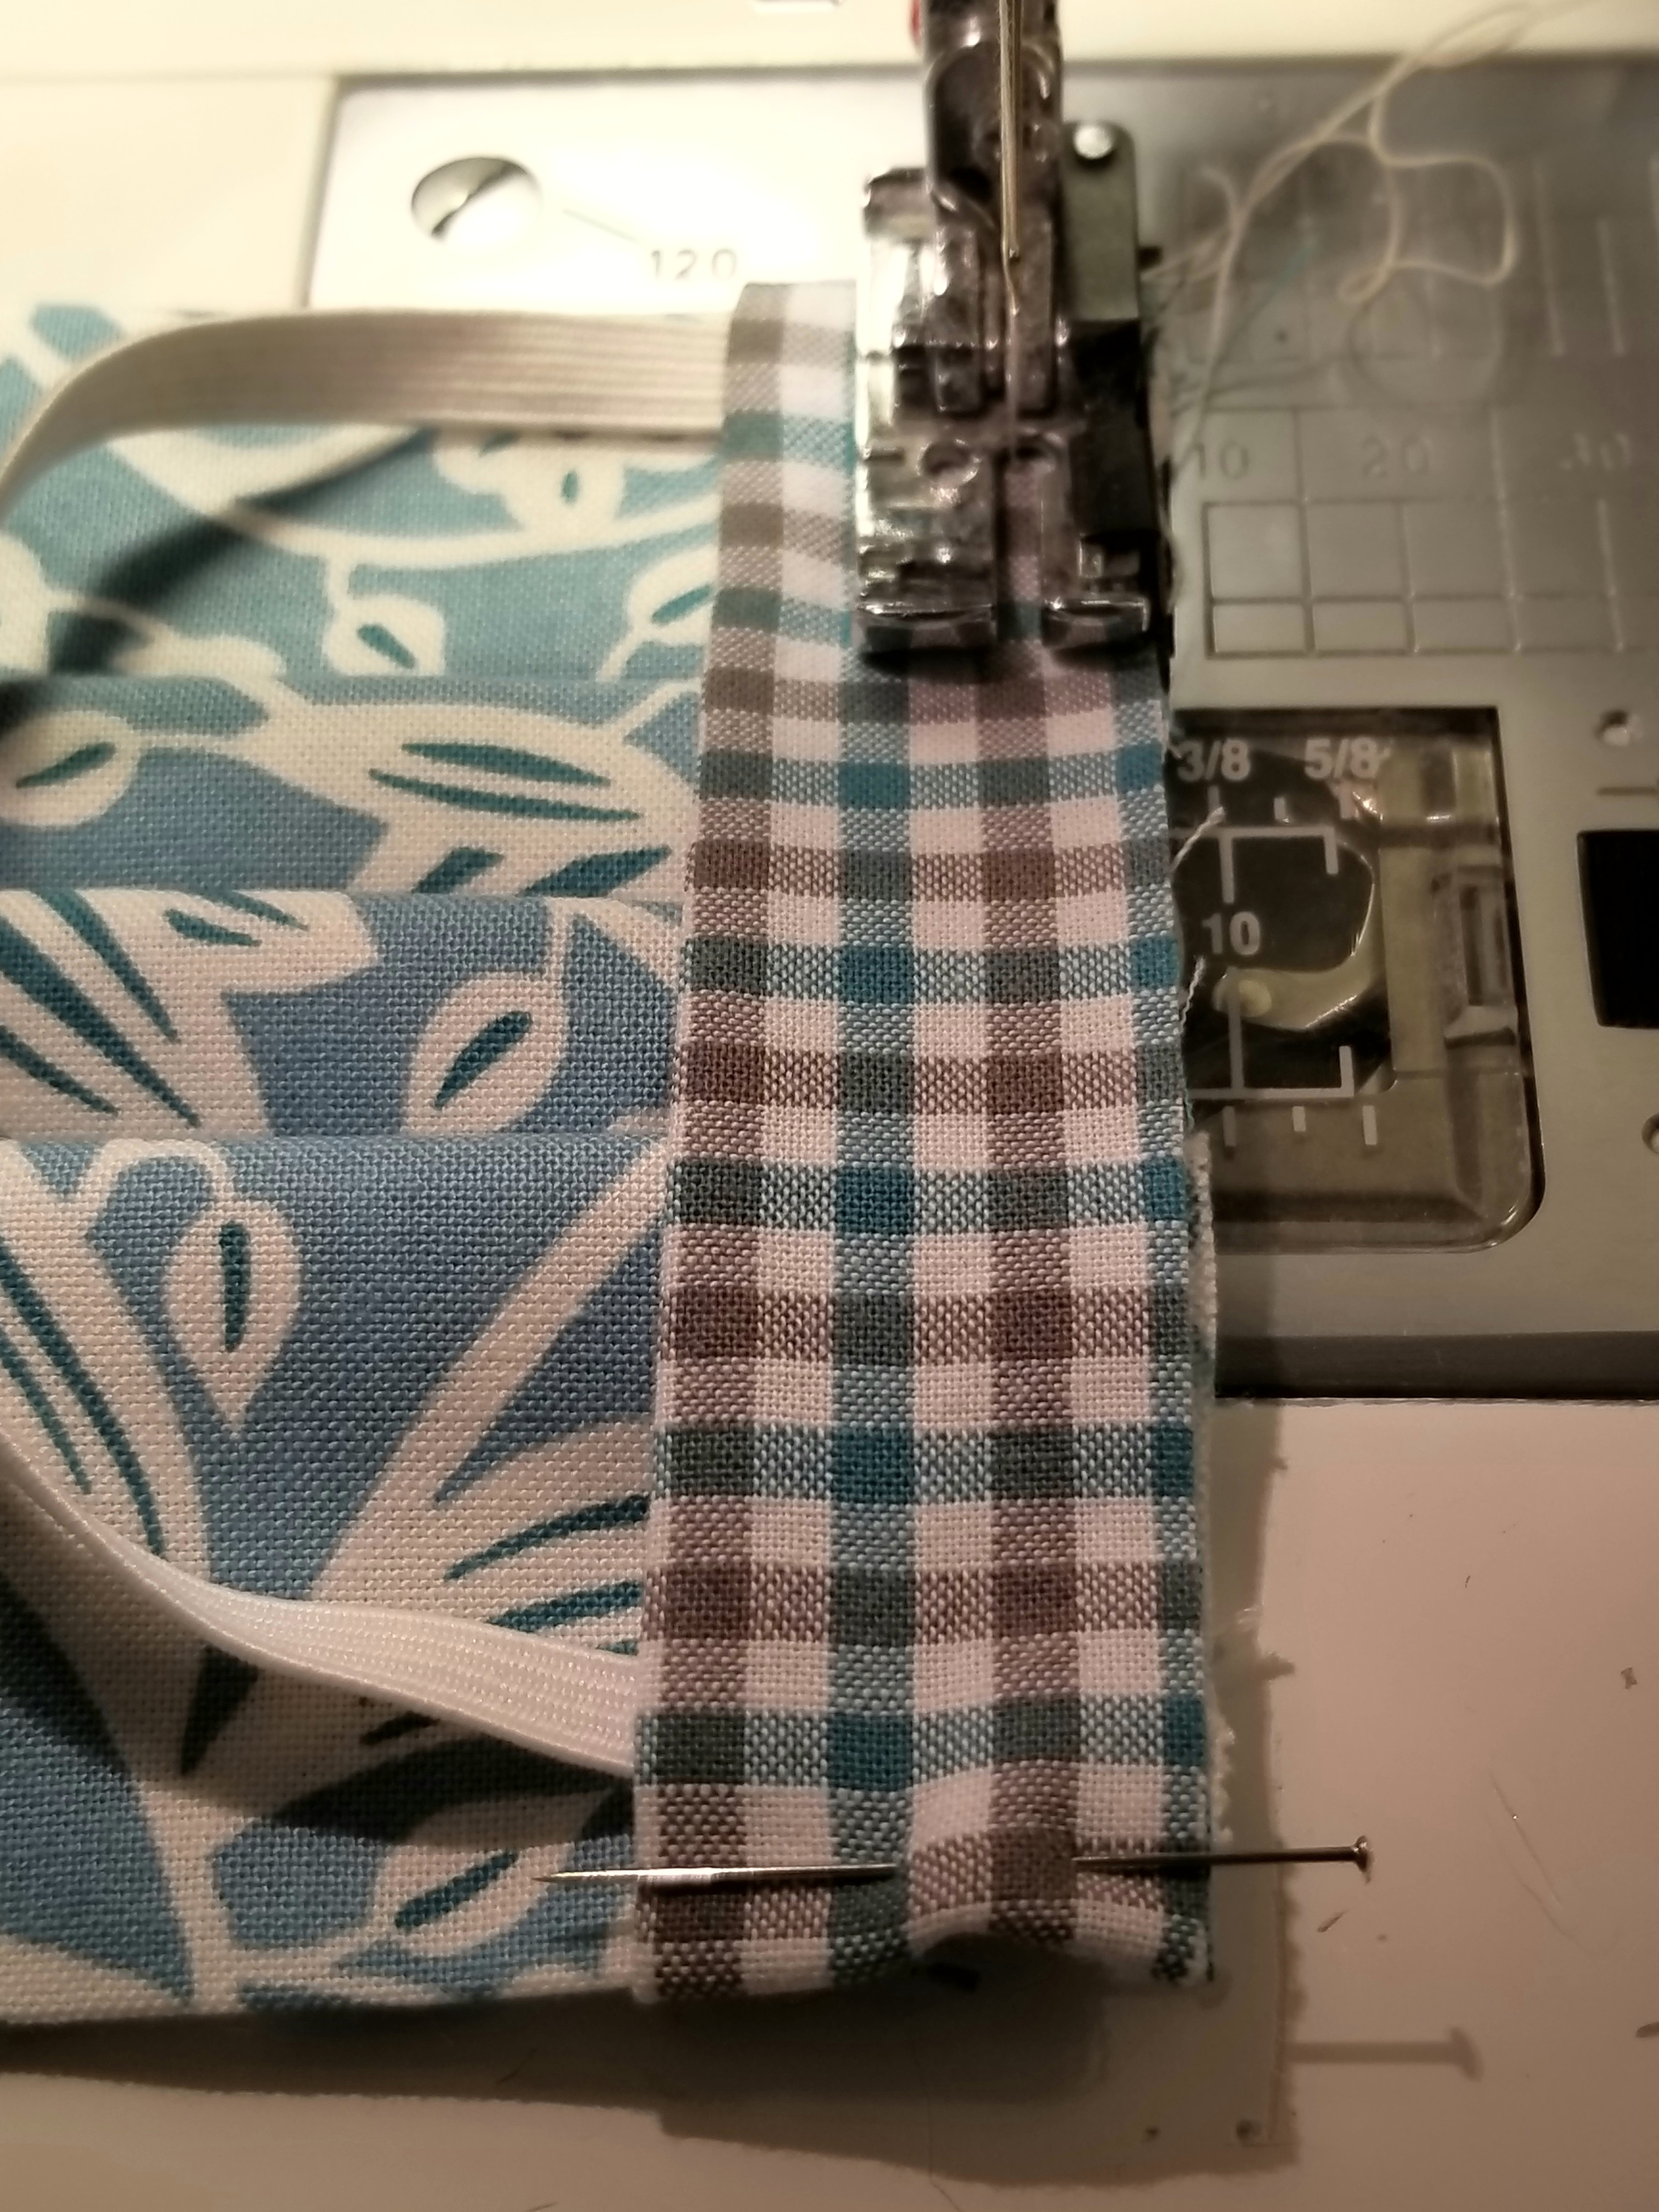
If you are a good sewist, you will change out your presser foot to a straight stitch foot. If you are lazy, like me, you will keep that 1/4″ presser foot on your machine and struggle your way through this next step. 😀 Stitch this accent strip down to the main body of the mask, sewing along the edge, making sure to back stitch at the beginning and end.
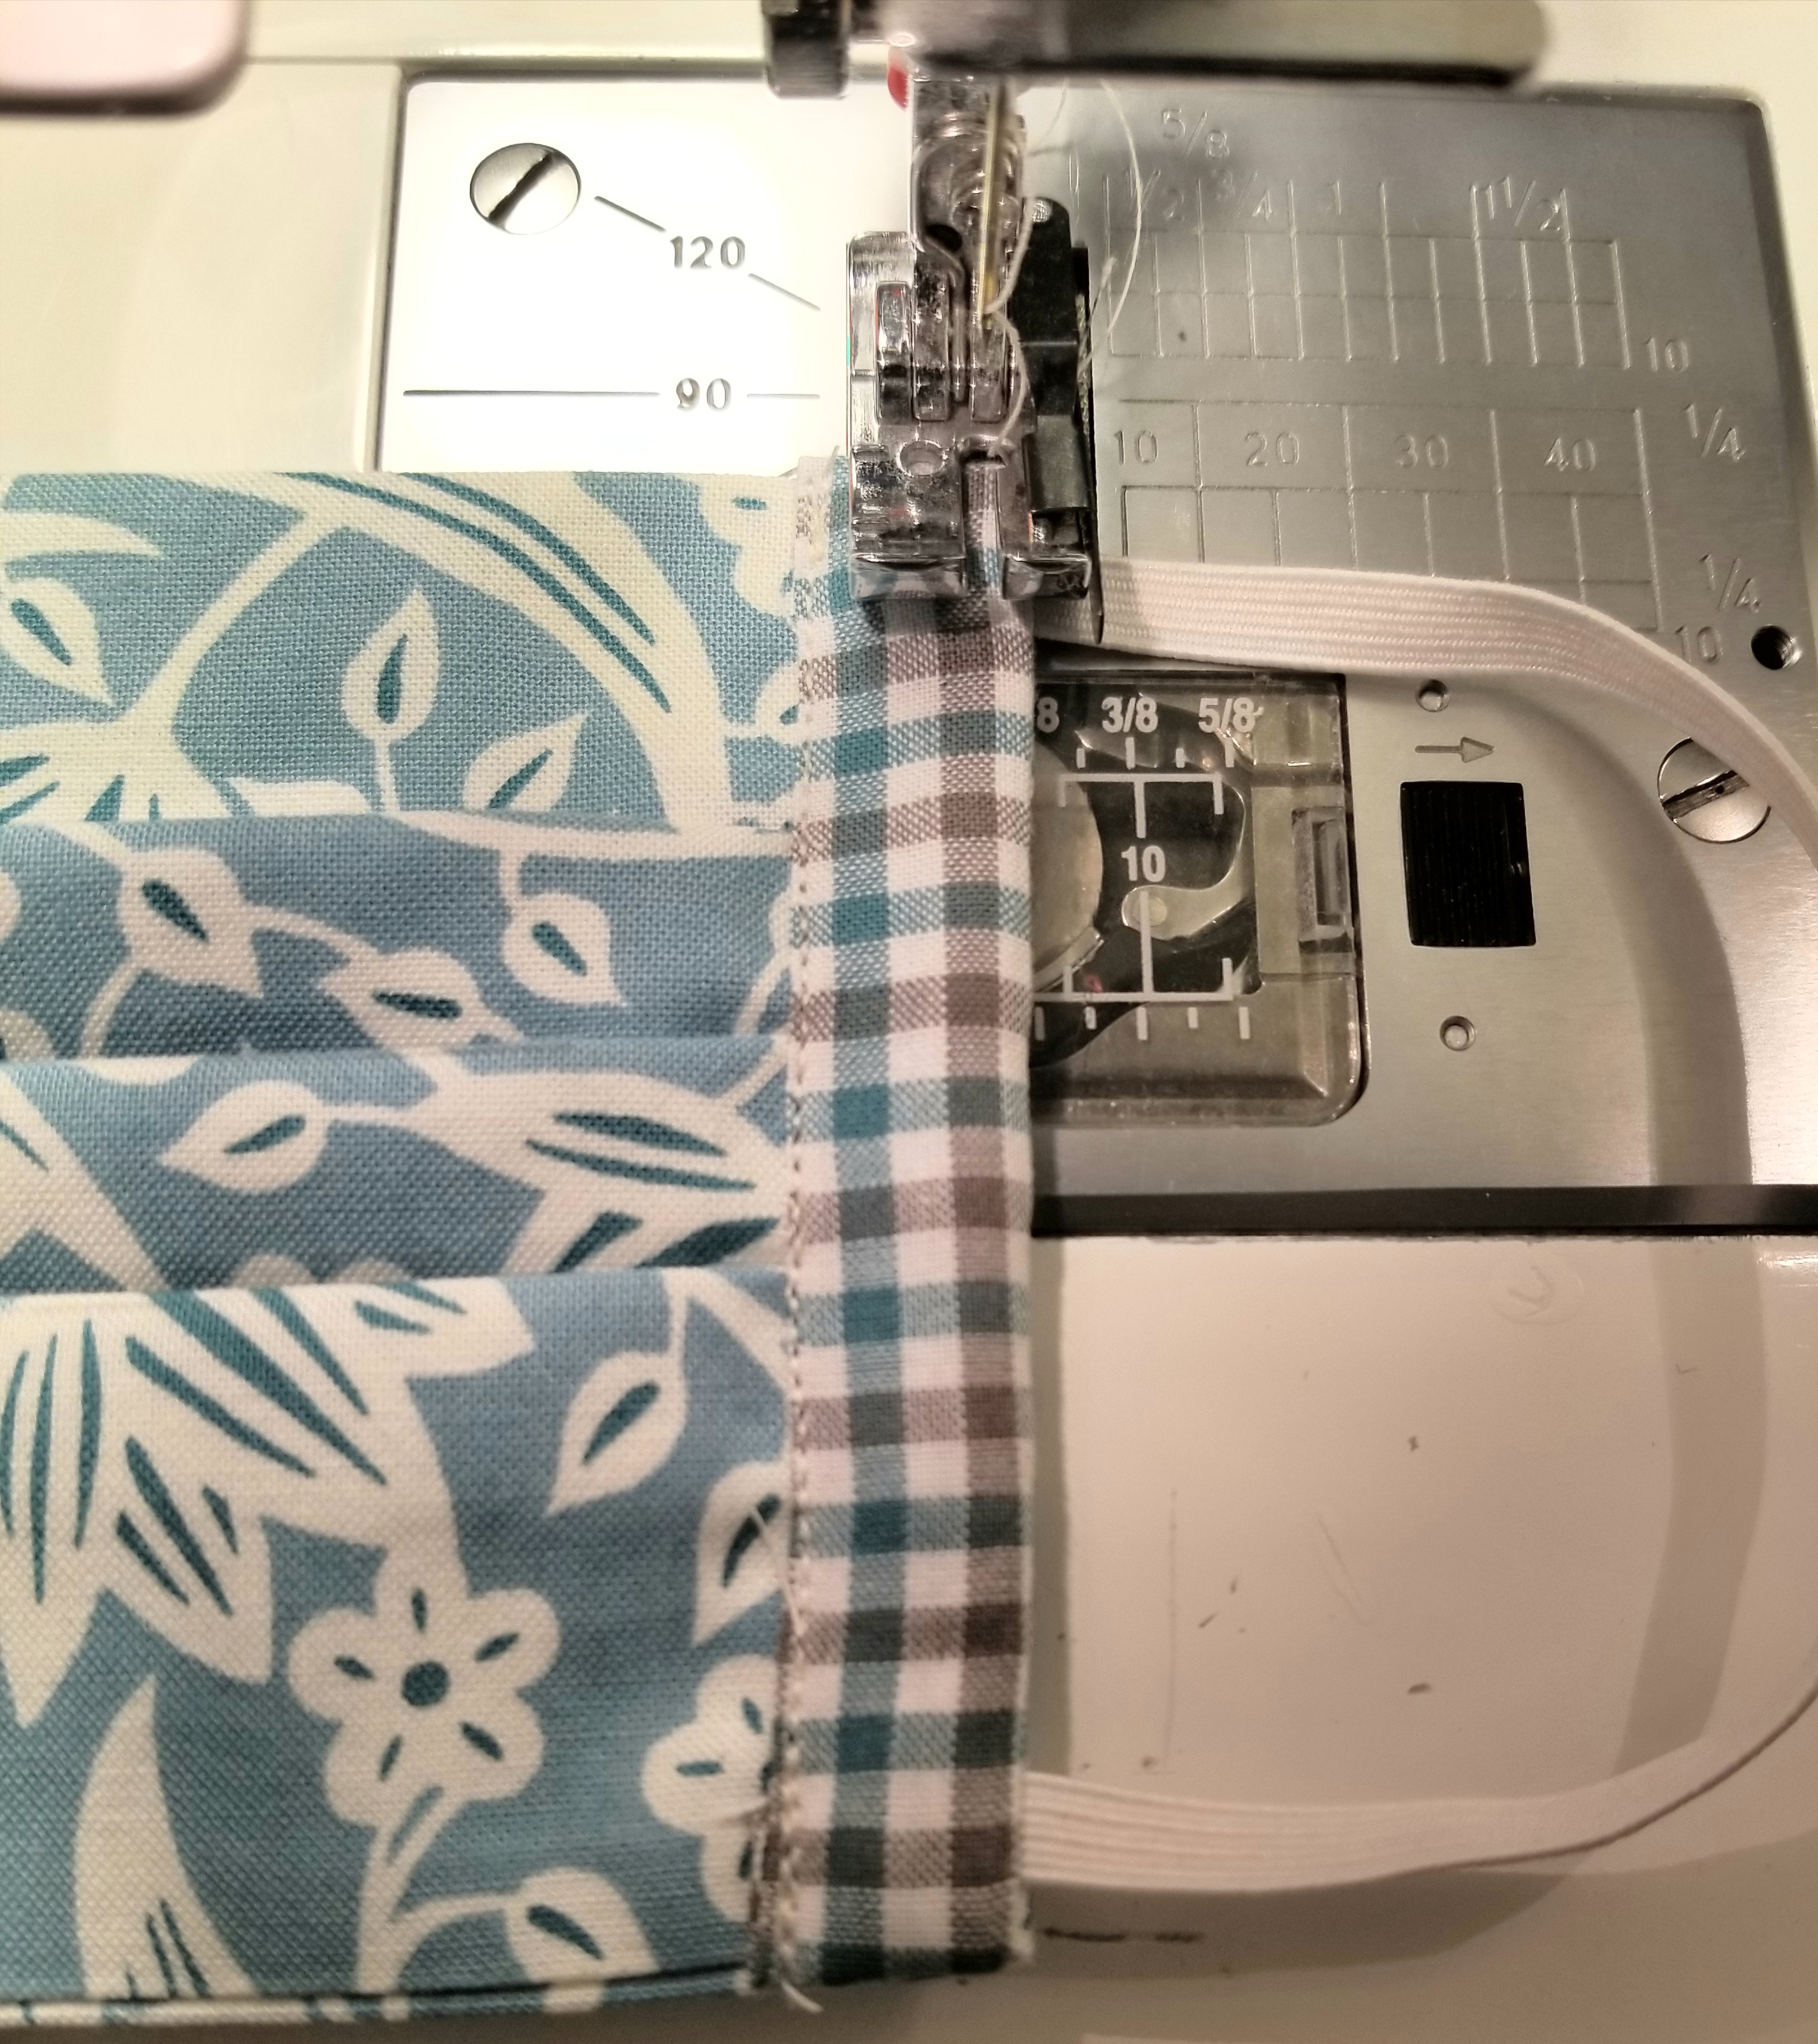
This step isn’t necessary. It just gives it a nice finished look, and helps to give that elastic a little extra stability. Stitch down the edge of the mask close to the elastic side.
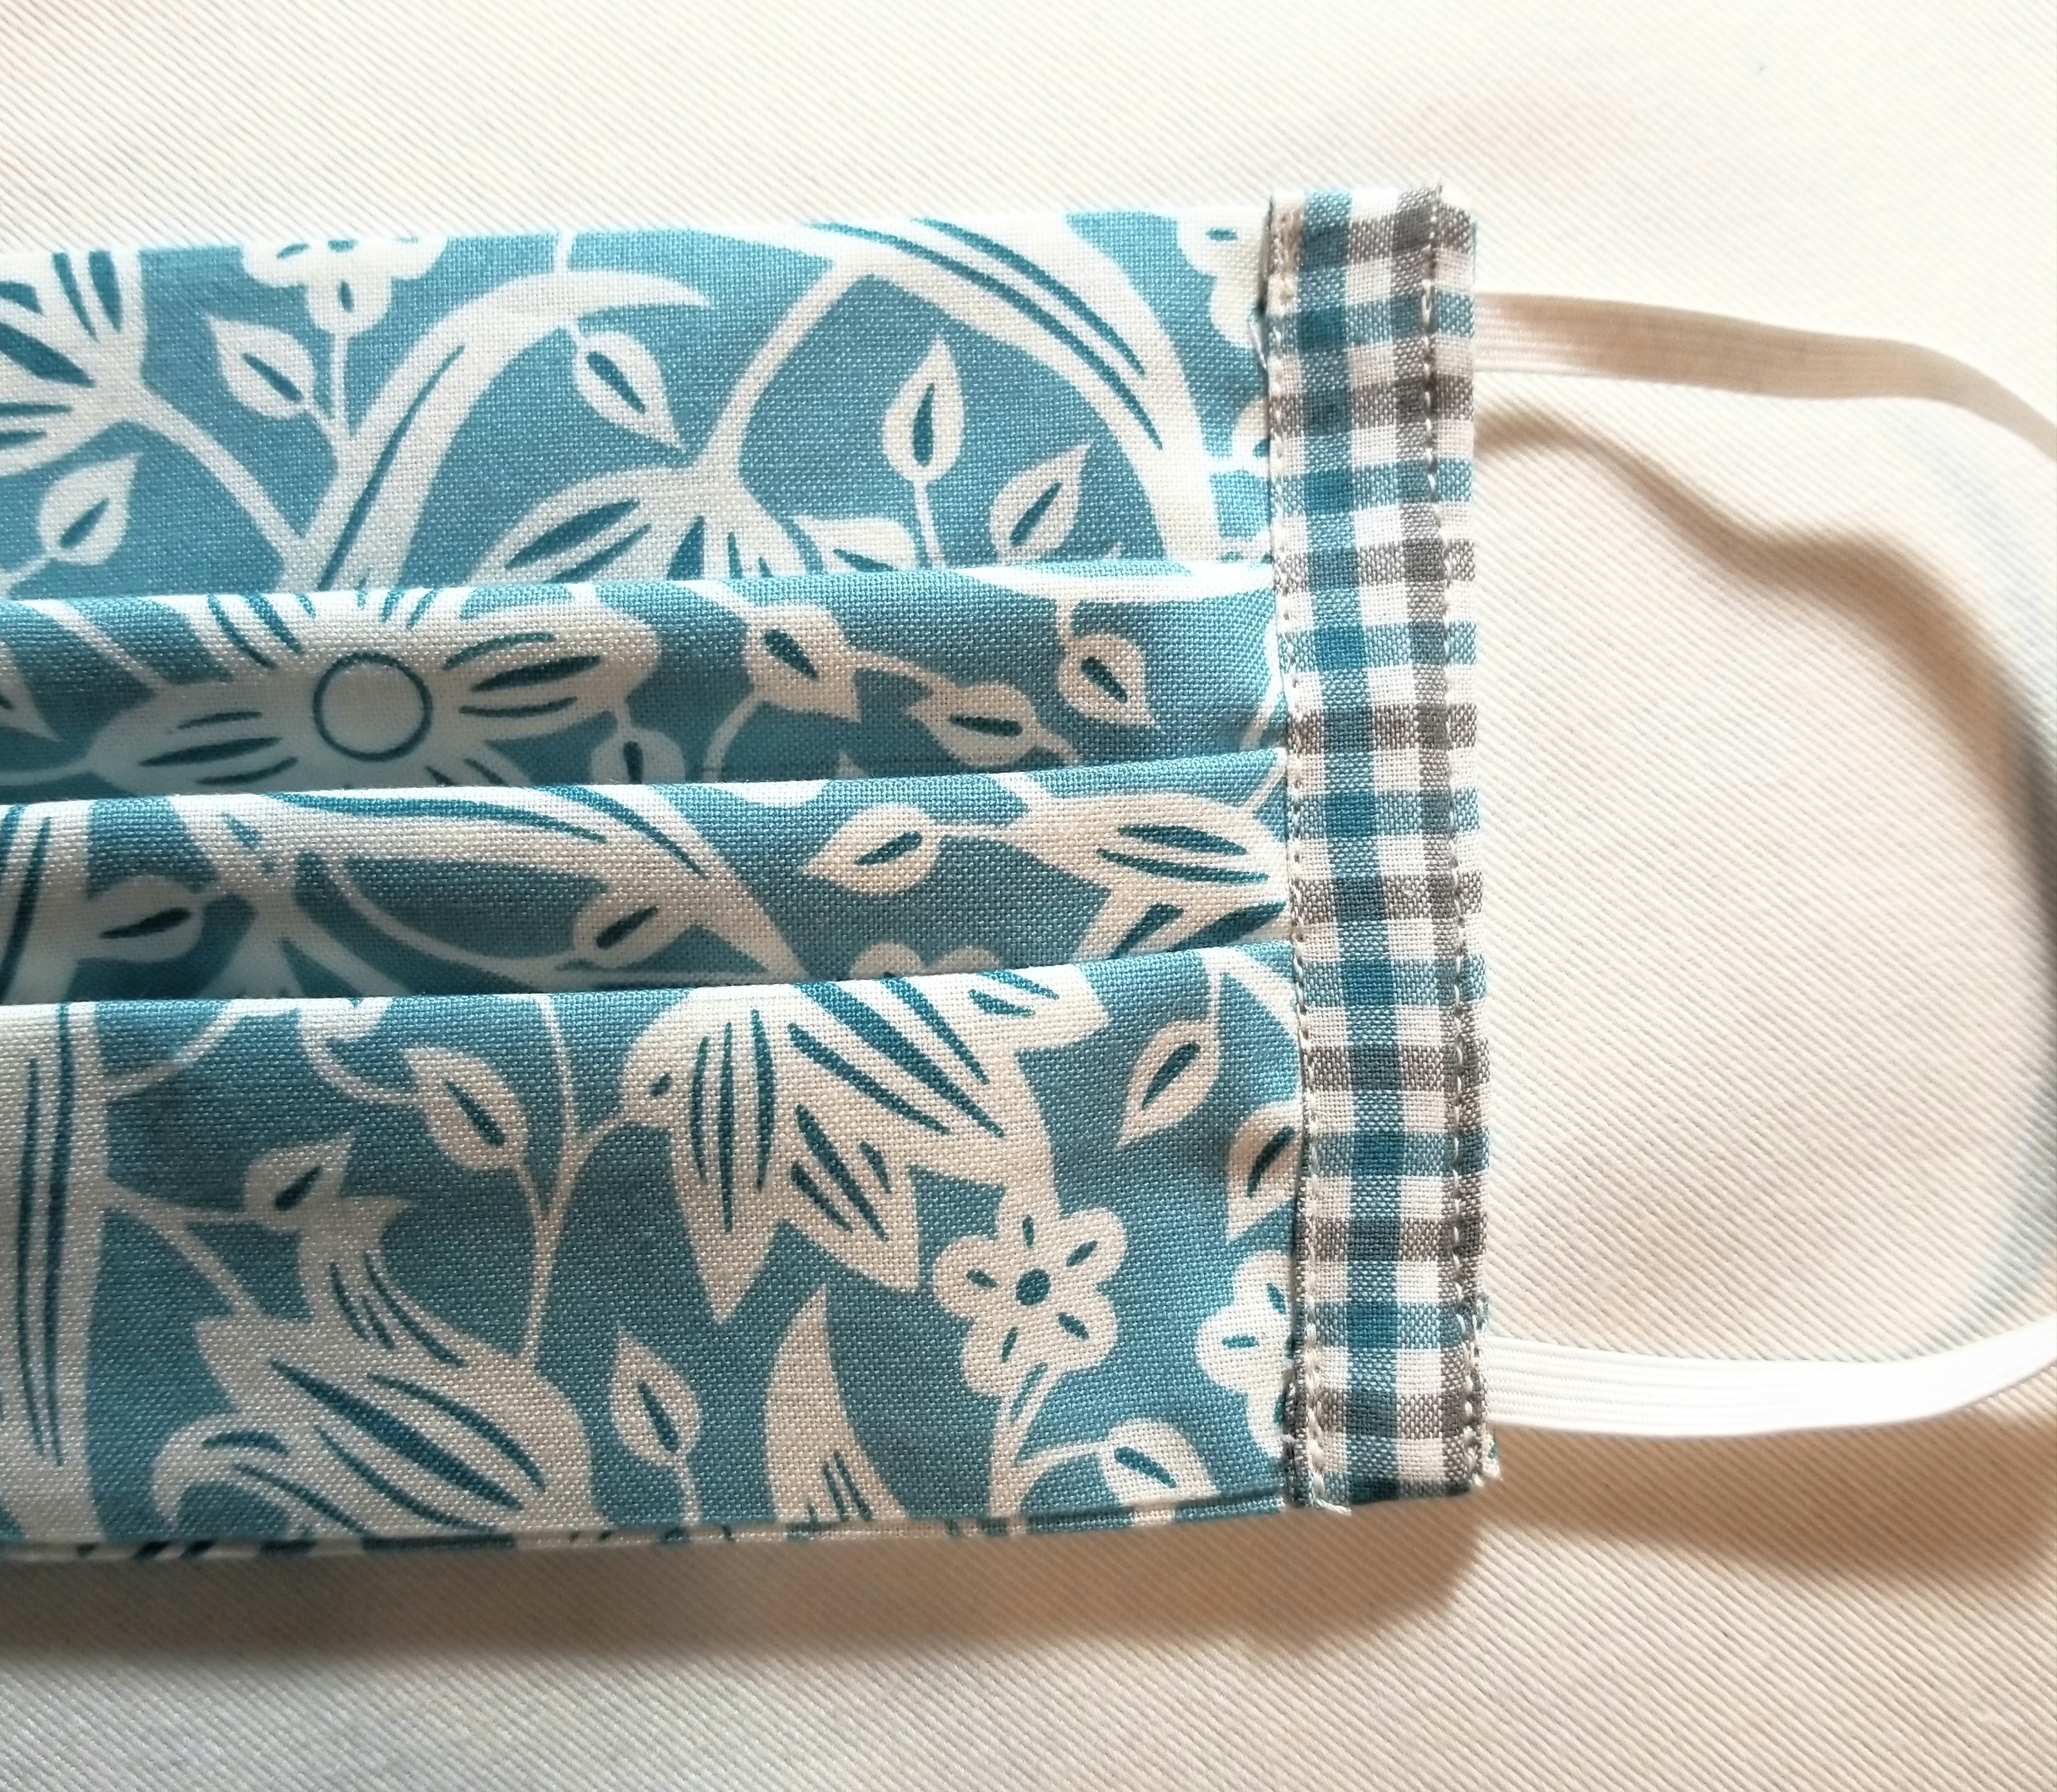
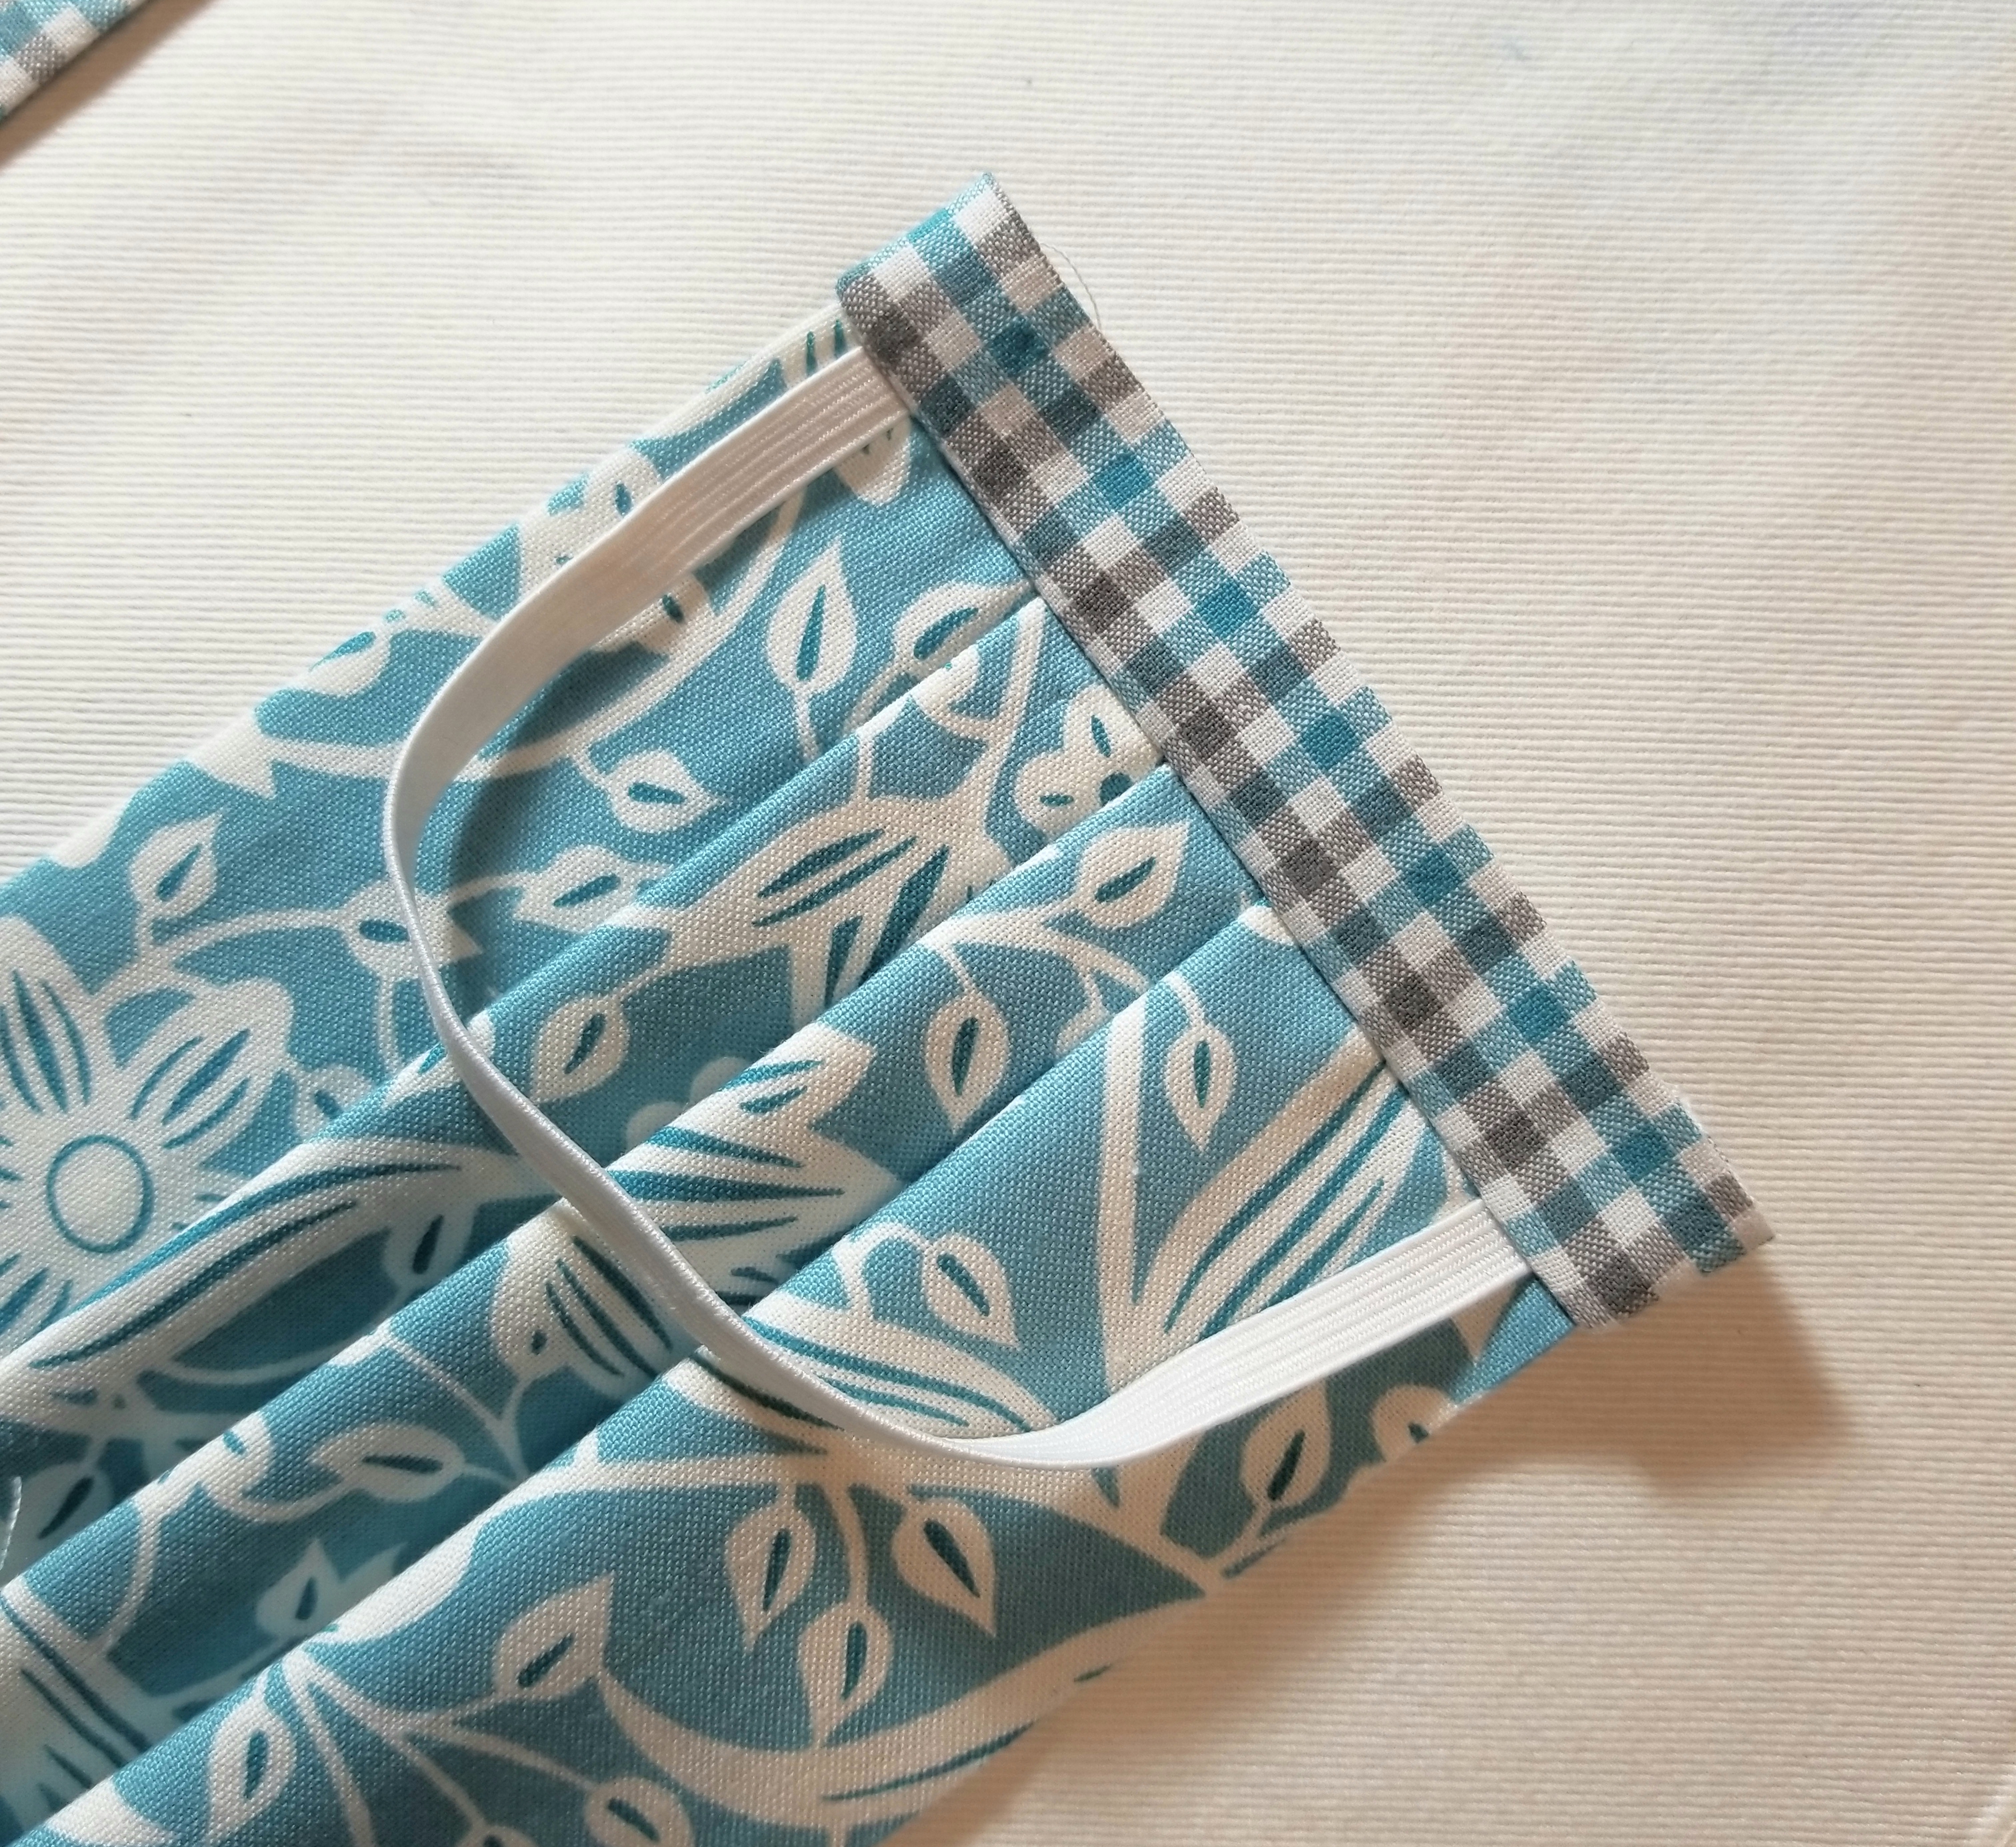
The front of your mask should now resemble the above picture.

The back of your mask should look like this. Following the previous steps, attach the remaining accent fabric piece to the other end of the mask.

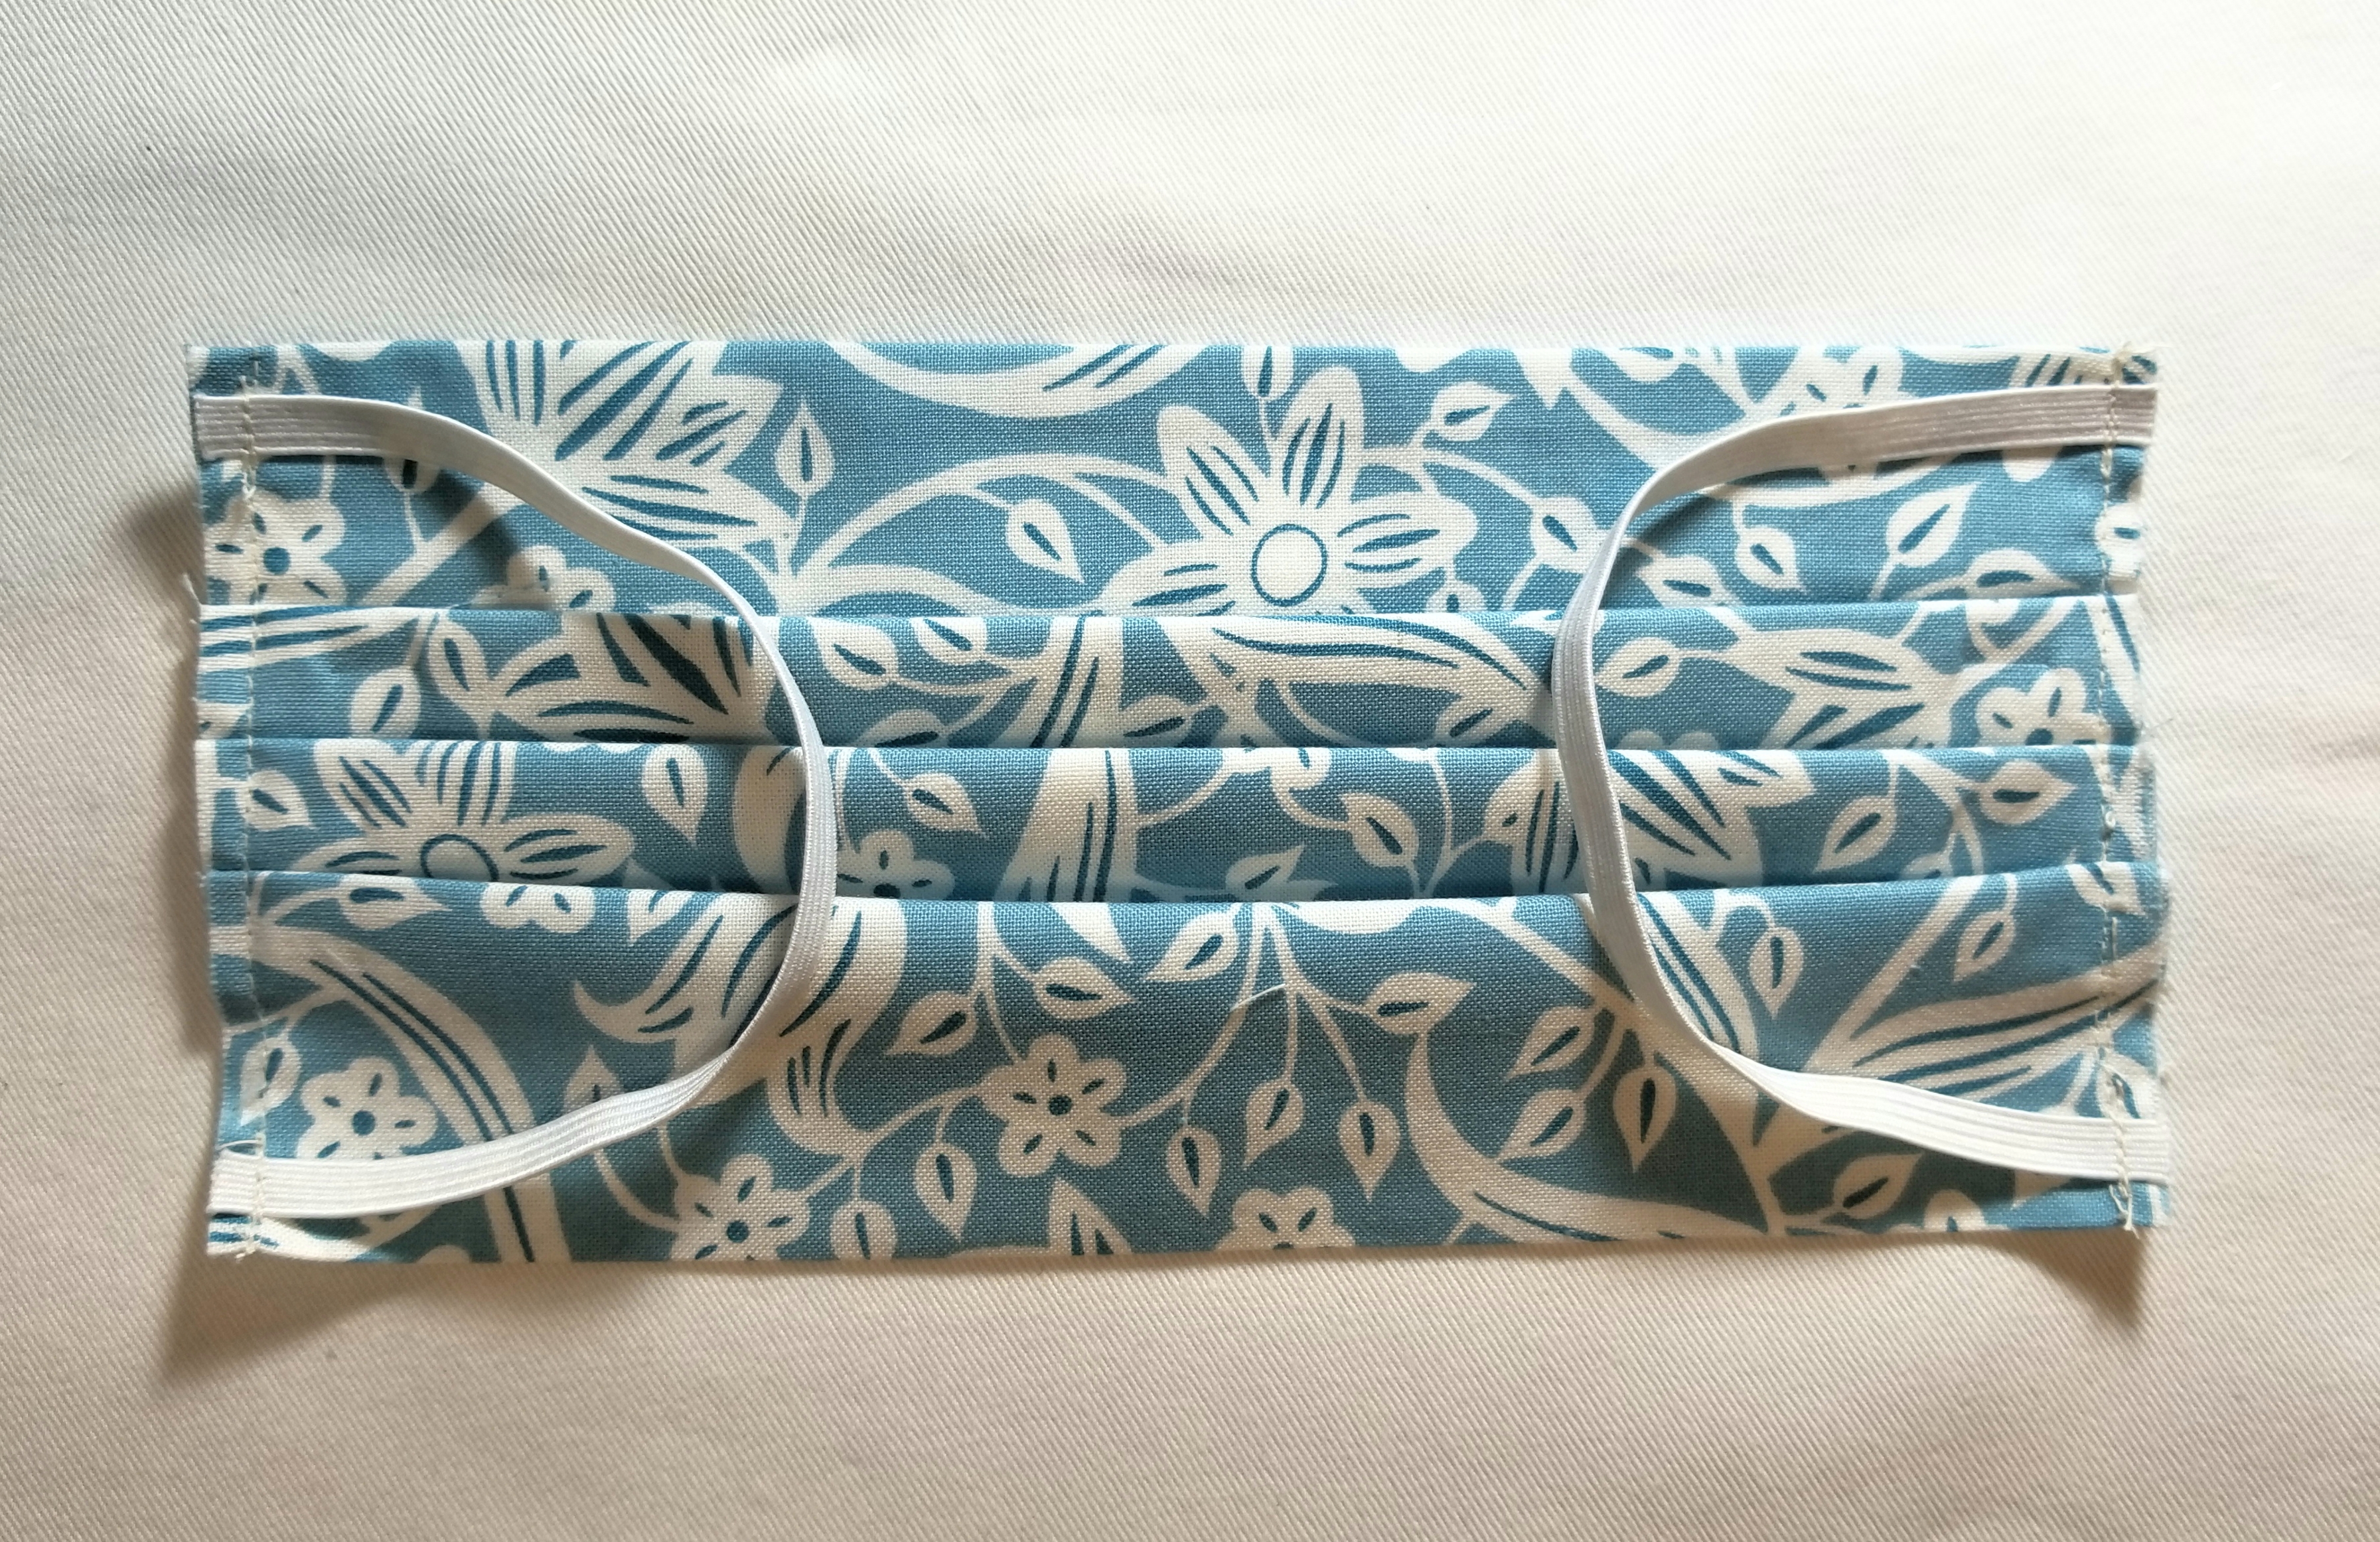
You should now have a reusable, washable mask that measures approximately 4″ x 7″ (unopened).
It took a few hours to put this free tutorial together for you. For this reason, I am greatly appreciative for any mentions that you can give me if you should use this tutorial. If you post a picture on social media, you can use the hashtag: #buttoncountermask. Feel free to share this page, and please tag me in your pictures so that I can see your beautiful creations. Last, I appreciate constructive criticism, so if you notice something that doesn’t look right, or does not make sense, bring it to my attention. I am happy to clarify any steps where you may have questions.
Enjoy!
P.S. Obviously, the elastic length can be adjusted to your facial measurements.
EDIT (March 24 2020): Because this tutorial has recently been used on a large scale, I will be adding a few things here as frequently asked and answered questions, suggestions, and reminders.
- This tutorial was happily shared by me over a year ago. This is not a new tutorial created in light of the current virus pandemic. I am not in charge, nor affiliated with any organization or entity requesting masks to be made. There are multiple organizations that are using this tutorial for their requests. If you have any question regarding what their requirements are, you really, really, really need to ask them. Please understand that I cannot and will not tell you what you should use, or how you should make your mask different from my tutorial.
- Keep in mind also that there are multiple entities that are using this tutorial for their requests. One entity may have completely different requests regarding features than another entity. (for example one organization is requesting a 4 layer mask, while another is fine with the two layer, as their thoughts are that they can be doubled up or used as a cover or liner to another kind of mask.) So, there is no correct or incorrect mask. Who are you making your mask for? Those are the people to whom you direct your questions.
- CHILD OR BABY MASK: After much thought, I have decided that it is in my best interest to NOT supply a mask tutorial for anyone other than an adult. One of my reasons for this is that I feel that a mask could pose as a choking hazard, and I do not want to have any part of that scenario. My suggestion is that you really should ask each individual child’s doctor or provider what their guidelines are, and go from there.
- I will not be held responsible for any mask misuse or malfunction.
- ELASTIC OR TIES? The main reason why my tutorial uses elastic is so I don’t have to tie it behind my head and mess up my hair. That’s it. So, if you are making the tutorial, and you don’t like the elastic, or if the person who you are making your mask for, requests ties; by all means put ties in yours. My pattern is very easily adapted to your preferences. There are organizations specifically asking for elastic, and some that are asking for ties only.
- ELASTIC LENGTH: I have read that a few of you recommend longer elastic; however, mine ended up being slightly loose. Therefore, I will not alter my pattern. I have stated in the tutorial that elastic length will need to vary due to the fact that human heads are not uniform (Thank goodness).
- I don’t have a PDF or printable version of my tutorial. If I decide to do that, I will; but it will be in my own time. I have received many hateful comments (that I deleted) demanding that I provide this. I need to remind those few sour apples that I am under zero obligation to do so. If my absolutely free visual tutorial isn’t to your liking, I invite you to go find one that makes you happy. If you are a person who often finds themselves using the words ”I need you to…”, you might fall into this category.
- I am completely honored that many of you are using my tutorial, or even certain aspects of it to help people in need. Even if you are using a completely different tutorial or pattern and just stopped by to check this one out, I applaud you for being a maker during this time. I cannot express enough how happy it makes me feel to see so many humans getting together to do something for the greater good. Please continue being that human. Those are the best ones.
I am signing off now to take care of my family, who needs me now more than ever. Thank you all for your kindness and understanding. God Bless.

I have loads of 3/8″ elastic. Think that’s okay, or too wide? THere’s not much diff between the two measurements.
3/8 inch is perfect.
How about placing a COFFEE FILTER in the pocket? I am going to make them with a pocket and some twisted wire over the nose. I’ll send to my family with extra pieces of non woven lightweight interfacing if they chose to use additional filtering.
Coffe filter is paper. Would it hold up in laundry? But a great idea
Your example illustrated and taped was very helpful for each step. Next time making a tutorial I would use a bold contrasting color of thread so the steps would be visually easier to see. Aging eyes need all the help they can get! (Thats me) Thank you for the simplicity of this pattern.
Love this idea!
Very nicely done. I may make some for when I garden…. allergies.
Thank you for this tutorial. Tip: if you have a metal hem gauge (e.g. Dritz “Ezy-hem”) it makes the pleating process faster and eliminates the need to mark. Just press, pin, sew.
Pingback: How to make a Face Mask to help Health Care Providers - It's Always Autumn
Awesome! Great detail. Thank you so much
Mayor 84-year-old mother-in-law would like to make some masks I’m trying to print this off. But I can’t find a place for printing.
Pingback: DIY Face Masks -
Pingback: Do you have a sewing machine, and can you use it? You can be a hero and save lives – Oligarchs In Charge
Excellent tutorial! Our local animal shelter was requesting some of these – what is the finished size of the mask? I didn’t see it in the tutorial, although I may have missed it.
Thanks!
Thank you so much! I am eagerly awaiting your child mask tutorial too! Until then I will make our adult ones!
Thank for this tutorial! Very easy to follow. One of our local fabric shops are donating fabric for these masks. I’m a quilter so I have a large stash! Lol!! The nurses at the hospital started making them hence the fabric donation came about!! Thanks again!! 😊
What are the dimensions of a finished mask?
Pingback: On assignment | Carpe diem
Great tutorial! Just made the first one and I noticed 2 things. First: I think it might be better to add about an inch to the length of the elastic. It was so tight that it wouldn’t stay on. However, it could be because I have a larger size of elastic. The 1/4 inch was sold out. Second: The current measurement elastic length of 6.5 inches is perfect for my 8 year old. So, I will play around with it and see what the perfect length is with the size I have. My 76 year old mother works in the guidance office of a local high school. She will have to go back to work next week. Even thought the schools are closed for students, the faculty and staff are to report for work. Given my mothers age and her history of asthma, she will definitely need to a mask to reduce her exposure. I look forward to being able to provide several of these for her use.
Hi Rebecca,
These masks will not filter properly. I’m deeply concerned this misinformation is circulating. It could hurt a lot of people. This cotton design will not create the air-tight seal necessary to filter viruses (and airtight seals are often also an issue for those of us with asthma; I’m one), and does not contain the specially woven fabric that allows masks to filter viruses.These cotton masks, will not protect your mother, unfortunately, and health care workers advise against these kind of masks as they give the wearer and those around them a false sense of security.
Her workplace Must excuse or accommodate her. They could get into a great deal of trouble otherwise, especially as a school. If they insist and she chooses to go in, the best way to protect herself is with social distancing (6ft to avoid breathing in respiratory droplets from other folk who may have the viruses); holding meetings and conversations outside in open air where the virus can’t concentrate as easily; practicing excellent hand washing hygiene; avoiding touching her face; and washing hands and showering once arriving home.
I greatly encourage her to remain home and isolate as a senior and also as a fellow asthmatic. A good deal of economic support is being offered right now as so many people, including those who aren’t vulnerable, are encouraged to stay home at this time to help reduce the spread of illness.
This free class on COVID-19 offered by Future Learn is a good source of information and support: https://www.futurelearn.com/courses/covid19-novel-coronavirus/1/welcome
Take Good Care,
Vel
Vel, I also have asthma. It’s one of the reasons why I created this mask in the first place. That, combined with my allergy suffering was a key reason for needing one. When I made mine, there were zero masks to be found. Zero. I couldn’t go outside because the pollen was so thick. For myself, wearing my mask was way better than not wearing one at all. Please understand the severity of the current situation. Hospitals are specifically asking for woven cotton masks to be made, because manufactured ones are becoming non-existent. There are individuals wearing disposable masks multiple times, and worse, there are health care workers being forced to share a mask. I truly appreciate and understand your concern. Nobody is saying anything about this mask blocking the covid-19 virus, but many health providers suggest that wearing one is better than not. My own sister is a Nurse Practitioner with over 15 years experience as an Emergency Room lead. I am hearing the news and requests for masks from the front line. The CDC is altering certain guidelines to accommodate them and others. In closing, Florence blessed Nightingale wore a single layer of woven cotton as a mask and dealt with some pretty hairy stuff, because it was better than nothing.
Hi Button Counter,
Thank you for the clarification (and time)–greatly appreciated! ❤
Can you make a note in the original post so folks are clearly aware of what you just told me: That these masks are one helpful precaution for those who *must* be within 6ft of others/assist those who are sick and don't have access to N95s– but are not equal to an N95 or a replacement for social distancing for the general public?
I know you made this tutorial for yourself pre-COVID19, and it's ultimately on the individual to keep themself informed…
…But I ask you to make a note in the original post because improper mask use/understanding is a big issue (even pre-pandemic). And during this pandemic helping each person understand information better helps keep everyone safer. ❤
Again, I really appreciate the clarification and am glad to see an effort to help.
I'm just concerned that it's easy, especially when we're all nervous, for the helpful idea that these masks, following local hospital guidelines, will help our health careworkers during a shortage of N95s… easily becomes the concerning idea that these masks will protect the gen. public from catching, and spreading, COVID19.
I think it would make a big difference to note the distinction and how these masks are being used in hospitals, and can be used safely by individuals *already taking social distancing precautions and good handwashing hygiene* during the COVID-19 outbreak. It would also mean this won't keep popping up as this fully clarifies all concerns I, and other commenters, are raising. 🙂
Thank you again for your time, effort, and thoughtfulness! ❤
Vel
Vel, my tutorial has nothing to do with the current viral pandemic, other than hospitals using the pattern for their request. Please understand that I will not be providing any medical related advice whatsoever. I am a quilter and sewist. My blog will not be used as a medical advice platform. I completely understand your concern, I would request that you utilize your social media outlets to spread the word. Thank you again.
Vel-
-you very obviously have knowledge regarding bacterial versus viral load, transmission and the requirements needed in PPE for those in need of it for personal or professional use. As we all should be aware, surgical masks, N95 masks and gowns should be reserved for our healthcare workers, paramedic/firefighters & police officers who are on the frontlines of serving to fight against the spread of COVID-19, caring for those who have already been affected and trying to slow and lower the curve of its spread.
-Since this tutorial has been shared countless times over and by many, many different entities…As an RN, I’ve personally seen it shared by 2 of my local county critical access hospitals which are government funded and in desperate need of supplies, by a local nursing home needing it for their patients, and on Facebook by friends showing other hospitals that are requesting masks, not to mention the front of the Joann Fabrics ad. I don’t believe anyone’s belief was that these “homemade”
masks were of a “professional grade and quality” that would equal that of an N95 respirator that is fit-tested to its wearer and shown to be effective against viral particles as long as it’s worn properly.
-Plus, the first time I myself saw this tutorial from Buttoncounter (and for which I am so very grateful-THANK YOU! so VERY much Buttoncounter!!! ❤️) I believe there was a disclaimer that in no way was there any medical advise being given and that this mask pattern was originally intended and designed for their own personal need in regards to allergies and not being able to find masks when the allergist suggested one be worn!
-I understand your concern Val that people be aware of the limitations of what is in front of them…BUT…there are also GREAT BENEFITS to this that you may have missed if you only glanced at this and didn’t choose to read everything that was in front of you.
Wishing health to all & an end to the need for homemade masks soon! (Unless its just because we like our pretty designs to wear while mowing, as I will be doing!)
Thank you. I am making these now to help with corona virus outbreak.
In other sites it states that surgical masks are not to be made of woven fabric. Could you verify this so that all the donated work is worthwhile. ?
“other sites” are not wrong, and ”other sites” are not right. Please verify with the entity for whom you are making these masks what they require.
But cotton is woven, linen is woven, polyester is woven…this doesn’t make sense. Regardless, best to check with your local needs office.
I was just wondering if you could use the fusible nonwoven light white interfacing between the layers. I’m going to try that today – Susie W
Thank you! Great pattern!
Thank you for creating this! I found a pattern earlier today for an “In the hoop” embroidery pattern, and it was much harder to create than yours. I appreciate the notes about how to measure and press the pleats – I had never done that. This was a great learning experience for me. Tomorrow I will start trying to make more of these so I can begin sharing with those that need them. Even after we get past the current crisis, these can be great for allergy sufferers when out and about.
Lots of folks are asking about kids sizes – here’s what I did. With 7 inches of elastic, it was a bit too small for me, so I added an inch. It fits, but it’s still tight. One more inch ought to do it! I might even try subtracting an inch from the overall size to create one for the kids. I’m thinking that since the local hospitals are asking for these, it might be worth it to make a few different sizes to fit everyone. This is very flexible! Thanks again for posting.
Thank you again for posting this. I remade my first one and it looks much better. After that I made myself cardboard templates so I could cut out several at once, measure, fold, pin, iron then sew, sew, sew. I’m not quick so I only got 10 done. I’m going to keep 2 and try to figure out where to take the others.
I’m making some Masks for a family Friend that’s a nurse. I’ve seen other masks that call for 3 layers. Will these masks be acceptable for nurses to wear in their hospitals? Or are they mandated to wear the ones with pockets?
What are the sizes for kid masks?
Several mentioned a PDF – how do you get one?
Thanks!
Any suggestions for what to use if you don’t have elastic? Have the fabric but all the stores are out of elastic.
You can use standard fabric ribbon and make them long enough to tie behind the head – which was the old fashioned way before elastic.
Maybe use elastic from an old fitted bed sheet?
Thank you so much for this tutorial. I will be making them for the local hospitals and doctors offices in our are. I like the idea of encasing a twist tie so it will be able to form to the nose area of the mask.
I read some comments before making my first mask. I made the following adjustments:
1 – to get the recommended 4 layers of fabric. I made 2 single piece of fabric masks (as instructed, folded and sewn, etc with binding. ! added elastic to 1 mask only. I made sure the second mask was the same finish dimensions as the first. Then I sewed together on 3 sides. This leaves 1 side (either long or short side – your choice) open. I choose to leave the top open. I now have a 4 layer mask, that an insert can be added and it’s reversible! (used 2 different fabrics plus 3rd fabric for binding on sides with elastic. Feel it is a little small and will add an inch or two to the long side for next mask. Thanks, this is a quick and easy pattern. Fun too.
Love this pattern and have made several already. If the following attachment is to be believed, you could add a pocket and slip in a piece of vacuum cleaner bag for better protection. https://smartairfilters.com/en/blog/best-materials-make-diy-face-mask-virus/
Pingback: A Walk, A New Quilt and The New Normal
Dear Button Counter,
Your work is beautiful.
I implore you to add a note to your tutorial that these masks–like any homemade cotton masks ****will not filter viurses and must not be used to protect against COVID-19**. Masks must be airtight and include melt blown fabric to filter viruses like COVID-19.
Please see this report on manufacturing effective face masks:
https://www.wbur.org/hereandnow/2020/03/19/face-mask-shortage-coronavirus
Social Distancing (6ft or more), good hand washing hygiene, avoiding touching our Faces, and cleaning surfaces regularly are the best way to protect ourselves–and others–from contracting and spreading COVID-19.
See the CDC’s page on prevention: https://www.cdc.gov/coronavirus/2019-ncov/prepare/prevention.html
If a mask is required an N95 must be used. These are manufactured with melt blown fabric to filter viruses, and fitted to faces with metal strips to create airtight seals.
Many Thanks,
Vel
Vel, I don’t feel the need to alter my tutorial, as I do not suggest or promise any effectiveness whatsoever regarding viruses in the first place.
How would you suggest lengthening the elastic once the mask is done & it’s a tad too tight? My wife just made 12 masks for her unit and realized they’re a bit small once they were all done 😕
Pingback: Are You Crafty? Consider Making and Donating Surgical Masks – One Thing You Can Do
Merci beaucoup pour votre sens du partage et d’aider les autres à se protèger. Bon courage à tous. Bonjour amical de France.
Thank you for your contributions. I’ll be making many of these from my stash. God bless you.
Thank you. Two of my daughters are nurses, my husband is a clinical laboratory scientist, a son-in-law works in the cath lab at a trauma center, and a son-in-law is a deputy. I just wanted to do something to help.
I HAVE MADE ABOUT 10 OF THESE MASK
Do you put something into the masks for filtration? How do they compare to surgical masks? Thanks!!
Thank you very much for posting this. I am going to make some for my family right away. God bless you.
Rose Grimm
I read where joann fabric was donating the fabric and elastic. Is this true and if so do I call my Joann fabric or walk in or what thank you.
NO they are not. giving away free fabric or elastic SOME stores have drop off boxes for the masks if you make a lot of them to donate but not all.
I found 100% cotton at JOann Fabrics online for 1.80 per yard.
Yes, they are in Peoria IL.
Yes, I picked up two free kits yesterday at Jo Ann’s in Amsterdam, NY each with fabric, thread and elastic for 5 masks. 🙂
I live in Albany, GA and our Joann’s also is giving away ready-made bags of pre-cut fabric, thread, and elastic. I think it’s a great thing!
Yes! The JoAnne Fabric in Peoria IL did have free material, and all supplies need to make 5 masks. One kit per person limit.
Pingback: How to Sew DIY Face Masks – Resources & Tutorials – Homeschool PDX
Thank you. Saved me a trip out in public. Looks very easy to follow. I’m getting started today.
Pingback: Coronavirus: Can homemade face masks prevent spread? – Dr Monique Tello
Thank you!
Thank you so much for making this tutorial -the pictures were helpful! I made 5 of these yesterday and found that it worked better for me to cut the 2 side pieces to be 2 1/4” x 6” because it was easier to sew down on the backside once they were sewn to the mask & flipped to the backside. I found the instructional cutting size of 1 3/4” x 6” wasn’t enough for me to work with. What I would also do differently would be to seam the two 8” edges, leaving an opening for a filter for this mask, rather than sewing the two 8” sides together, as instructed. All in all, these were GREAT instructions and a great starting point for my intended purpose. THANK YOU again for taking the time to create your tutorial!
Merv 15furnace filters
This is what you use in the mask? What do I need to do to use these? Do you cut them to size? How long are they good for? Thank you!!
Excellent suggestions. I, too, found 1 3/4″ too narrow for my preferences. I’m gonna try seaming the edges.
I also decided 2 1/4″ was the perfect size for me to work with earlier today! Interesting to see I’m not the only one. Great tutorial though!
Where is the link for the pdf file for this pattern. I would like to pint it out.
I have not created one. Any PDF created was done so without my permission.
The one with a PDF is a different site
Thank you. That makes perfect sense now.
Very simple instructions and easy to follow. Thank you for posting this a year ago so it is now available to us in this time of crisis. God Bless you! (Ps, I don’t bother changing out my pressure foot either 😉)
😆 you are a true friend.
If you can’t find twist ties for the nose piece you can use pipe cleaners as an insert. Vacuum cleaner bag is the most effective filter but you have to take into consideration the breath ability factor. Local hospital is using furnace filter material as filter insert.
I’m going to try this. Will comment after.
Thank you for this tutorial! It was very helpful and I feel can be altered very easily should it be deemed necessary!! Good luck, stay safe and healthy!
A nurse said it is best to use elastic if possible. Fabric ties could contaminate the users hair.
This is a matter of opinion. Some health providers are specifically asking for ties. Therefore, I want everyone to follow the guidelines that the individual requestor has put in place. Some places are preferring ties because bleach breaks down the elastic, and many are allergic to latex. It really depends on the source.