

My allergies have been incredible this year, and by that I mean that they have been worse than they have ever been. (Please, please, please do not suggest medical advice here. Much appreciated.) I see an allergy specialist who gives me 2 shots, 2-3 times a week to help with my symptoms. They have helped a lot; however, Juniper Ash (Cedar Fever!) here in Austin is 6 times worse than average this year, and boy oh boy, do I feel it. She suggested that I wear a face mask when I go outside to help reduce the amount of pollen that is going into my lungs and sinuses. After going to a few different stores to purchase some, I found that many other Austinites had already bought them out. No worries, right? I know how to sew. I will just make one. When I finished, I had many requests for a tutorial, so here you go:
Materials needed:

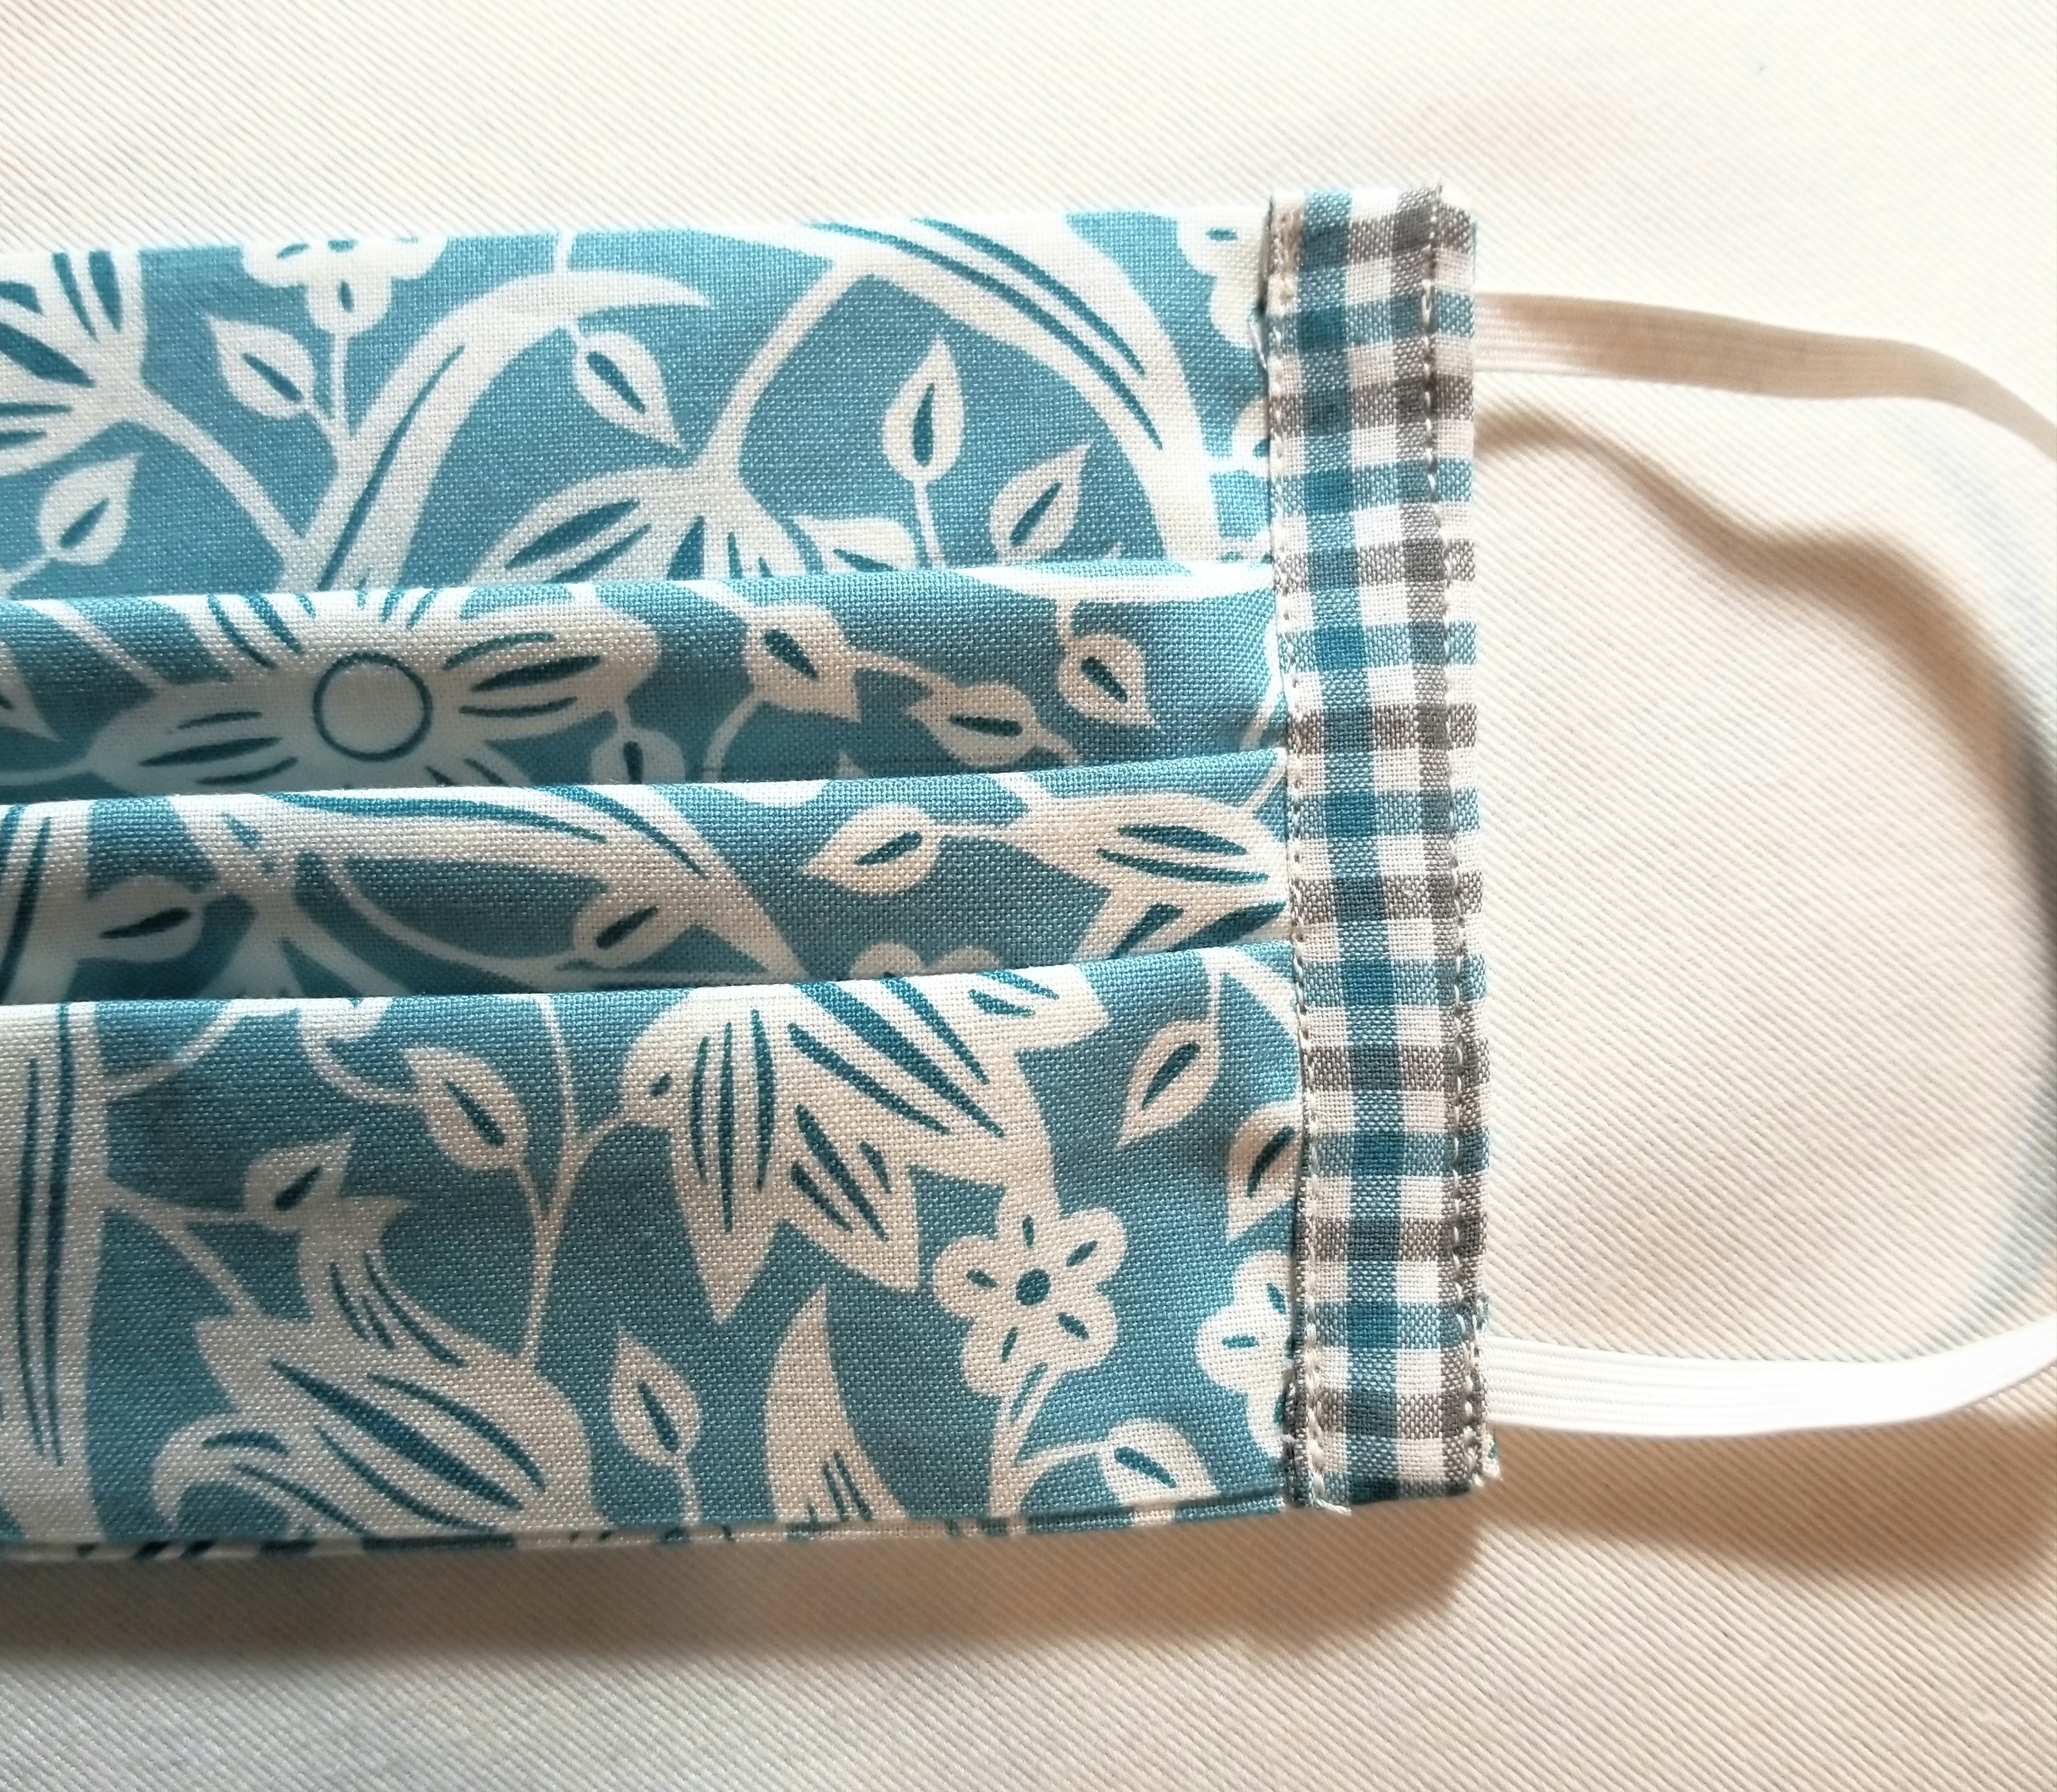
- 1 piece of fabric measuring 8” x 14”. Until you get familiar with this tutorial, I would suggest a non-directional print. One that has a scattered image printed on the surface such as the one shown.
- 2 strips of fabric measuring 1.75” (1 3/4”) x 6”. This will be the accent edge piece. It can be the same fabric as the main piece or a small-scale print or solid.
- Two pieces of 1/4” width elastic. These will be about 6 1/2” long.
- Ruler
- Fabric marking tool.
- Pins
- Scissors
- Sewing machine, threaded.
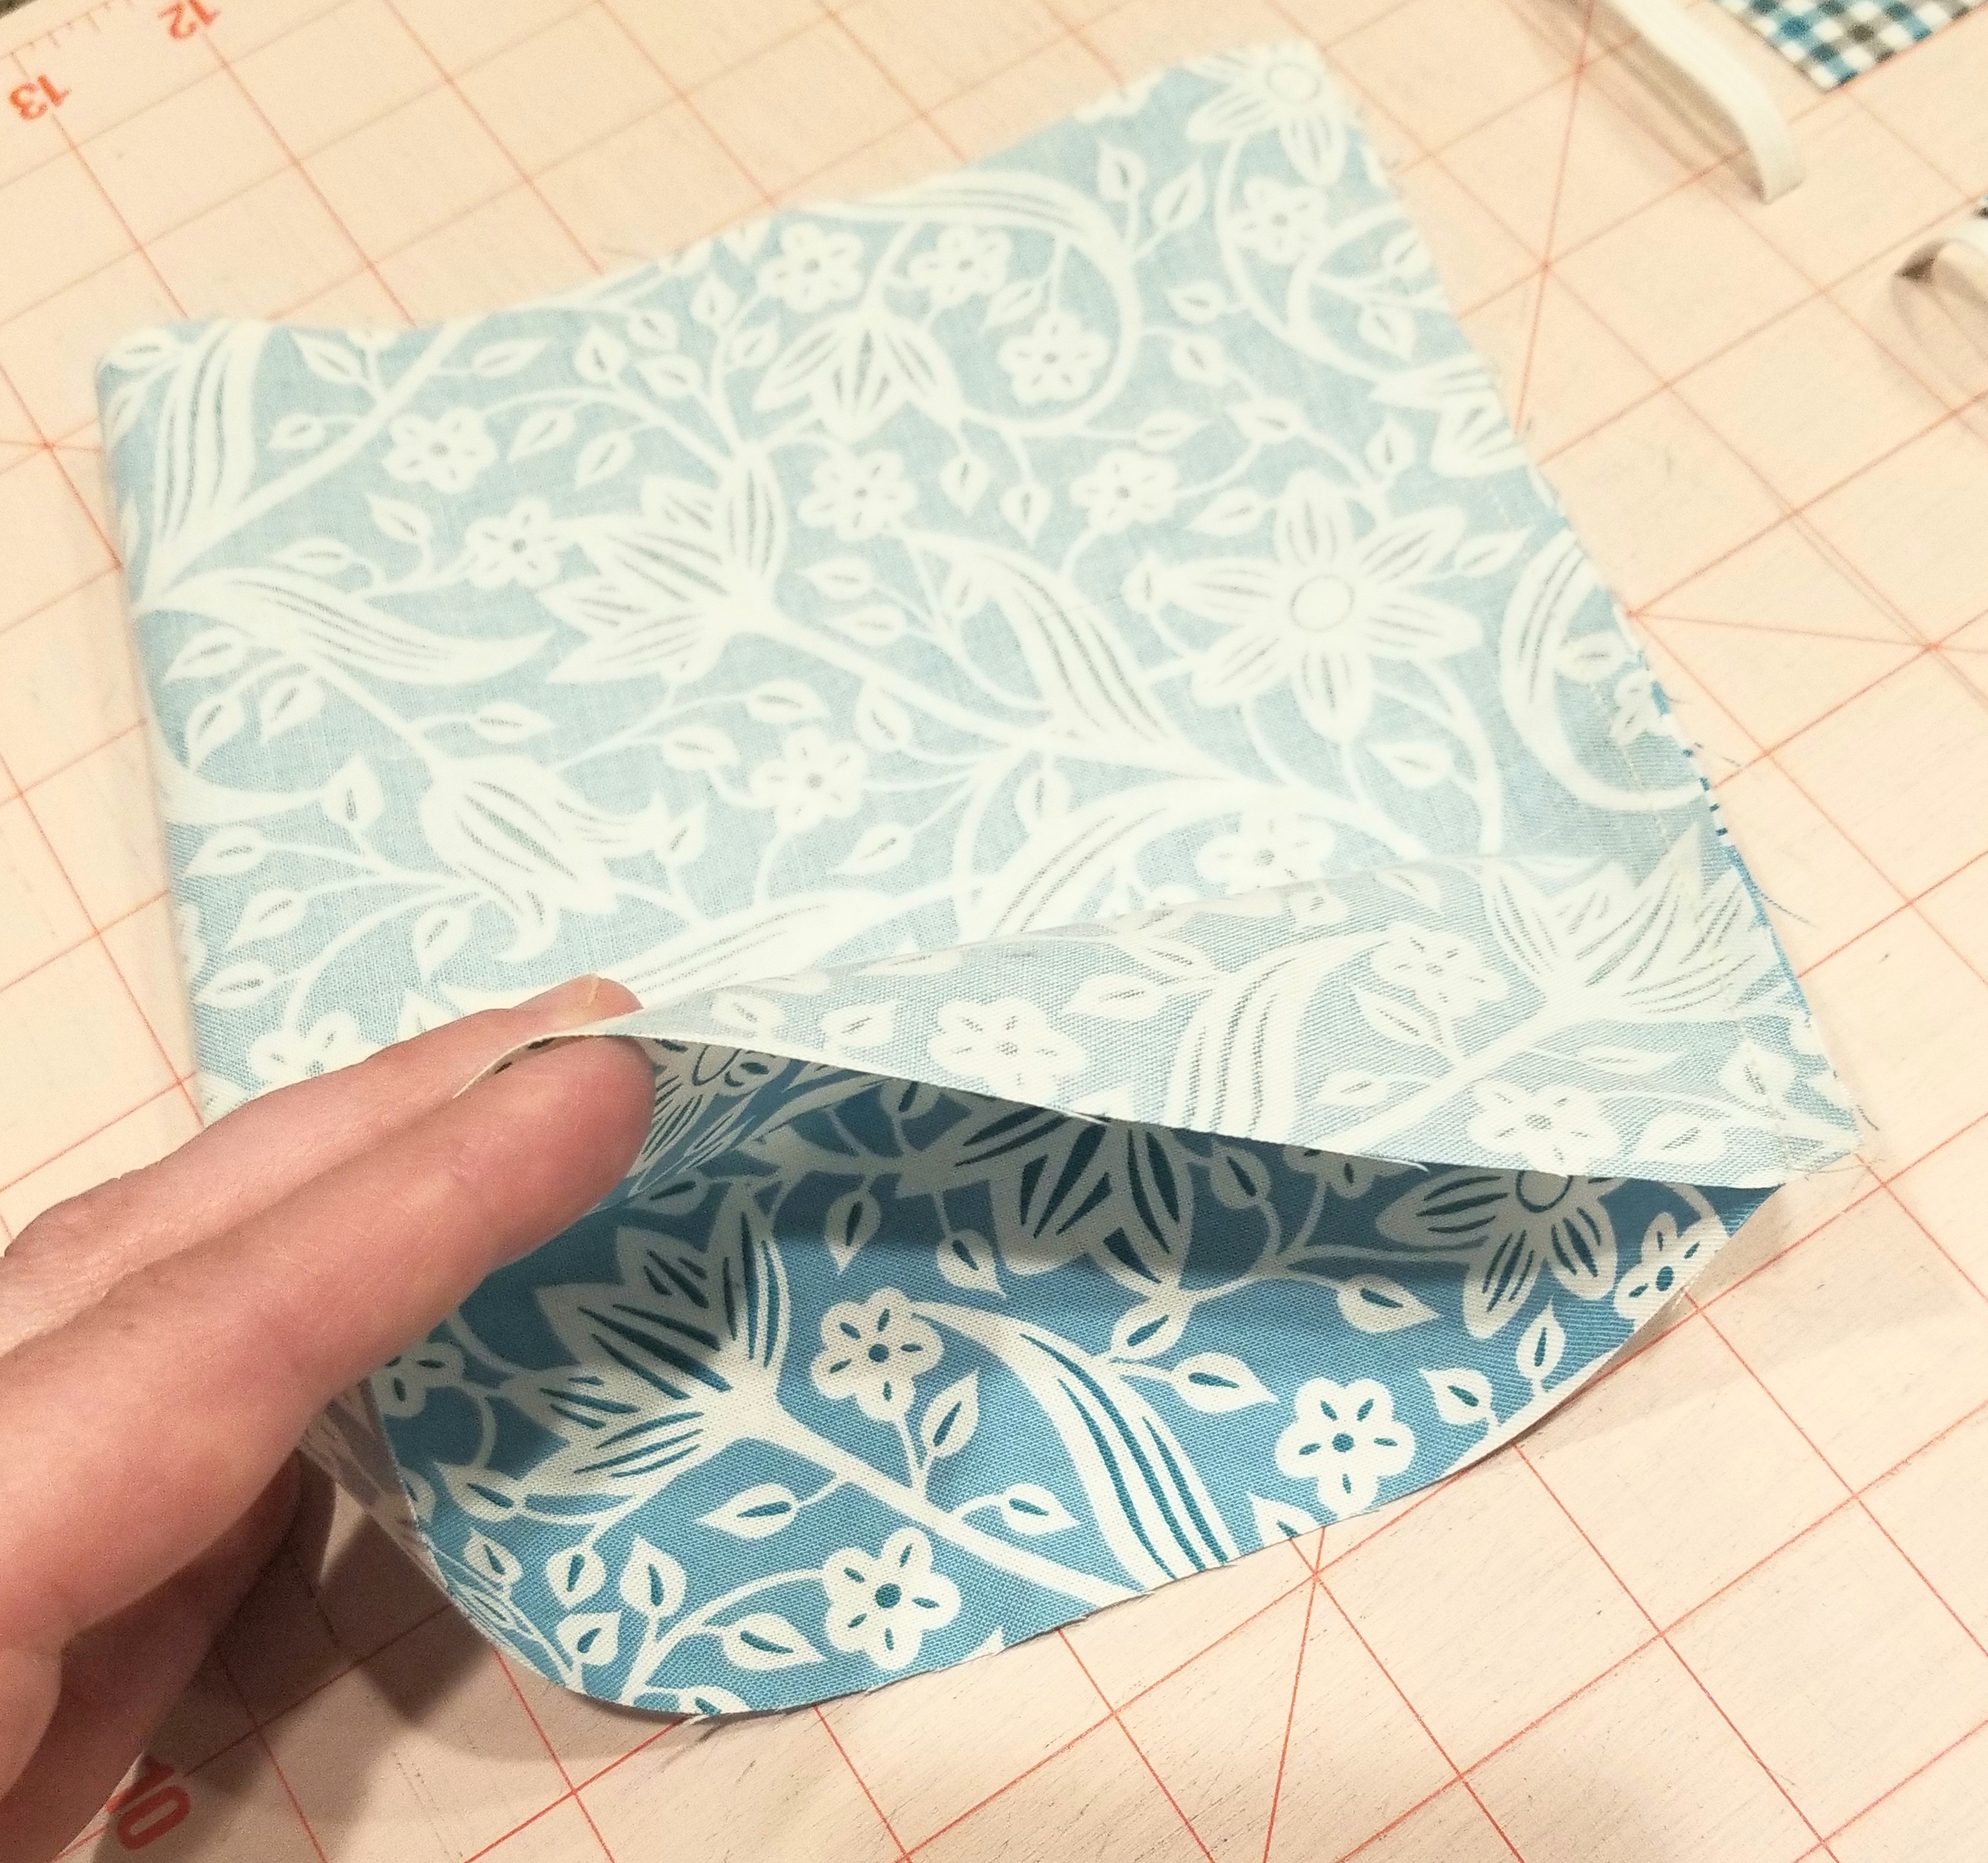
Fold the main piece of fabric in half, right sides together. Sew along the 8 inch width edge, using a 1/4 inch seam allowance.
Turn this tube shape inside out, so that the right side of the fabric is now on the outside. Press this flat, keeping the seam to one end of the flattened tube.
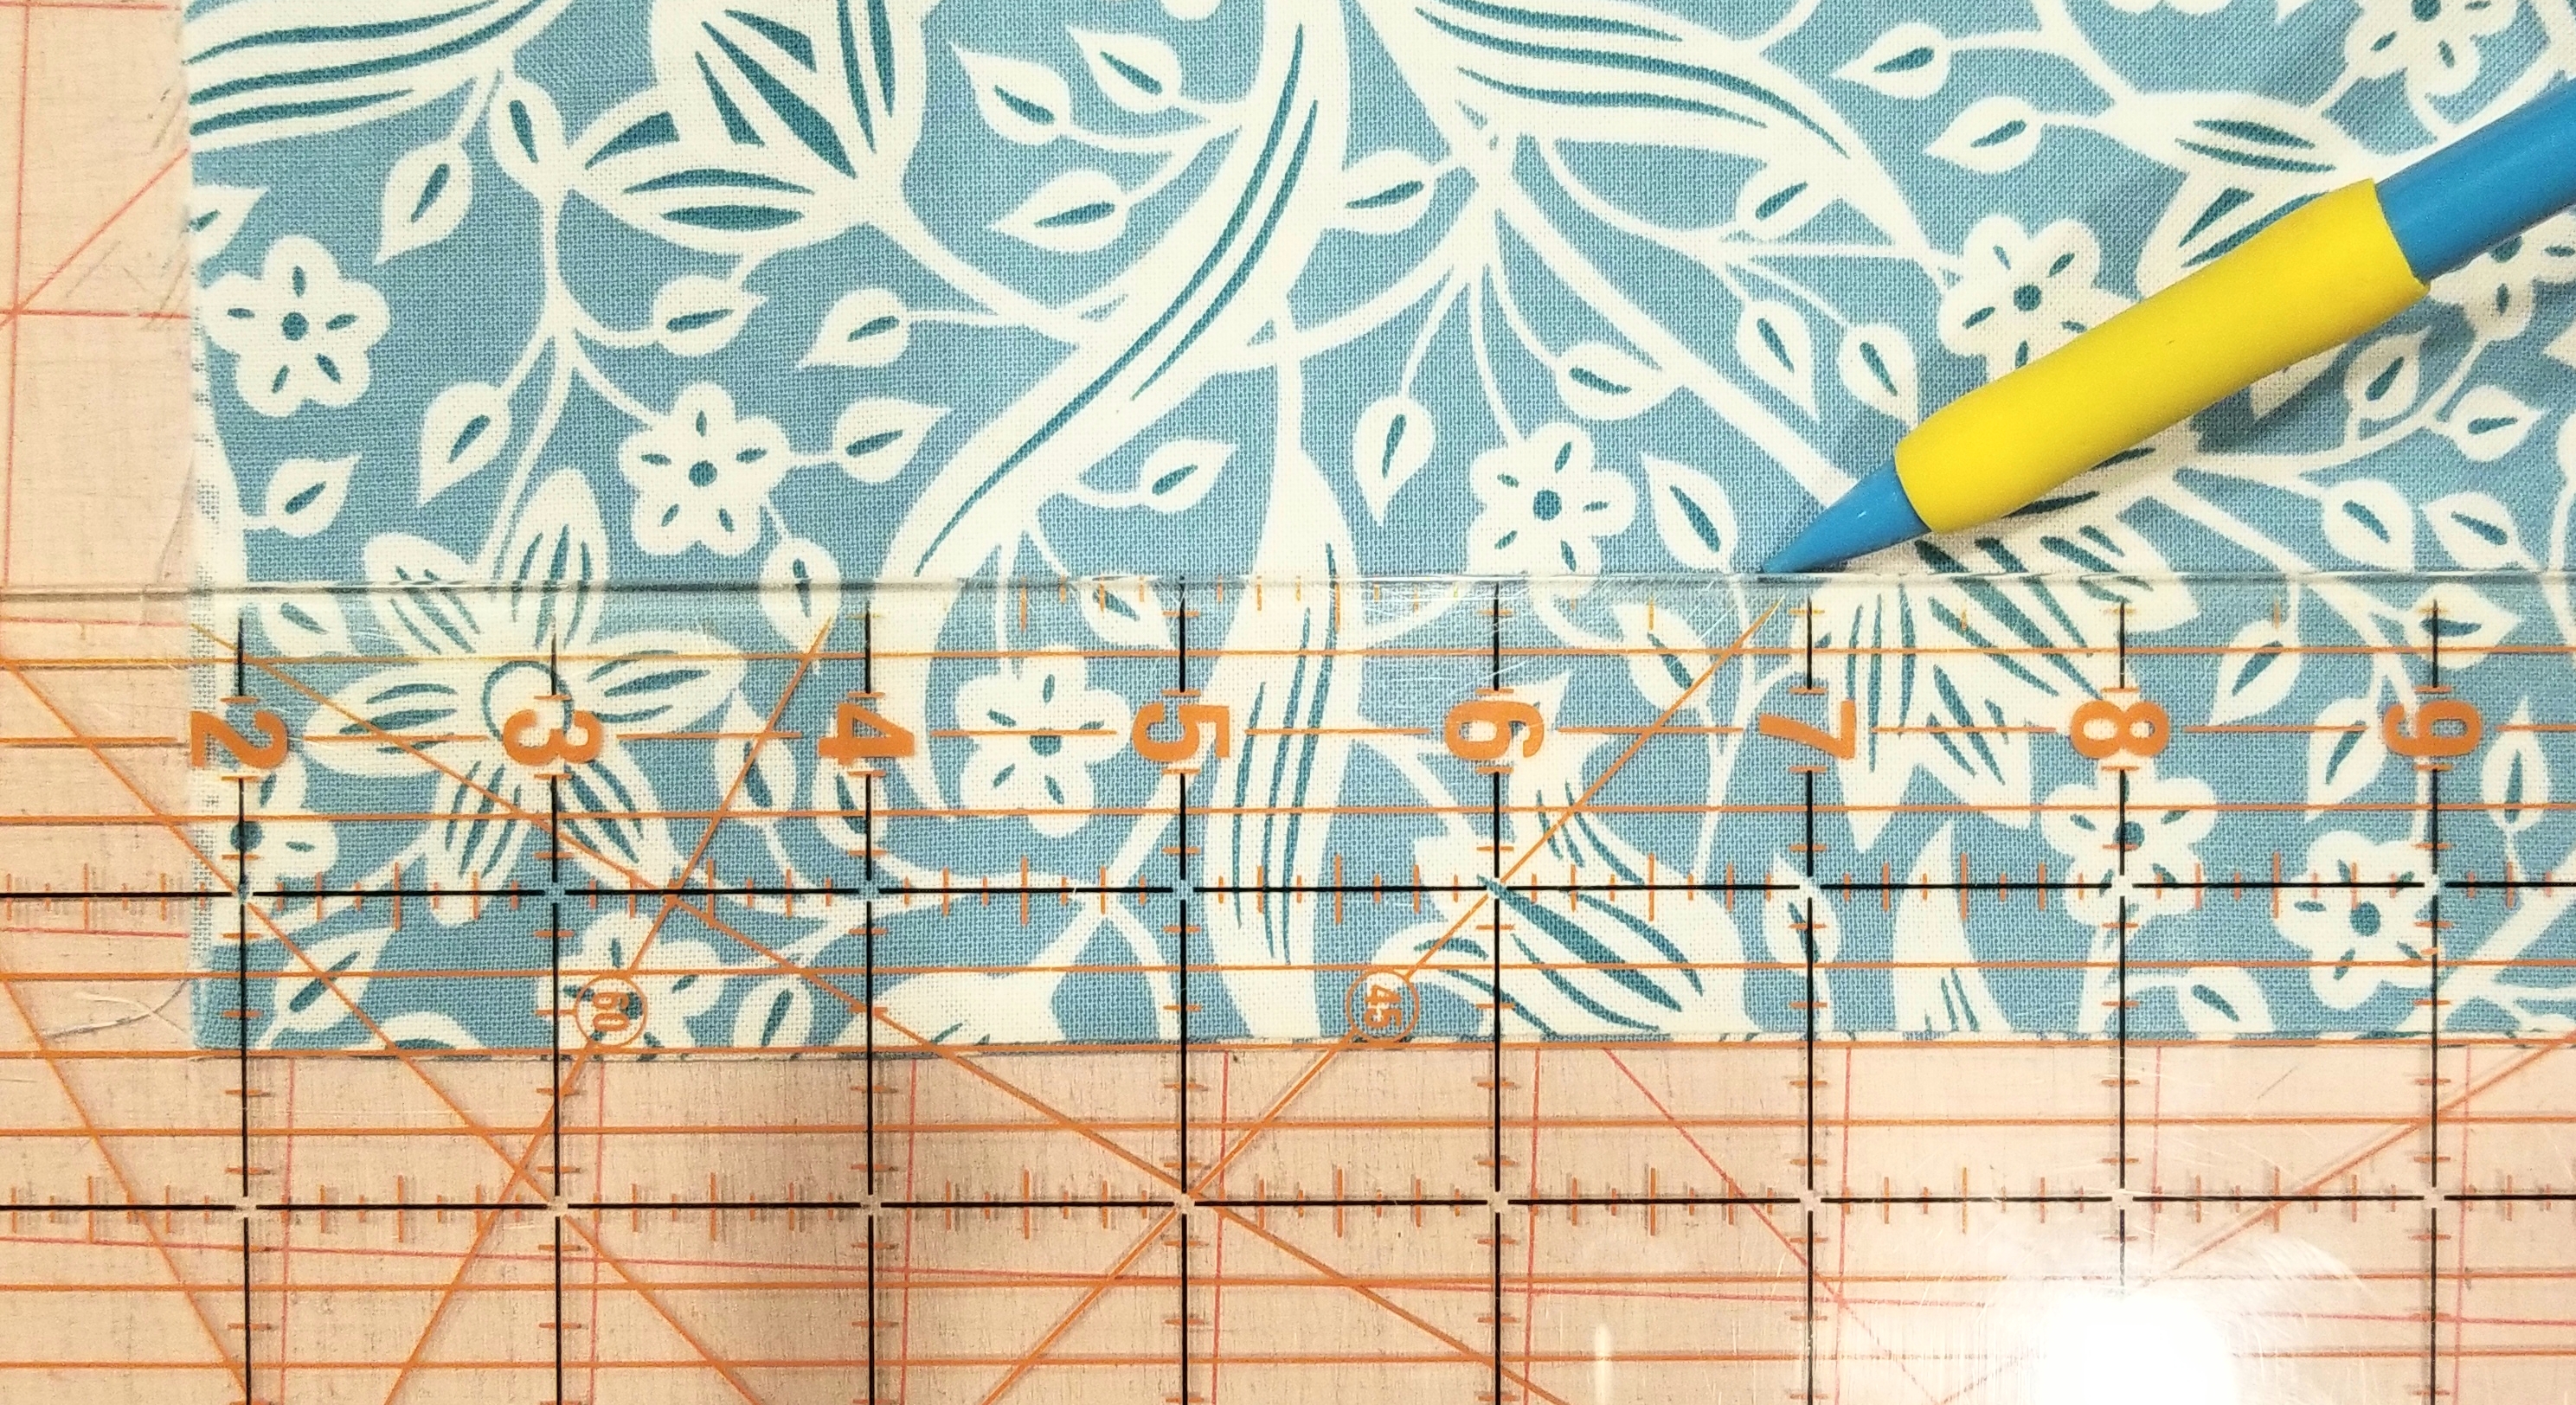
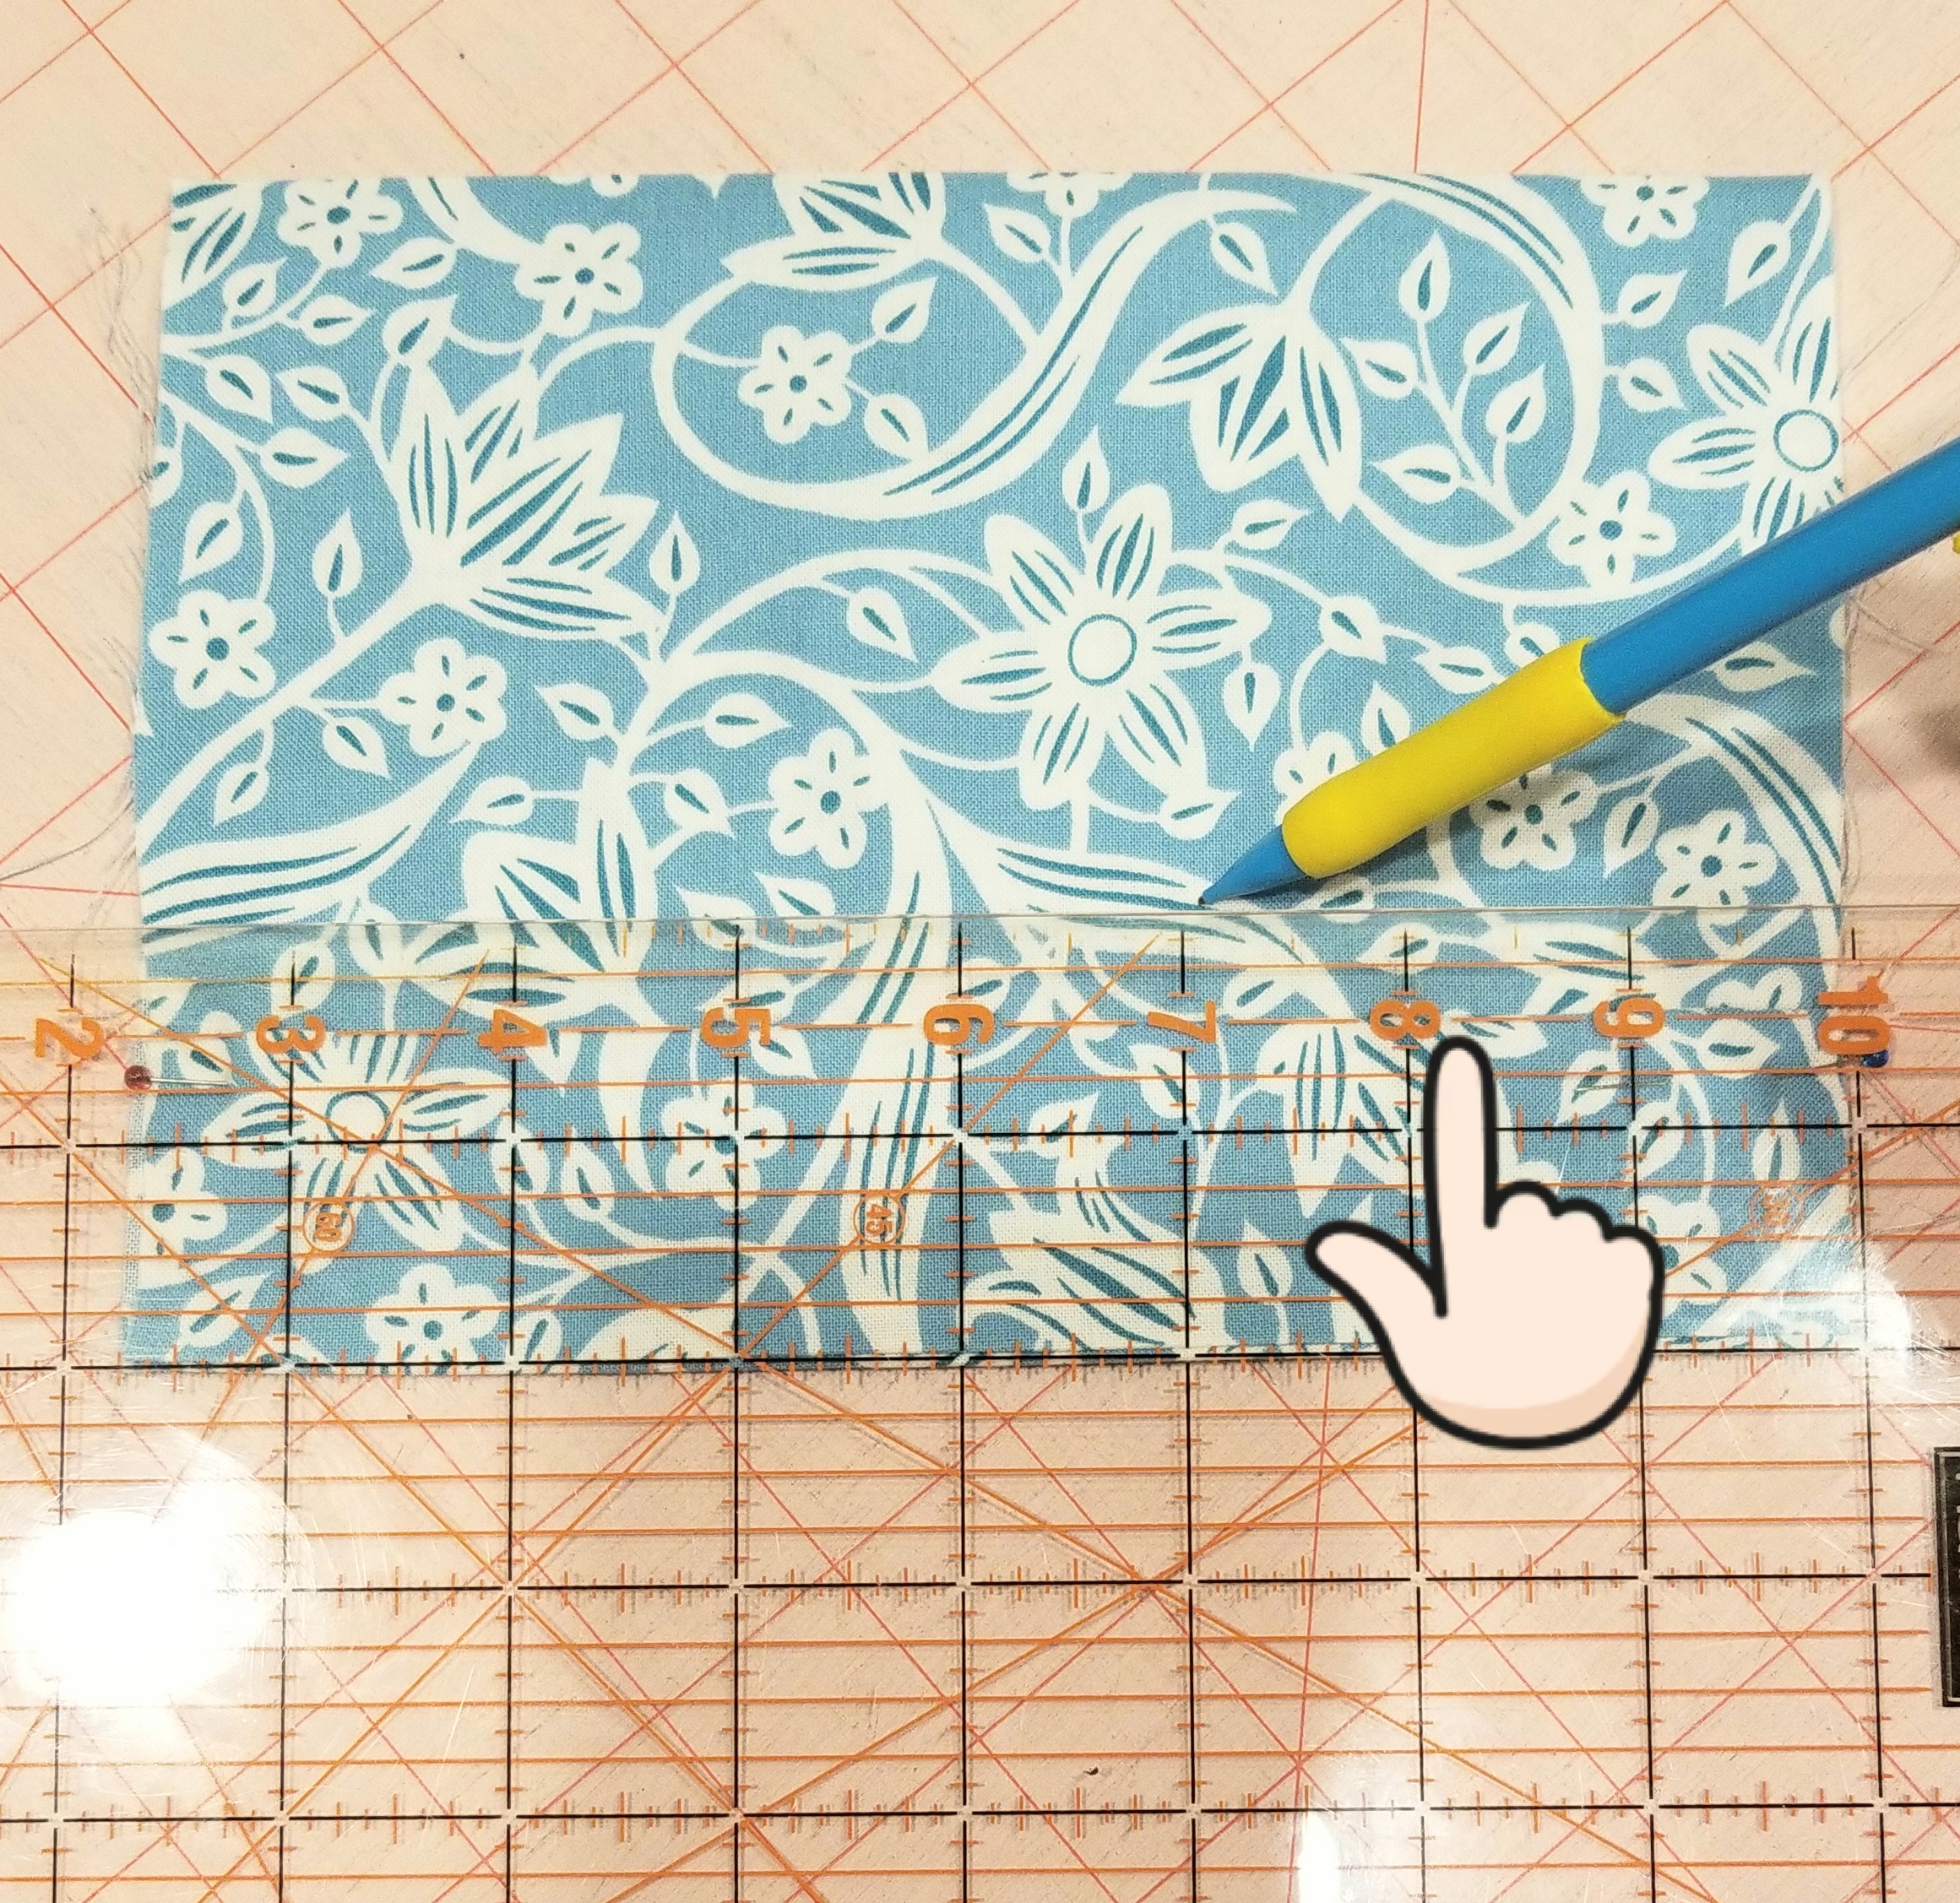
Place the tube of fabric so that the raw edges are on each side and the seam edge is at the bottom. Using a ruler, measure and mark a line 1 1/2 inches from the bottom edge. Make another line 1 inch above this line, or 2 1/2 inches from the seam edge. Don’t use a pencil as you see in the picture, use a fabric pen, or fabric chalk. I used a pencil for illustration purposes.
Fold the seam edge up (or down in this picture, as I turned it upside down…sorry) making the crease on the first line that you just marked. You should have 1 1/2 inch edge here.
Flip the tube piece over. Match the crease edge to the second line that you made earlier. Press. The pleat that you just created will be 1/2 inch deep. Pin the pleat down on each raw edge end.
Now you will mark the lines for the second pleat. Mark a line measuring 1/2” from the top crease of the last pleat, (or 2″ from the bottom seam edge). It was difficult to see the top of the crease in this picture, so look at the finger indicator above.
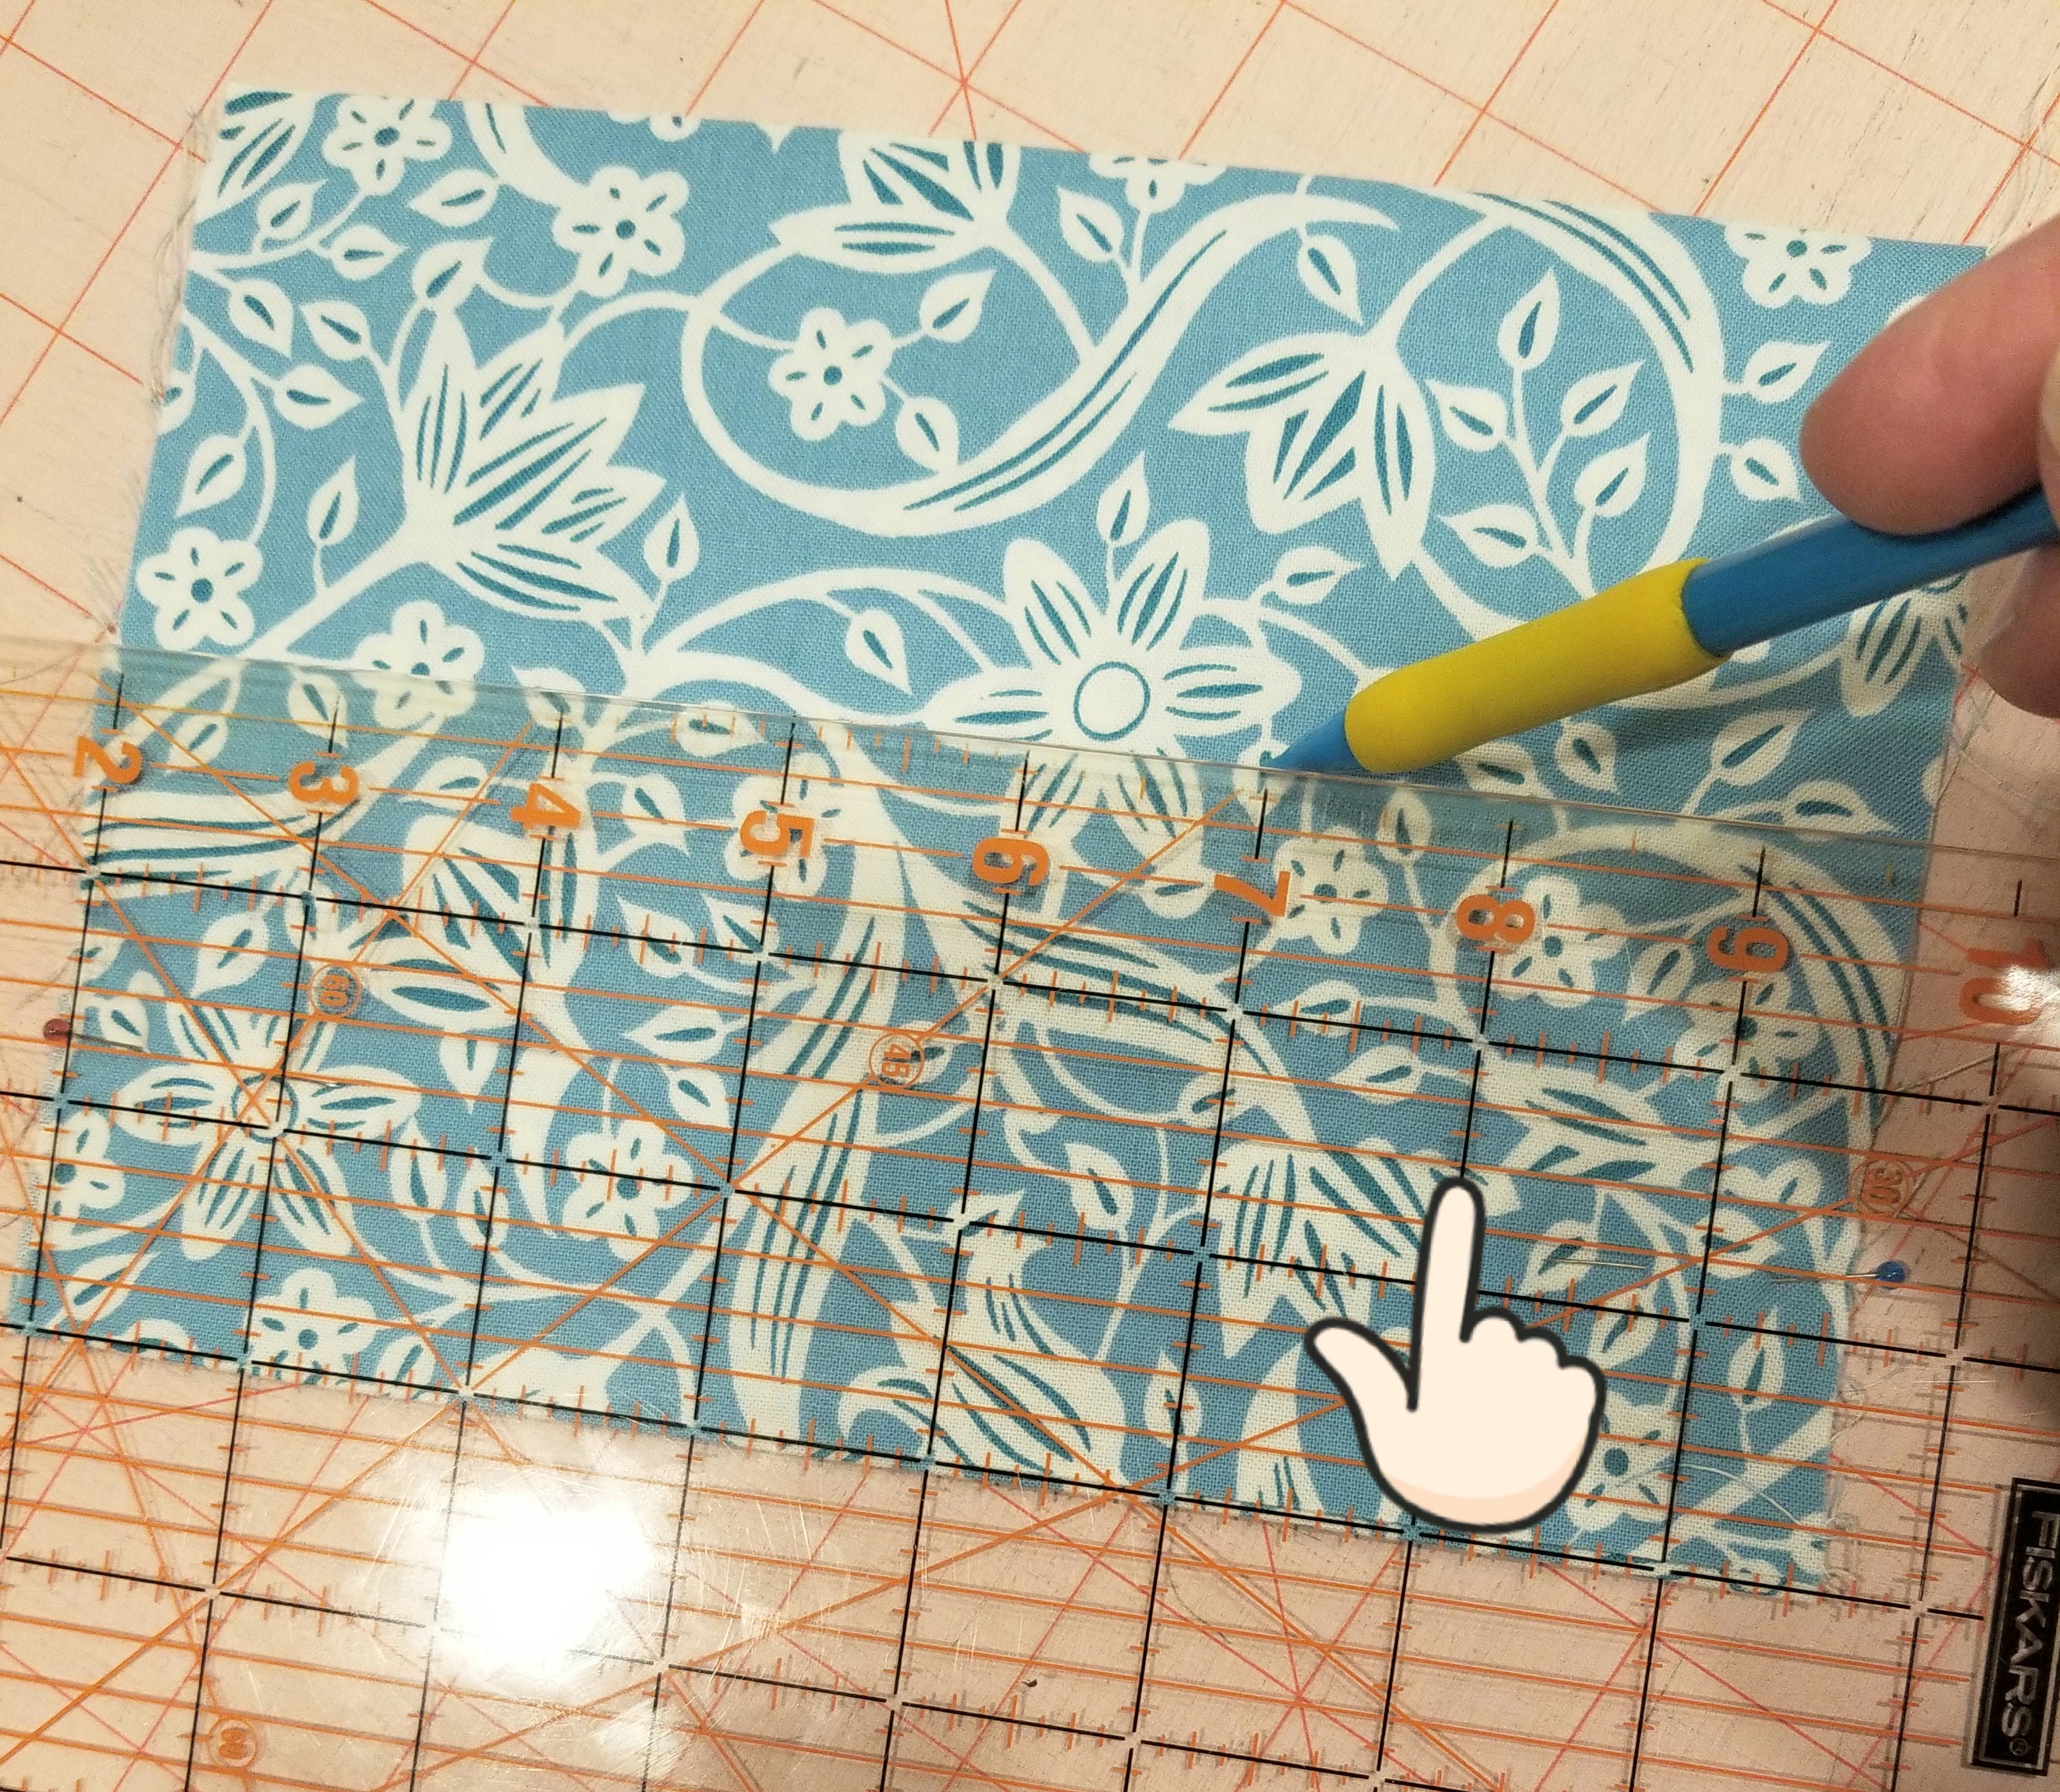
Now mark another line one inch above the last line that you made (or 3 inches above the seam edge). Using these lines as your guide, repeat the steps that you followed to make the first pleat.
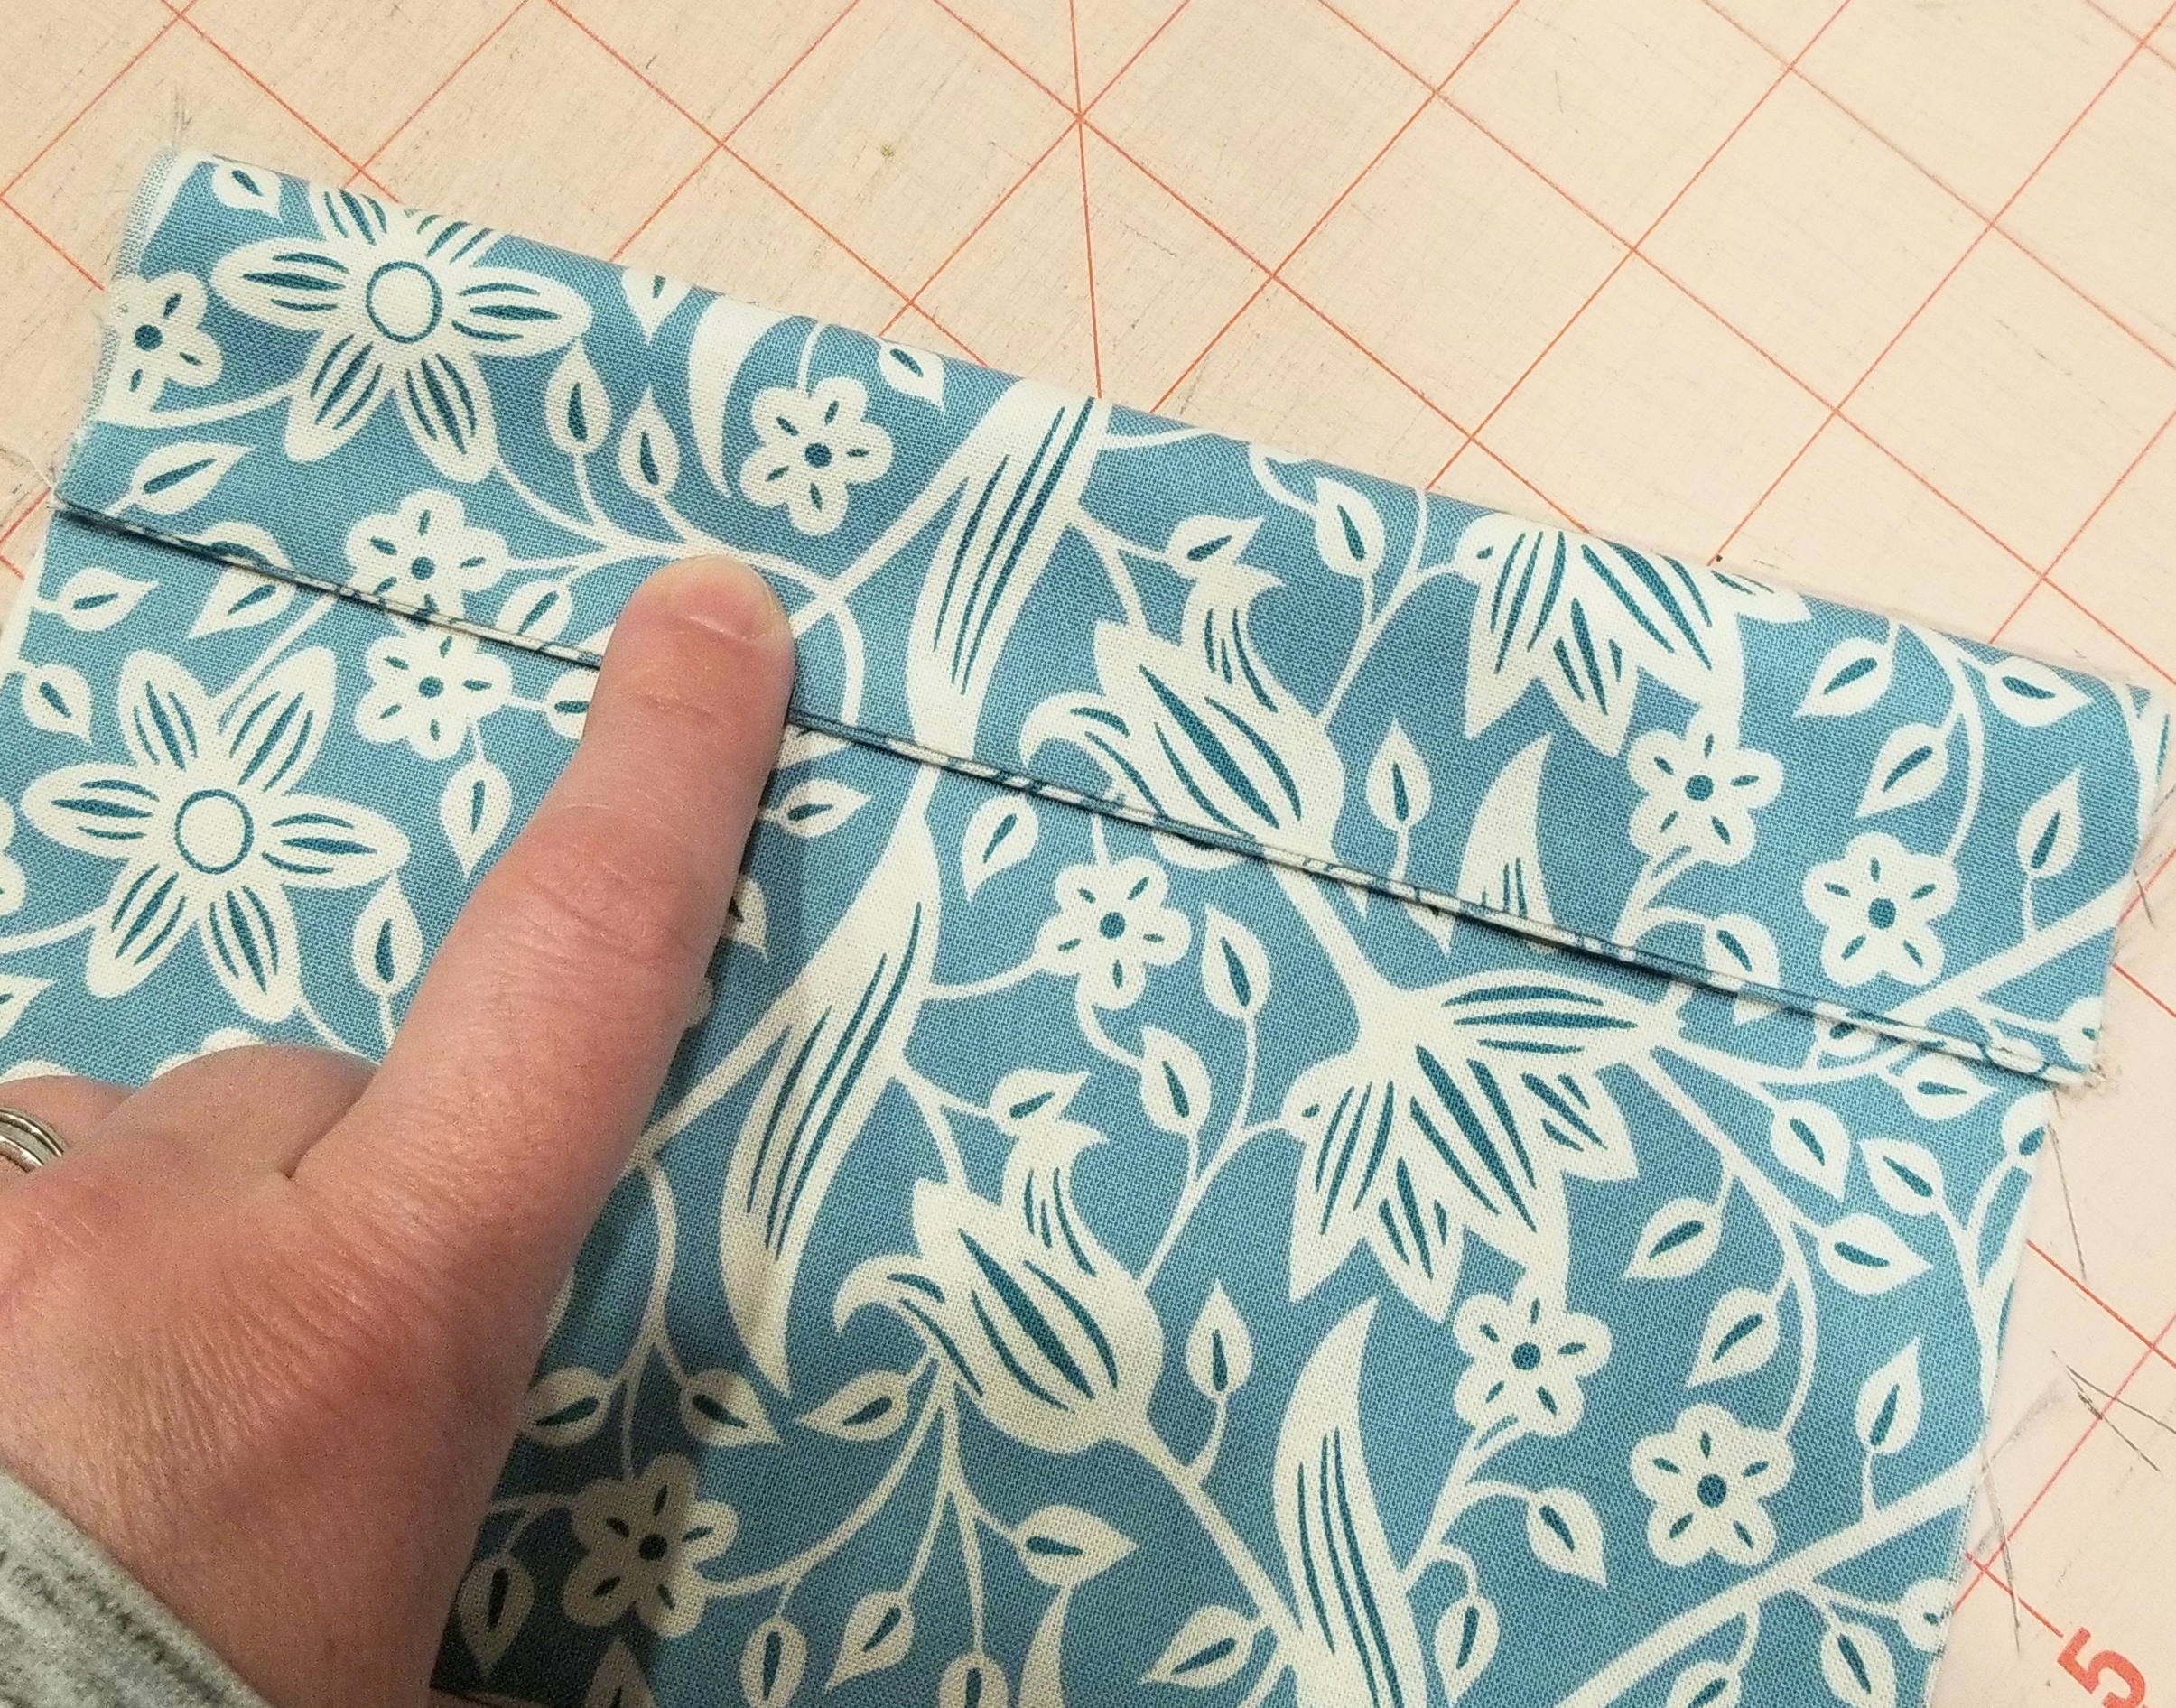
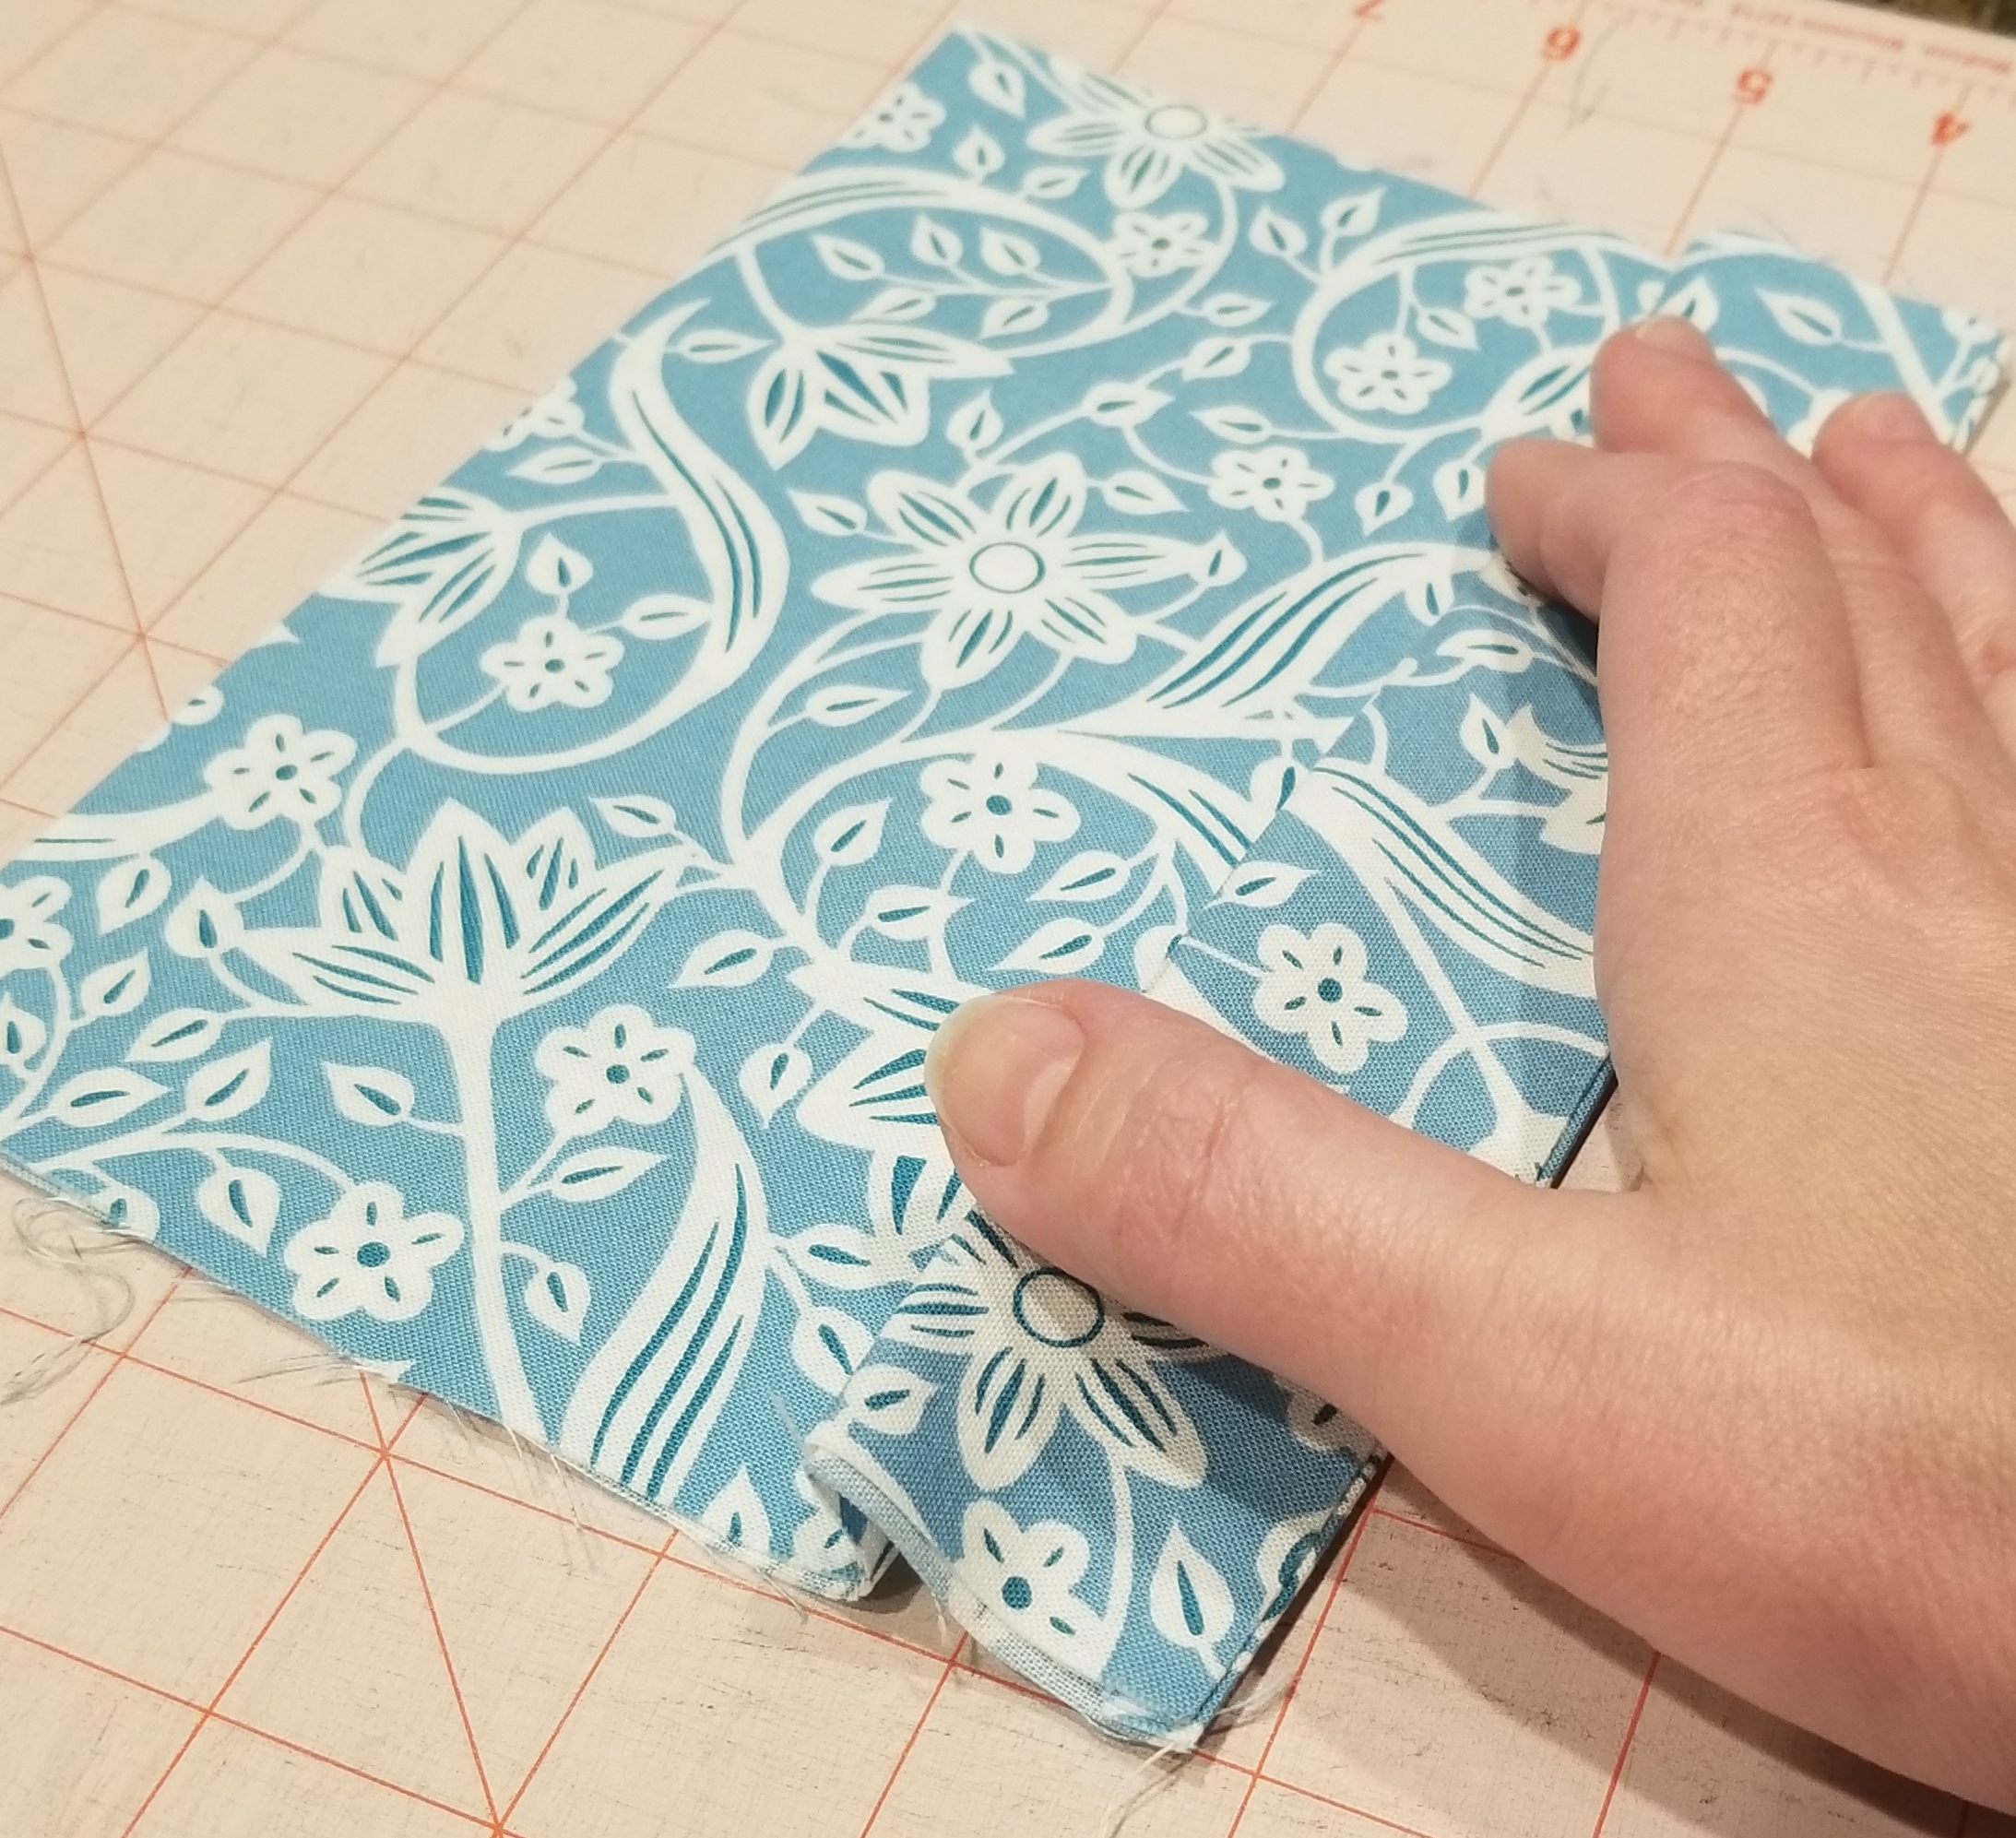
You should now have two pleats, each one being 1/2 inch deep. Repeat the steps you used to make the second pleat, so that you end up with three pleats total. Press.
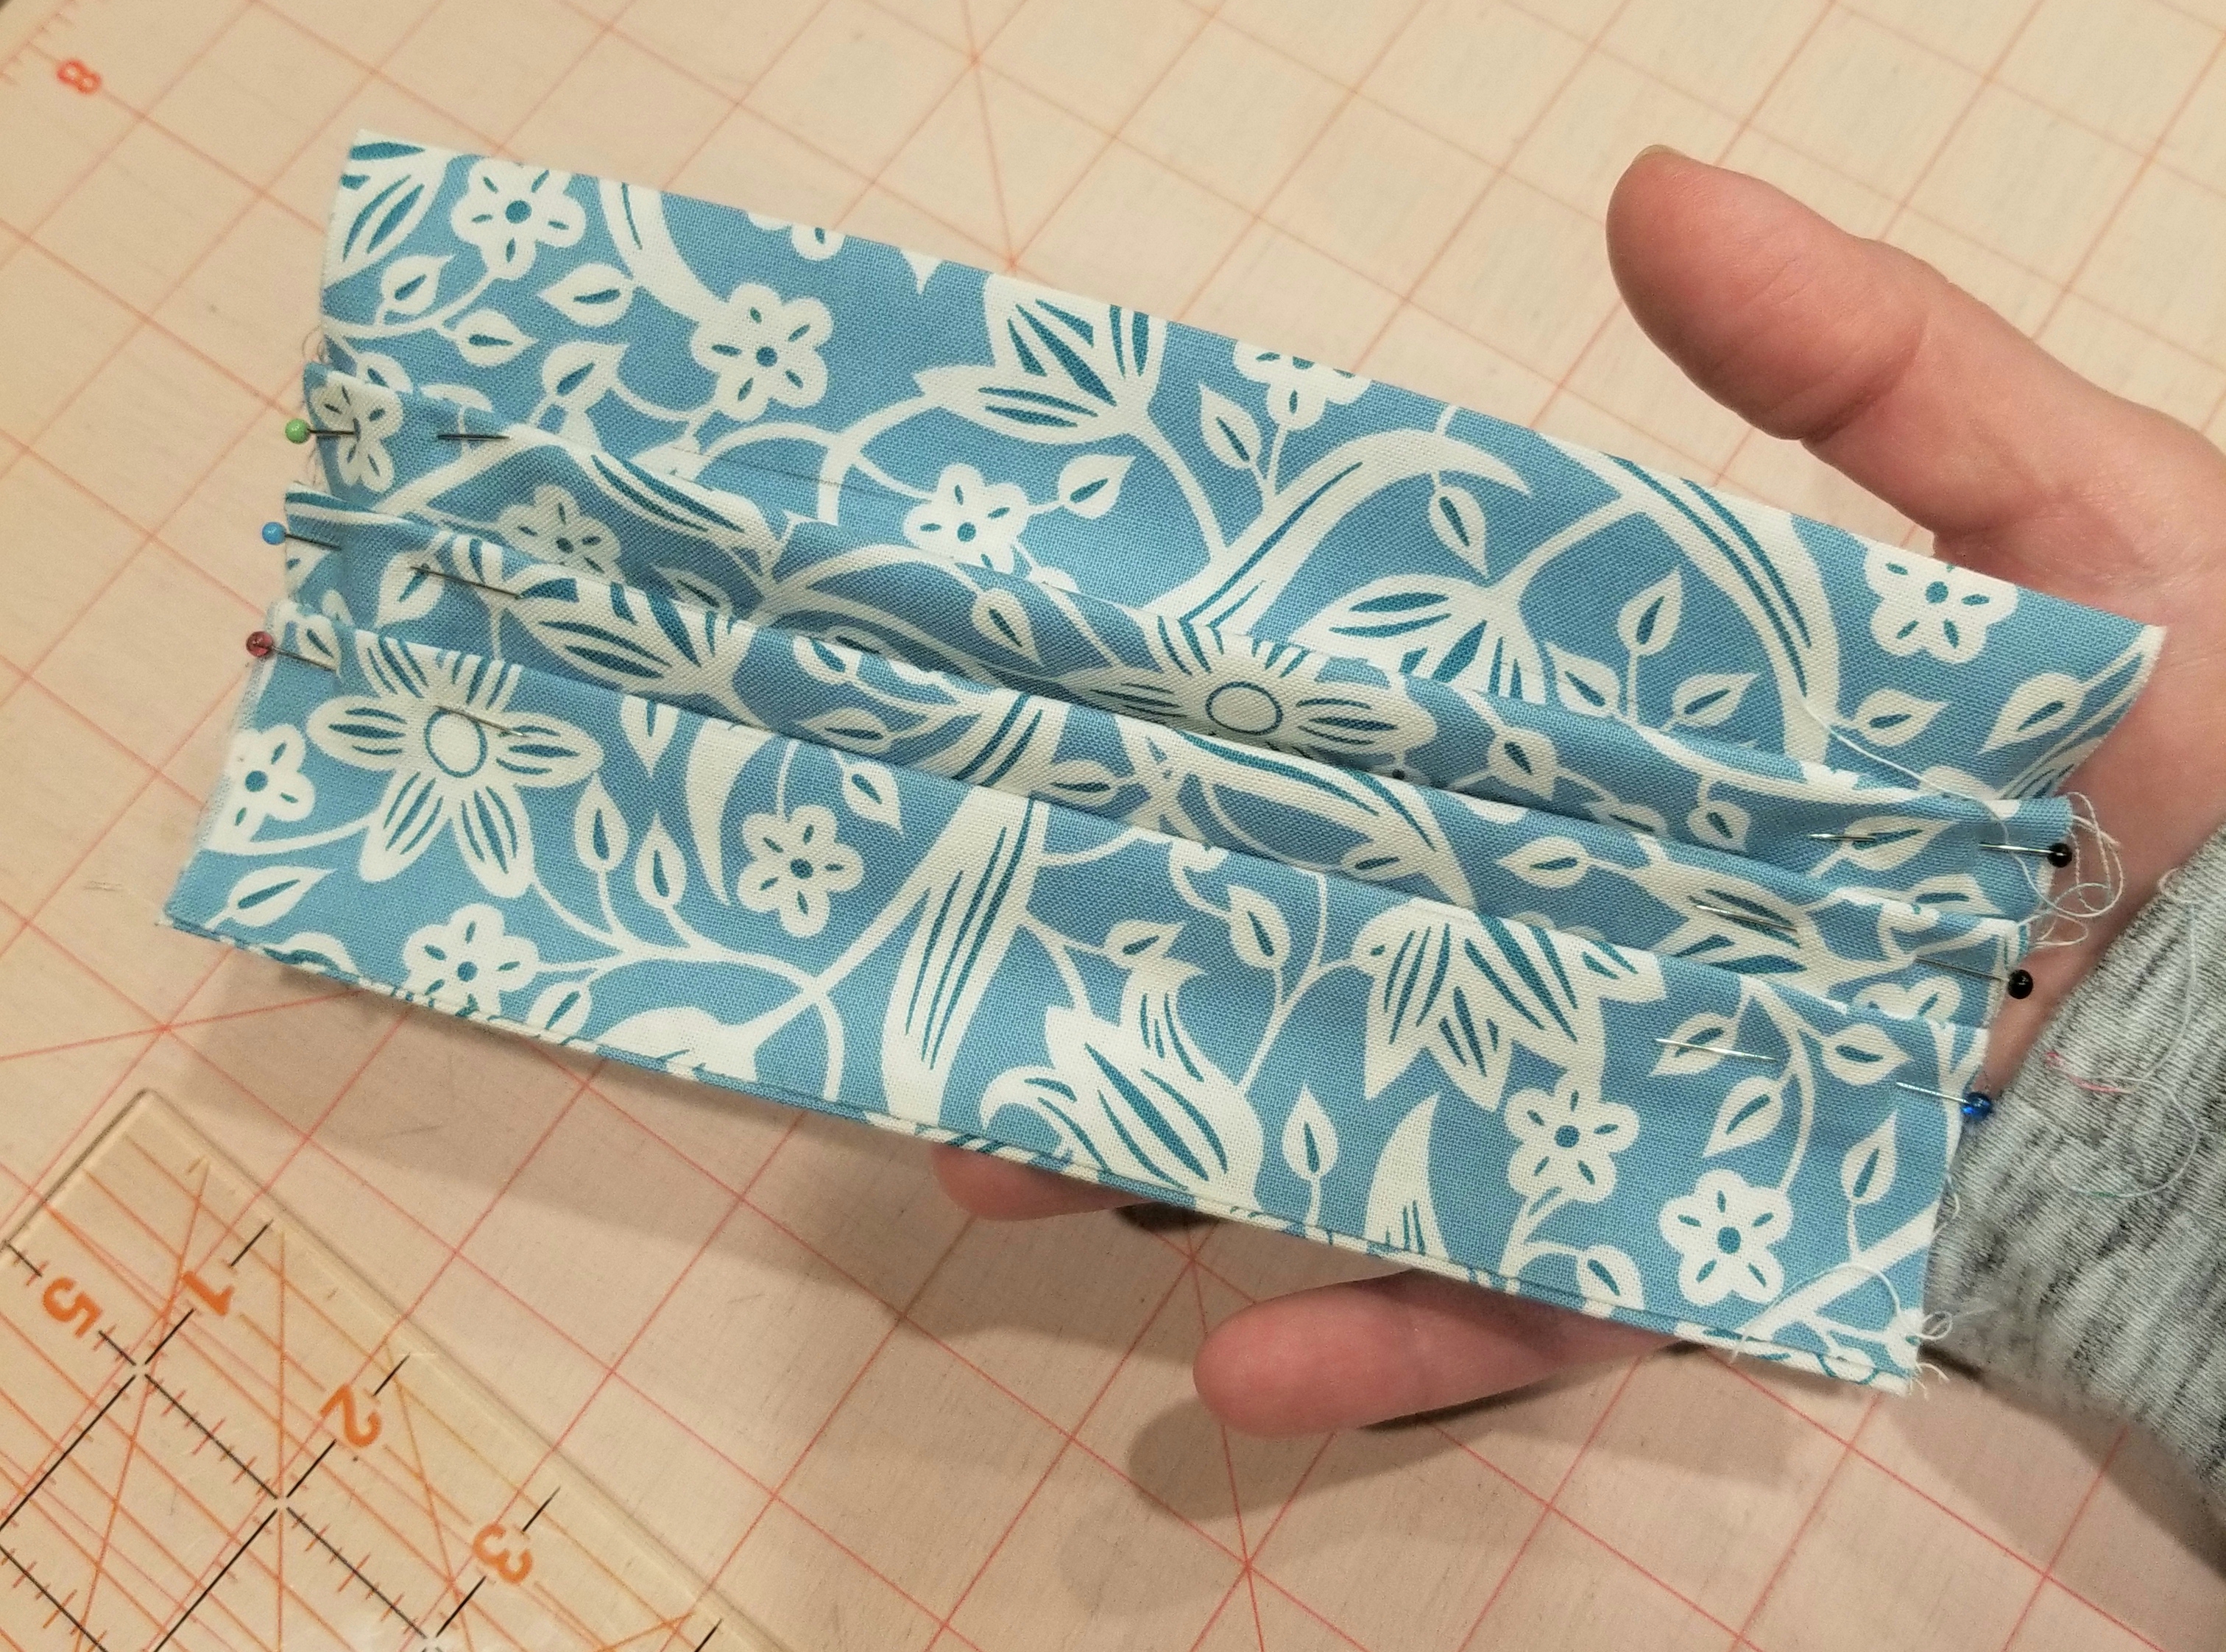
This is what your main piece should look like at this point.
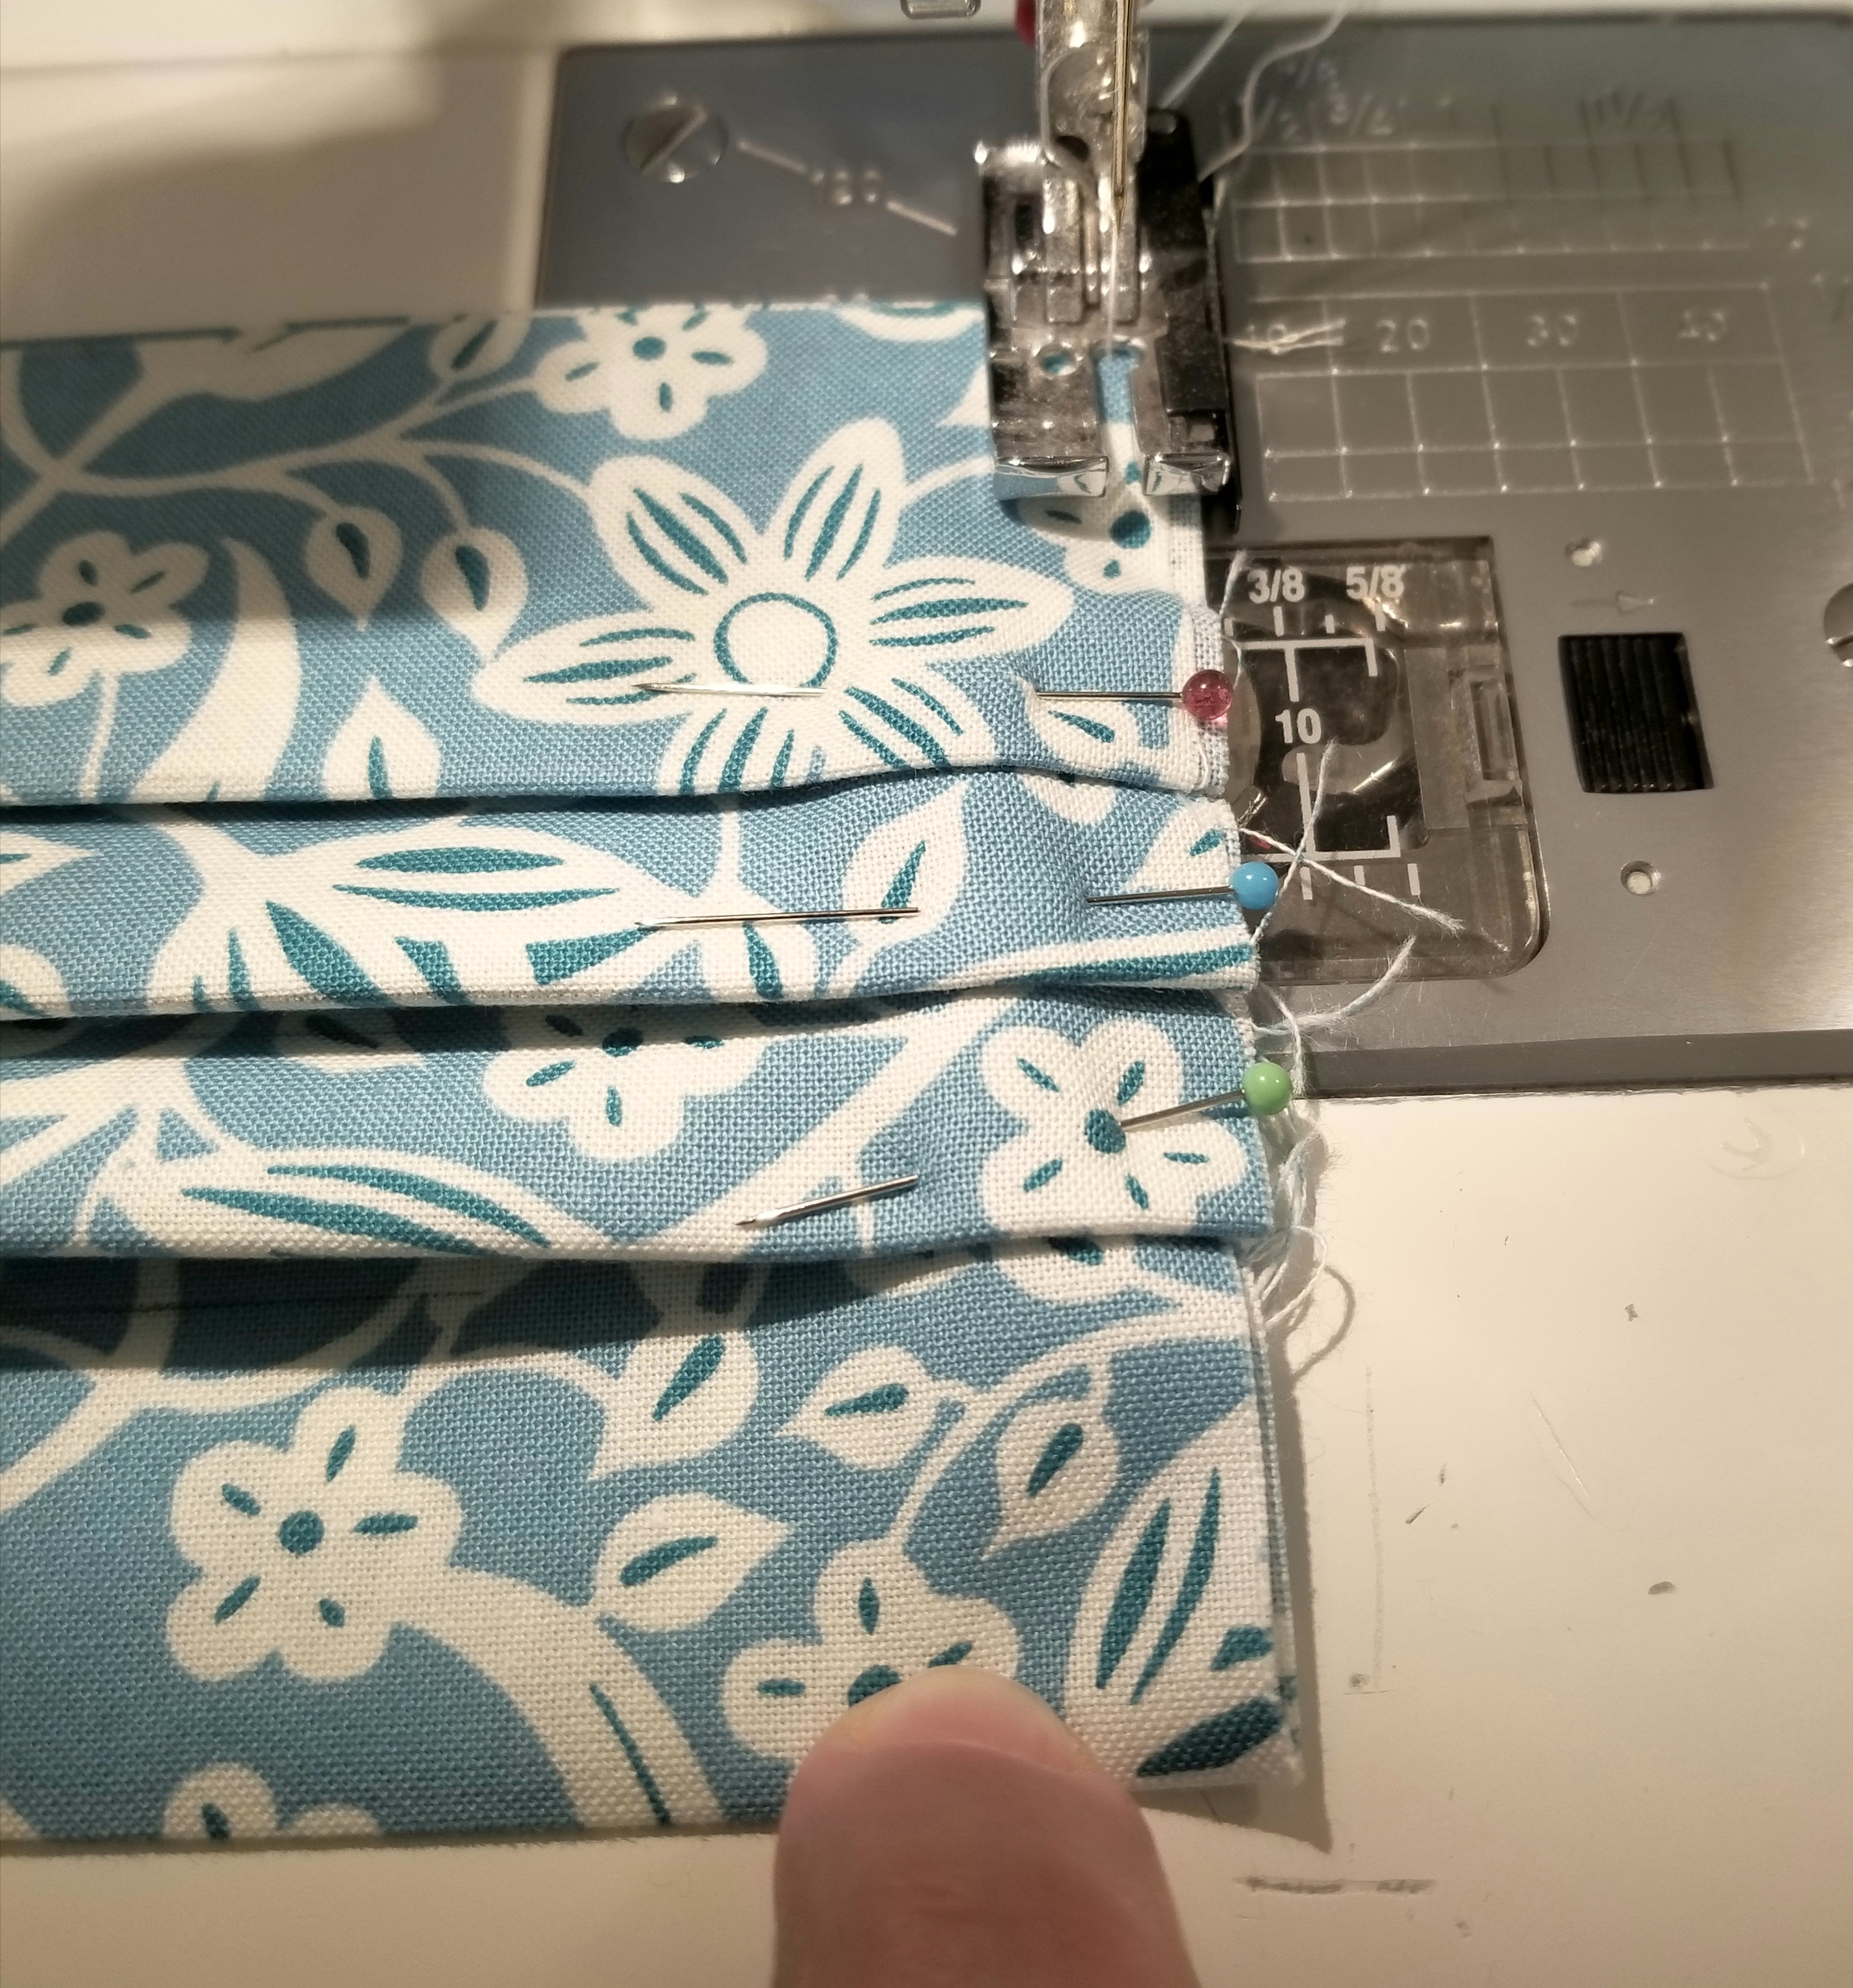
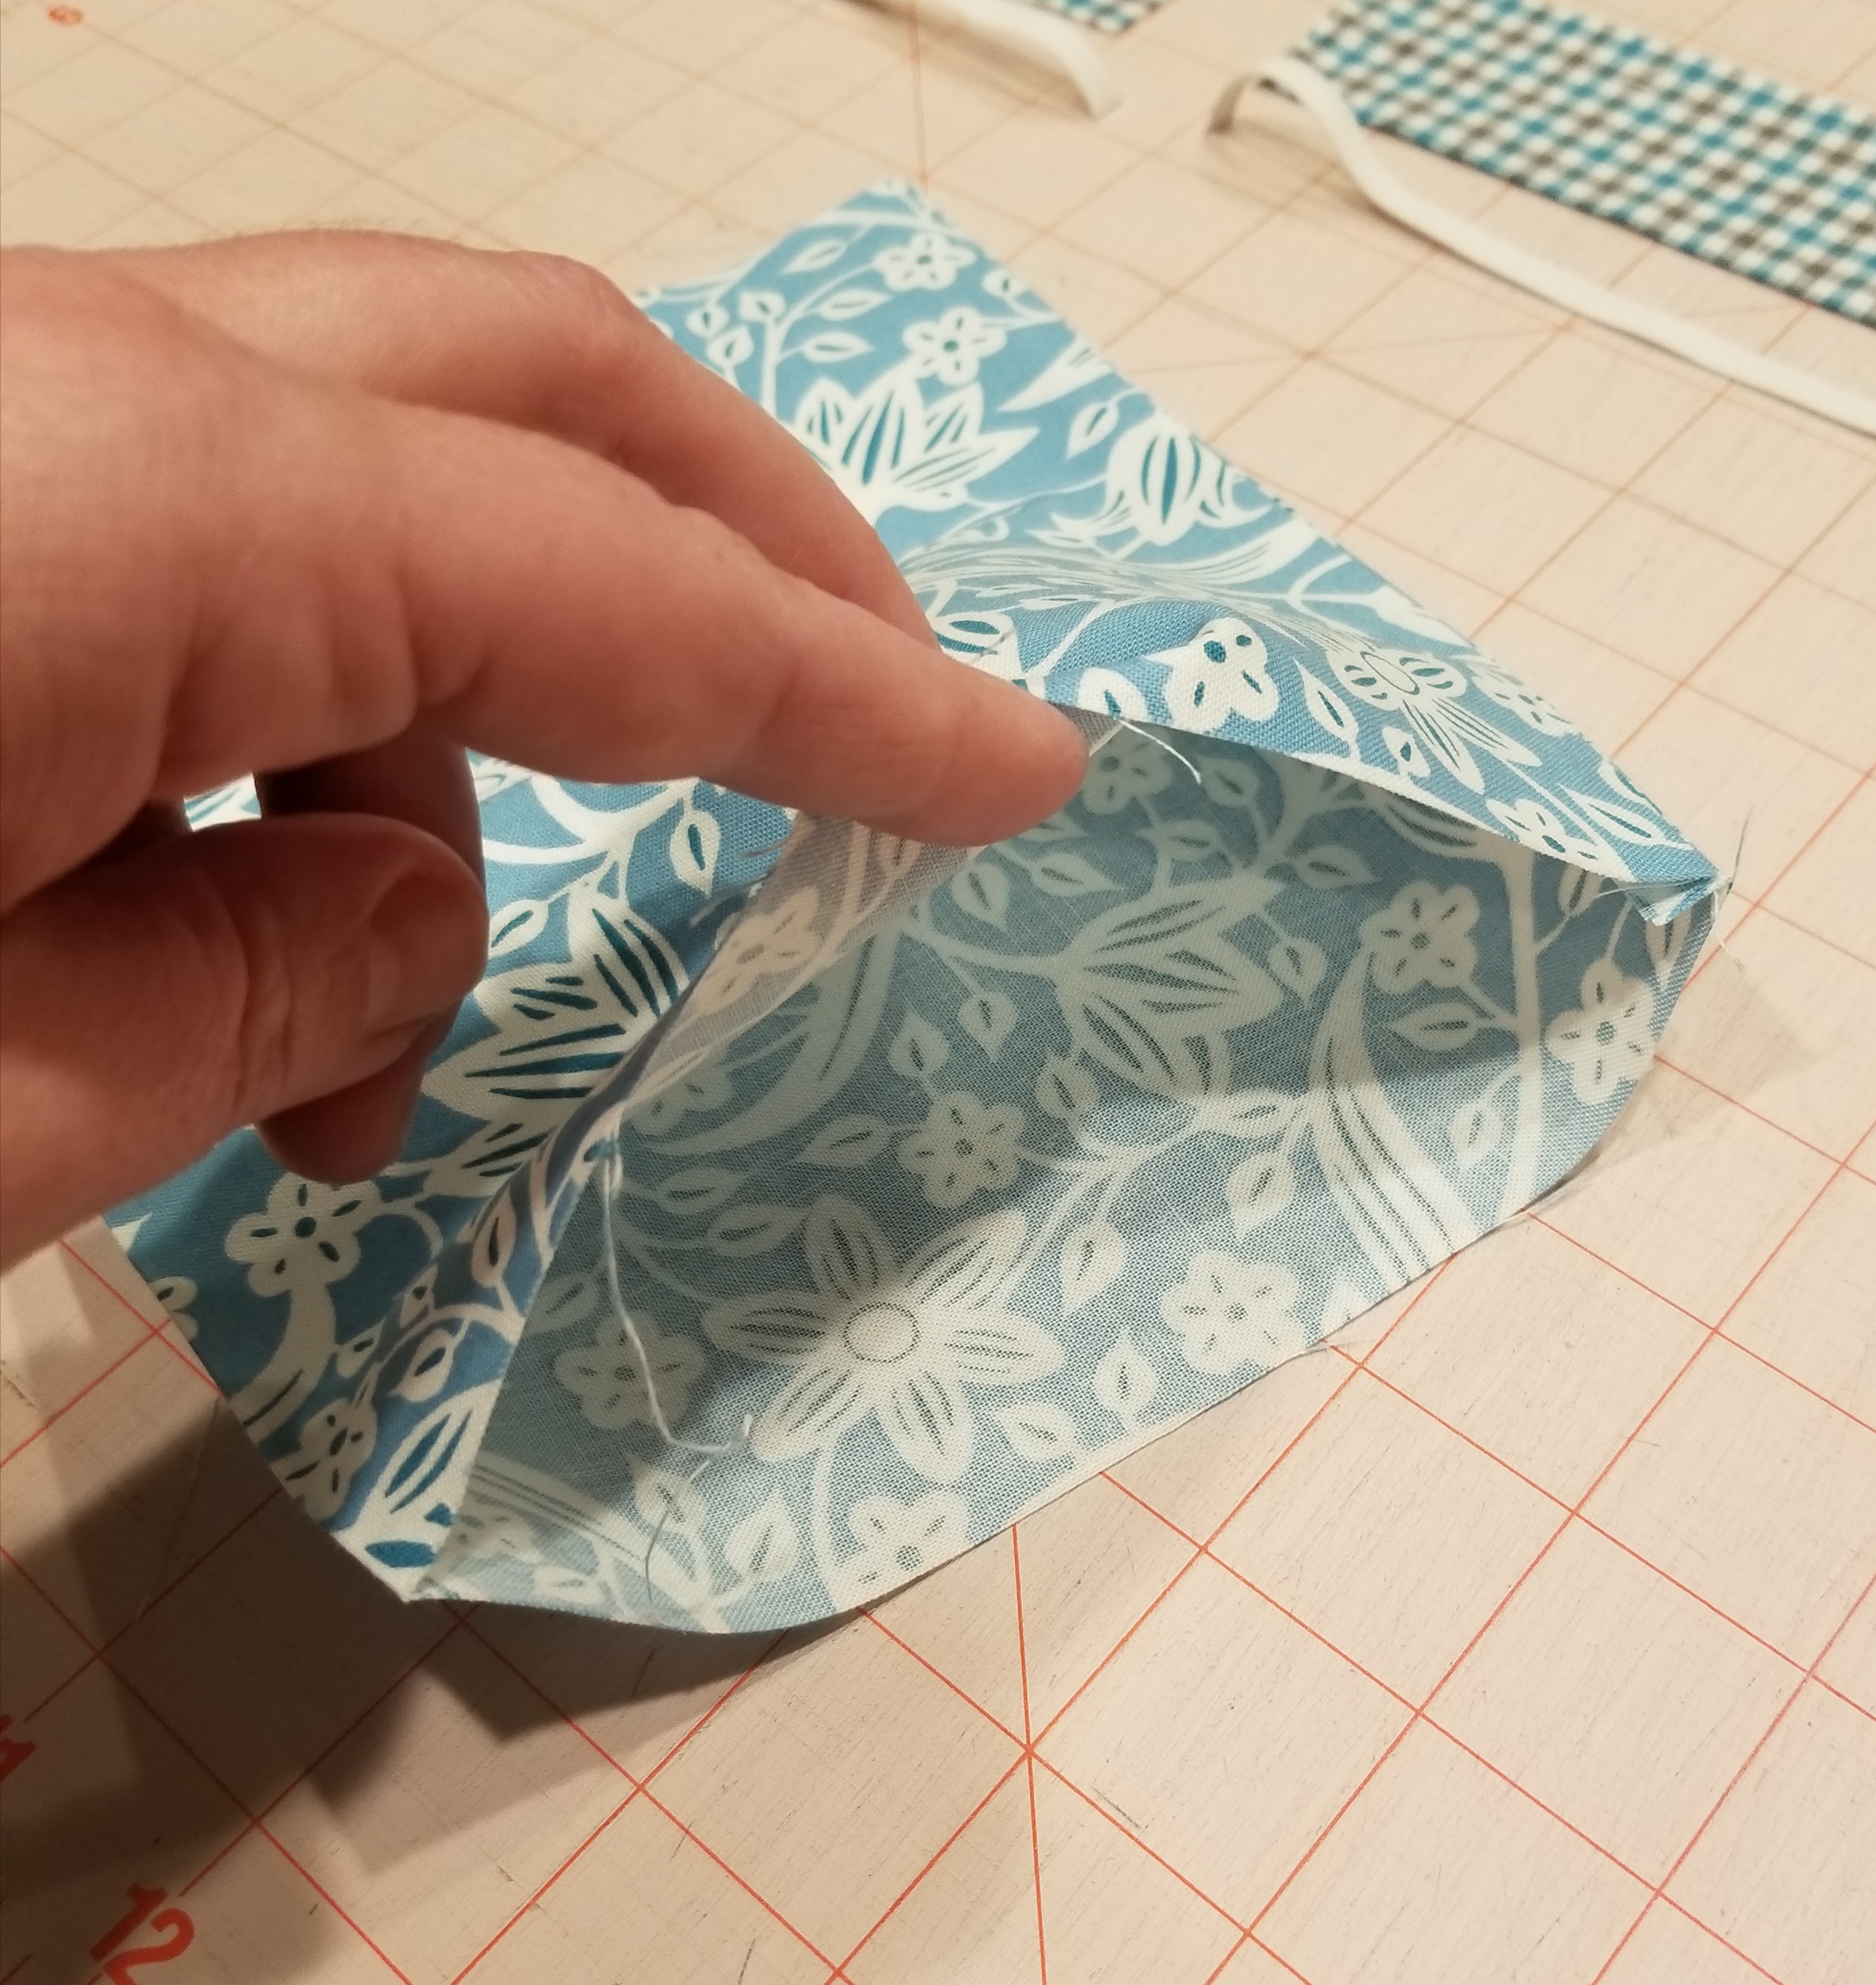
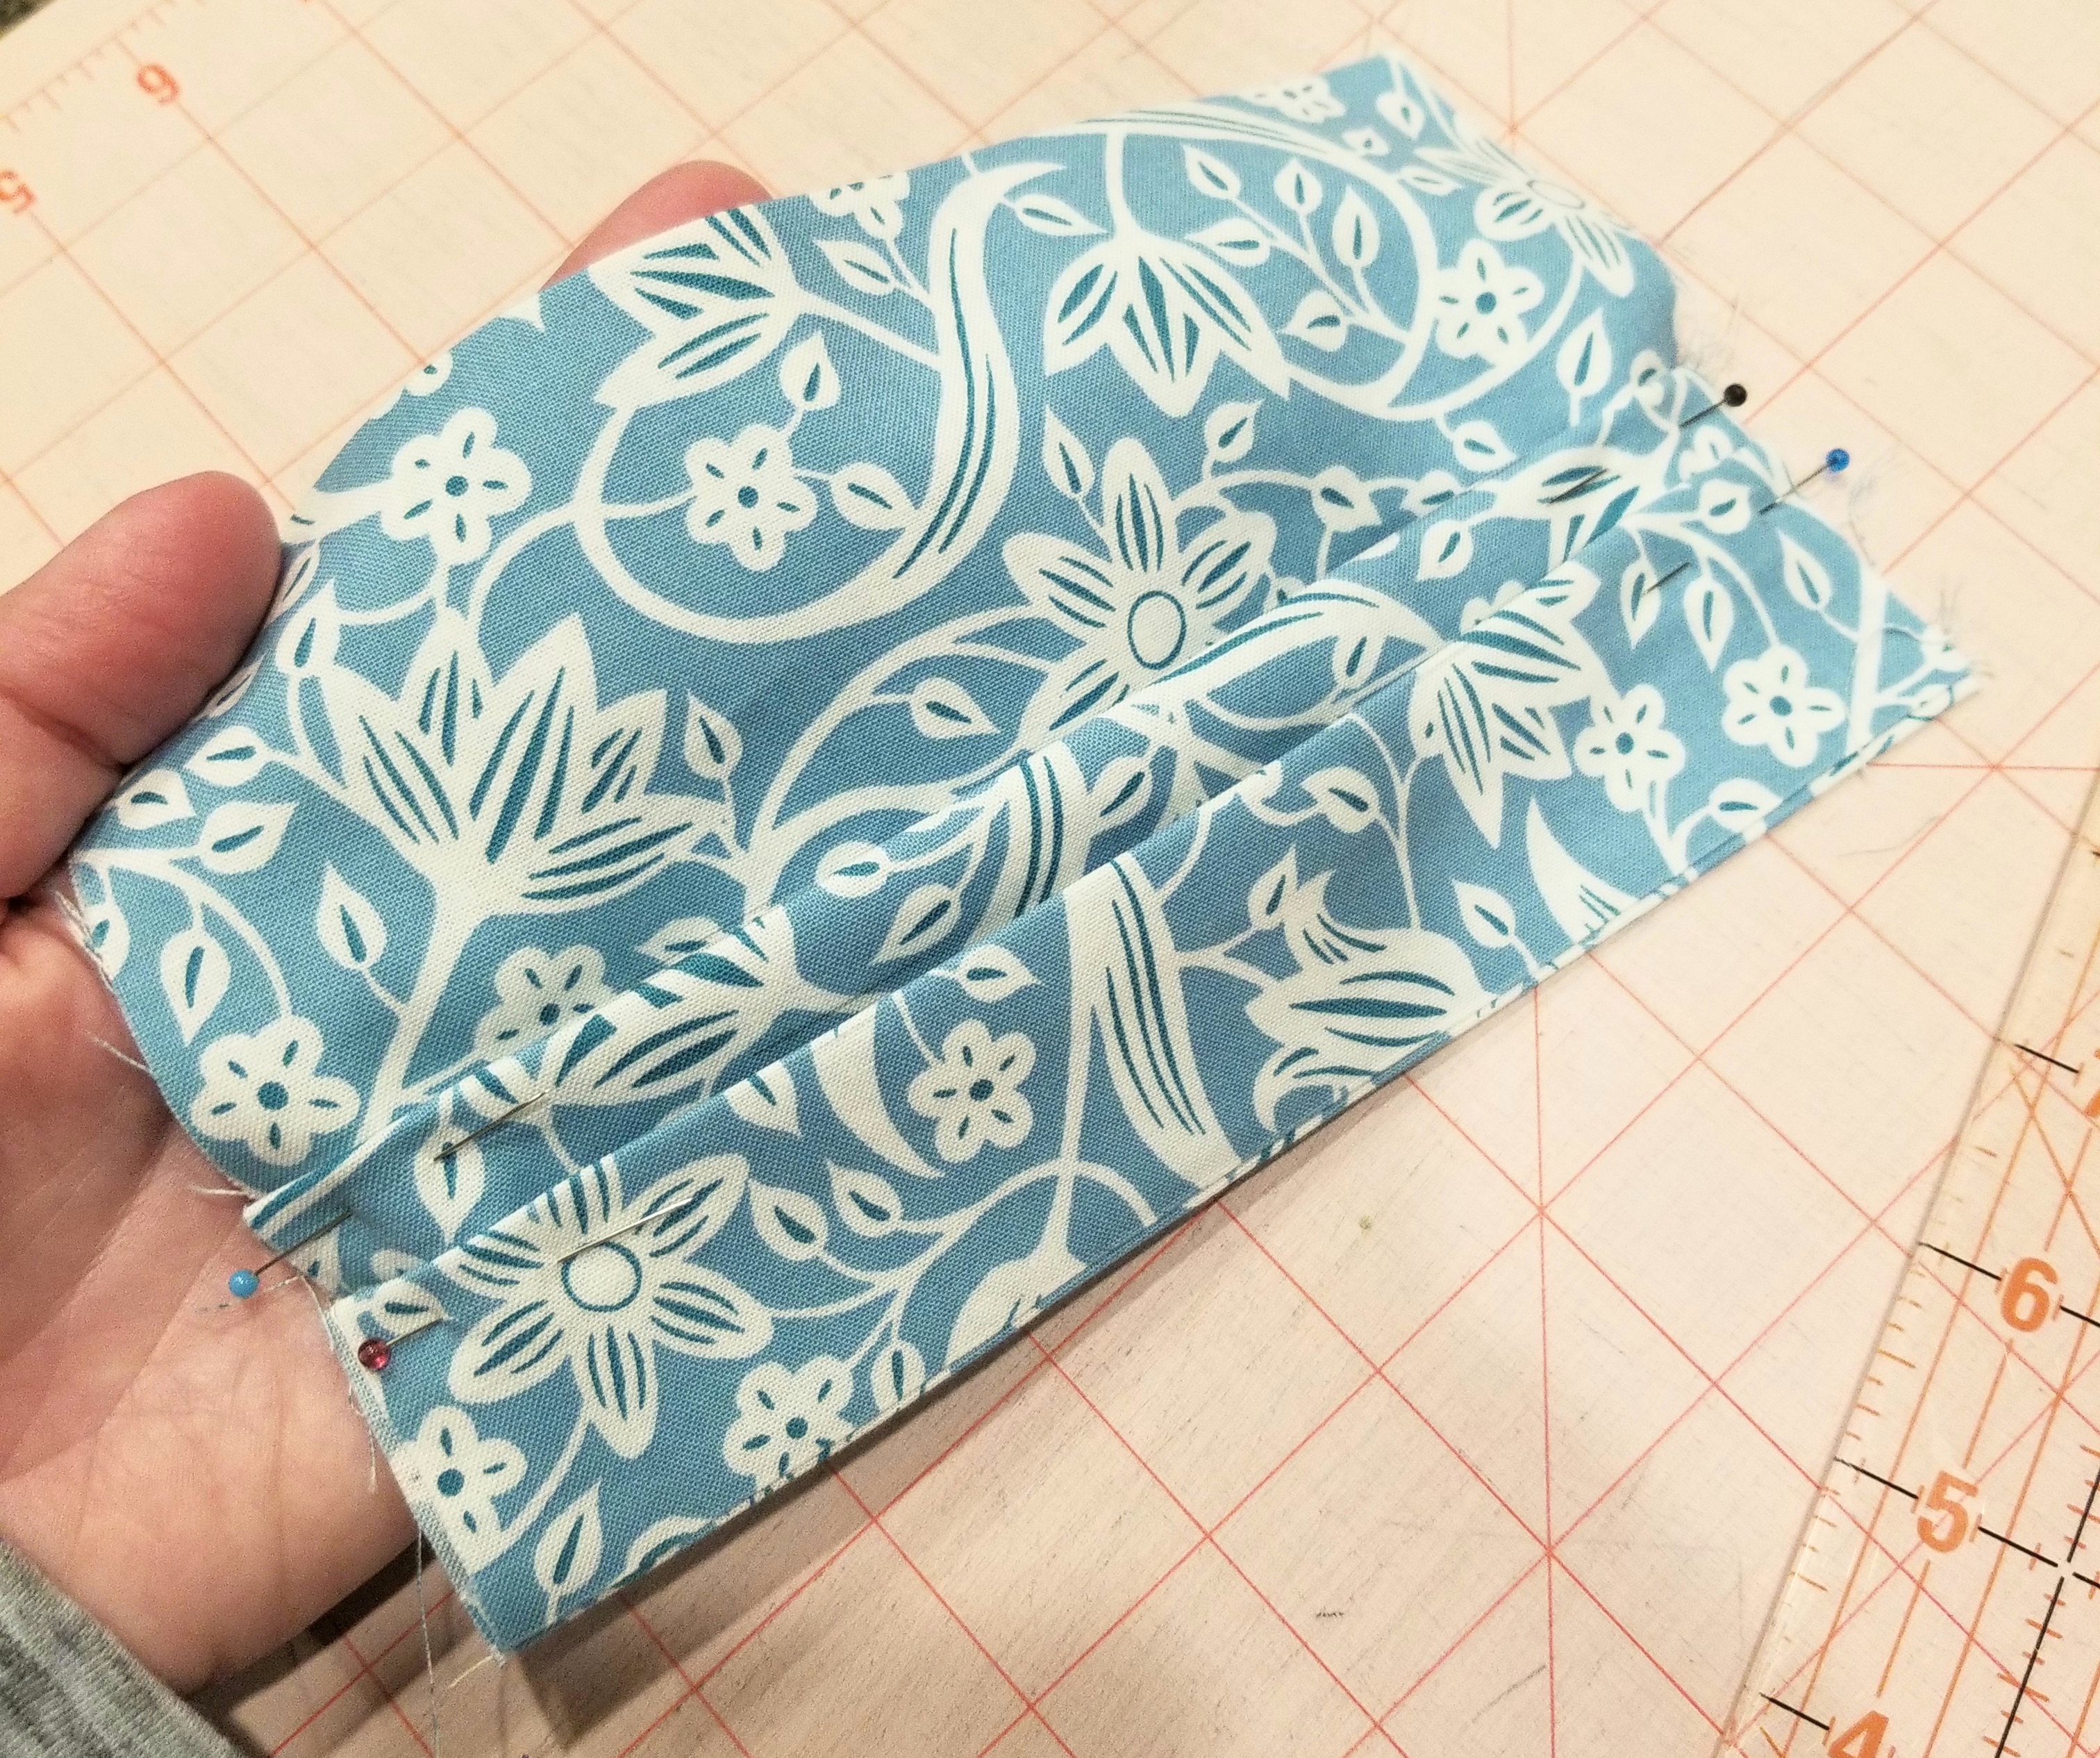
Using a 1/8” seam allowance, baste stitch the raw edges.
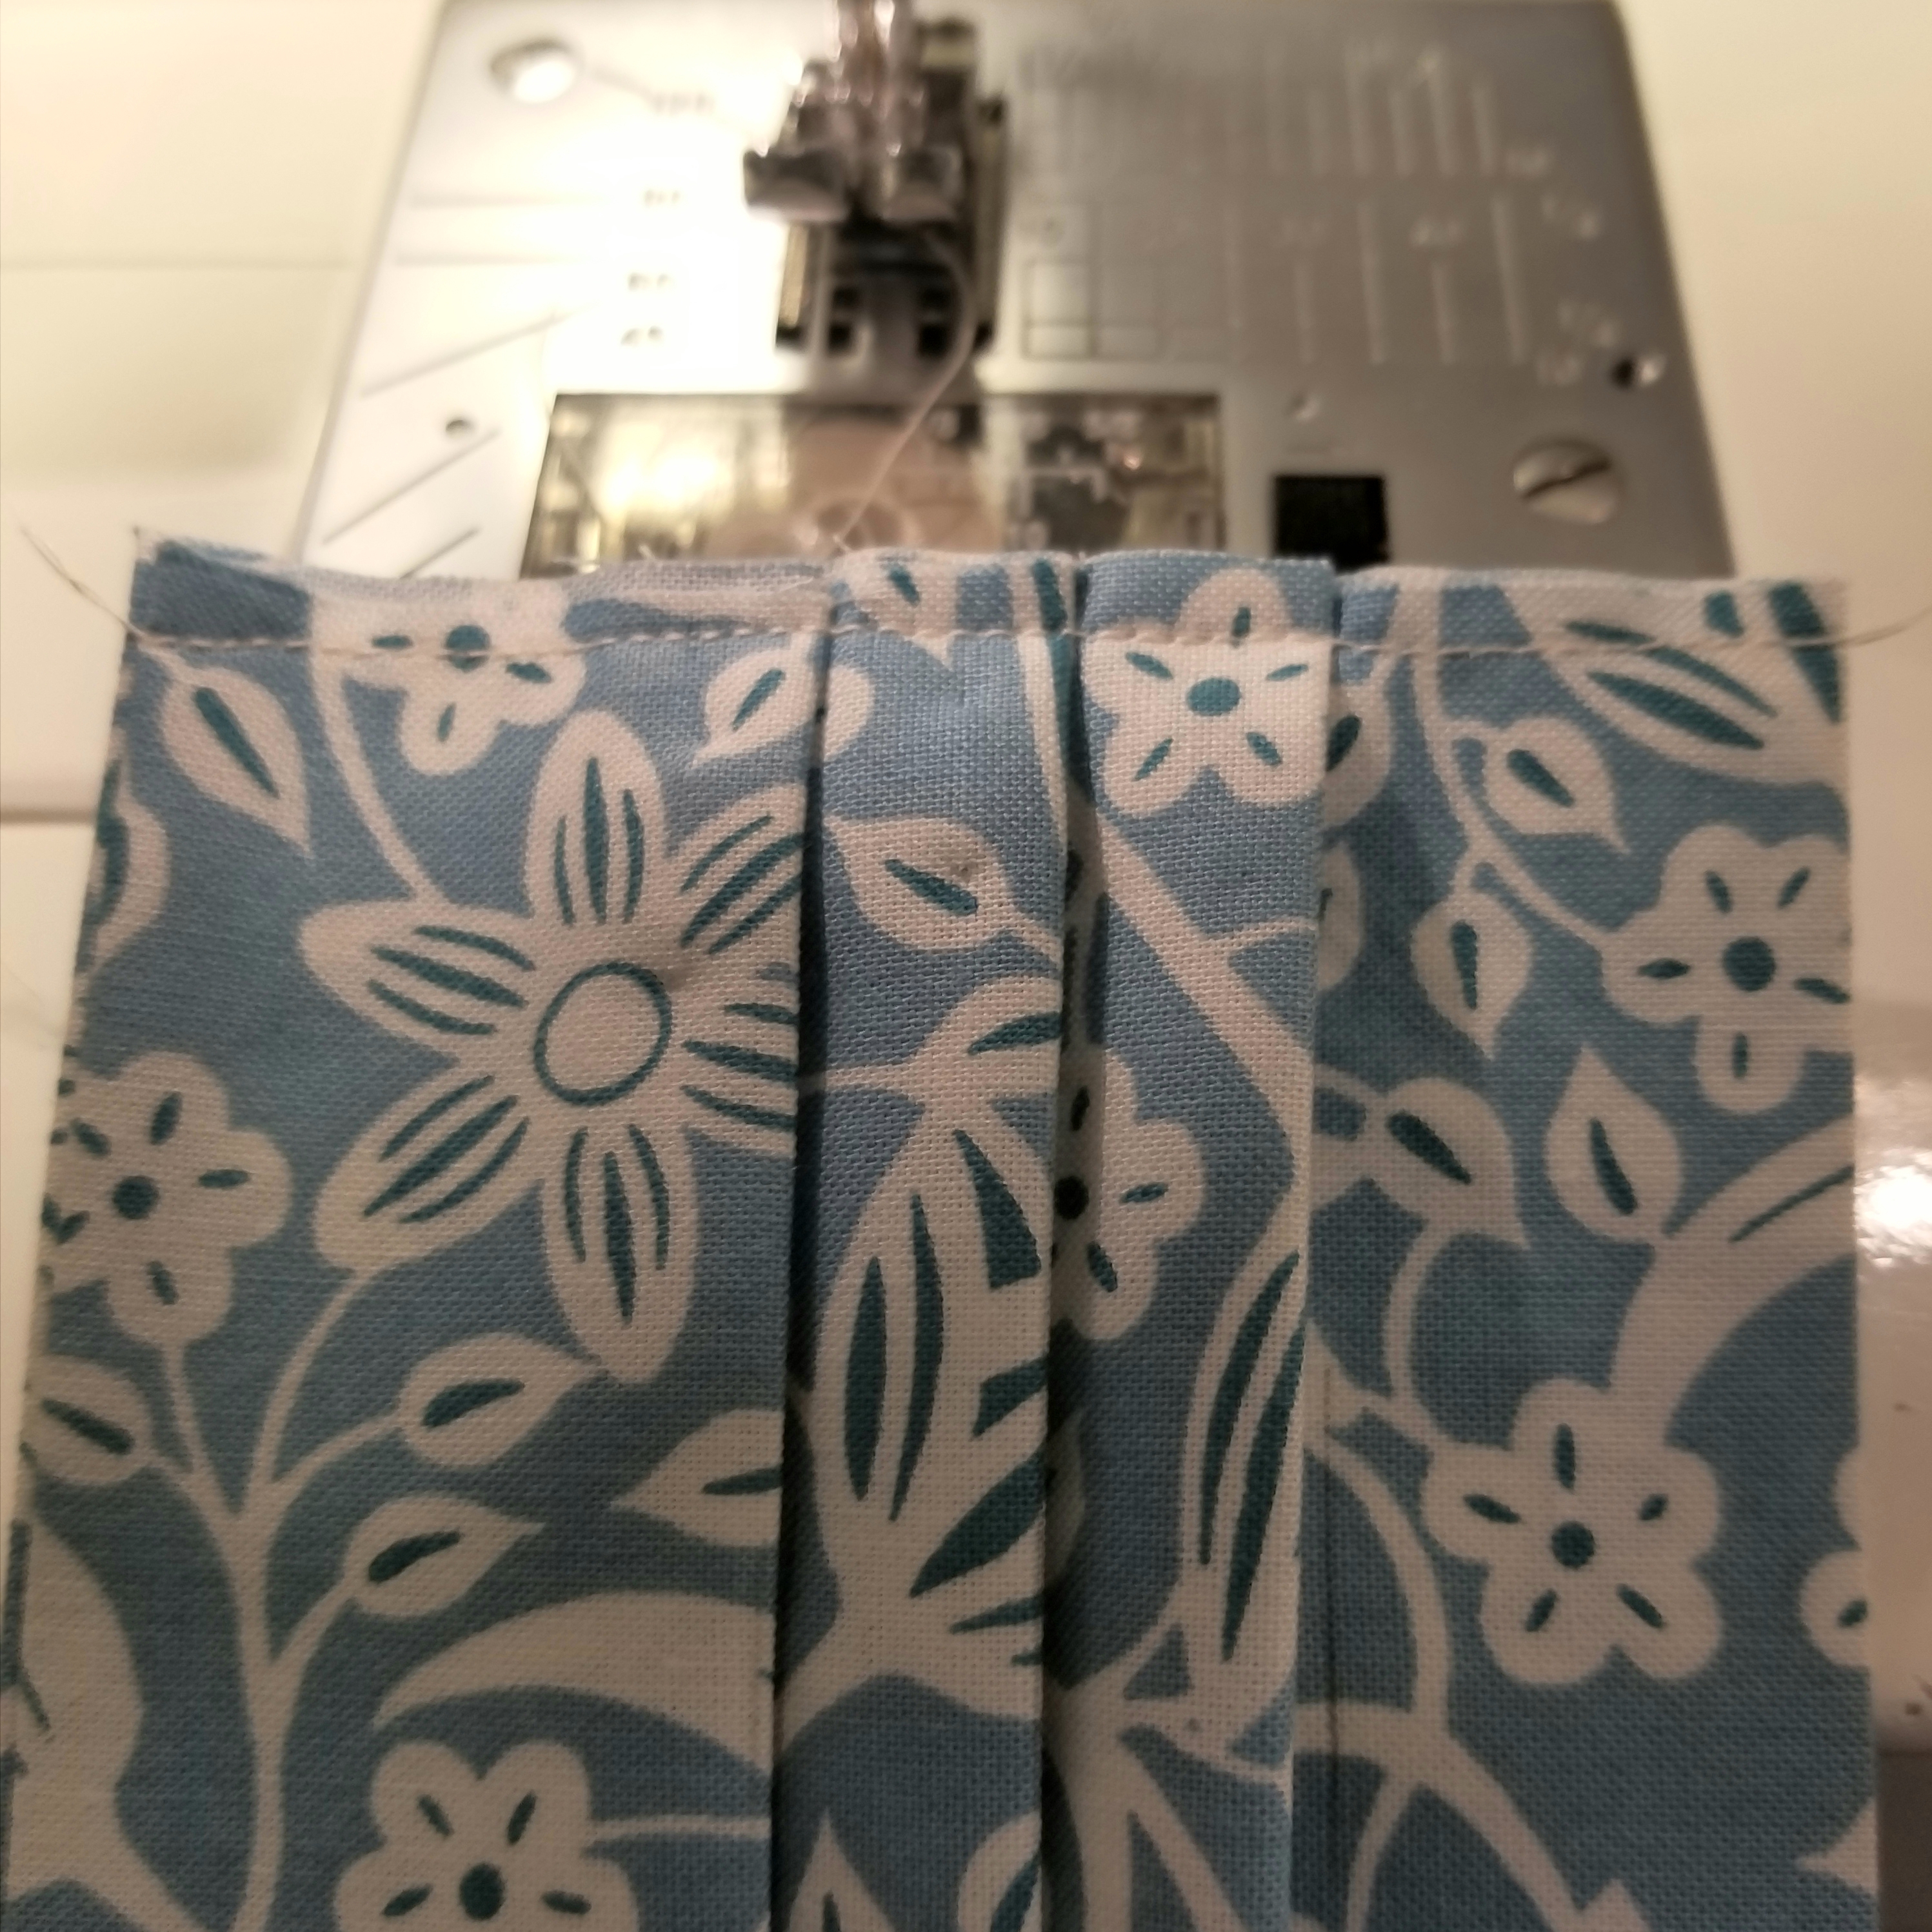
Repeat this step so that both raw edges are basted as shown in the picture above.
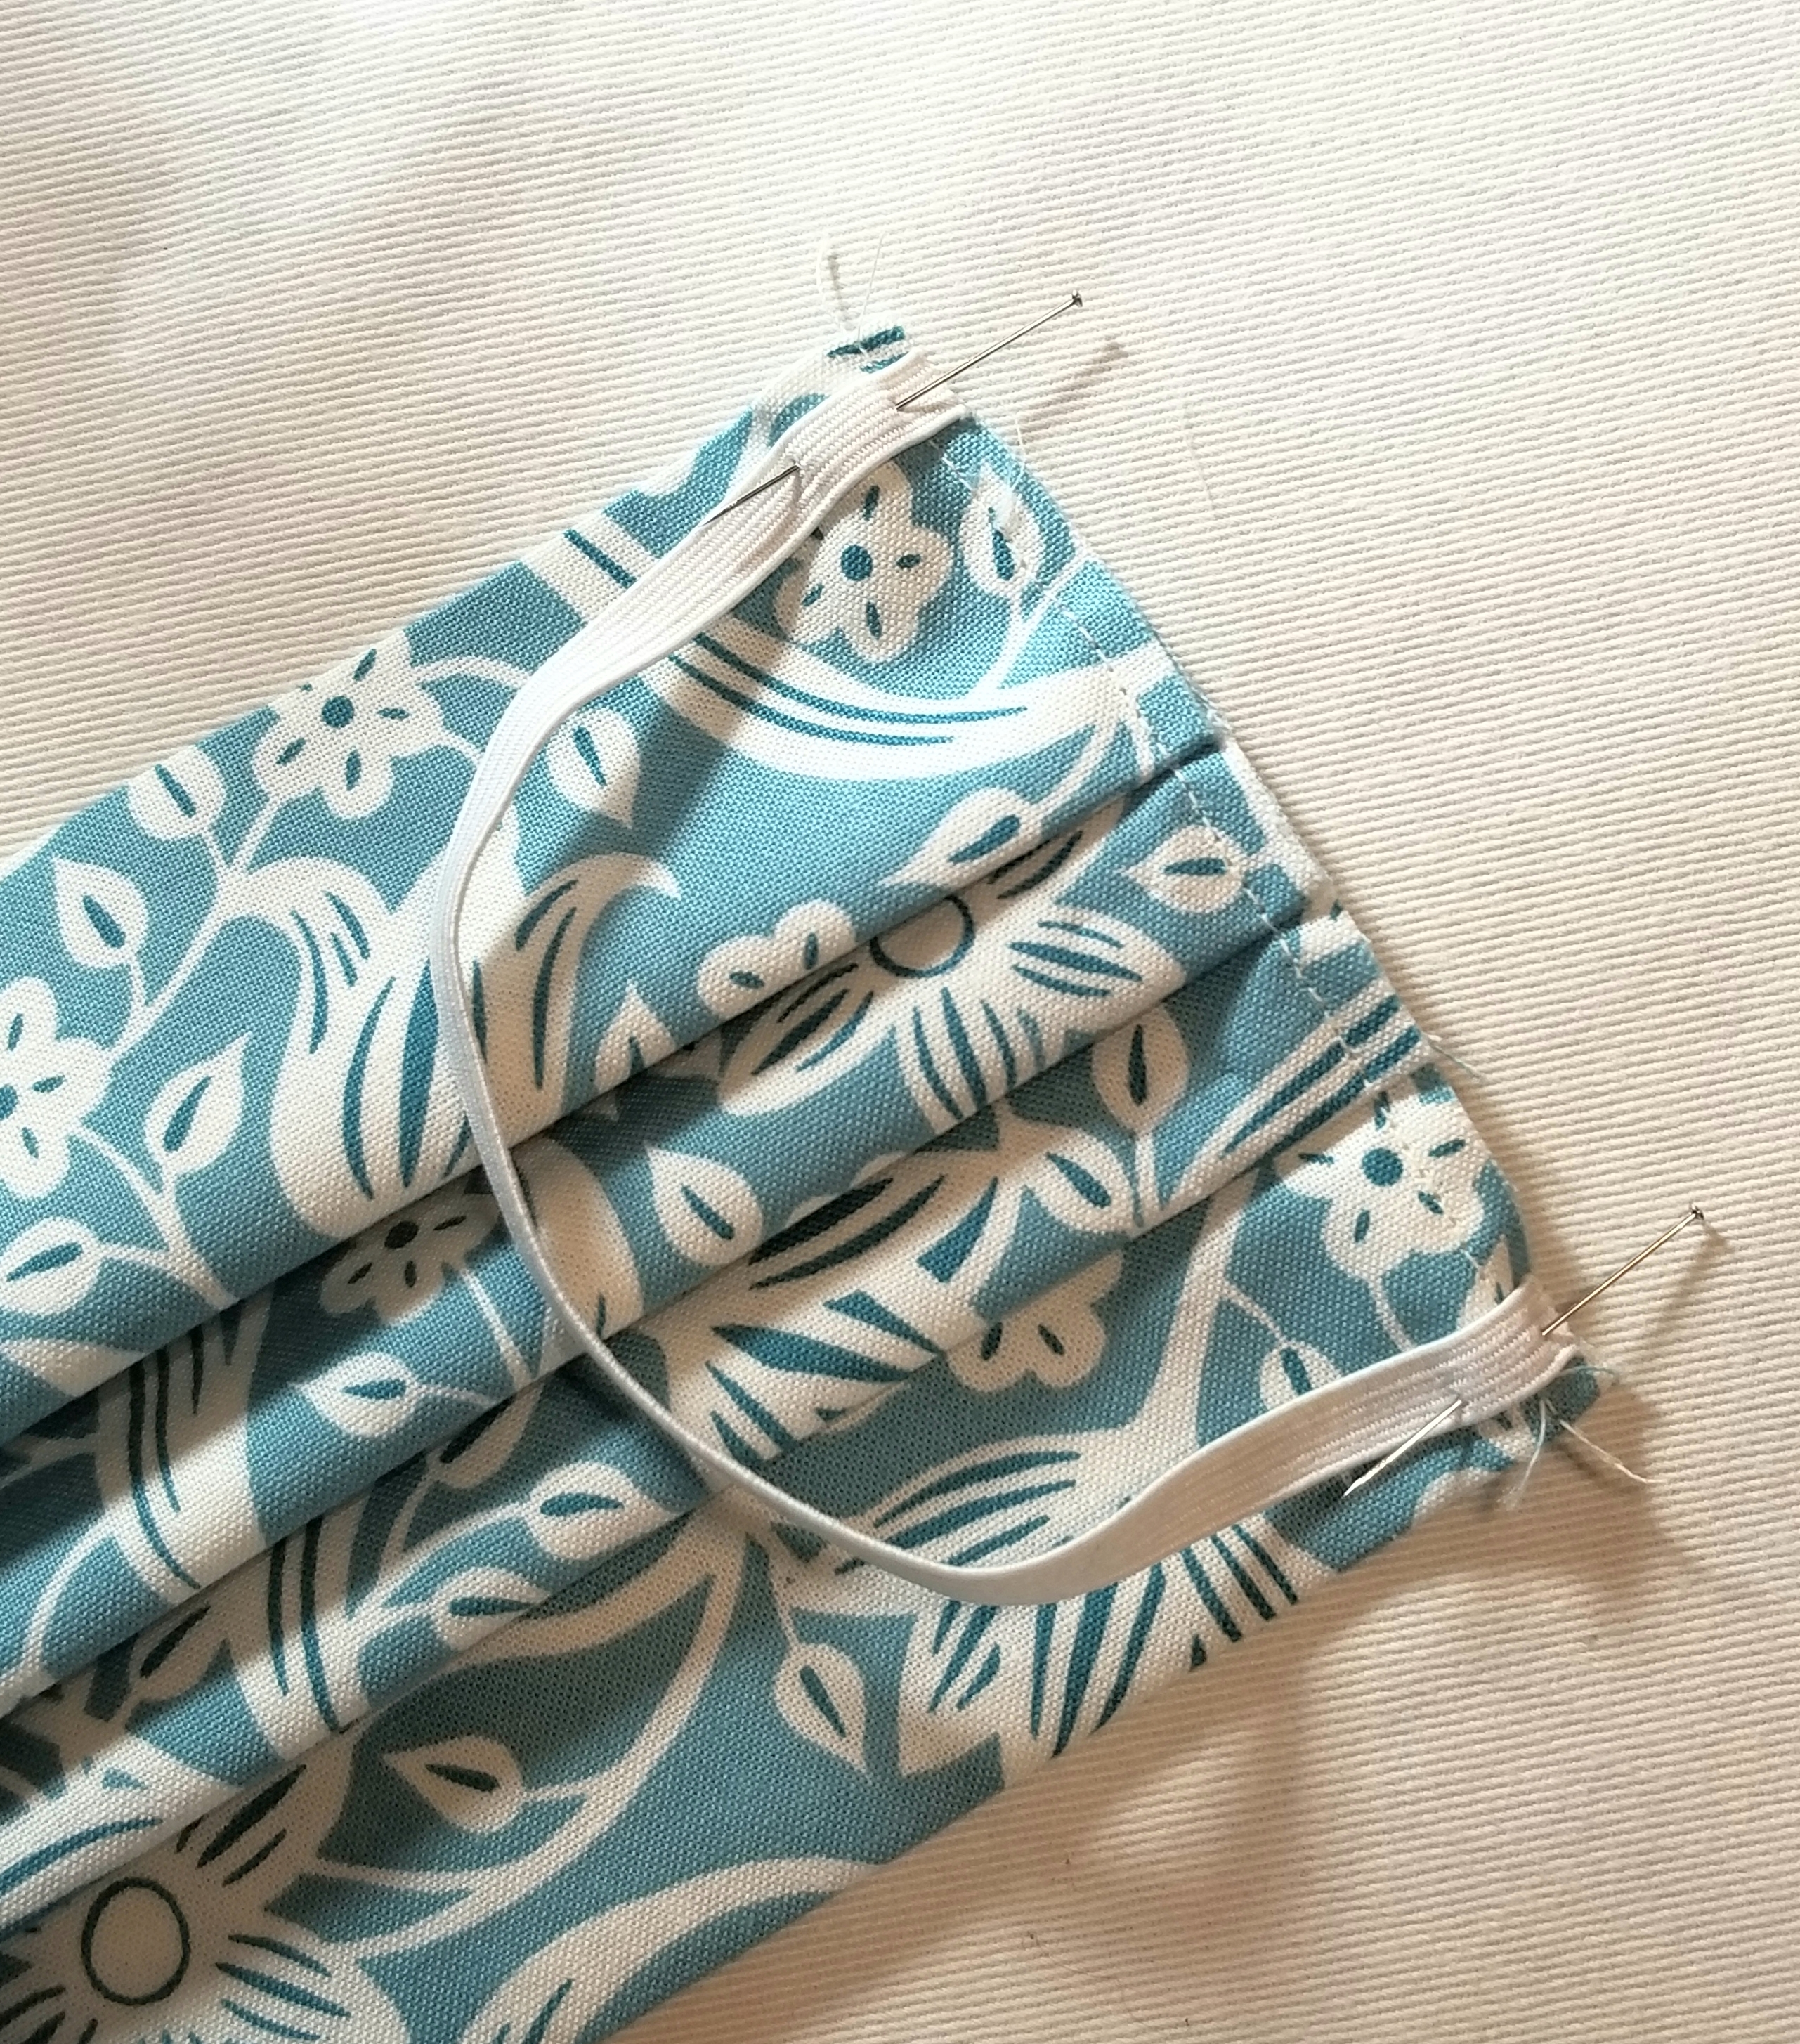
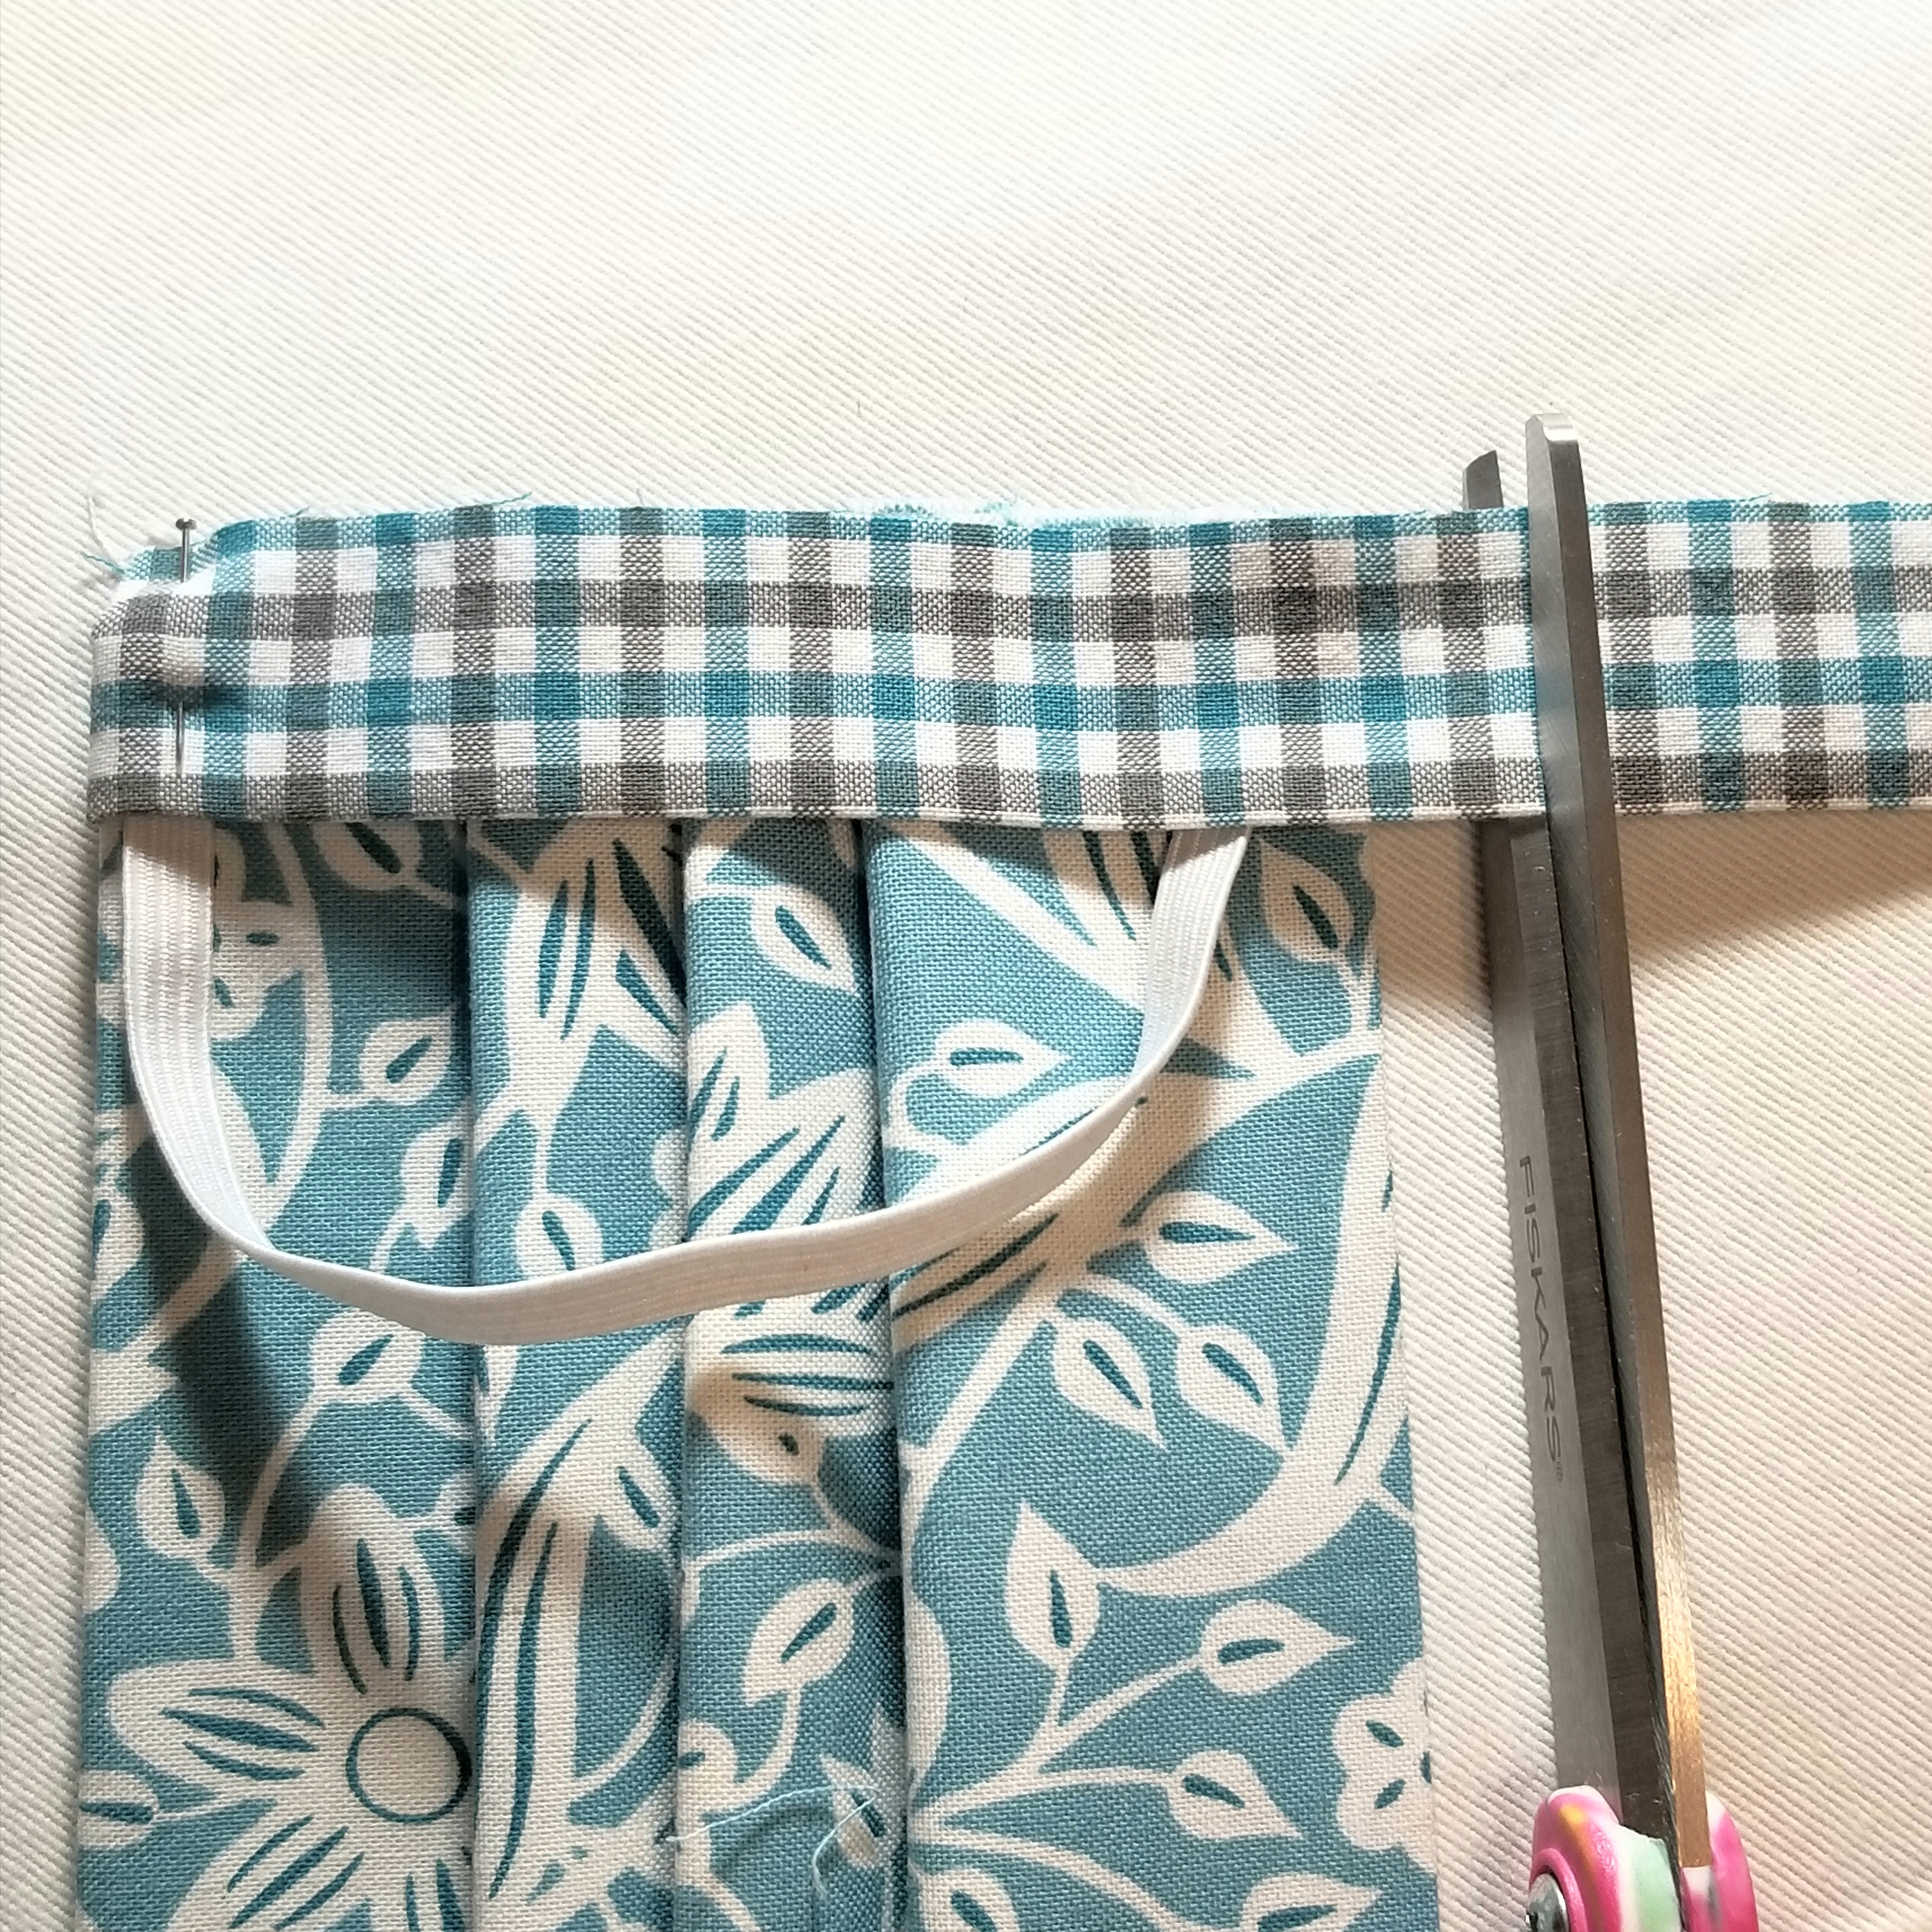
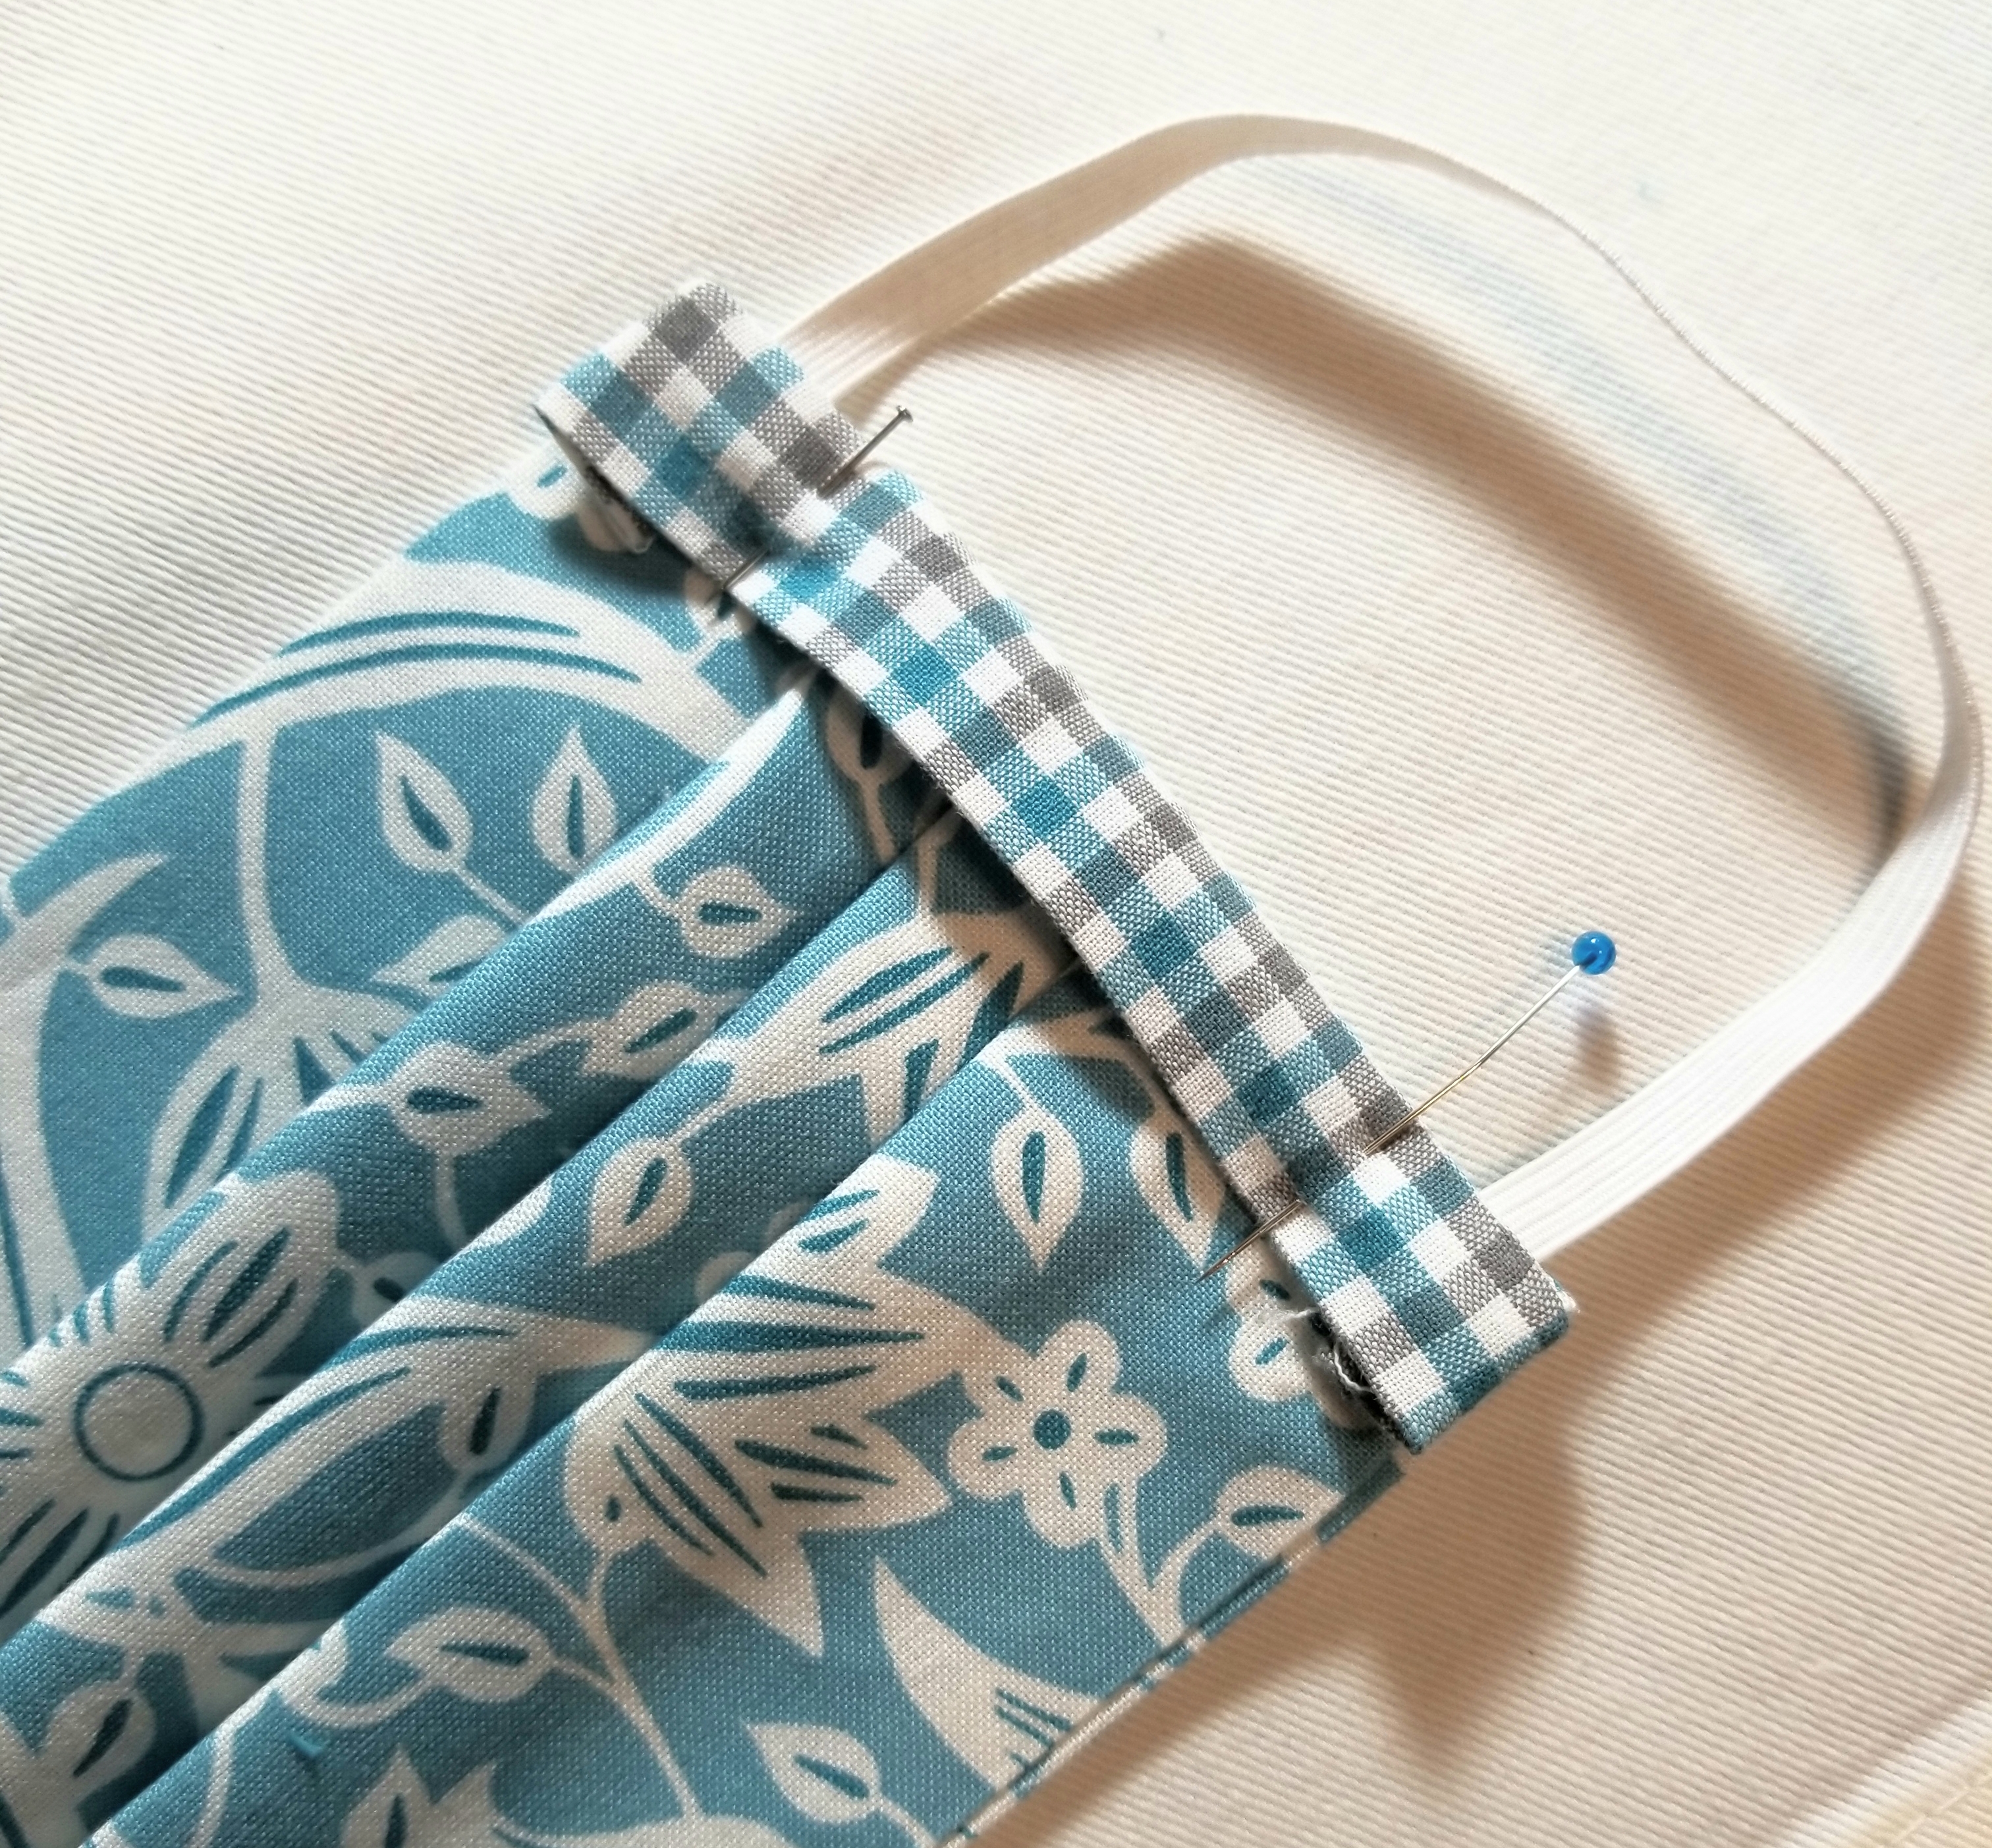
Pin one elastic piece to the raw edge, making sure not to twist it before baste stitching it to the edge at both ends. I placed mine 1/8” from the top and bottom edge of the main pleated piece. Baste elastic in place 1/8” inch from raw edge. Repeat, to attach remaining elastic piece to the other raw edge.
Your pleated piece should now resemble the picture above.
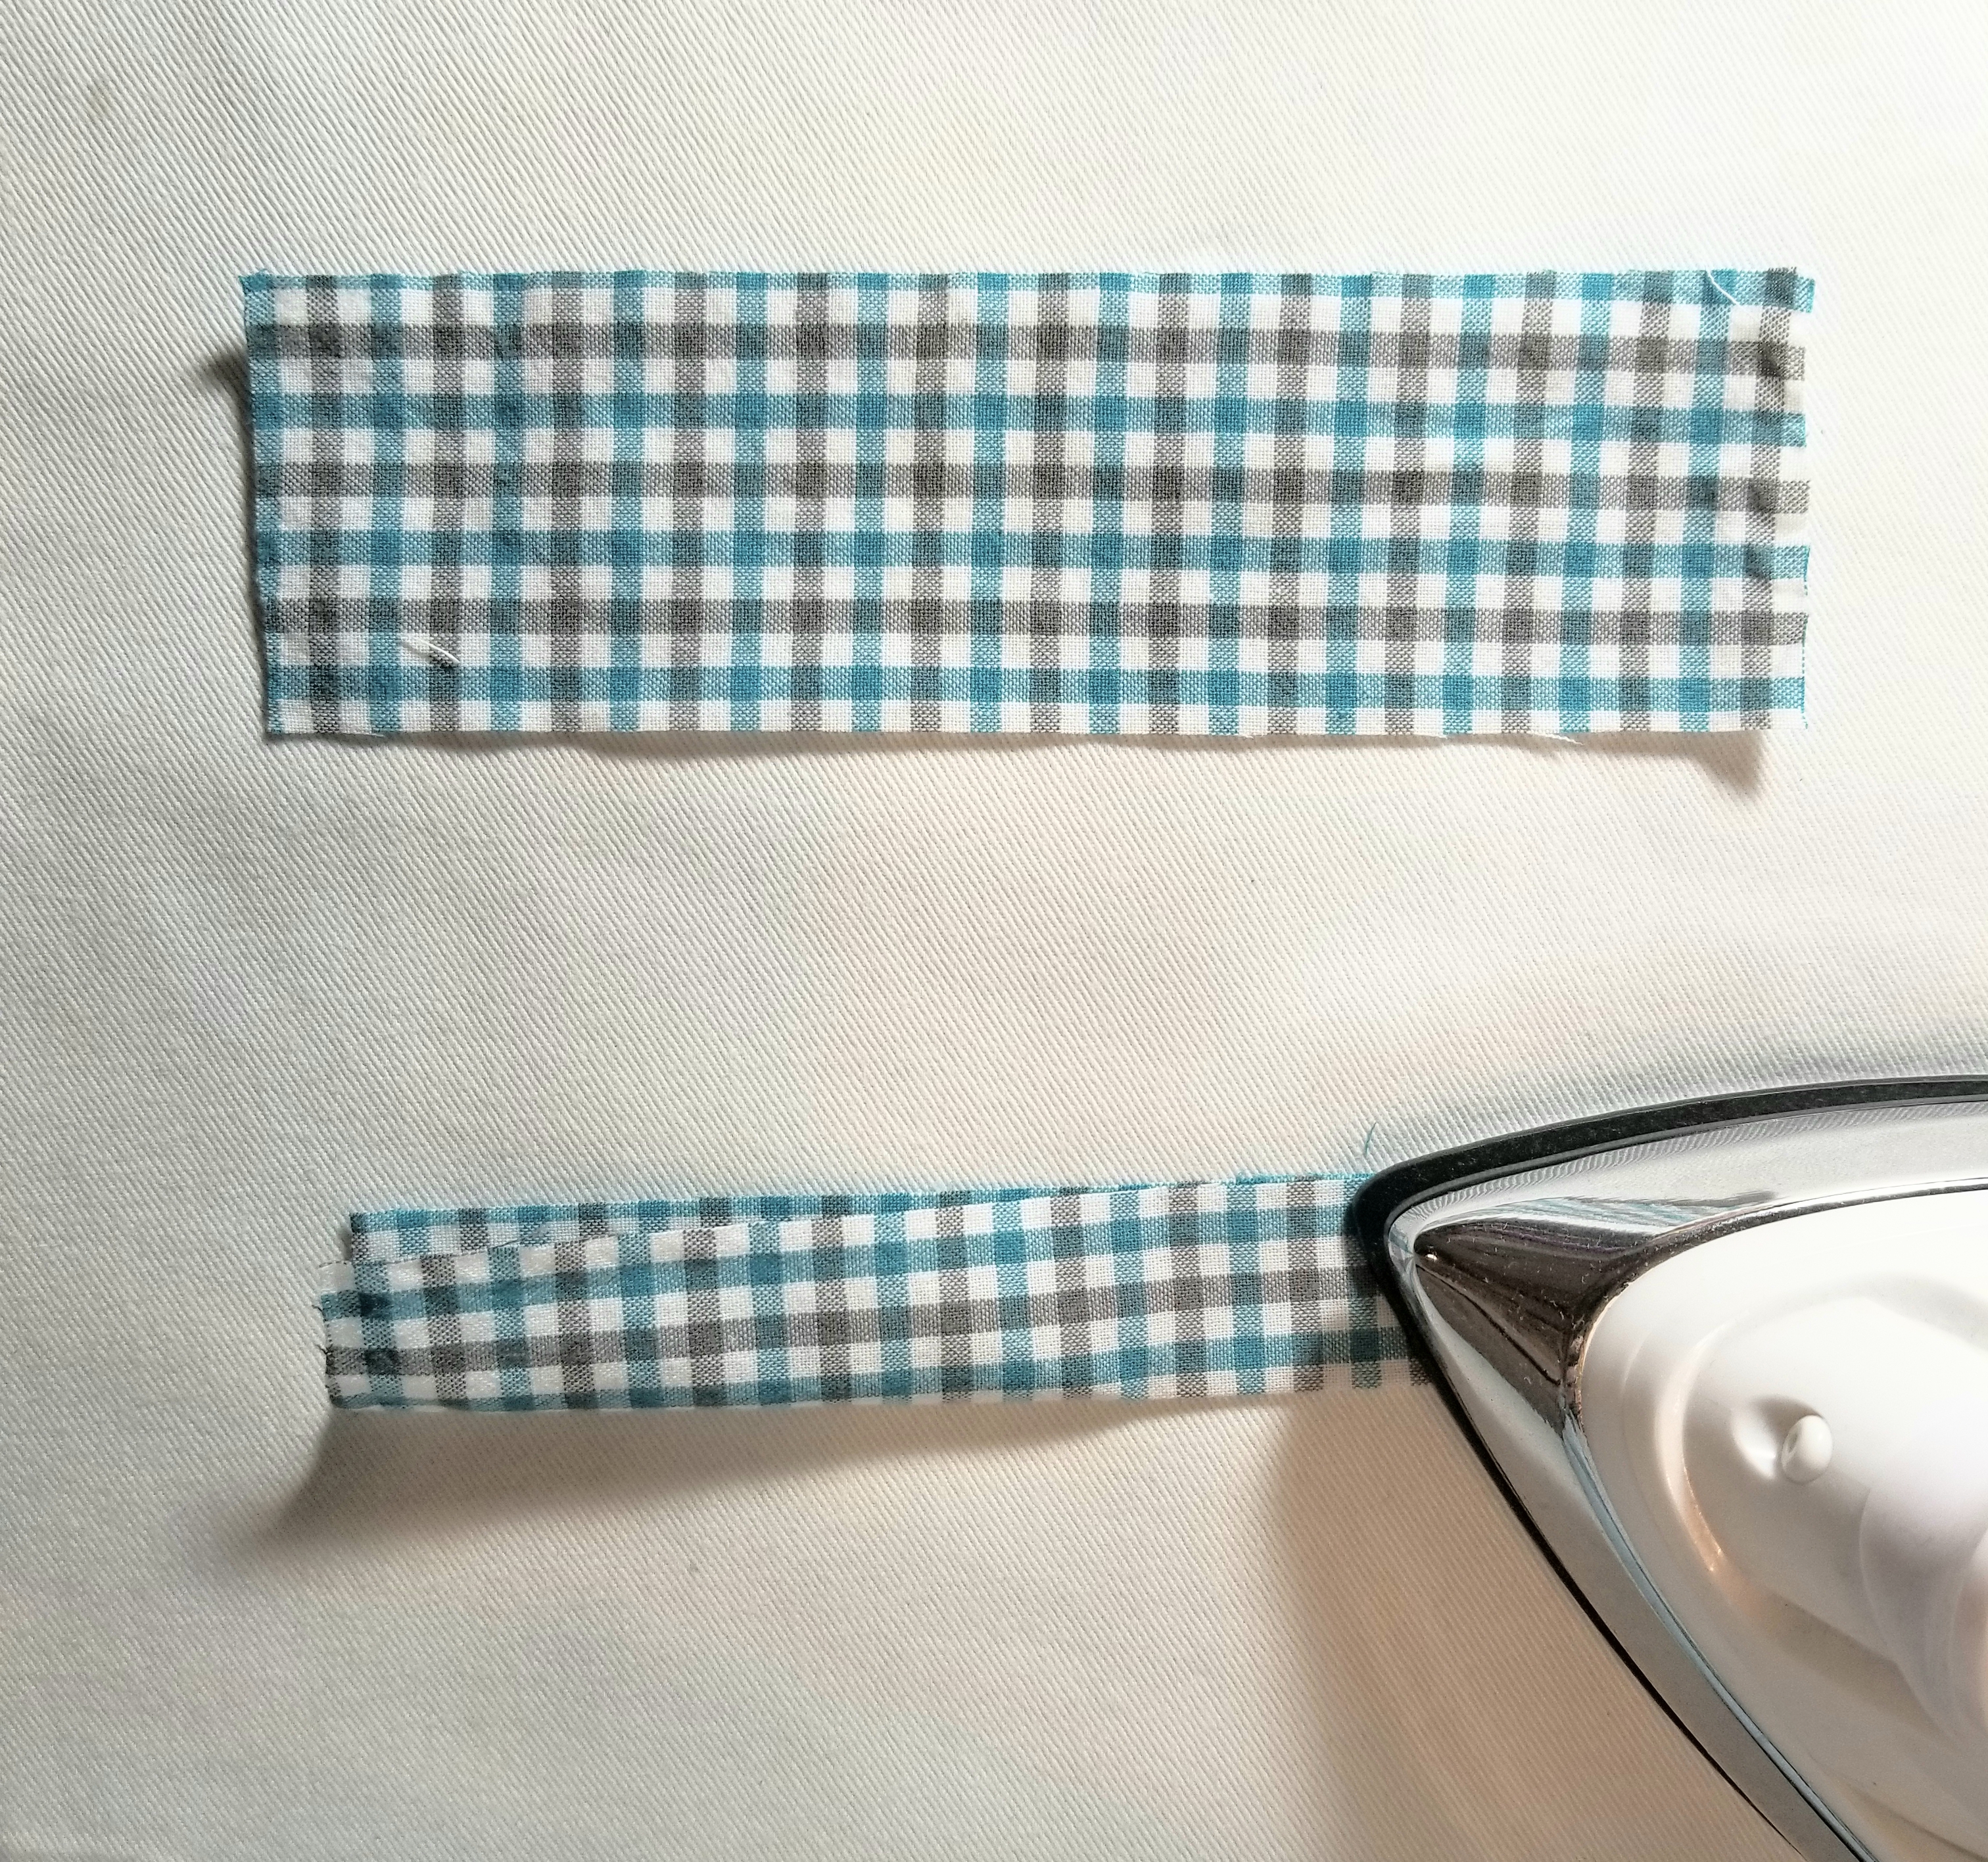
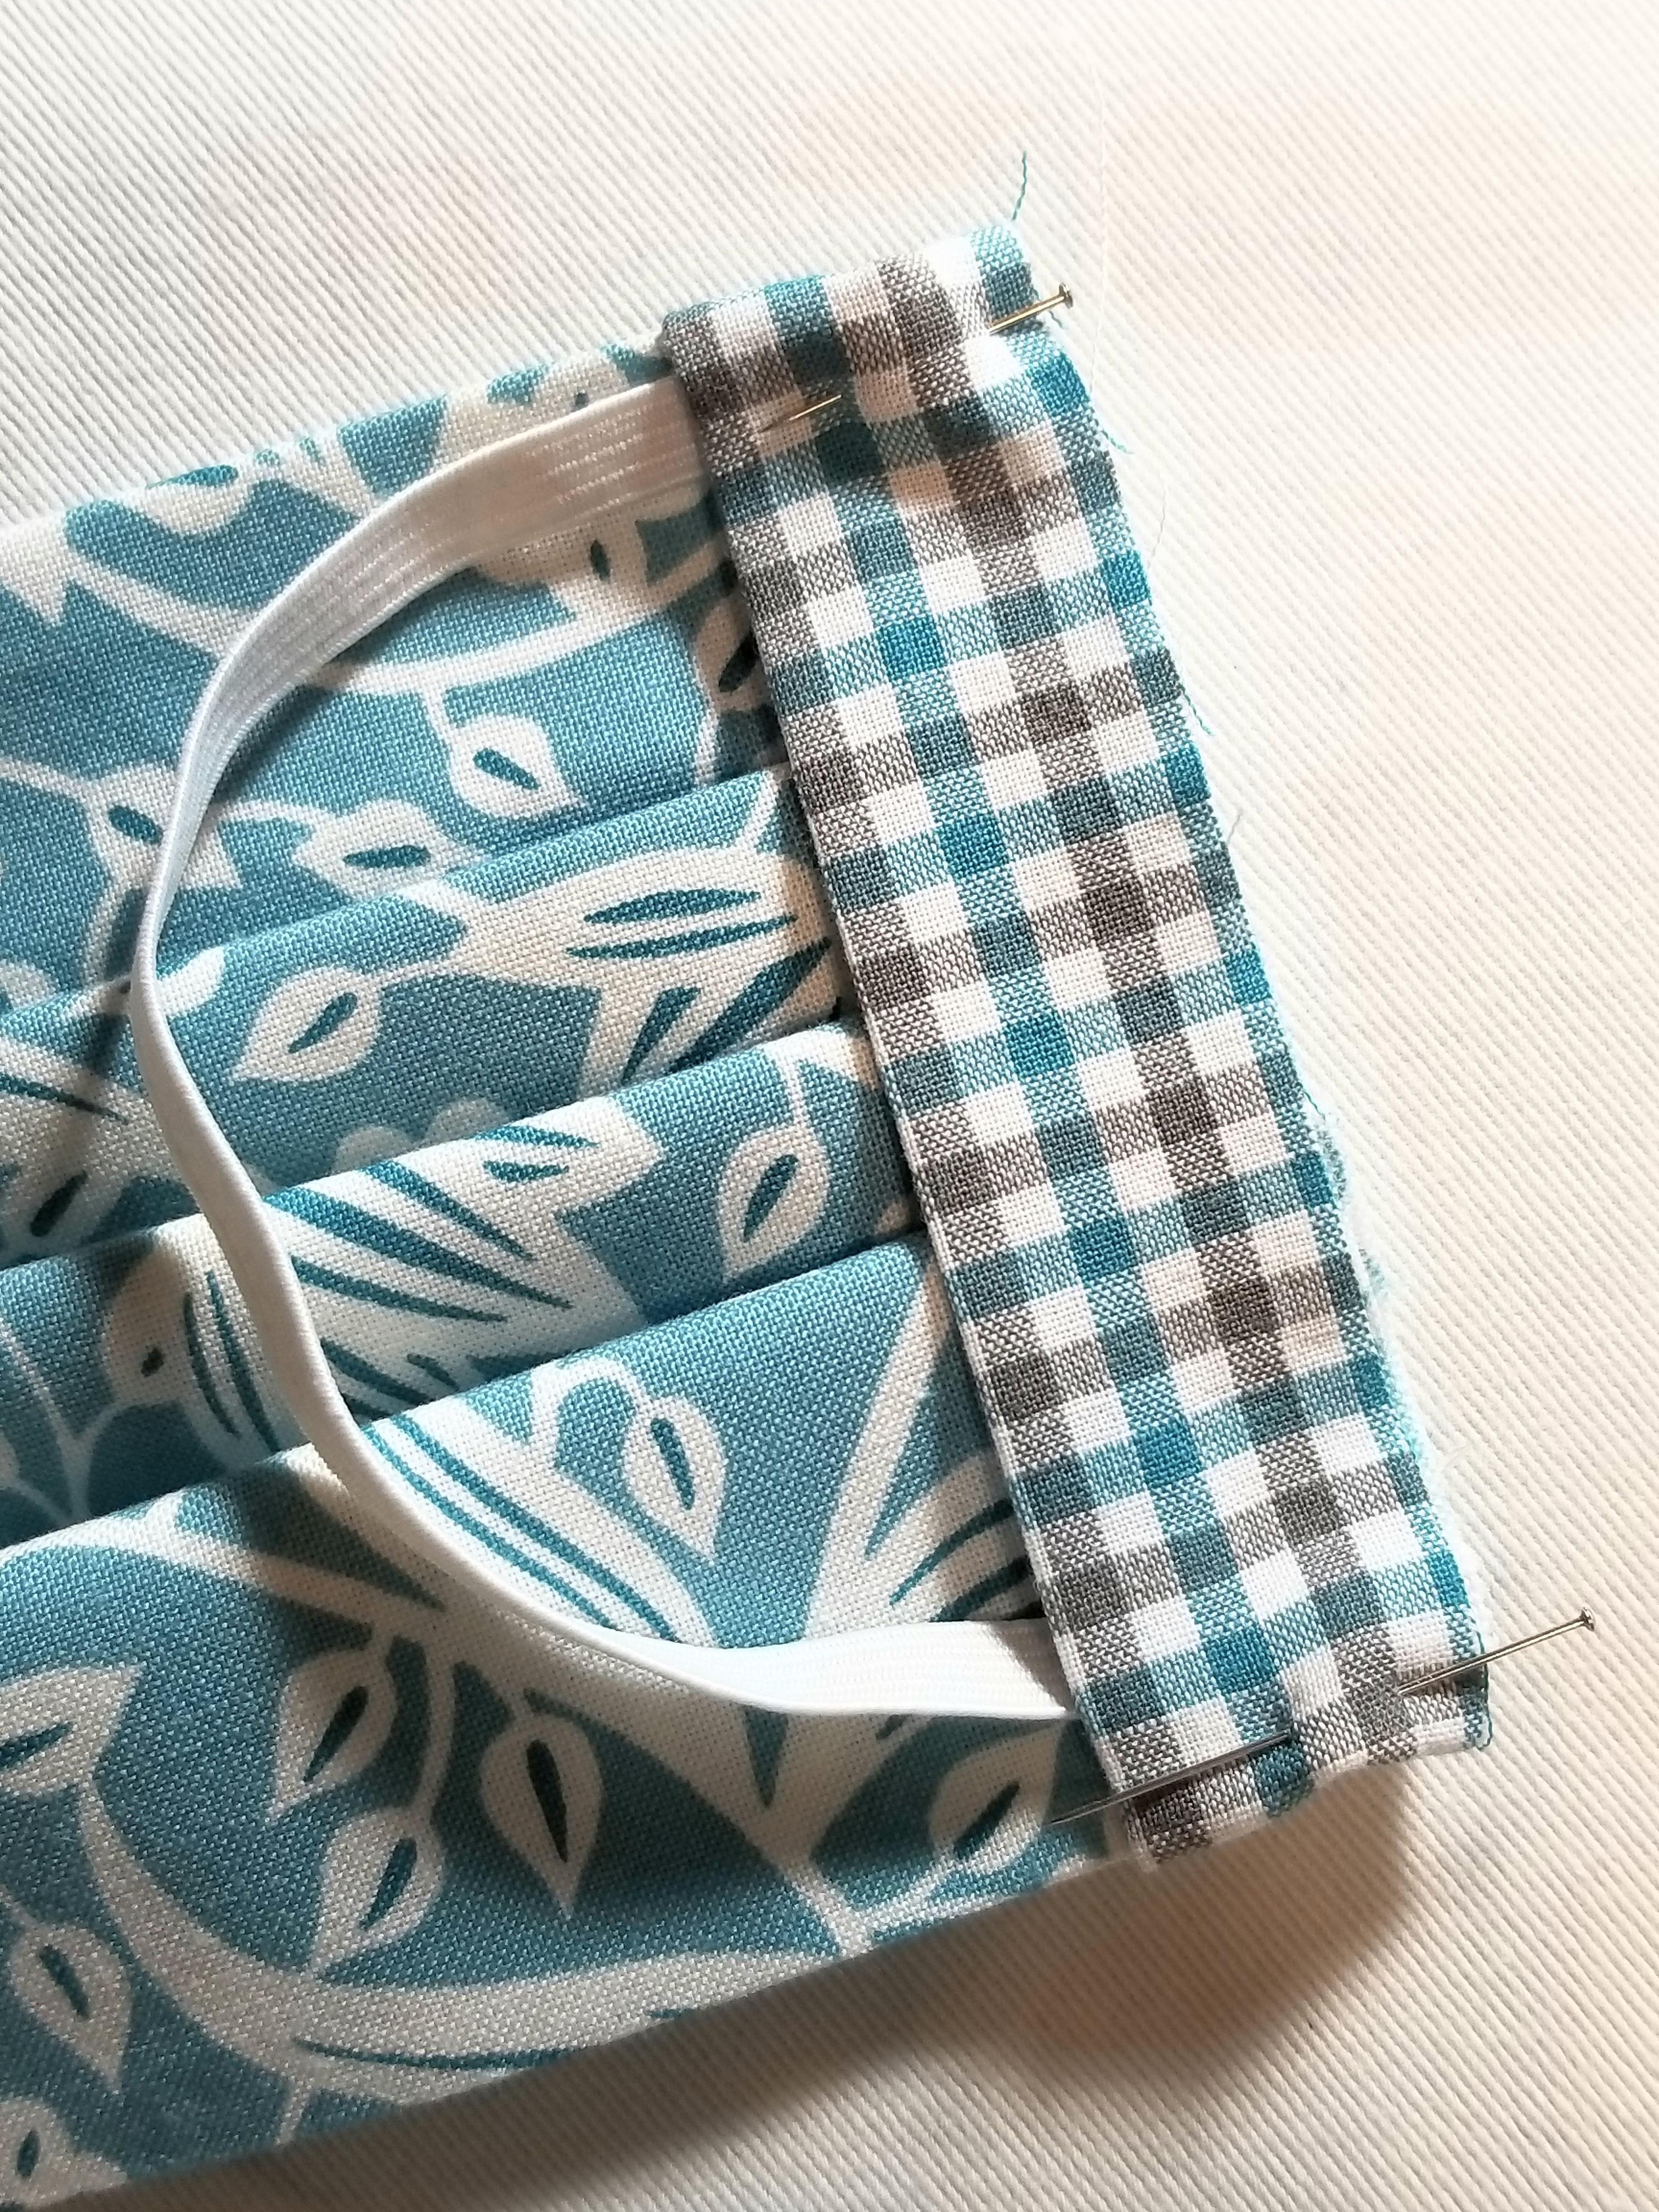
Fold each accent strip of fabric lengthwise in half, matching raw edges, as shown in the picture above. Press.
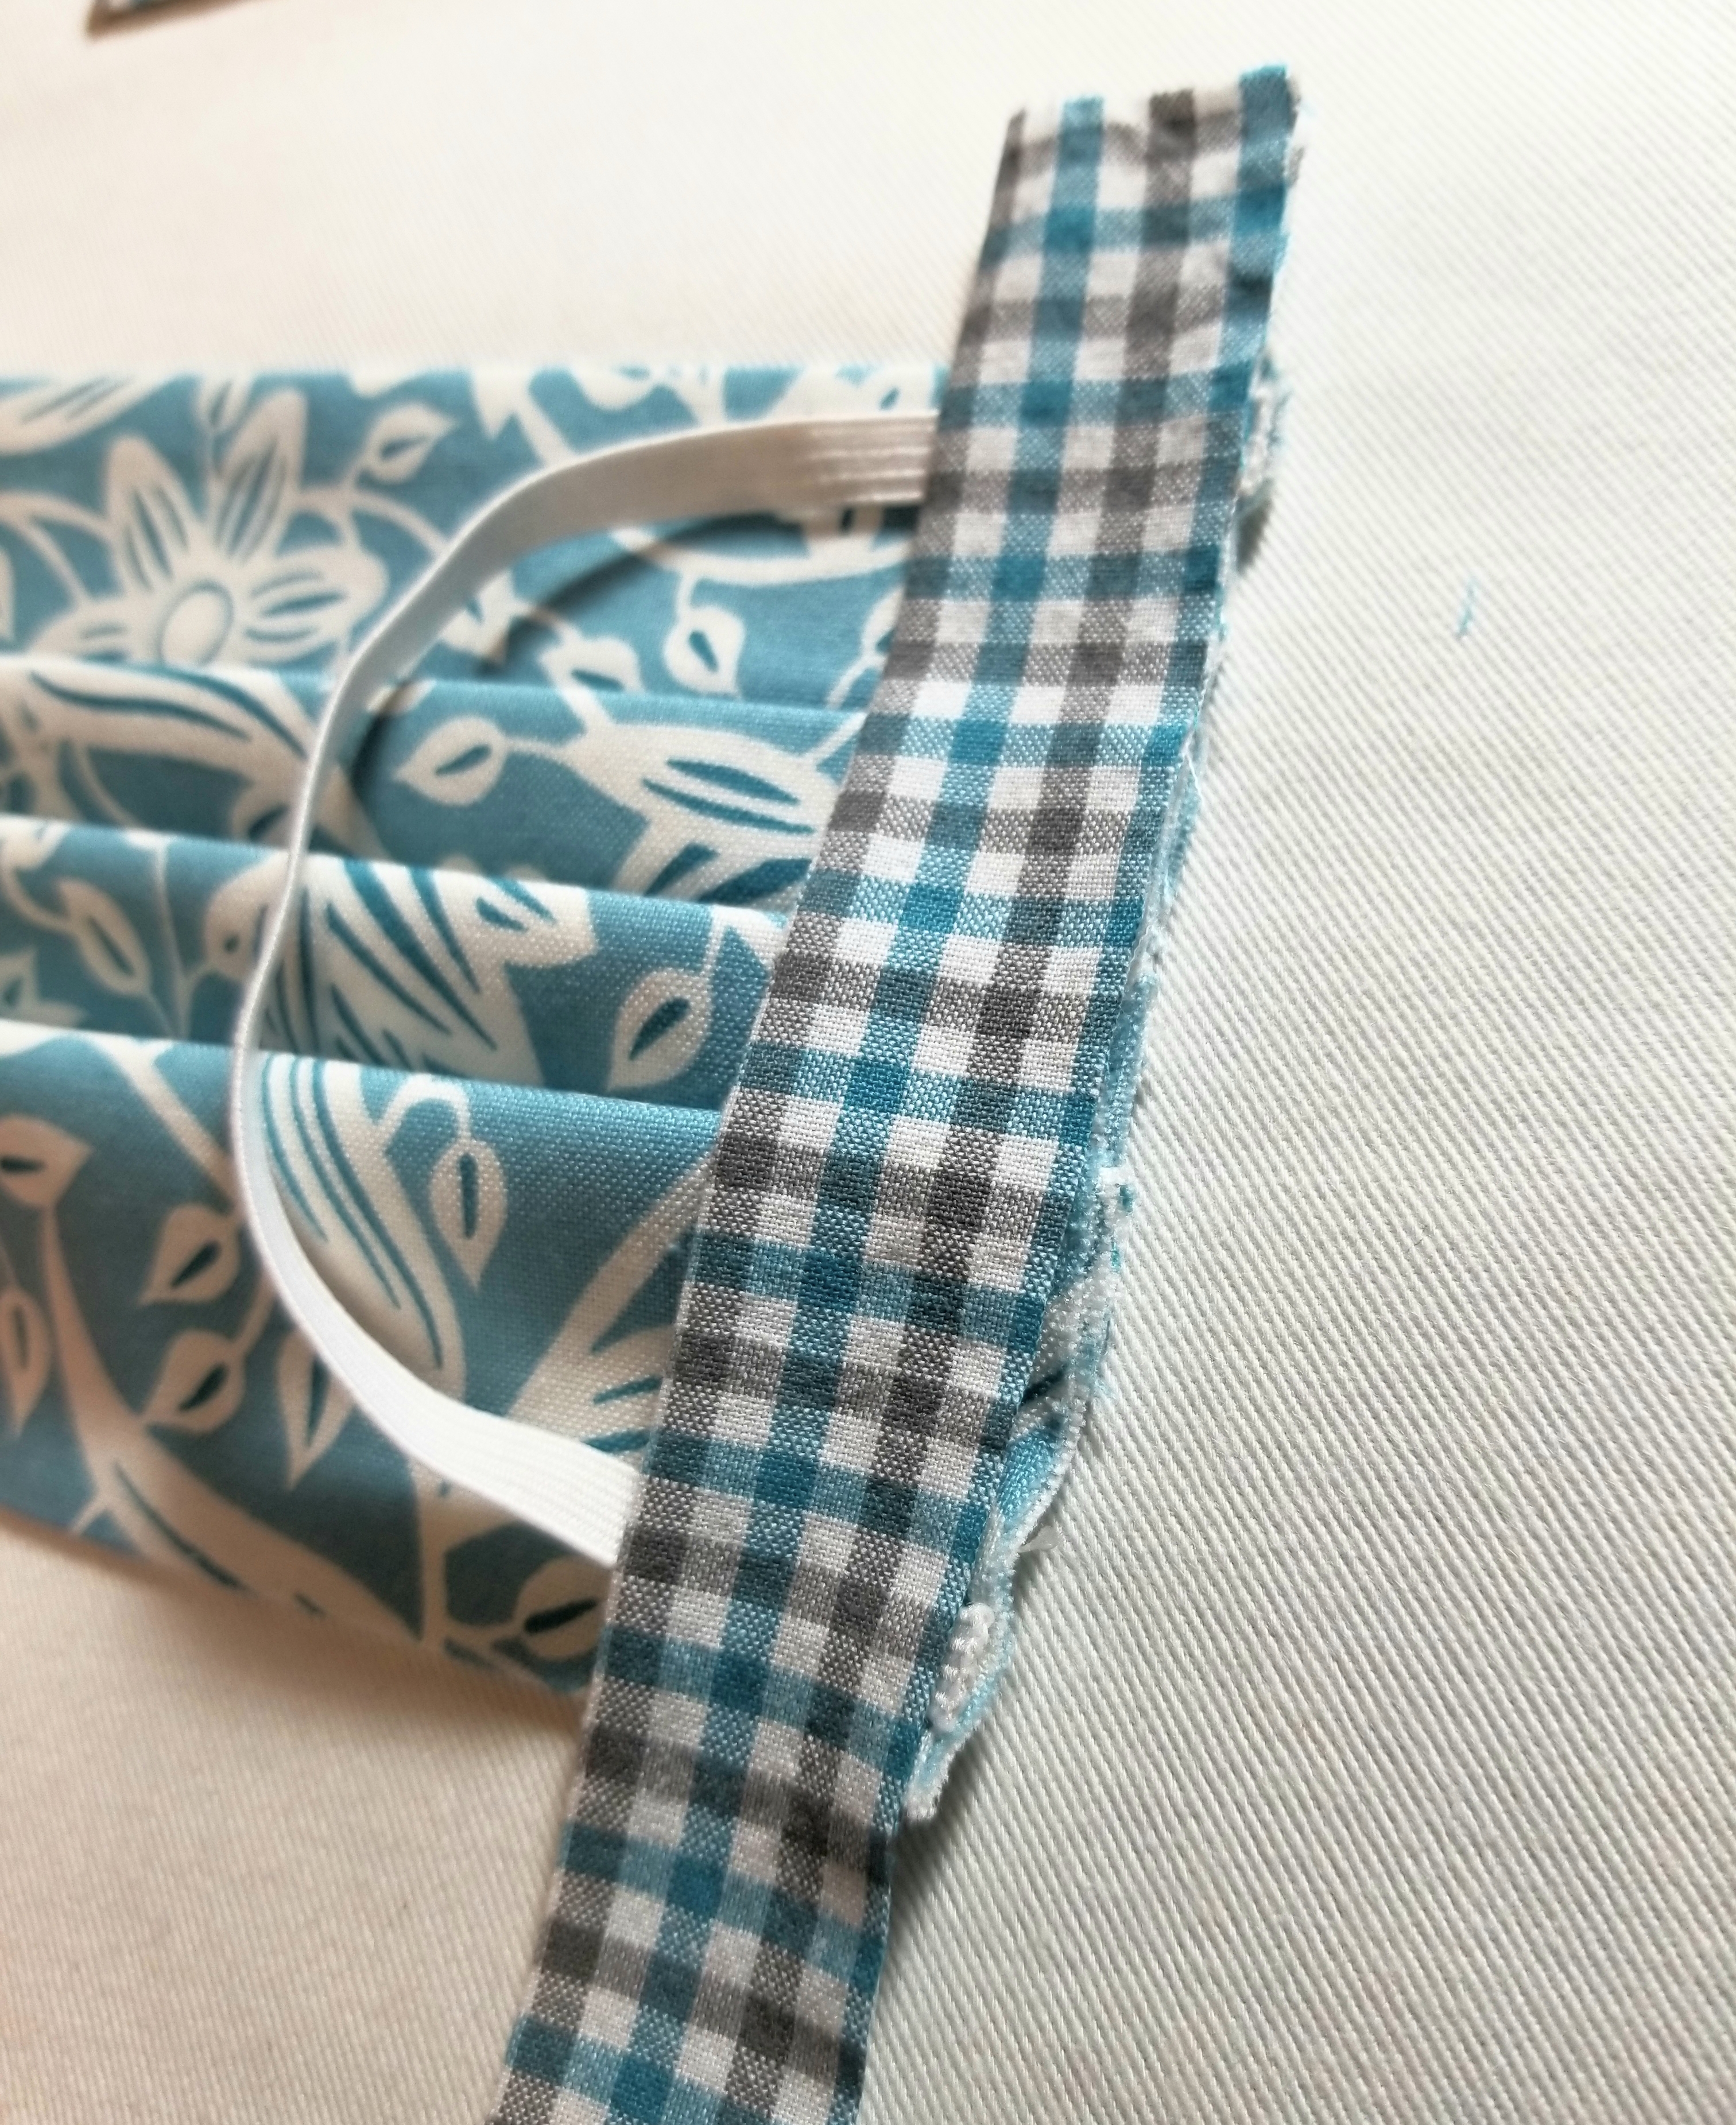
Place the strip on top of the elastic. Make sure the raw edge is facing outward, and the creased edge is facing the main body of the pleated piece. It will be a little longer on the top and bottom and that is okay, as we are going to fold some of that to the back.

Tuck about 1/2” of the top edge to the back as shown in the picture above.
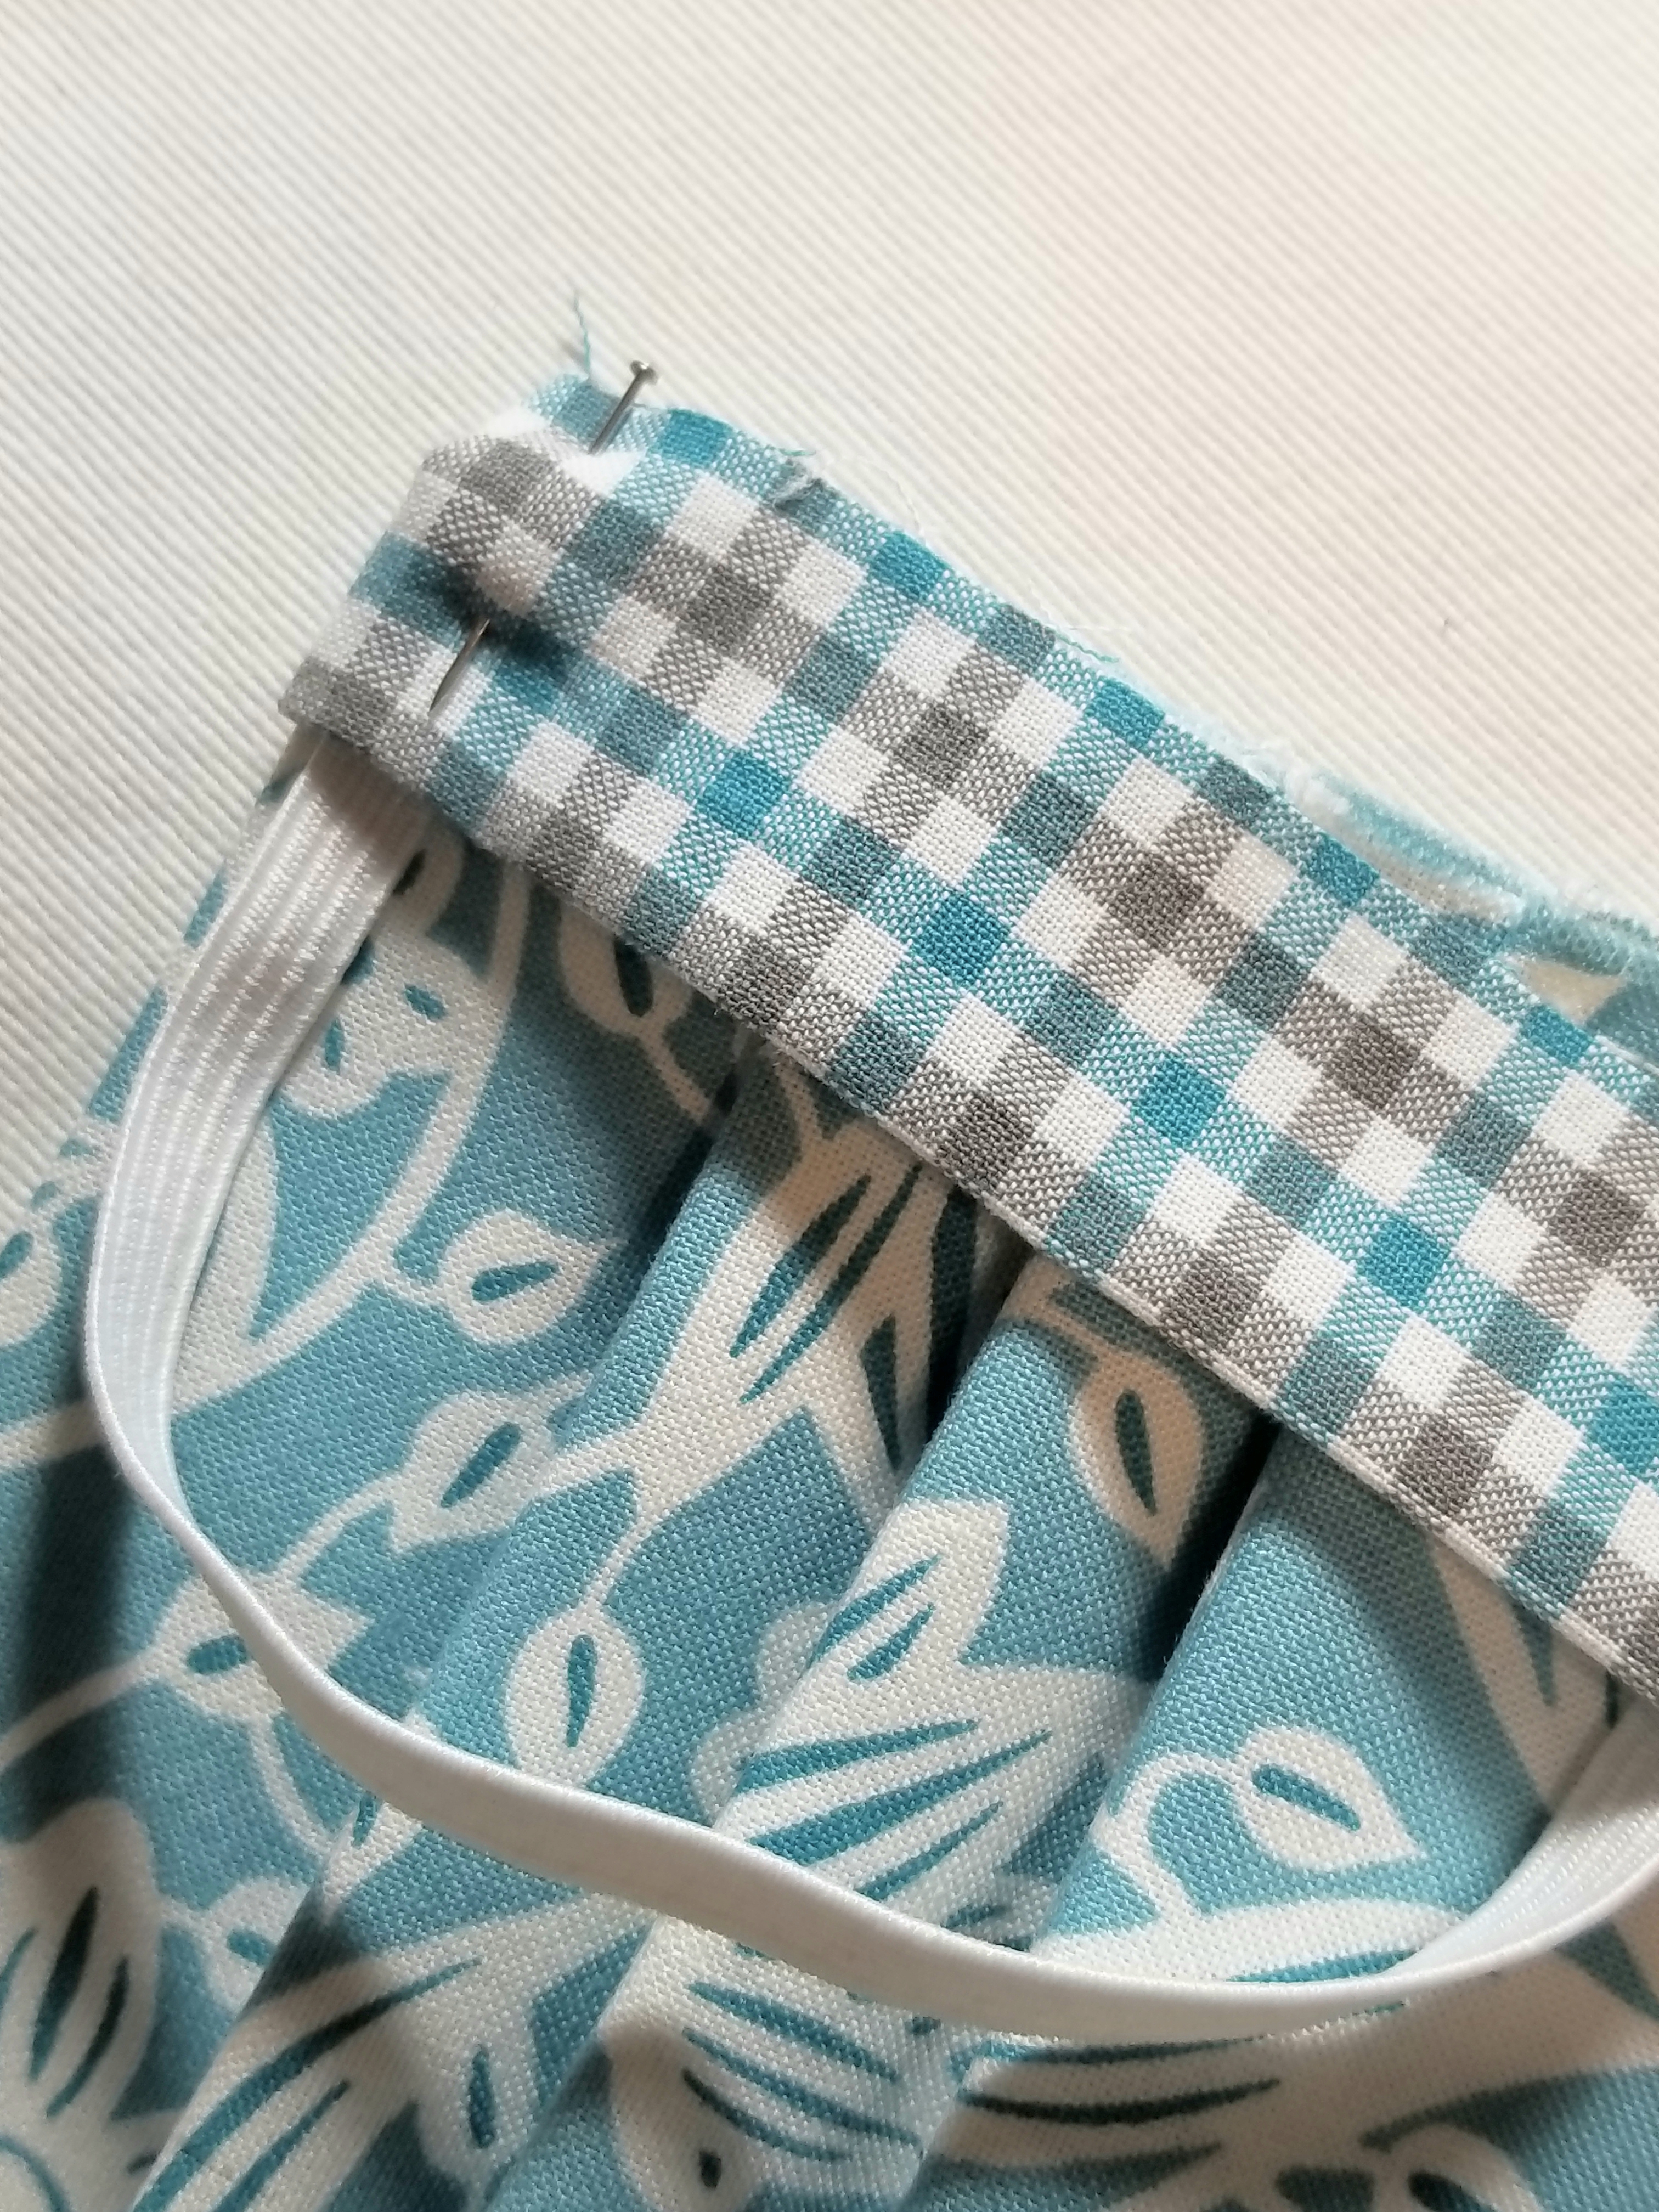
Pin all layers in place.
Trim the other end of the accent strip, so that it is about 1/2” longer than the bottom edge of the main pleated piece.

Fold the bottom edge of the accent fabric strip to the back, just as you did with the top edge.
Pin both ends in place.
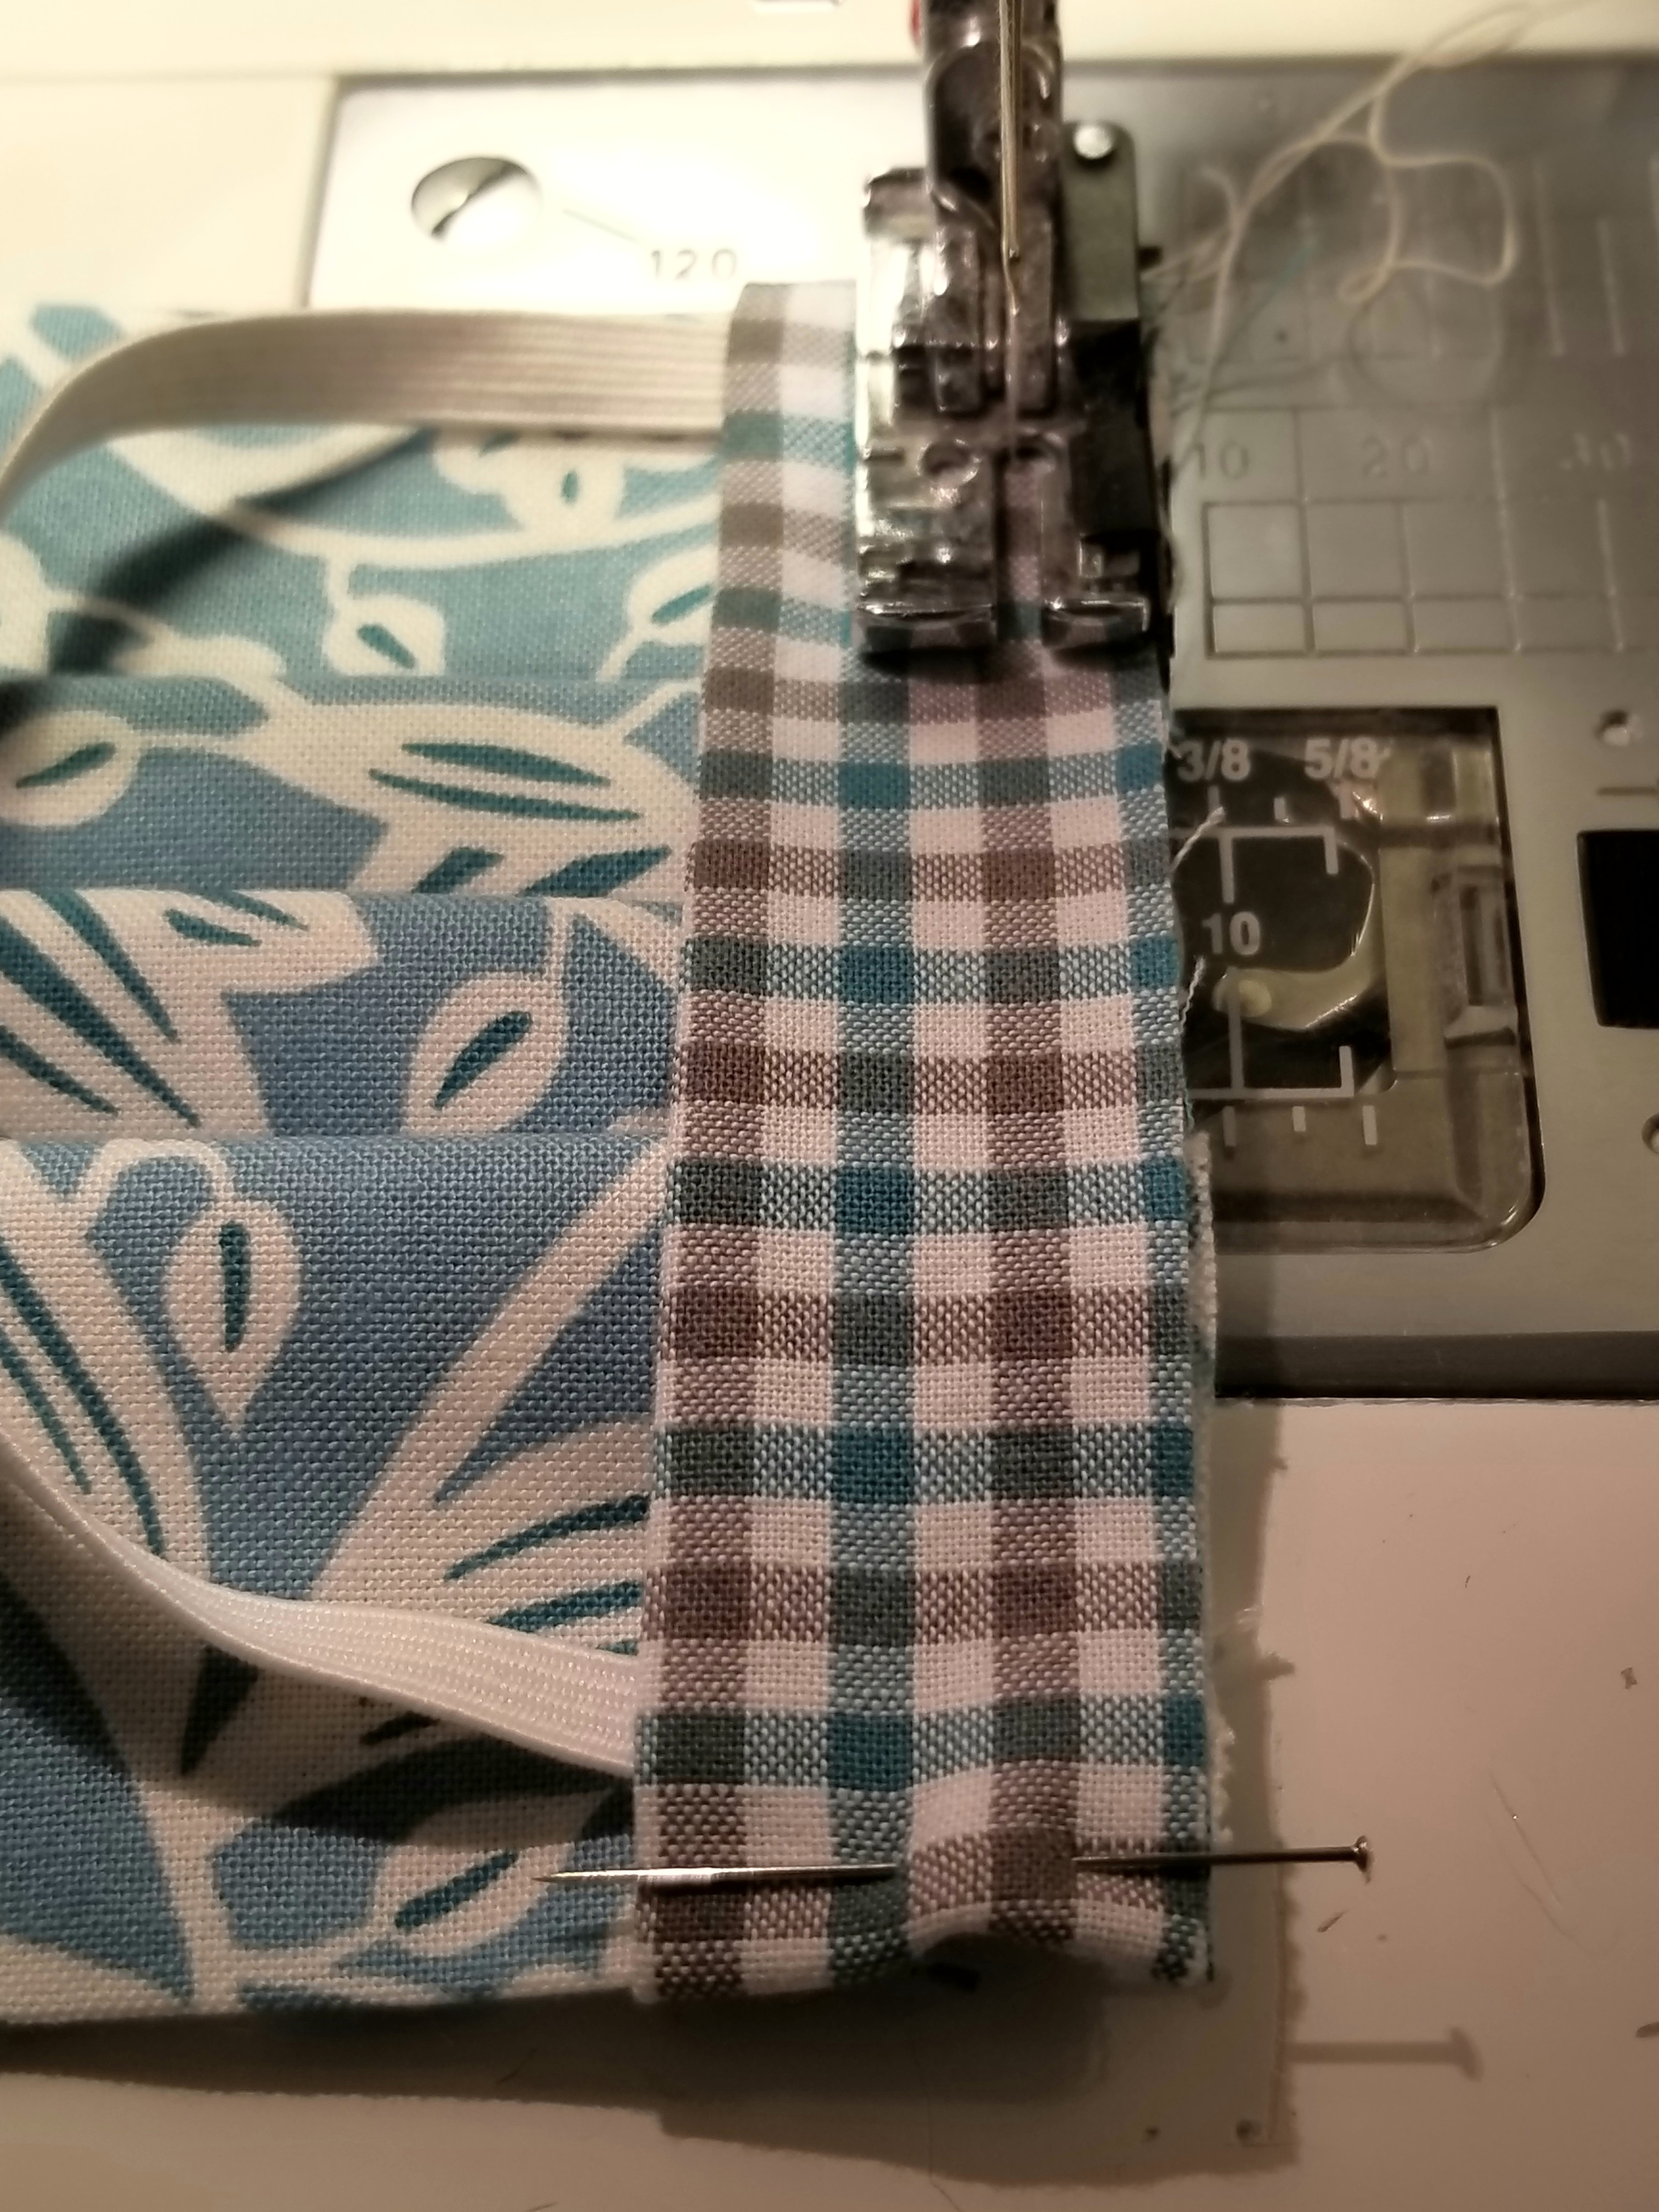
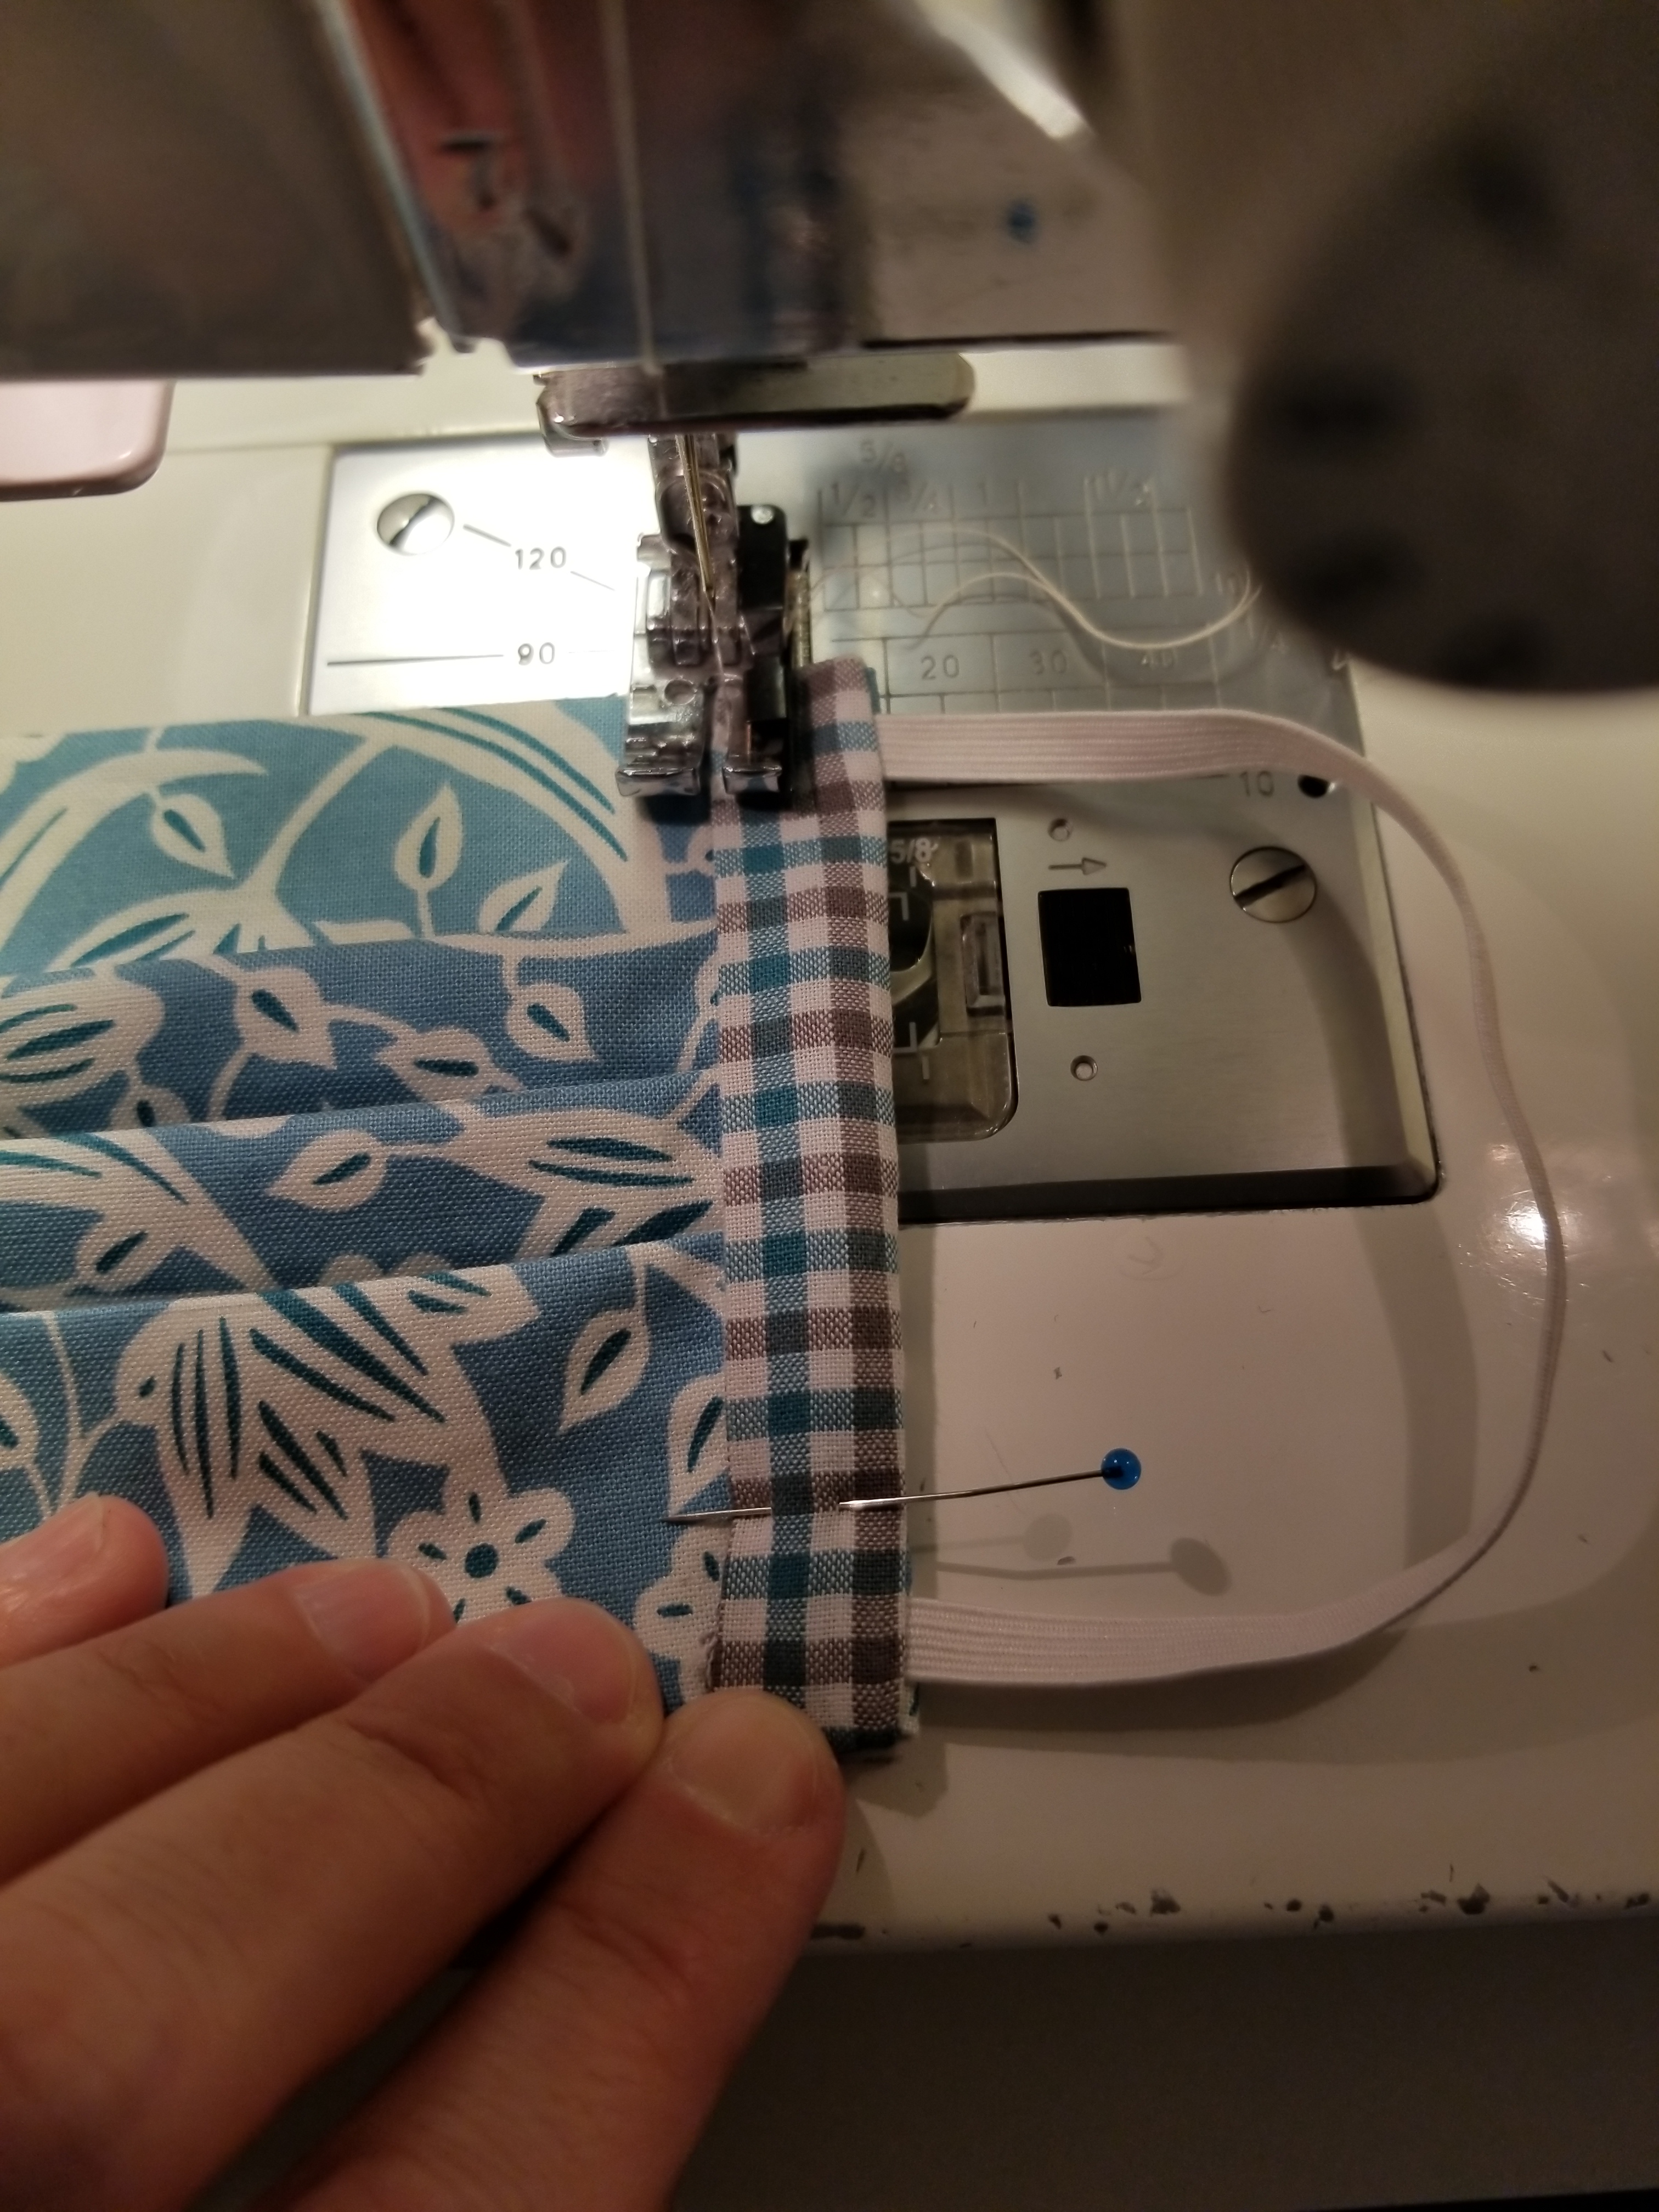
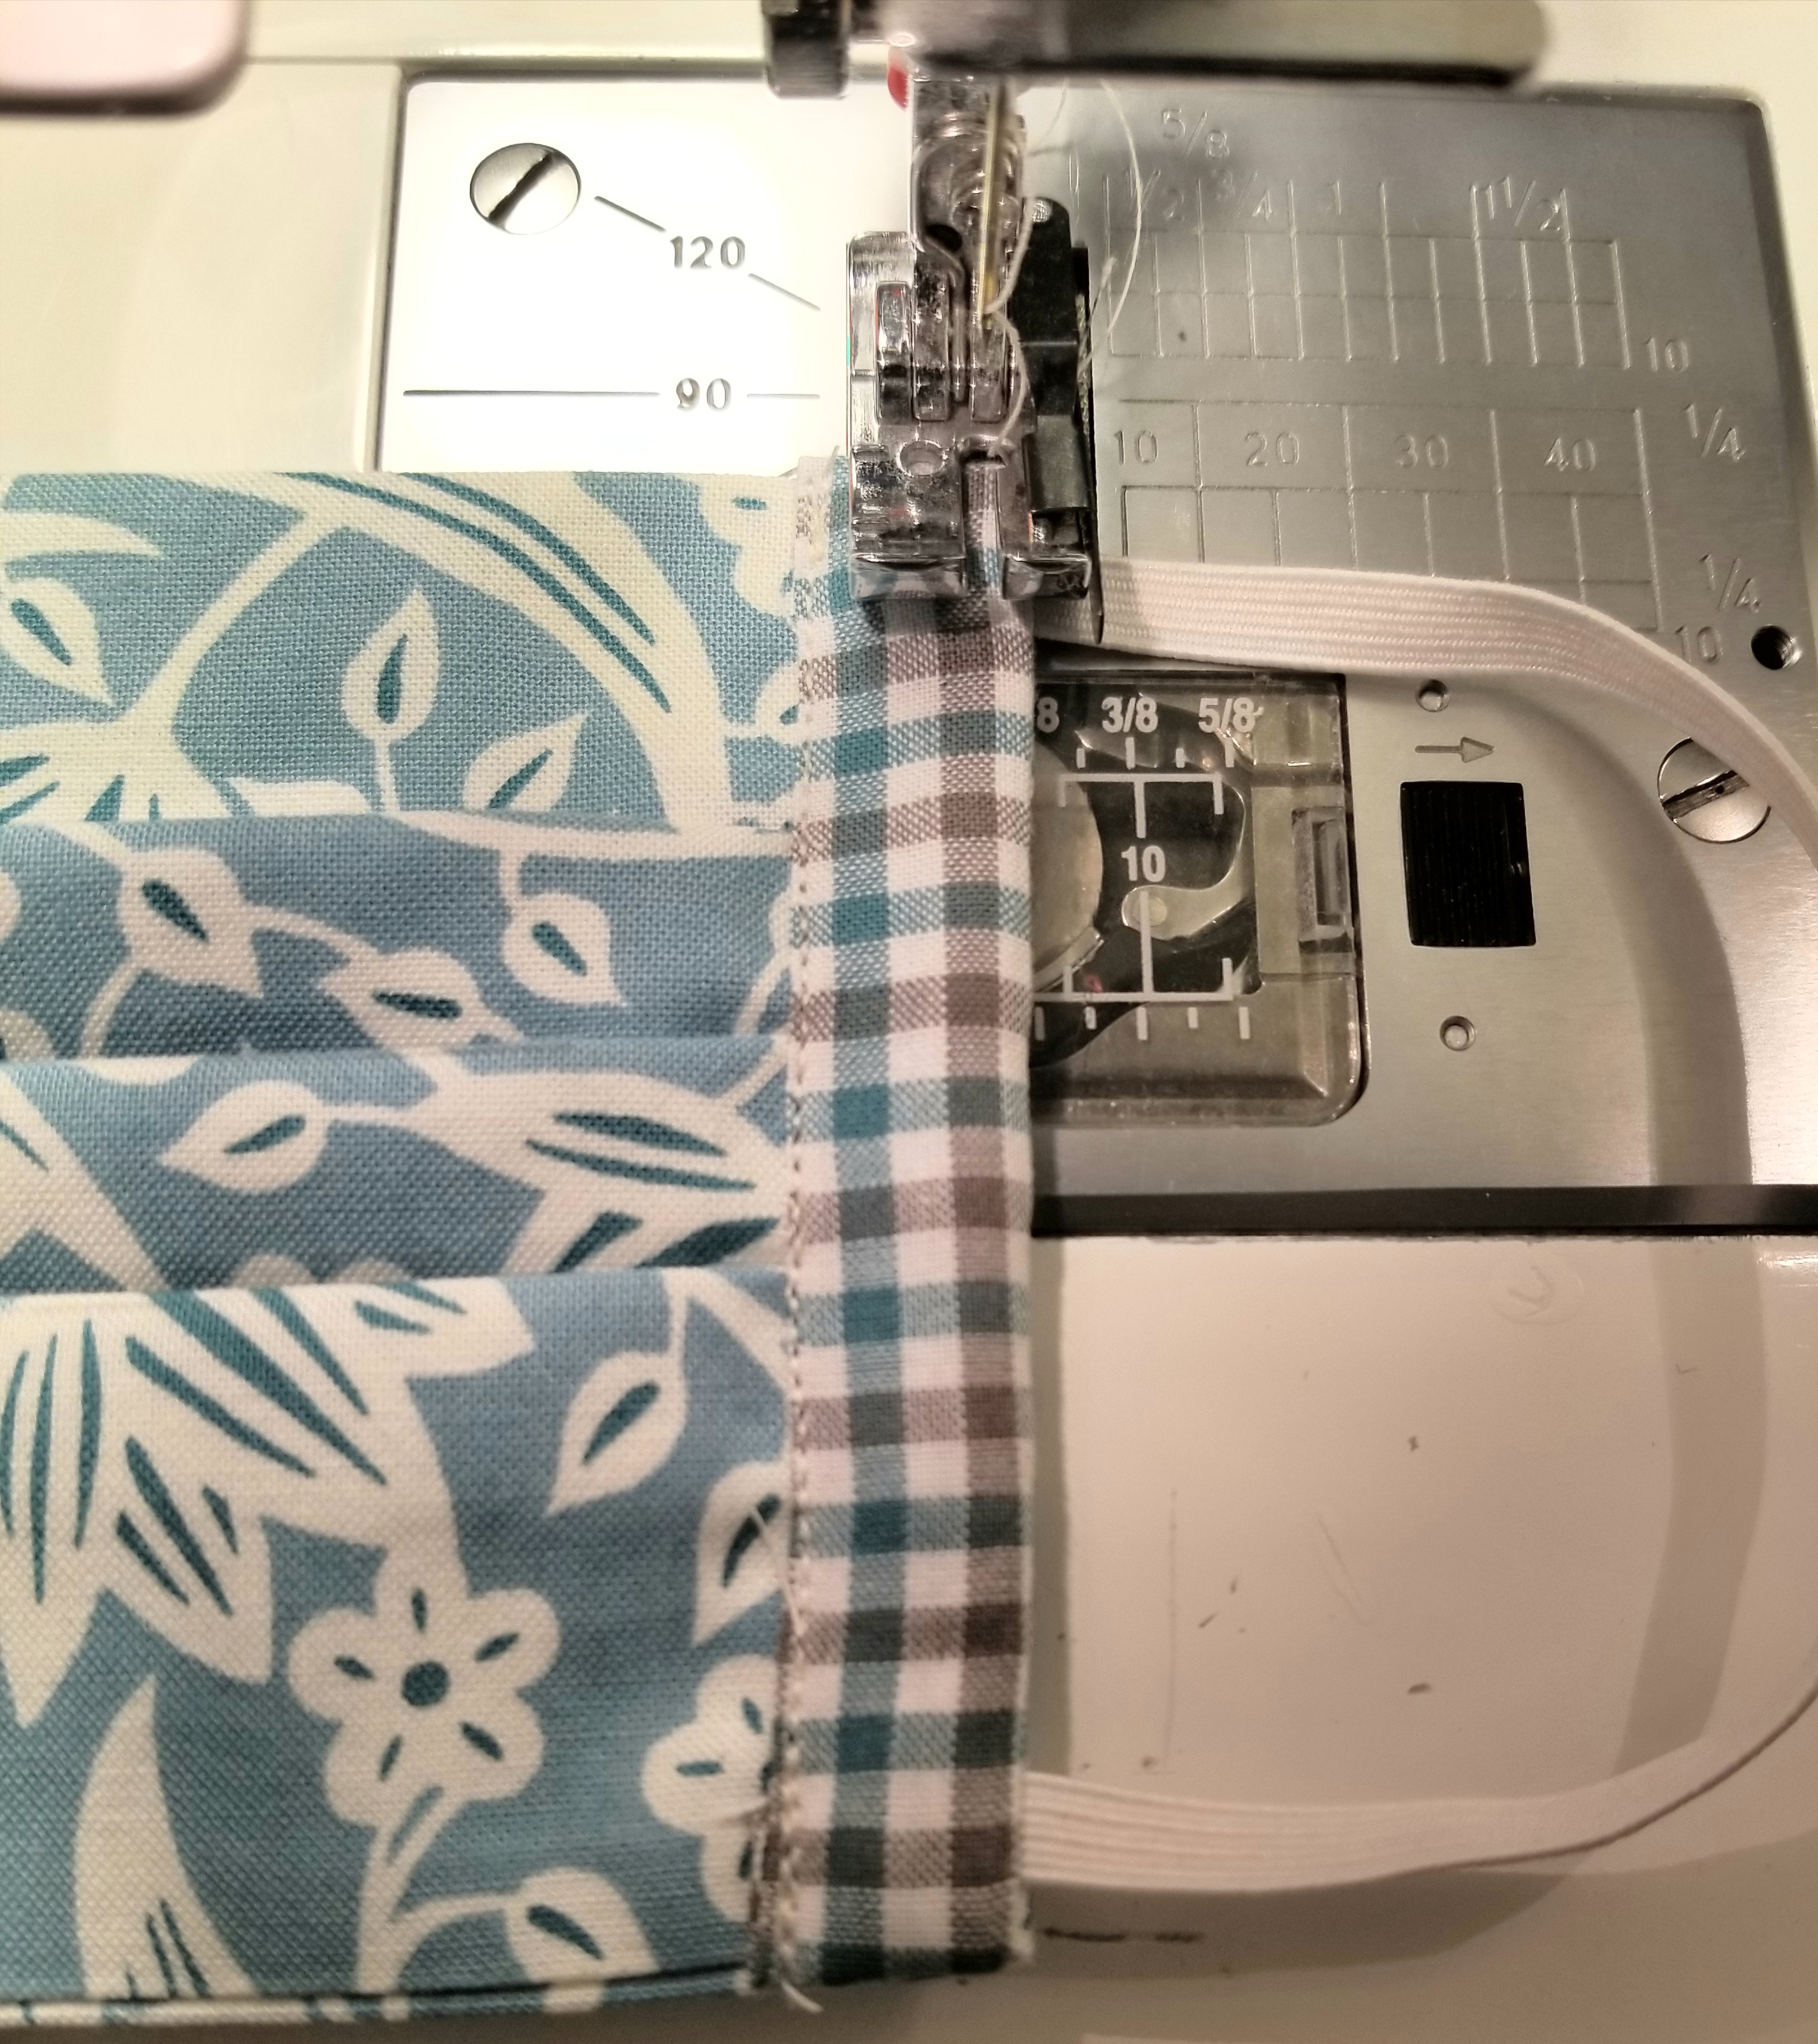
Using a 1/4 inch seam allowance, stitch the length of the entire edge, making sure to back stitch at the beginning and end.
Open the the accent fabric strip seam by flipping it outward away from the main pleated piece, then press.
This is what the mask should look like if you flip it over.
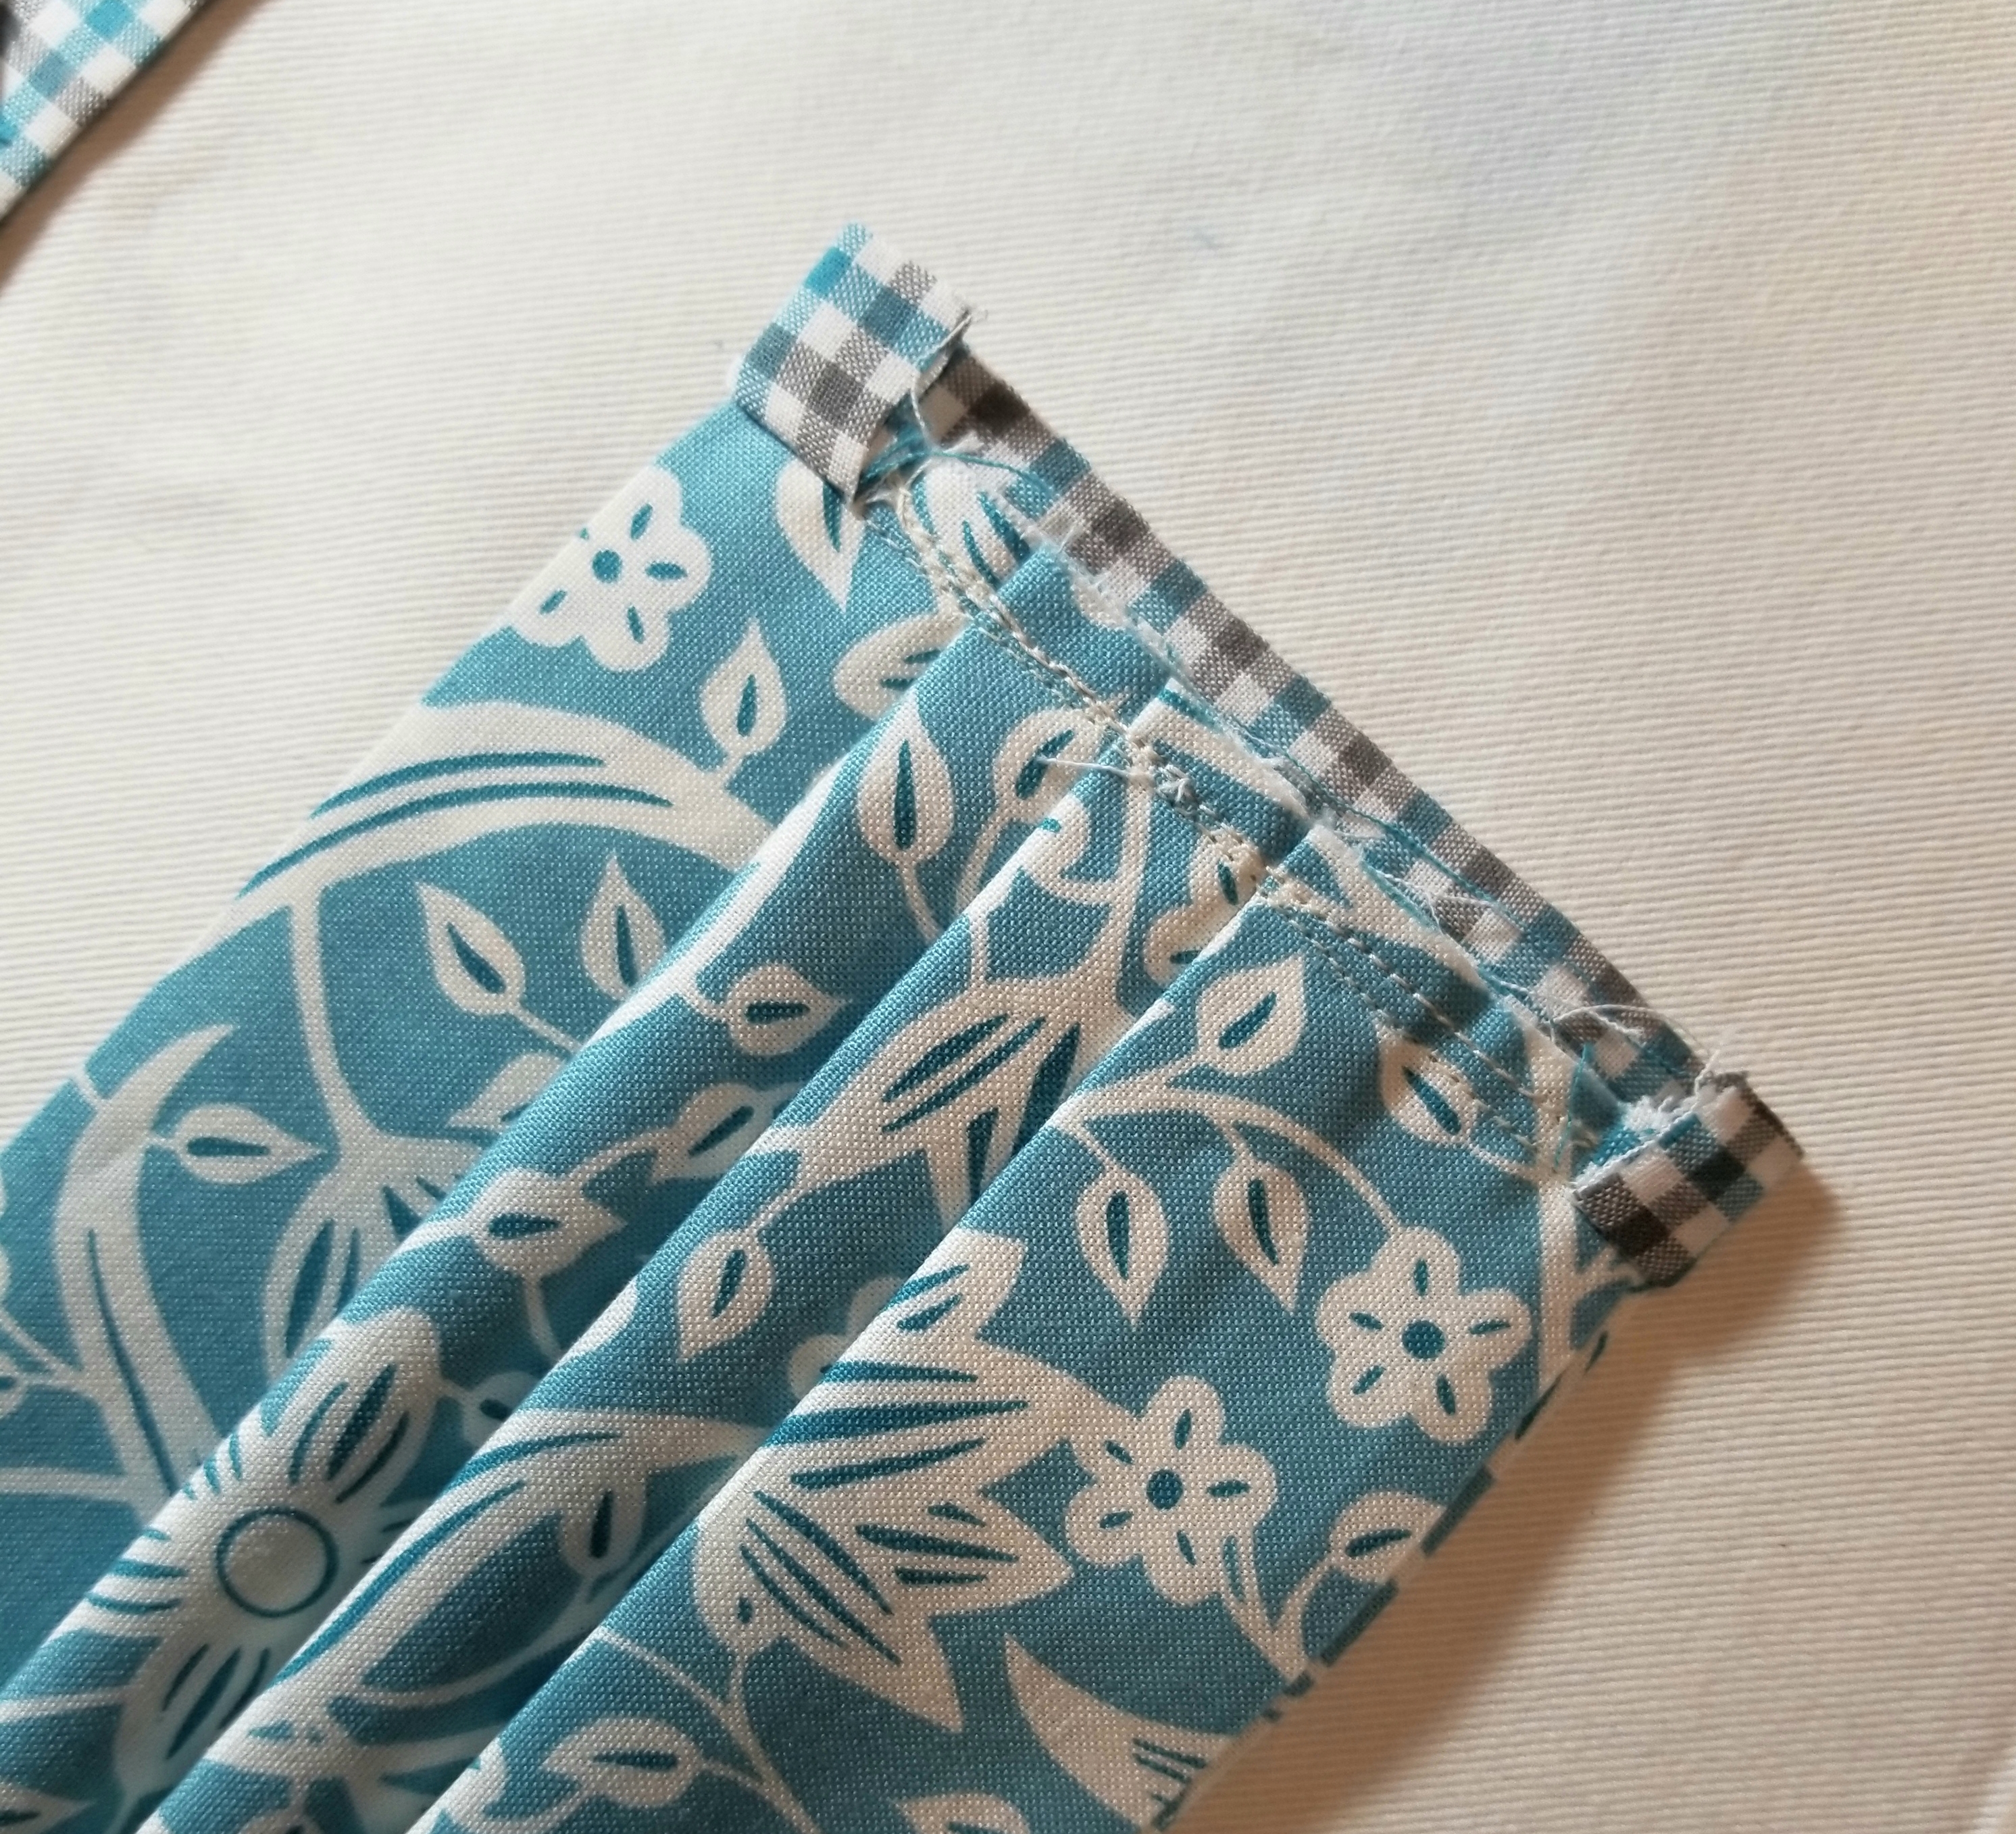
fold the ENTIRE accent piece down toward the main pleated piece, encasing the raw seam. You will now see the accent piece on this side, but not at all on the flip side. Press. Pin edge down.
If you are a good sewist, you will change out your presser foot to a straight stitch foot. If you are lazy, like me, you will keep that 1/4″ presser foot on your machine and struggle your way through this next step. 😀 Stitch this accent strip down to the main body of the mask, sewing along the edge, making sure to back stitch at the beginning and end.
This step isn’t necessary. It just gives it a nice finished look, and helps to give that elastic a little extra stability. Stitch down the edge of the mask close to the elastic side.
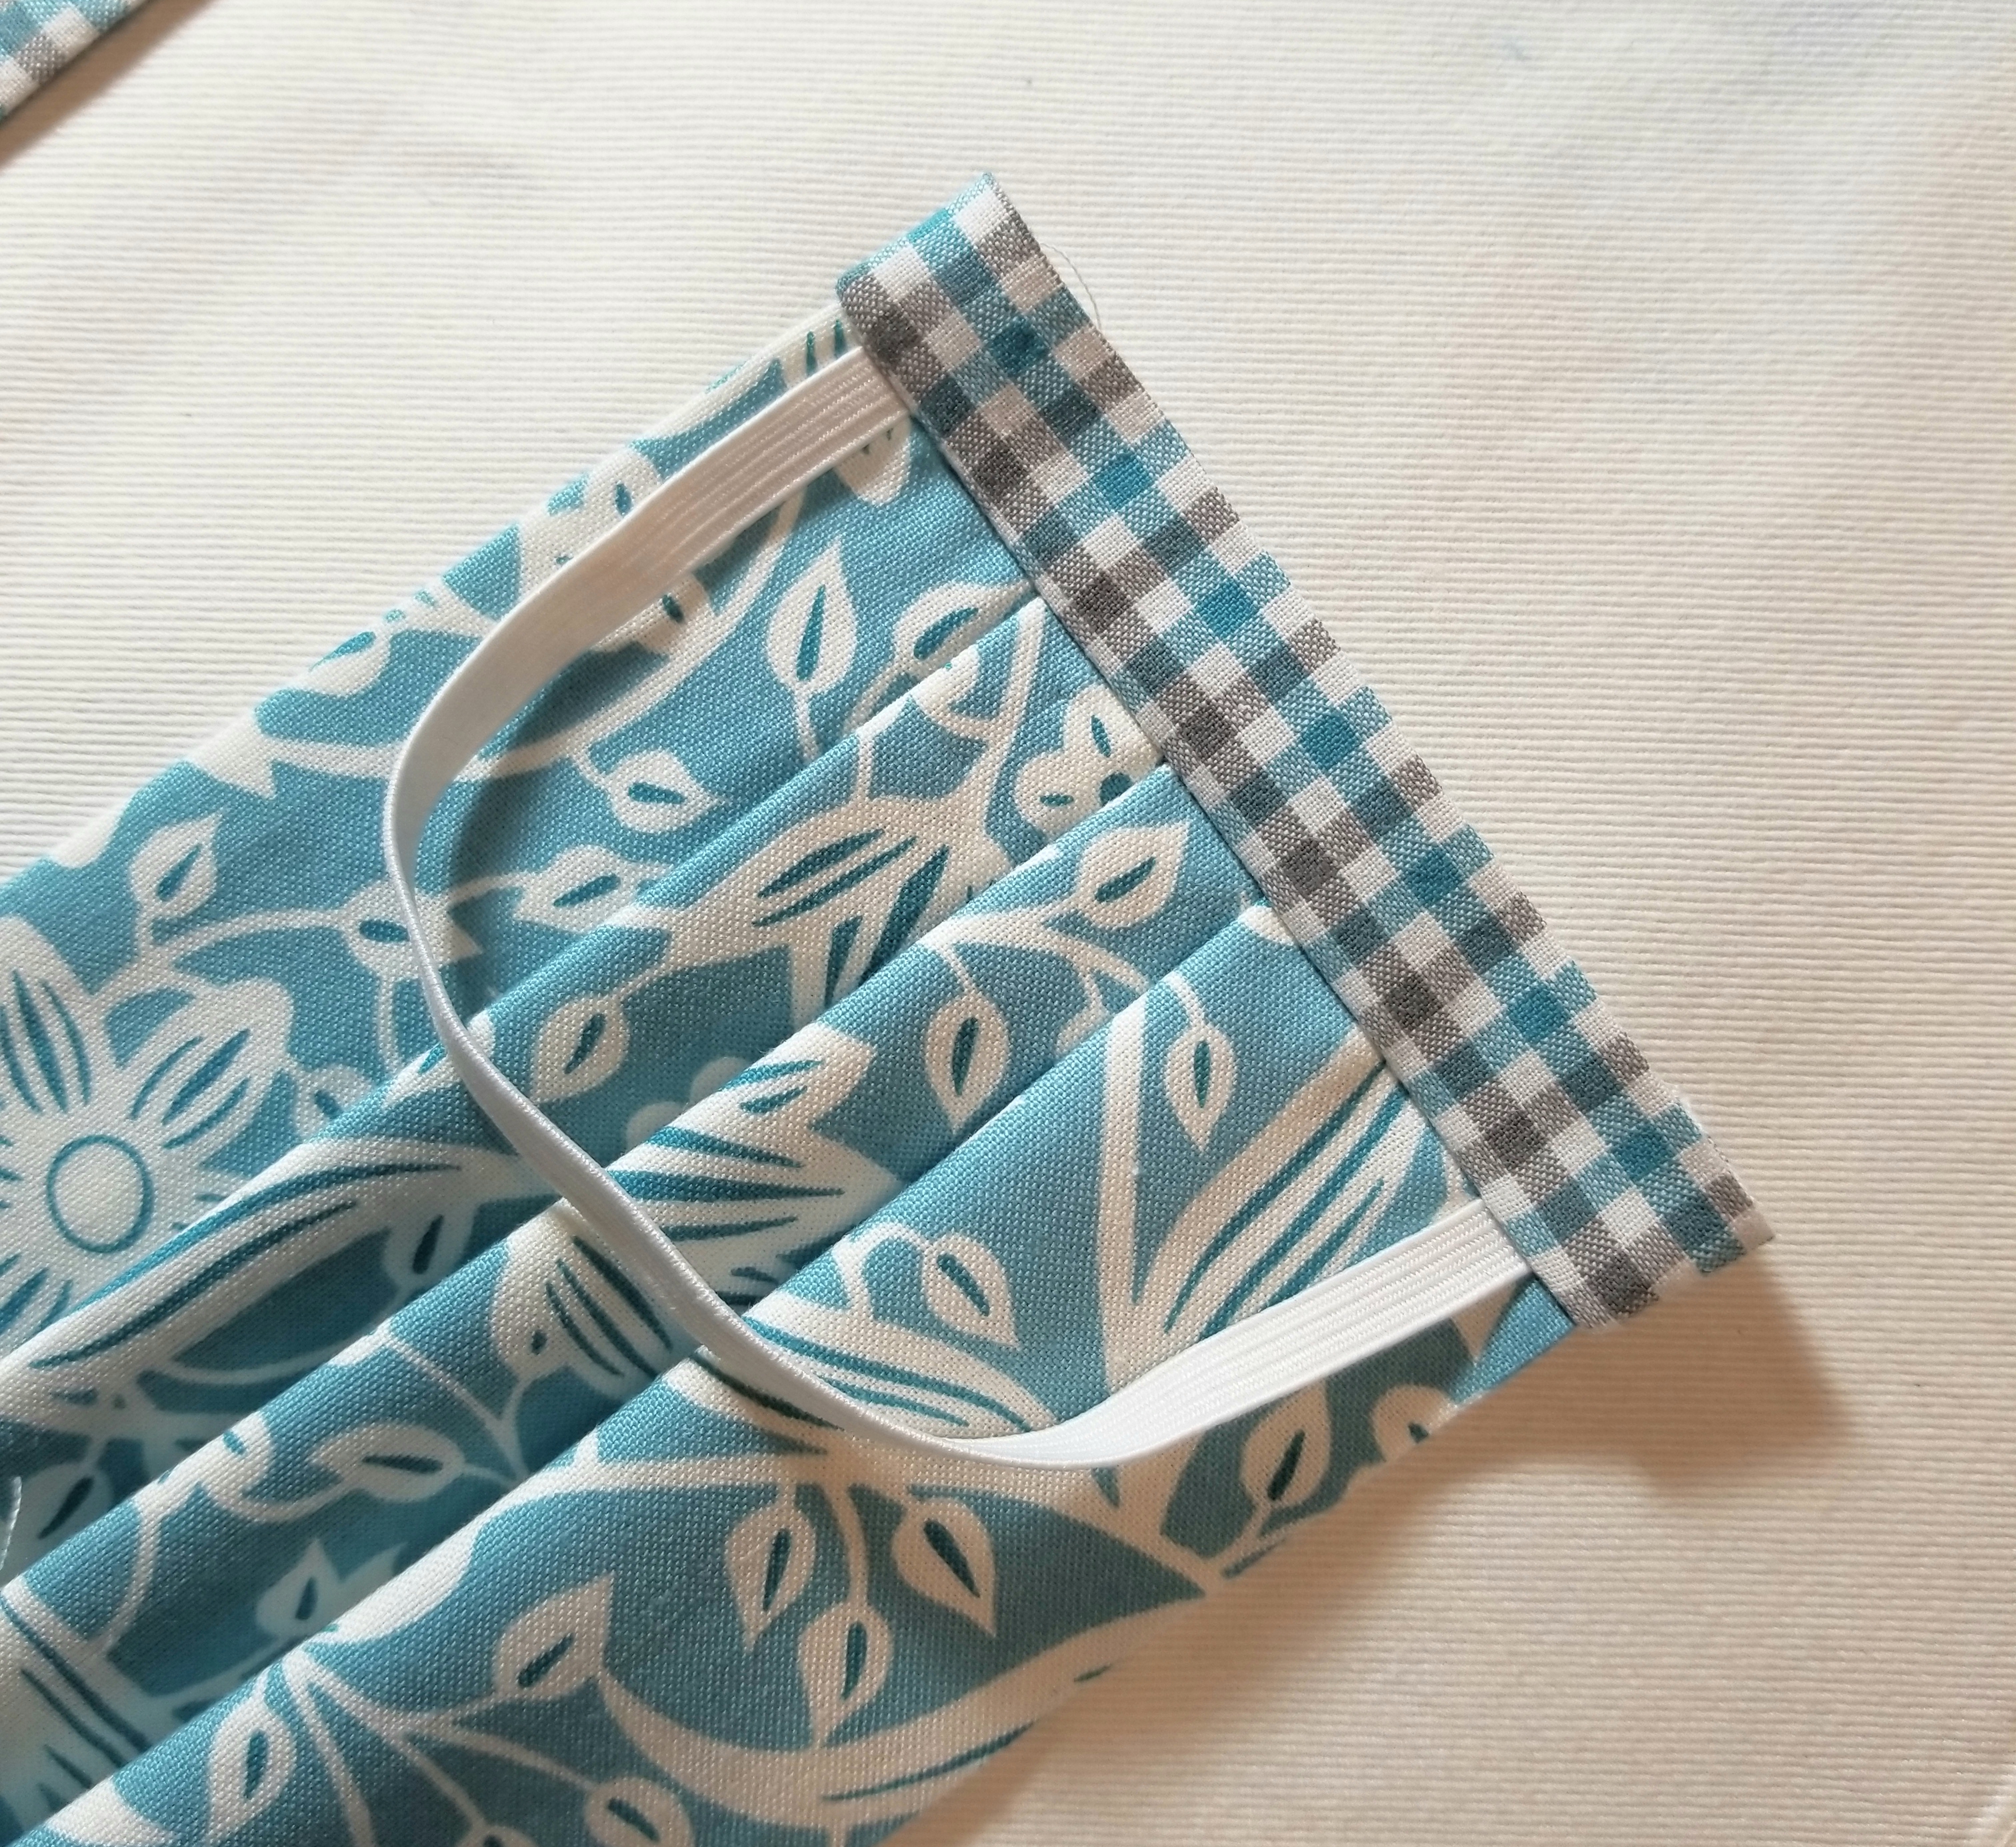
The front of your mask should now resemble the above picture.

The back of your mask should look like this. Following the previous steps, attach the remaining accent fabric piece to the other end of the mask.

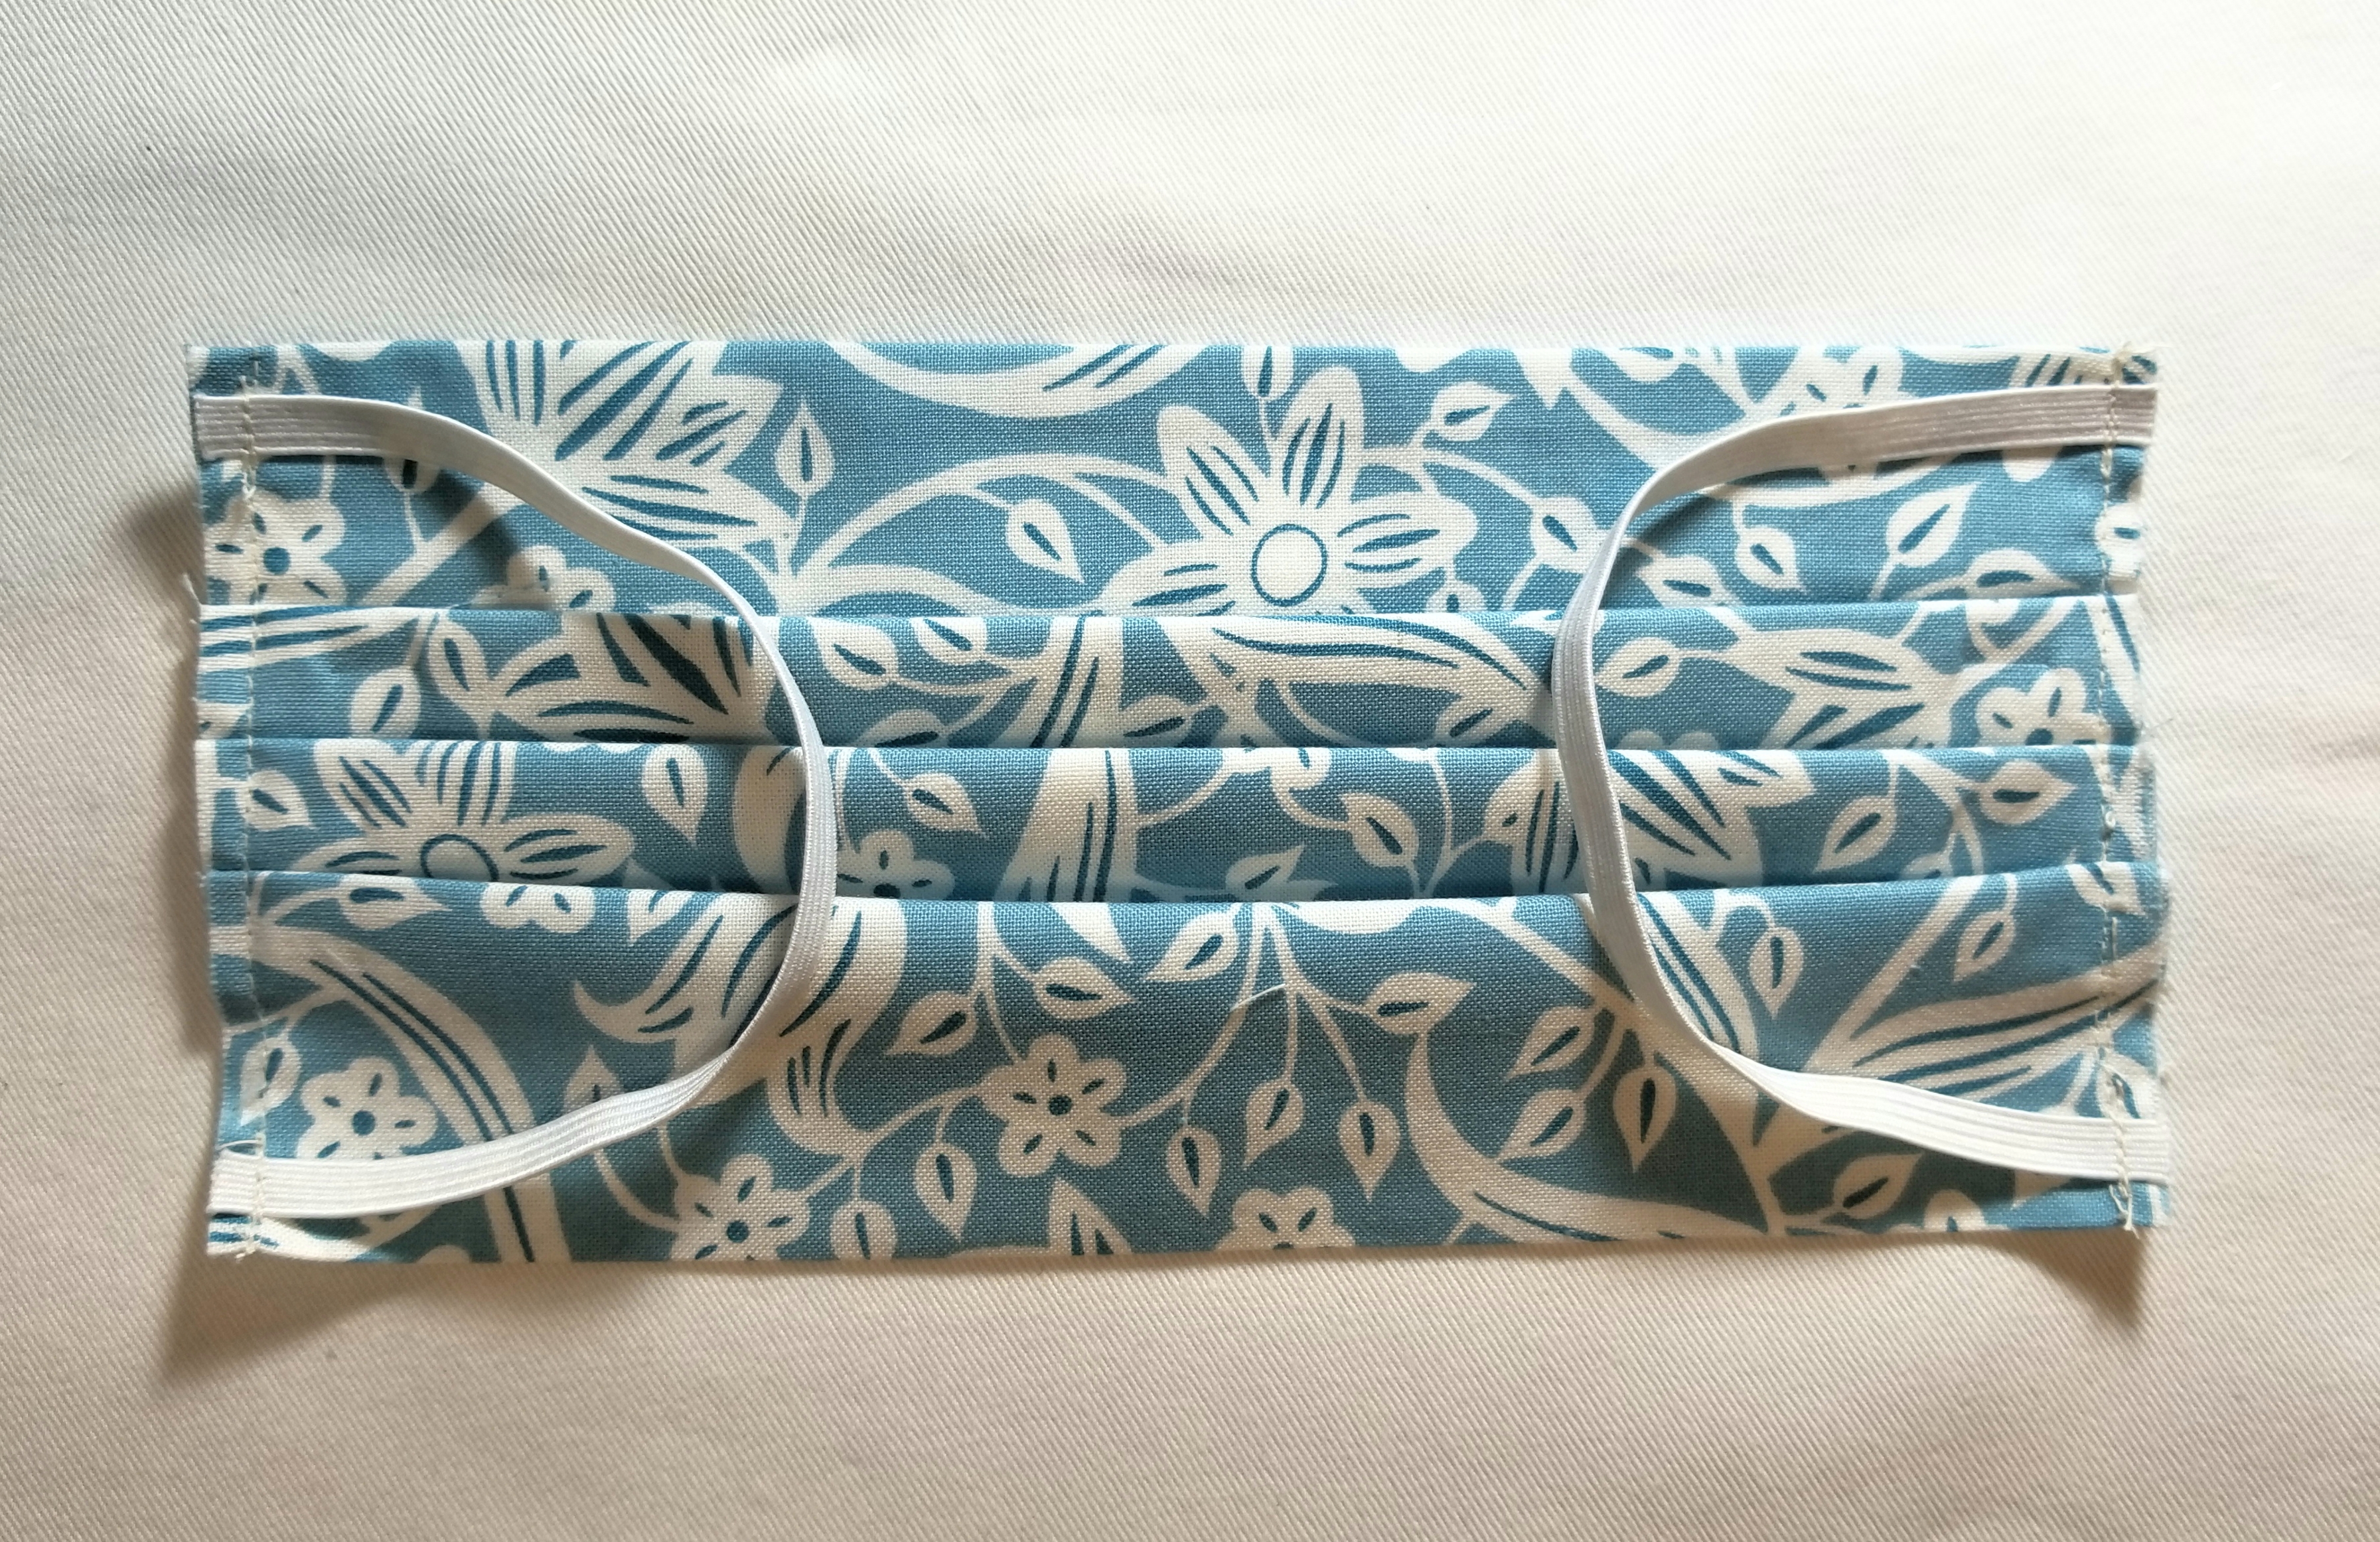
You should now have a reusable, washable mask that measures approximately 4″ x 7″ (unopened).
It took a few hours to put this free tutorial together for you. For this reason, I am greatly appreciative for any mentions that you can give me if you should use this tutorial. If you post a picture on social media, you can use the hashtag: #buttoncountermask. Feel free to share this page, and please tag me in your pictures so that I can see your beautiful creations. Last, I appreciate constructive criticism, so if you notice something that doesn’t look right, or does not make sense, bring it to my attention. I am happy to clarify any steps where you may have questions.
Enjoy!
P.S. Obviously, the elastic length can be adjusted to your facial measurements.
EDIT (March 24 2020): Because this tutorial has recently been used on a large scale, I will be adding a few things here as frequently asked and answered questions, suggestions, and reminders.
- This tutorial was happily shared by me over a year ago. This is not a new tutorial created in light of the current virus pandemic. I am not in charge, nor affiliated with any organization or entity requesting masks to be made. There are multiple organizations that are using this tutorial for their requests. If you have any question regarding what their requirements are, you really, really, really need to ask them. Please understand that I cannot and will not tell you what you should use, or how you should make your mask different from my tutorial.
- Keep in mind also that there are multiple entities that are using this tutorial for their requests. One entity may have completely different requests regarding features than another entity. (for example one organization is requesting a 4 layer mask, while another is fine with the two layer, as their thoughts are that they can be doubled up or used as a cover or liner to another kind of mask.) So, there is no correct or incorrect mask. Who are you making your mask for? Those are the people to whom you direct your questions.
- CHILD OR BABY MASK: After much thought, I have decided that it is in my best interest to NOT supply a mask tutorial for anyone other than an adult. One of my reasons for this is that I feel that a mask could pose as a choking hazard, and I do not want to have any part of that scenario. My suggestion is that you really should ask each individual child’s doctor or provider what their guidelines are, and go from there.
- I will not be held responsible for any mask misuse or malfunction.
- ELASTIC OR TIES? The main reason why my tutorial uses elastic is so I don’t have to tie it behind my head and mess up my hair. That’s it. So, if you are making the tutorial, and you don’t like the elastic, or if the person who you are making your mask for, requests ties; by all means put ties in yours. My pattern is very easily adapted to your preferences. There are organizations specifically asking for elastic, and some that are asking for ties only.
- ELASTIC LENGTH: I have read that a few of you recommend longer elastic; however, mine ended up being slightly loose. Therefore, I will not alter my pattern. I have stated in the tutorial that elastic length will need to vary due to the fact that human heads are not uniform (Thank goodness).
- I don’t have a PDF or printable version of my tutorial. If I decide to do that, I will; but it will be in my own time. I have received many hateful comments (that I deleted) demanding that I provide this. I need to remind those few sour apples that I am under zero obligation to do so. If my absolutely free visual tutorial isn’t to your liking, I invite you to go find one that makes you happy. If you are a person who often finds themselves using the words ”I need you to…”, you might fall into this category.
- I am completely honored that many of you are using my tutorial, or even certain aspects of it to help people in need. Even if you are using a completely different tutorial or pattern and just stopped by to check this one out, I applaud you for being a maker during this time. I cannot express enough how happy it makes me feel to see so many humans getting together to do something for the greater good. Please continue being that human. Those are the best ones.
I am signing off now to take care of my family, who needs me now more than ever. Thank you all for your kindness and understanding. God Bless.

Thank you for sharing😊. Very much appreciated!
You are very welcome. Thank you, Judy.
You are now providing a very valuable resource for those making masks for the COVID-19 pandemic. I just wanted to say thank you. I’ve seen a hospital or two in WA state share your website for those that want to volunteer their time and resources making these masks for those in the healthcare industry.
Bonnie, that is music to my ears. I am so honored that I was able to help in my small way. Thank you for your kind comment.
Hi I would like a mask
Hello, this is a tutorial that you can follow so that you can make a mask. I do not have the actual masks.
This is great. My daughter and I get to feel like we’re doing something healthy and protective for ourselves and our family. And it’s fun. So many learning opportunities in one little project…
We’re also very excited for the kid-size measurements…
I am also looking for the kids sizing.
Donneta, thank you for your comment. Yes, the kiddo’s mask is coming, It would not be for any child smaller than four years of age, because I think that a doctor should be involved with guidelines and recommendations. I don’t want there to be issues for choking hazards, etc.
Realize you are very busy with the selling of your home, but I as well would very much appreciate not so much instructions for a child’s mask but approximate measurement of fabric required prior to cutting. (Presumably an 8 year old’s size would work for a number of ages from 6 and up. Plan to tweak the ends and form a channel to slip elastic through then knot. Also hope to create a pocket for insertion of a ‘removable’ Hepa filter liner.) In closing; thank you so much for sharing your instructions and sending wishes of good health your way.
Footnote: I’ve been told that a vacuum cleaner Hepa filter with a 0.1 or 0.3 micron would be feasible as a liner. i.e.: Kirby Micron Magic Hepa Filtration bags that you would cut to required size.
Mrsben, I am unable at this moment to make another tutorial. If I am able to get one made in my free time, I will add it to the same post by simply editing it. Thank you for your helpful information. It is greatly appreciated.
Thank you so much for this wonderful tutorial. The pleats make it easier to wear over the nose and chin. I have made several for the clinic where my daughter works. Although medical masks are preferred, their supply is running low. Just an addition for the person who asked if they are adjustable- you could add tie strings to replace the elastic.
Linda, Yes, absolutely. Strings are the normal version, mine just had elastic so that I didn’t mess up my hair. Obviously, that doesn’t matter in these times. Thank you for sharing your skills with those that may need them.
I understand there is a special fabric for “medical masks”. I believe it may be a tighter weave. Does anyone know where the yardage can be purchased?
well, it is March 20, 2020… thank you for the tutorial…. I am not sure how many masks I will make and donate, this is very helpful!
The ones that you make, will make a difference to someone for sure. Thank you for being a sewist in these times.
Pingback: Oklahoma needs mask makers – Million Masks Challenge
Pingback: Face Masks needed for Non-Corona Virus Uses. Please read on. Use up your fabric stash – Yoga with Gail – Yoga with Gail Pickens-Barger
Thank you so much for this. I plan on being at my sewing machine for the next few days making these for family and friends, the directions are very clear and i like that you included step by step photos. We are soon due for our pine pollen and this will help as well as for the corona virus. Thank you again.
I use mine all the time for these dang allergies, and for cleaning the house as well. Some cleaning smells (fumes?) are pretty potent. Enjoy your sewing time.
Thanks so much for putting this together, I noticed someone asked a child size. My Great Granddaughter is only 3 and could use something like this [of course, that’s assuming she’d wear it. lol] Her mom and grandmom are in the healthcare field and both wear masks for work. So that might be a help.
Susan, If you alter this for little children, please get advice from a doctor first, as I would hate it to be a choking hazard. A doctor would have better advice about necessary features and omissions than myself. Thank you for your kind comment.
Is there a PRINT file?
Ethel, there is not. My tutorial was designed to be in great detail with many steps and large pictures to make it easier for the general public to follow along. You could probably print it out but it would be a lot of pages.
Love your pattern. I need to do them with ties instead of elastic. Can you tell me how long to make the ties.
I would guess approximately 12 inches (?) I am not sure what the length of the strings are on the disposable masks. Keep in mind that this could be a choking hazard for certain individuals, so use your own discretion when making these alterations.
Shoelaces might work for the ties. I’ll bet one of the dollar stores would have some of them—if they are open!
Thank you for your information Patty.
Nice job!
Thank you, Debbie.
I would not be able to get to that request anytime soon, Mel, I am very sorry. Please accept my apologies.
Can flannel be used in making these or should you only use cotton?
I can only tell you what I use for mine, and that is quality quilting cotton. I am not sure that flannel has a tight enough weave or not. Please take this into consideration, but use your own discretion in any alterations that you make.
I’ve made 21 in the past two days for a nursing home where my daughter is a NP. Thanks so much for sharing this pattern!
Aww! Let me know if you get any pictures. My sister is a NP as well. 🙂 You are so very welcome.
So impressed!
Thank you, Mary Lee. I appreciate it.
Just saw a news story on our local television station about making masks for the hospitals in our area. I looked on line and found your tutorial. Very well done. Pictures are excellent! I am planning to make many of these.
Thank you, Twila. I am sure that there are quite a few people that would appreciate them. Enjoy.
I was wondering if I were to line these with machine embroidery stabilizer would make them more medical worthy for the COVID-19. Just trying to find alternatives. I really don’t know what makes them medical masks.
There are many quality levels of medical masks, but the ones that they are trying to save for covid-19 patients and staff are the N95 ones. I would just find out what organizations are requesting specifically, then go from there. This tutorial could be easily adapted to accommodate those requests so be sure to get their guidance. Good luck, Kathy, and thank you.
I would love a paper pattern with instructions
Mary, I am sorry that I do not have a paper pattern.
My son is a doctor in Memphis and the need for masks is critical. Thank you so much for this tutorial and I’m starting on this tomorrow!
Thank you Debbie, I hope this is of good use. I appreciate you comment.
Thank you for sharing your pattern and instructions. I am going to make some for the local hospital…sew on.
You are very welcome, Patty, have a great sewing day.
Hello from Athens Greece. Here in my country we sew (volunteering), that type of masks for our hospitals, as we slowly have shortages. I wish all this would pass very soon, stay home, be safe!!!! ❤️❤️❤️❤️
Anastasia, Thank you for being a volunteer! I wish more were up to the task. I appreciate your kind words.
We make and sell cotton headbands, could these be used as masks? We can donate them today.
Kenz Laurenz
Hey! I am located in Oregon but want to contribute to the movement if possible! Does the fabric have to be a special fabric for worried citizens or nurses??
From what I understand (Please verify this on your own), The masks are being used for non covid-19 instances (patients and clinics) to preserve the n95 masks for hospitals. These are also washable, where the disposable ones are one time use masks. I am only the provider of the pattern.
I was reading about things that make the mask a n95 was vacuum cleaner bags. I will find the research and post it.
If you made a sleeve in the mask you could cut up vacuum cleaner bags to fit the sleeve and insert it.
Thanks so much for the pattern – I’m starting mine in the morning!
You are welcome, Judy. Enjoy.
Perfect timing!
Cant wait to make about 40 for our EMTs to us! Thank you so much for sharing.
Allison, I am so glad that you are able to put this tutorial to good use. I am sure they will appreciate it. Thank you.
YOU ROCK! Thank you, will get started immediately!
no, YOU rock. 🙂 You are welcome, Virginia.
Great job with instructions and photos.
Thank you, Ilaine. I appreciate your feedback.
I’ve made masks for family members with iron on facing , left over quilting material and a surging machine. I made about 8 in an hour. I know they are not CDC compliant, but can they be helpful to anyone else?
Edwina, I am not sure. I can only speak for myself in that having a mask certainly helps me as I am always putting my hands to my face, eyes, picking my nose (just kidding…making sure everyone is reading) but really, the mask helps me. I CANNOT speak for others but I can say that your doctor will have good guidance or requests regarding mask material guidelines, so I would definitely ask them. Thank you for your question.
With Covid19 the need for mask is great, the idea is for DRs offices to use the homemade one and give their supplies to hospital and ER’s who need the ones to protect them from the virus. NY, Seattle and Okla and asking for anyone who can sew them to please help out. They’re hoping to get 100,000,000,000.
That is a great many masks. I might even have enough fabric in my sewing room to make them all. (lol) Thank you, MaryAnn for spreading the word.
Please read for filtration of common items
https://www.researchgate.net/profile/Katy-Anne_Thompson2/publication/258525804_Testing_the_Efficacy_of_Homemade_Masks_Would_They_Protect_in_an_Influenza_Pandemic/links/53fefd8f0cf21edafd154e85/Testing-the-Efficacy-of-Homemade-Masks-Would-They-Protect-in-an-Influenza-Pandemic.pdf?origin=publication_detail
Thank you, Gayla. I did read this, and I wonder if that homemade mask was simply one layer of t-shirt material. That would be a completely different mask from this one. I am not suggesting anything by this, only interested in the testing data. Thank you for sharing.
Thank you for sharing your pattern. I hope to make a few to pass out to family and friends and hopefully health care people who can use them.
Thank you, Nora. I am sure they will greatly appreciate that.
Thanks for the tutorial. I may try it.
You’re welcome Sandie. Enjoy.
My daughters friend works at a rest home and her husband is a firefighter and they are running out of masks because of this virus. So she sent us your pattern. Will be making some to help. We will be happy to help and mention you. Thanks
Thank you so much, Judith. I am glad that this will be of service to you. They will appreciate your efforts, I am sure.
So excited! My niece and I are going to make several of these to give out during this COVID-19 crisis. I will be sure to credit you and God bless you for taking the time for putting this together!
I am glad that it is being utilized for those that need it. Bless you as well, and good luck with the manufacturing process. Enjoy.
Thank you for this great tutorial! My daughter is a registered nurse in Oregon & there are no masks available for them. She has asked me to make some for her & the staff she works with, since I’m not working because my Governor shut my business down for two weeks, due to the Covid-19. I’m going to cut some hepa filter vacuum bags to put inside the mask to help filter a bit more. Thanks again
Thank you, Collette. I hope this is helpful to you and to her. Take care.
I was wondering how I could add extra filtration, great idea
The problem with using a vacuum bag is that it’s not breathable. I don’t take credit for the info. I read it here: https://smartairfilters.com/en/blog/best-materials-make-diy-face-mask-virus/. Read the article. It will give you good ideas.
For extra filtration you can use two Scott or viva towels placed in opposite directions between your face and the mask just be sure to still only touch your mask/face after washing your hands.
One thing that would help is to make a lining, or different fabric on the inside. This pattern could be adapted for that. So you have 2 layers of fabric.
Would it be washable with the heparin vacuum filter in? Or would it have to be removable and replaced with new after washing?
Dont you love auto correct? Hepa filter not heparin. That changes alot, lol.
They do not want the masks with heparin vacuum filters in them. They are not sanitary and reusable as I understand it. You can not wash them and reuse them, and would have to be thrown away.
Was reading about what material(s) to use to make masks. BEWARE: while vacuum bags filter the most they are also VERY difficult to breathe through!
Thank you so much for taking the time to put this tutorial together. I really appreciate it!
Thank you, Patricia. Things were a little less crazy a year ago when I did this, little did I know at the time. Good luck.
Thanks for your pattern. I had copied and pasted it this afternoon and then heard mention of your pattern on TV tonight. I have a couple of thoughts. Another pattern makes it possible to slip in a filtering material to make the mask stronger. These can be replaced after the mask is washed. Cut up (unused) vacuum cleaner bags is one suggestion. Also, I am planning to somehow sew in a piece of wire that can be molded over the nose for a tighter fit. One pattern suggests putting elastic that goes behind the head to take stress off the ears. Your idea is very timely. Thank you!
Yes, I made this pattern over a year ago, for my allergies. In my situation then, I didn’t want ties to mess up my hair, but these days and situations are a bit different, right? Anyway, I have recommended to have people get guidance from the entities that are requesting the masks, because each clinic, hospital, etc. is different and may want different things. My tutorial can easily be adapted to accommodate custom requests. Thank you for your comment.
I wonder if a long wire-covered twist tie inserted in top of mask would work to mold mask to nose.
RL,
Yes a simple ‘sleeve’ could be added to the nose area to accommodate a wire (opened paper clip maybe?) The pattern should be very simple to alter to individual needs. Thank you.
I’ll be making these with floral wire, 24 gauge, to help hold the mask across the bridge of our noses. I appreciate this free pattern, thank you from Vancouver, Canada.
hello from San Antonio. I am testing two materials to make a tighter seal on the nose. the first is pipe cleaners, the kind sold for real pipes, which are white and I think are a heavier gauge wire than the craft ones. we use them a lot as twist ties on a garden fence, and they seem to last a long time. the other is the metal flexible sealing strip on the coffee bags. I tested that today and it molds well around the contours of my own nose. I haven’t yet tried sewing it into the mask, but it should be able to secure it in place or sew a channel to slip it into.
I can’t find your name anywhere on your blog. What is your email and name? Graphicdesign/quilter. I converted this face mask post to a MS Word document and PDF to give to you so you can send it to people. It can be circulated more widely. It is condensed down to few pages so that people can print out the directions. How do I contact you to send it to you?
mjnauert@hotmail.com Monica Nauert. I can be found on Instagram as well for direct messaging.
Great idea!
I watched another mask video tonight, and they used a twist tie (like for garbage bags) for the nose. I also like the vacuum bag suggestion.
If you are using interfacing, regular or iron on? Thank you. My son is an ER nurse so I am going to start working on masks tomorrow, first for him and then as many more as I can make. Just getting supplies ready tonight. Thank you,
I haved used bailing wire. It costs almost nothing and comes in a roll of 500 feet. I paid $4.00 for the roll that I have at 6 inches per nose piece you get 1,000 mask nose pieces per roll. if 4 inches are used then 1,500 pieces can be made. The wire is very stiff and durable and care must be taken so it does not poke through the fabric. I cut a 1 inch wide strip of fabric 2 feet long and a 2 foot long piece of wire. Place the wire along the long edge of the fabric. superglue each end and the middle to stick the wire to the fabric. Carefully jellyroll the fabric and wire. superglue at 1 inch intervals along the length of the now padded wire to secure the fabric.
Susan, I don’t have much elastic and am unable to purchase more. Would using lengths of 1/4″ webbing that can be tied be workable?
Yes, I think anything that ties can be used instead of the elastic. I just used elastic on mine so that I didn’t have to tie it behind my head. Both versions work well. Thank you for your question.
Any ribbon could work for tying the mask. OR – use short pieces of elastic sewn to ribbon. The short elastic.
I think another option would be sewing button holes in lengths of fabric or ribbon, and putting a button on each side of the mask.
Thank you for the tutorial. I live in Jakarta, Indonesia, which has so far 362 covid-19 cases, but very high mortality rate. The hospitals already sounding alarm bell about PPE shortages, so I thought we could help.
I wonder if there’s a pattern for protective medical gown? Isolation gown?
Feby, I am not aware of an Isolation gown pattern, but I would be surprised if one didn’t already exist. Is there anyone else reading this that might have ideas or suggestions for Feby? Thank you so much.
Are ear loops really preferred over elastic that goes around back of your head? Then It can slip off and still be hanging around the neck.
Ear loops are just one way to make them. you could sew ties at each corner instead of the elastic. Keep in mind, I wrote this pattern over a year ago so that I could wear my mask around during Cedar fever. The idea is that I didn’t want my hair messed up. This matters very little for people who desperately need a mask, so strings that tie at the back of the head are perfectly fine for most situations.
This page was mentioned on TV today in reference to Coronavirus mask needs by hospital workers, the missing component professional masks have is a microb blocking middle layer.
One can find “Melt-blown Fabric” on Chinese market places like aliexpress.
Other mask making articles referenced here: tinyurl.com/CoronaTech
Thank you, Max, for the shared information. I hope that individuals who are making these to fill requests get guidance and recommendations from the entities that ask for them, because they may vary depending on the source. I appreciate your input.
i searched the comments and didn’t see it. Did you ever give dimensions for a child size mask?
Sandra, not yet. I am working on it. I am just a little nervous going in that direction, as I don’t want to provide a tutorial (even a free one) that may pose a liability or choking hazard. If/when that comes, it will likely be similar instructions with smaller dimensions (no ties). You might want to play around with it on your own to see what you can come up with, but I would NOT give a mask to anyone under the age of 4 without consulting a doctor first.
Thank you for your time and effort. Your pattern seems easy enough for me. I will make some for my family and friends.
Thank you Dee. I hope it proves simple and that you are able to make multiple without hitches. Enjoy.
Elastic doesn’t survive an autoclave but putting some tie-able straps on would be an easy mod.
William, yes. When I made this tutorial over a year ago, keeping my hair looking presentable was key. Obviously, this is small beans considering today’s concerns. Sew on…and thank you.
might need to use bleach and water solution instead of autoclave. Be sure to use cold water as hot water breaks down bleach antimicrobial effect.
Thank you for taking the time to create this picture face mask tutorial. I took your information and created a .pdf file. If you want to email me I’ll send it to you to post. Now, we can all help in our respective areas. Bless you and stay healthy.
Caryn in California
craphael0609@aol.com
Thank you, Caryn. mjnauert@hotmail.com is my email address
Can you please email me a pdf file? It’ll be so much easier to print.
Thanks for doing this!
Erin F.
efirst5711@gmail.com
I just made my first 3. Didn’t quite follow the edge pieces sewn right but I’ve plenty of stash to keep learning. Considering where the USA sits at the moment, this will be a popular pattern. I’ve shared it with several folks. Thanks so much.
Thank you for your comment. I hope it was helpful to you.
Thank you for the tutorial. We done!
Thank you Jean. You are so welcome.
What is the finished dimension of the adult mask, and are measurements for child’s mask here somewhere? I am making masks for COVID19 too.
Doyle Detroit, finished measurements are about 7″x 4″, or slightly bigger, as mine have all been washed, so they have shrunk ever so slightly. Many people are asking for the child size, and as I have mentioned before, I am working on it, but I have concerns about masks posing a choking hazard for children and such other concerns that I need to work out before making that smaller size tutorial. Thank you for your questions.