

My allergies have been incredible this year, and by that I mean that they have been worse than they have ever been. (Please, please, please do not suggest medical advice here. Much appreciated.) I see an allergy specialist who gives me 2 shots, 2-3 times a week to help with my symptoms. They have helped a lot; however, Juniper Ash (Cedar Fever!) here in Austin is 6 times worse than average this year, and boy oh boy, do I feel it. She suggested that I wear a face mask when I go outside to help reduce the amount of pollen that is going into my lungs and sinuses. After going to a few different stores to purchase some, I found that many other Austinites had already bought them out. No worries, right? I know how to sew. I will just make one. When I finished, I had many requests for a tutorial, so here you go:
Materials needed:

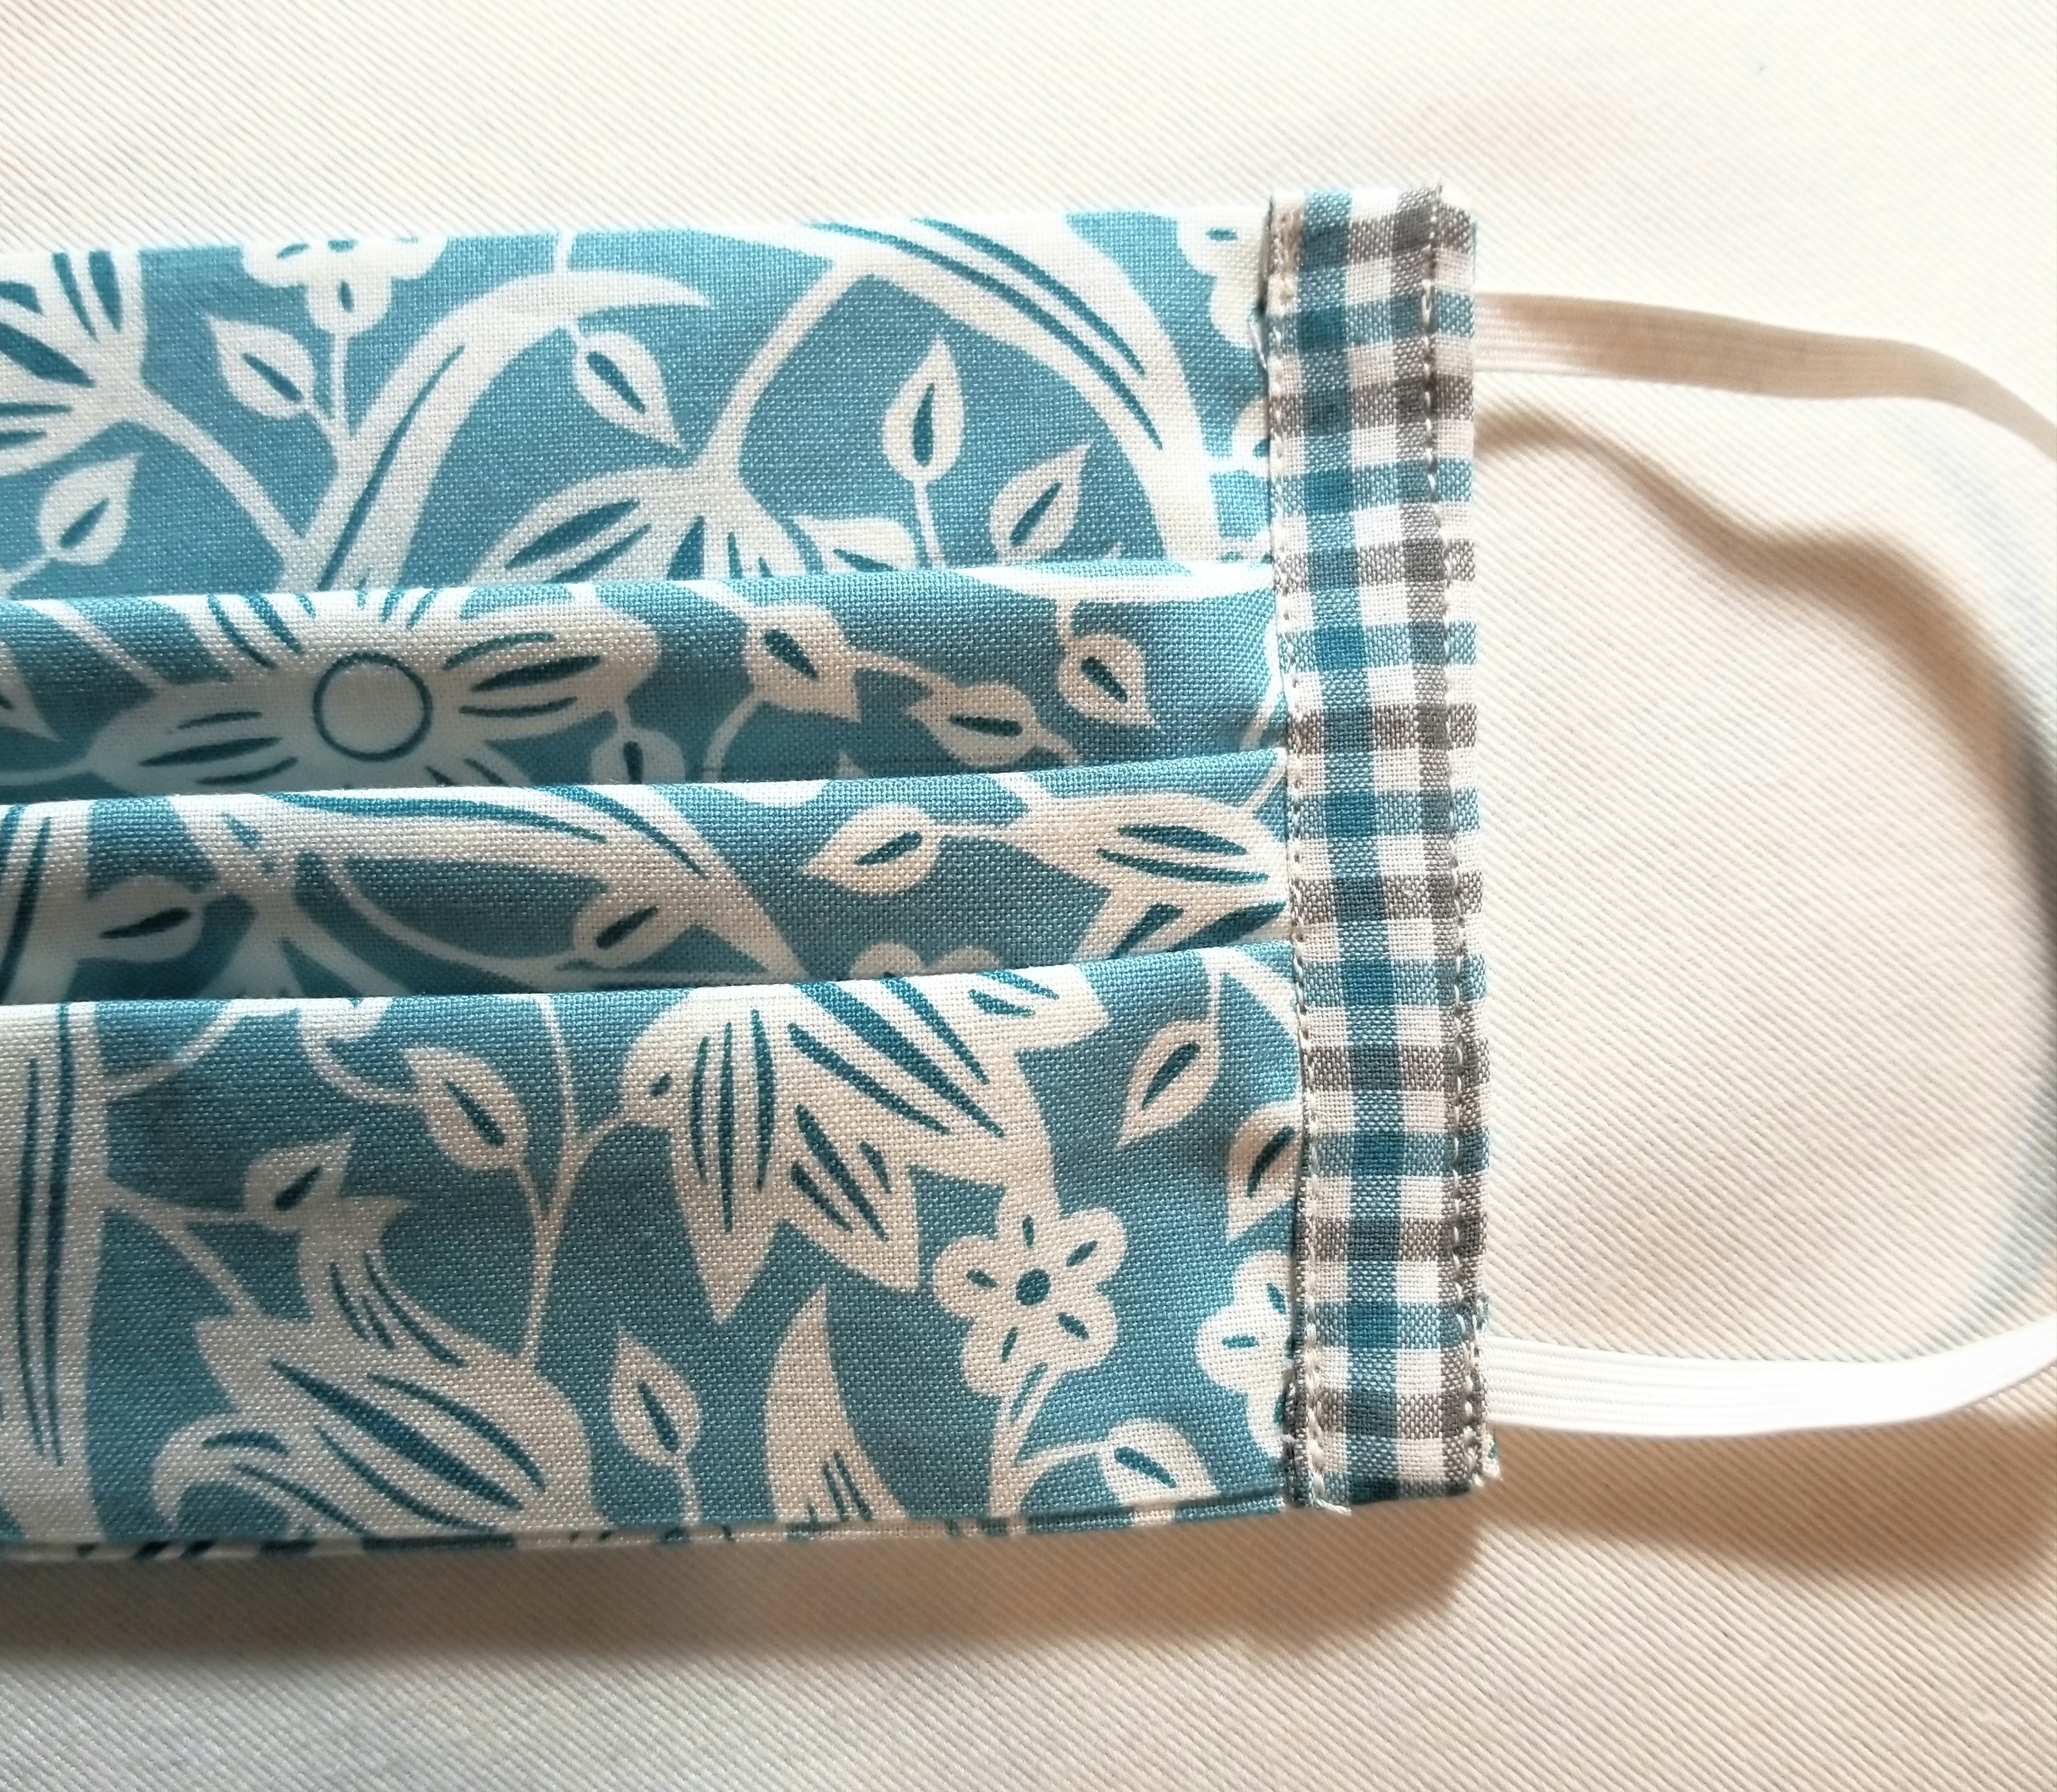
- 1 piece of fabric measuring 8” x 14”. Until you get familiar with this tutorial, I would suggest a non-directional print. One that has a scattered image printed on the surface such as the one shown.
- 2 strips of fabric measuring 1.75” (1 3/4”) x 6”. This will be the accent edge piece. It can be the same fabric as the main piece or a small-scale print or solid.
- Two pieces of 1/4” width elastic. These will be about 6 1/2” long.
- Ruler
- Fabric marking tool.
- Pins
- Scissors
- Sewing machine, threaded.
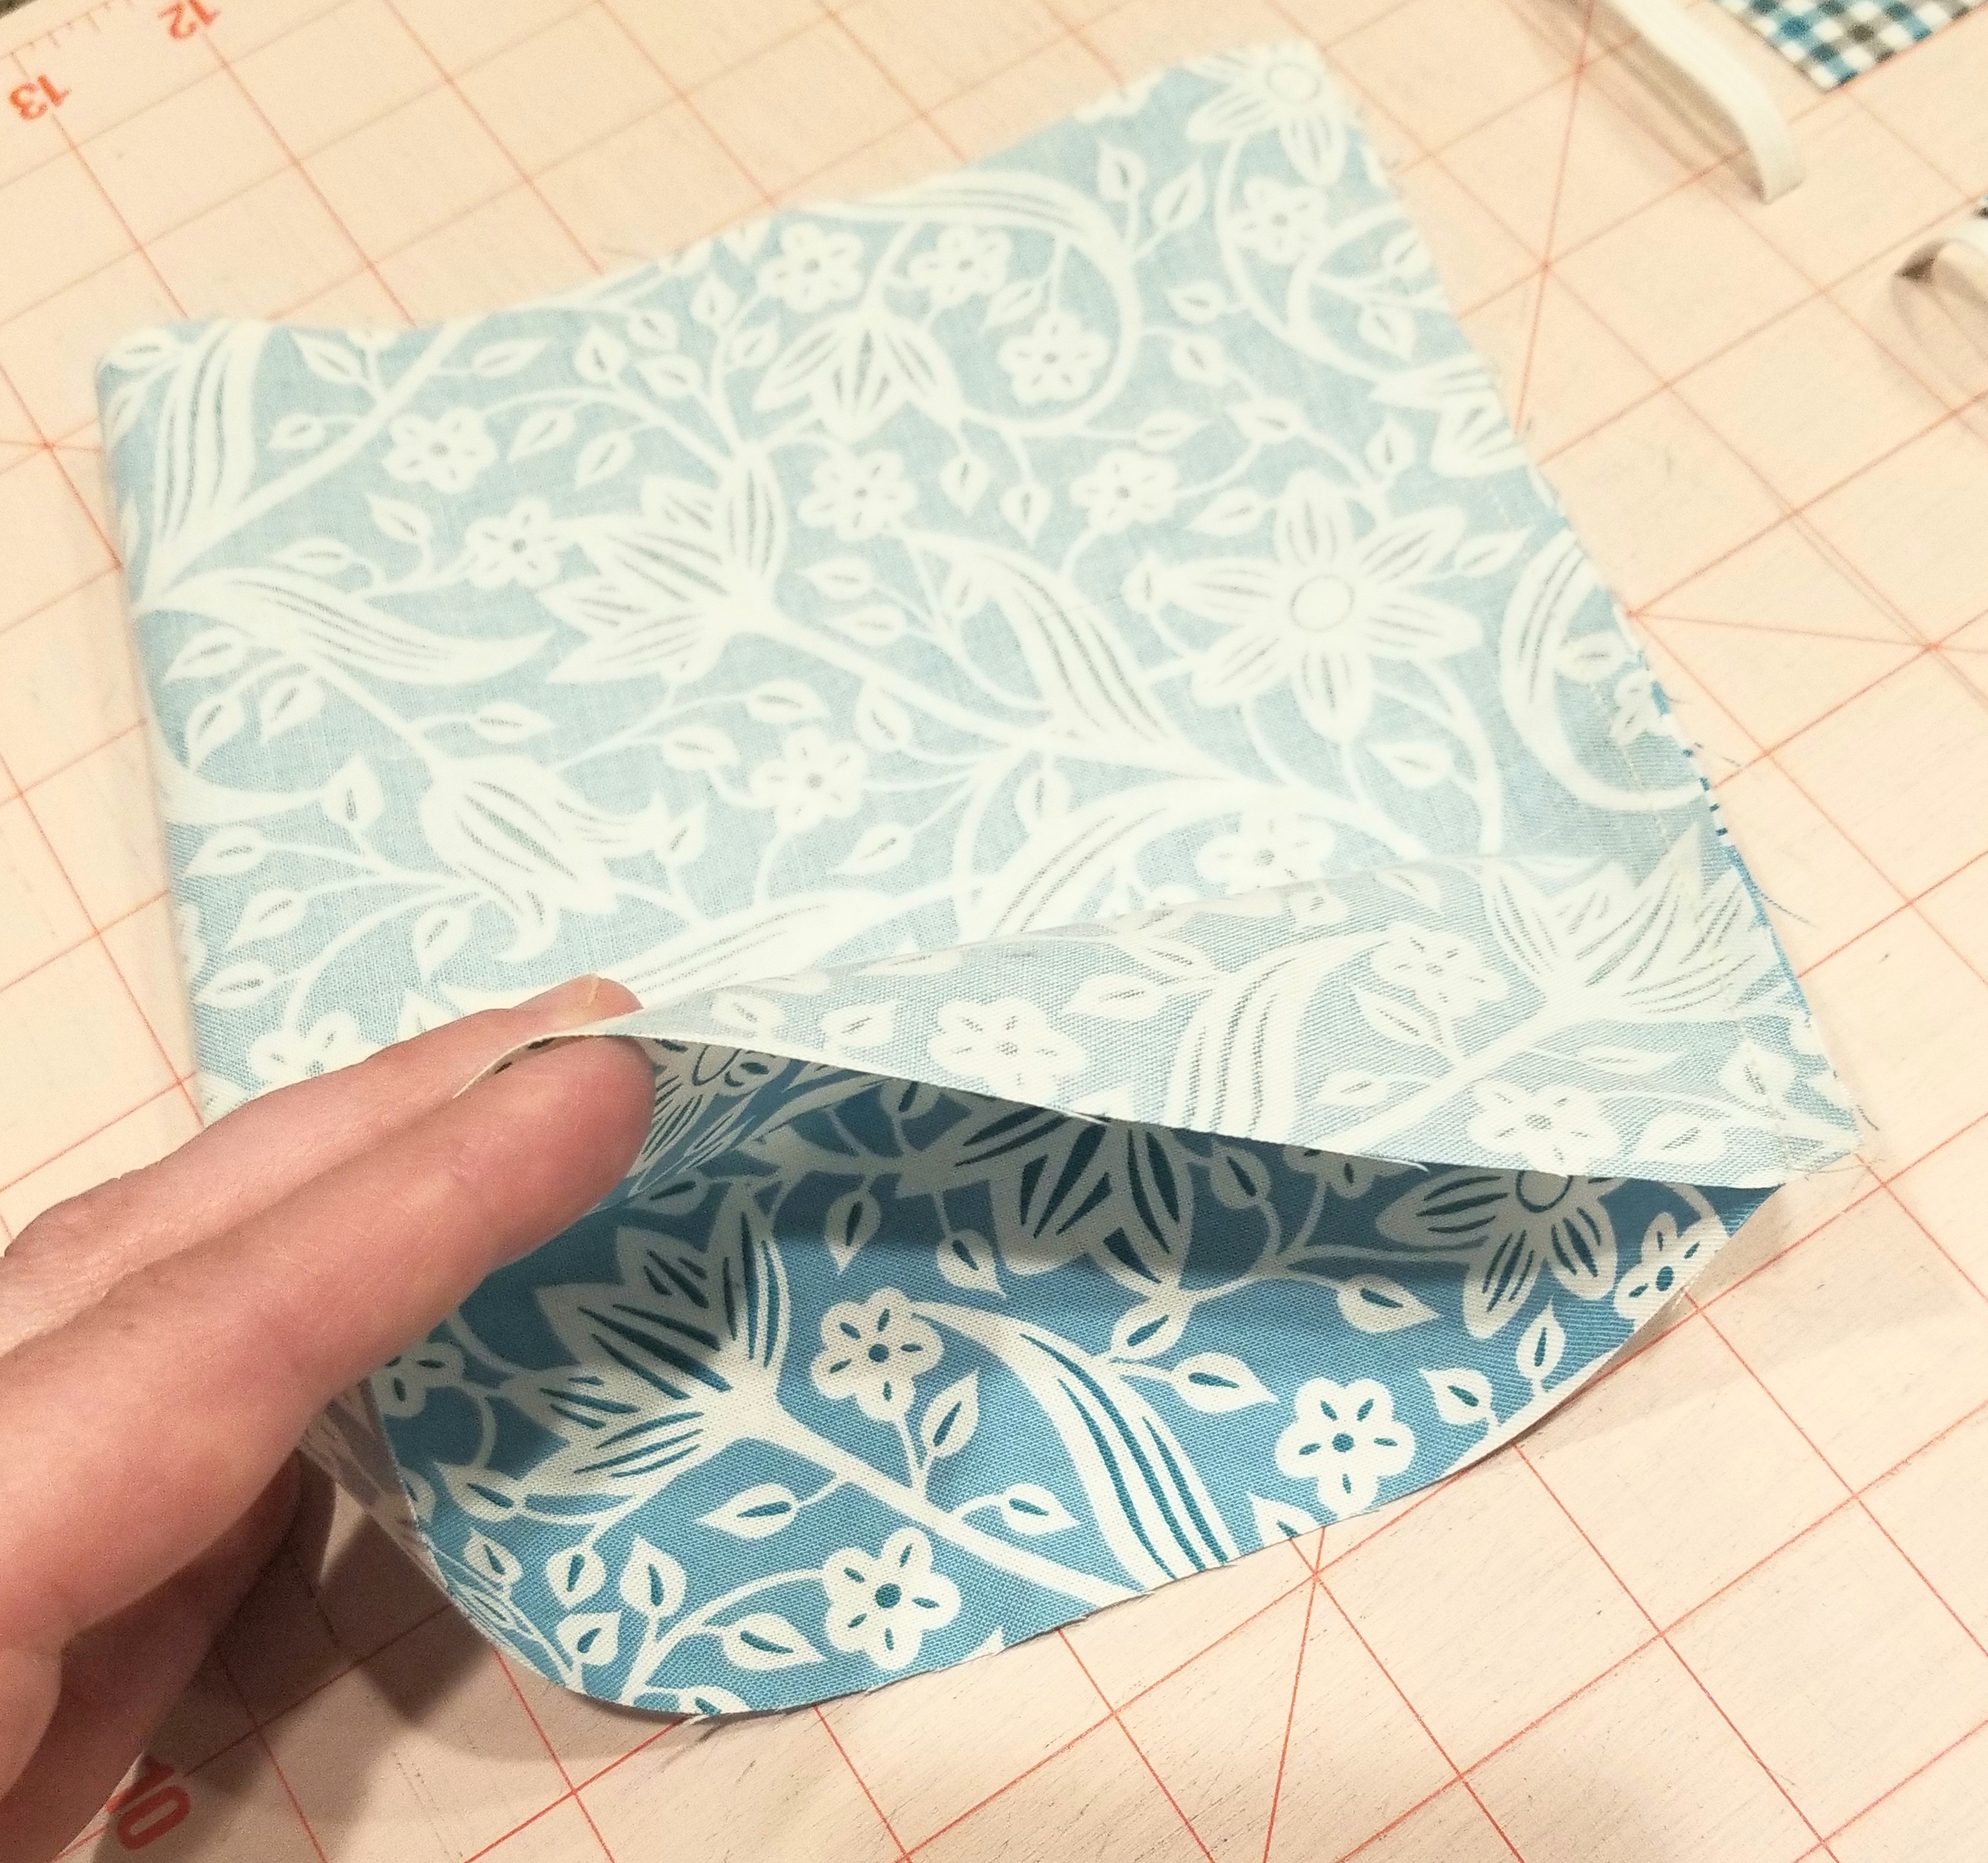
Fold the main piece of fabric in half, right sides together. Sew along the 8 inch width edge, using a 1/4 inch seam allowance.
Turn this tube shape inside out, so that the right side of the fabric is now on the outside. Press this flat, keeping the seam to one end of the flattened tube.
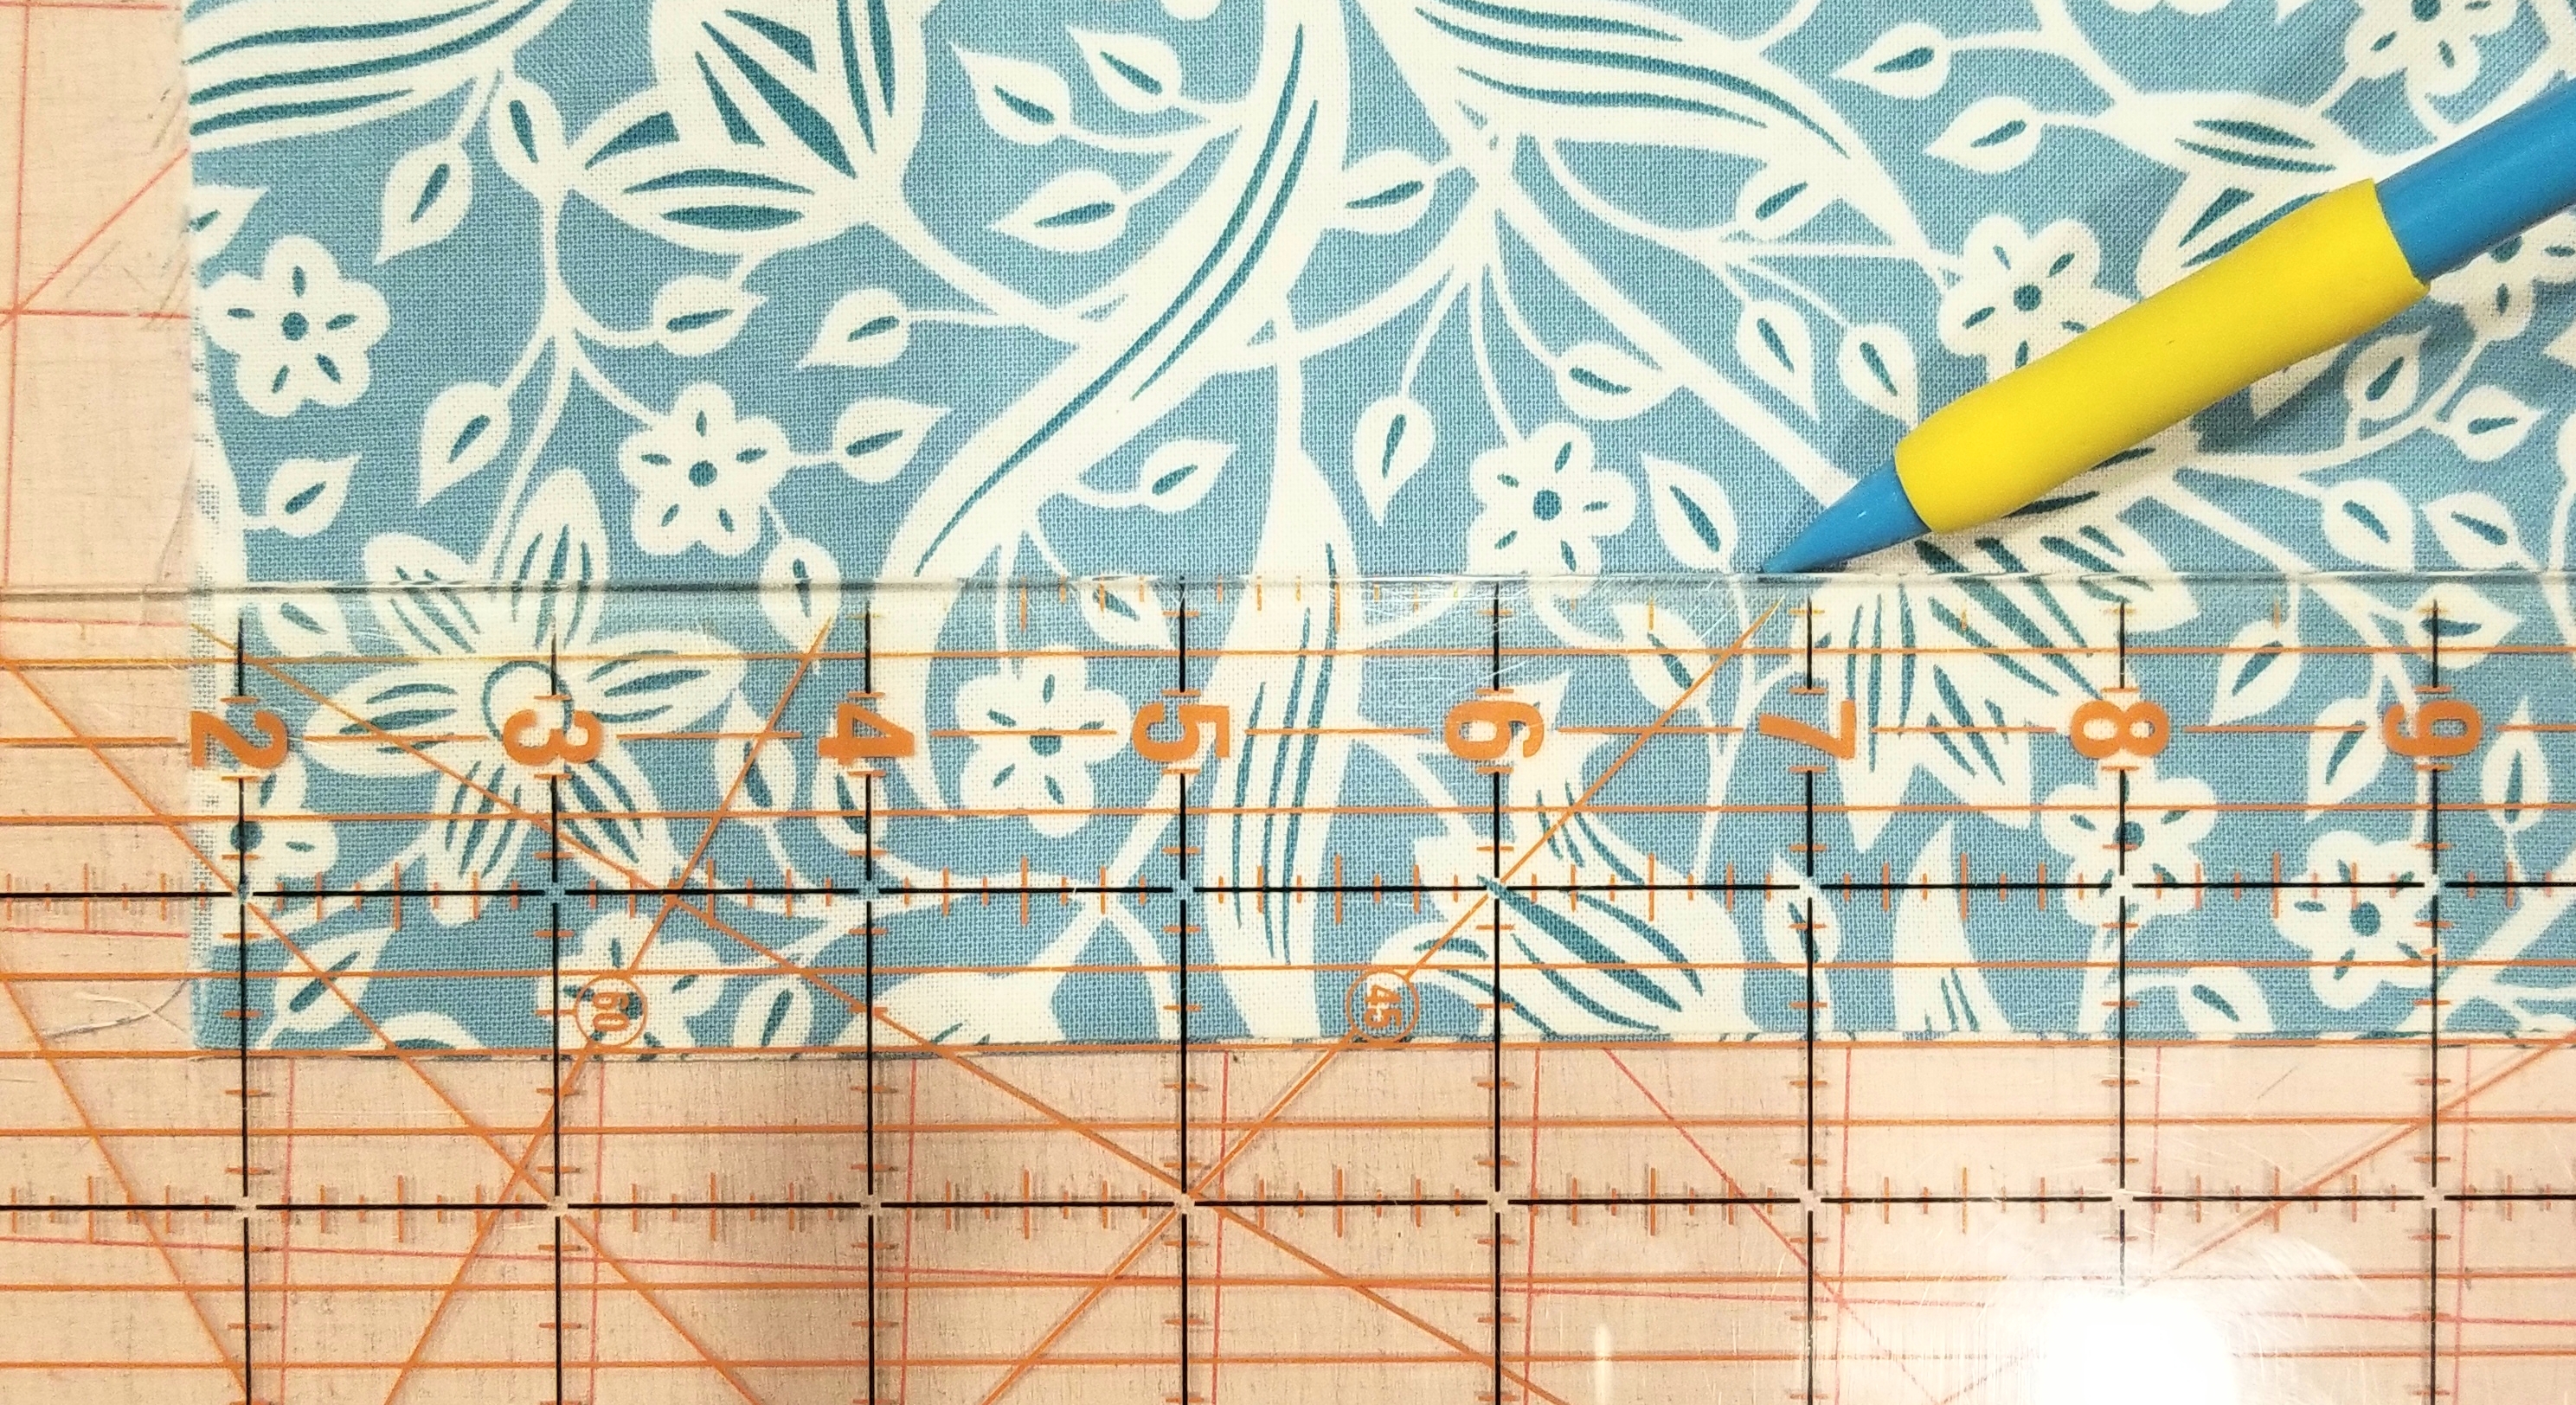
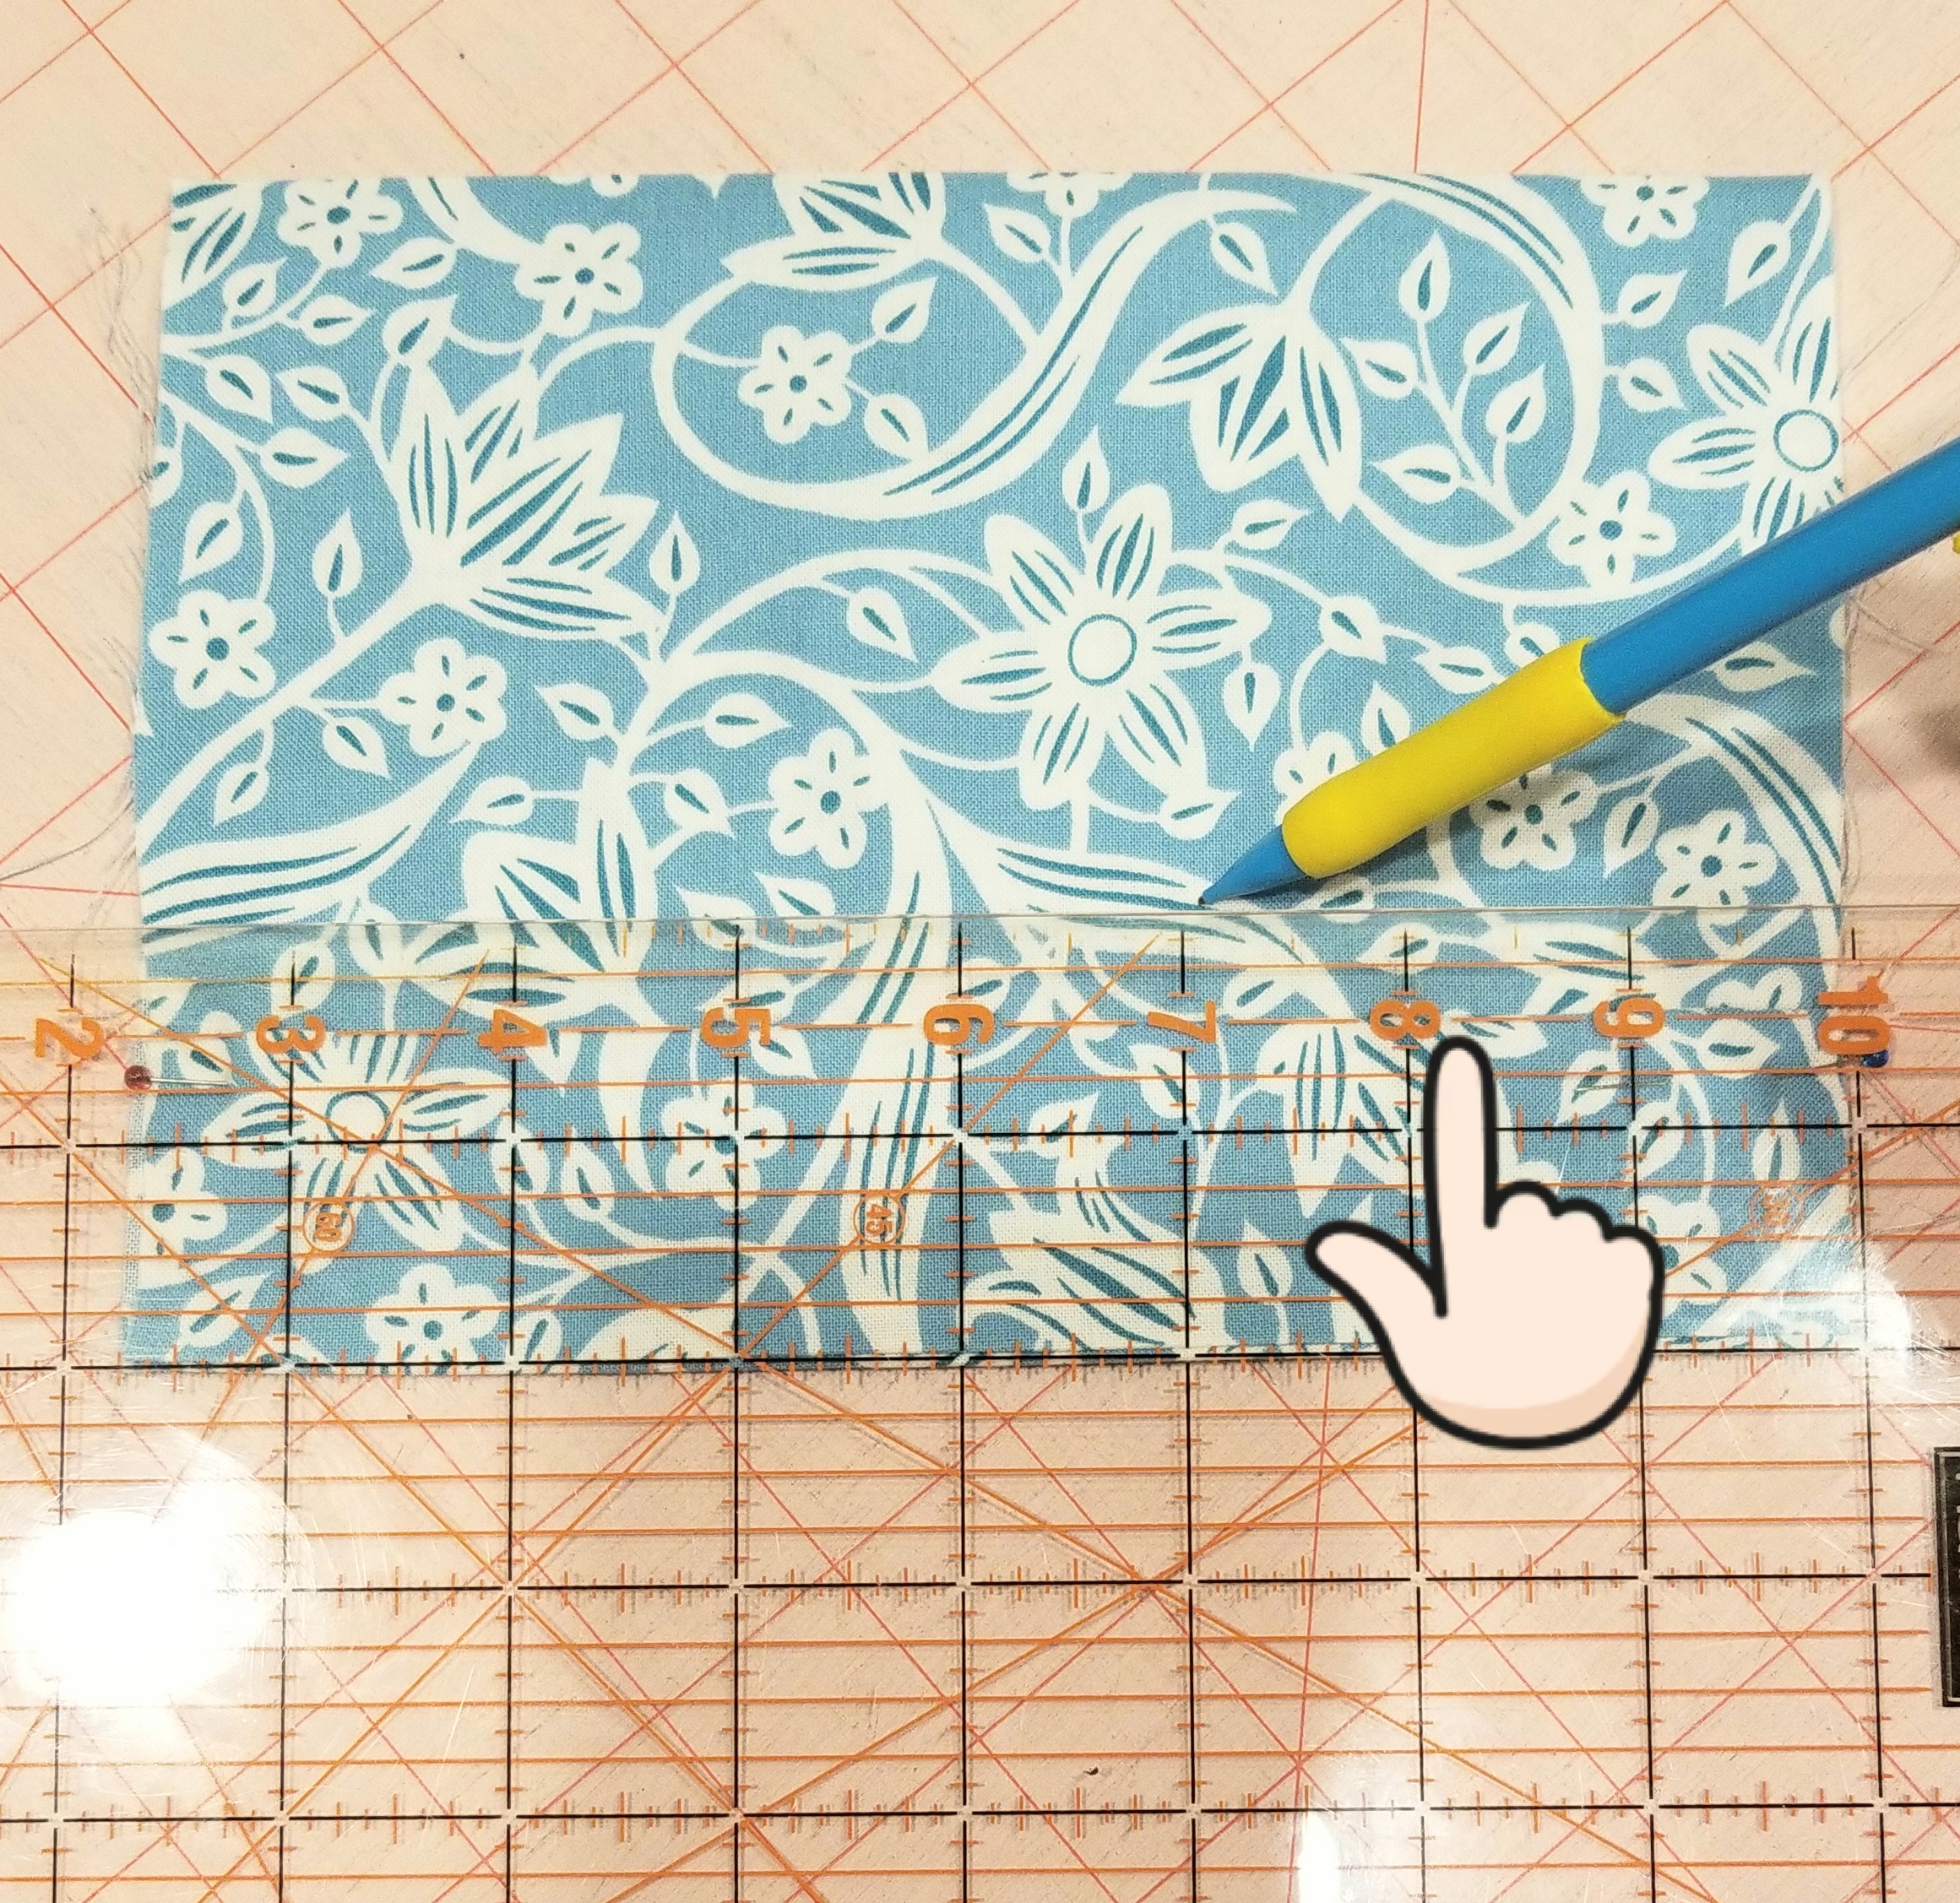
Place the tube of fabric so that the raw edges are on each side and the seam edge is at the bottom. Using a ruler, measure and mark a line 1 1/2 inches from the bottom edge. Make another line 1 inch above this line, or 2 1/2 inches from the seam edge. Don’t use a pencil as you see in the picture, use a fabric pen, or fabric chalk. I used a pencil for illustration purposes.
Fold the seam edge up (or down in this picture, as I turned it upside down…sorry) making the crease on the first line that you just marked. You should have 1 1/2 inch edge here.
Flip the tube piece over. Match the crease edge to the second line that you made earlier. Press. The pleat that you just created will be 1/2 inch deep. Pin the pleat down on each raw edge end.
Now you will mark the lines for the second pleat. Mark a line measuring 1/2” from the top crease of the last pleat, (or 2″ from the bottom seam edge). It was difficult to see the top of the crease in this picture, so look at the finger indicator above.
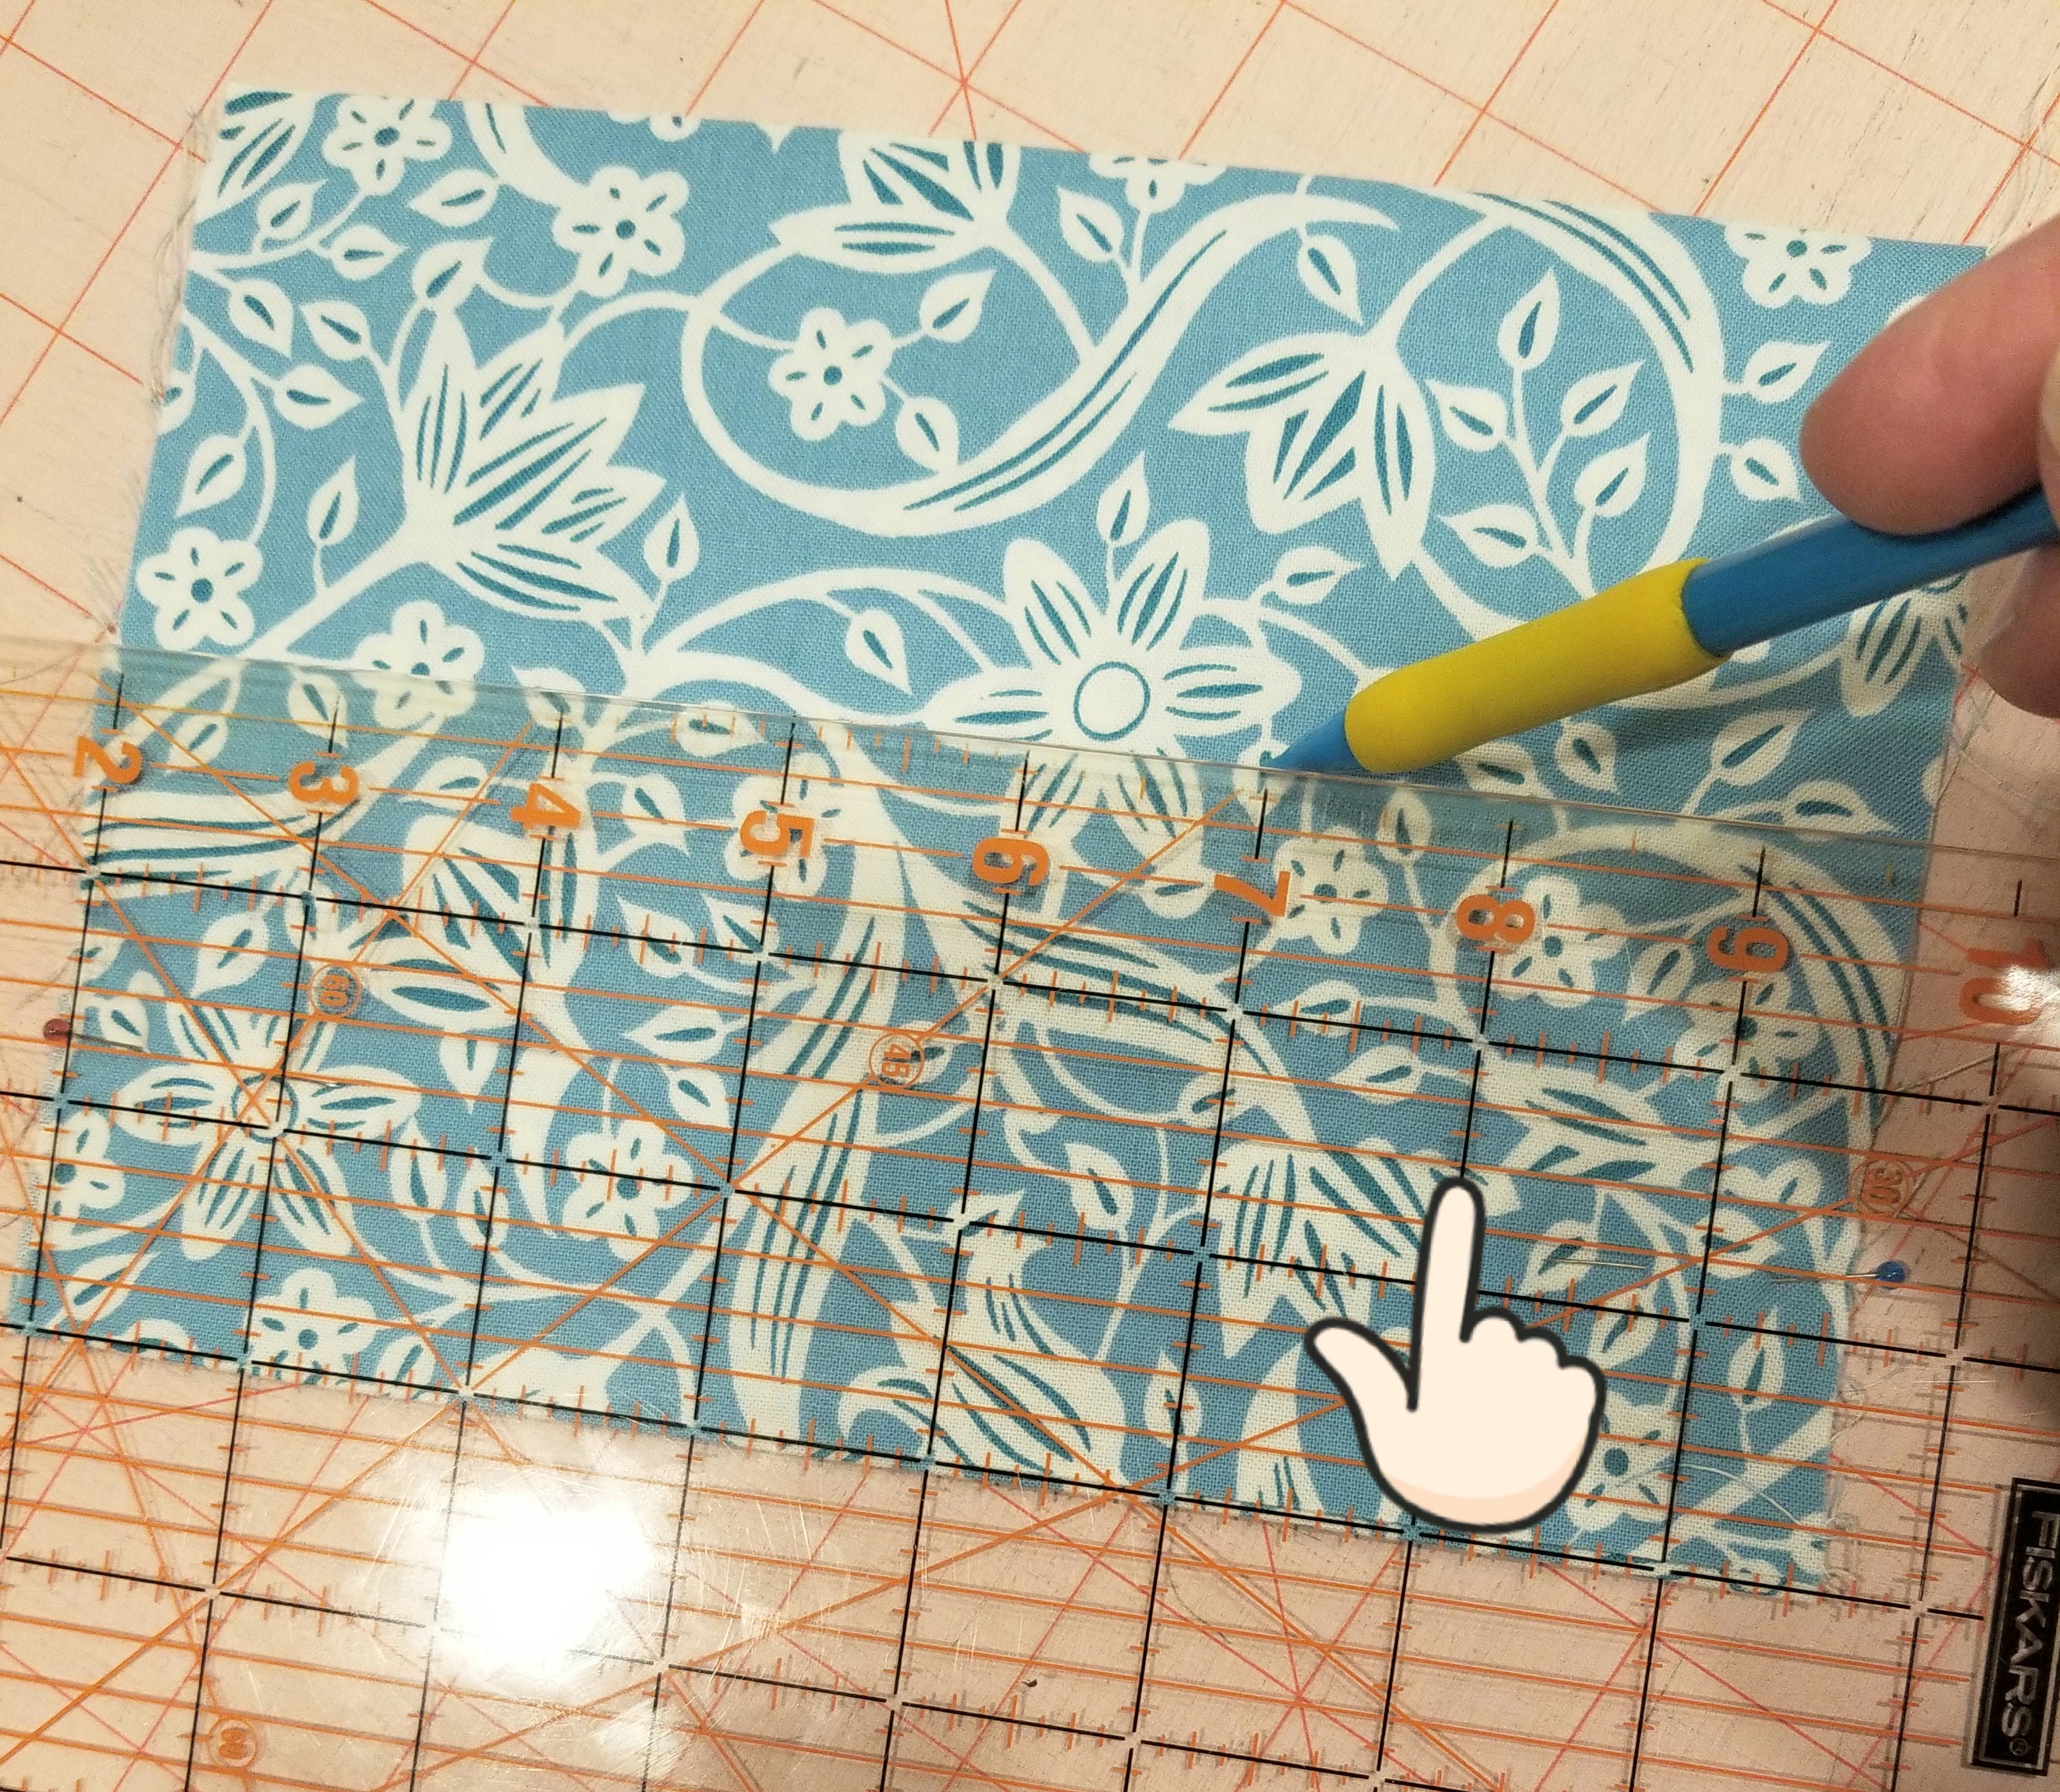
Now mark another line one inch above the last line that you made (or 3 inches above the seam edge). Using these lines as your guide, repeat the steps that you followed to make the first pleat.
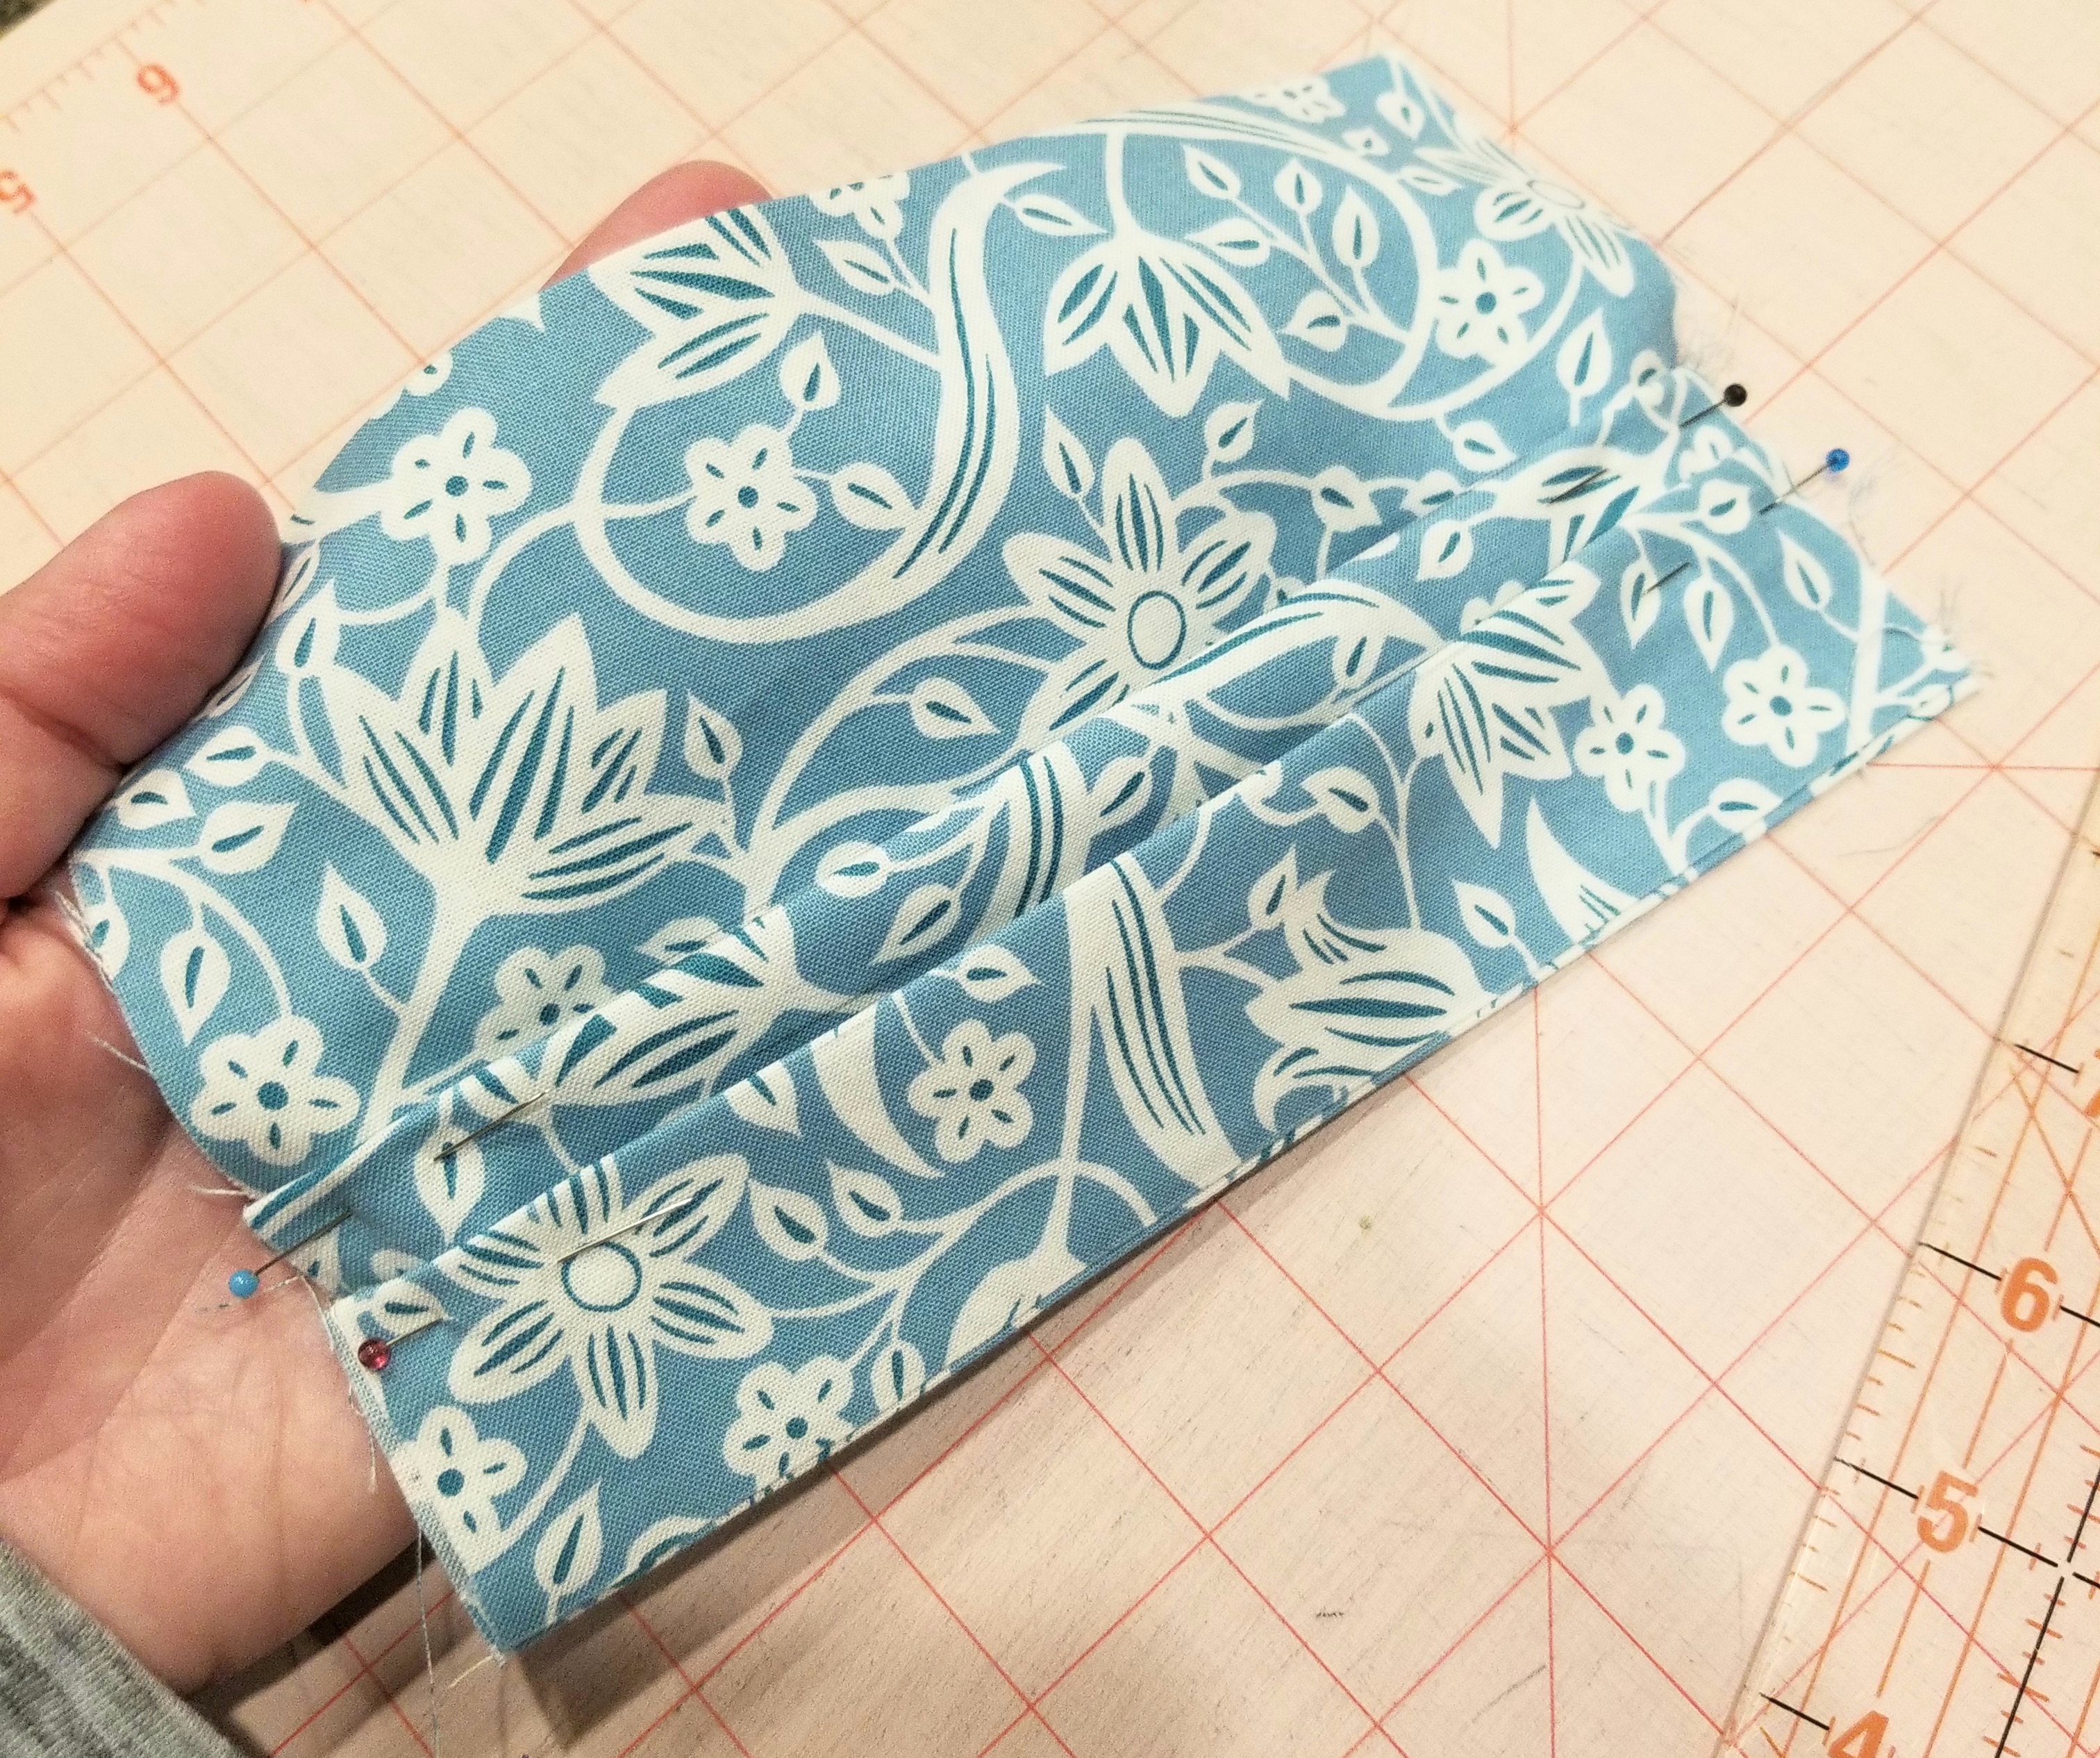
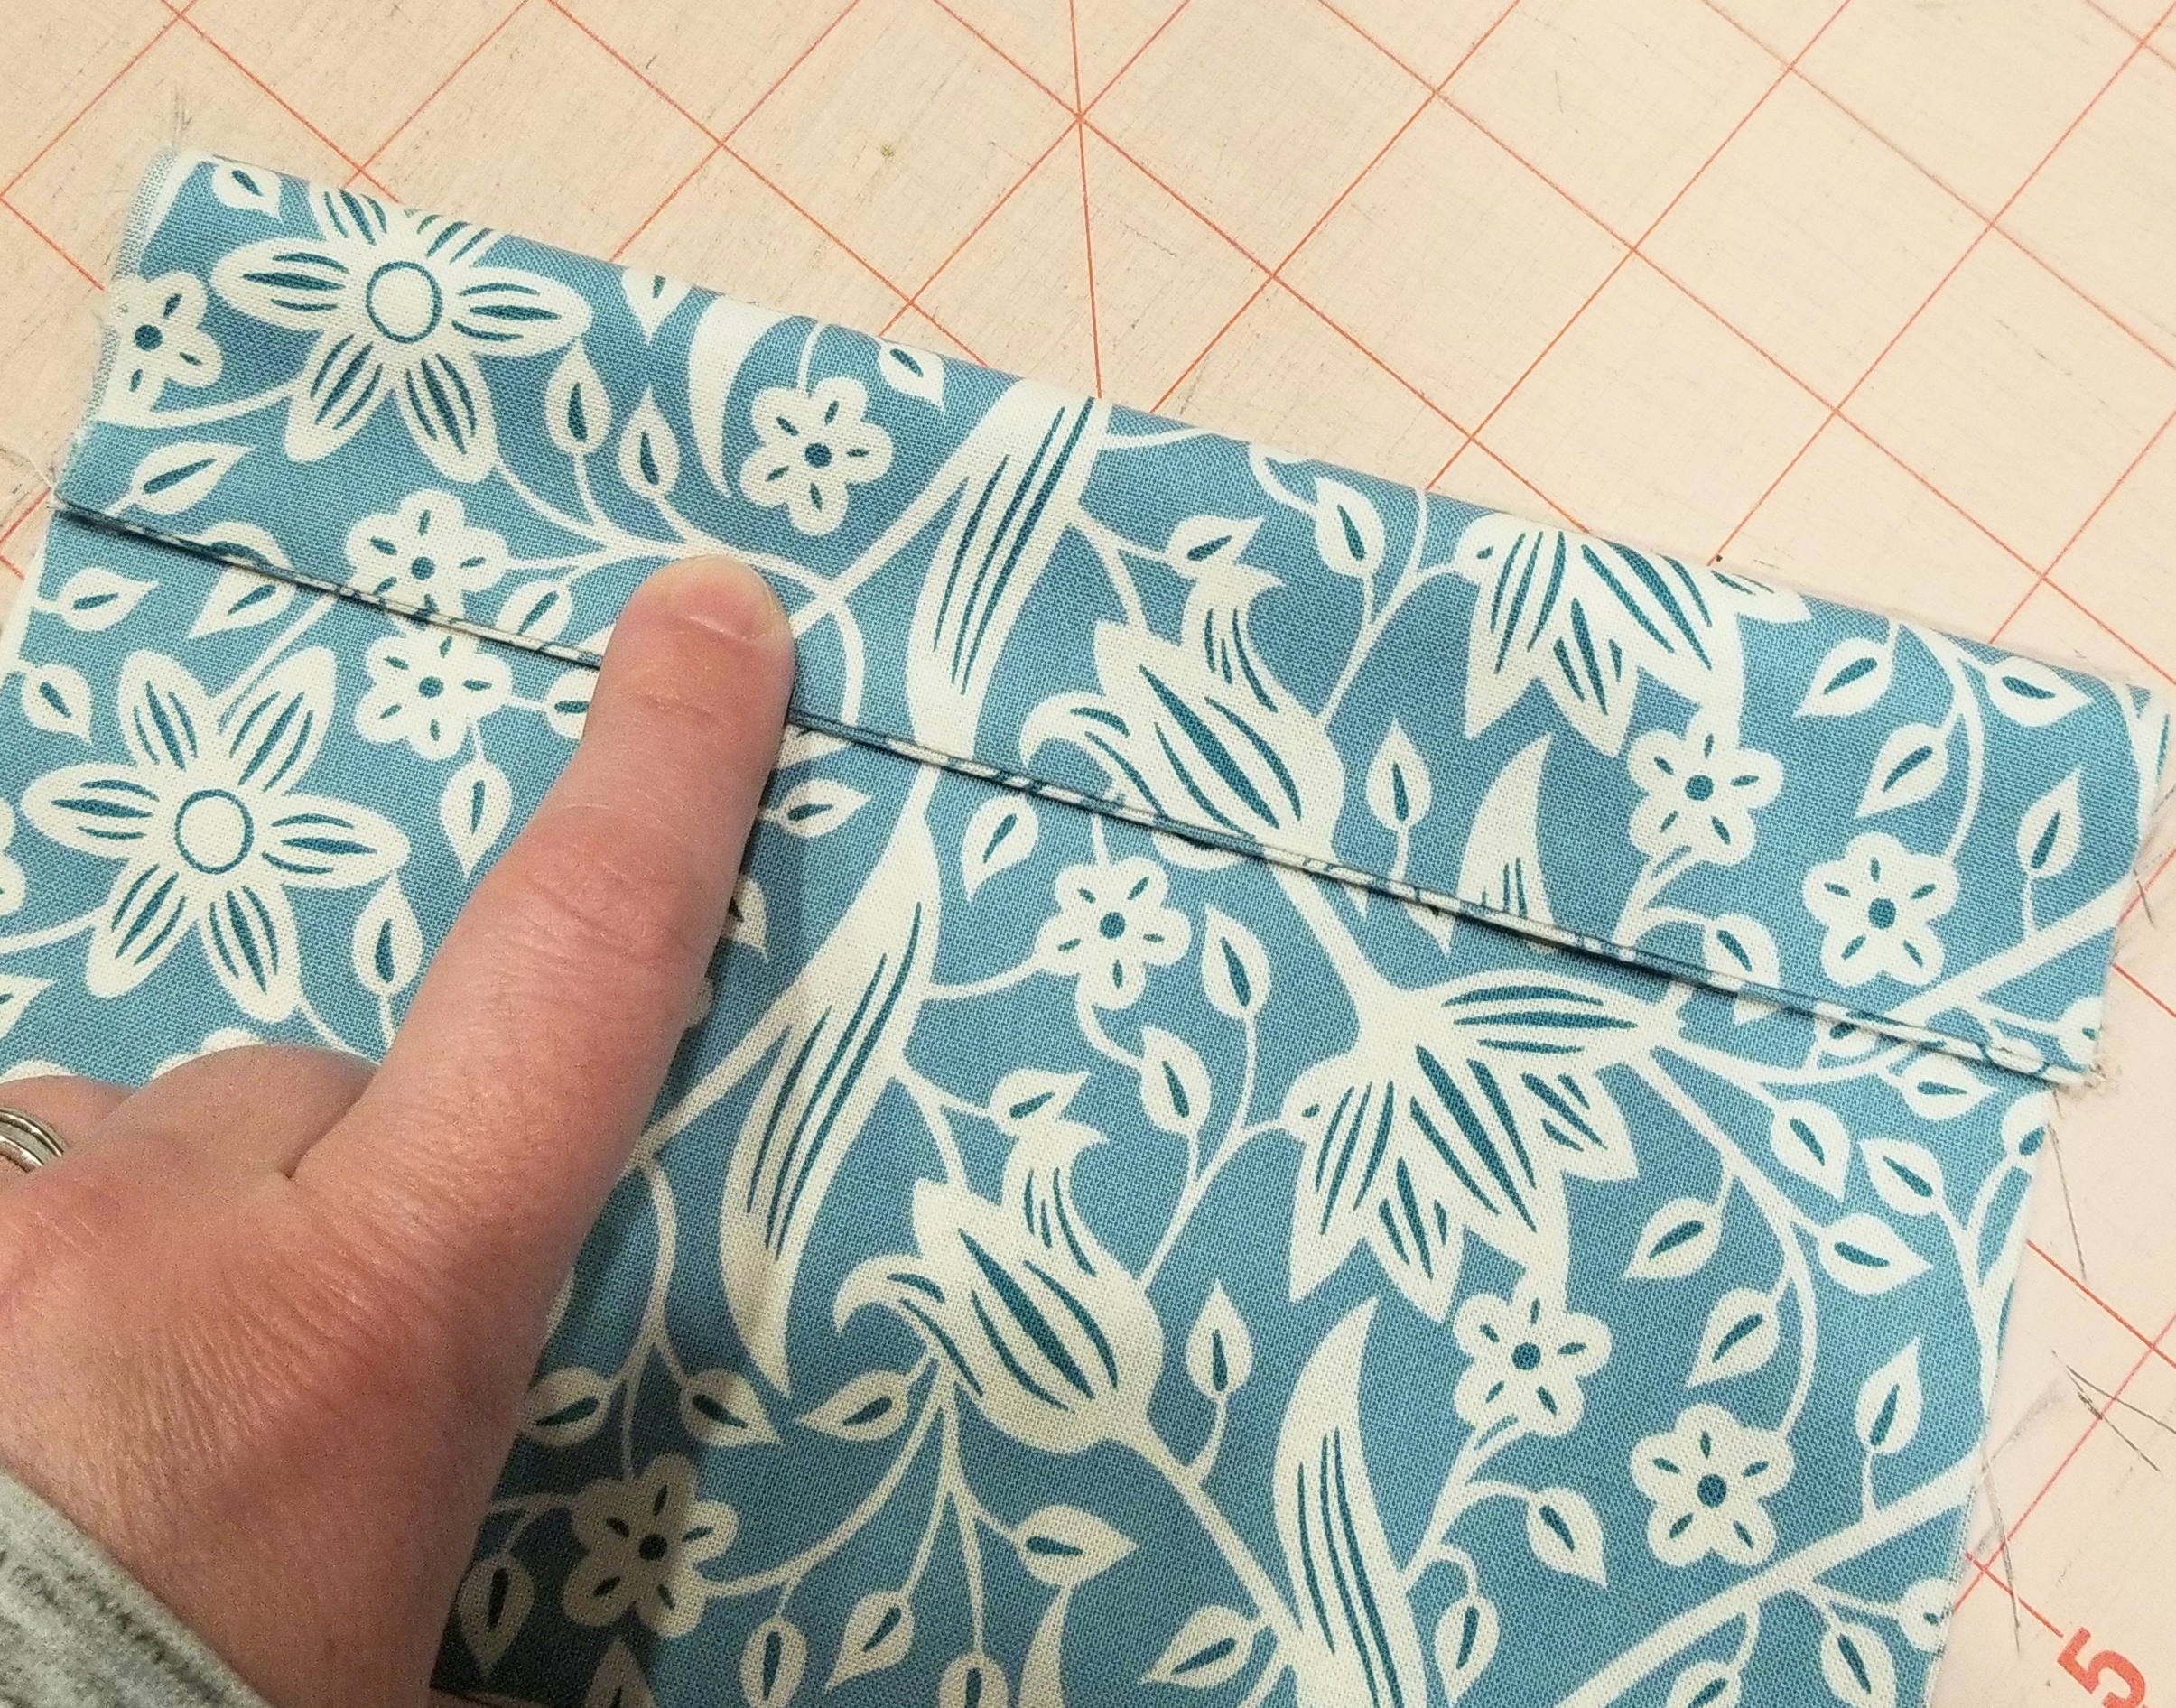
You should now have two pleats, each one being 1/2 inch deep. Repeat the steps you used to make the second pleat, so that you end up with three pleats total. Press.
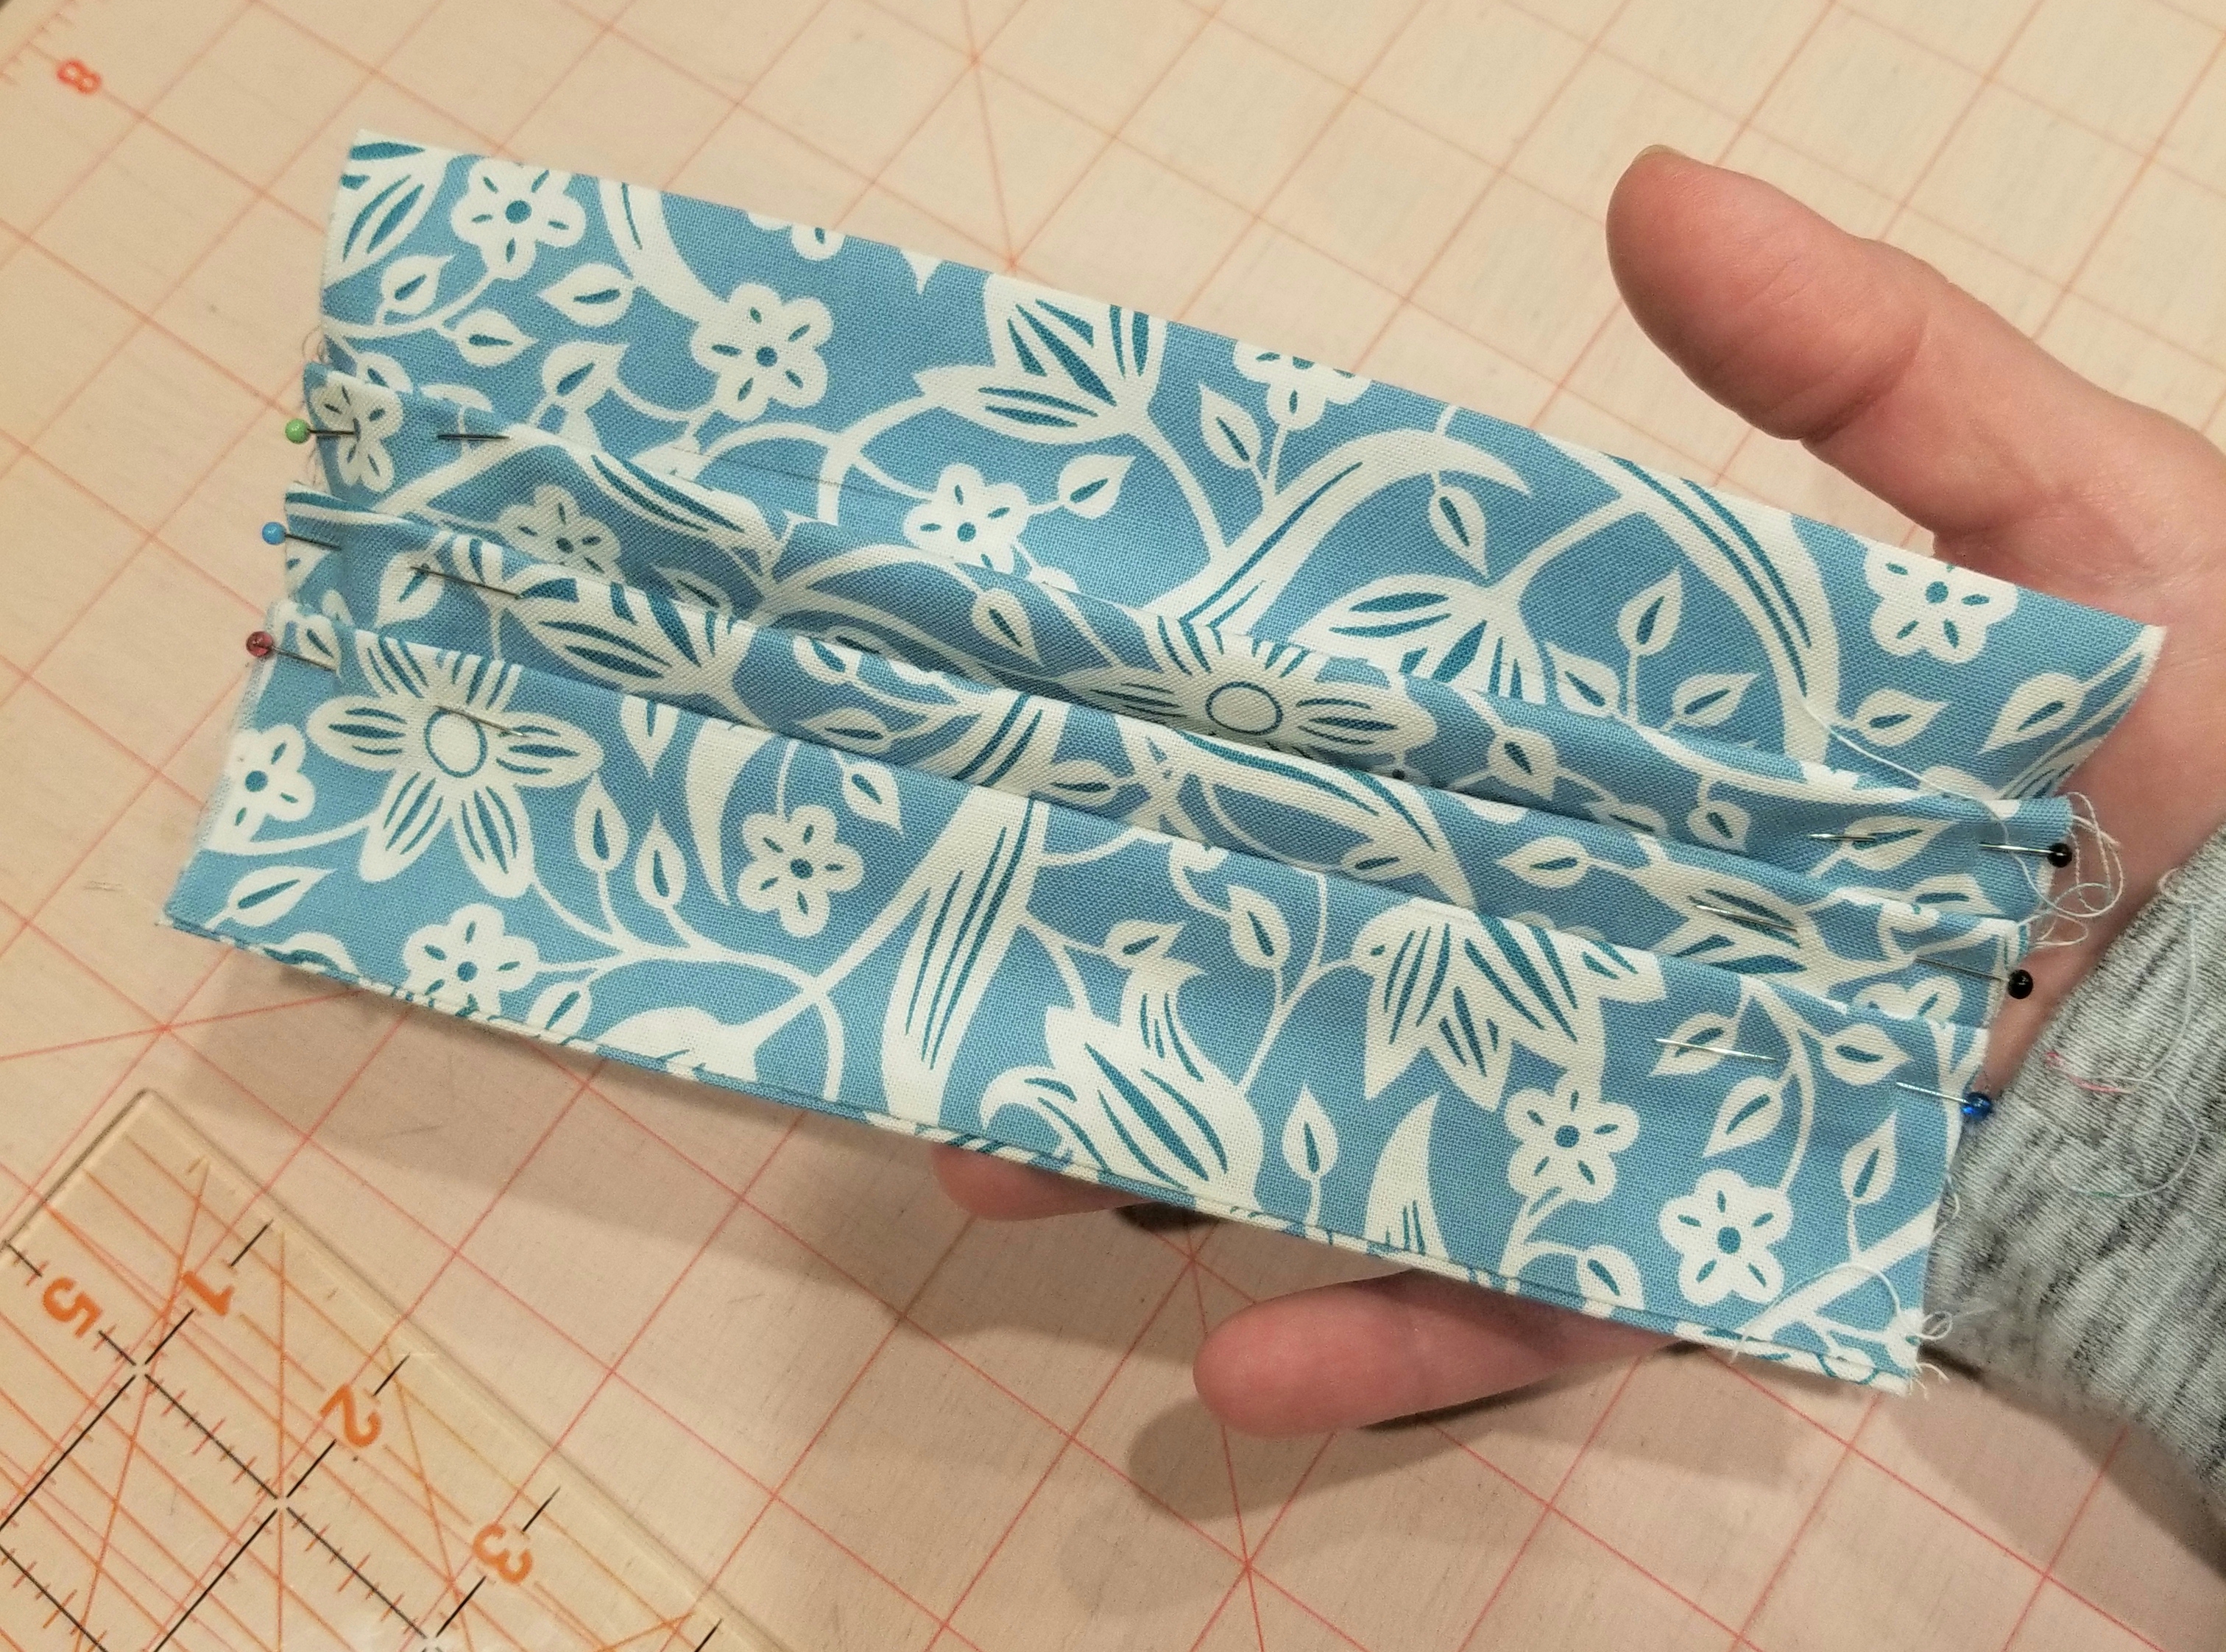
This is what your main piece should look like at this point.
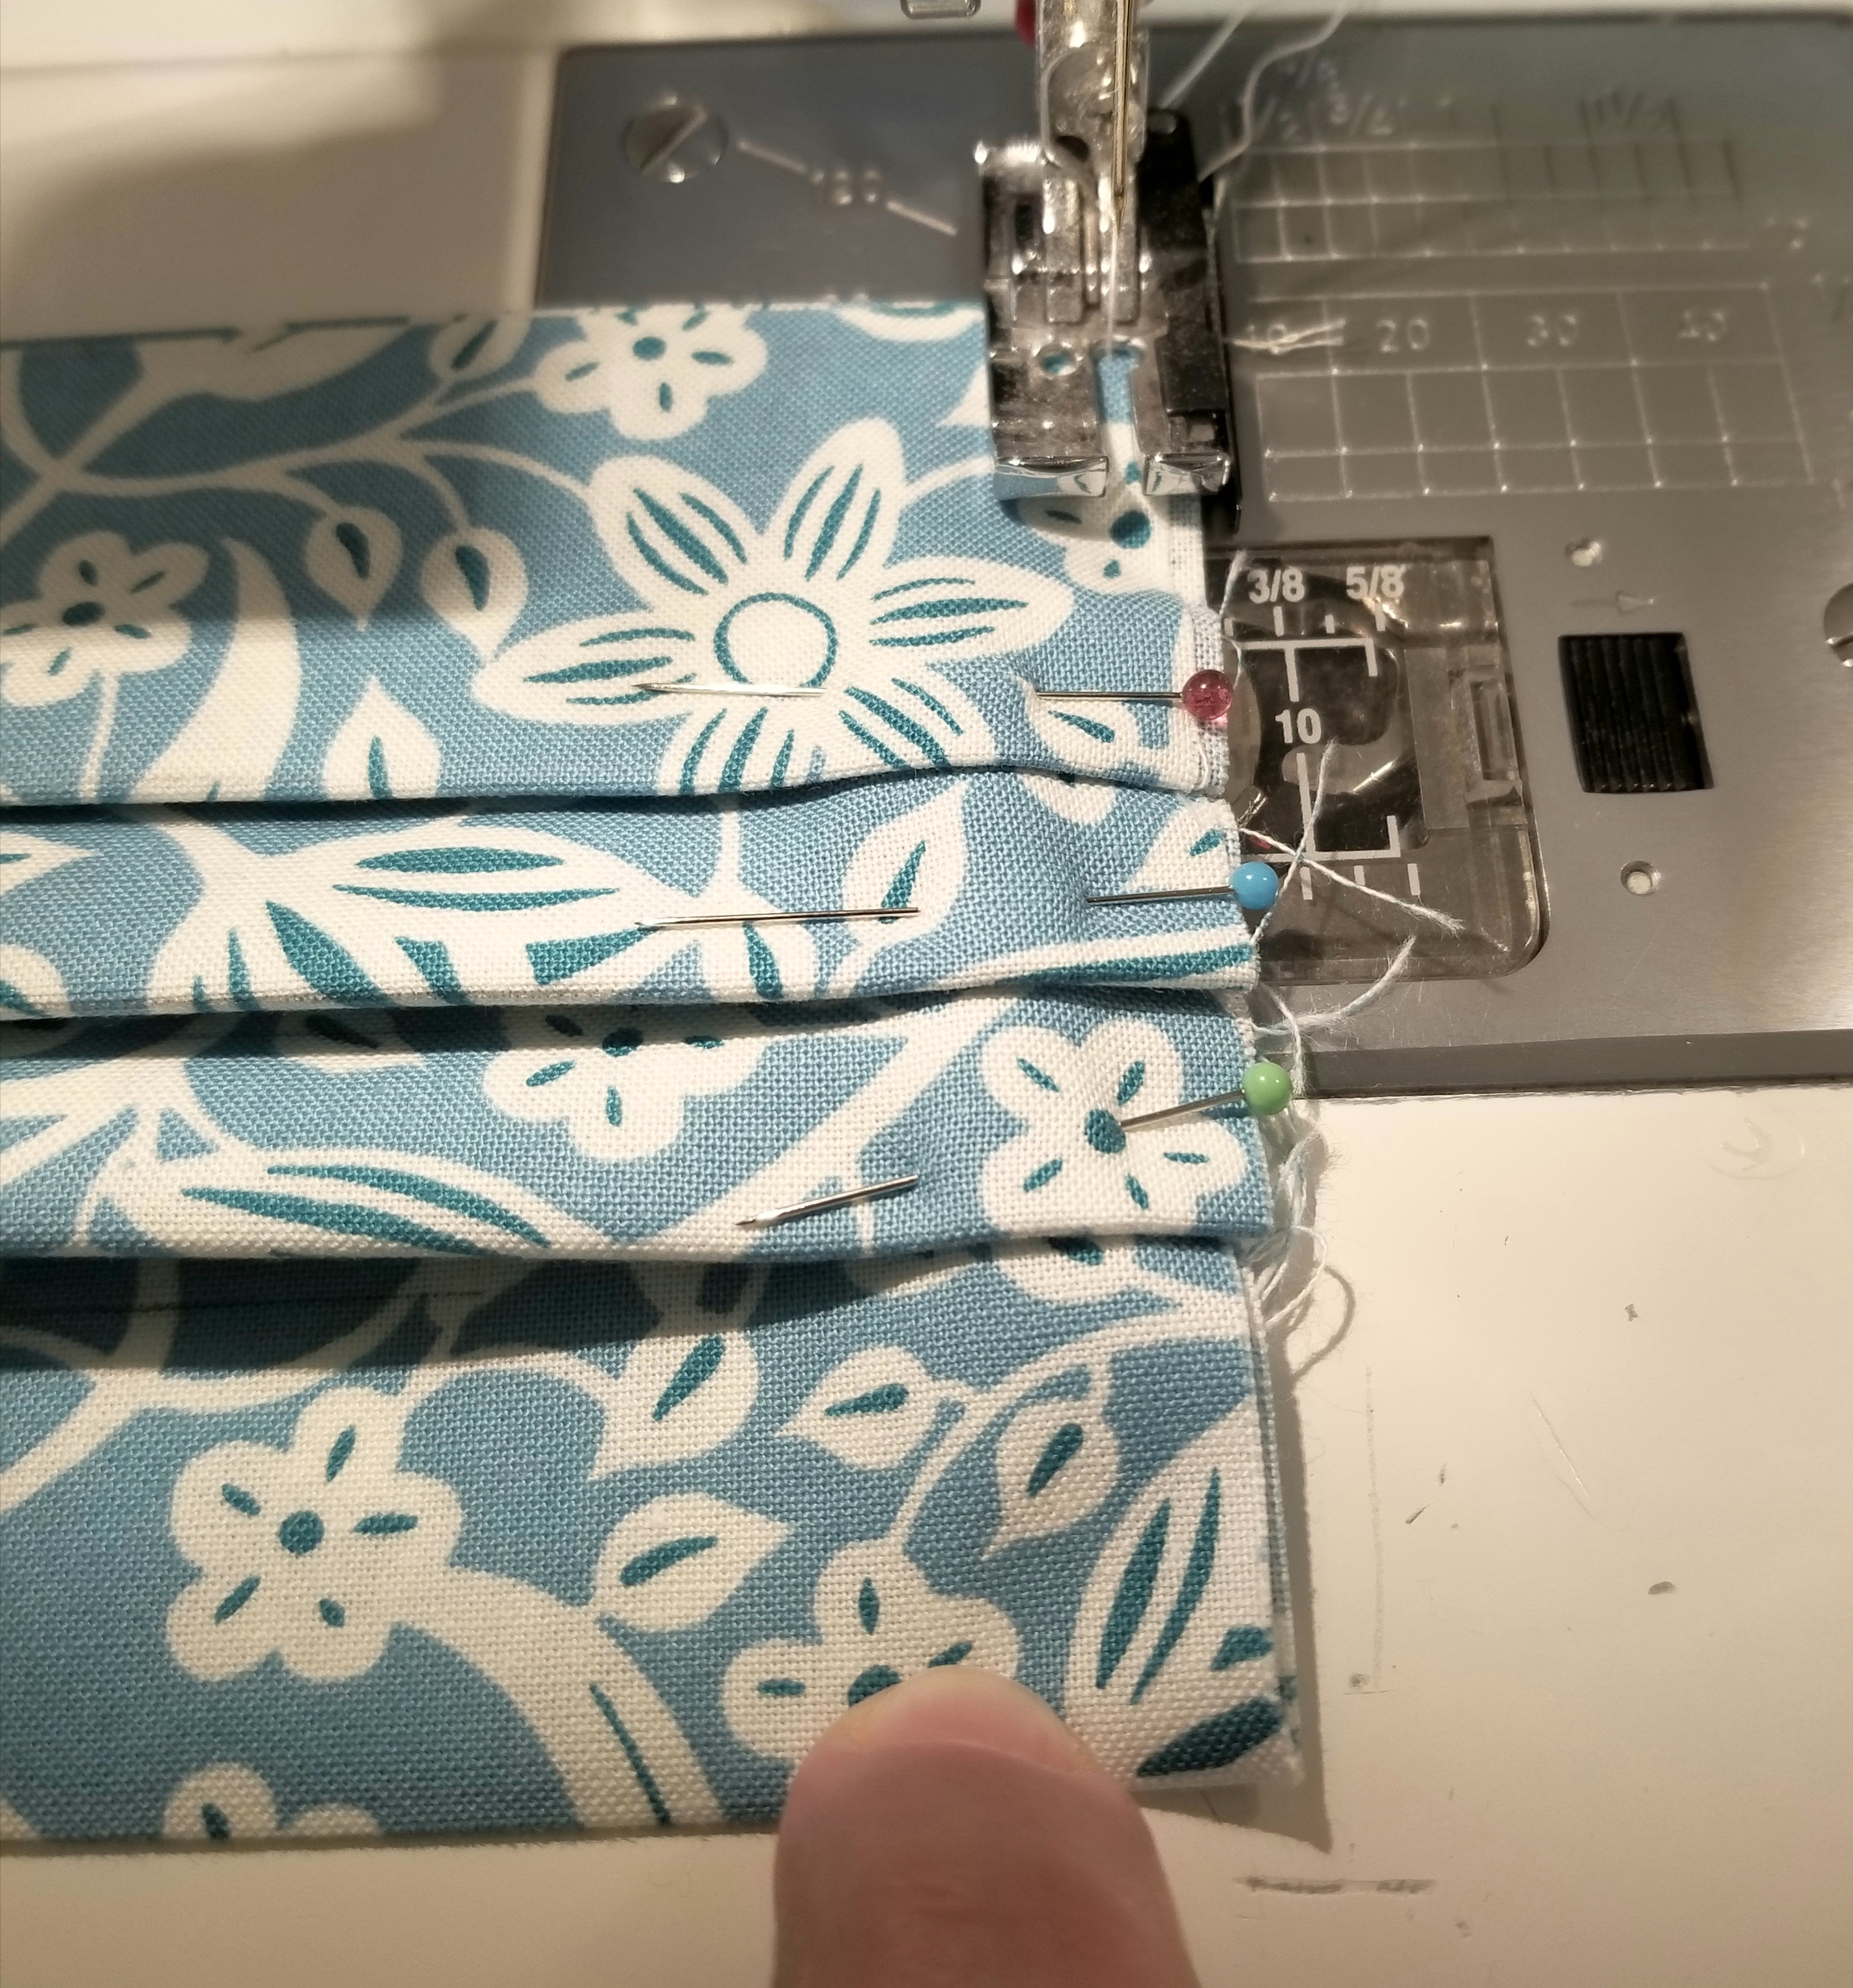
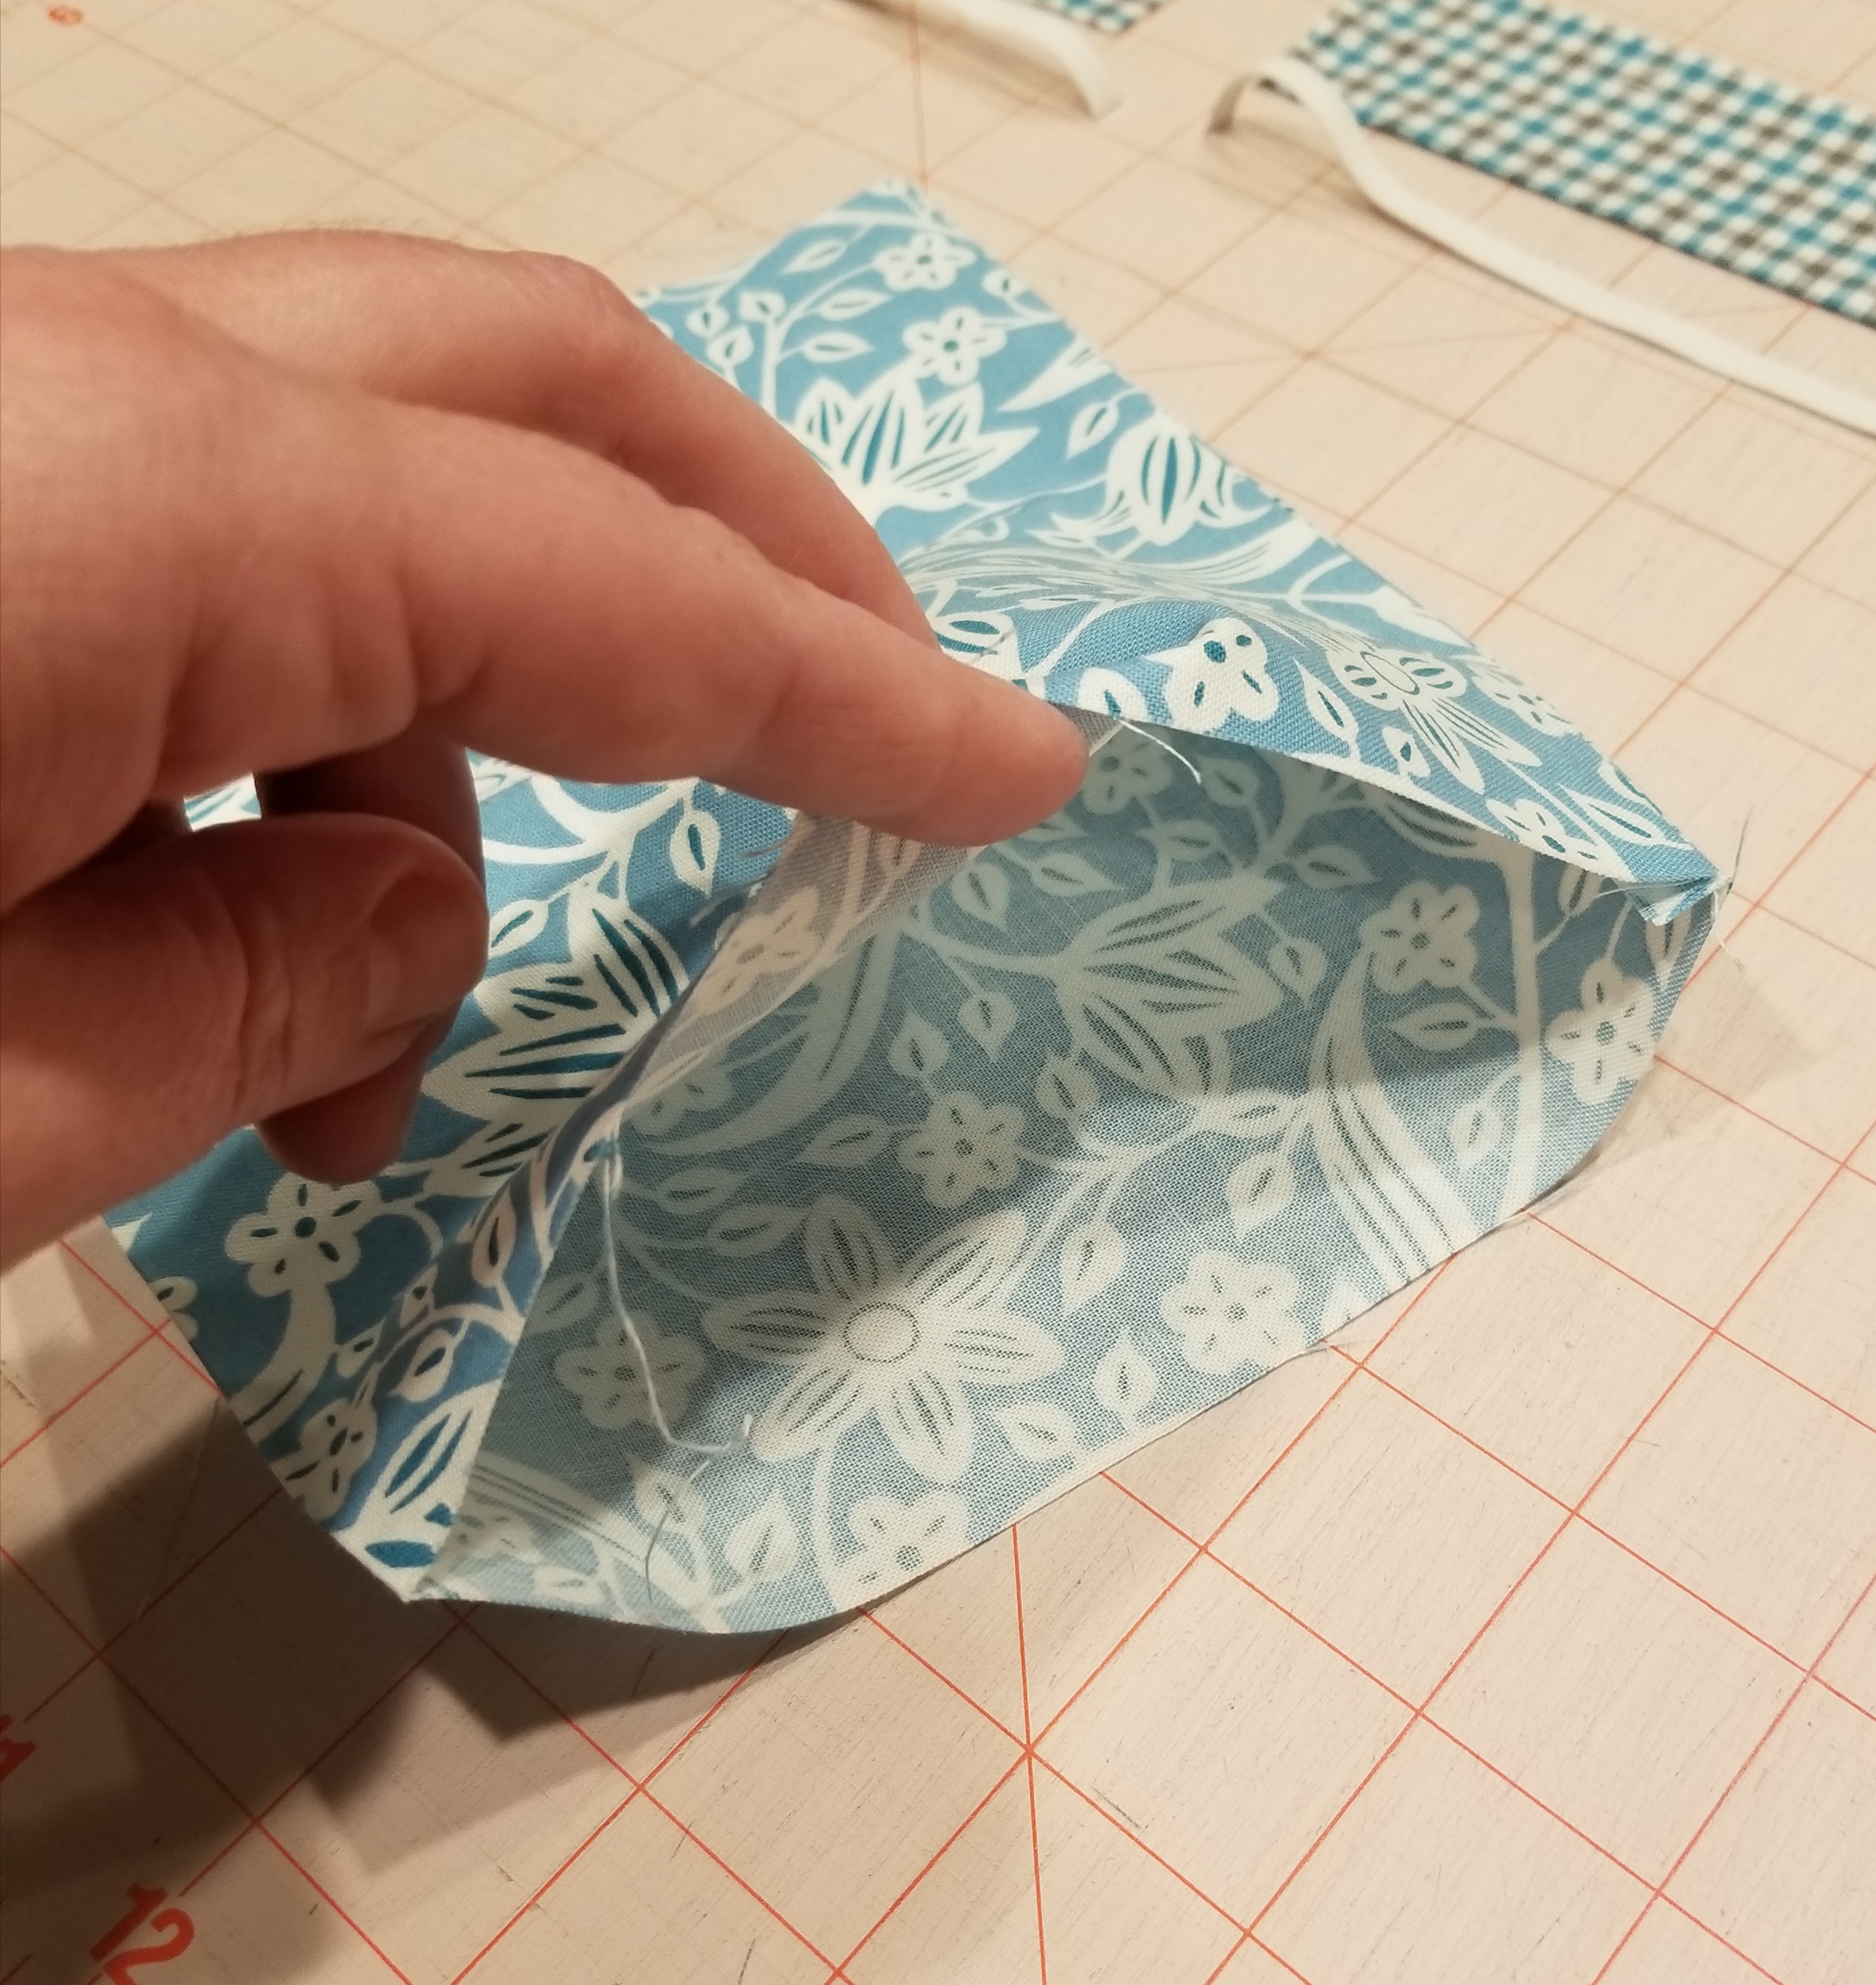
Using a 1/8” seam allowance, baste stitch the raw edges.
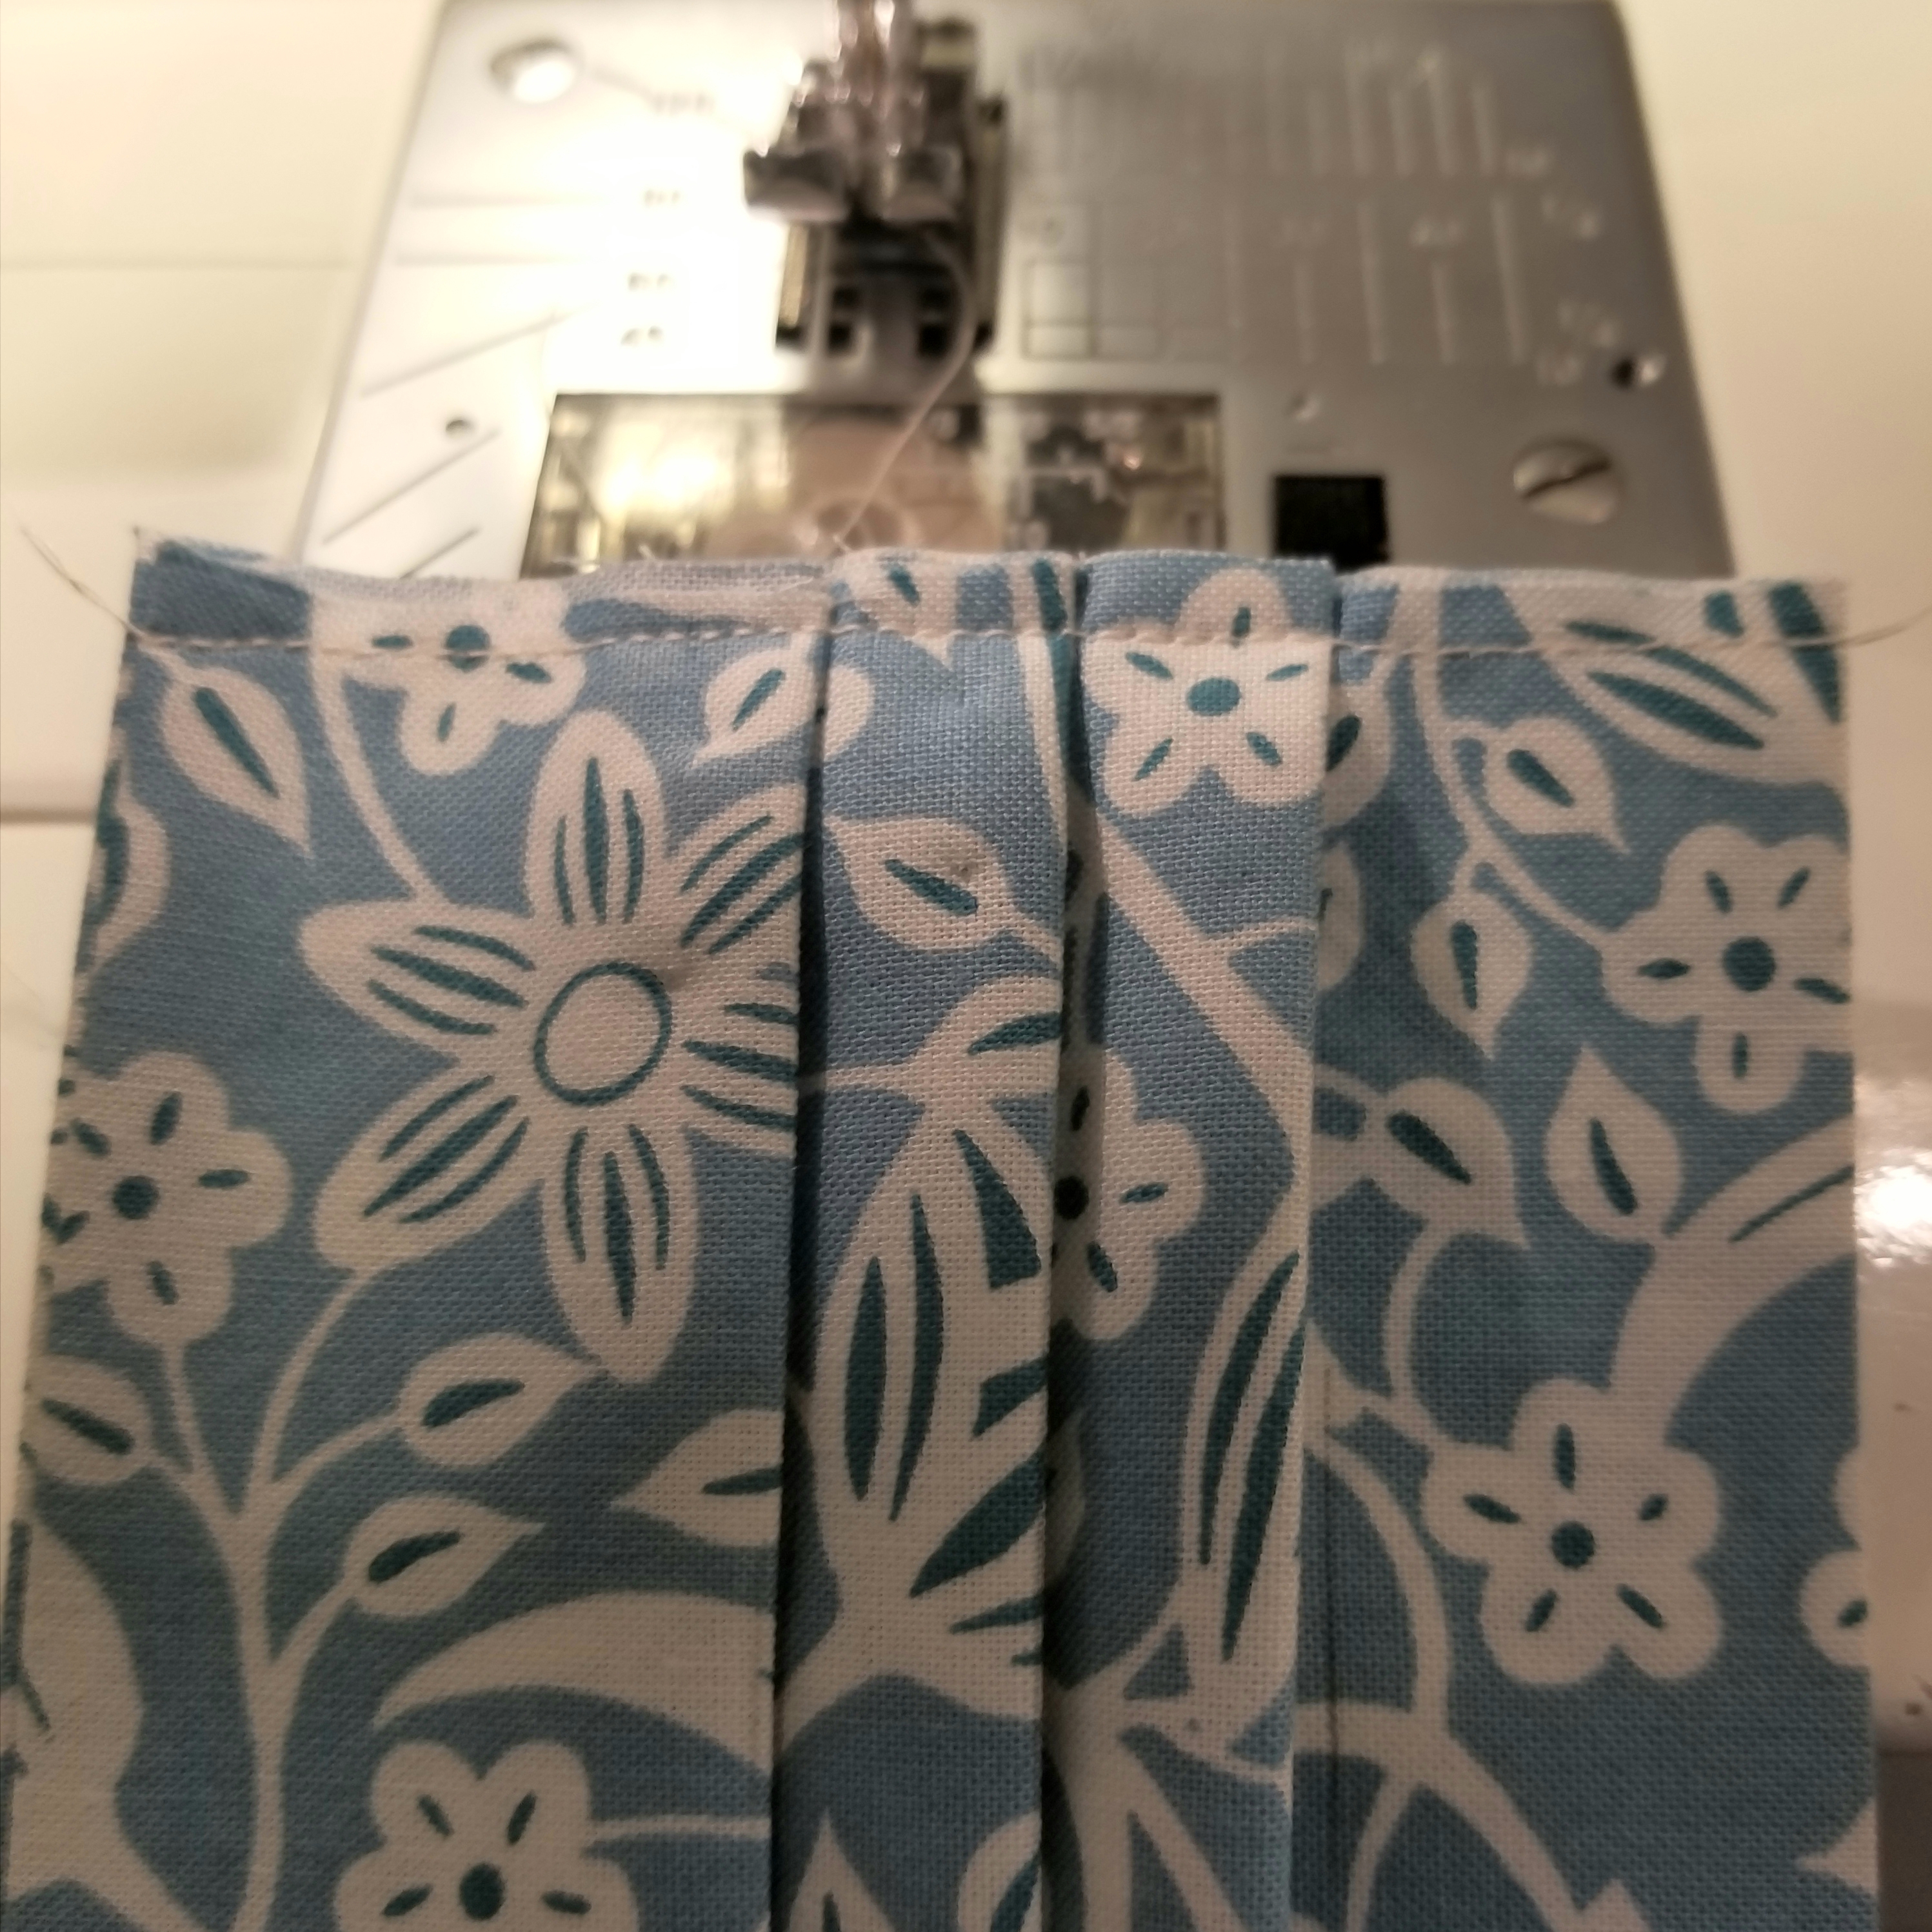
Repeat this step so that both raw edges are basted as shown in the picture above.
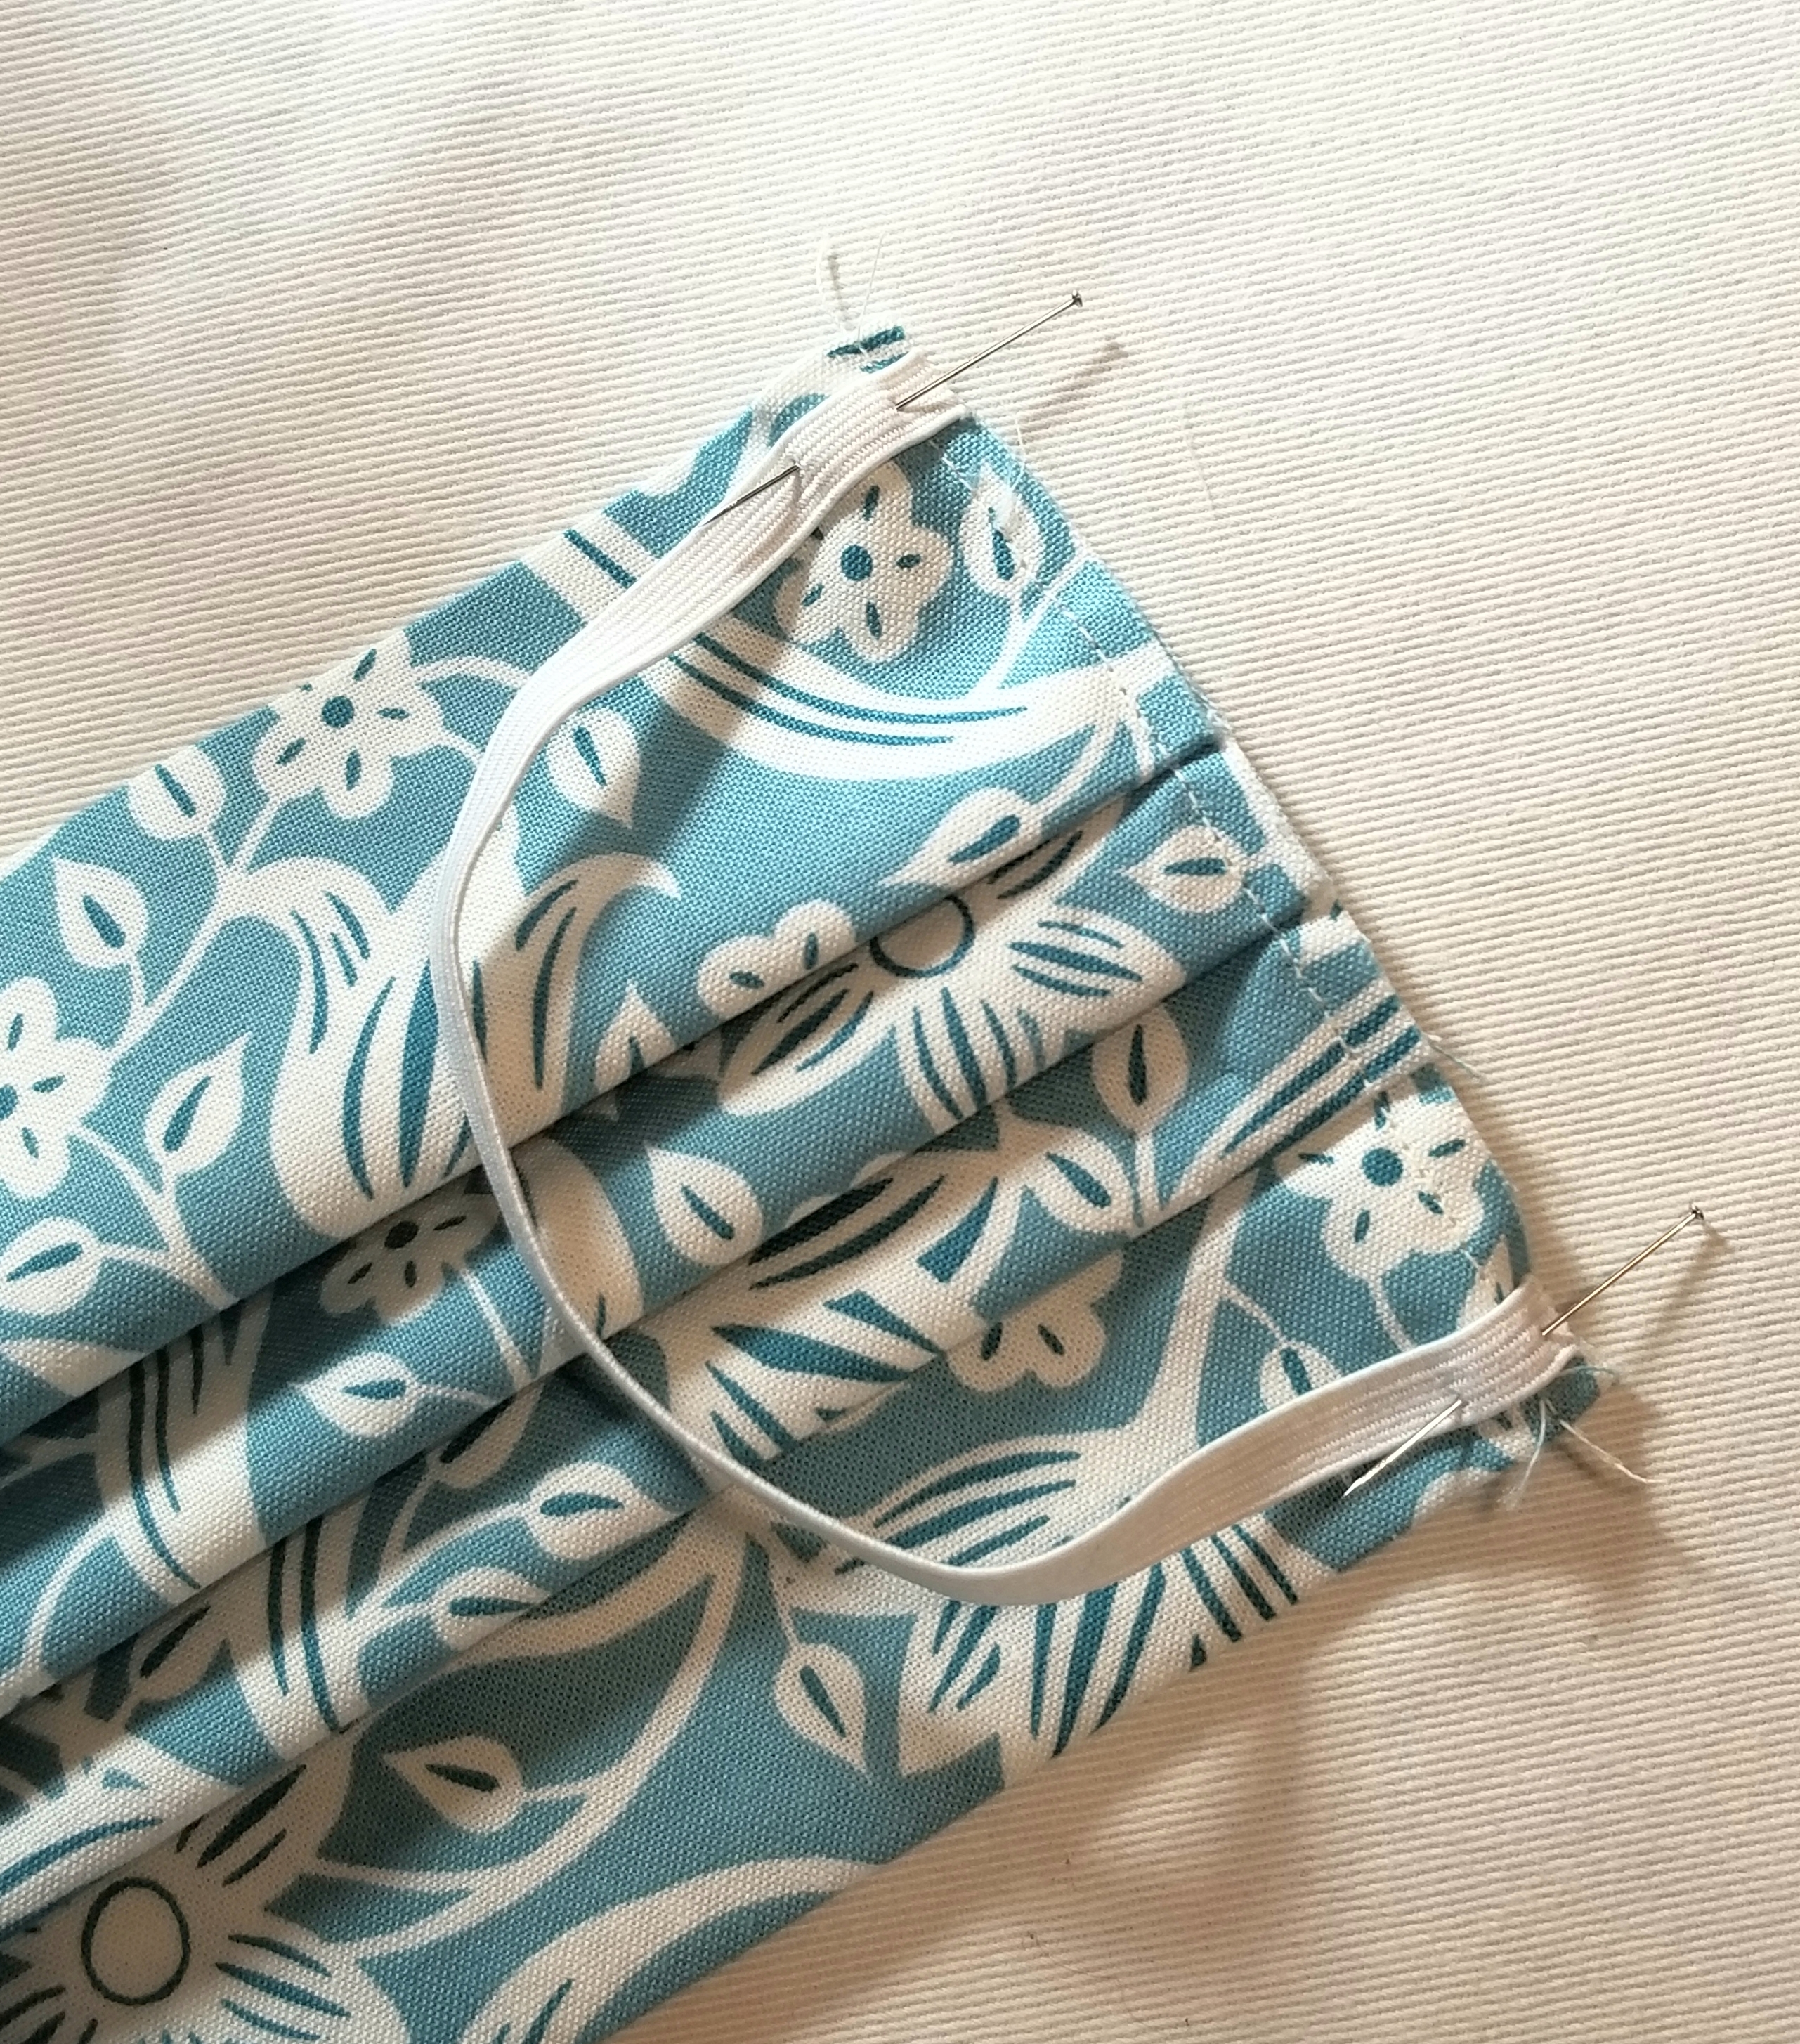
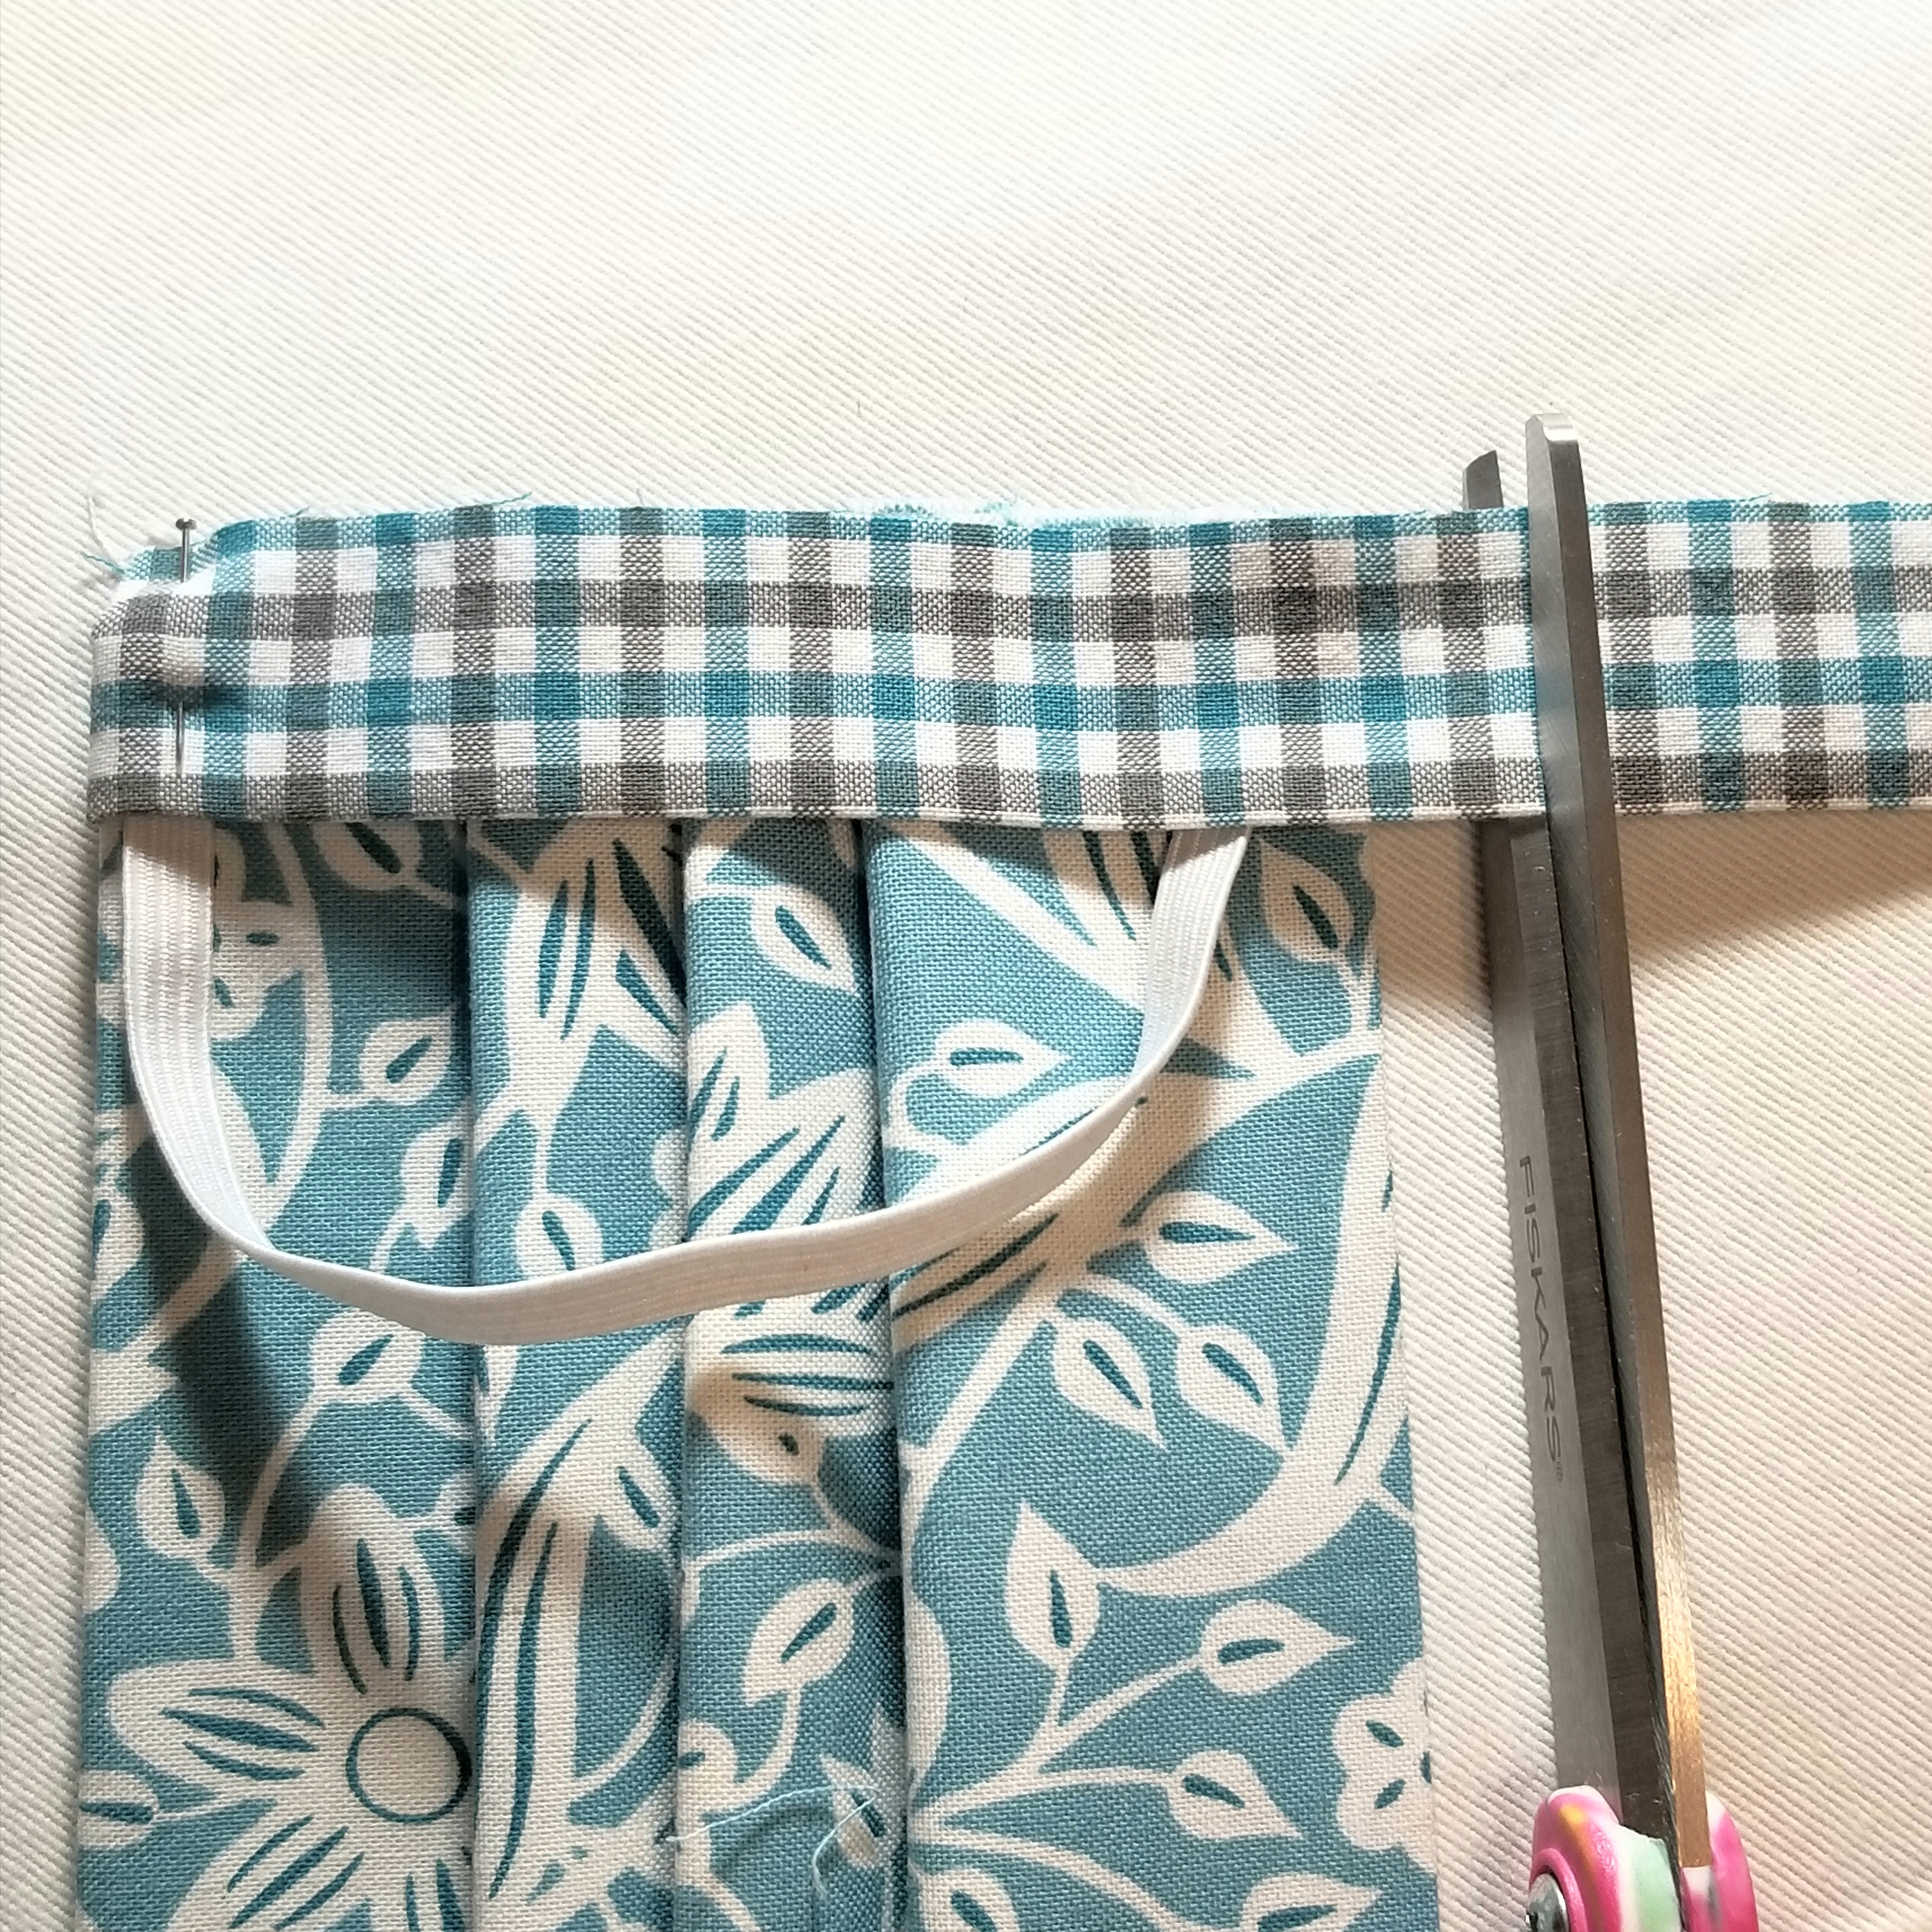
Pin one elastic piece to the raw edge, making sure not to twist it before baste stitching it to the edge at both ends. I placed mine 1/8” from the top and bottom edge of the main pleated piece. Baste elastic in place 1/8” inch from raw edge. Repeat, to attach remaining elastic piece to the other raw edge.
Your pleated piece should now resemble the picture above.
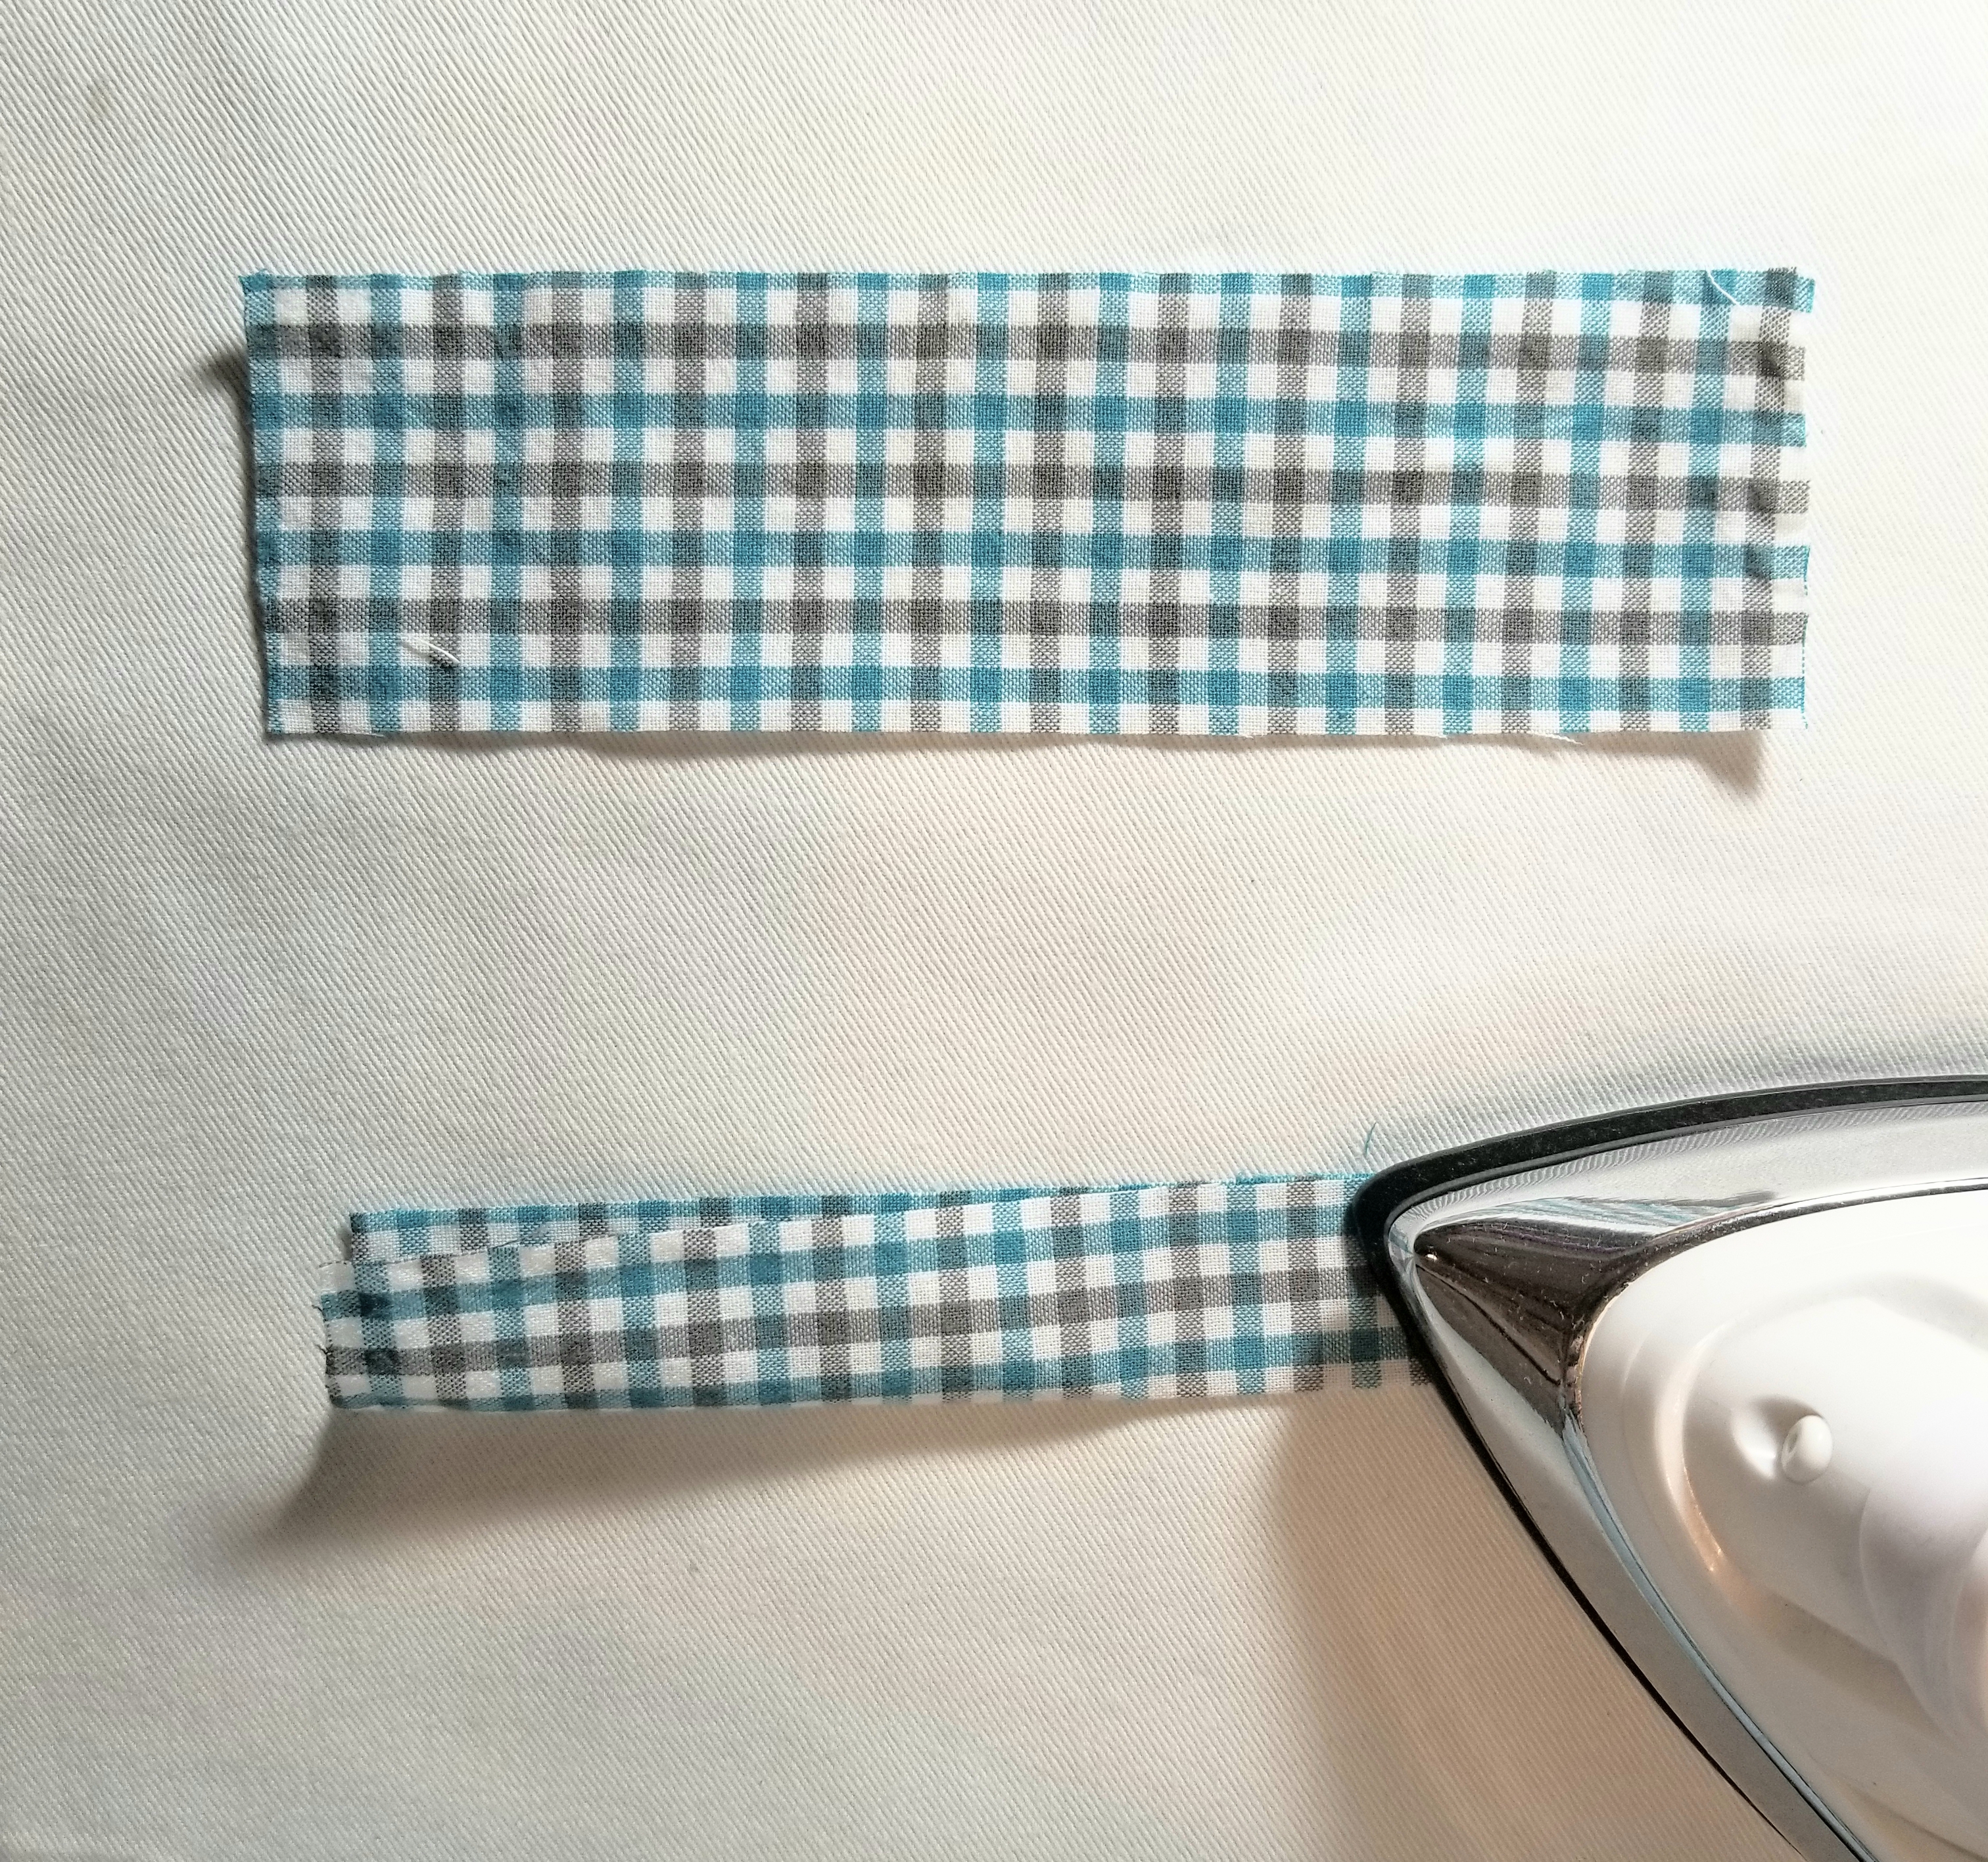
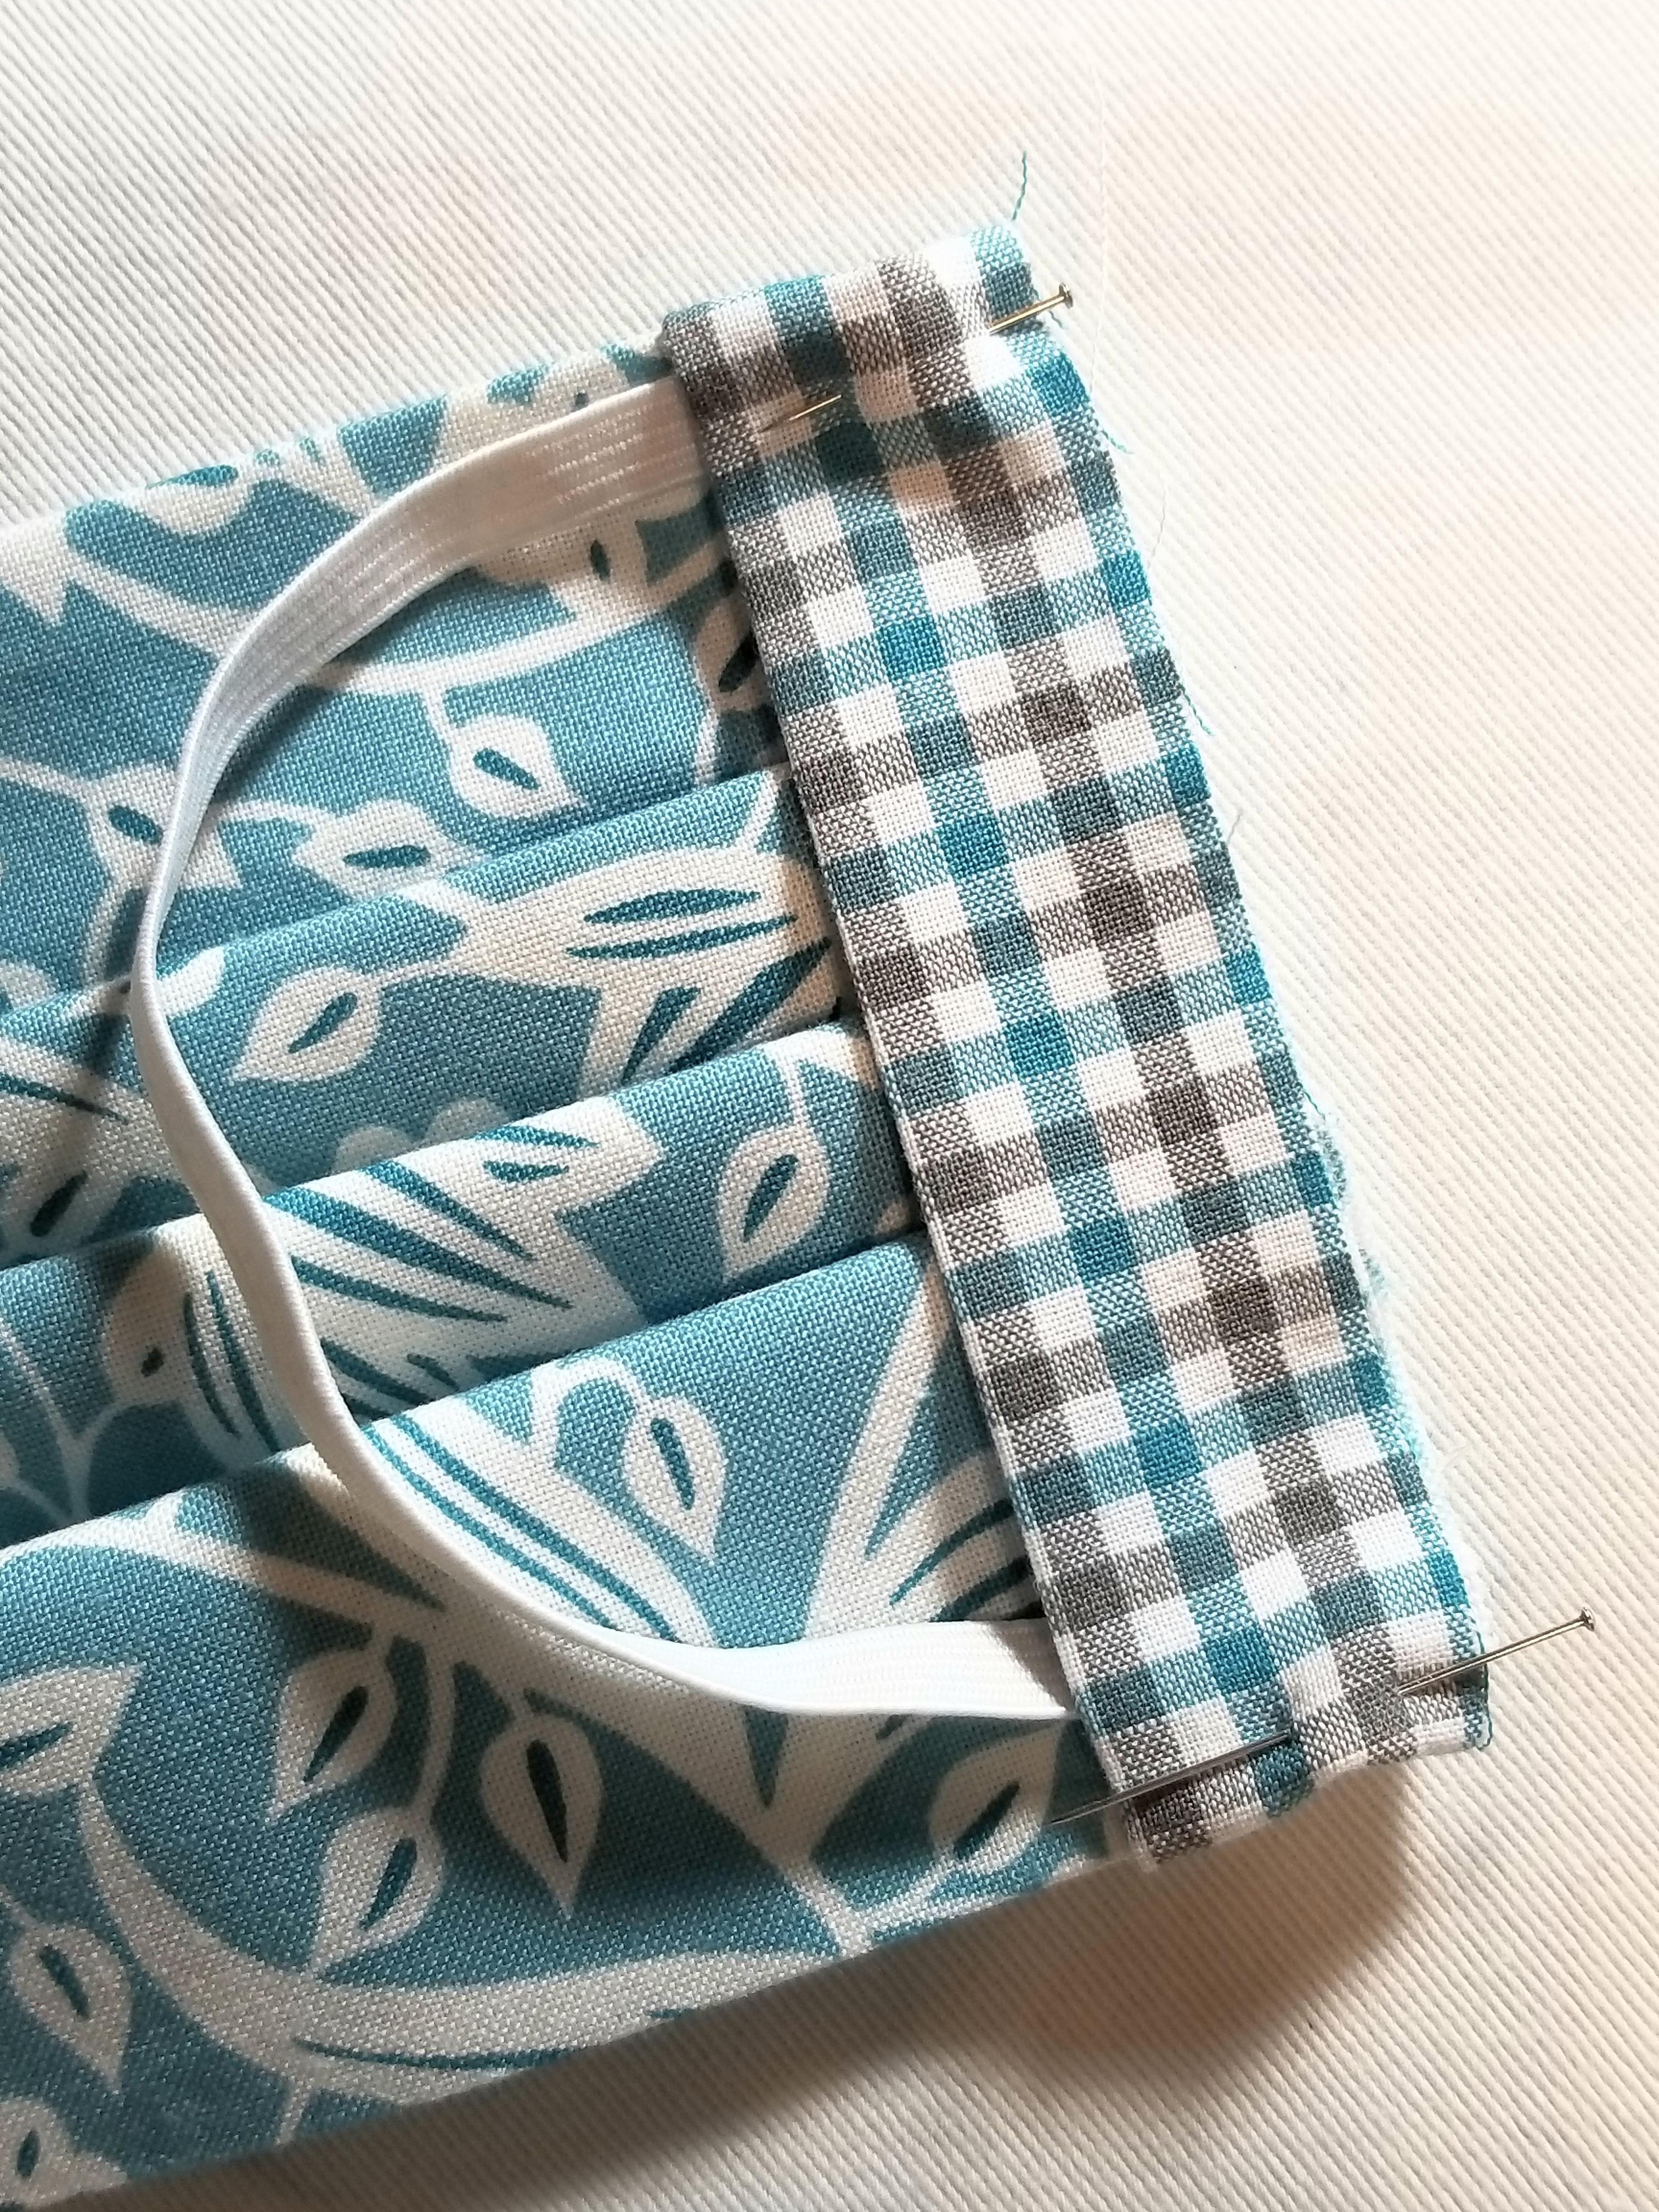
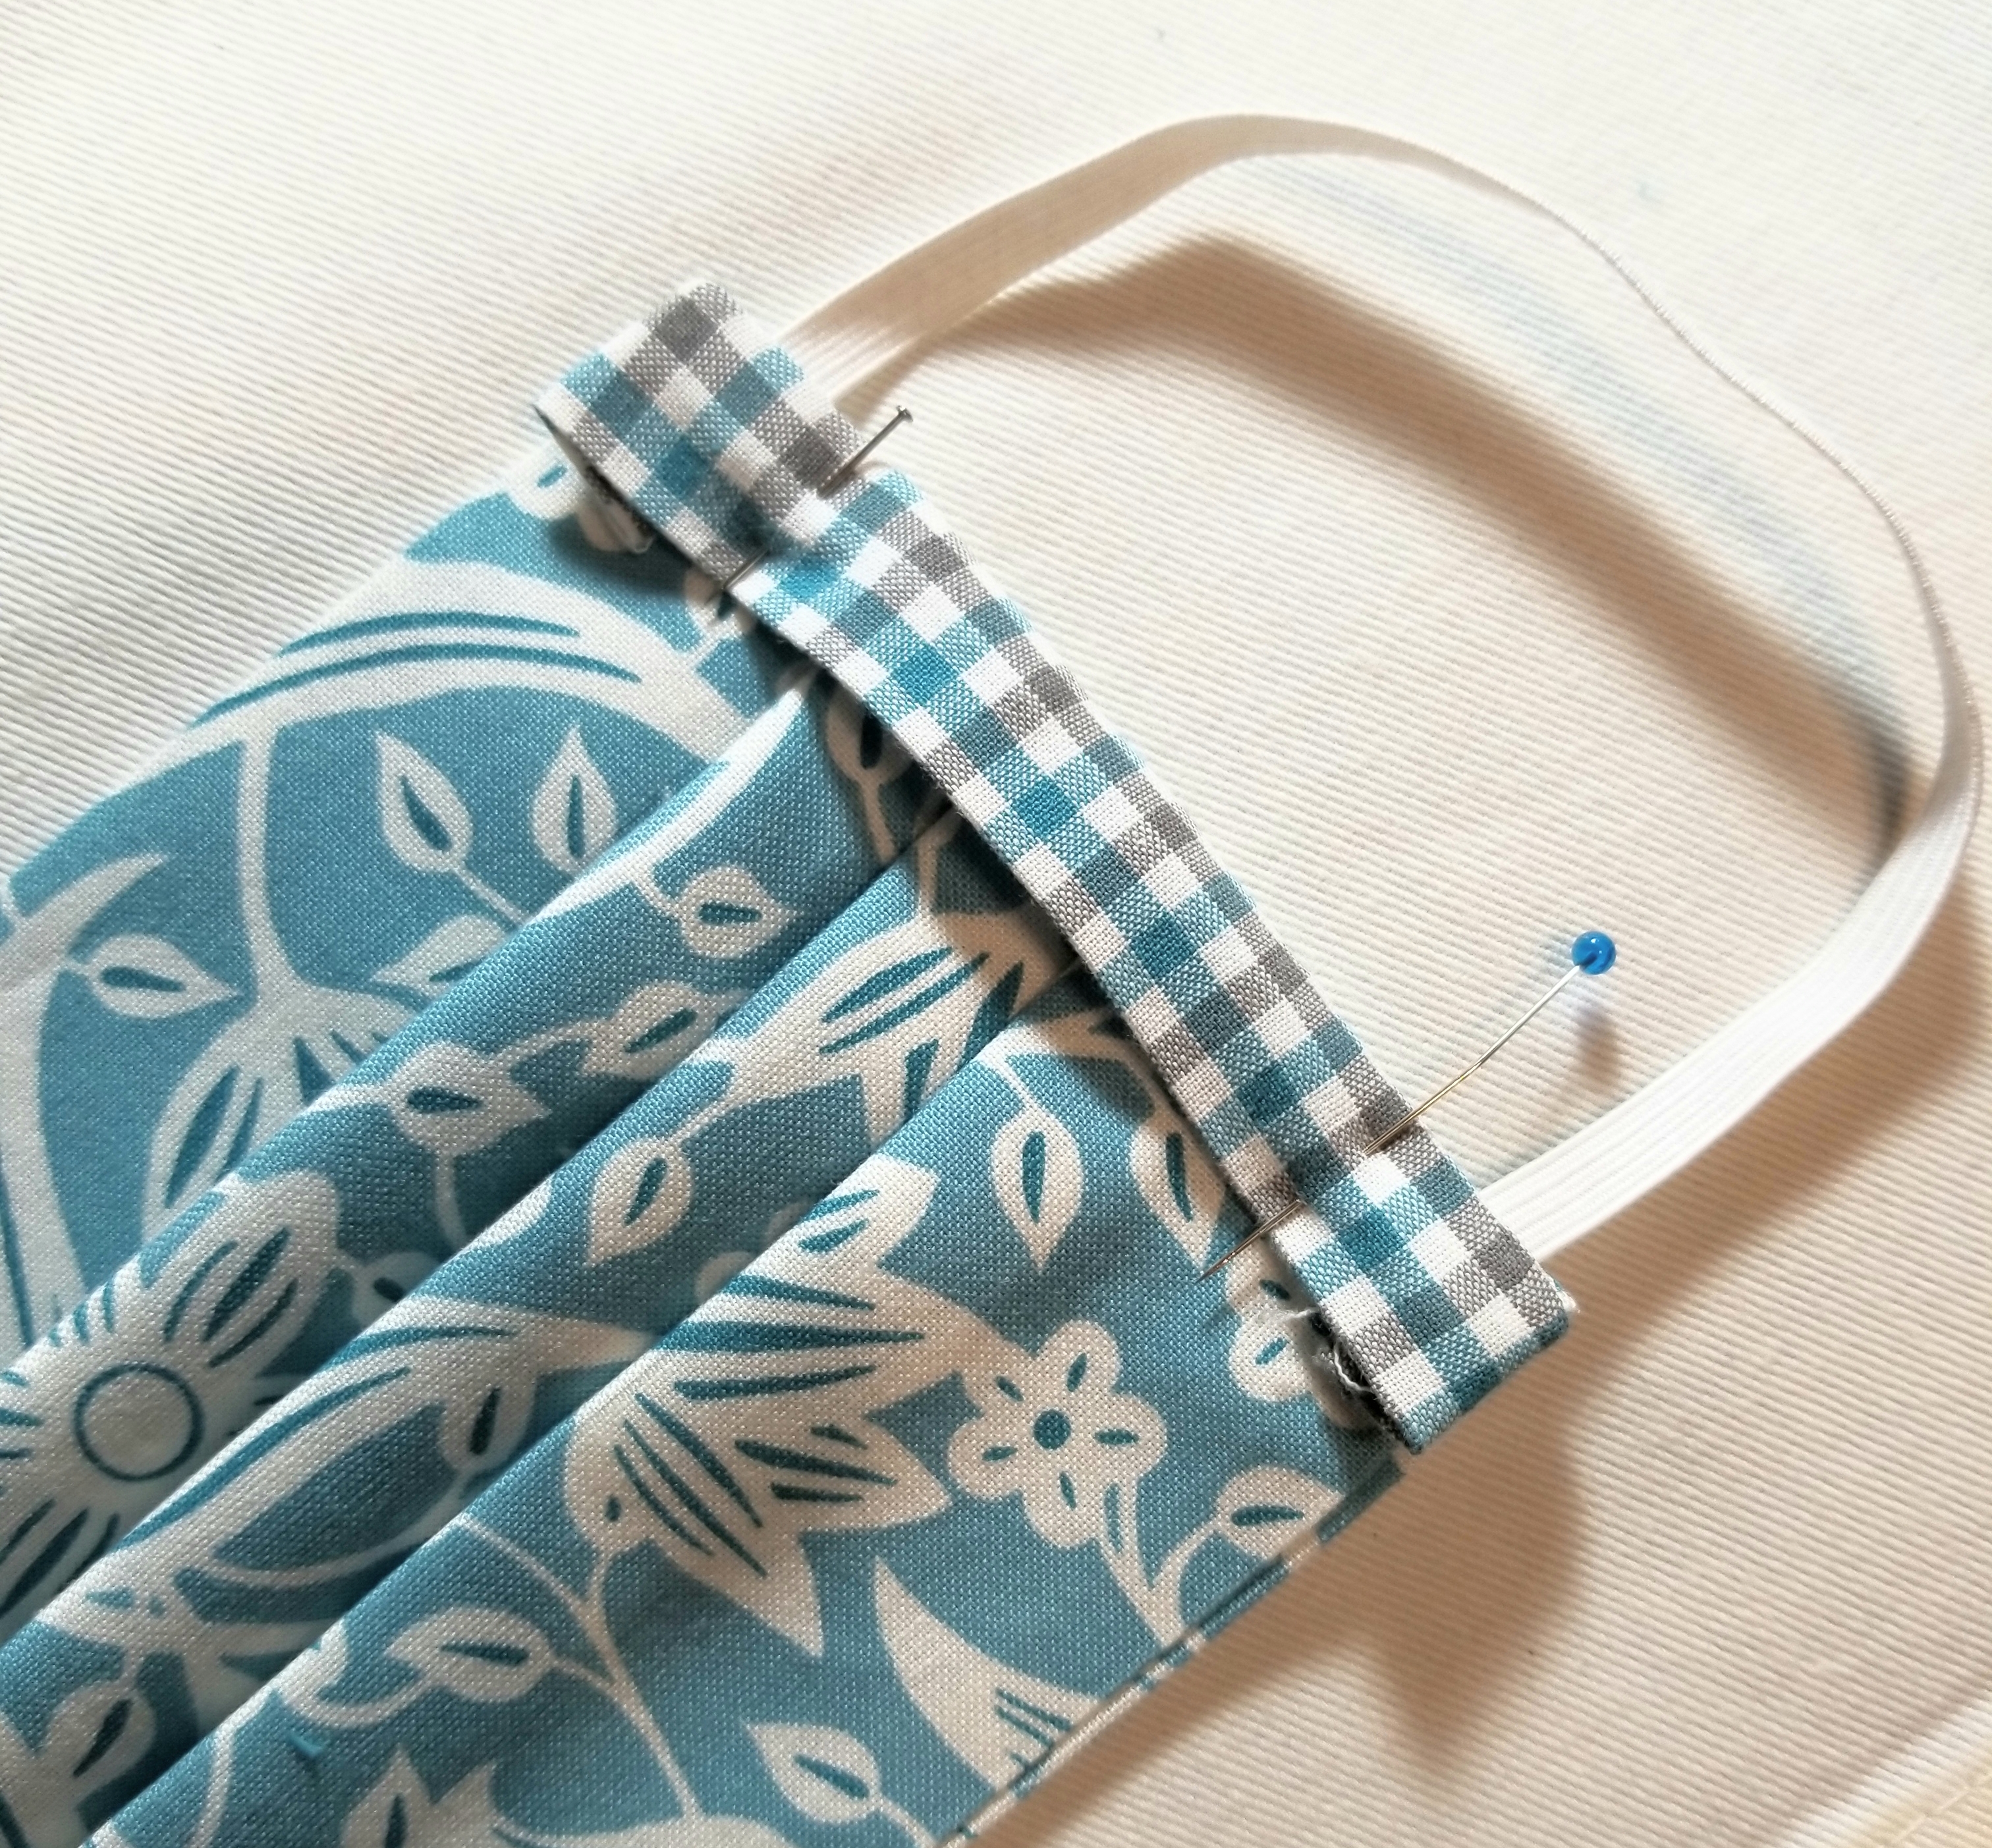
Fold each accent strip of fabric lengthwise in half, matching raw edges, as shown in the picture above. Press.
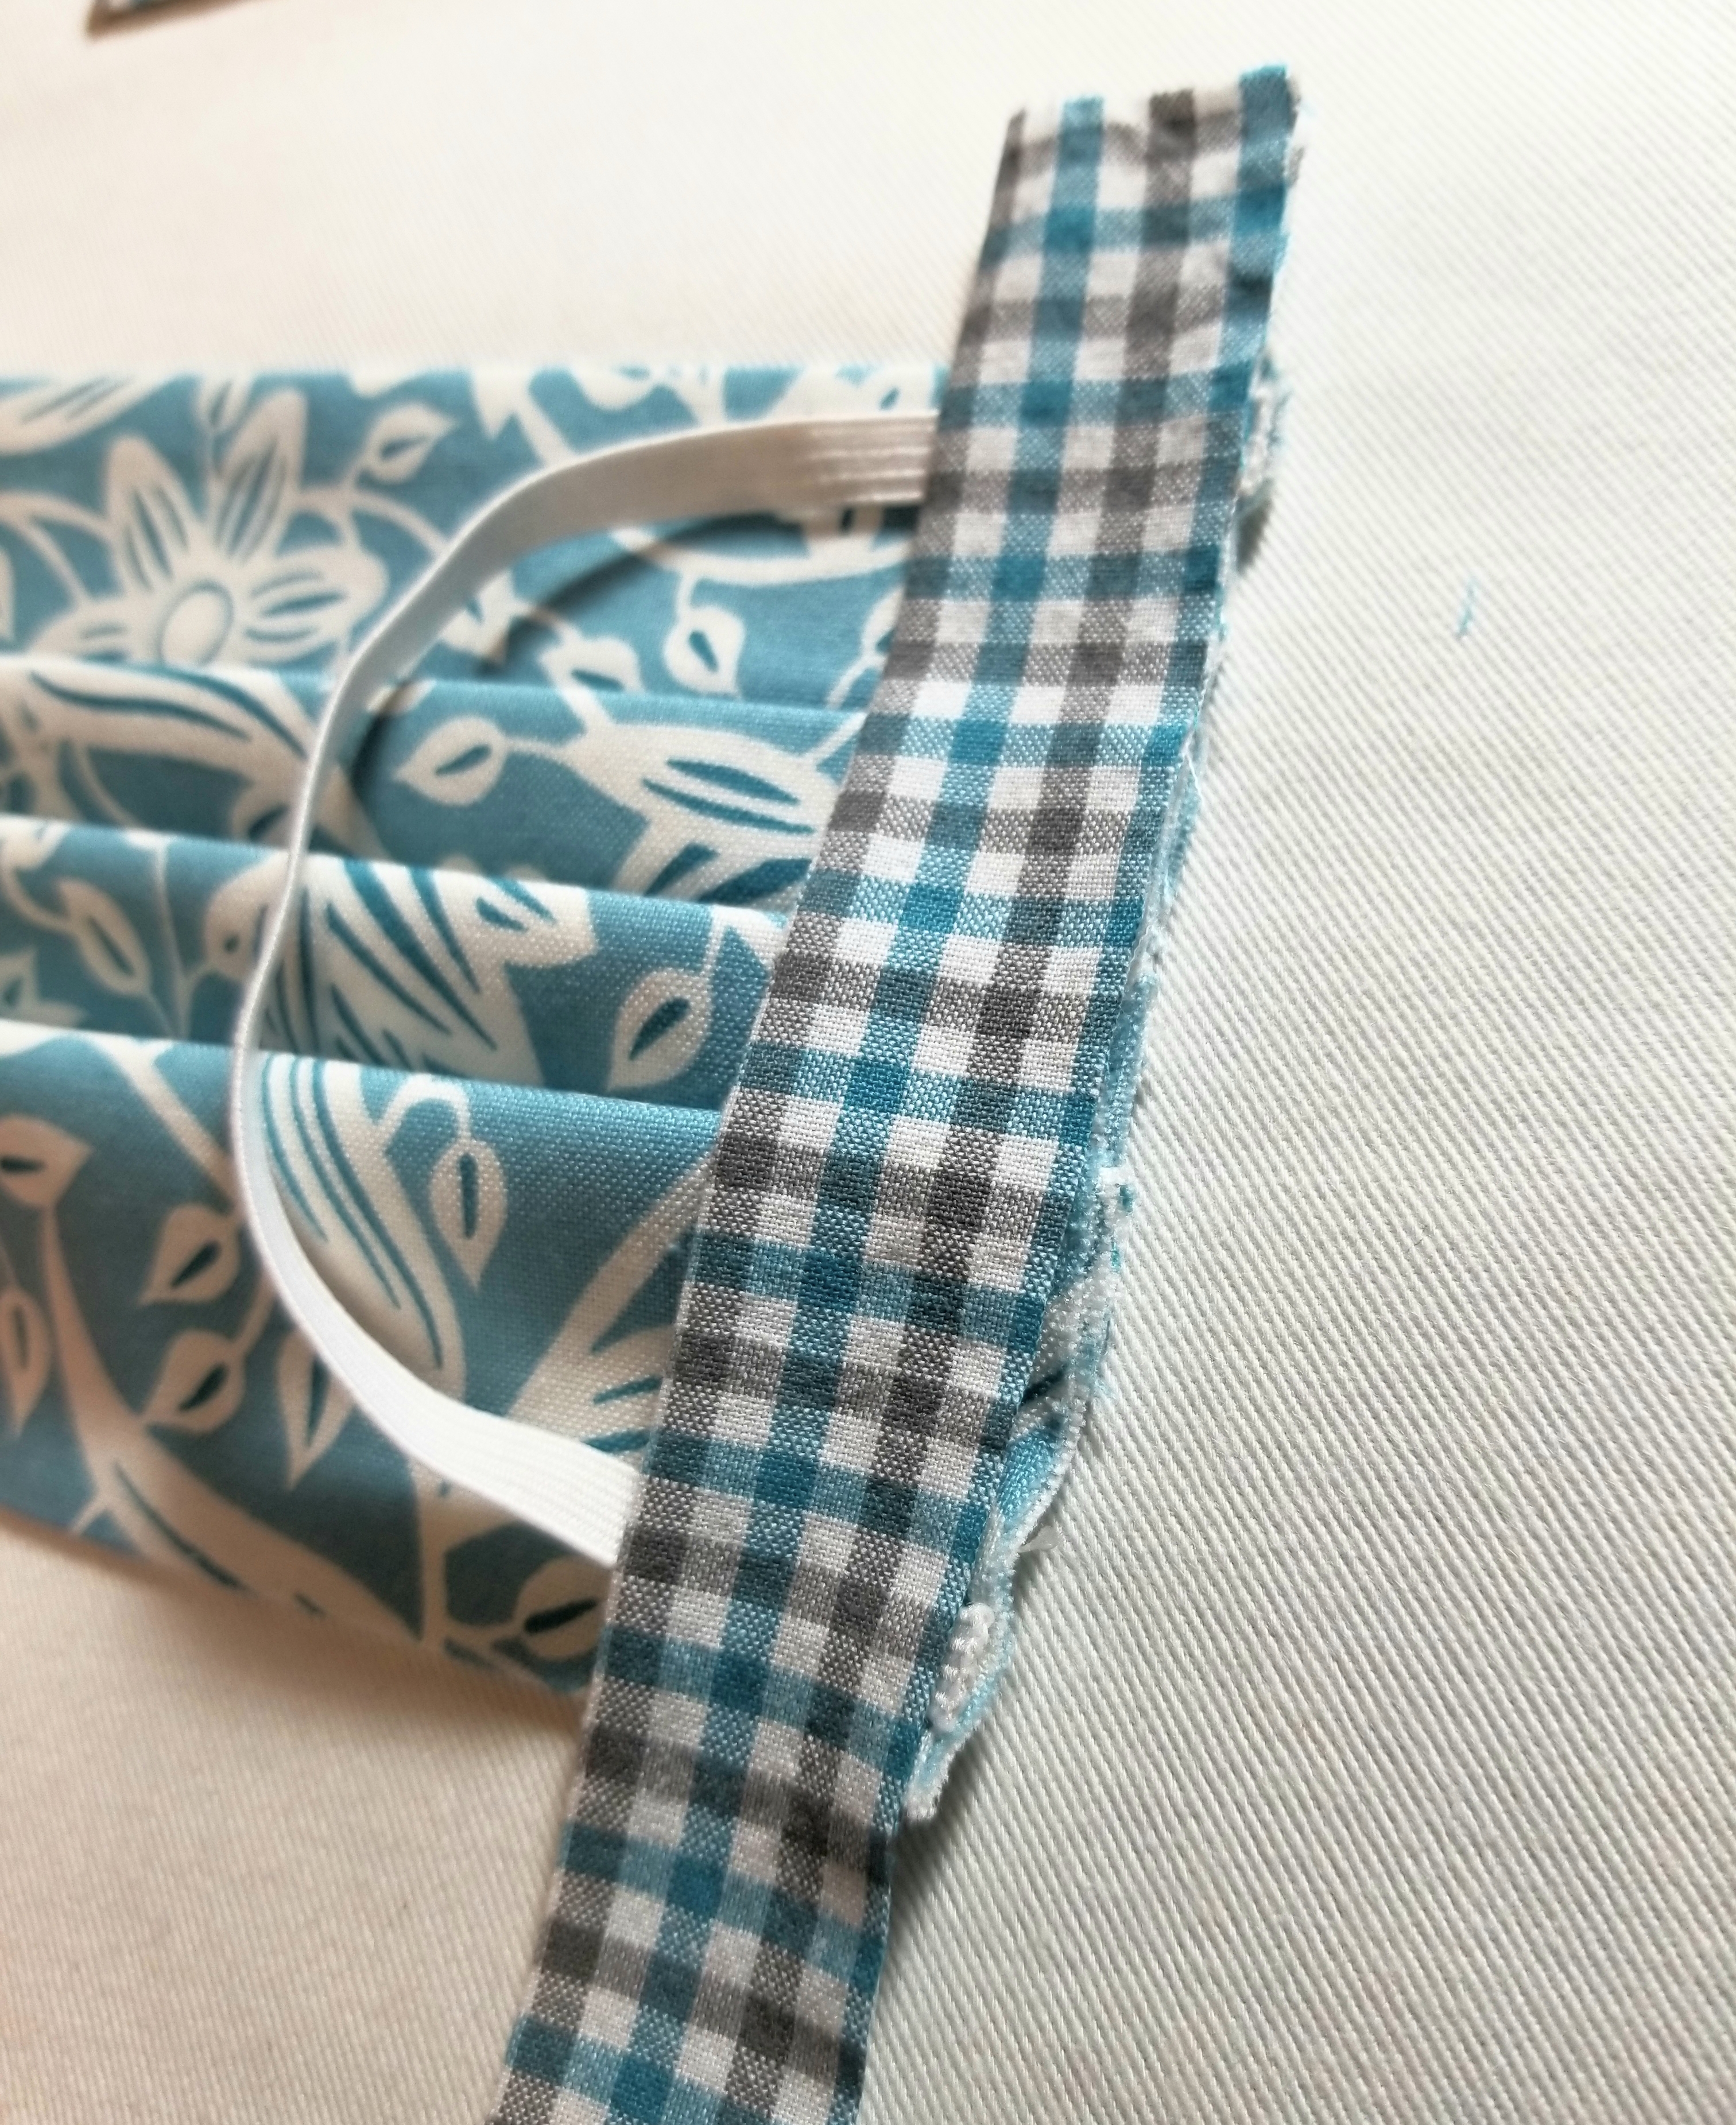
Place the strip on top of the elastic. Make sure the raw edge is facing outward, and the creased edge is facing the main body of the pleated piece. It will be a little longer on the top and bottom and that is okay, as we are going to fold some of that to the back.

Tuck about 1/2” of the top edge to the back as shown in the picture above.
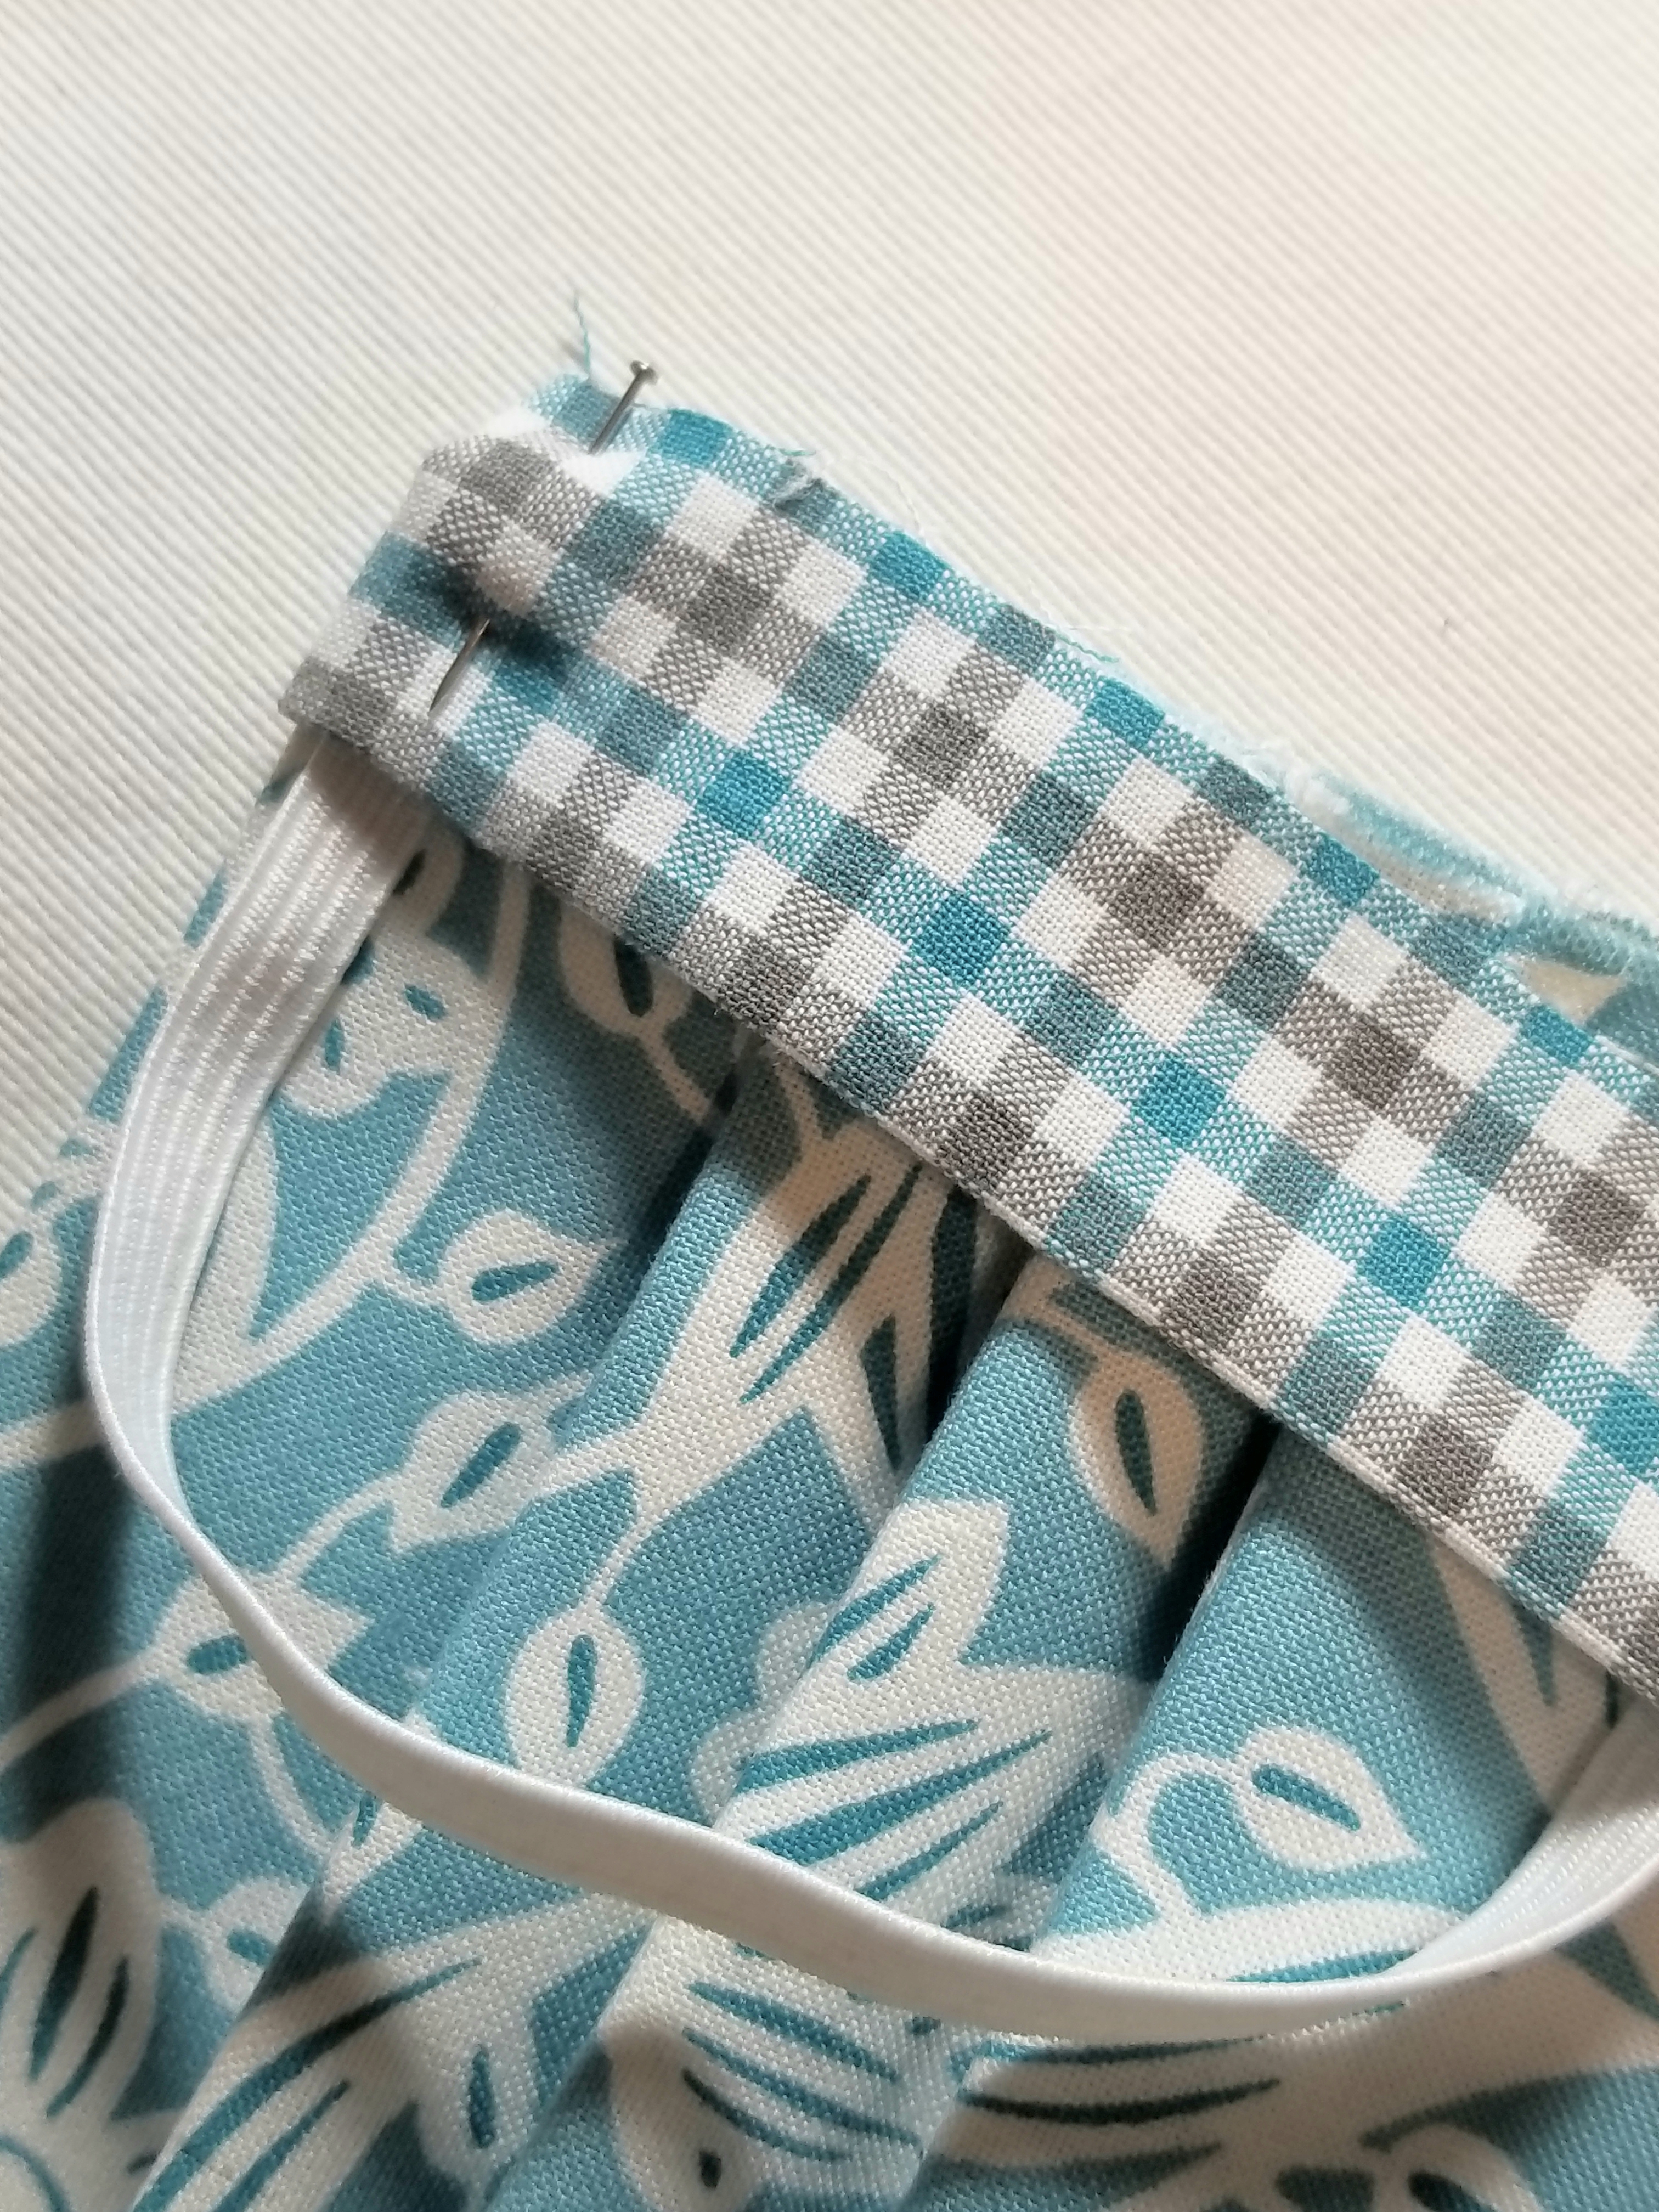
Pin all layers in place.
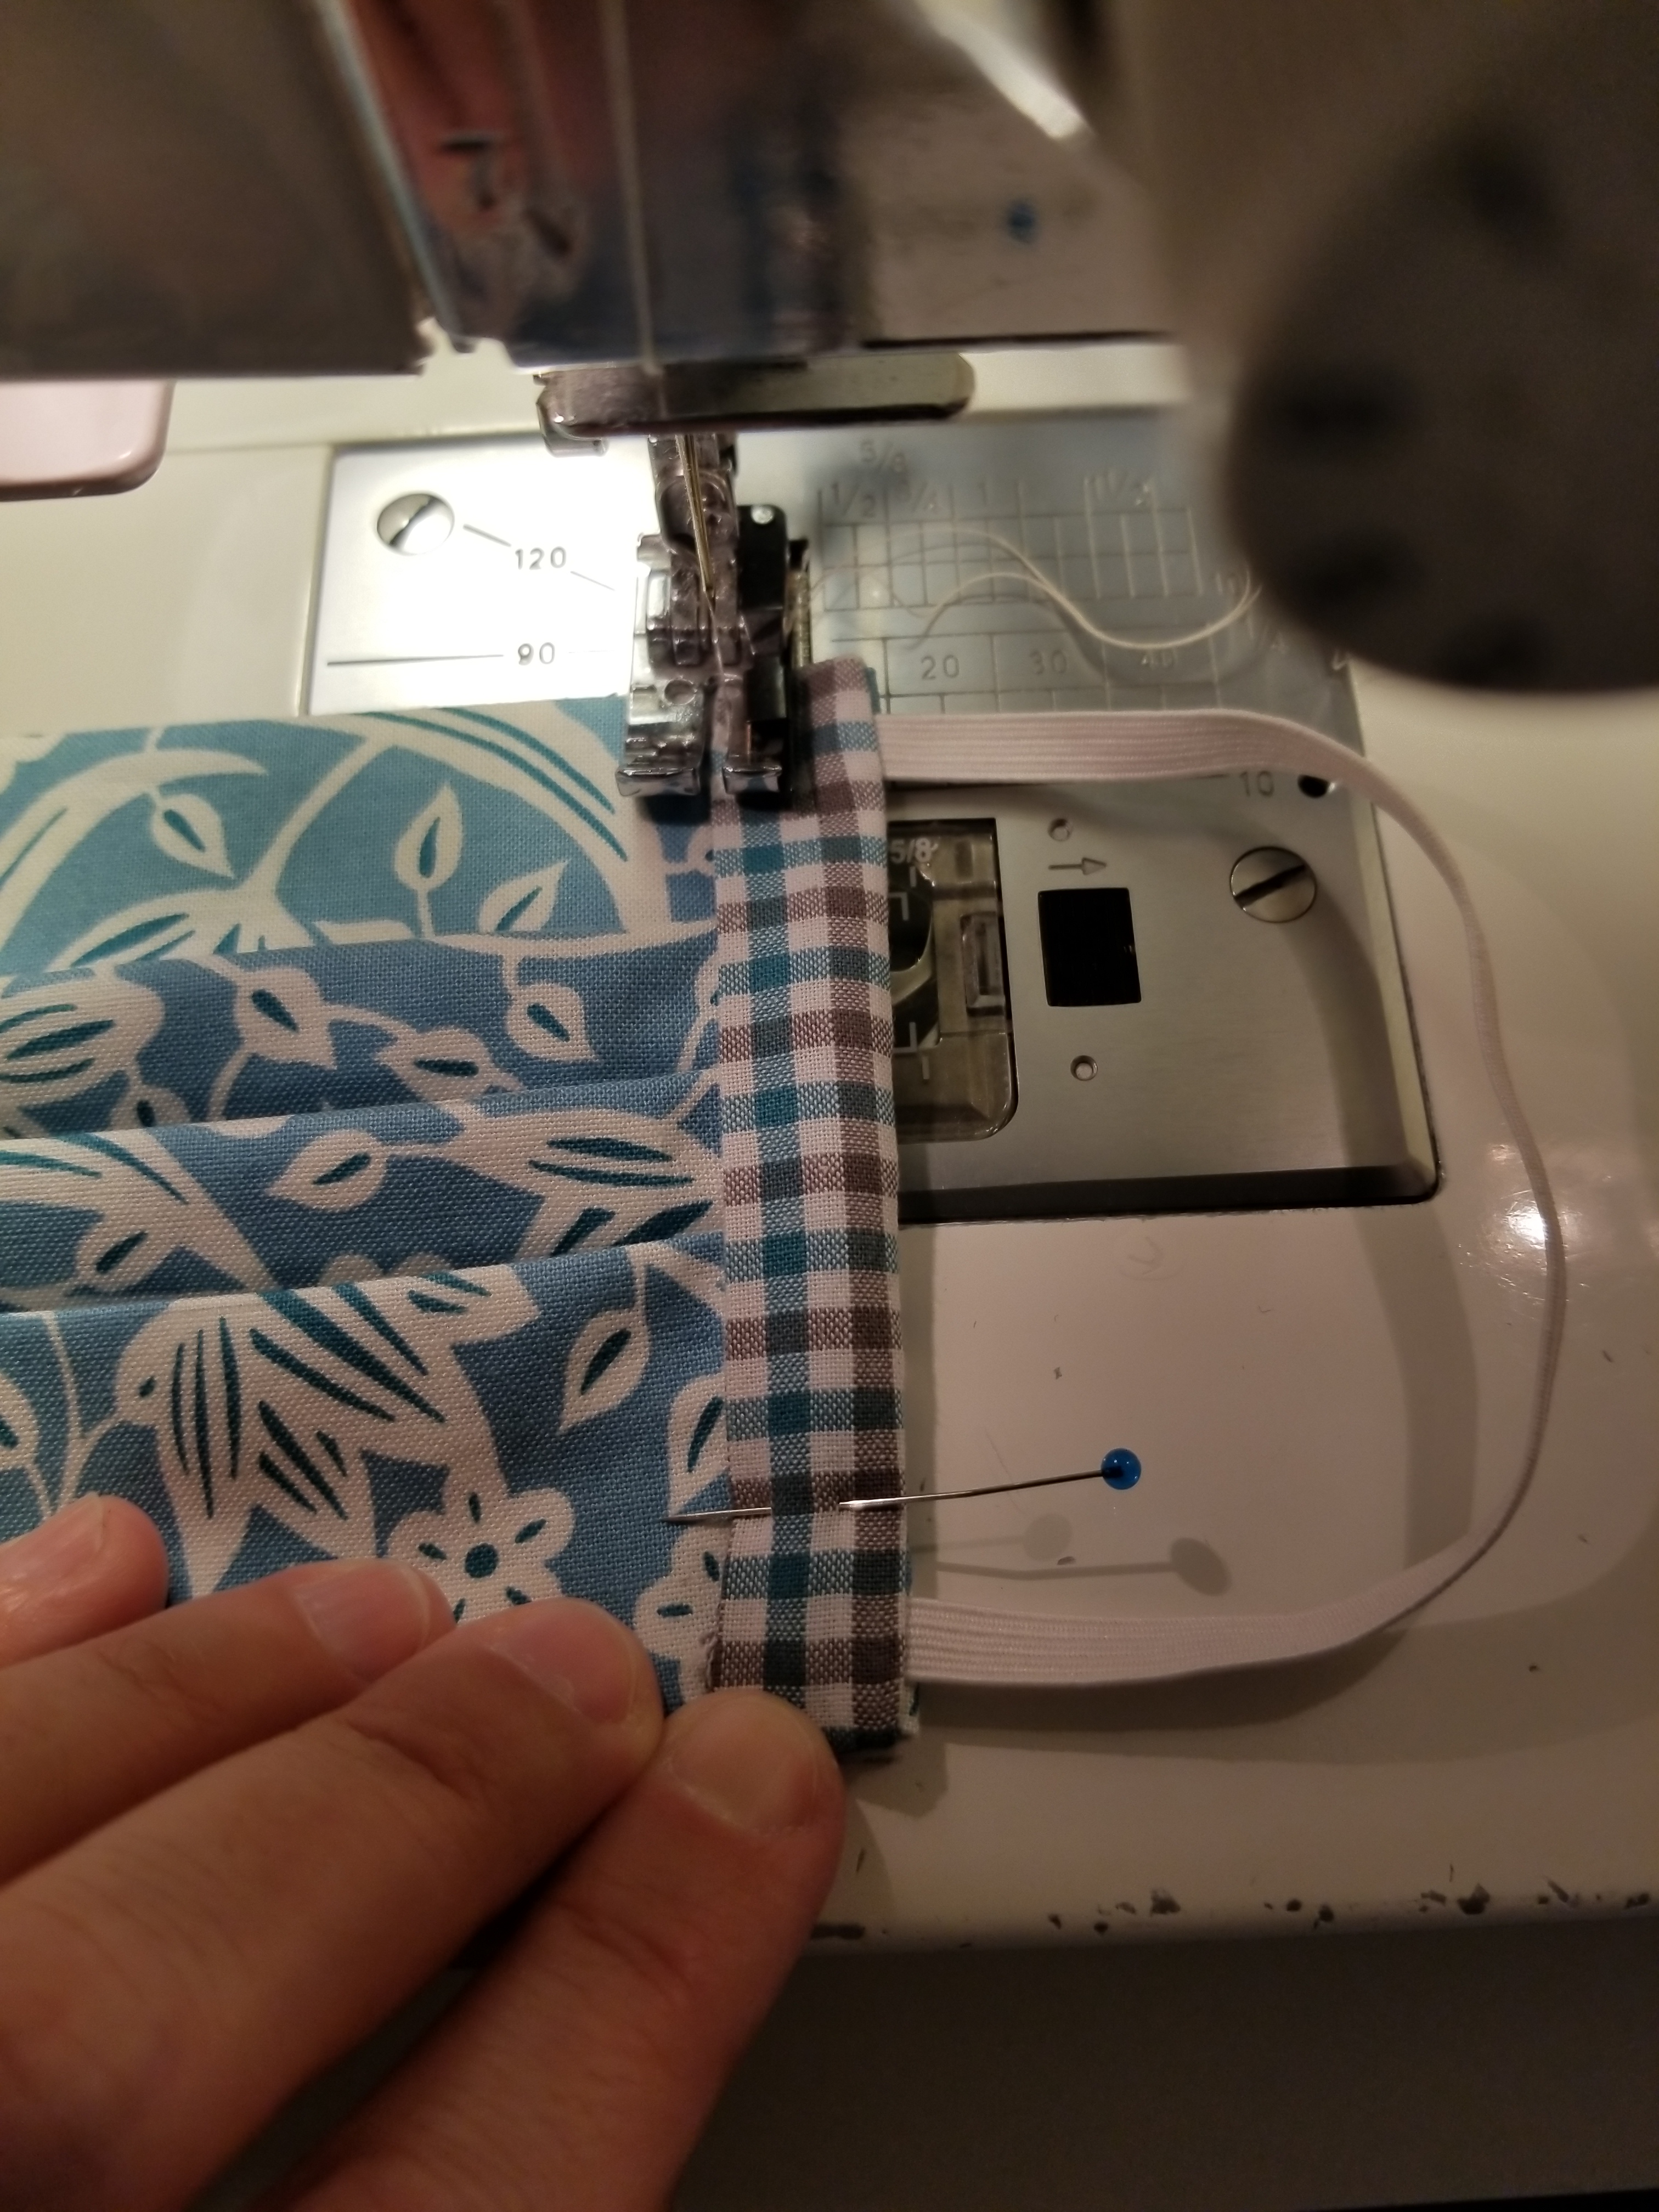
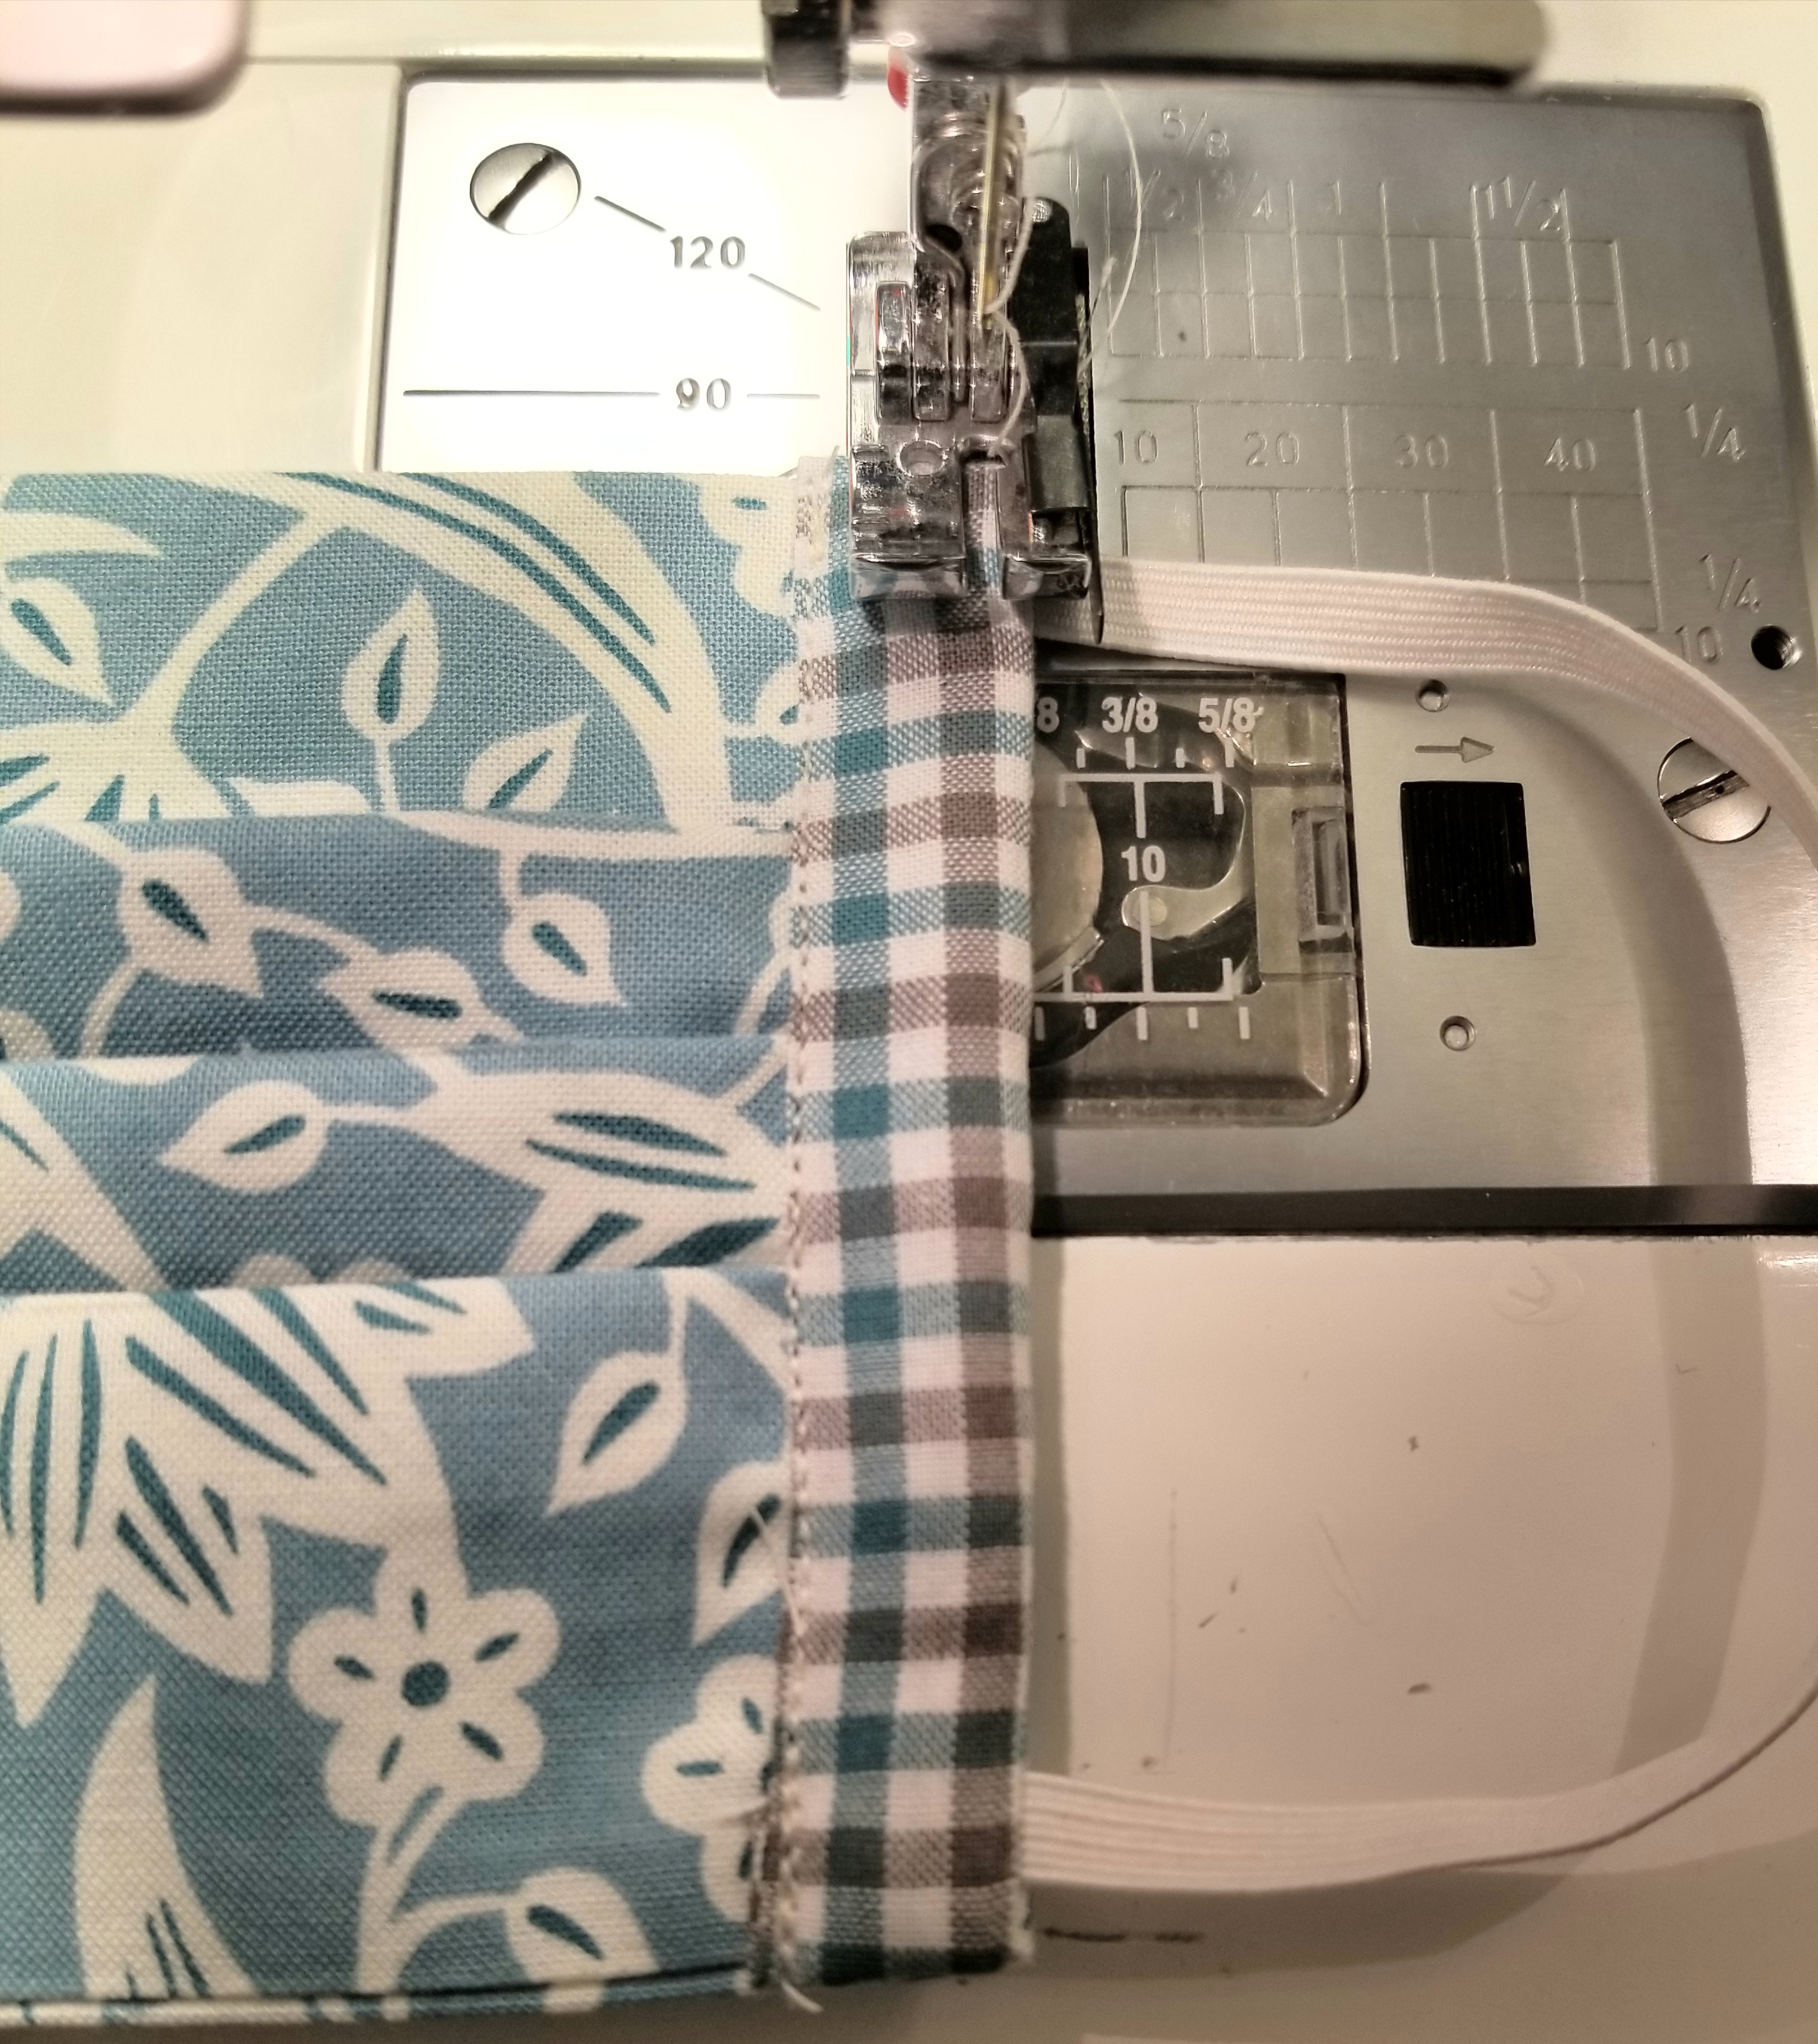
Trim the other end of the accent strip, so that it is about 1/2” longer than the bottom edge of the main pleated piece.

Fold the bottom edge of the accent fabric strip to the back, just as you did with the top edge.
Pin both ends in place.
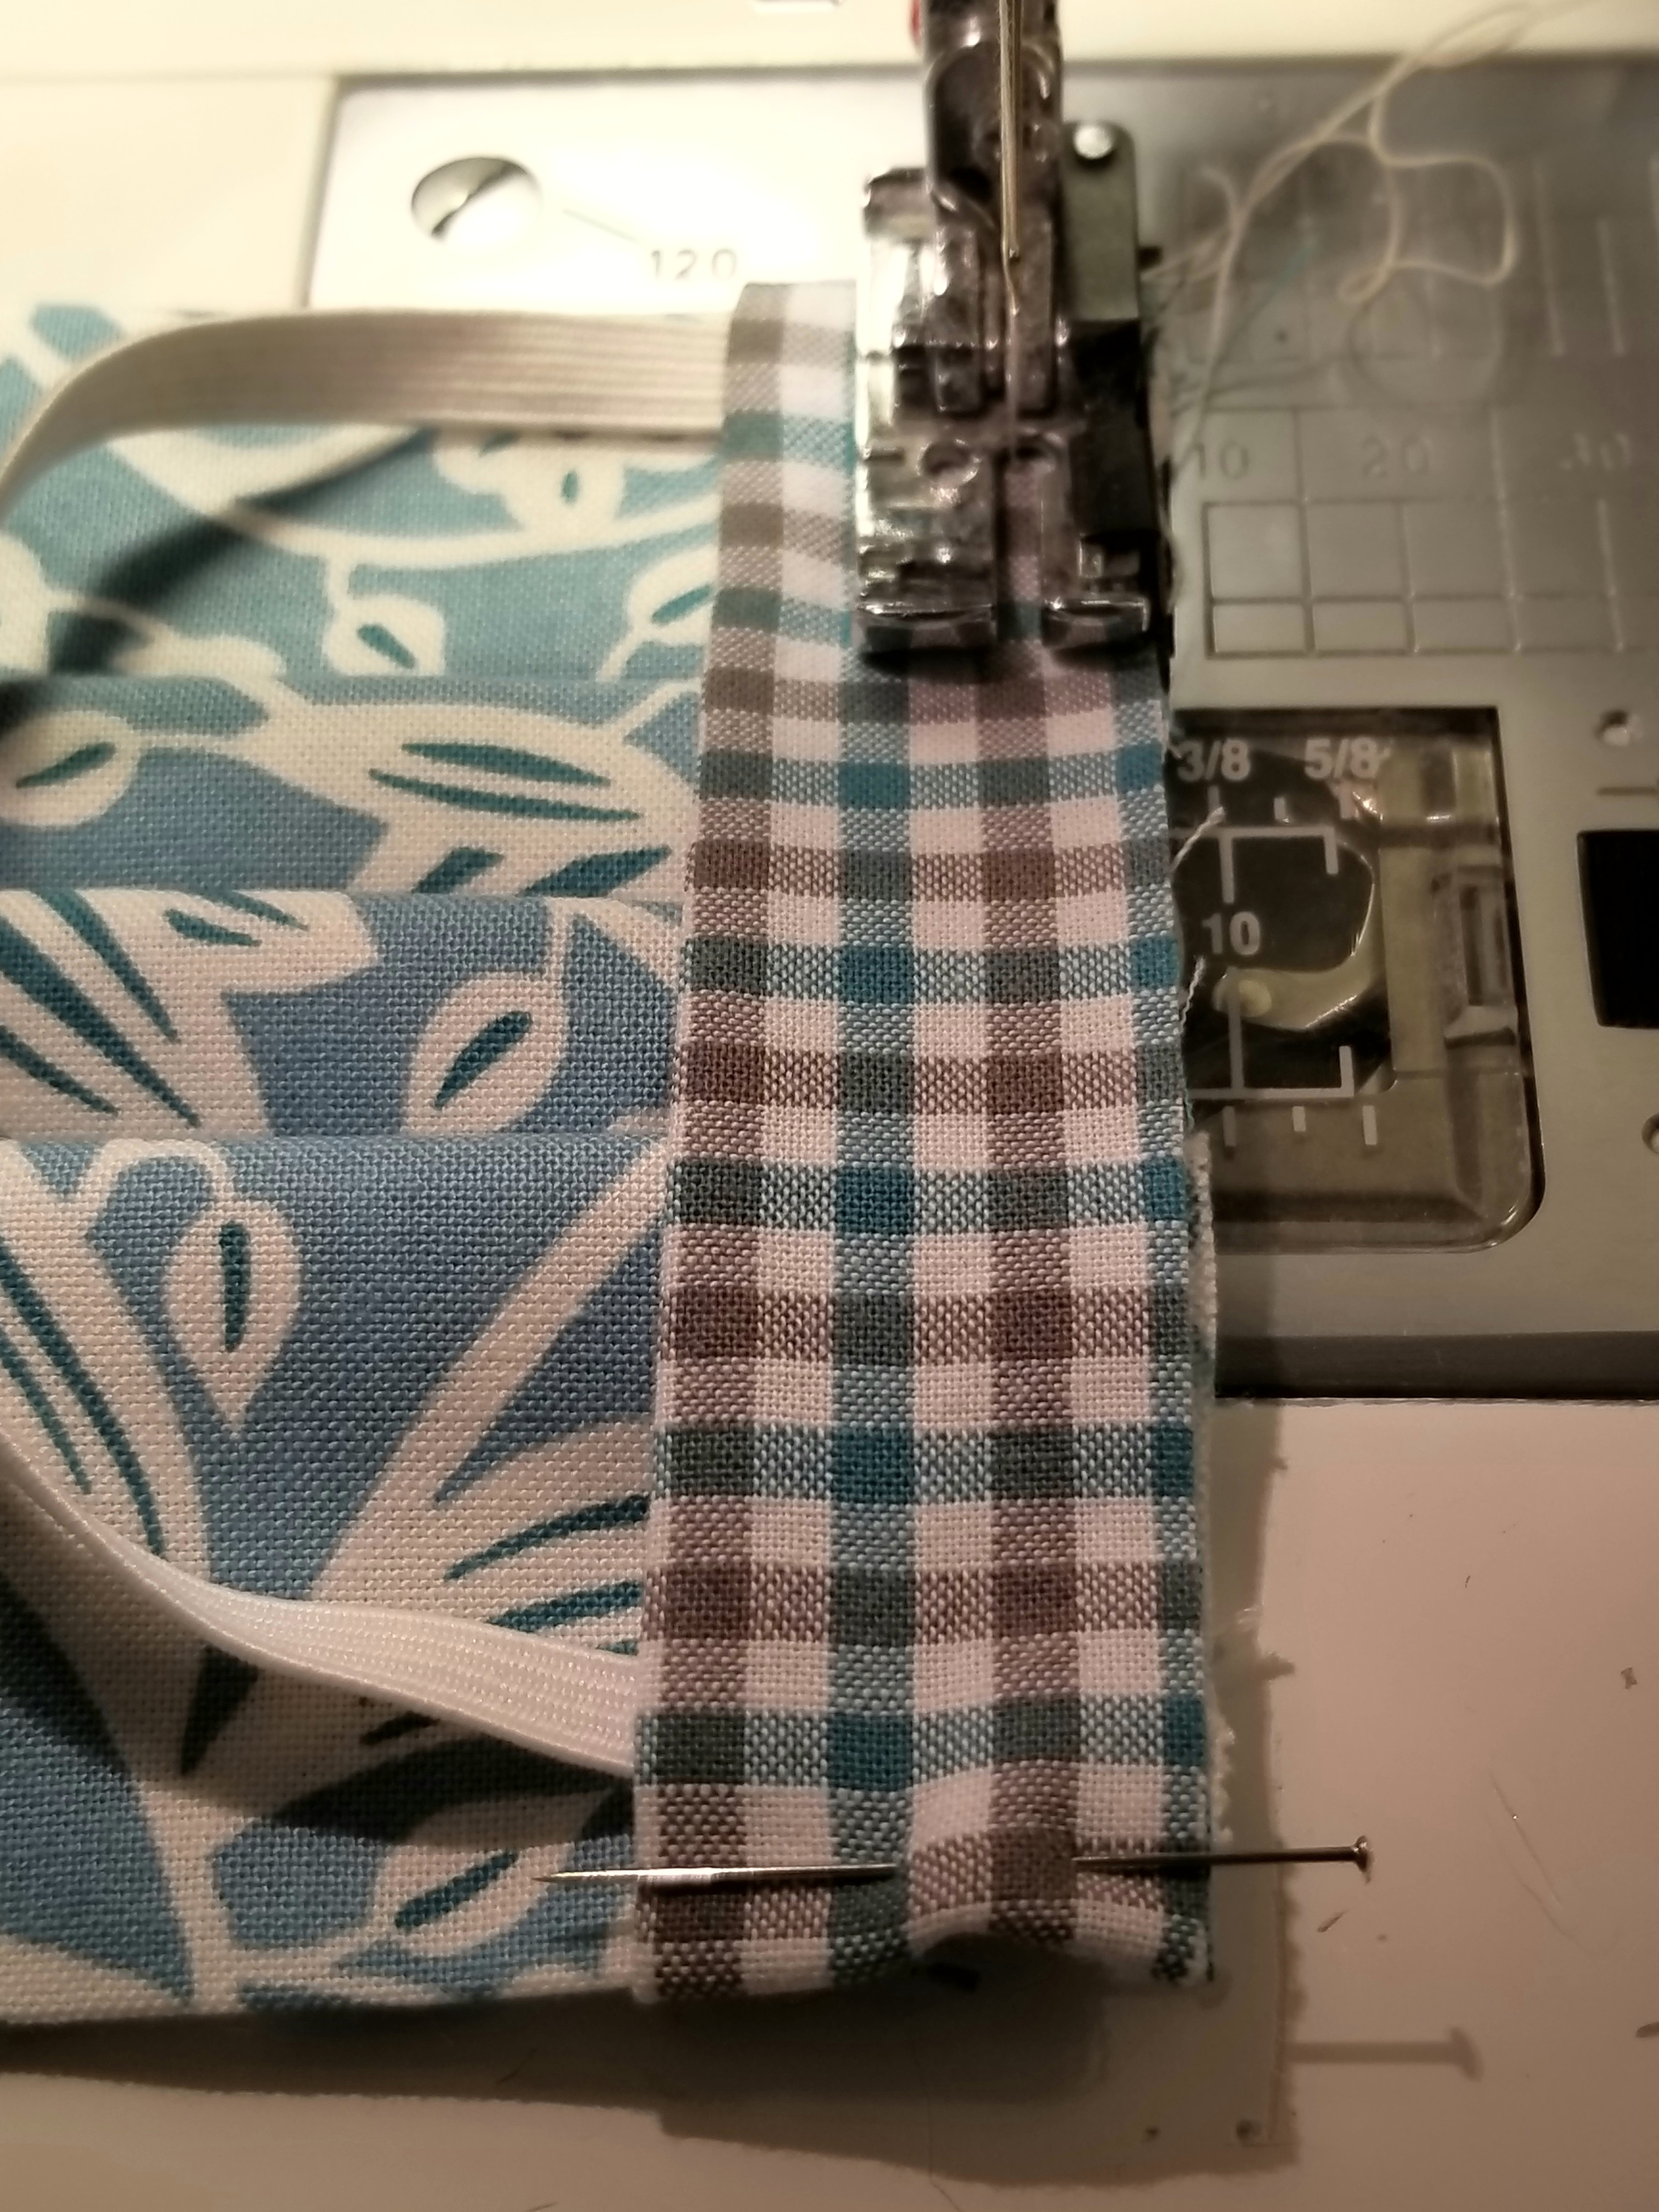
Using a 1/4 inch seam allowance, stitch the length of the entire edge, making sure to back stitch at the beginning and end.
Open the the accent fabric strip seam by flipping it outward away from the main pleated piece, then press.
This is what the mask should look like if you flip it over.
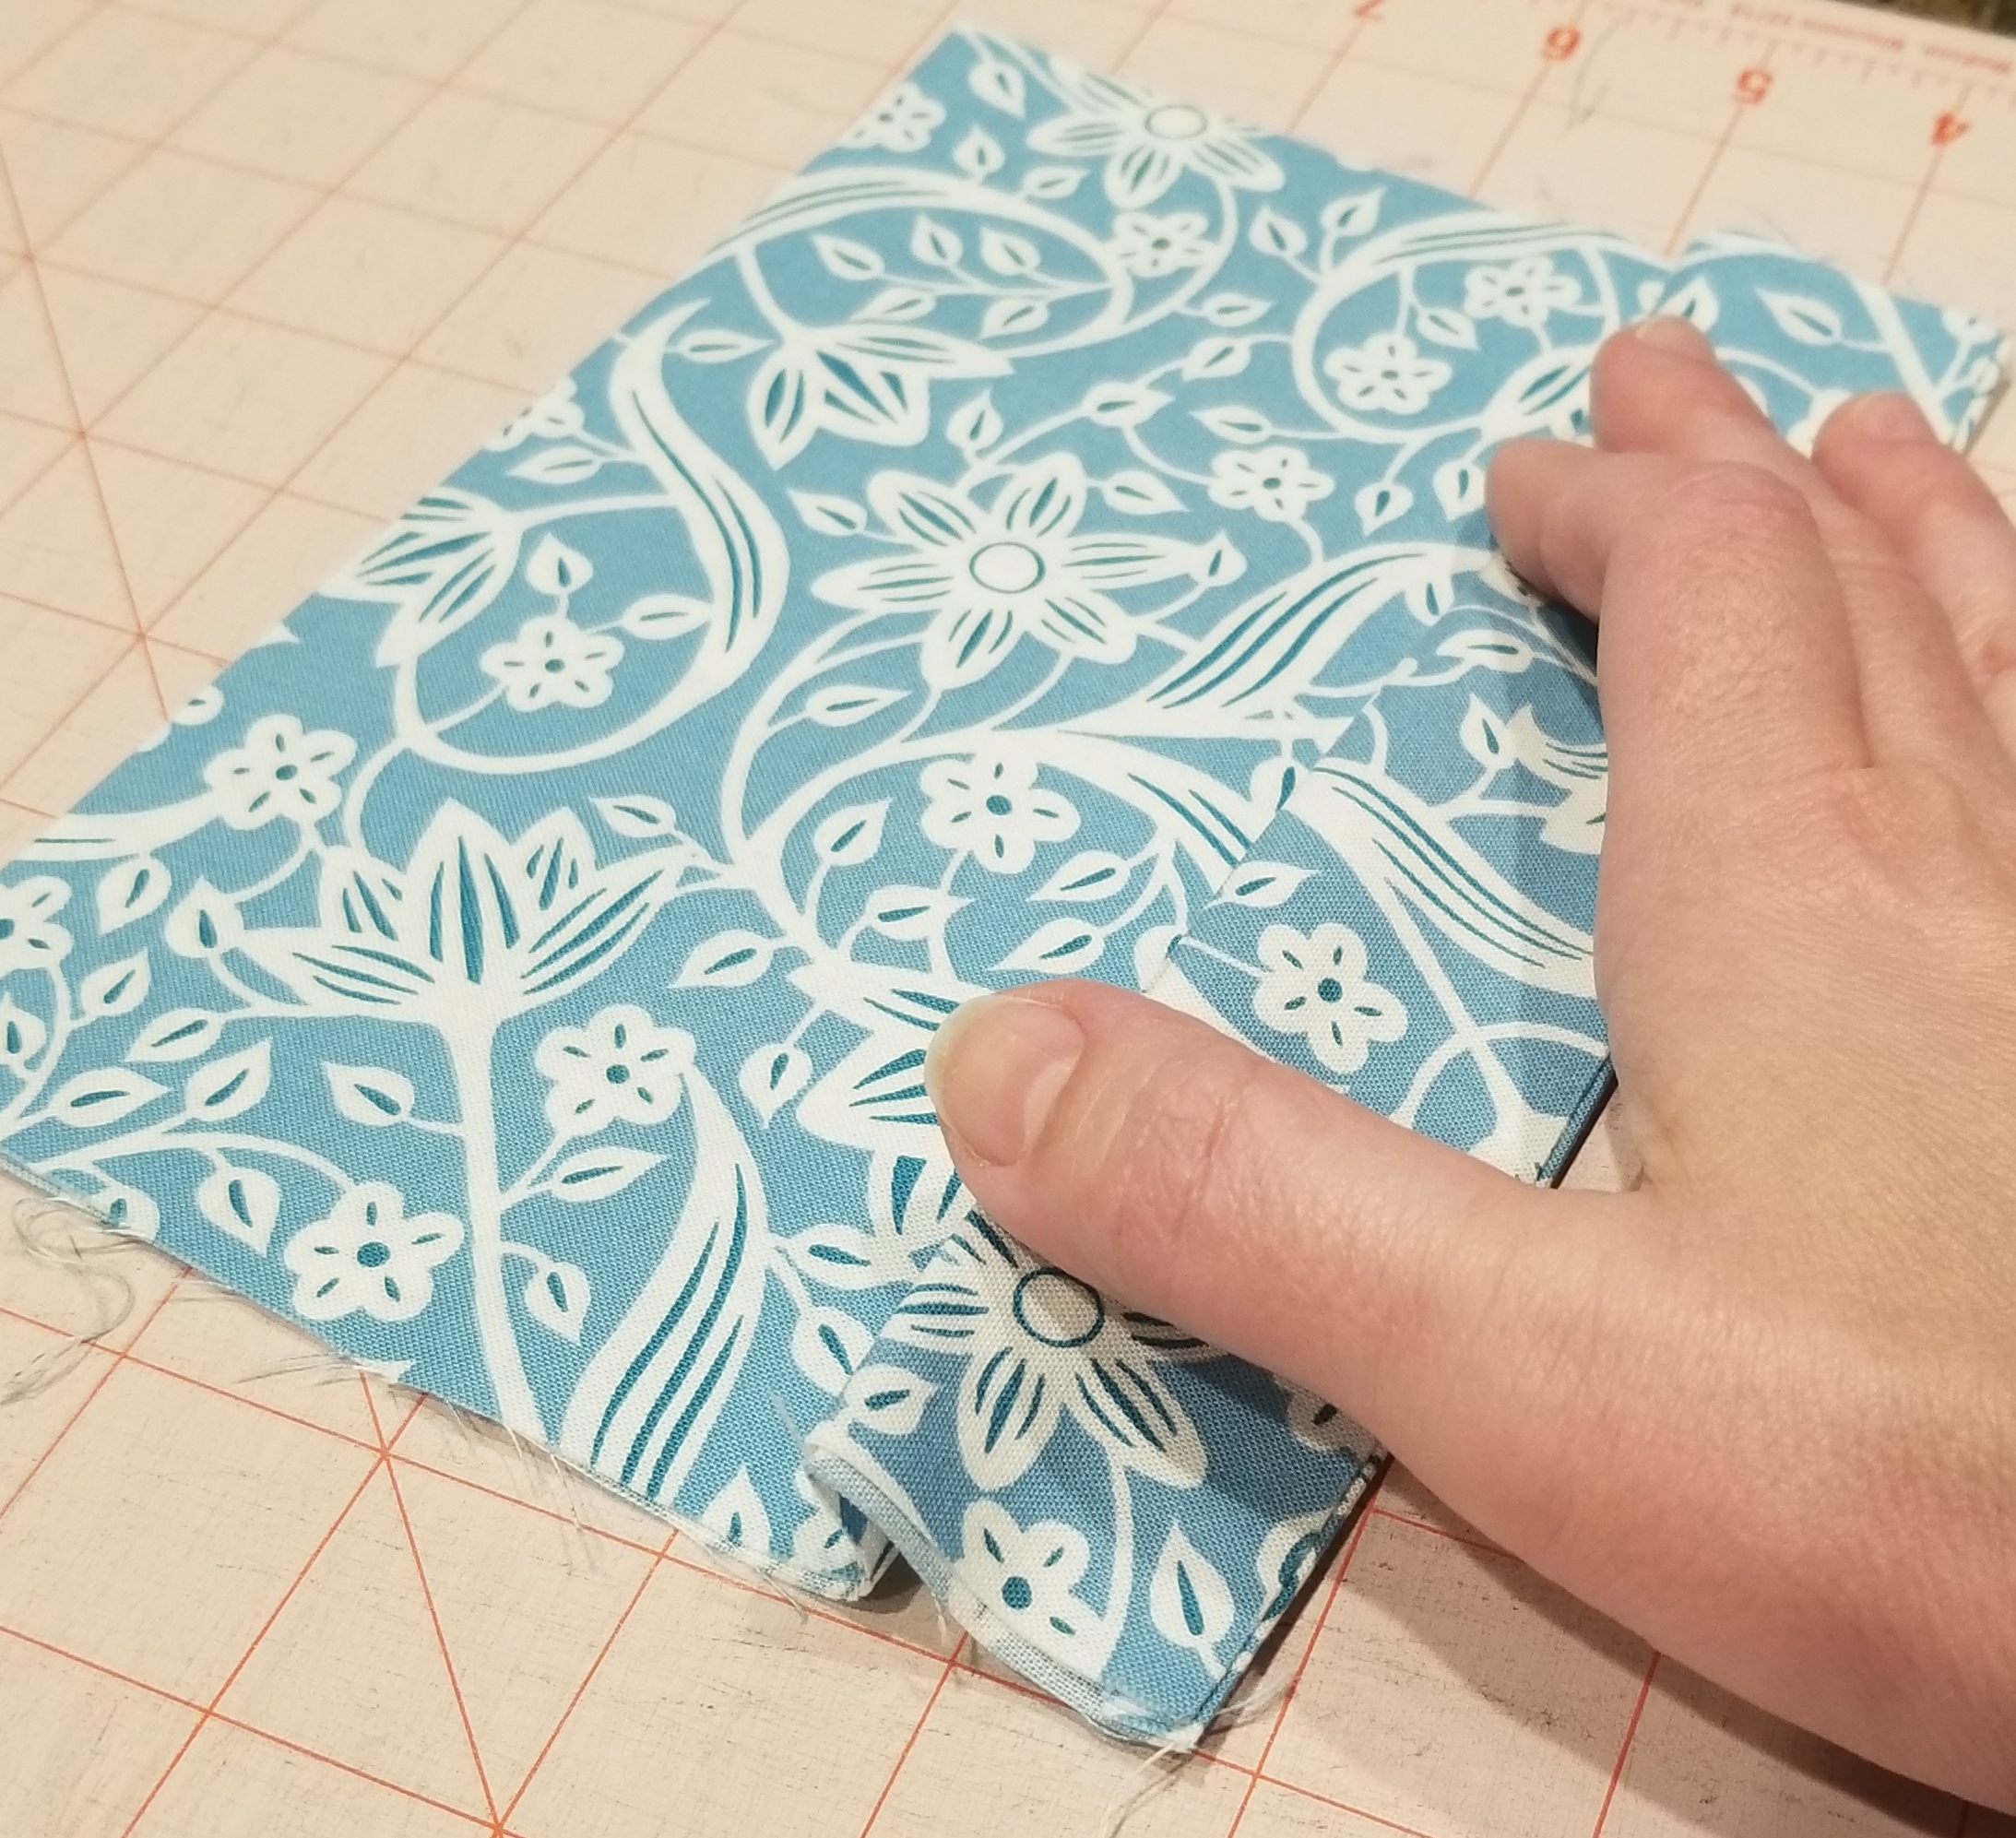
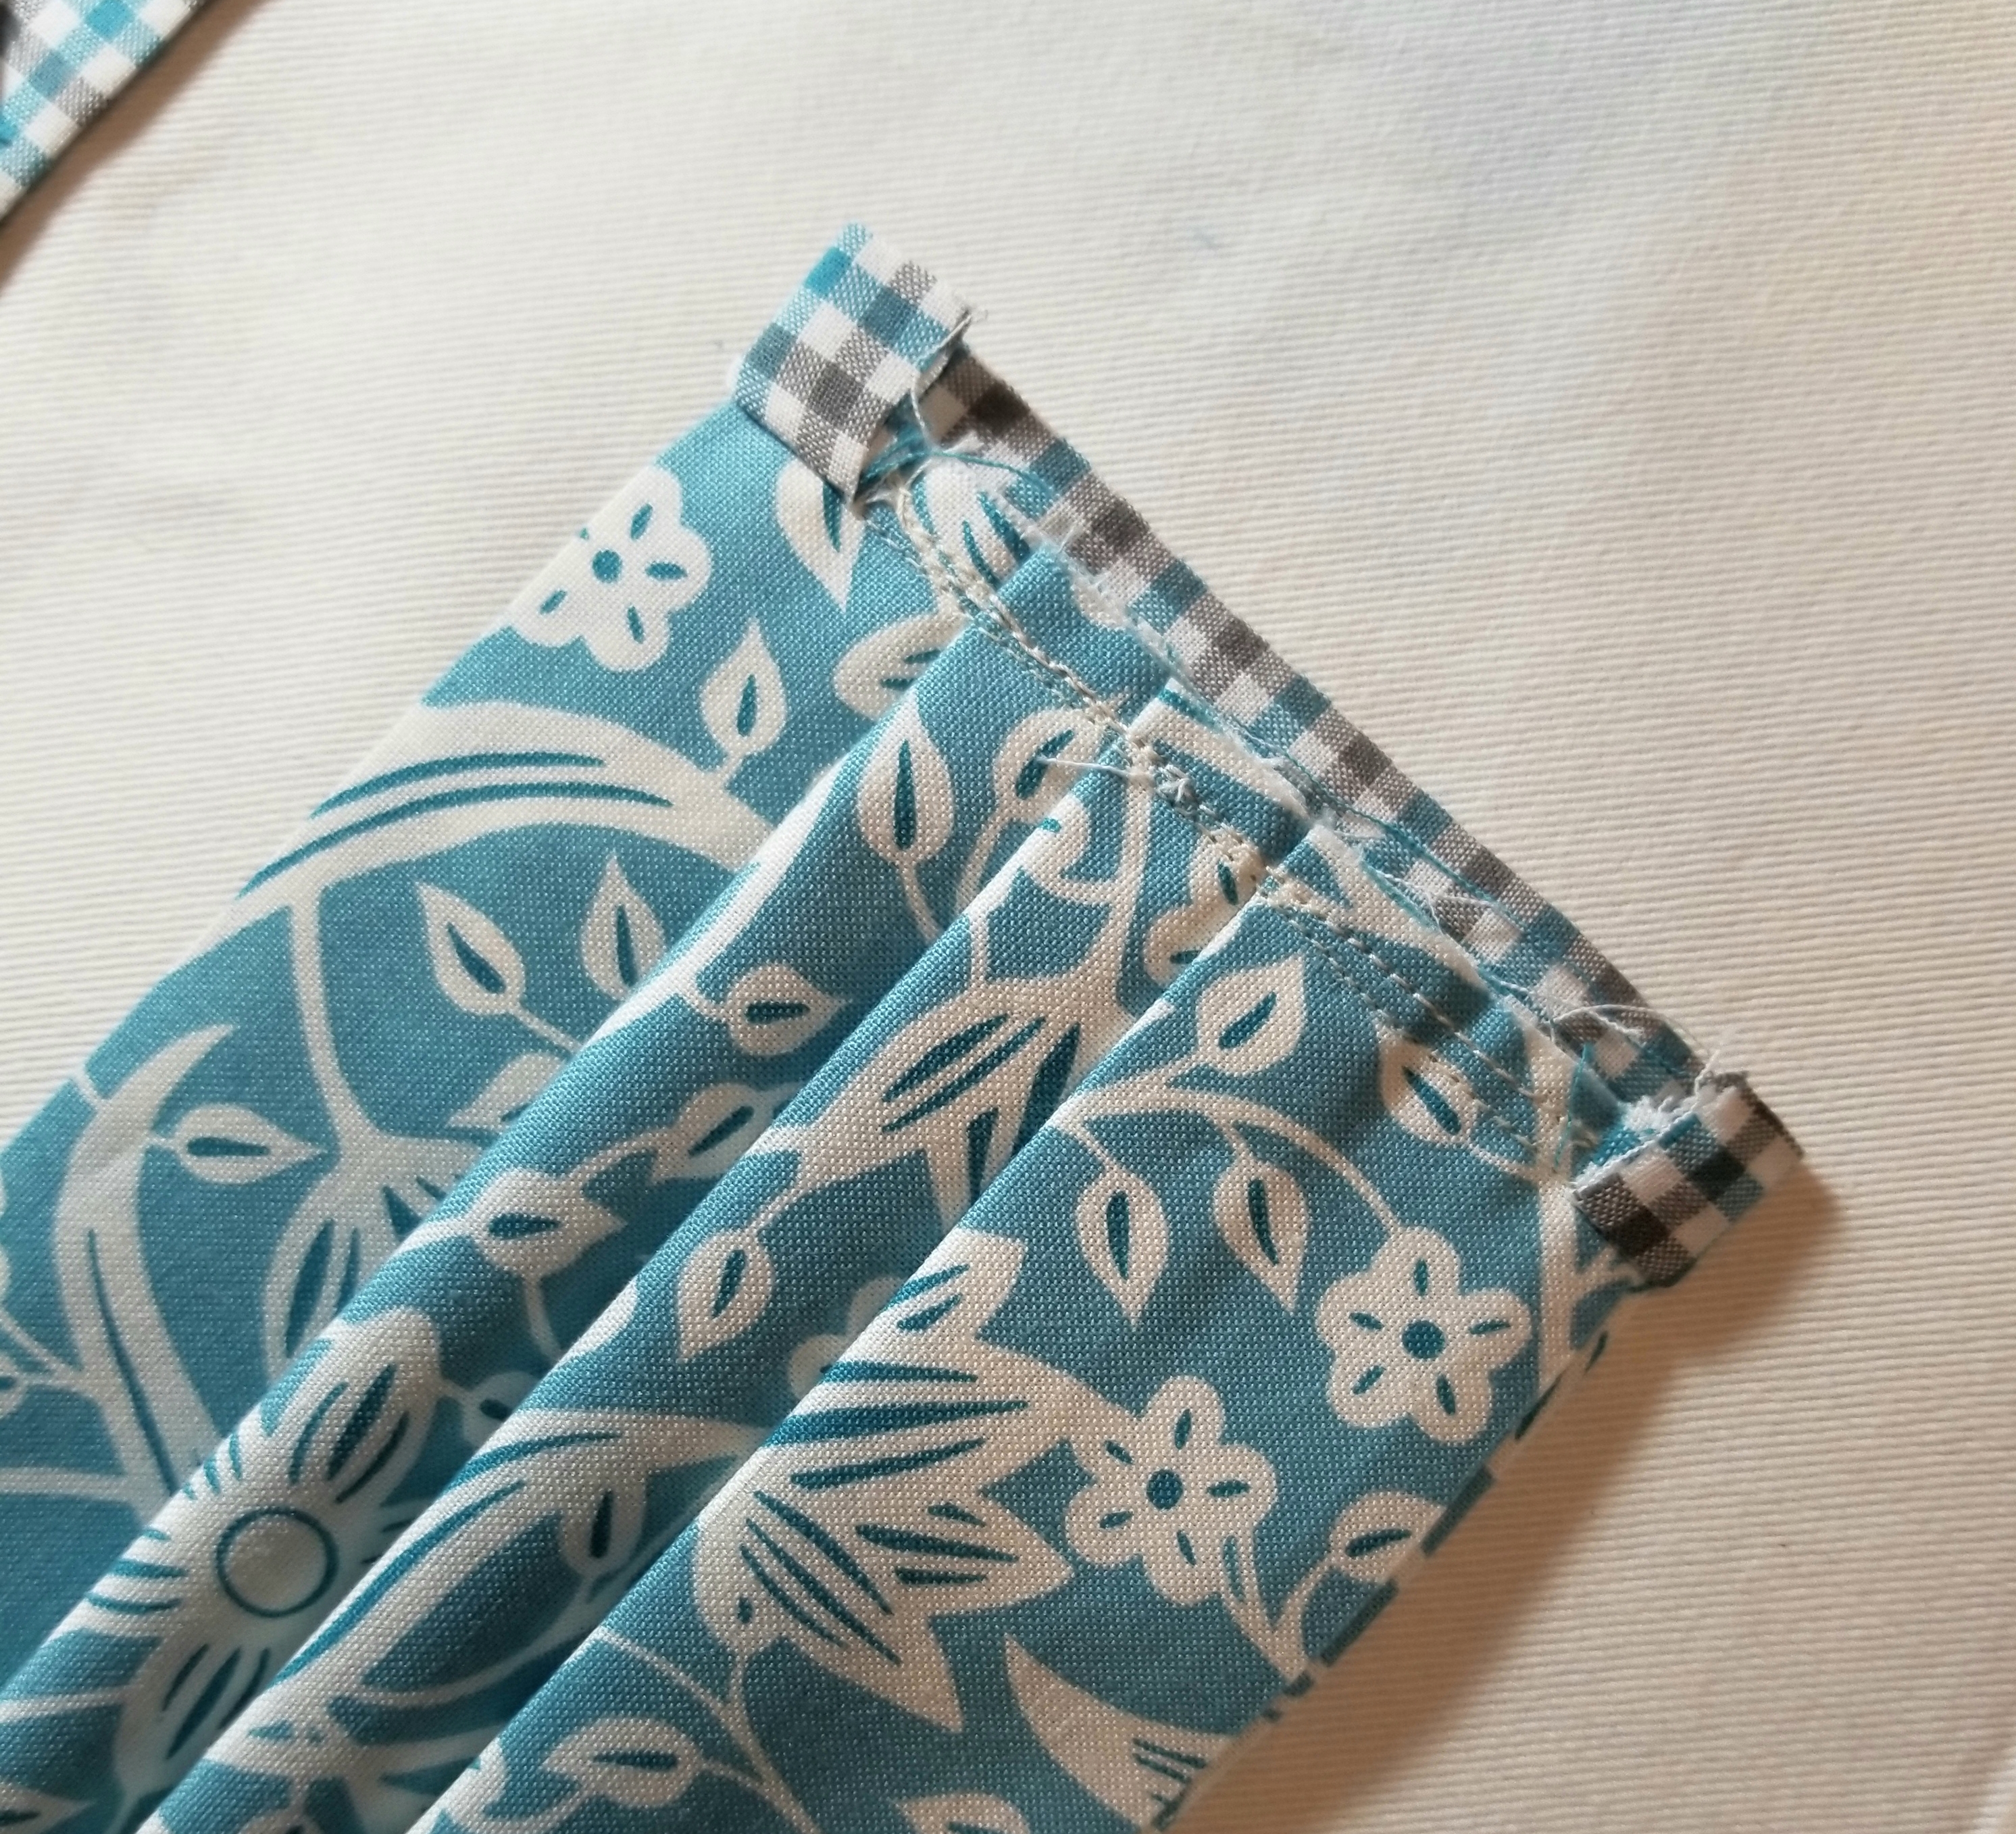
fold the ENTIRE accent piece down toward the main pleated piece, encasing the raw seam. You will now see the accent piece on this side, but not at all on the flip side. Press. Pin edge down.
If you are a good sewist, you will change out your presser foot to a straight stitch foot. If you are lazy, like me, you will keep that 1/4″ presser foot on your machine and struggle your way through this next step. 😀 Stitch this accent strip down to the main body of the mask, sewing along the edge, making sure to back stitch at the beginning and end.
This step isn’t necessary. It just gives it a nice finished look, and helps to give that elastic a little extra stability. Stitch down the edge of the mask close to the elastic side.
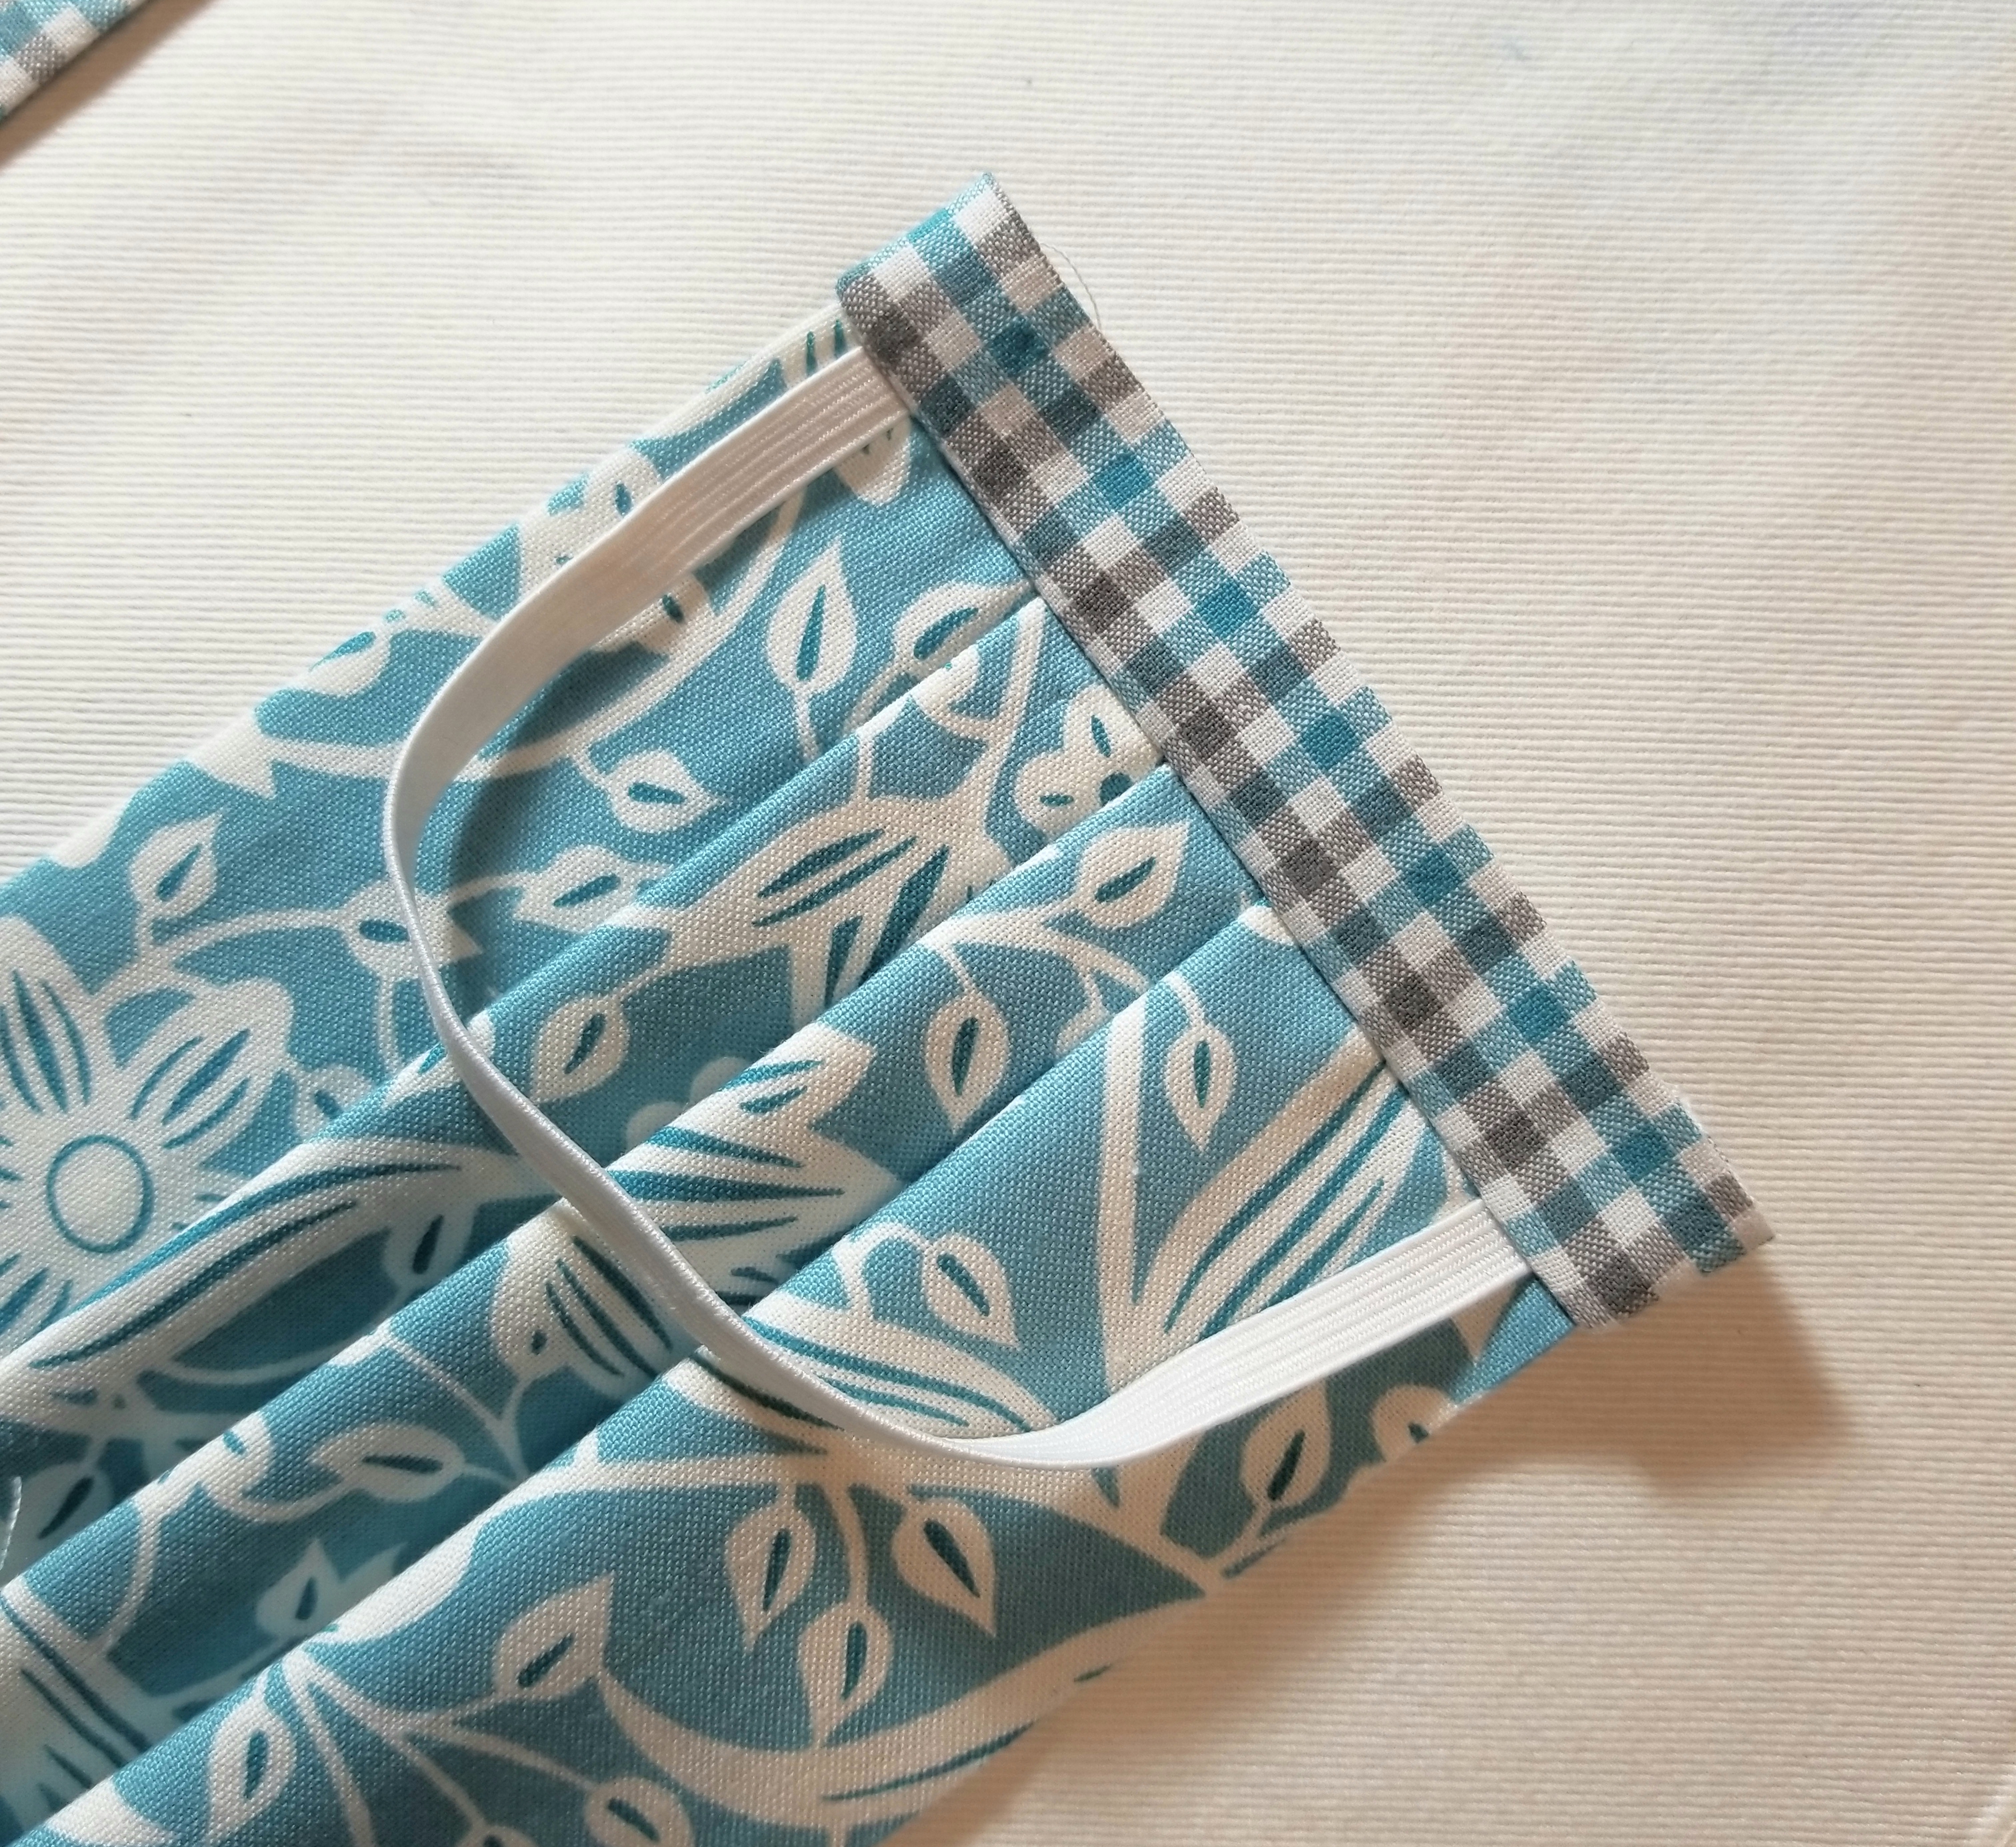
The front of your mask should now resemble the above picture.

The back of your mask should look like this. Following the previous steps, attach the remaining accent fabric piece to the other end of the mask.

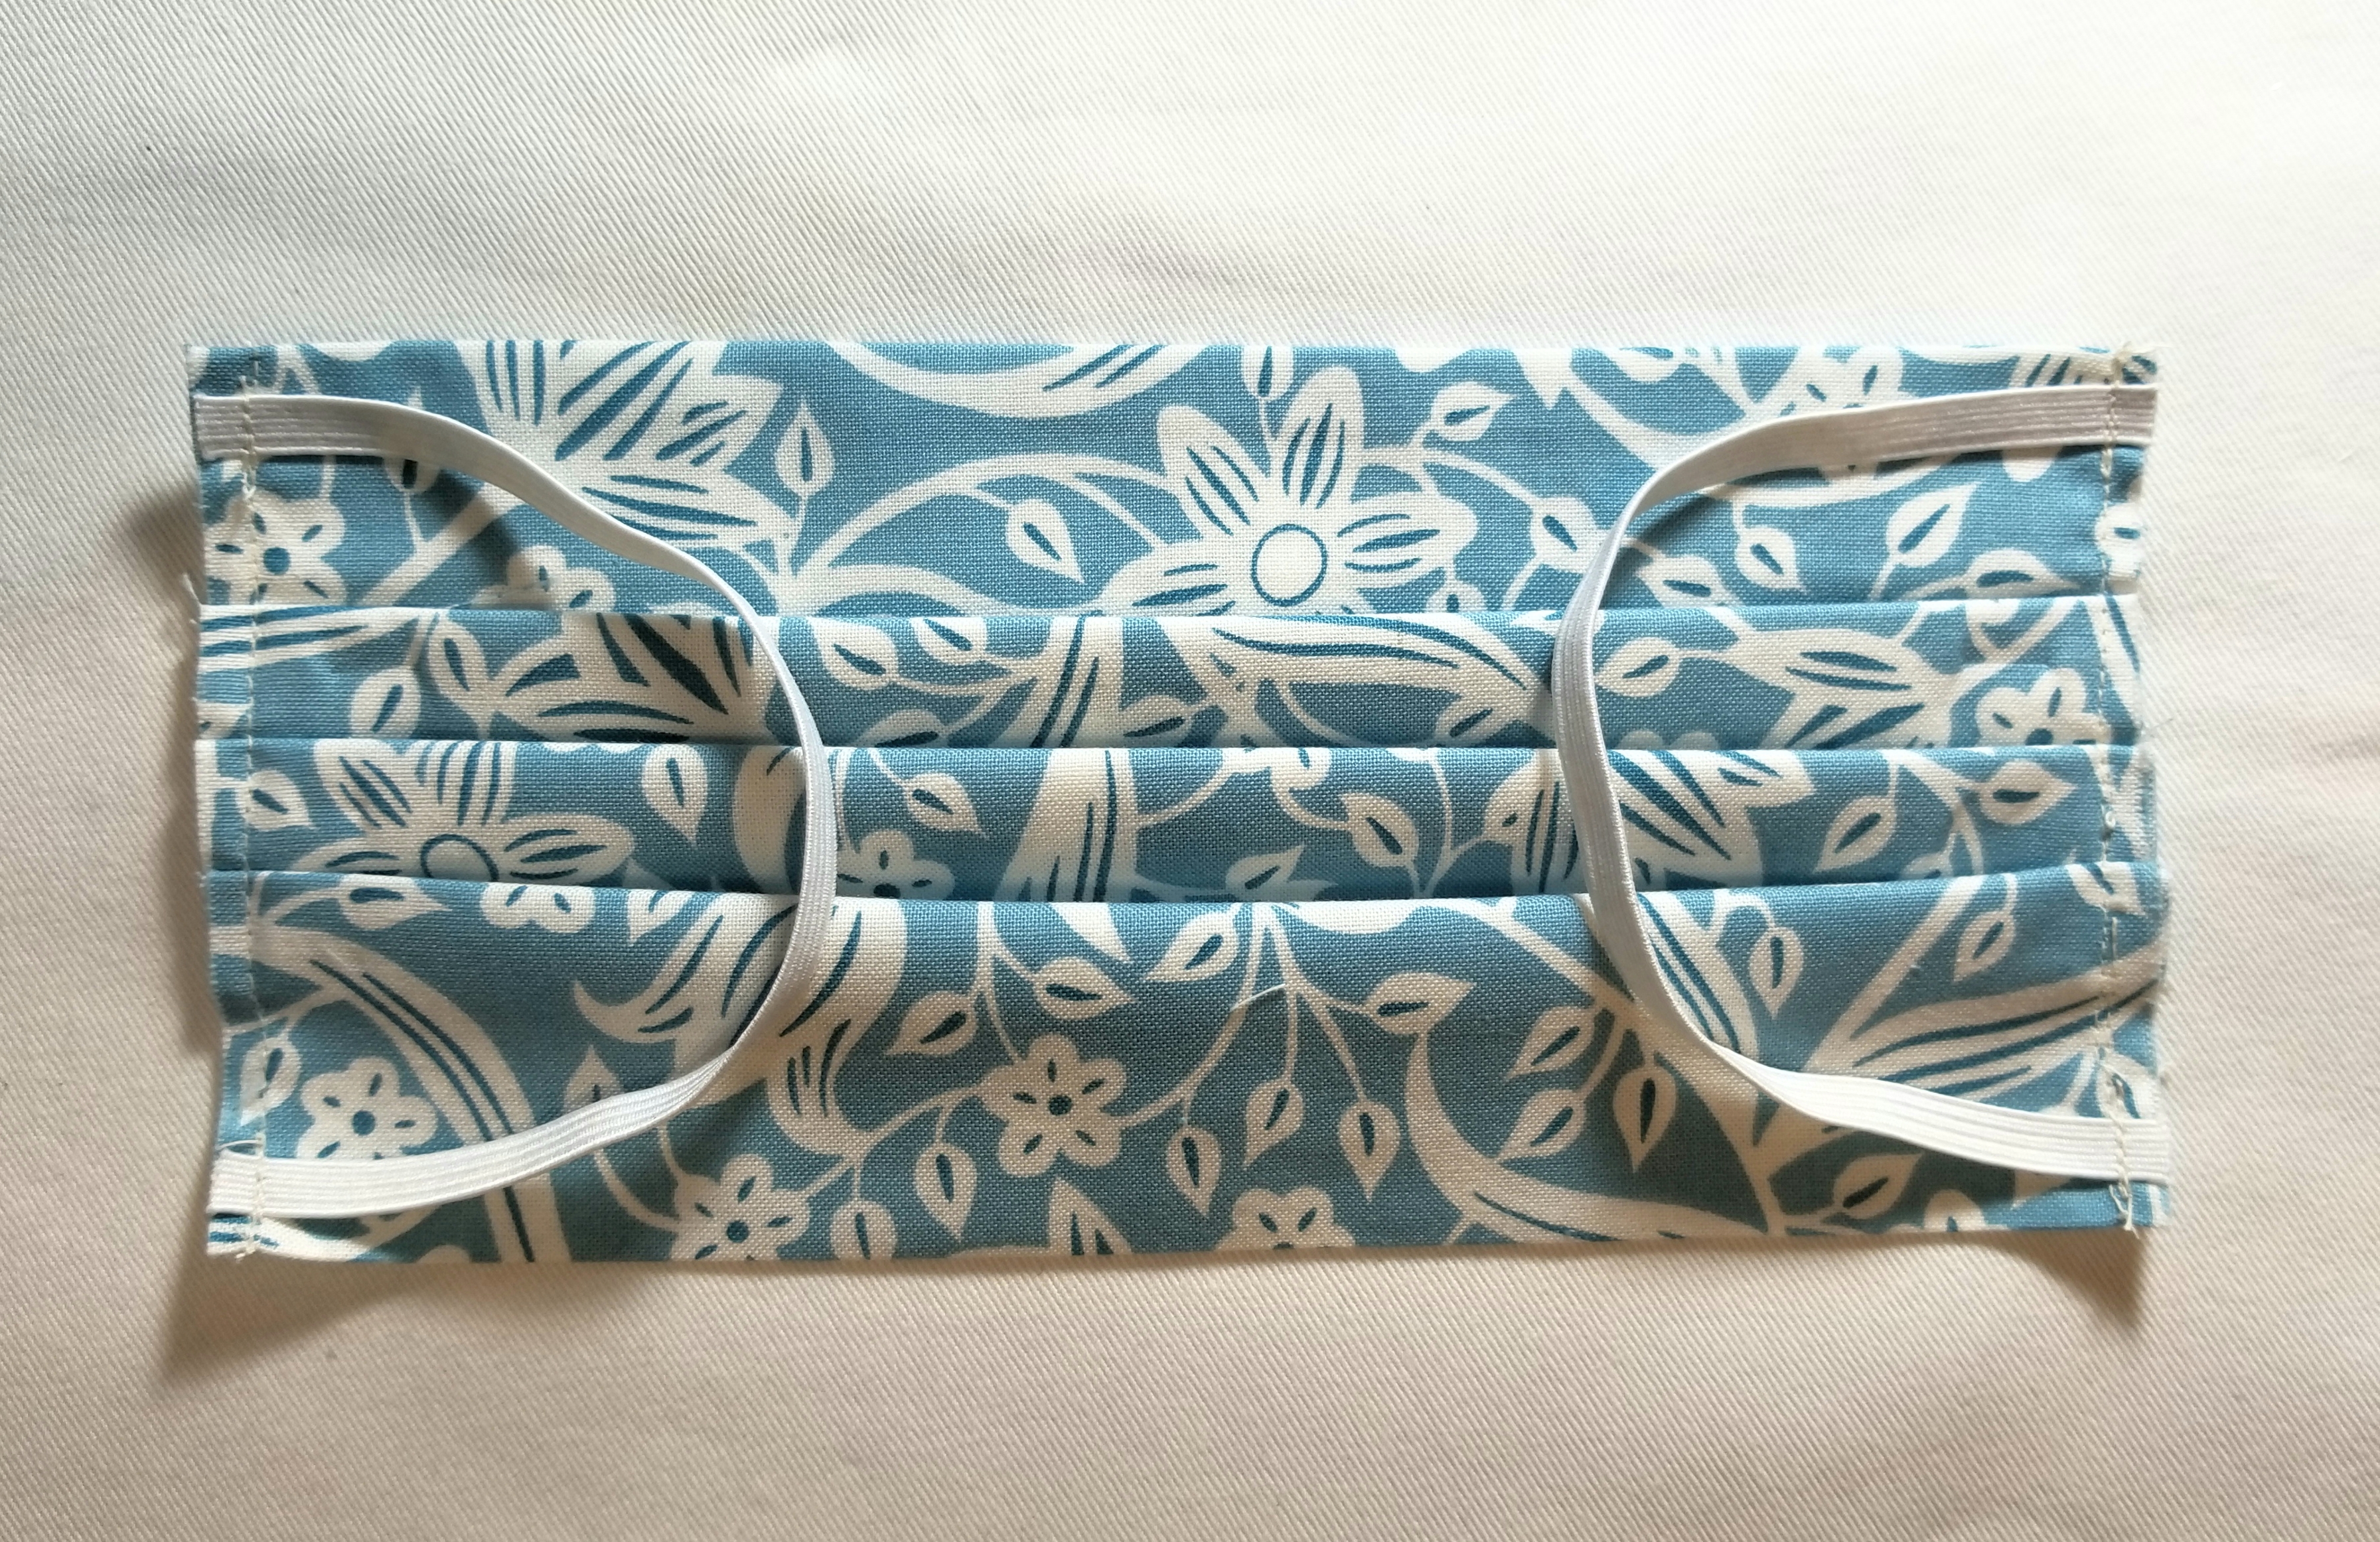
You should now have a reusable, washable mask that measures approximately 4″ x 7″ (unopened).
It took a few hours to put this free tutorial together for you. For this reason, I am greatly appreciative for any mentions that you can give me if you should use this tutorial. If you post a picture on social media, you can use the hashtag: #buttoncountermask. Feel free to share this page, and please tag me in your pictures so that I can see your beautiful creations. Last, I appreciate constructive criticism, so if you notice something that doesn’t look right, or does not make sense, bring it to my attention. I am happy to clarify any steps where you may have questions.
Enjoy!
P.S. Obviously, the elastic length can be adjusted to your facial measurements.
EDIT (March 24 2020): Because this tutorial has recently been used on a large scale, I will be adding a few things here as frequently asked and answered questions, suggestions, and reminders.
- This tutorial was happily shared by me over a year ago. This is not a new tutorial created in light of the current virus pandemic. I am not in charge, nor affiliated with any organization or entity requesting masks to be made. There are multiple organizations that are using this tutorial for their requests. If you have any question regarding what their requirements are, you really, really, really need to ask them. Please understand that I cannot and will not tell you what you should use, or how you should make your mask different from my tutorial.
- Keep in mind also that there are multiple entities that are using this tutorial for their requests. One entity may have completely different requests regarding features than another entity. (for example one organization is requesting a 4 layer mask, while another is fine with the two layer, as their thoughts are that they can be doubled up or used as a cover or liner to another kind of mask.) So, there is no correct or incorrect mask. Who are you making your mask for? Those are the people to whom you direct your questions.
- CHILD OR BABY MASK: After much thought, I have decided that it is in my best interest to NOT supply a mask tutorial for anyone other than an adult. One of my reasons for this is that I feel that a mask could pose as a choking hazard, and I do not want to have any part of that scenario. My suggestion is that you really should ask each individual child’s doctor or provider what their guidelines are, and go from there.
- I will not be held responsible for any mask misuse or malfunction.
- ELASTIC OR TIES? The main reason why my tutorial uses elastic is so I don’t have to tie it behind my head and mess up my hair. That’s it. So, if you are making the tutorial, and you don’t like the elastic, or if the person who you are making your mask for, requests ties; by all means put ties in yours. My pattern is very easily adapted to your preferences. There are organizations specifically asking for elastic, and some that are asking for ties only.
- ELASTIC LENGTH: I have read that a few of you recommend longer elastic; however, mine ended up being slightly loose. Therefore, I will not alter my pattern. I have stated in the tutorial that elastic length will need to vary due to the fact that human heads are not uniform (Thank goodness).
- I don’t have a PDF or printable version of my tutorial. If I decide to do that, I will; but it will be in my own time. I have received many hateful comments (that I deleted) demanding that I provide this. I need to remind those few sour apples that I am under zero obligation to do so. If my absolutely free visual tutorial isn’t to your liking, I invite you to go find one that makes you happy. If you are a person who often finds themselves using the words ”I need you to…”, you might fall into this category.
- I am completely honored that many of you are using my tutorial, or even certain aspects of it to help people in need. Even if you are using a completely different tutorial or pattern and just stopped by to check this one out, I applaud you for being a maker during this time. I cannot express enough how happy it makes me feel to see so many humans getting together to do something for the greater good. Please continue being that human. Those are the best ones.
I am signing off now to take care of my family, who needs me now more than ever. Thank you all for your kindness and understanding. God Bless.

Thank you for the instructions, planning to make as many I can for the three nurses in my family to use.
You are very welcome, Lillian. Enjoy.
Just a quick question. Your instructions say 8×14 piece of fabric and accent pieces are
1.75 x 6…Of I look at your fabric layout photo your pieces are 8×15 and 1.75 x 7. Which ones are right😊 Ty so much!!
Julie,
I am looking at the same photo, and see them as 1.75 x 6. I would need further detail to help out if I can. I hope I didn’t make a mess somewhere. Thank you for your inquiry.
I have shared this post. Hopefully that is ok. We are all trying to help out our communities with facemasks.
Absolutely. I hope it serves many people. Thank you, Anne.
Thanks for the tutorial! We also suffer from some seasonal allergies and this is an awesome idea! The comment above regarding the micron-rated polyester fabric ordered through Amazon was also helpful. I may see how those turn out as well. Thank you for sharing all these ideas and helping everyone in the process!
Rosemary, Thank you so much! If you get any pictures of the micron-rated polyester ones after you make them, let me know, I would love to see how they turn out. I appreciate your comment.
I just told my husband I should start sewing masks, not five minutes ago. Then I see where a friend shared a news report on facebook, of an Oklahoma hospital asking for seamstresses to sew masks and deliver to their hospital, in the midst of the 2020 Corona virus. The news report had a link to your online pattern. You could be literally helping to save lives, thank you for sharing this as it’s now became more essential than ever! I’m headed off to pull excess fabrics out of the closet now.
Linda, Thank you so much for sewing up masks. You are probably doing a great amount of saving as well. Happy stitching.
You’ve become very popular all of a sudden! Bless you!
The picture that they showed of your mask has ties on the side instead of elastic. How long and wide are those pieces to add to it instead of elastic.
Thank you
Can u send me the face mask directions so I can print – need to make for co workers
I don’ t have a print format. My tutorial was designed to be viewed on a screen for viability and clarity during the steps. Maybe you could share the link address? That would also make it paperless, and prevent many hands touching surfaces? I do appreciate your request, I apologize if I wasn’t any help.
with the pandemic and the lack of masks available could this be a good substitute. would you need to add something in side the mask?
Della, I think that clinics and hospitals are mostly using them for non-covid patients and situations, to help with saving the N95 masks for covid-19 staff and patients. I am not a doctor, but I think that wearing a mask in these times is better than not wearing one at all. Remember, I am not giving medical advice, so please ask your doctor what they advise. I am simply the gal that made a free tutorial. I hope this helps.
Thank you so much.
Phyllis, you are very welcome.
These are very good instructions … thank you. I find them very clear, concise and extremely easy to read and follow. Will be using them because of allergies and asthma as well. Thank you for sharing.
Mary, Thank you for your comment. It was a huge amount of work the day that I put all of this together, so I am very honored to be helpful to people that need it.
Thank you! Great, easy instructions. I will pass it on!
Thank you Trisha, enjoy.
Thank you for the tutorial. I will be making a few for friends.
Thank you Judi I am sure they will be appreciated.
I’m sorry if I overlooked this, but did you ever list info for a child size? I just need measurements, thank you 😀
Thanks for the tutorial. Our church sewing ministry was asked to make them for area hospitals. After looking at many tutorials and recommendations, I decided to use this one (as recommended by the hospital in Stillwater OK). The only problems I has was when I didn’t follow the directions. Once I went back and re-read I was much better off!
Ann, That’s where I usually have problems too. 🙂 I am so glad that you got it all worked out. good luck, and thank you
Hello! I am having a hard time with the pleats. When you say “flip the tube piece over” – are you saying turn it over to the backside or just rotate the fabric? Thank you!
Mrsskel, I am trying to figure out which step you are on. I am not seeing the words ”flip the tube piece over”…are you at the steps where you are sewing the accent strip on?
I figured it out thank you! It was the pleats!
Oh, okay…I am glad you got it. Sorry for being late to respond.
Thank you for sharing!
Lynn, you are very welcome.
Hi, I just thought you might be tickled to know that the humane society of the pikes peak region is asking for volunteers to make these for the staff. If you know of others who could make a fee to donate and the mail I know they would greatly appreciate it. I’m going to try your tutorial and make a few also. This is so neat thanks for doing this!
Heather, That is great news! I used to live in Colorado Springs before making Texas my home 20 years ago. I am glad that the humane society can put this tutorial to good use. Thank you so much.
Sorry for the typos. I meant make a few and mail them to the humane society.
Thank you so much– this is a great tutorial! I really appreciate the pictures and the step by steps. Do you by chance have a tutorial on a fabric mask that has a cover or pocket where one can insert a medical face mask inside? (aka the fabric face mask serves as a cover for the medical face mask.
Emily, I do not, but a pocket could easily be added to the outside of the fabric before it is folded into a tube shape. Keep in mind that these can be washed then reused as well. Thank you for your very good question.
Your EXCELLENT face mask tutorial was just posted in a request from Stillwater Oklahoma, US. It was a plea for seamstresses to please make these for local hospitals. The time you took to use your talent and make this wonderful tutorial will save lives. THANK YOU.
Joyce, thank you for letting me know about this, it is so kind. I hope it is used for those that really need it.
Question: can I get permission to share this widely and make a .pdf of it for the craft group I’ve joined to make masks during the pandemic? I own a handmade shop and industrial sewing studio, and have joined a group of crafters to make these and donate them to the medical facilities that are short on masks. This is a very good and thorough tutorial for those who’s sewing skills aren’t as keen as mine or my team’s. Thanks in advance!
You are welcome to share my tutorial with anyone who needs it as long as you give me credit, and to provide links as its source. Thank you, Elyse.
Thank you so much for your pattern. I am now making these as fast as I can and giving them away to any and everybody who needs one. My friends have brought me toilet paper and snacks and have offered fabric to help. I feel like this is one thing I can do to help in the crisis we’re in. Thanks again for your wonderful pattern!!
Thank you for your kind comment.
Would this work for Covid=19?
Rhonda, I am not at liberty to make promises on the mask’s capabilities, because those can vary greatly, depending on the materials that you use, the fit of the mask unaltered, the severity or differences of your biological environment, by the amount of use that the mask gets between washings, or even your current state of health. I just cannot say that this blocks covid-19 one hundred percent. Use your discretion in regards to this tutorial and your own application to its use.
Thanks so much for this detailed tutorial! My afternoon project is already lined up now :))
Enjoy some stitch time with some good tunes. Thank you, Ruth.
i AM THINKING THAT ONE COULD RUN A ‘GATHERING’ STITCH ON EACH SIDE INSTEAD OF MAKING PLEATS AND THIS WORK JUST AS WELL. ALSO, JUST USE THE NEW TYPES OF COTTON THAT NEEDS NO IRONING–REMEMBER THAT DIAPERS OF LONG AGO WERE COTTON AND NEVER NEEDED IRONING. JUANITA
Thank you so much for sharing this tutorial. Will try this weekend.
Thank you, Hinson. It goes together fairly easily. Good luck.
Can I use a thin batting for the polyester fiber?
Vicki, my pattern simply calls for woven cotton, but it can be easily altered to whatever specifications that you require. I am guessing that you mean to add it to the inside of the cotton tube at the beginning of the tutorial (?)
Thank you for such a well-done tutorial. I expect you will be getting more traffic to your site. #Covid19 #Flattenthecurve
Homemade masks are helpful and here is some data related to how well they compare to commercially produced paper masks.
https://smartairfilters.com/en/blog/diy-homemade-mask-protect-virus-coronavirus/
Sabine, Thank you so much for this information. I relieves me to know that my tutorial is being used for those that really need it. I appreciate your comment.
Thank You.
Thank you as well, Melvie.
I will attempt to make one. Thank you. Instructions seem easily understood. If I can make one, I’ll volunteer to make them for our hospitals in crisis due to the present virus. Prayers for wellness
Dayna, Thank you very much for your prayers. I will return them to you. The first mask goes together a little slower than the others following, but if you put the music on it makes the work easy. Good luck.
Well done! Your explanations are clear and it is well illustrated.
Thank you, Deborah for your kind feedback. Good luck making these.
Did you do the child’s size tutorial?? I want to make a few..
Are flannel and knit fabrics acceptable for the hospital personnel masks? The pictures look like woven material, like quilt fabric, and I have lots of that so I’m anxious to get started!
Kathlyn, I am not sure. I can tell you that mine is higher quality quilting cotton. I hope that answers you question. I would advise to ask those organizations that are putting in requests what material they prefer. Many are okay with the cotton ones. I don’t know if flannel weave might be too loose, or not. I just don’t want to be wrong.
Thank you I have two family members that are physicians- this gives me something to do to help!
Me too! As you know they are usually too busy to sew. Thank you for being a helper.
I must be following your tutorial wrong. My finished product has the elastic laying on top of the binding on the front side instead of hidden like your picture. Help!
Carol, I think that you might not have flipped that accent strip all the way over to the other side. Once the accent strip is sewn over the elastic, it is flipped completely over to the other side, so the elastic is at the seam edge. then you sew the accent strip down on the side that you flipped it to, to cover that raw edge. Let me know if this helped you.
Thank you for your work preparing this tutorial! Several of my neighbors are thinking of making some for this crisis we are in and I found information from another site that stated the sewer is adding a layer of light interfacing for a little more protection. I will pass this along and give you the credit. Blessings and hope you and your loved ones stay well.
Brenda, I am so glad that you can use the pattern, and happy that it is easily altered for yours and/or other’s specifications. Thank you also for giving me credit, I am honored and appreciative.
what is the best material to use for the healthcare providers during the pandemic…. there has been a request for 100 million of these but i am not sure what type of material would be best for the covid 19 virus? appreciate your help.
Susan, Thank you for your question. My mask is made of quality quilting cotton (double thickness when it is complete); however, I can not and will not recommend any medical advice for liability reasons. Therefore, I would request that you ask the individual entity that is wanting you to make the masks in the first place, as they would know better than anyone what material is best. I am simply the gal that made the mask tutorial. I apologize if that is not helpful. Good luck.
This is exactly what I was looking for…specifics for medical grade.
Tanks to both of you for your ideas and tutorial.
I failed to say that I propose to answer the call that hospitals asked for persons with sewing machines to help cure the shortage of masks.
Thank you, Joann.
Joann, you’re welcome, I hope the tutorial is useful to you.
Thank you for the pattern for the face mask. I will be making one for me, my husband, and a few friends. Thanks again, I was just thinking that I could make one
The first one goes slower than the following. Enjoy, and thank you.
Please inform your friends that face masks are to protect patients from the germs of their health care providers, not the other way around. Wearing one may actually increase your risk of infection. https://www.forbes.com/sites/tarahaelle/2020/02/29/no-you-do-not-need-face-masks-for-coronavirus-they-might-increase-your-infection-risk/#ab46544676ca
I appreciate your comment, Bev; however, I am going to avoid all medical recommendations in my comments. I hope that everyone asks their own doctors for guidance in these matters as every individual has different concerns. I am not a doctor, I am just the gal that made the mask tutorial. Thank you so much. Take care.
Bev, I also need to add that many hospitals and clinics are not necessarily requesting these for covid-19 prevention, but to use for non-covid 19 scenarios so the the remaining medical masks can be used for covid-19. That is what I am understanding anyway.
I’m also seeing some where you can eventually insert some sort of filter. I plan on making some for the crisis as well but incorporating a pocket where a filter can be inserted at some point.
I I thought your tutorial was great and I’m going to try it thank you for putting it out there may God bless you. Lorraine scranton pa
Thank you, Lorraine. May you be blessed as well. The first mask goes slower than the ones that follow. Good luck.
Thank You for this pattern. During the Covid-19 outbreak, this is going to be very useful. I plan on making some for family and friends. I may add some batting to act as additional filtering.
Feel free to alter the pattern in any way that is useful to you. I am happy to share it with you.
Thank you so much for your tutorial. As a fellow Austinite I totally get the allergy thing and have often worn masks during Cedar season. And as a professional dressmaker I found your tutorial clear and beautifully detailed. We are now in a different season with a different pathogen, but from all I read from reputable sources (ie. the CDC and the Forbes article I got your link from), DYI masks are effective when other masks are not available and I like yours very much. I want to try one with microbial pillowcase material.Thanks for your contribution.
Susan, I remember you from a block exchange! How are you? Yes, after talking with my sister in the medical industry, she stated that reusing the disposable ones is waaaayyyy worse than using cotton ones that you can wash over and over again between uses. I also agree that wearing one is better than not. Thank you for your comment.
i am looking for a mask filler that would help with filtration. what is microbial pillow fabric? do you know of what else can be used? i will be making masks for hospitals. do you have any suggestlions?
I do not. I am not going to provide any medical guidelines, because that could get me into a world of trouble if I were wrong, so I recommend mask makers to ask their own medical providers what they suggest for your situation.
thanks a bunch. in lieu of the corona virus….and masks running out, my google search led me to your site. thank you. i’ll be making a bunch for family.
Thank you for your comment, Nang. I hope they come together faster than the first few. Good luck, and bless you.
Hi there! I found this tutorial as recommended by a hospital which is running low on masks and asking those who can sew to make some to donate. Their article stated that this mask needs to have 4 layers of cloth. Can you please offer me advice as to how I should do this? Would I just make 2 identical masks and stack the fabrics (like a double mask that is stitched together with 1 binding on each side)? Any help you can offer is greatly appreciated!!
This can be made with two layers of fabric (folded to make four layers) it will simply be a little bulkier during the sewing process, but not impossible. Only one accent strip for each side would be used. You wouldn’t have to double that thickness. I hope that helps to adapt it to their requirements.
4 layers would be pretty hard to breath through and a bit heavy for comfort.It would be fun to match your mask with outfit.
Erica, yeah, I was thinking that as well. I feel that if it were 4 layers, the air would come around the mask instead of through it. Just my thoughts, not my guidelines or recommendations.
I wanted to print your mask instructions but it was 37 pages. I am giving my young cousin a sewing machine and wanted to have her make something. Can we get this down to a reasonable size. I would be more than happy to do that for you if you would send me the open doc in Word. I am a sales rep for Brewer and write patterns. Your instructions look very good, but pix are very large
Linda, under normal circumstances I would be thrilled for you to rewrite my pattern. My husband and I are in the middle of trying to sell our house during this pandemic, which is making me put a ton of things on the back burner for now. I would be honored to revisit this in the near future. Thank you for your kind request.
Linda – if you copy and paste into a word processing program you can resize the photos to take less room. It’ll take you a few minutes, but I frequently do this with articles, recipes, and knitting instructions.
Linda if you do make a pdf pattern, I would love to have a copy. I plan to make the mask for hospitals here in Lubbock TX
Thank you so much,
Peggy Dieu
Peg5450@yahoo.com
Thank you, Peggy. I will see what I can do about adding it. I have been super, super busy though, so I cannot promise. I appreciate your request.
Still having trouble. Your last two photos of the finished mask are confusing me. How can the backside of the mask not have the accent fabric showing if it was folded toward the back in an earlier step?
Carol, thank you for your question. The accent strip is sewn to one side of the mask in an earlier step. Then, when you flip the mask over so that the opposite side shows, you fold the accent strip all the way over to this opposite side. All the way over, so the fold is on the seam that you created. I hope that helps, if not, please let me know.
I am also confused with the last pictures of the front and back. I understand that the accent piece is folded and the raw edges are sewn to the front side, matching the raw edges. Then you fold it to the back and sew it down but the picture of the backside does not show the accent fabric 🤷🏼♀️ Thanks for your help.
Ruth, The folded accent strip is sewn down (on top of the elastic). now open it completely and press it (the elastic will be sticking out of the seam). Now fold the entire accent strip to the other side, so the the elastics are coming from the edge of the mask. The accent strip will now be sewn down on one side of the mask, but you wont see it on the other side, because you flipped it completely over after sewing the layers together. I hope this makes sense, but please let me know if not.
Pingback: Do you have a sewing machine, and can you use it? You can be a hero and save lives – All Sides Of It
Thank you for sharing this. Your site was linked in news articles on Facebook. I shared it with a group of Dragon*Con cosplayers in Atlanta. Cosplayers are known for DIY creations including sewing. One early response was from the UK, so hopefully your kind suggestion continues to spread.
I have friends who are in theater costuming and Cosplay fans. You are right that they are at the helm of creativity. Thank you very much for sharing my free tutorial with those that really need it. I appreciate your comment.
the hospital that needs these says the masks must be adjustable! these are not!
or are they ok?
Susan, Thank you for your comment, a very simple alteration of putting a single string at each of the four corners instead of the elastic ends, will allow a person to tie the mask to the back of the head. When I designed this, it was for wearing during my allergy seasons and house cleaning (didn’t want to mess up my hair.) This matters little these days. Thank you for your comment. I appreciate it.
This went together so quickly and easily – great directions (although I almost got into trouble “assuming” I knew how the contrast edging worked – nope, read the directions and it’s clear as a bell!). I’m going to see if our local hospital needs a bunch of these – thanks again!
Thank you for your feedback, Susan. I am sure there are a great many people that would appreciate these. Thank you also for being a maker.
Thanks for the tutorial! I made a couple of these today. The instructions were easy to follow. I got bogged down a bit with the contrast piece on the first one. I tweaked it a bit for the second one it it was perfect.
Yes, when I made my masks, they were for less stressful times, where making them pretty was slightly important. This is no longer the case, so sew away and slay the day my friend.
Thank you for this timely post. I plan to make a few.
Me too! Thank you for contributing. I am sure it will be greatly appreciated.
Thank you for your pattern. I will try to make these for a hospital that needs them. Thought all i could to offer frabric to make toilet paper Ha Ha.
Carolyn, Thank you for helping in any way that you can. I am sure there are many that appreciate our contributions.
Hello! I will making these in bulk to send to a hospital for healthcare workers during the current COVID-19 crisis. Does the accent strip provide a more secure fit to the face, or is it purely for decoration?
Krista, it is functional, but in a crisis situation, not super necessary. It prevents the elastic from easily pulling off. If you want to leave the edge raw and simply zig zag stitch it, that should work fine, just be sure to anchor the elastic (or strings, if you go that route) extra carefully.
Hello Krista
I would also like to make masks that healthcare workers could use. Do you know what kind of material we should use? Would appreciate your input. Thanks
This tutorial calls for quality grade quilters cotton, but I would advise to ask the healthcare entity that you are making these for what they recommend or request. I would like to leave it in their hands, as they know best. I will tell you that this tutorial provide double thickness of woven cotton if they should ask about the tutorial.