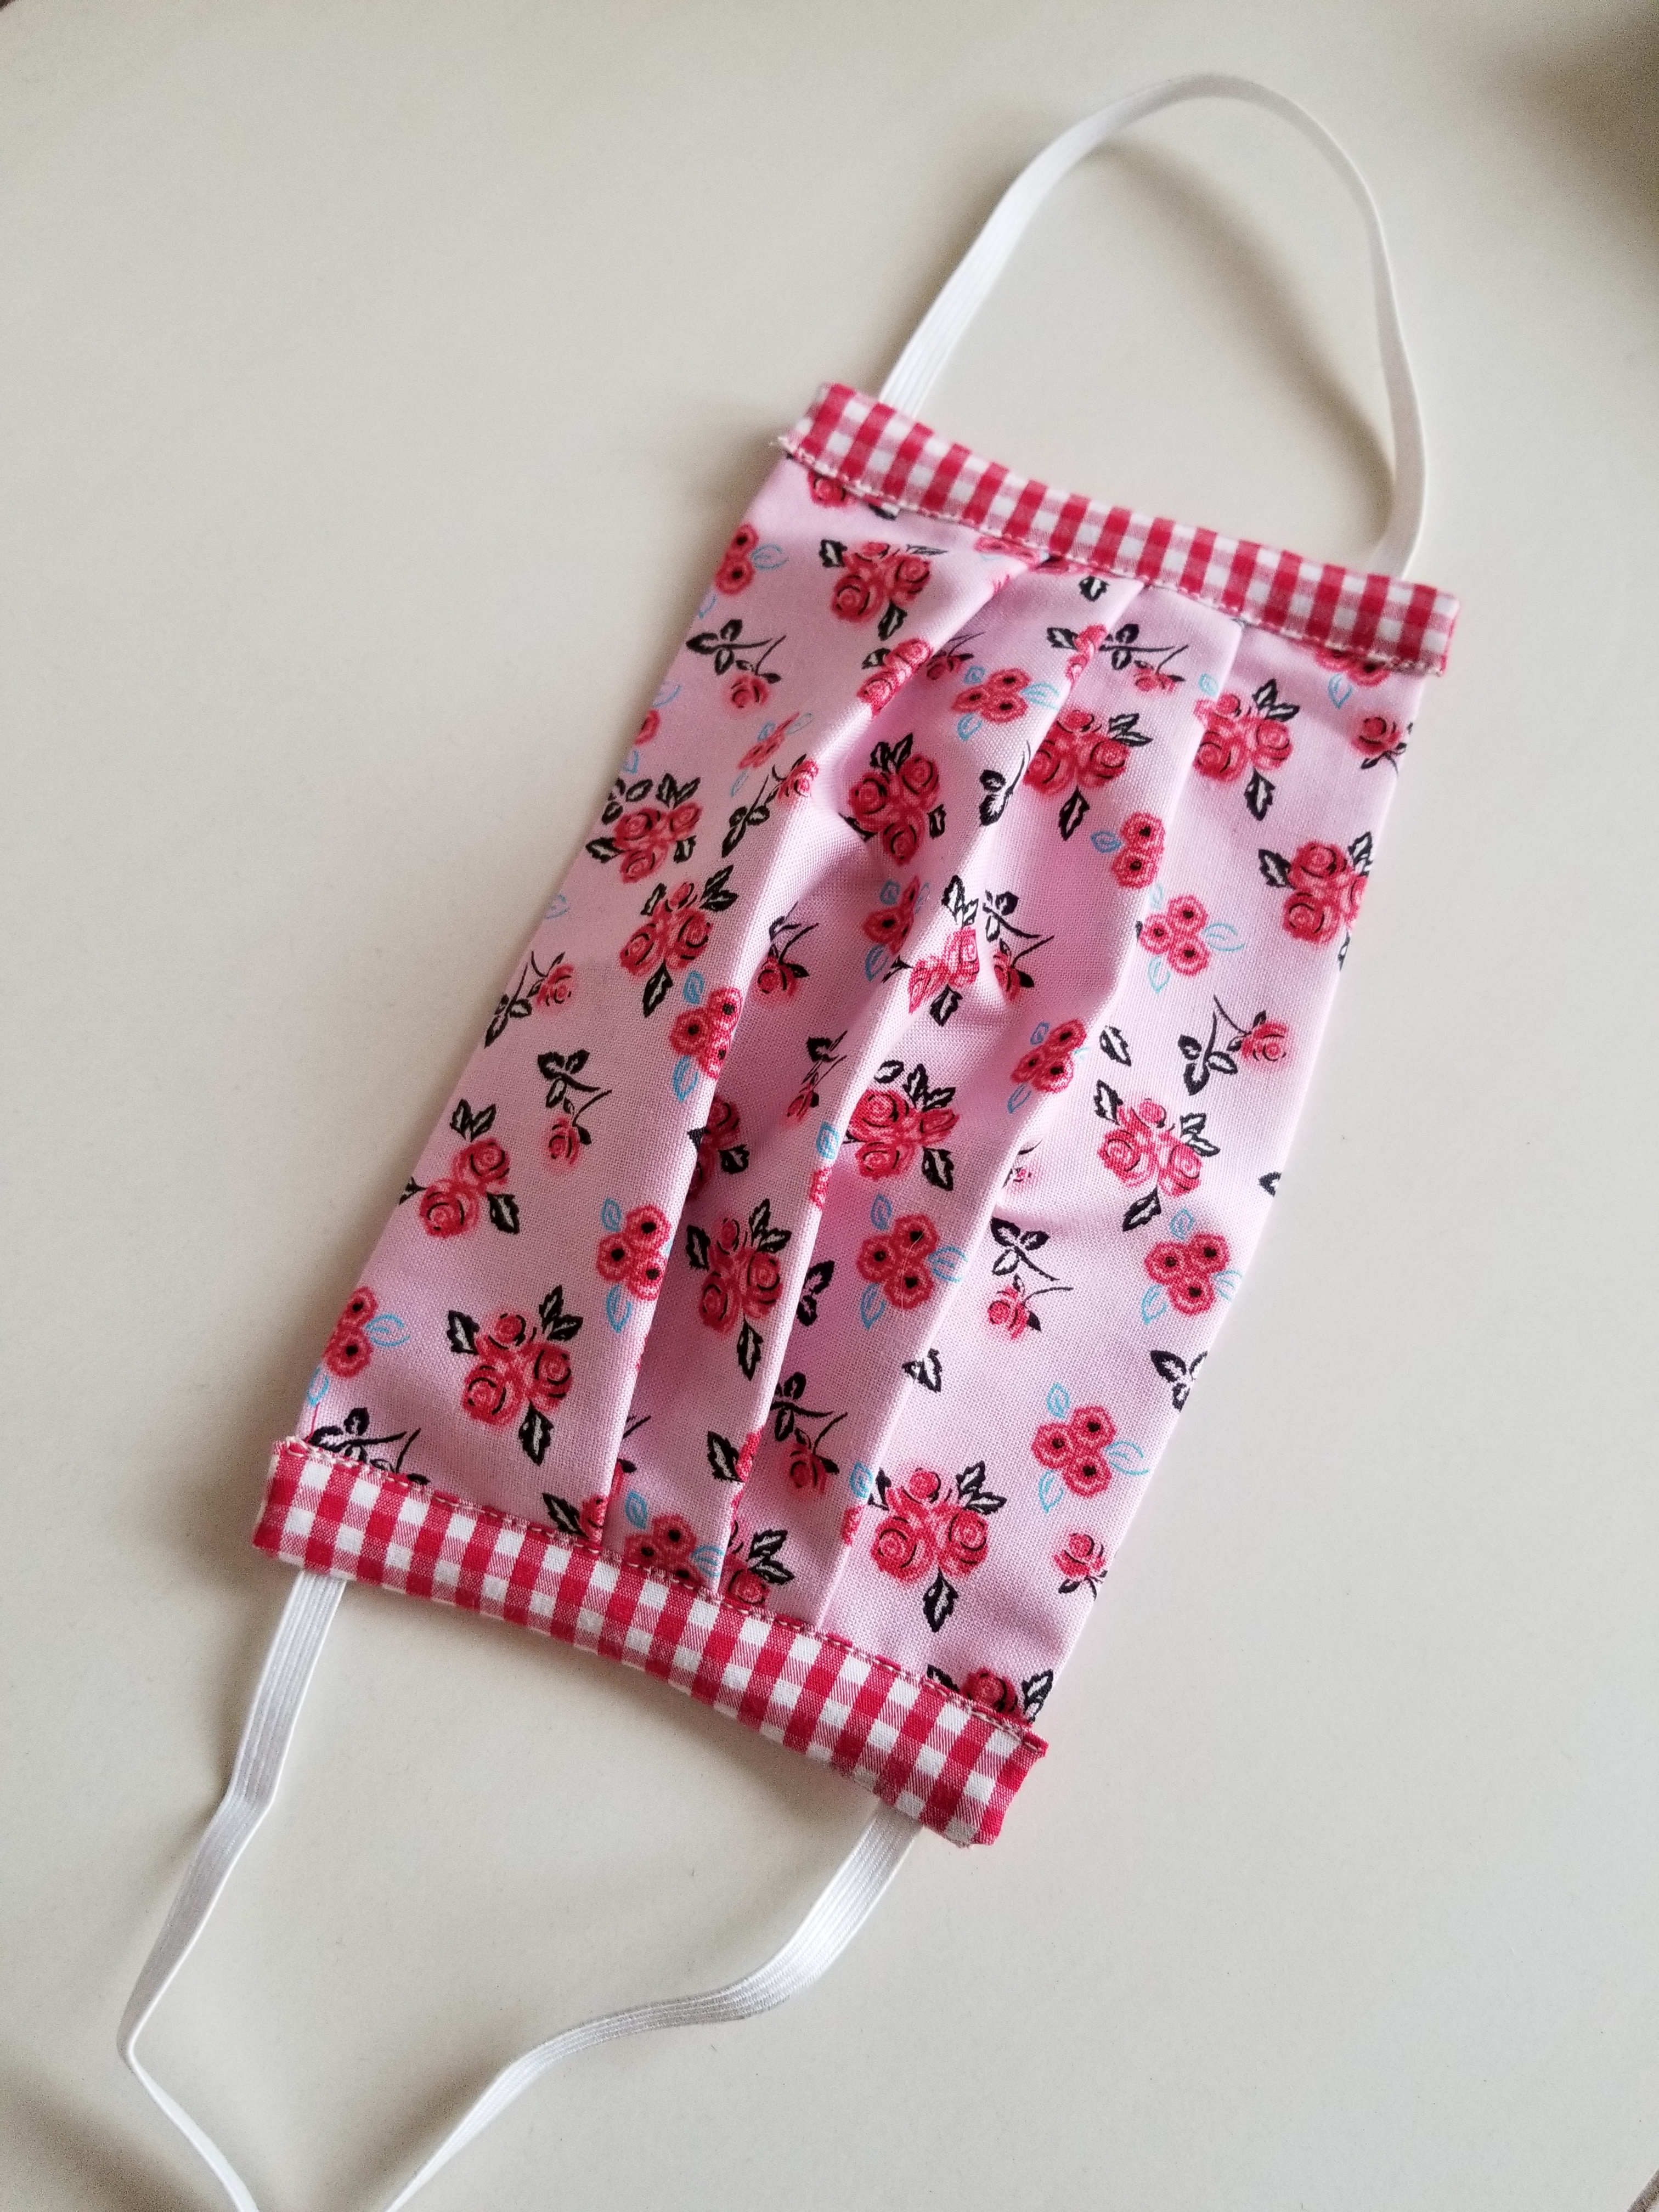
My allergies have been incredible this year, and by that I mean that they have been worse than they have ever been. (Please, please, please do not suggest medical advice here. Much appreciated.) I see an allergy specialist who gives me 2 shots, 2-3 times a week to help with my symptoms. They have helped a lot; however, Juniper Ash (Cedar Fever!) here in Austin is 6 times worse than average this year, and boy oh boy, do I feel it. She suggested that I wear a face mask when I go outside to help reduce the amount of pollen that is going into my lungs and sinuses. After going to a few different stores to purchase some, I found that many other Austinites had already bought them out. No worries, right? I know how to sew. I will just make one. When I finished, I had many requests for a tutorial, so here you go:
Materials needed:
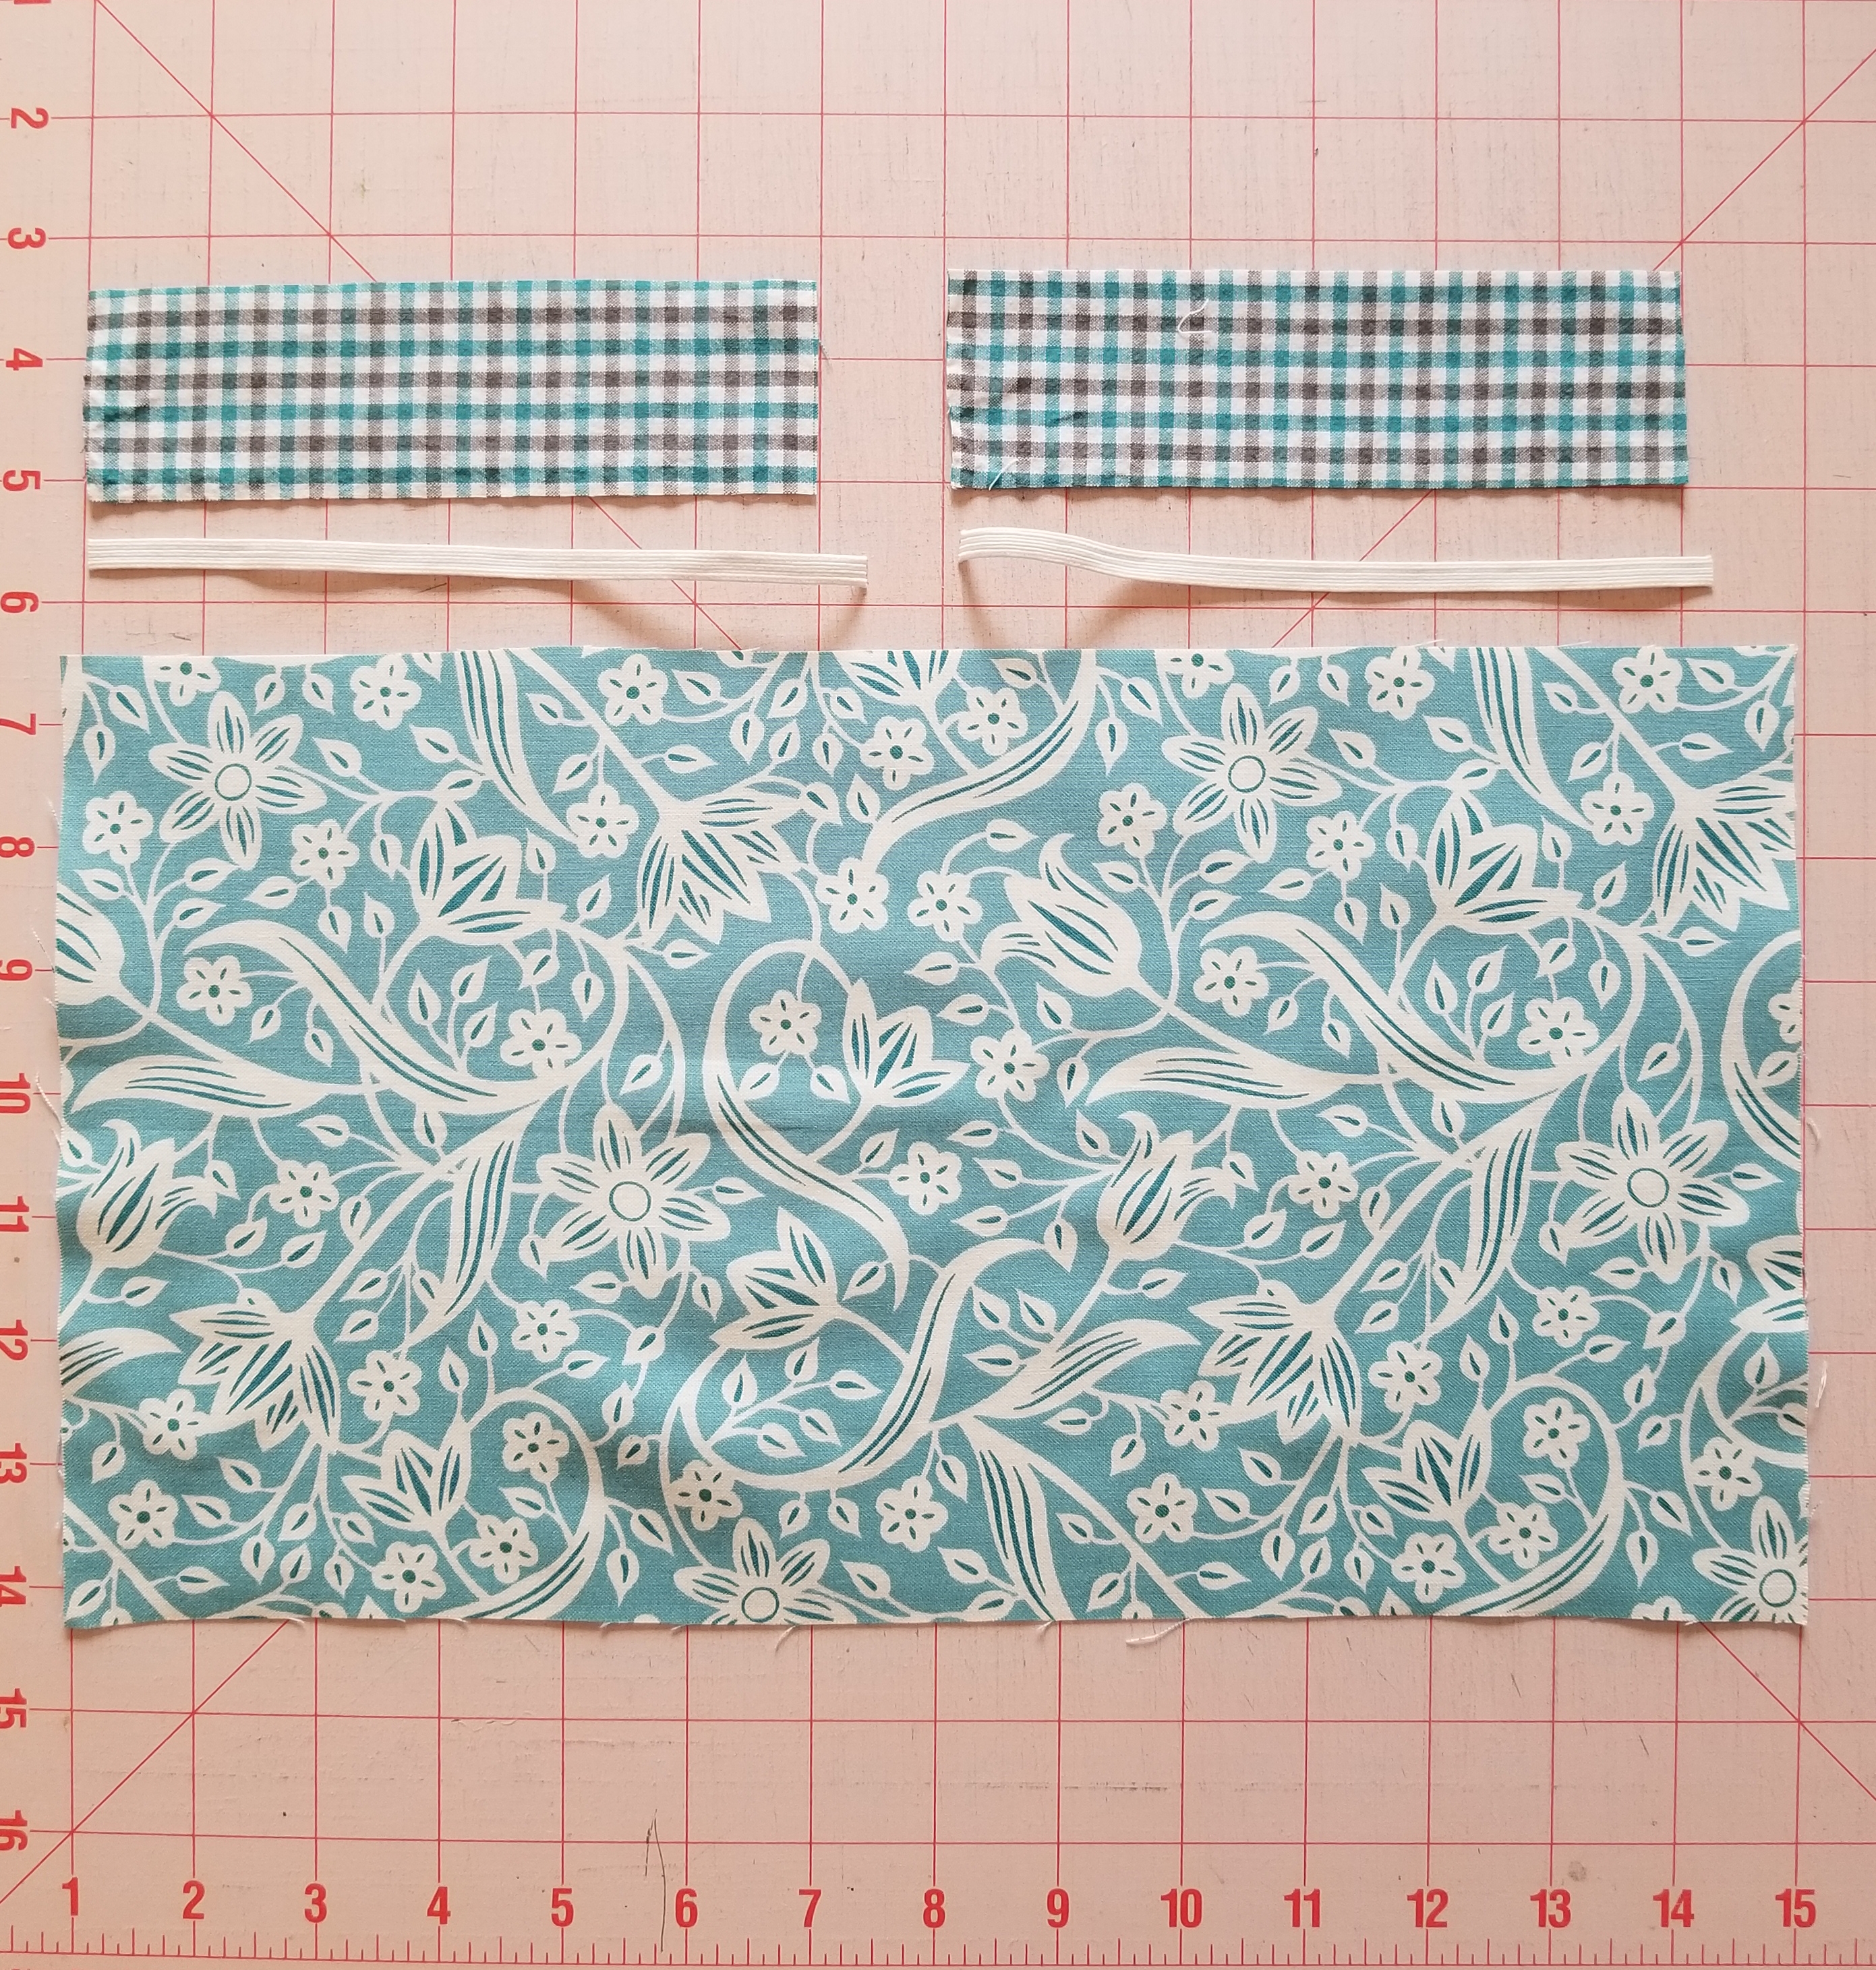
- 1 piece of fabric measuring 8” x 14”. Until you get familiar with this tutorial, I would suggest a non-directional print. One that has a scattered image printed on the surface such as the one shown.
- 2 strips of fabric measuring 1.75” (1 3/4”) x 6”. This will be the accent edge piece. It can be the same fabric as the main piece or a small-scale print or solid.
- Two pieces of 1/4” width elastic. These will be about 6 1/2” long.
- Ruler
- Fabric marking tool.
- Pins
- Scissors
- Sewing machine, threaded.
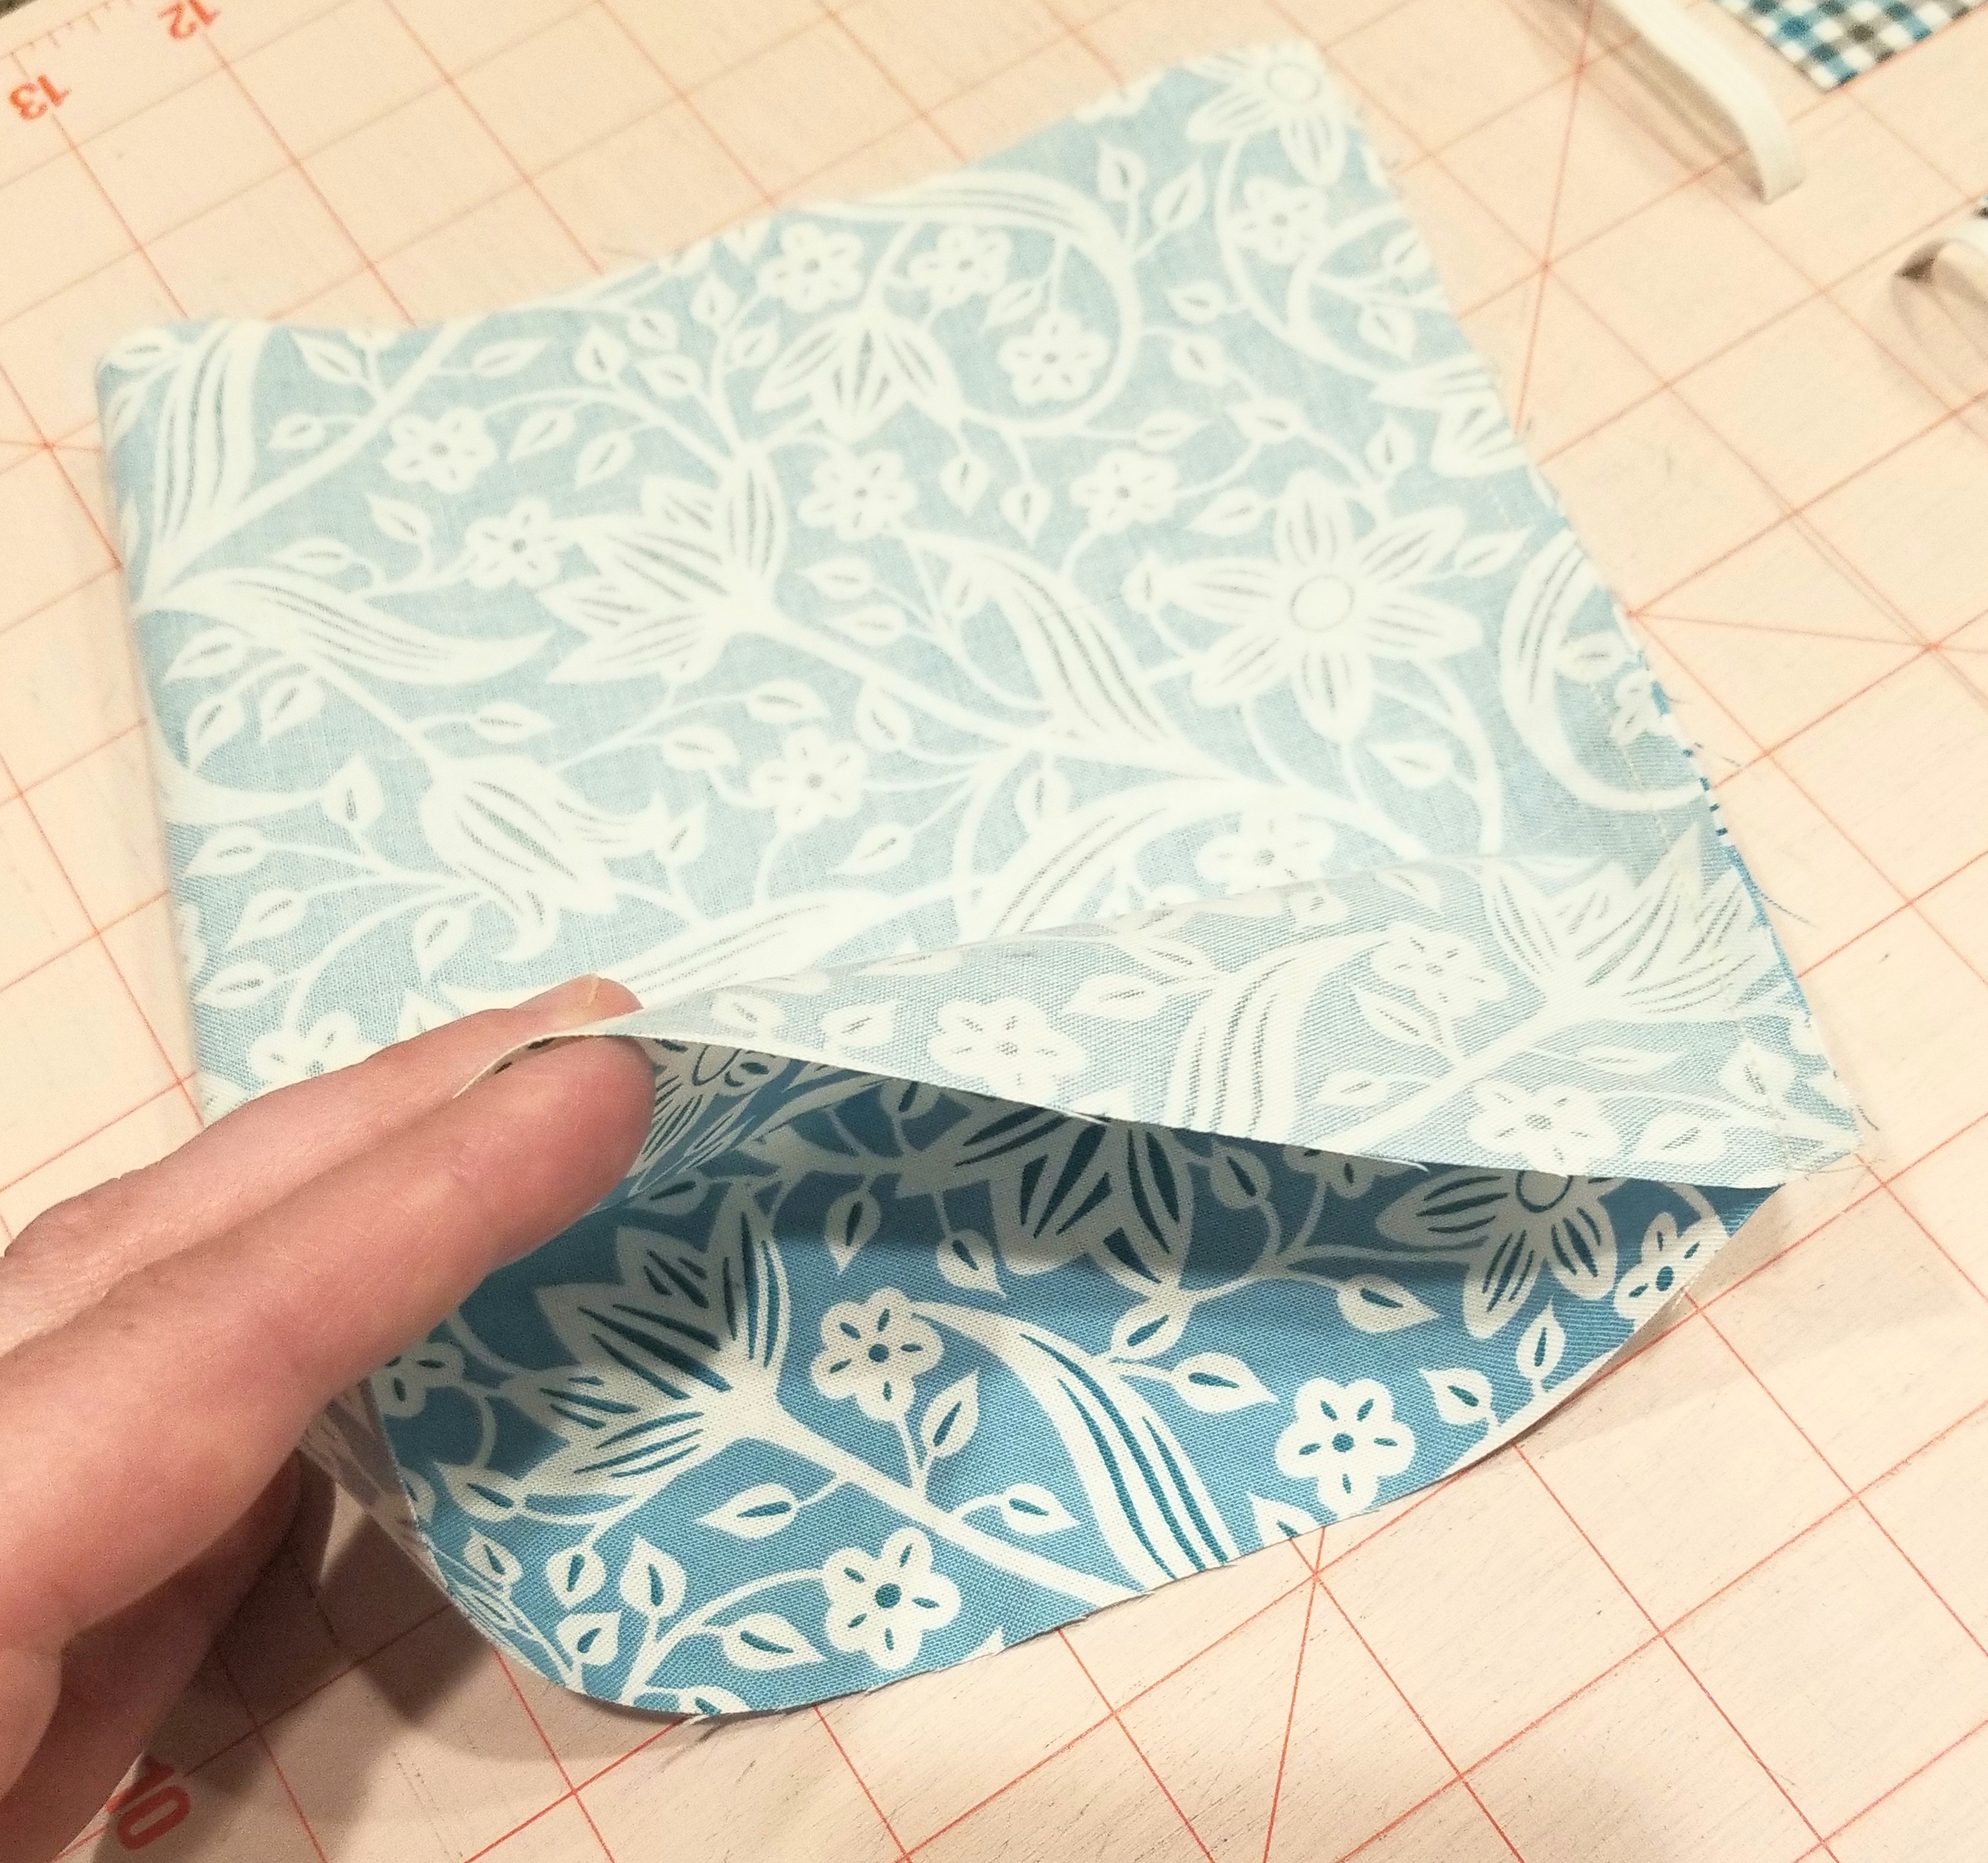
Fold the main piece of fabric in half, right sides together. Sew along the 8 inch width edge, using a 1/4 inch seam allowance.
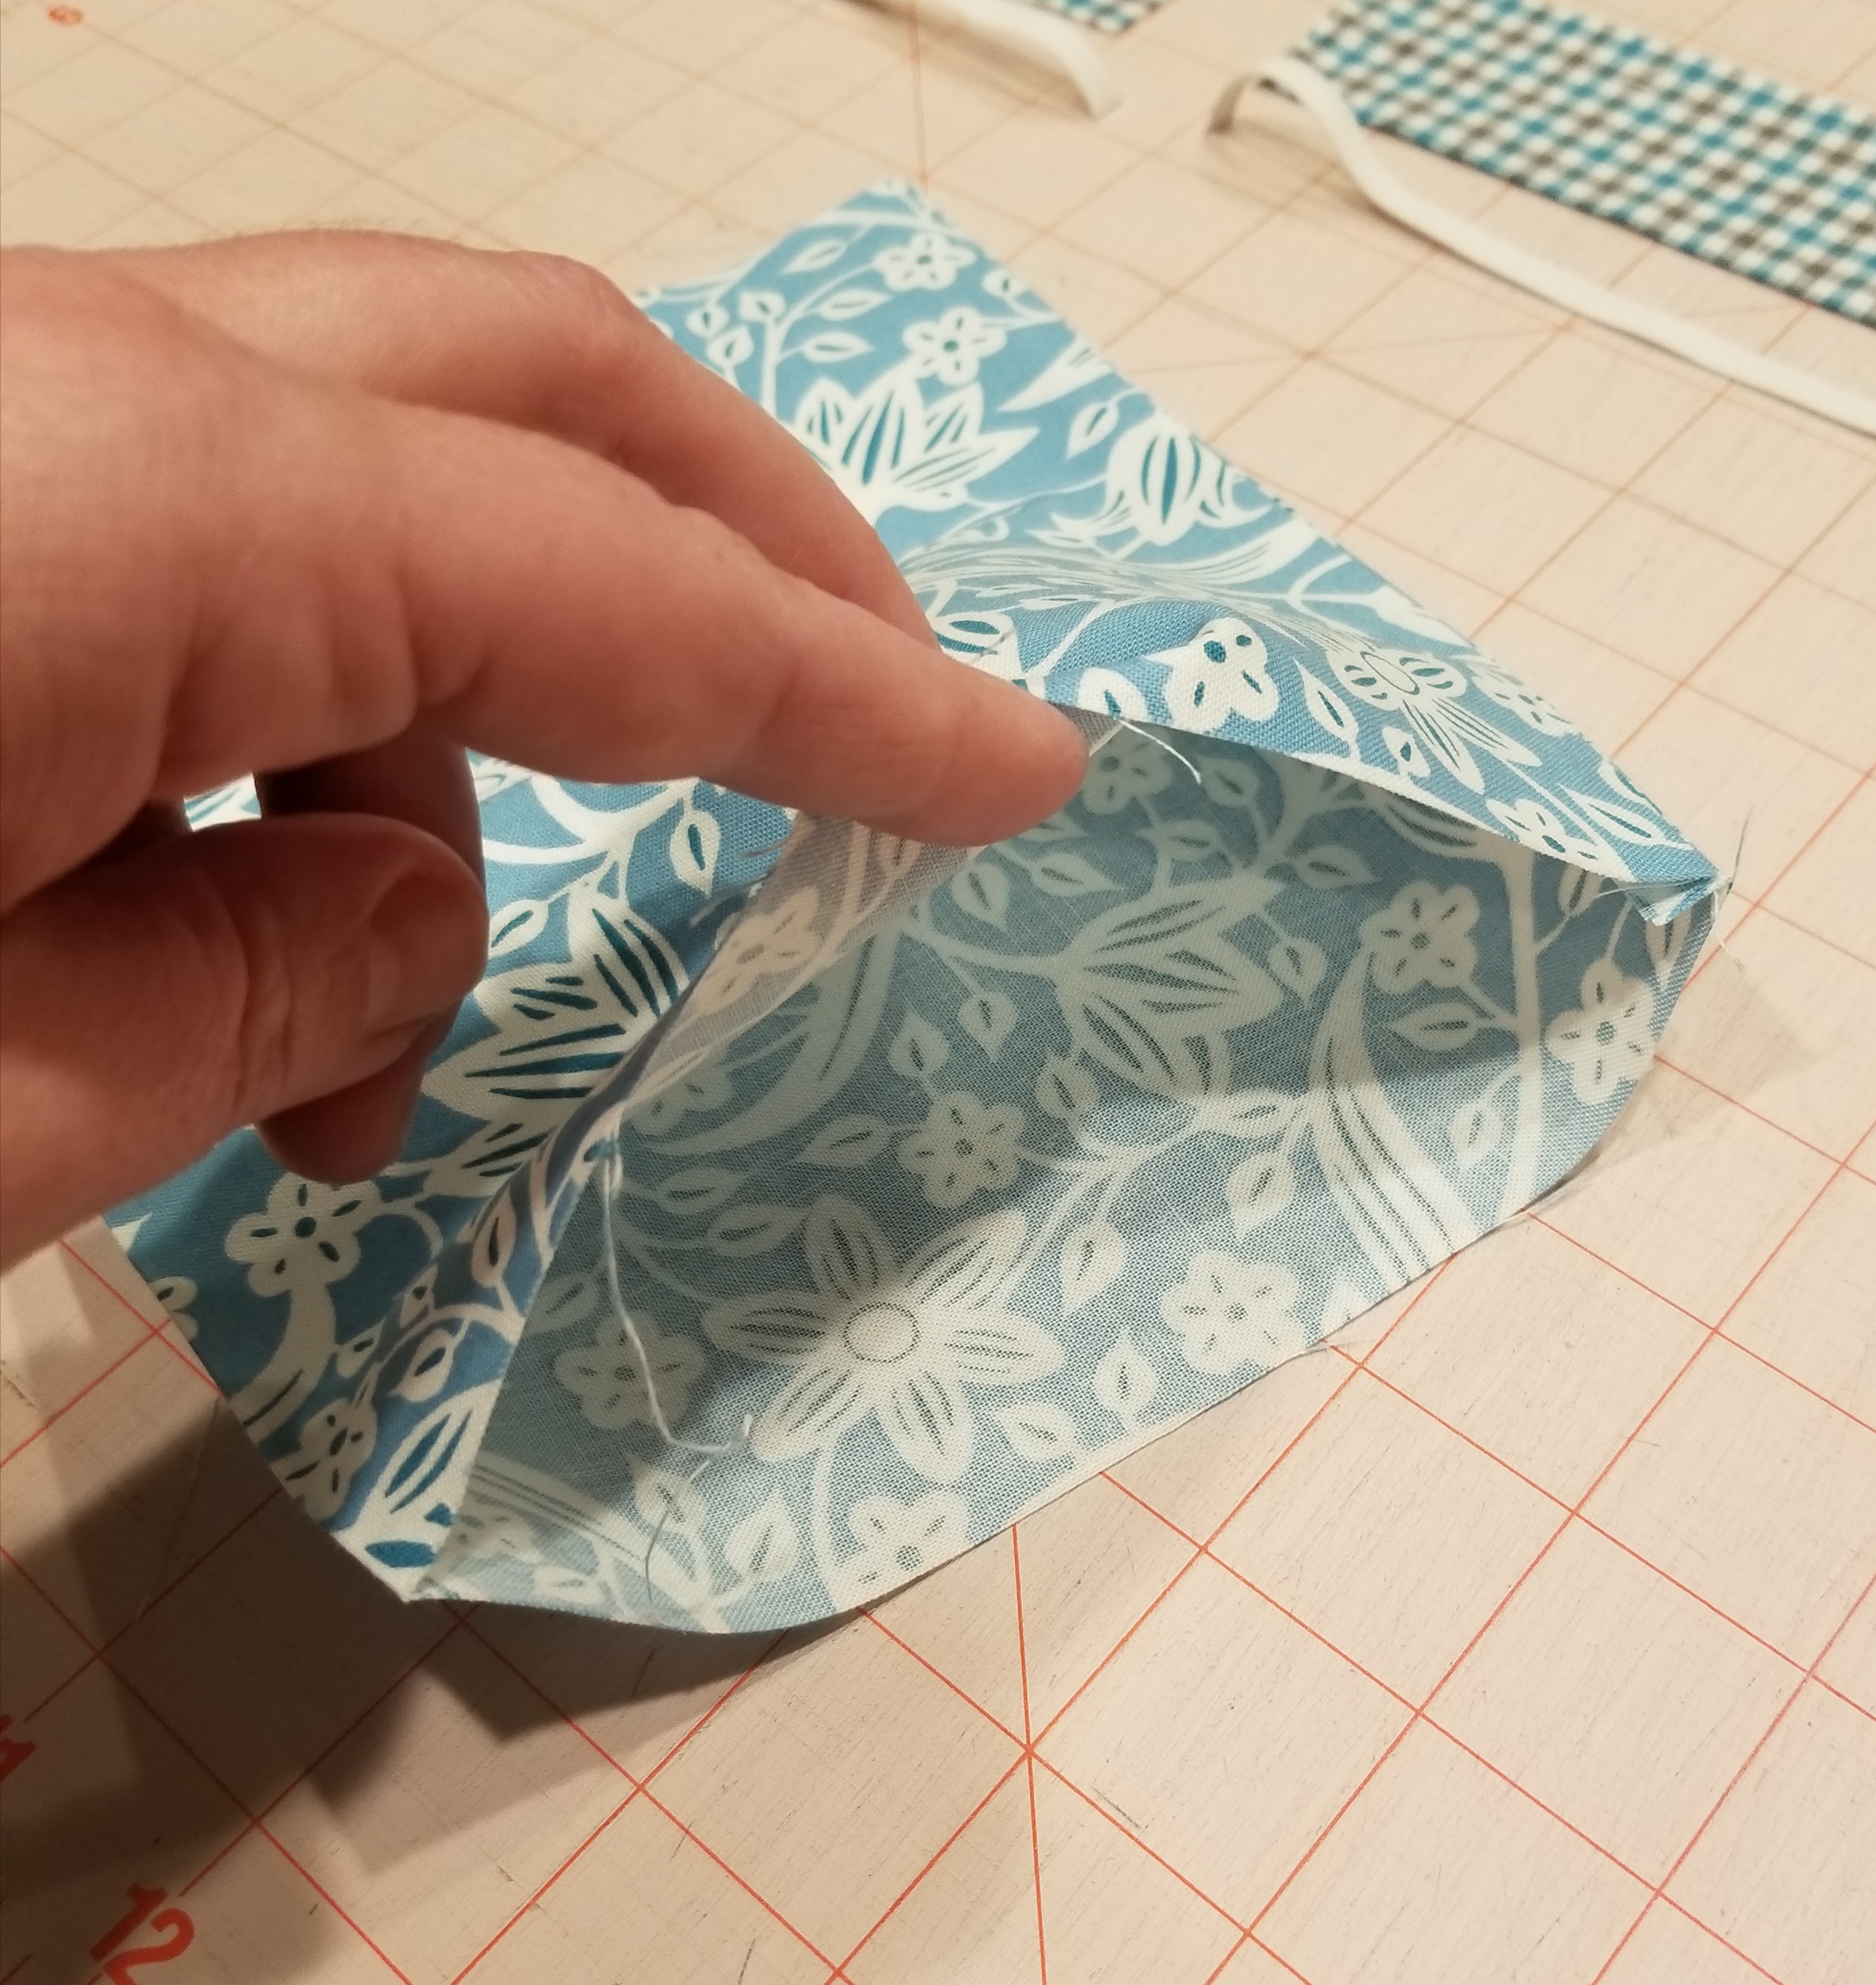
Turn this tube shape inside out, so that the right side of the fabric is now on the outside. Press this flat, keeping the seam to one end of the flattened tube.
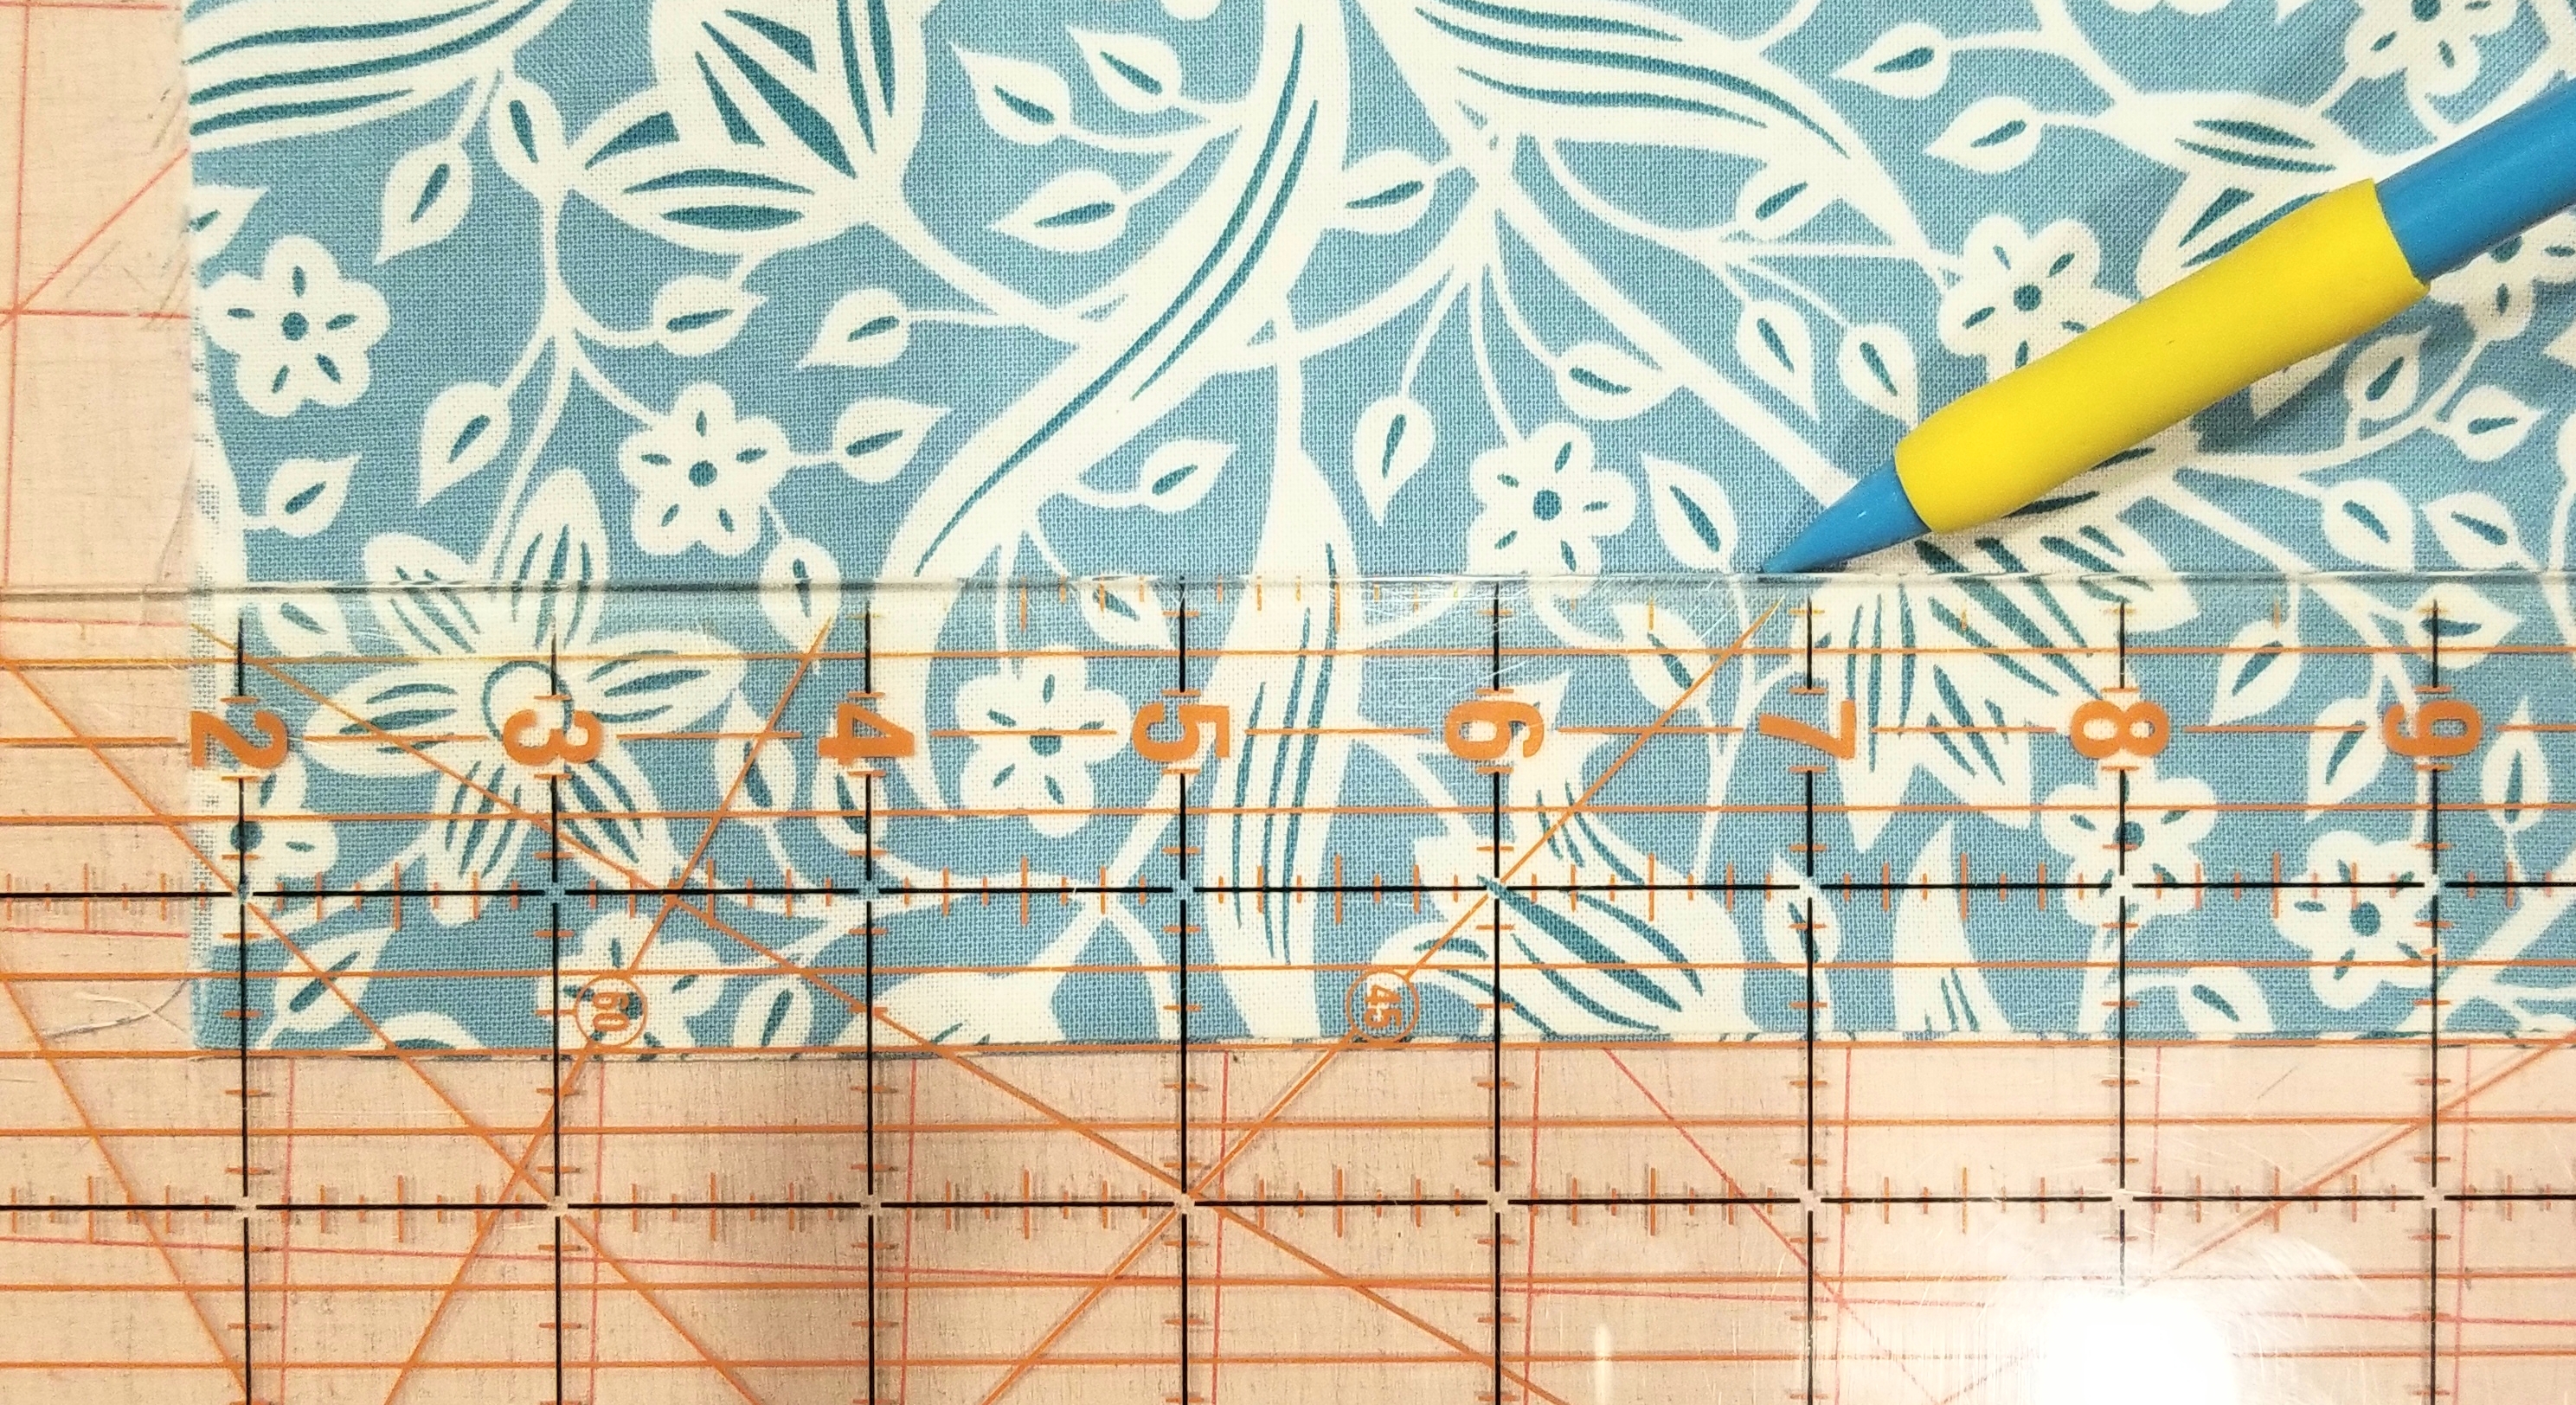
Place the tube of fabric so that the raw edges are on each side and the seam edge is at the bottom. Using a ruler, measure and mark a line 1 1/2 inches from the bottom edge. Make another line 1 inch above this line, or 2 1/2 inches from the seam edge. Don’t use a pencil as you see in the picture, use a fabric pen, or fabric chalk. I used a pencil for illustration purposes.
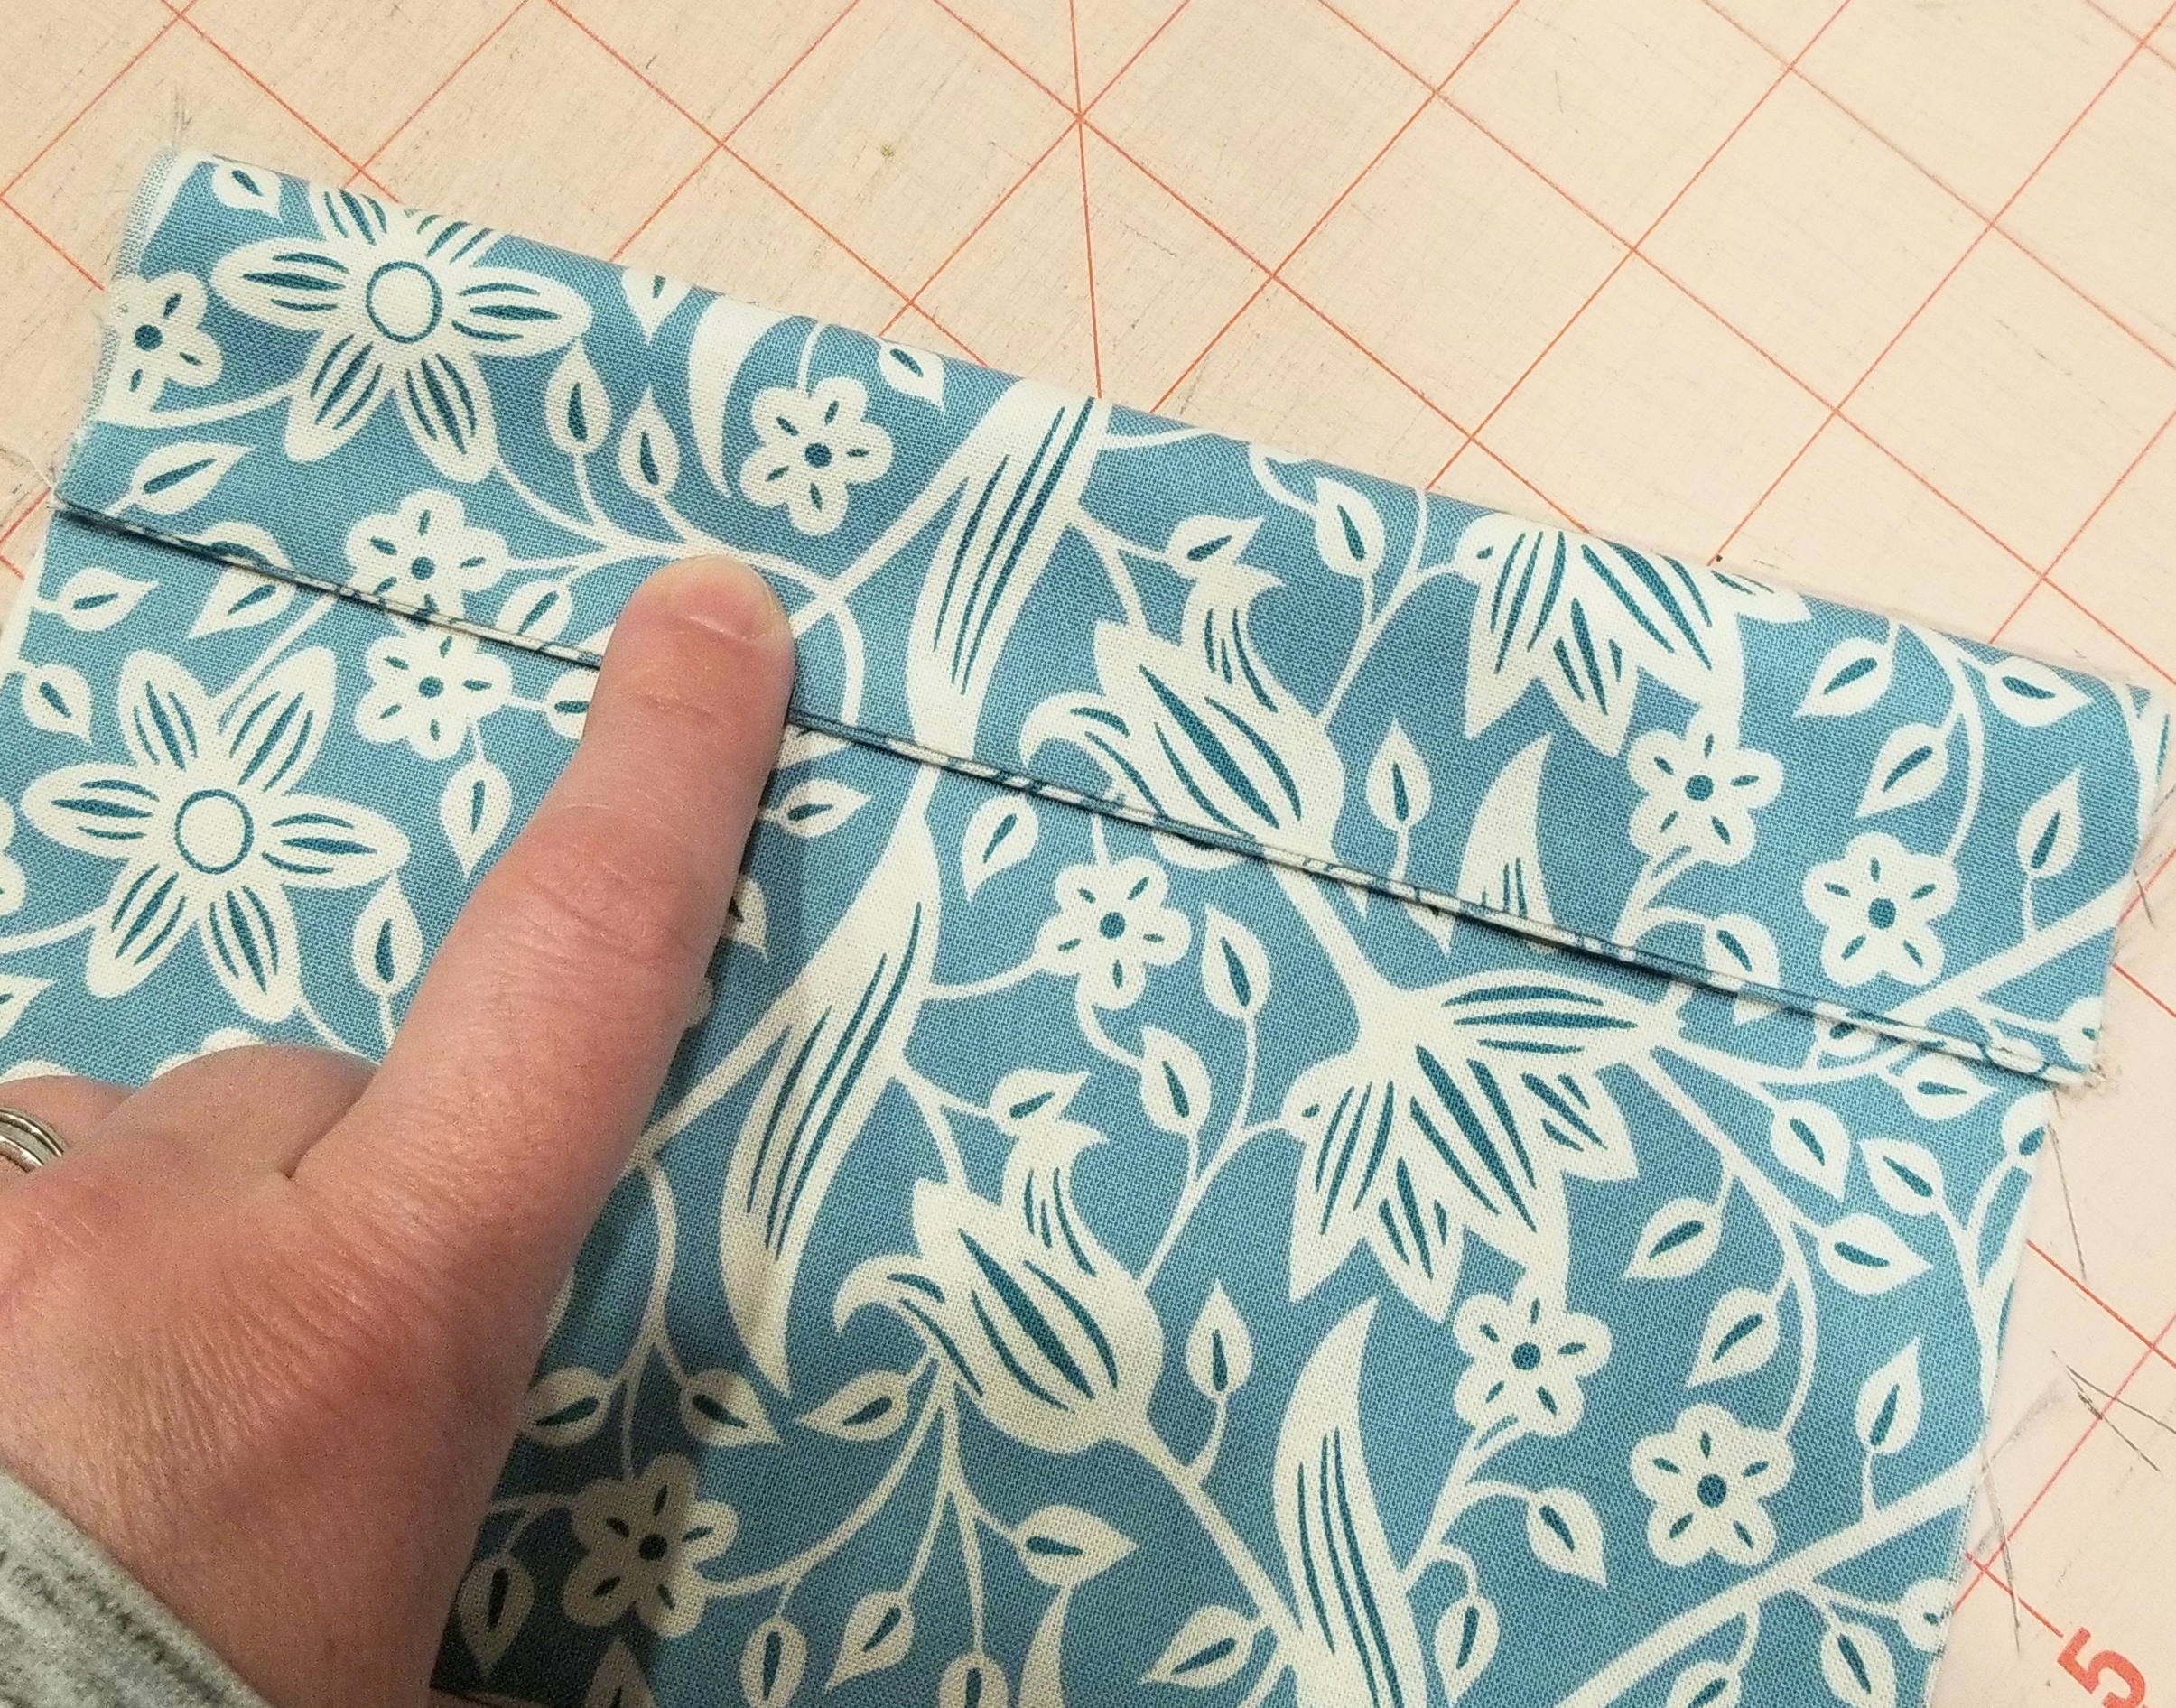
Fold the seam edge up (or down in this picture, as I turned it upside down…sorry) making the crease on the first line that you just marked. You should have 1 1/2 inch edge here.
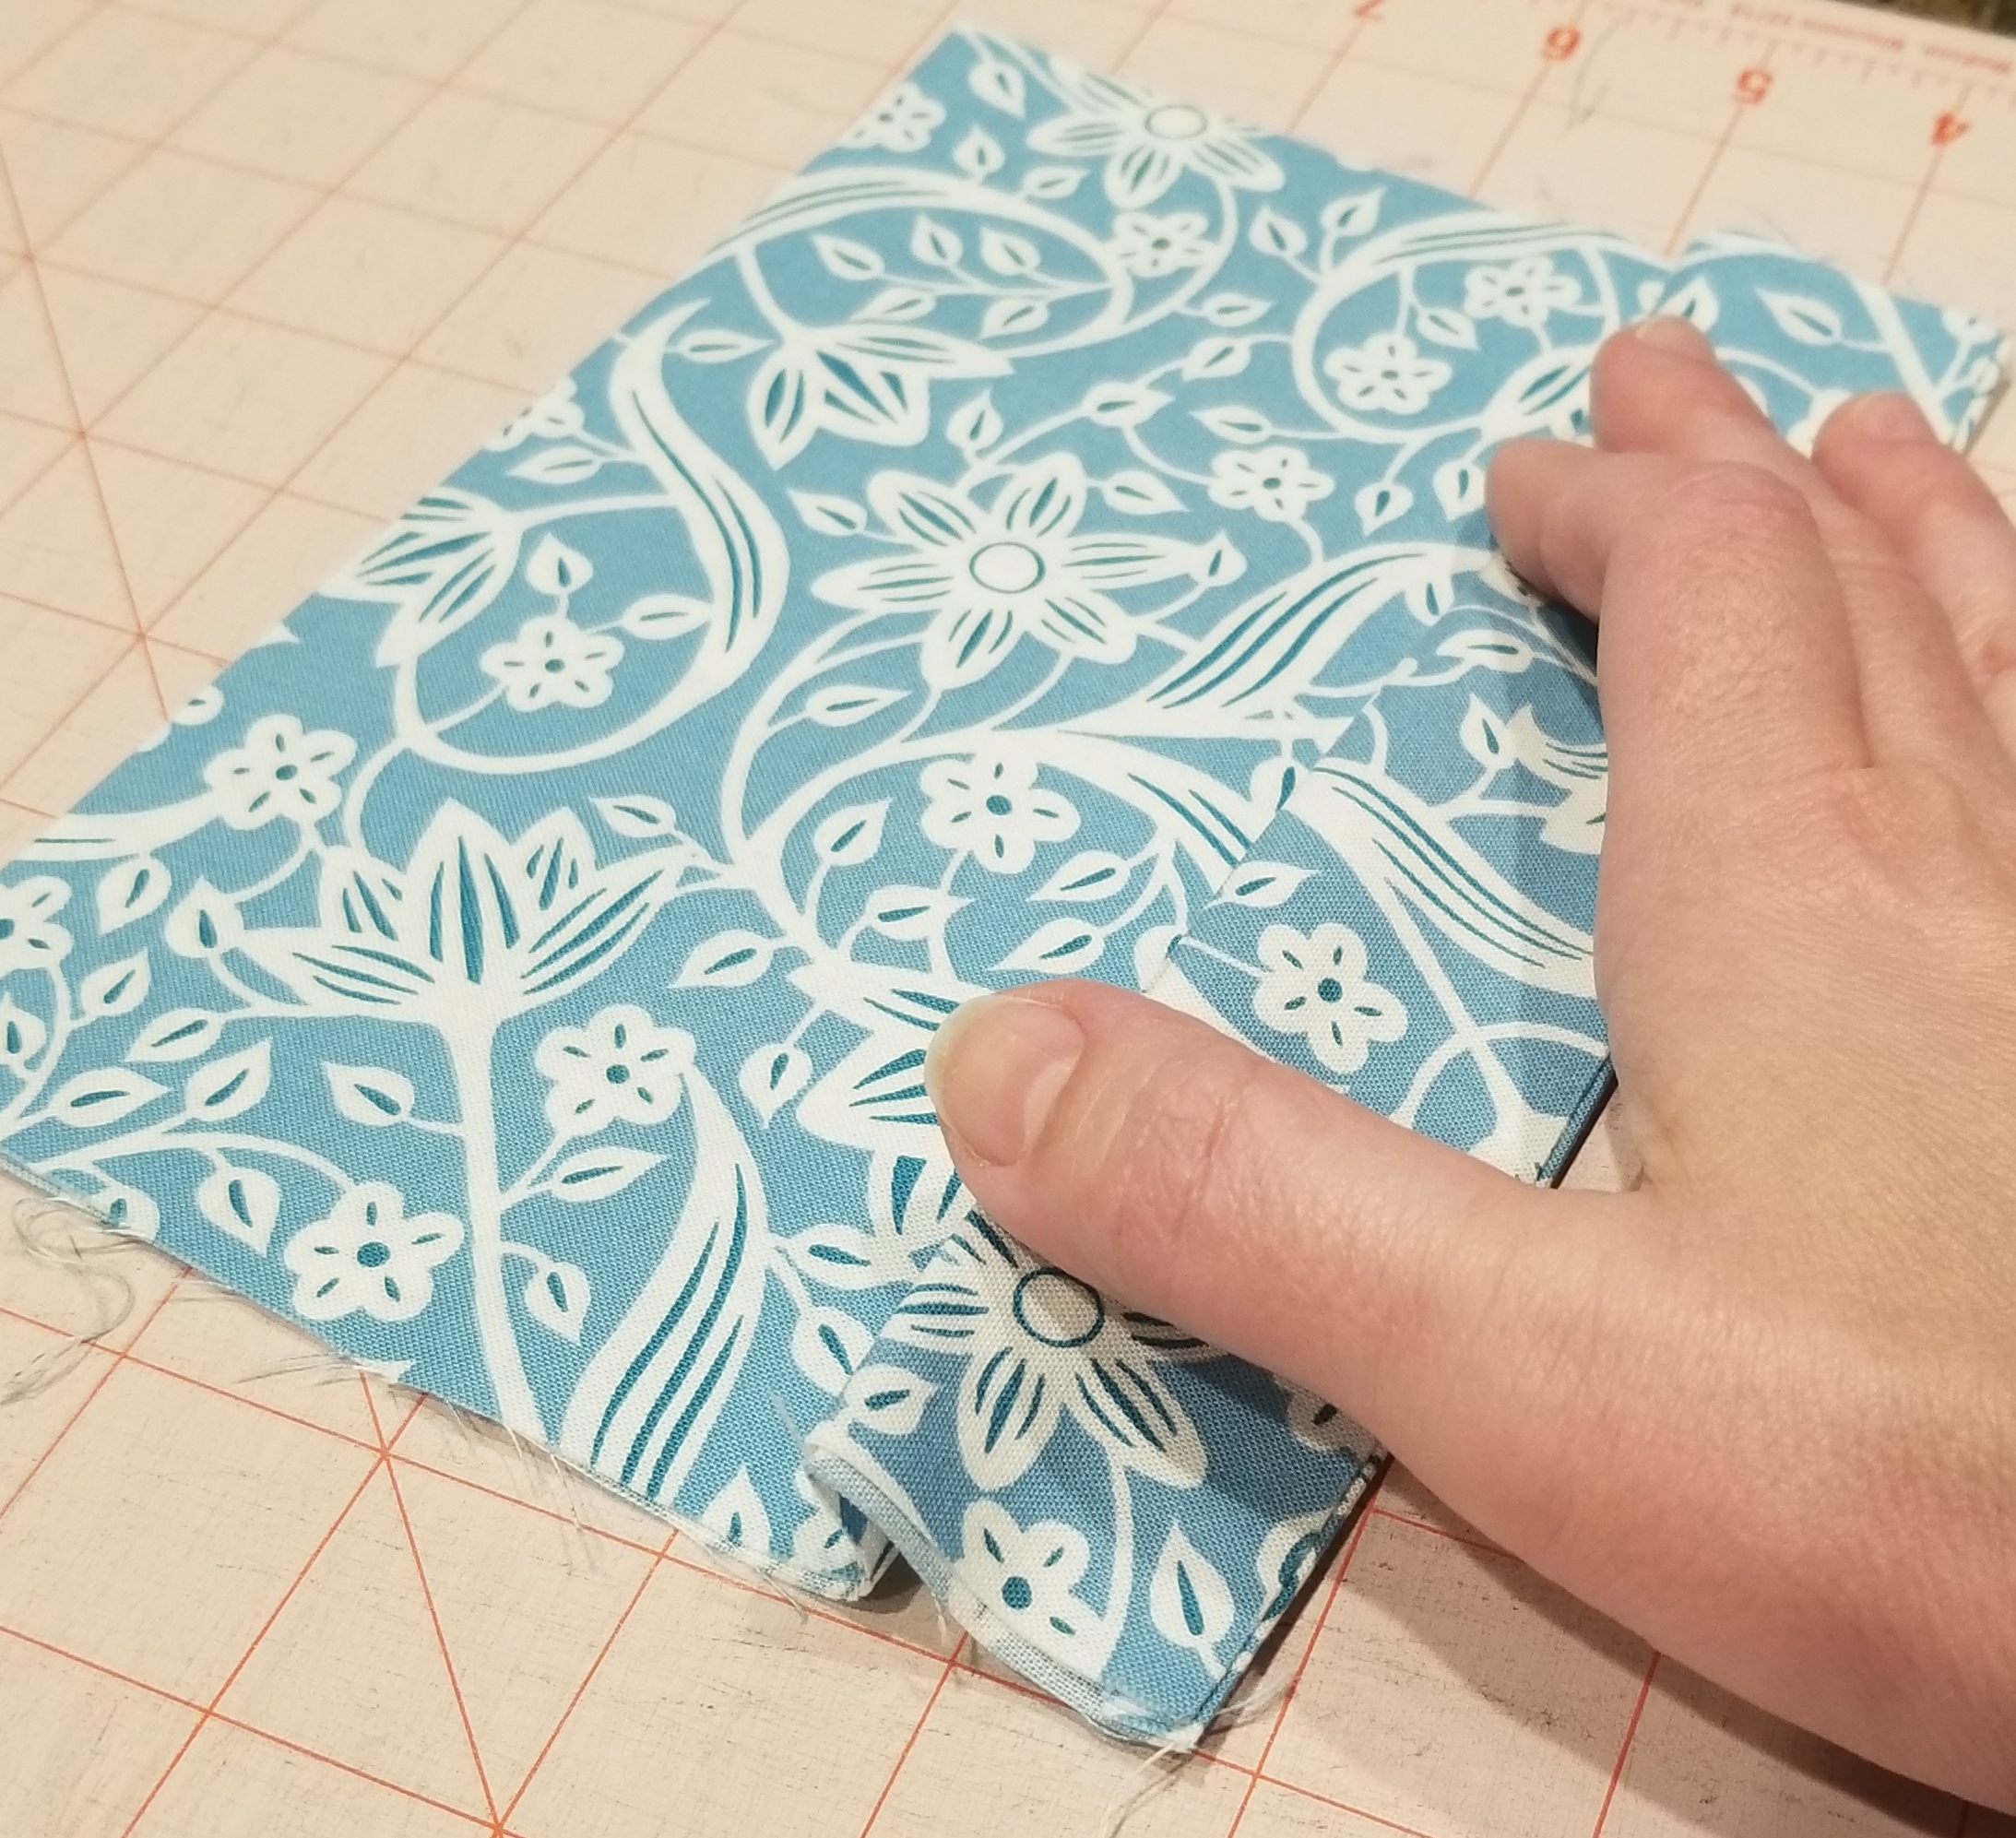
Flip the tube piece over. Match the crease edge to the second line that you made earlier. Press. The pleat that you just created will be 1/2 inch deep. Pin the pleat down on each raw edge end.
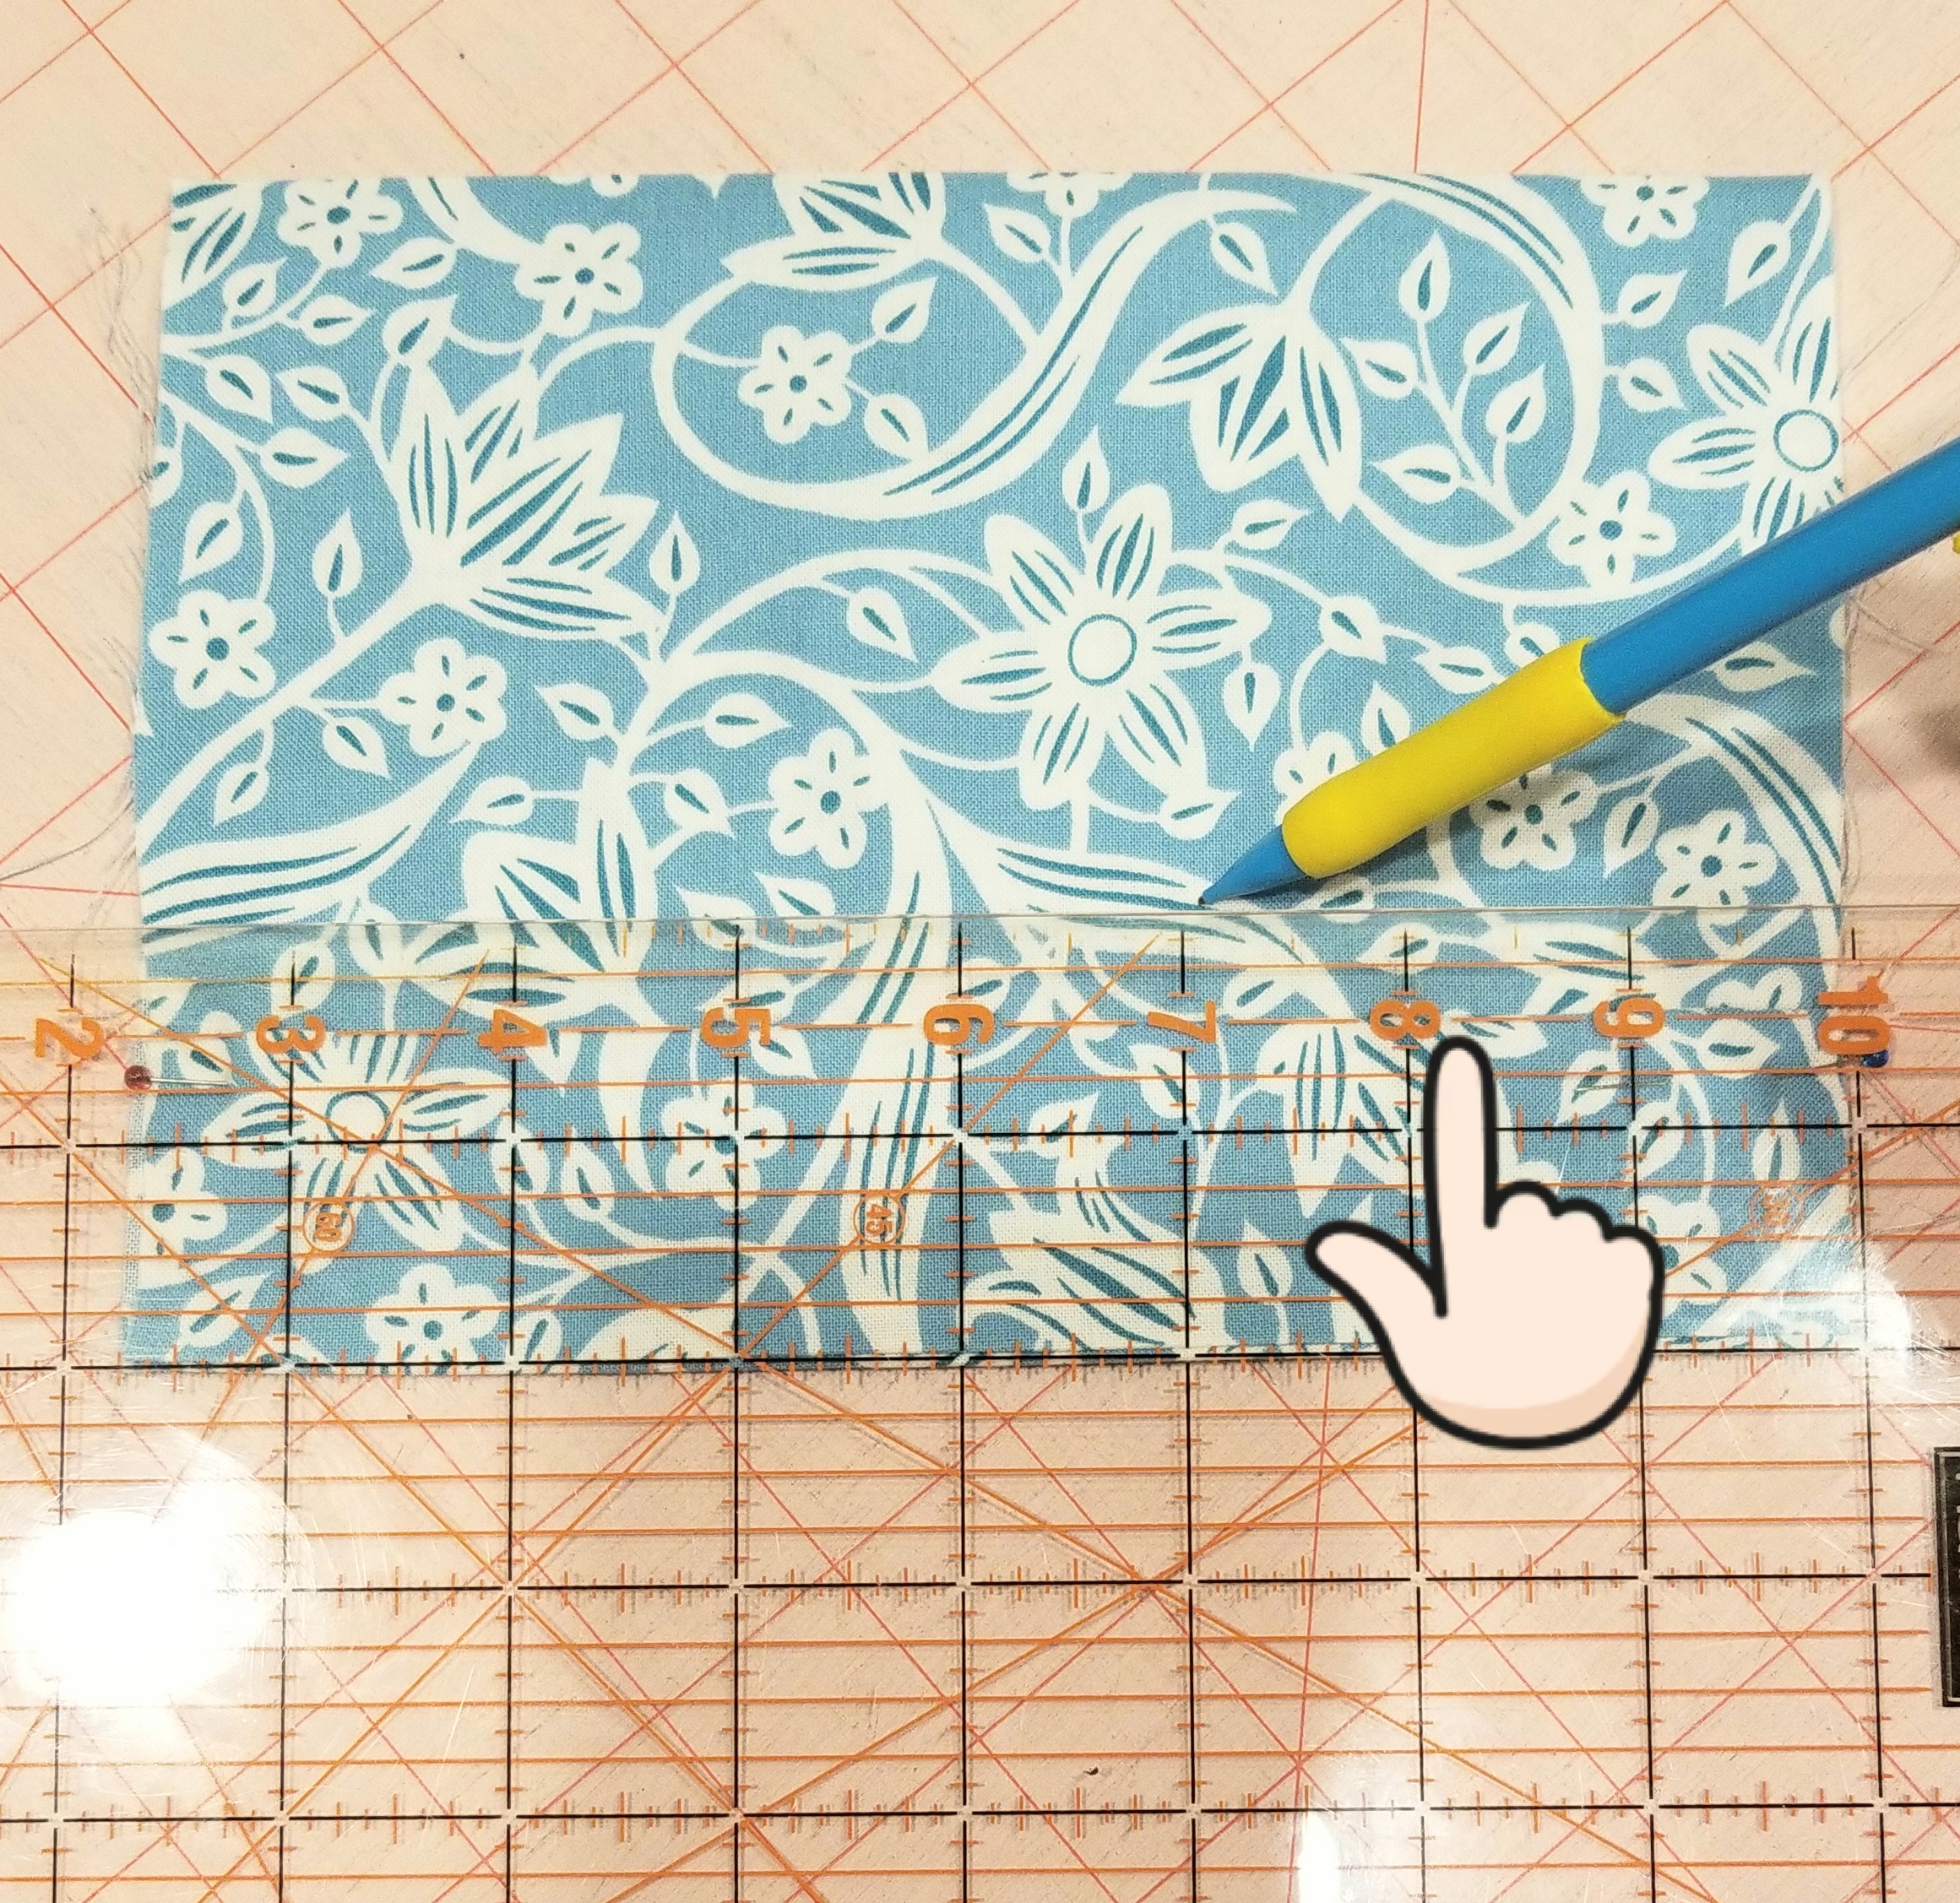
Now you will mark the lines for the second pleat. Mark a line measuring 1/2” from the top crease of the last pleat, (or 2″ from the bottom seam edge). It was difficult to see the top of the crease in this picture, so look at the finger indicator above.
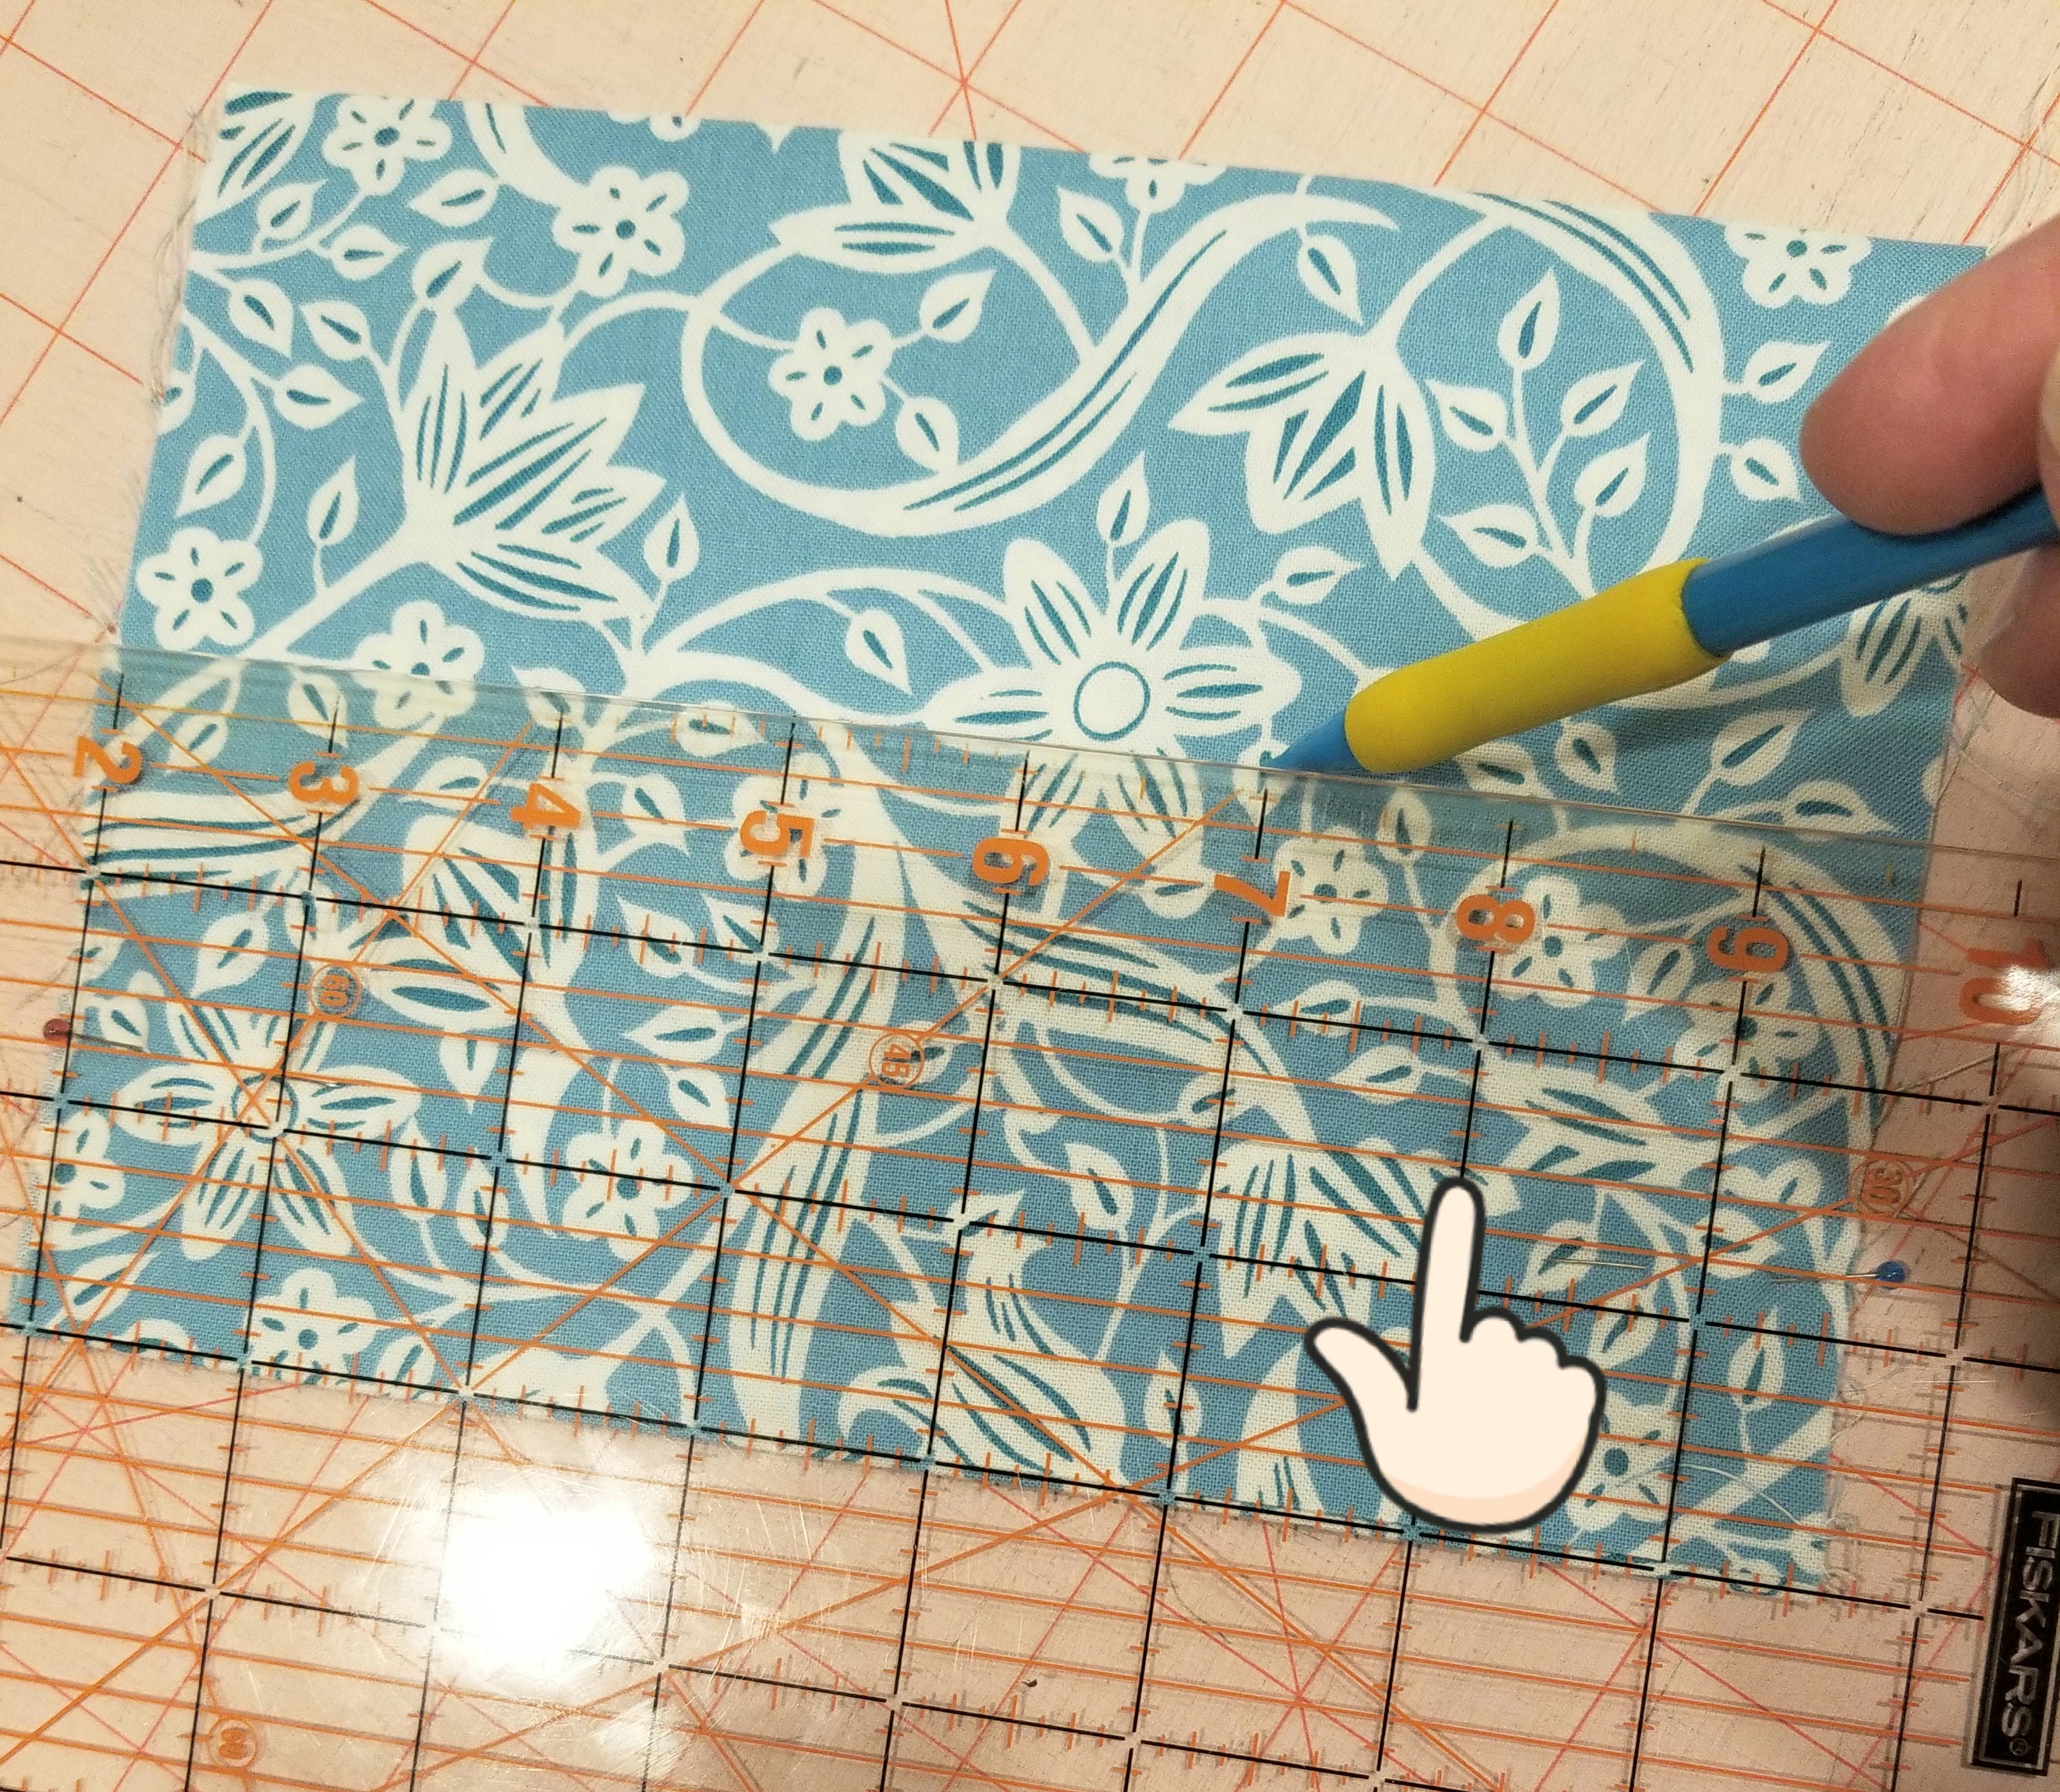
Now mark another line one inch above the last line that you made (or 3 inches above the seam edge). Using these lines as your guide, repeat the steps that you followed to make the first pleat.
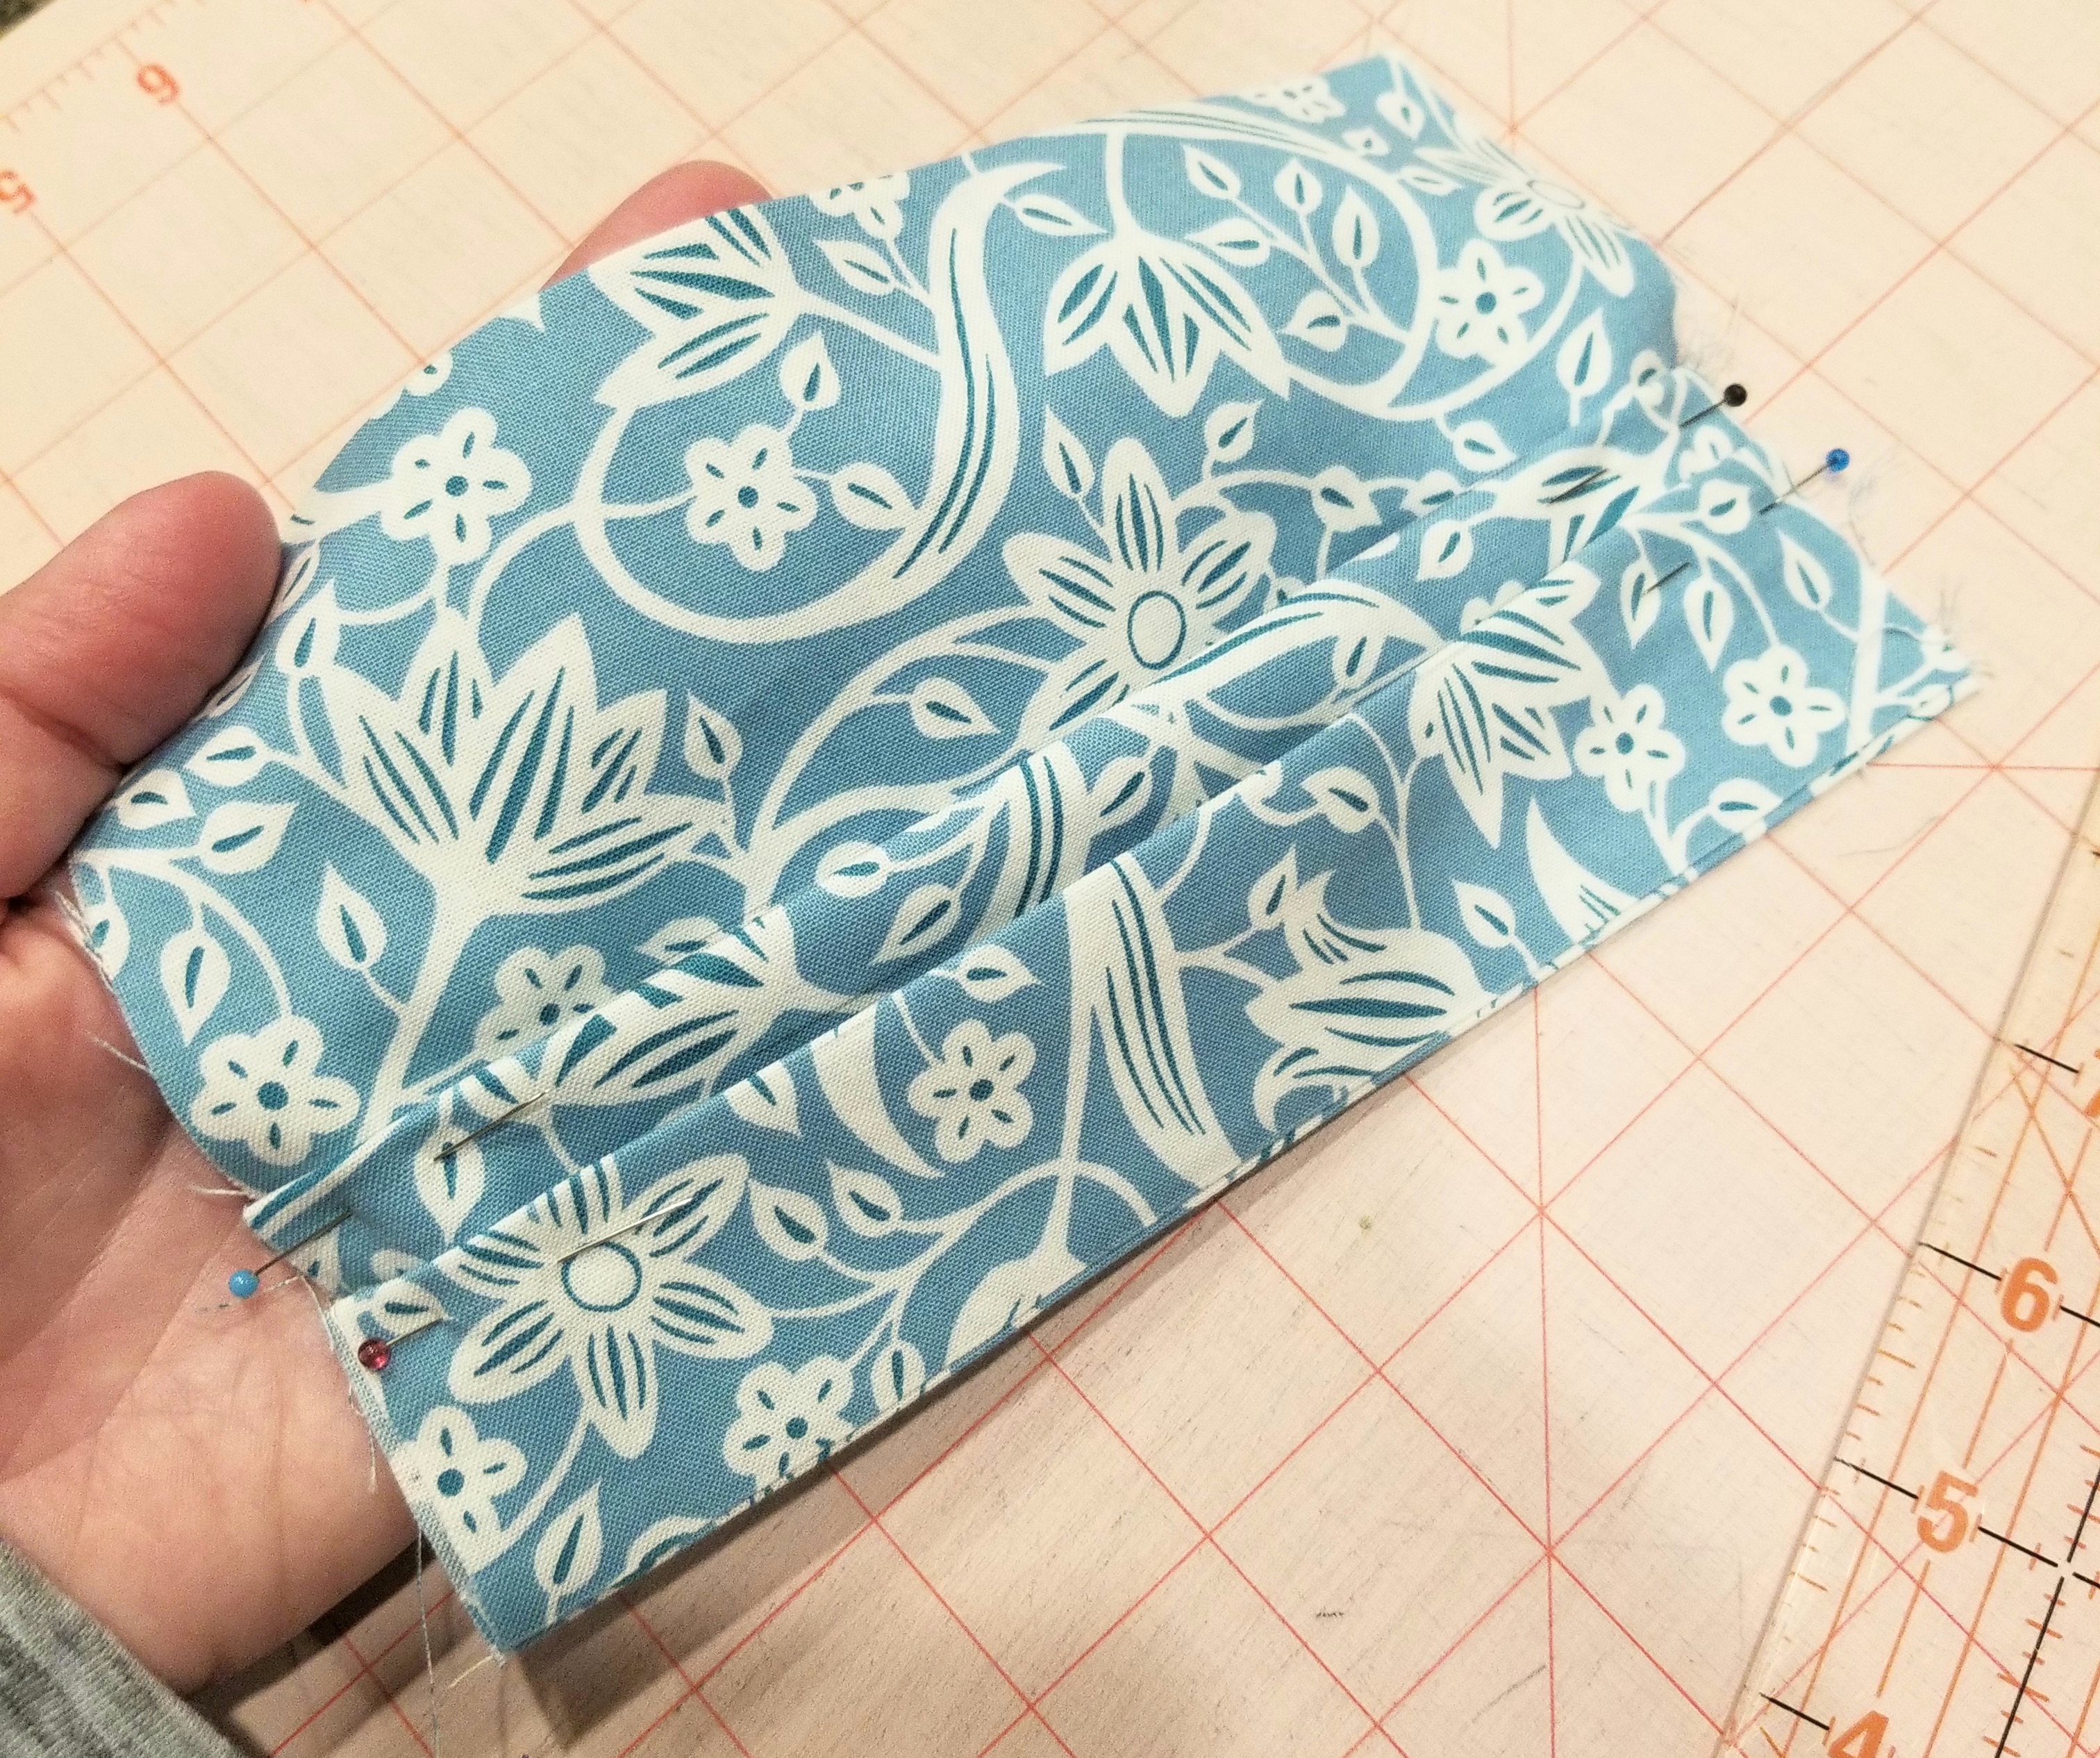
You should now have two pleats, each one being 1/2 inch deep. Repeat the steps you used to make the second pleat, so that you end up with three pleats total. Press.
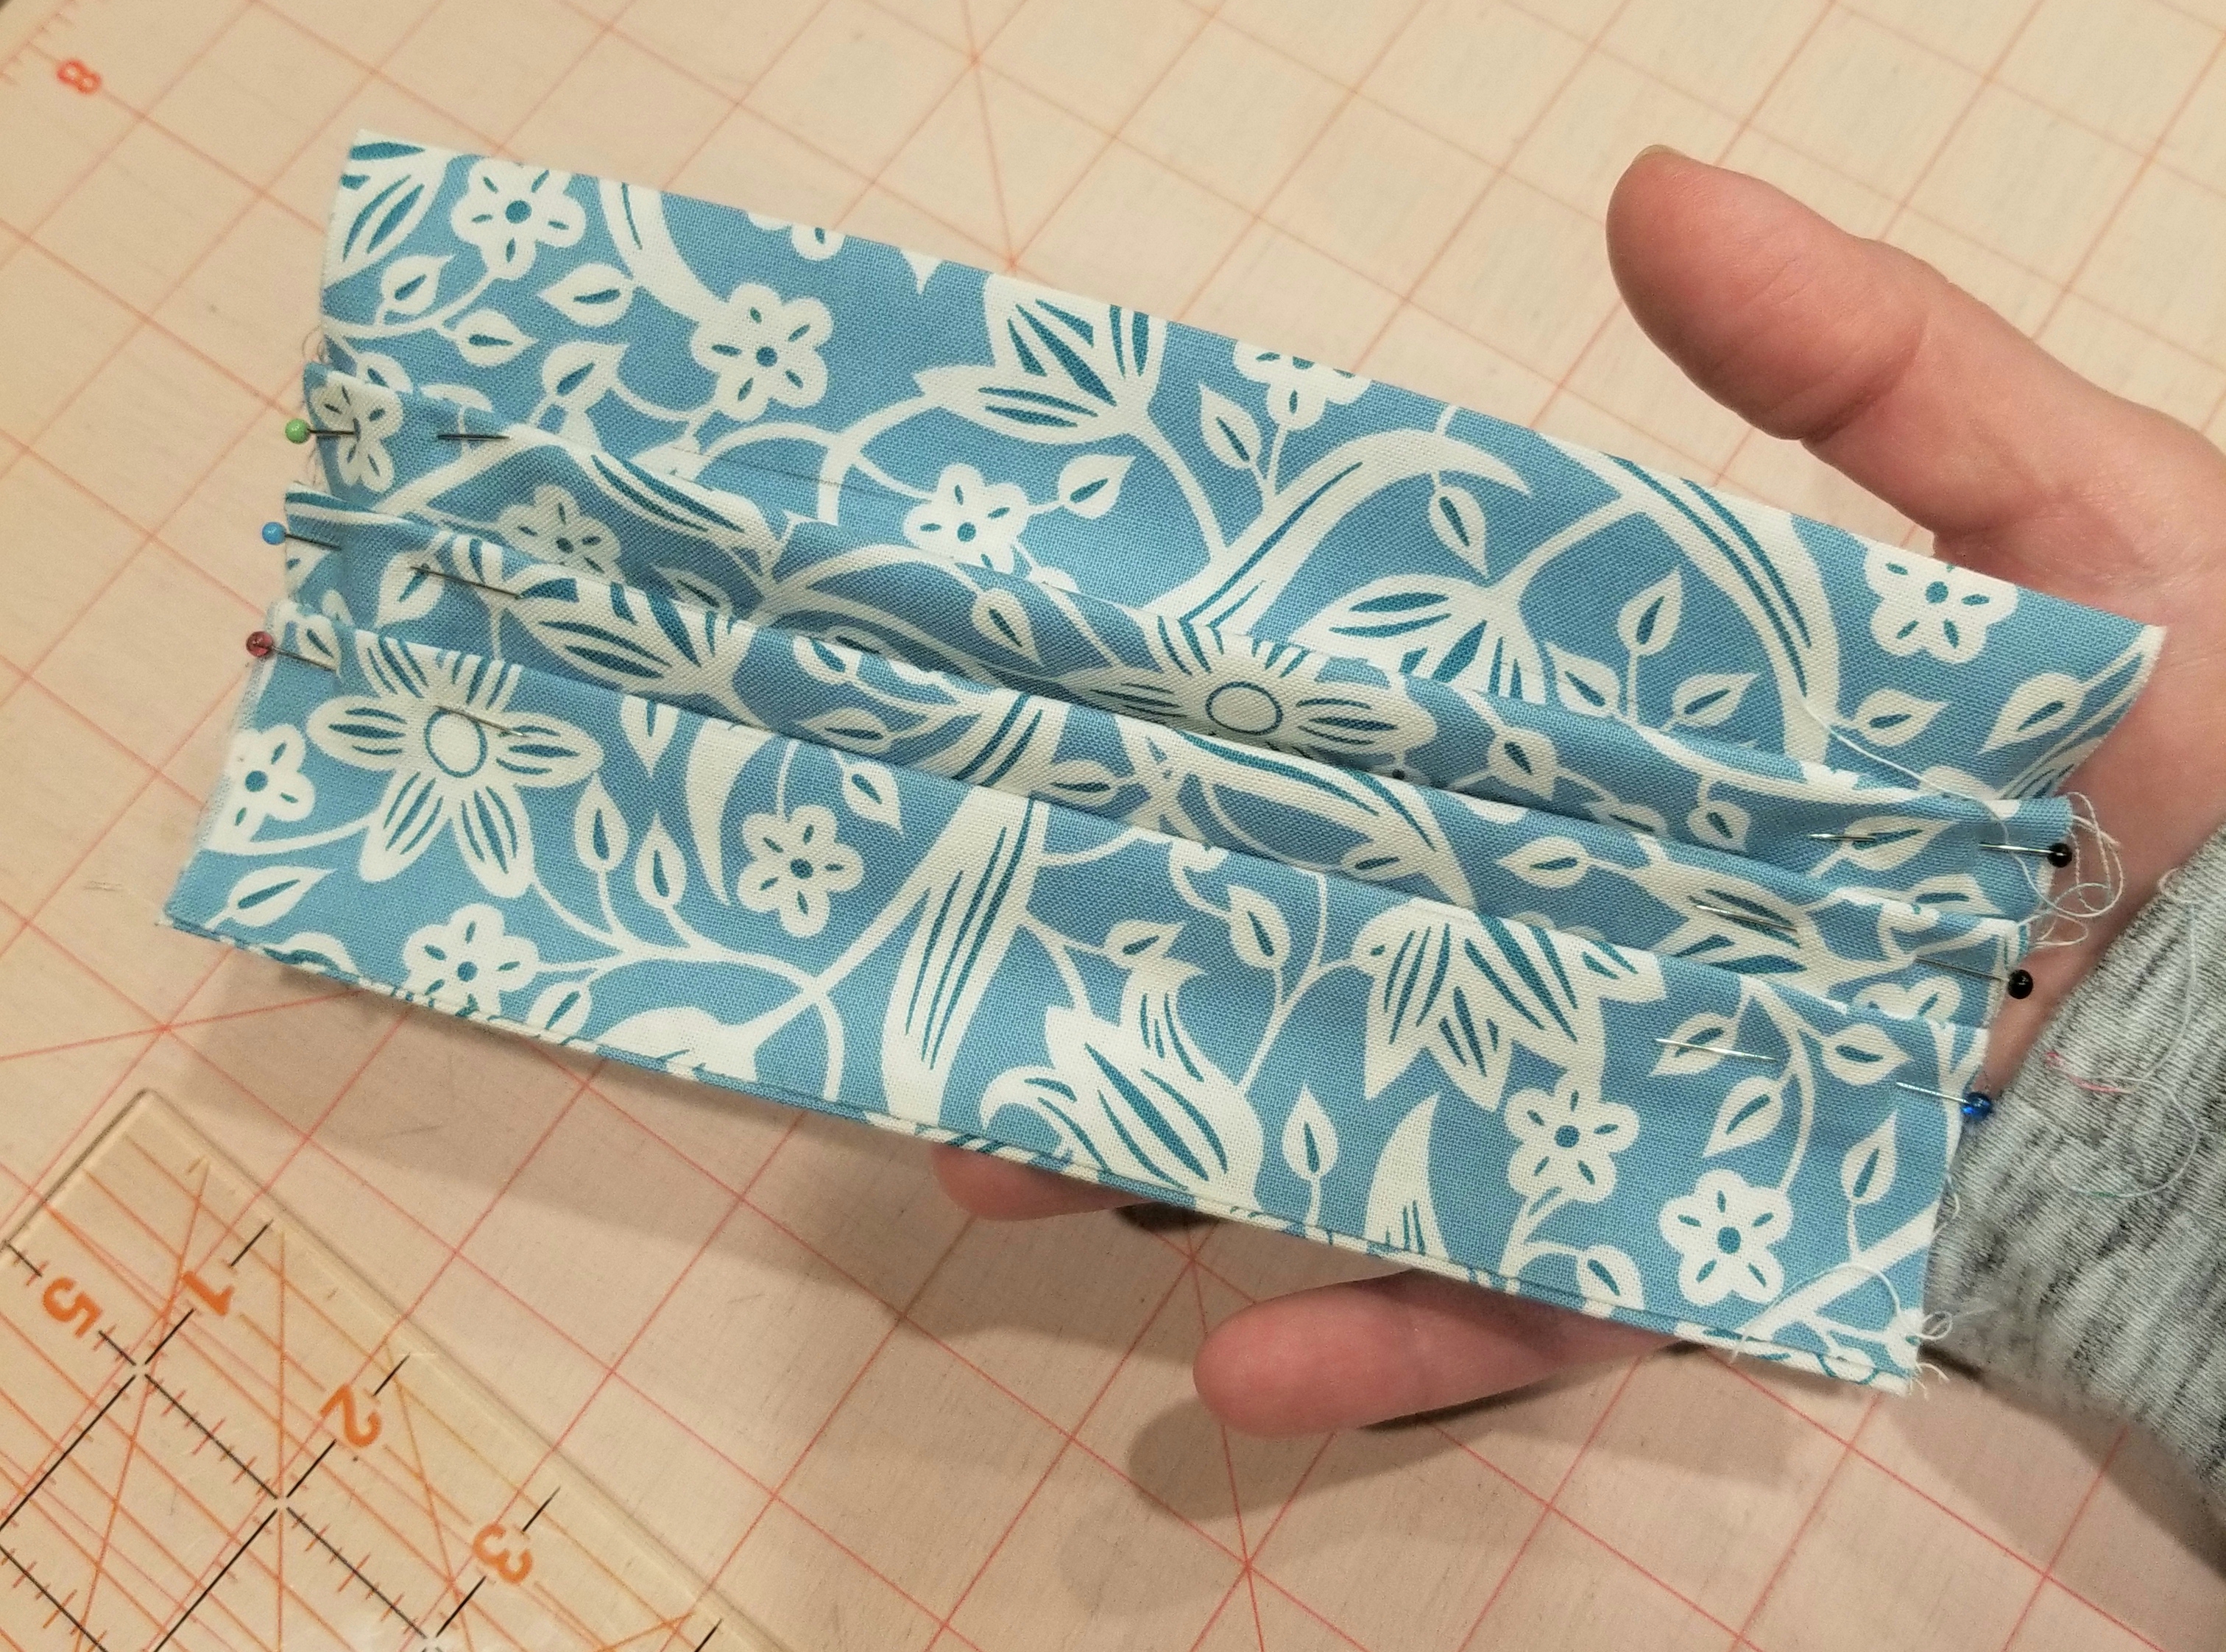
This is what your main piece should look like at this point.
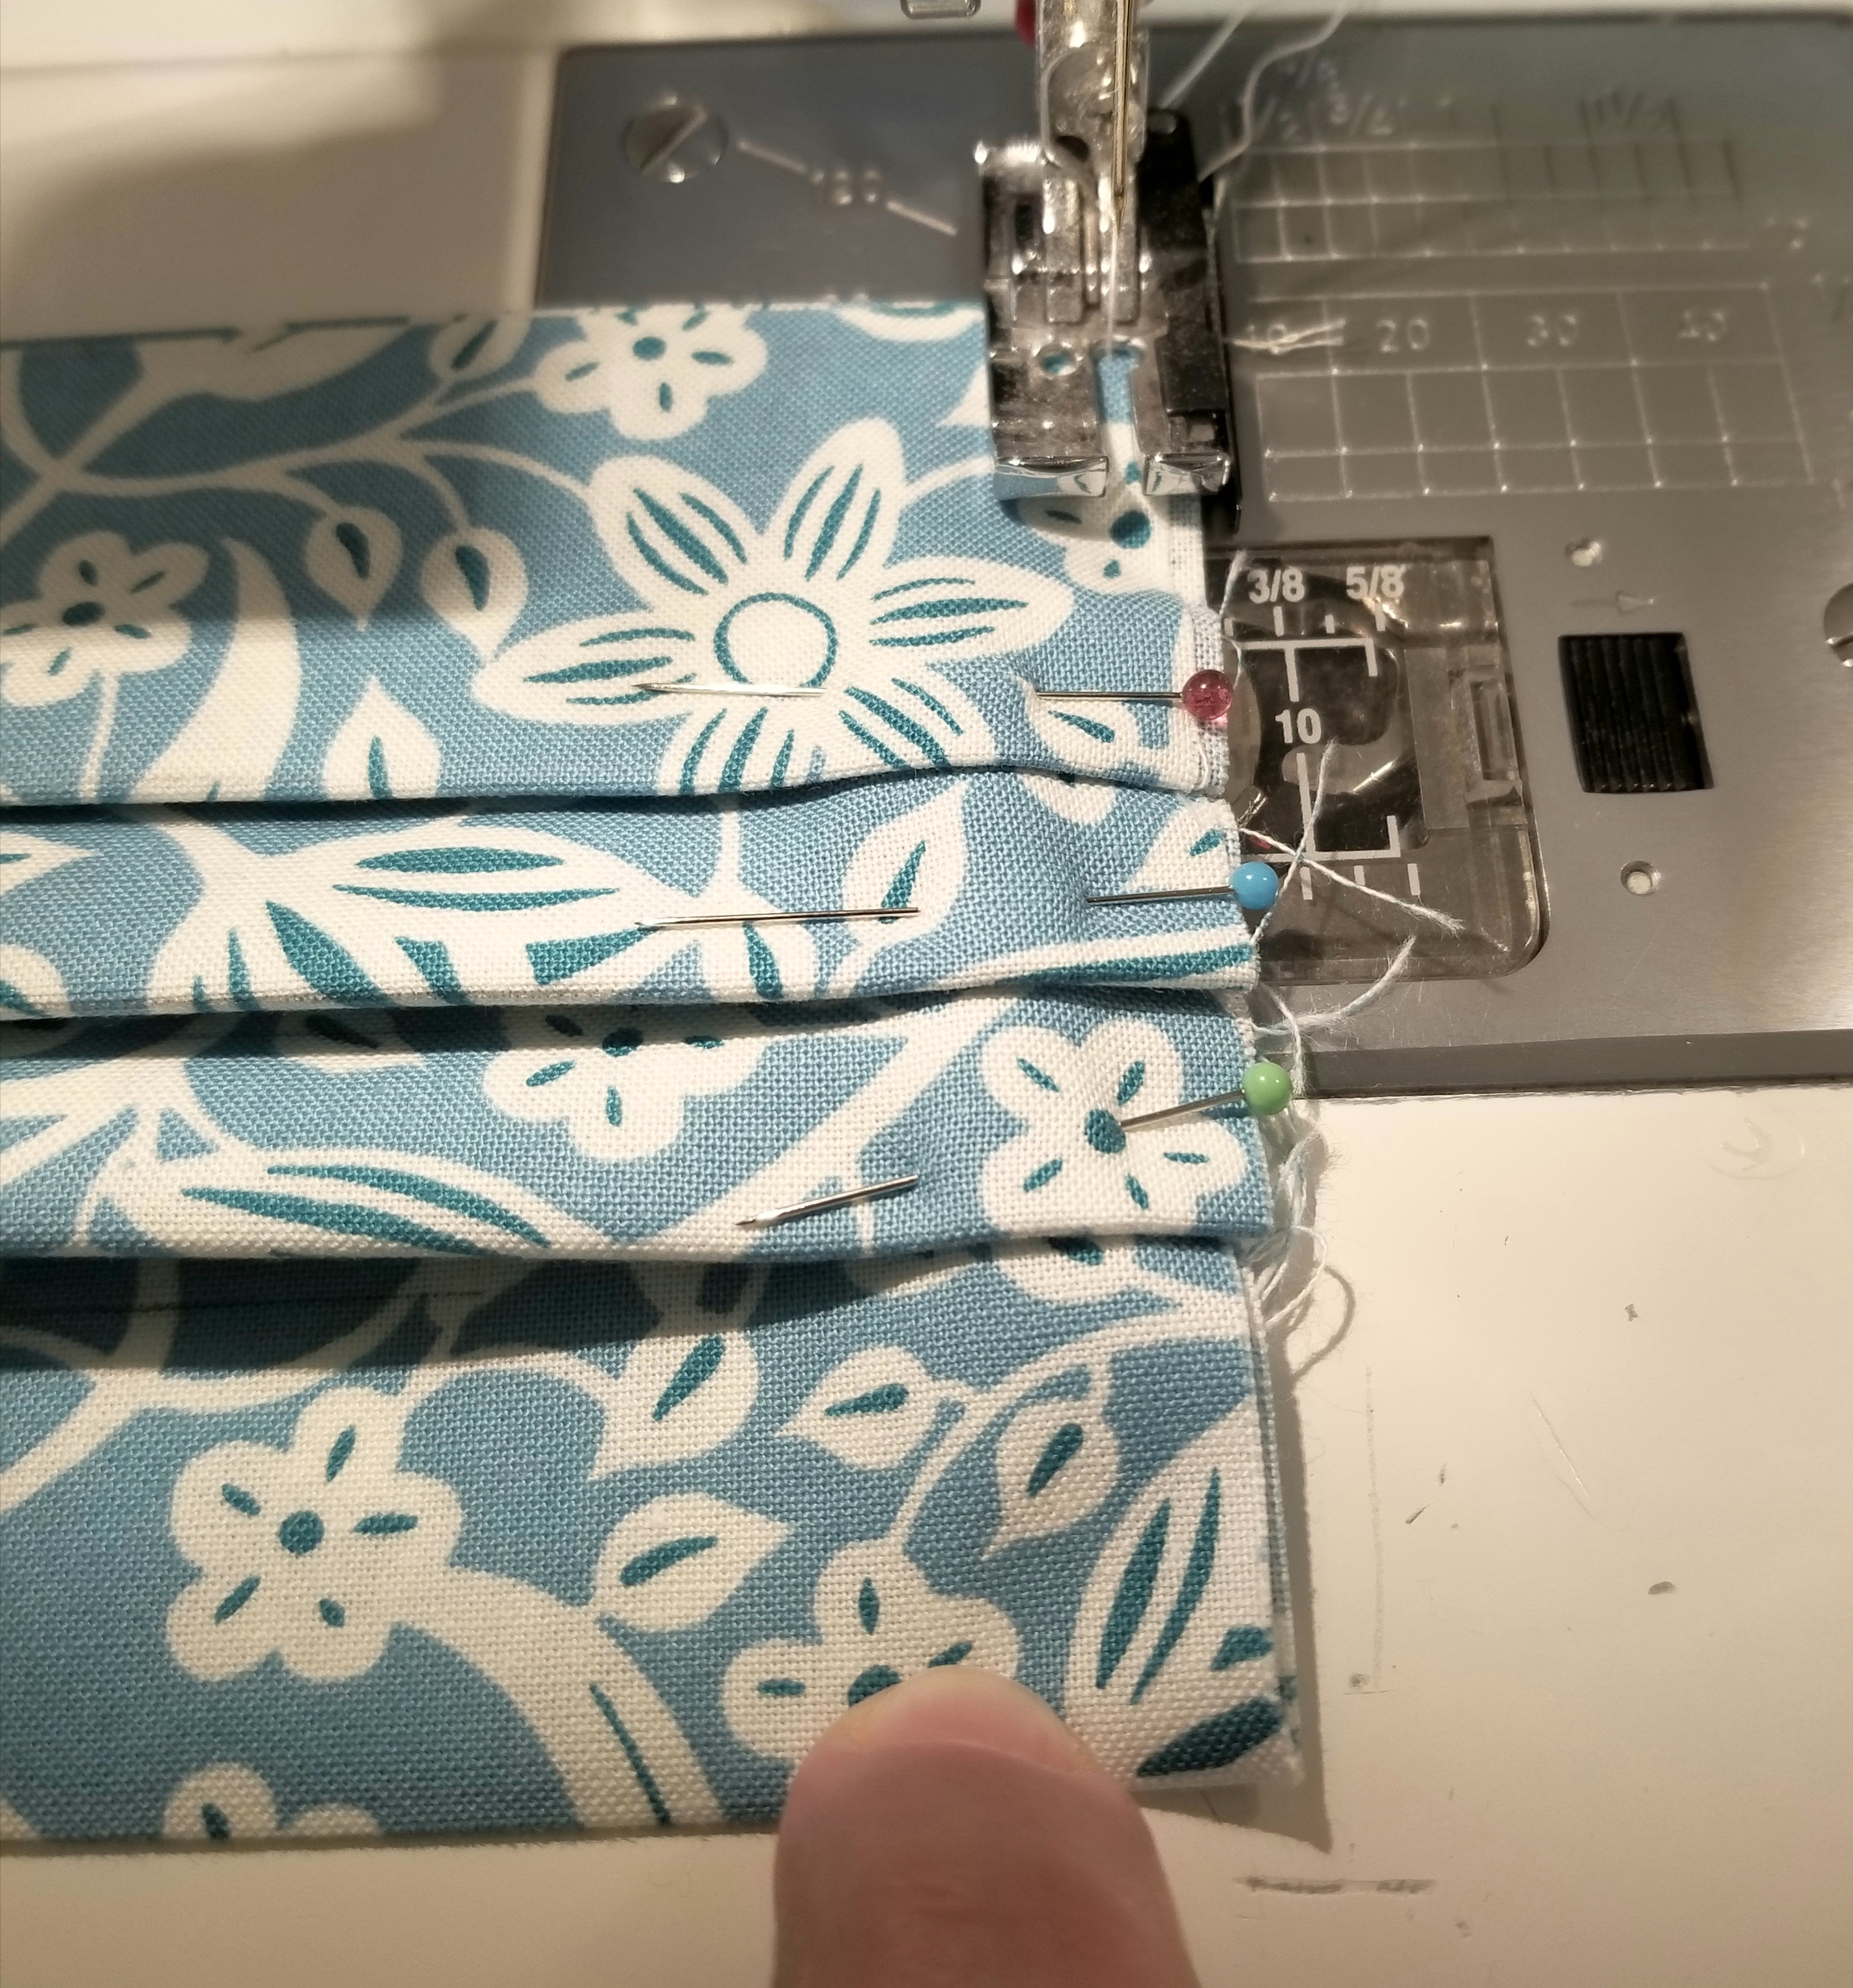
Using a 1/8” seam allowance, baste stitch the raw edges.
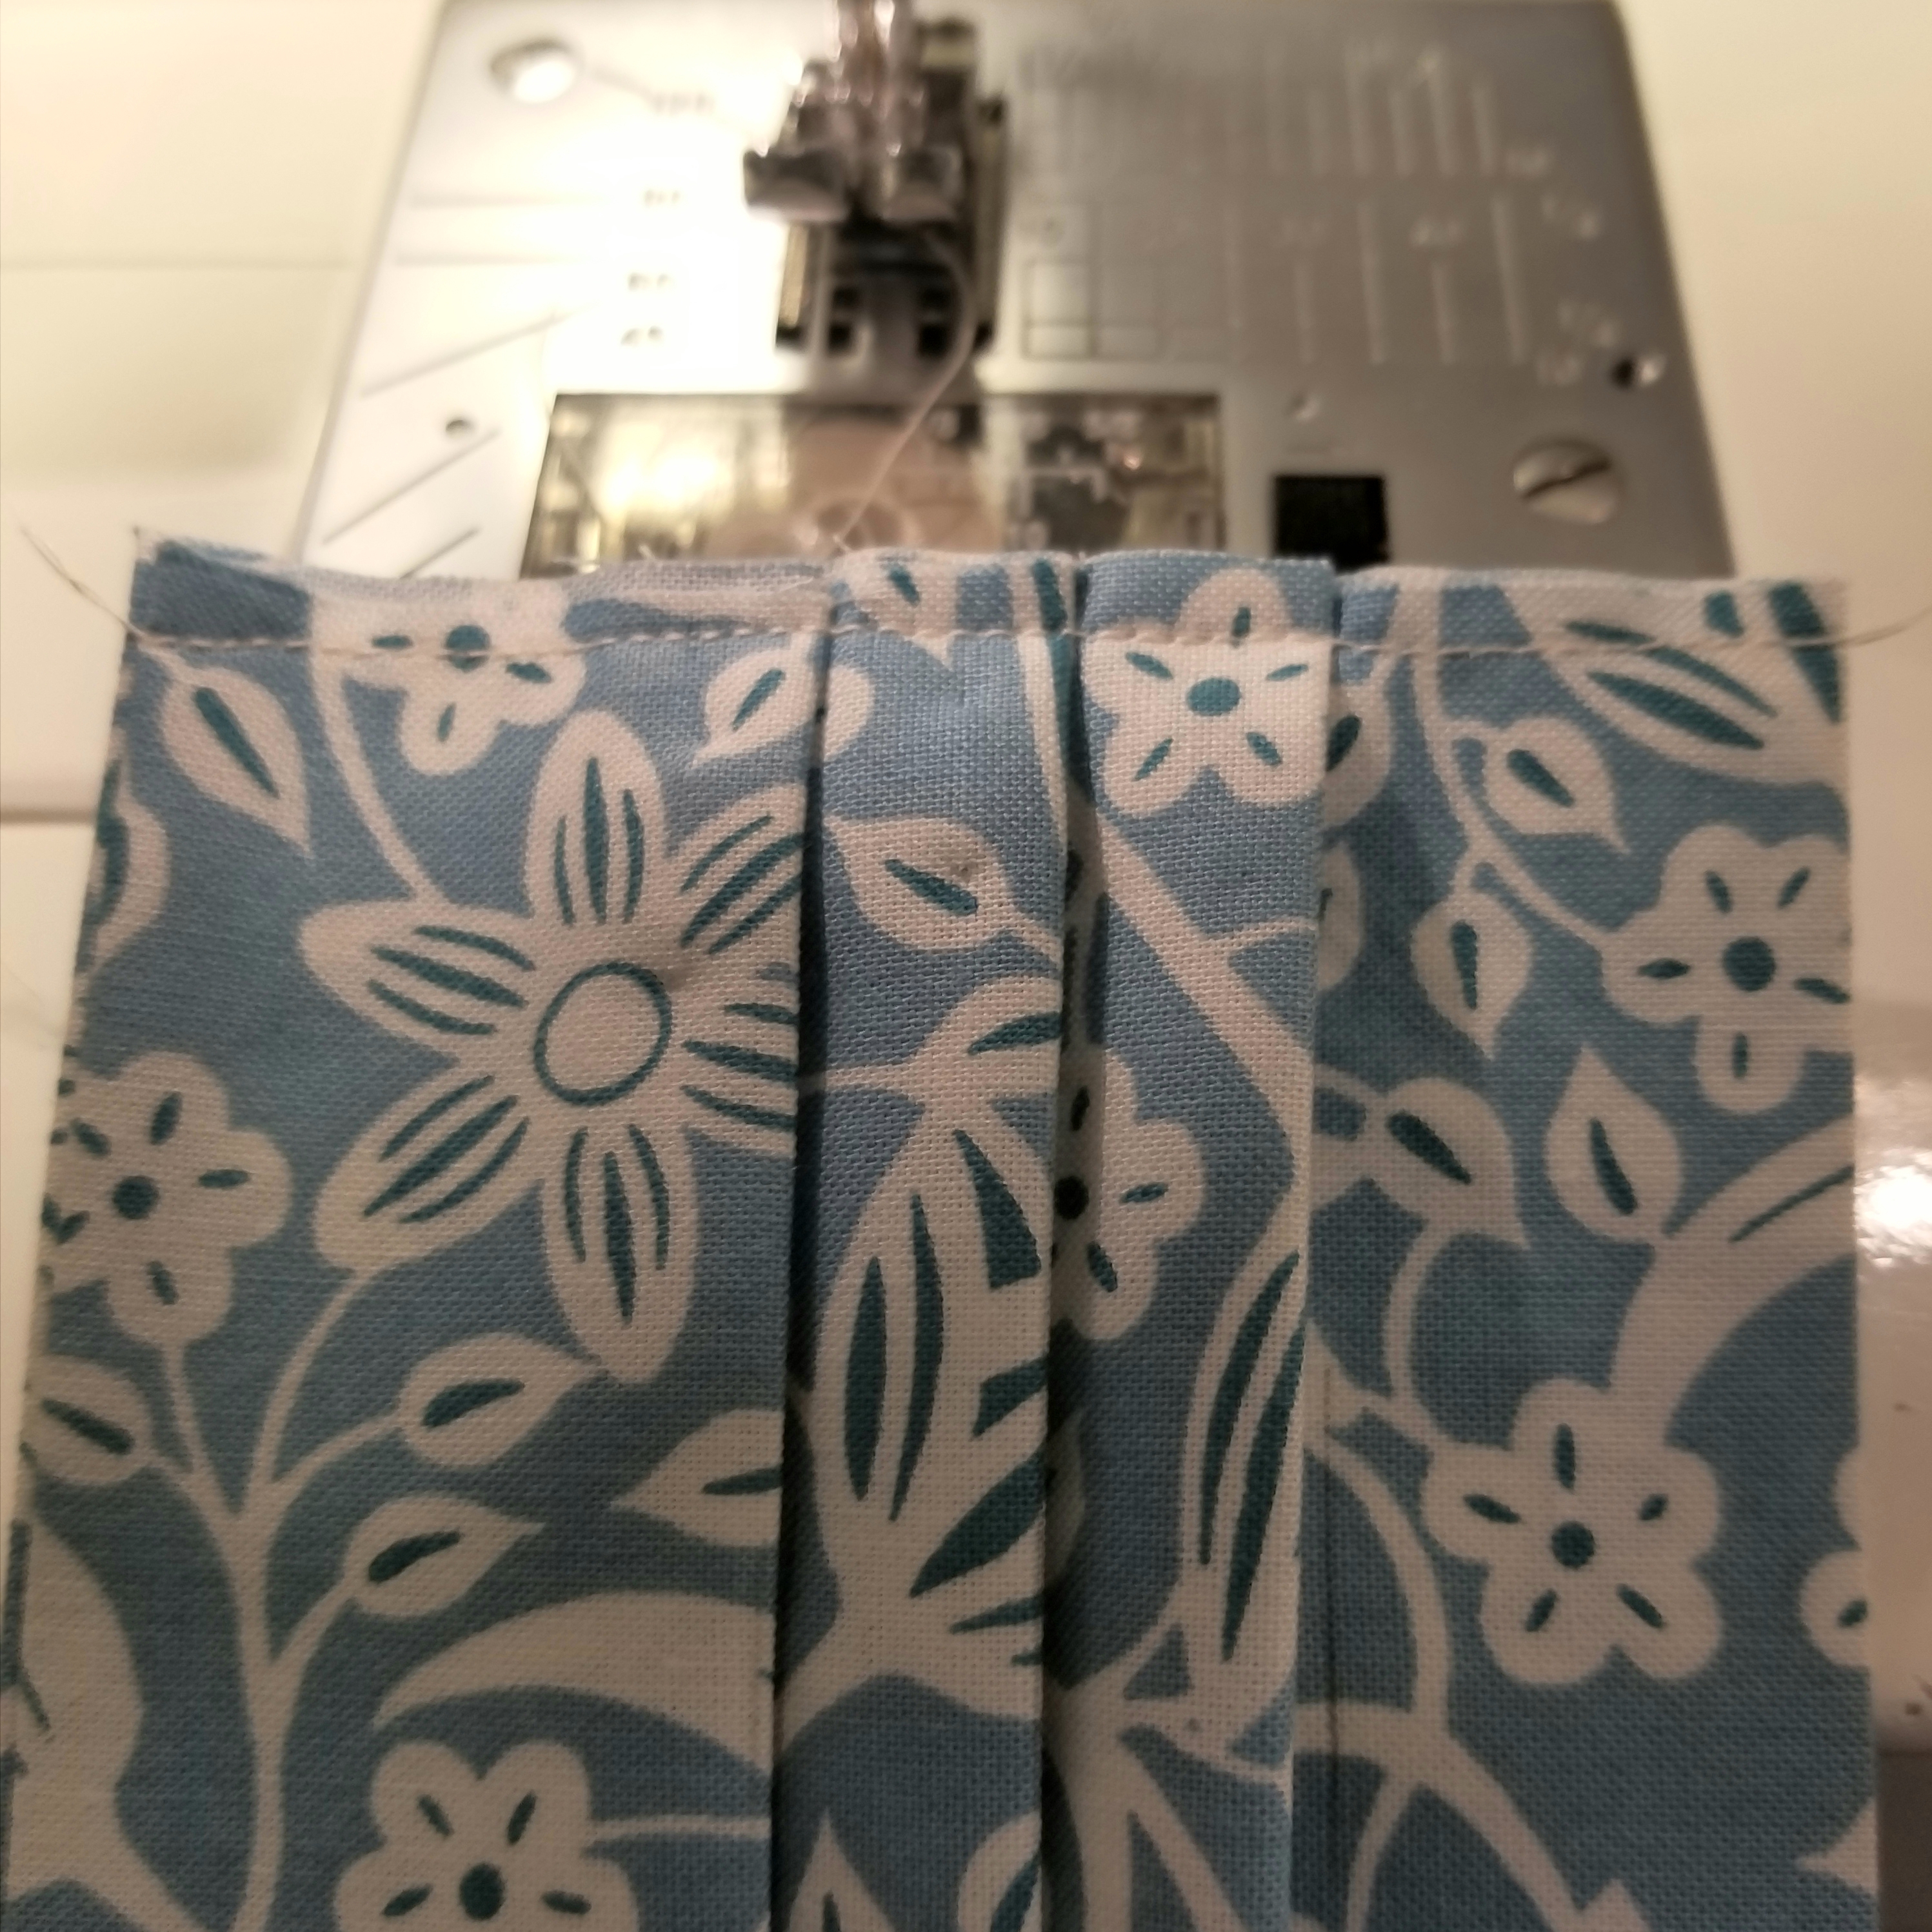
Repeat this step so that both raw edges are basted as shown in the picture above.
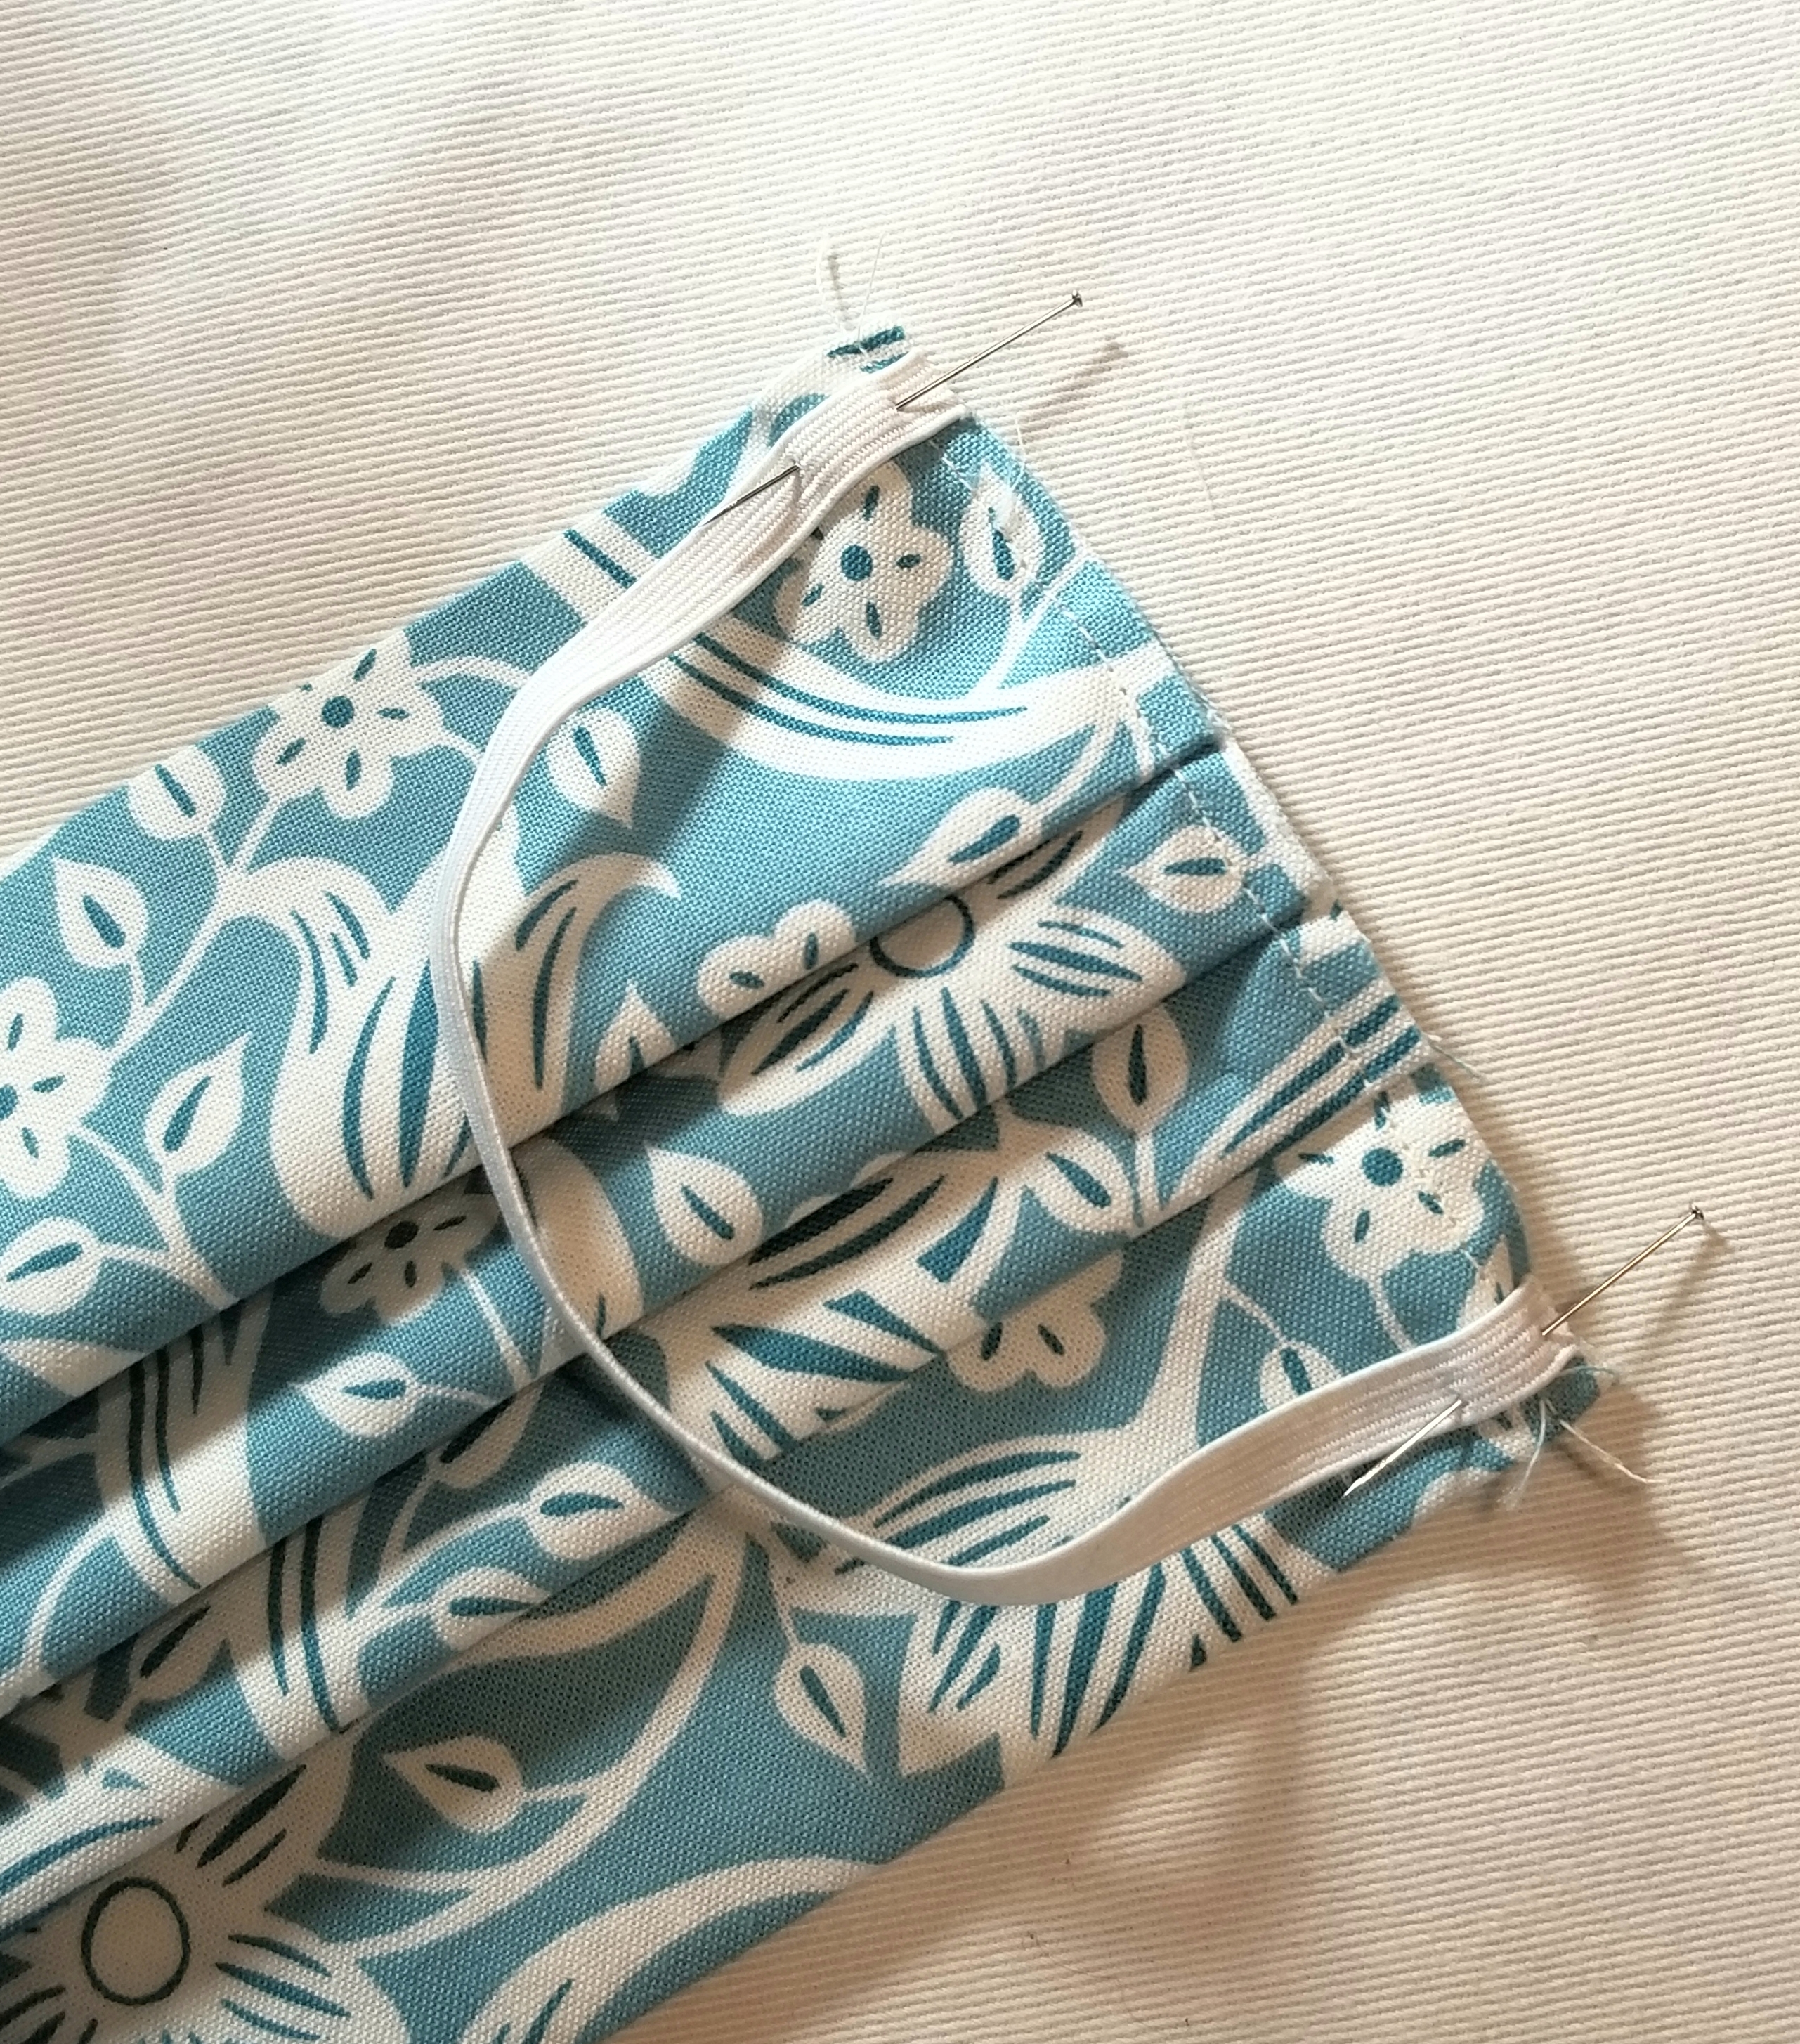
Pin one elastic piece to the raw edge, making sure not to twist it before baste stitching it to the edge at both ends. I placed mine 1/8” from the top and bottom edge of the main pleated piece. Baste elastic in place 1/8” inch from raw edge. Repeat, to attach remaining elastic piece to the other raw edge.
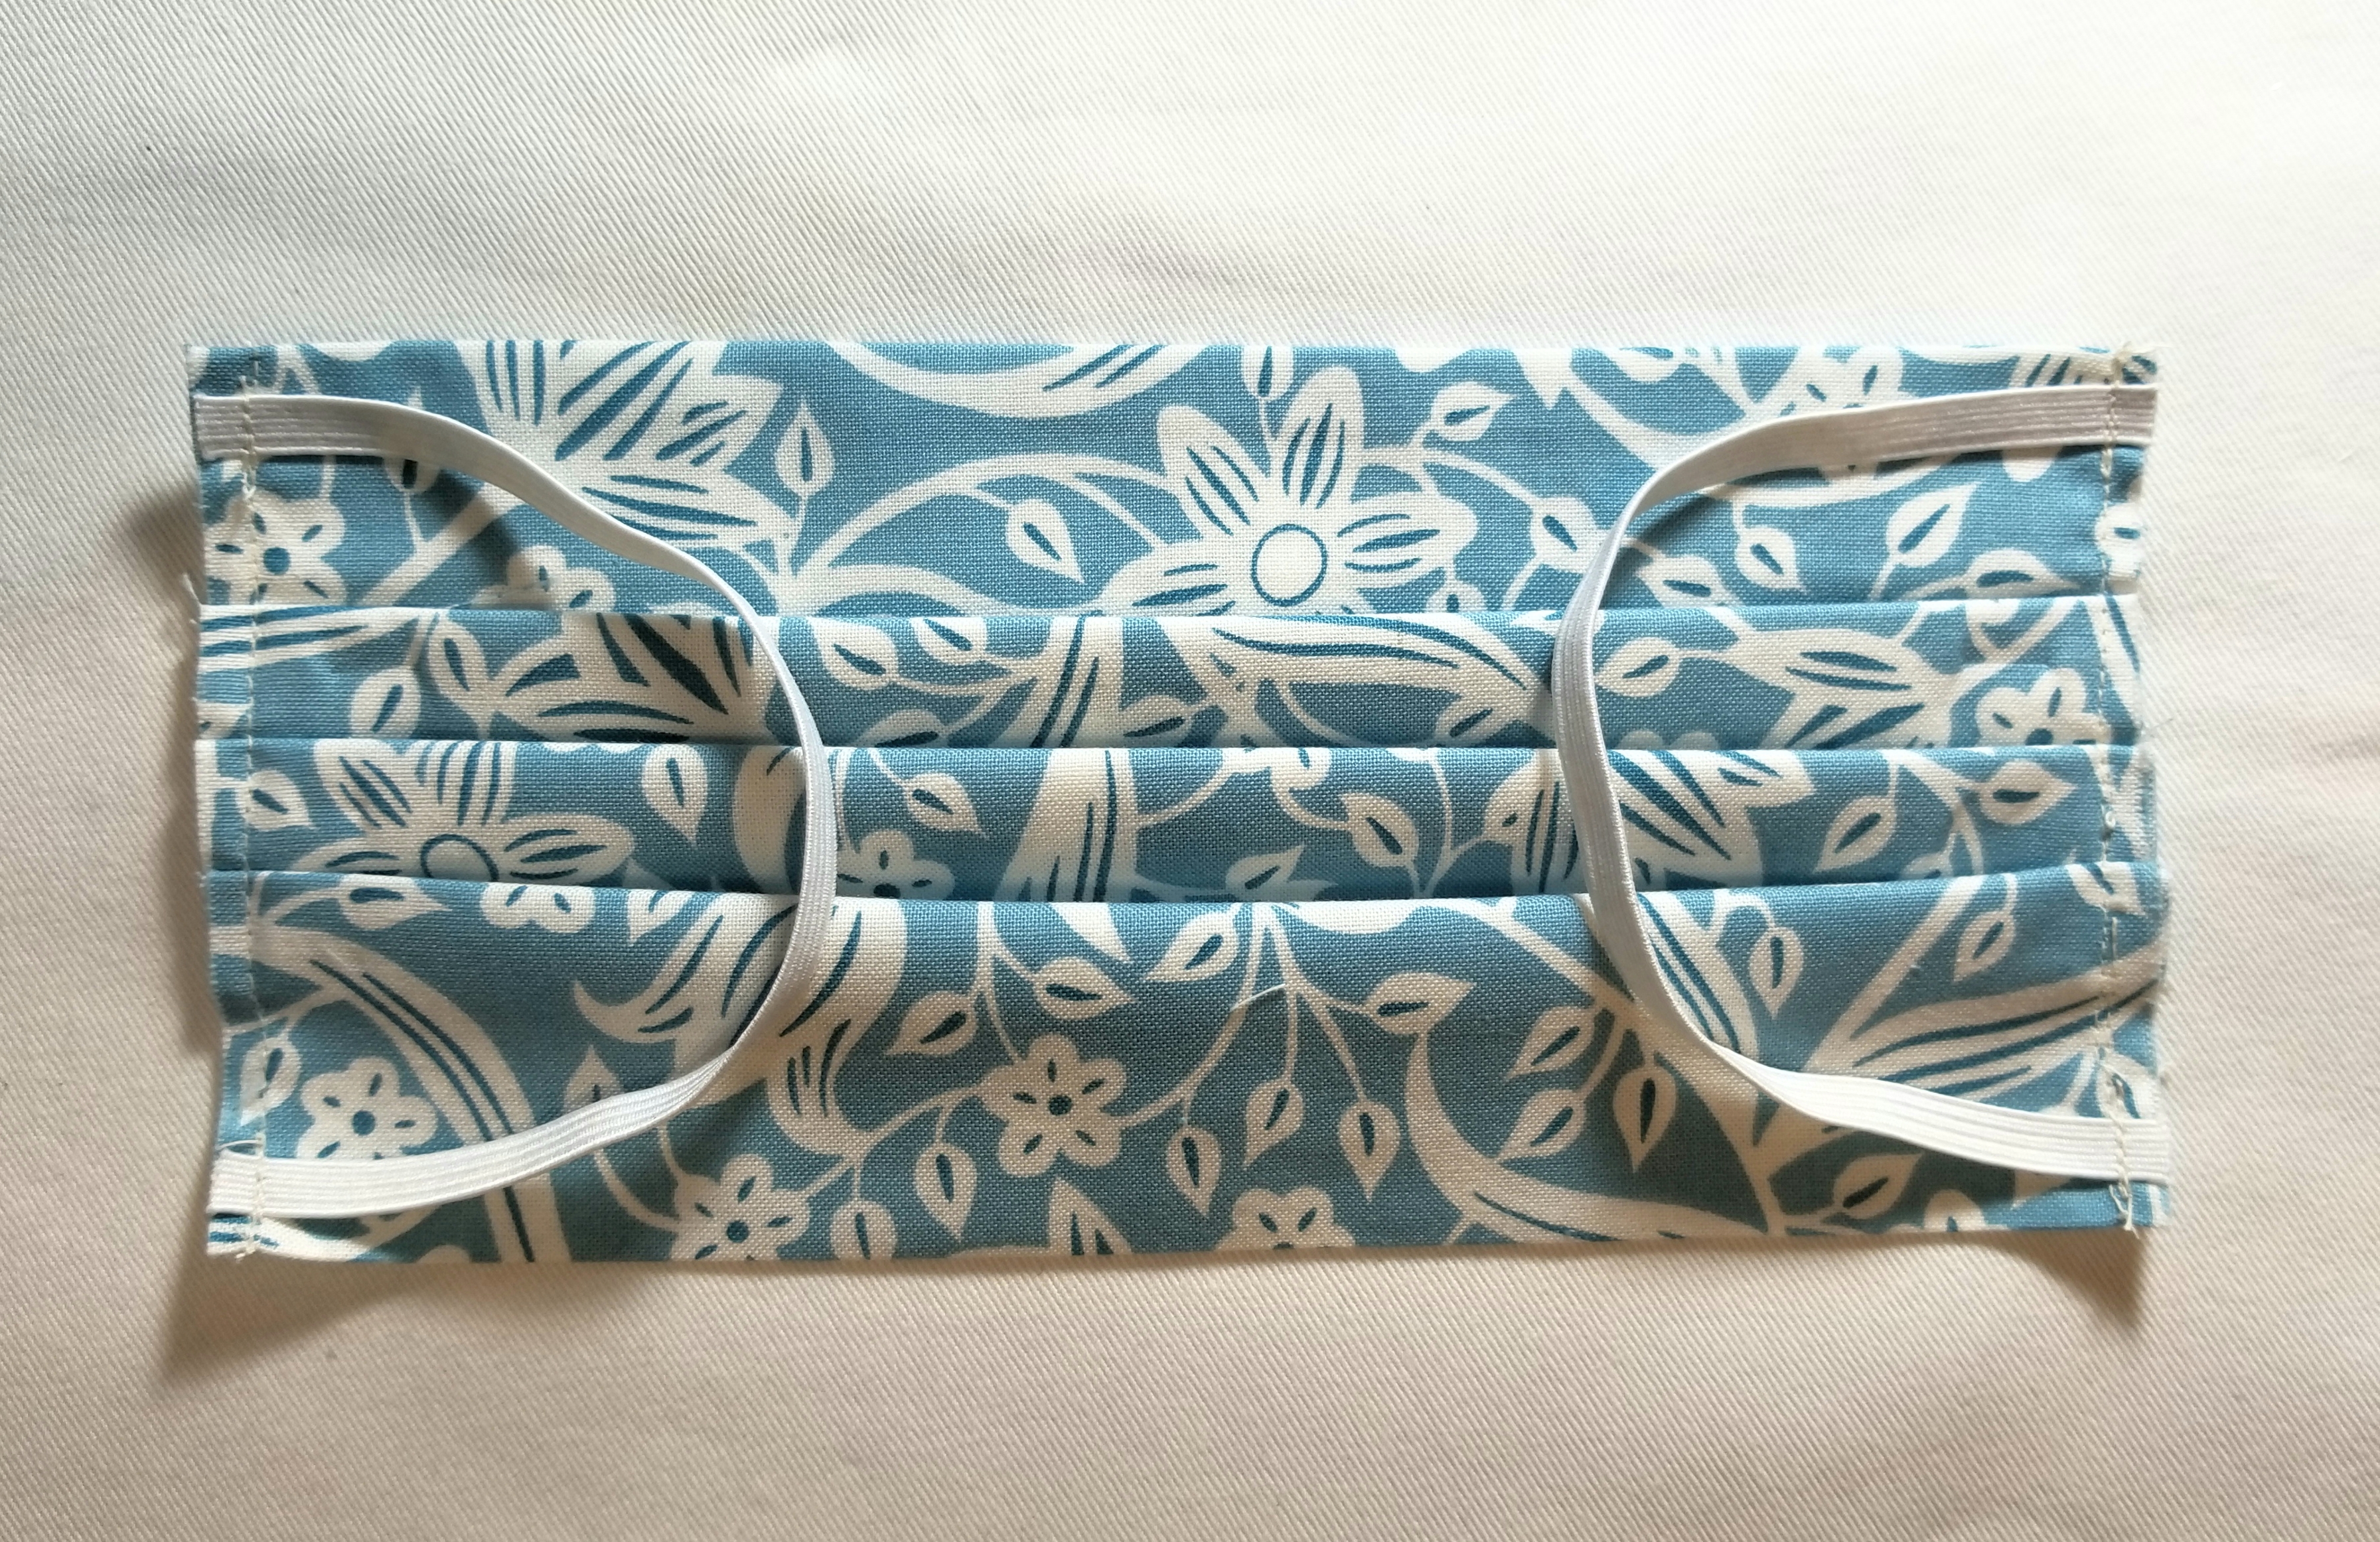
Your pleated piece should now resemble the picture above.
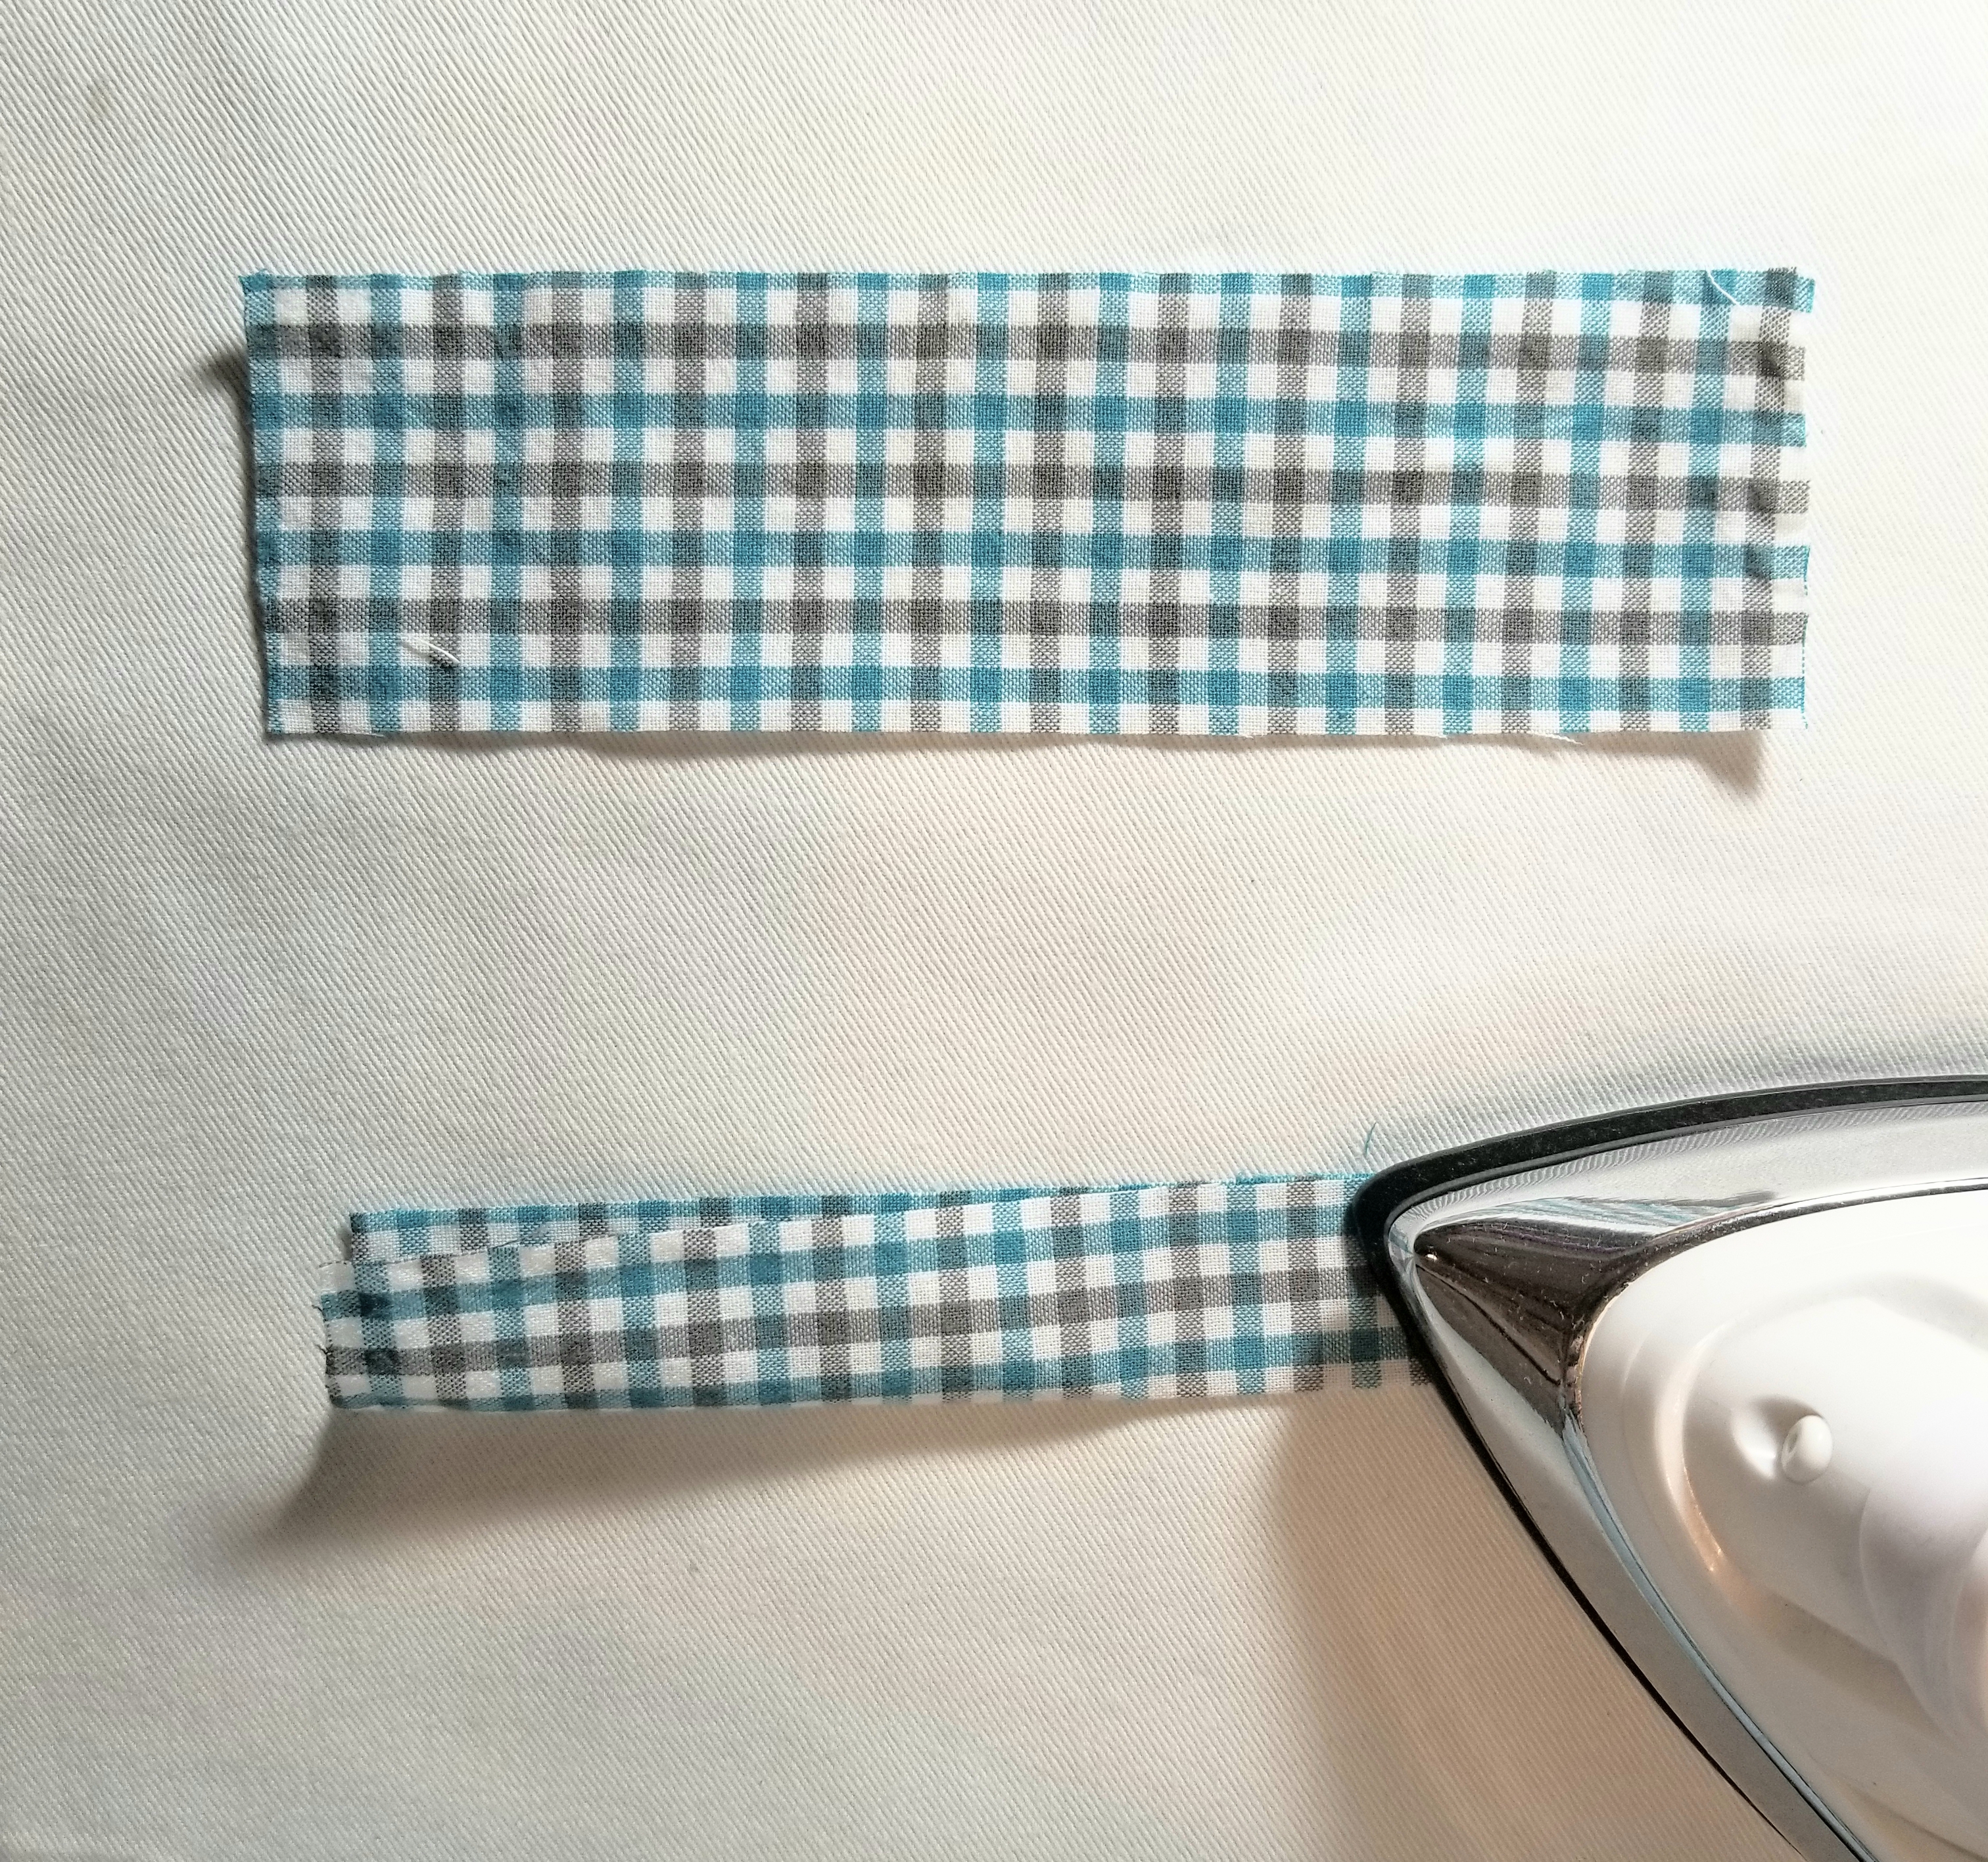
Fold each accent strip of fabric lengthwise in half, matching raw edges, as shown in the picture above. Press.
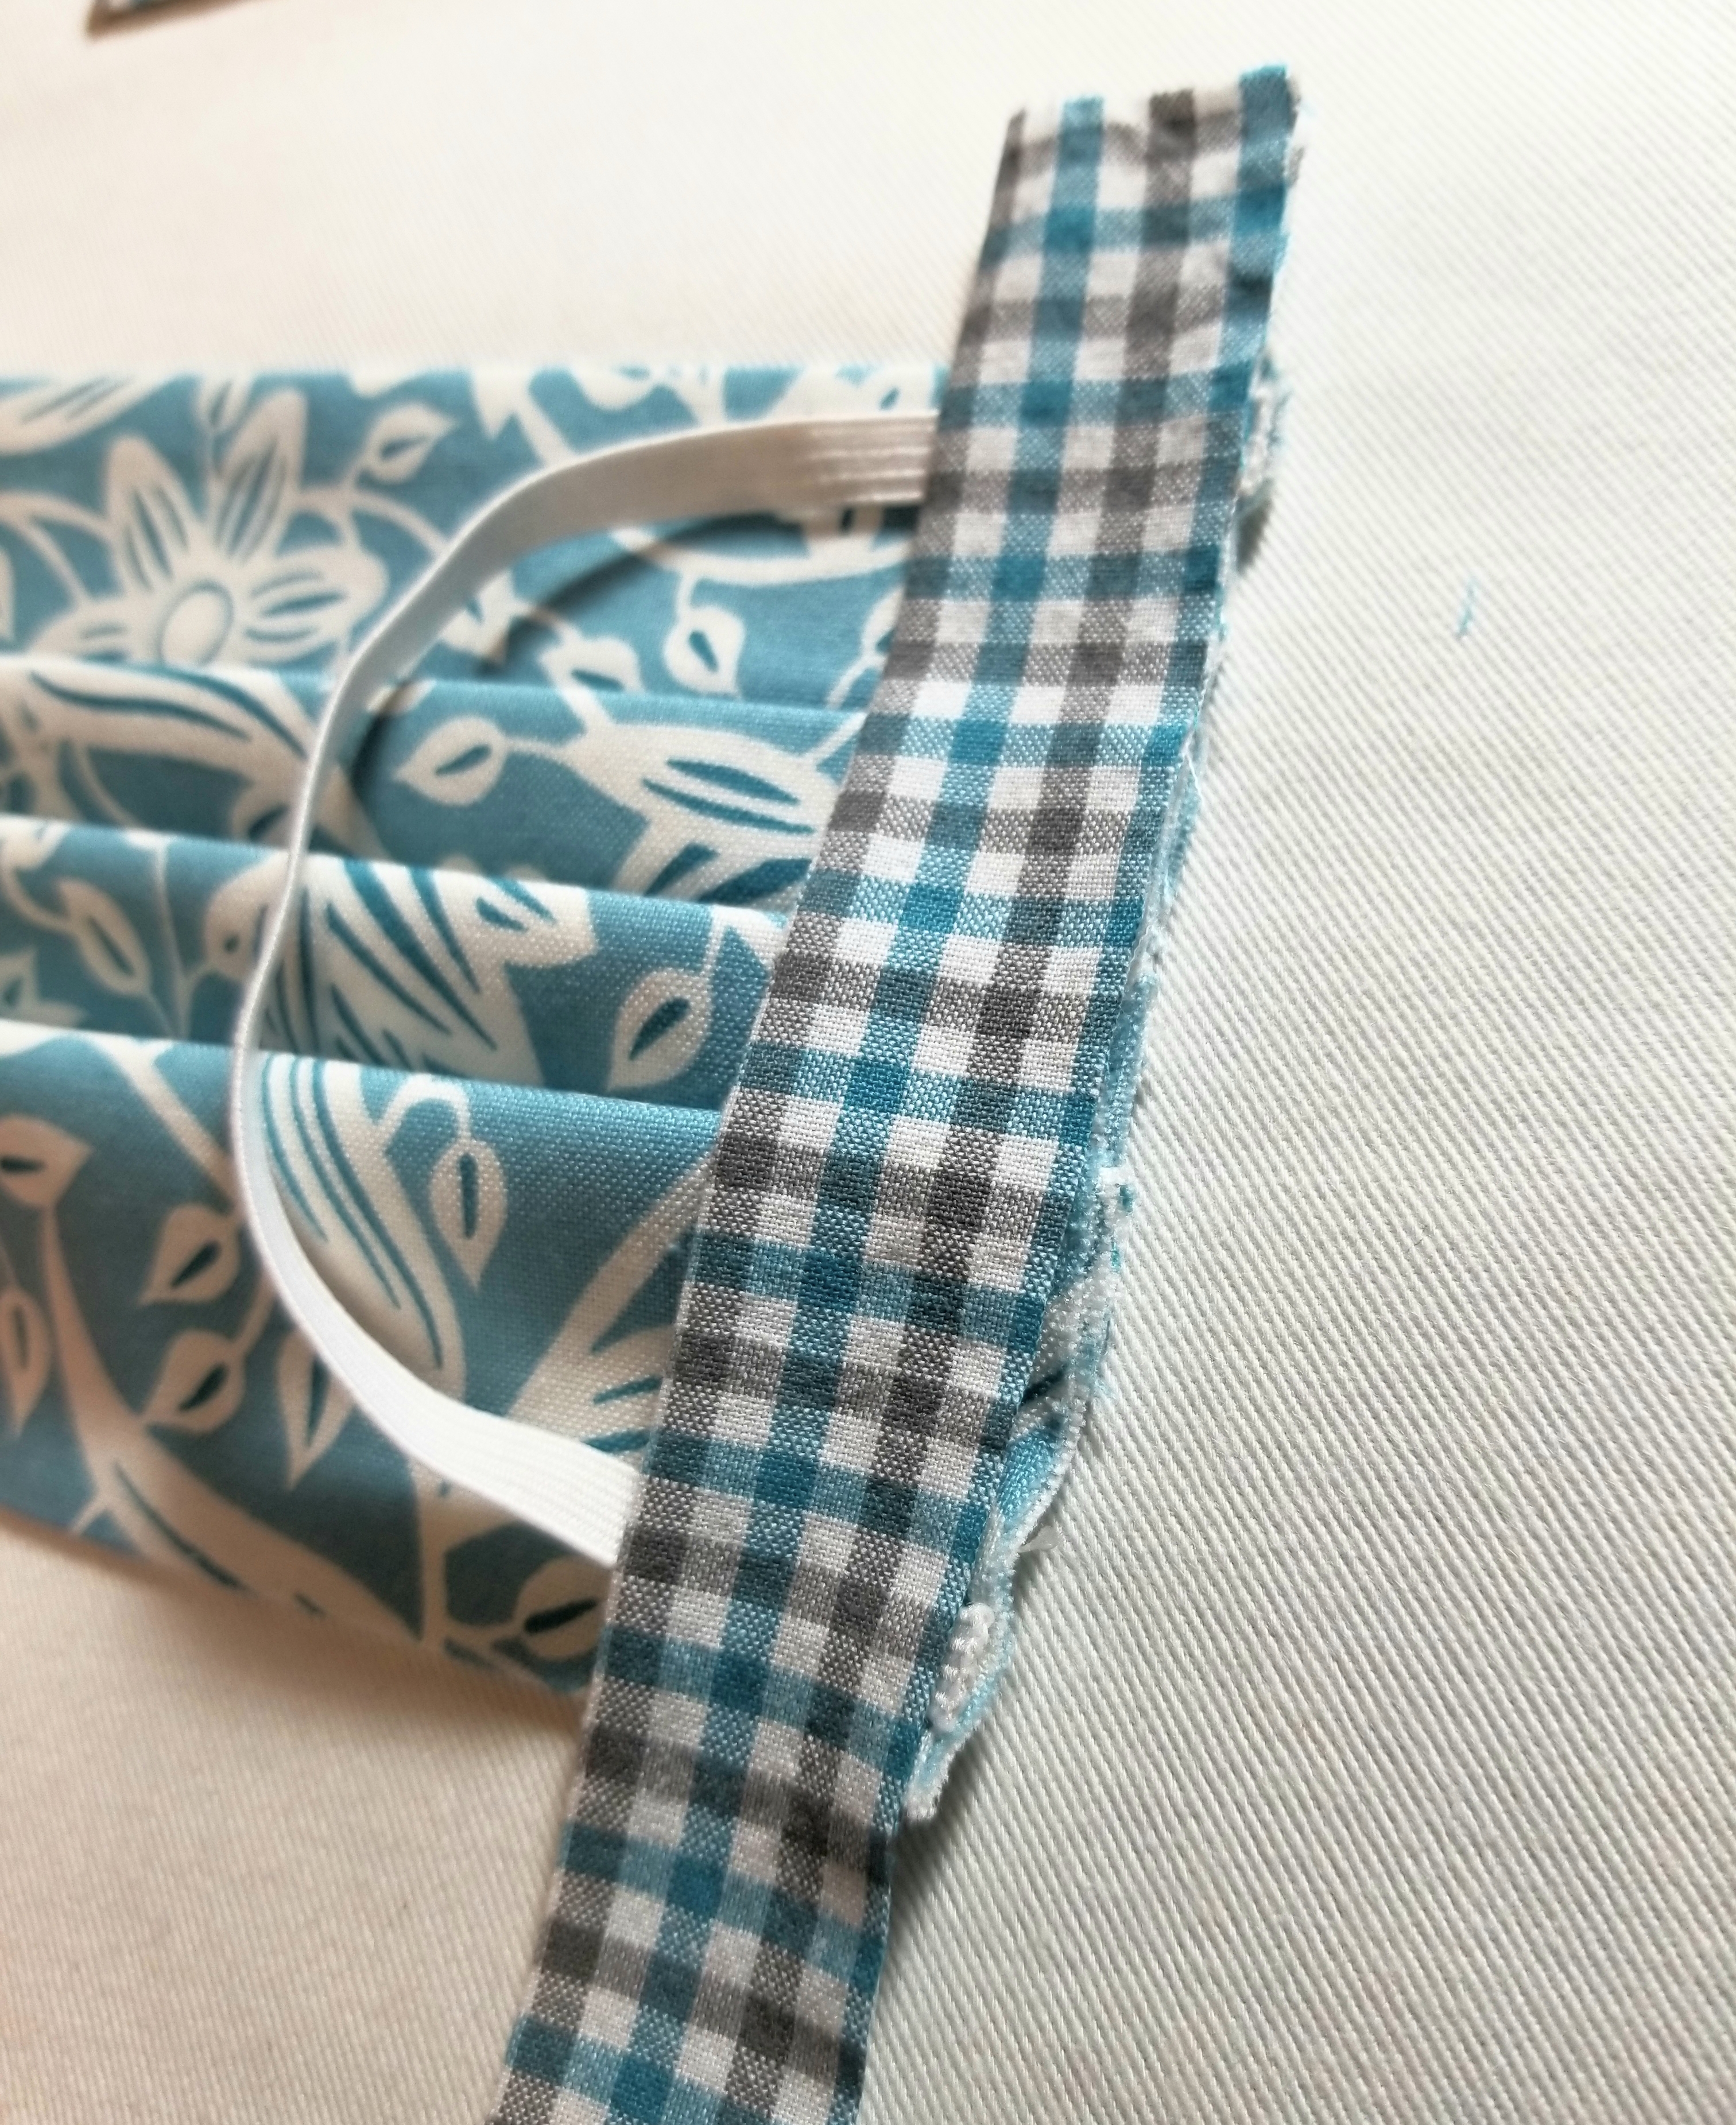
Place the strip on top of the elastic. Make sure the raw edge is facing outward, and the creased edge is facing the main body of the pleated piece. It will be a little longer on the top and bottom and that is okay, as we are going to fold some of that to the back.
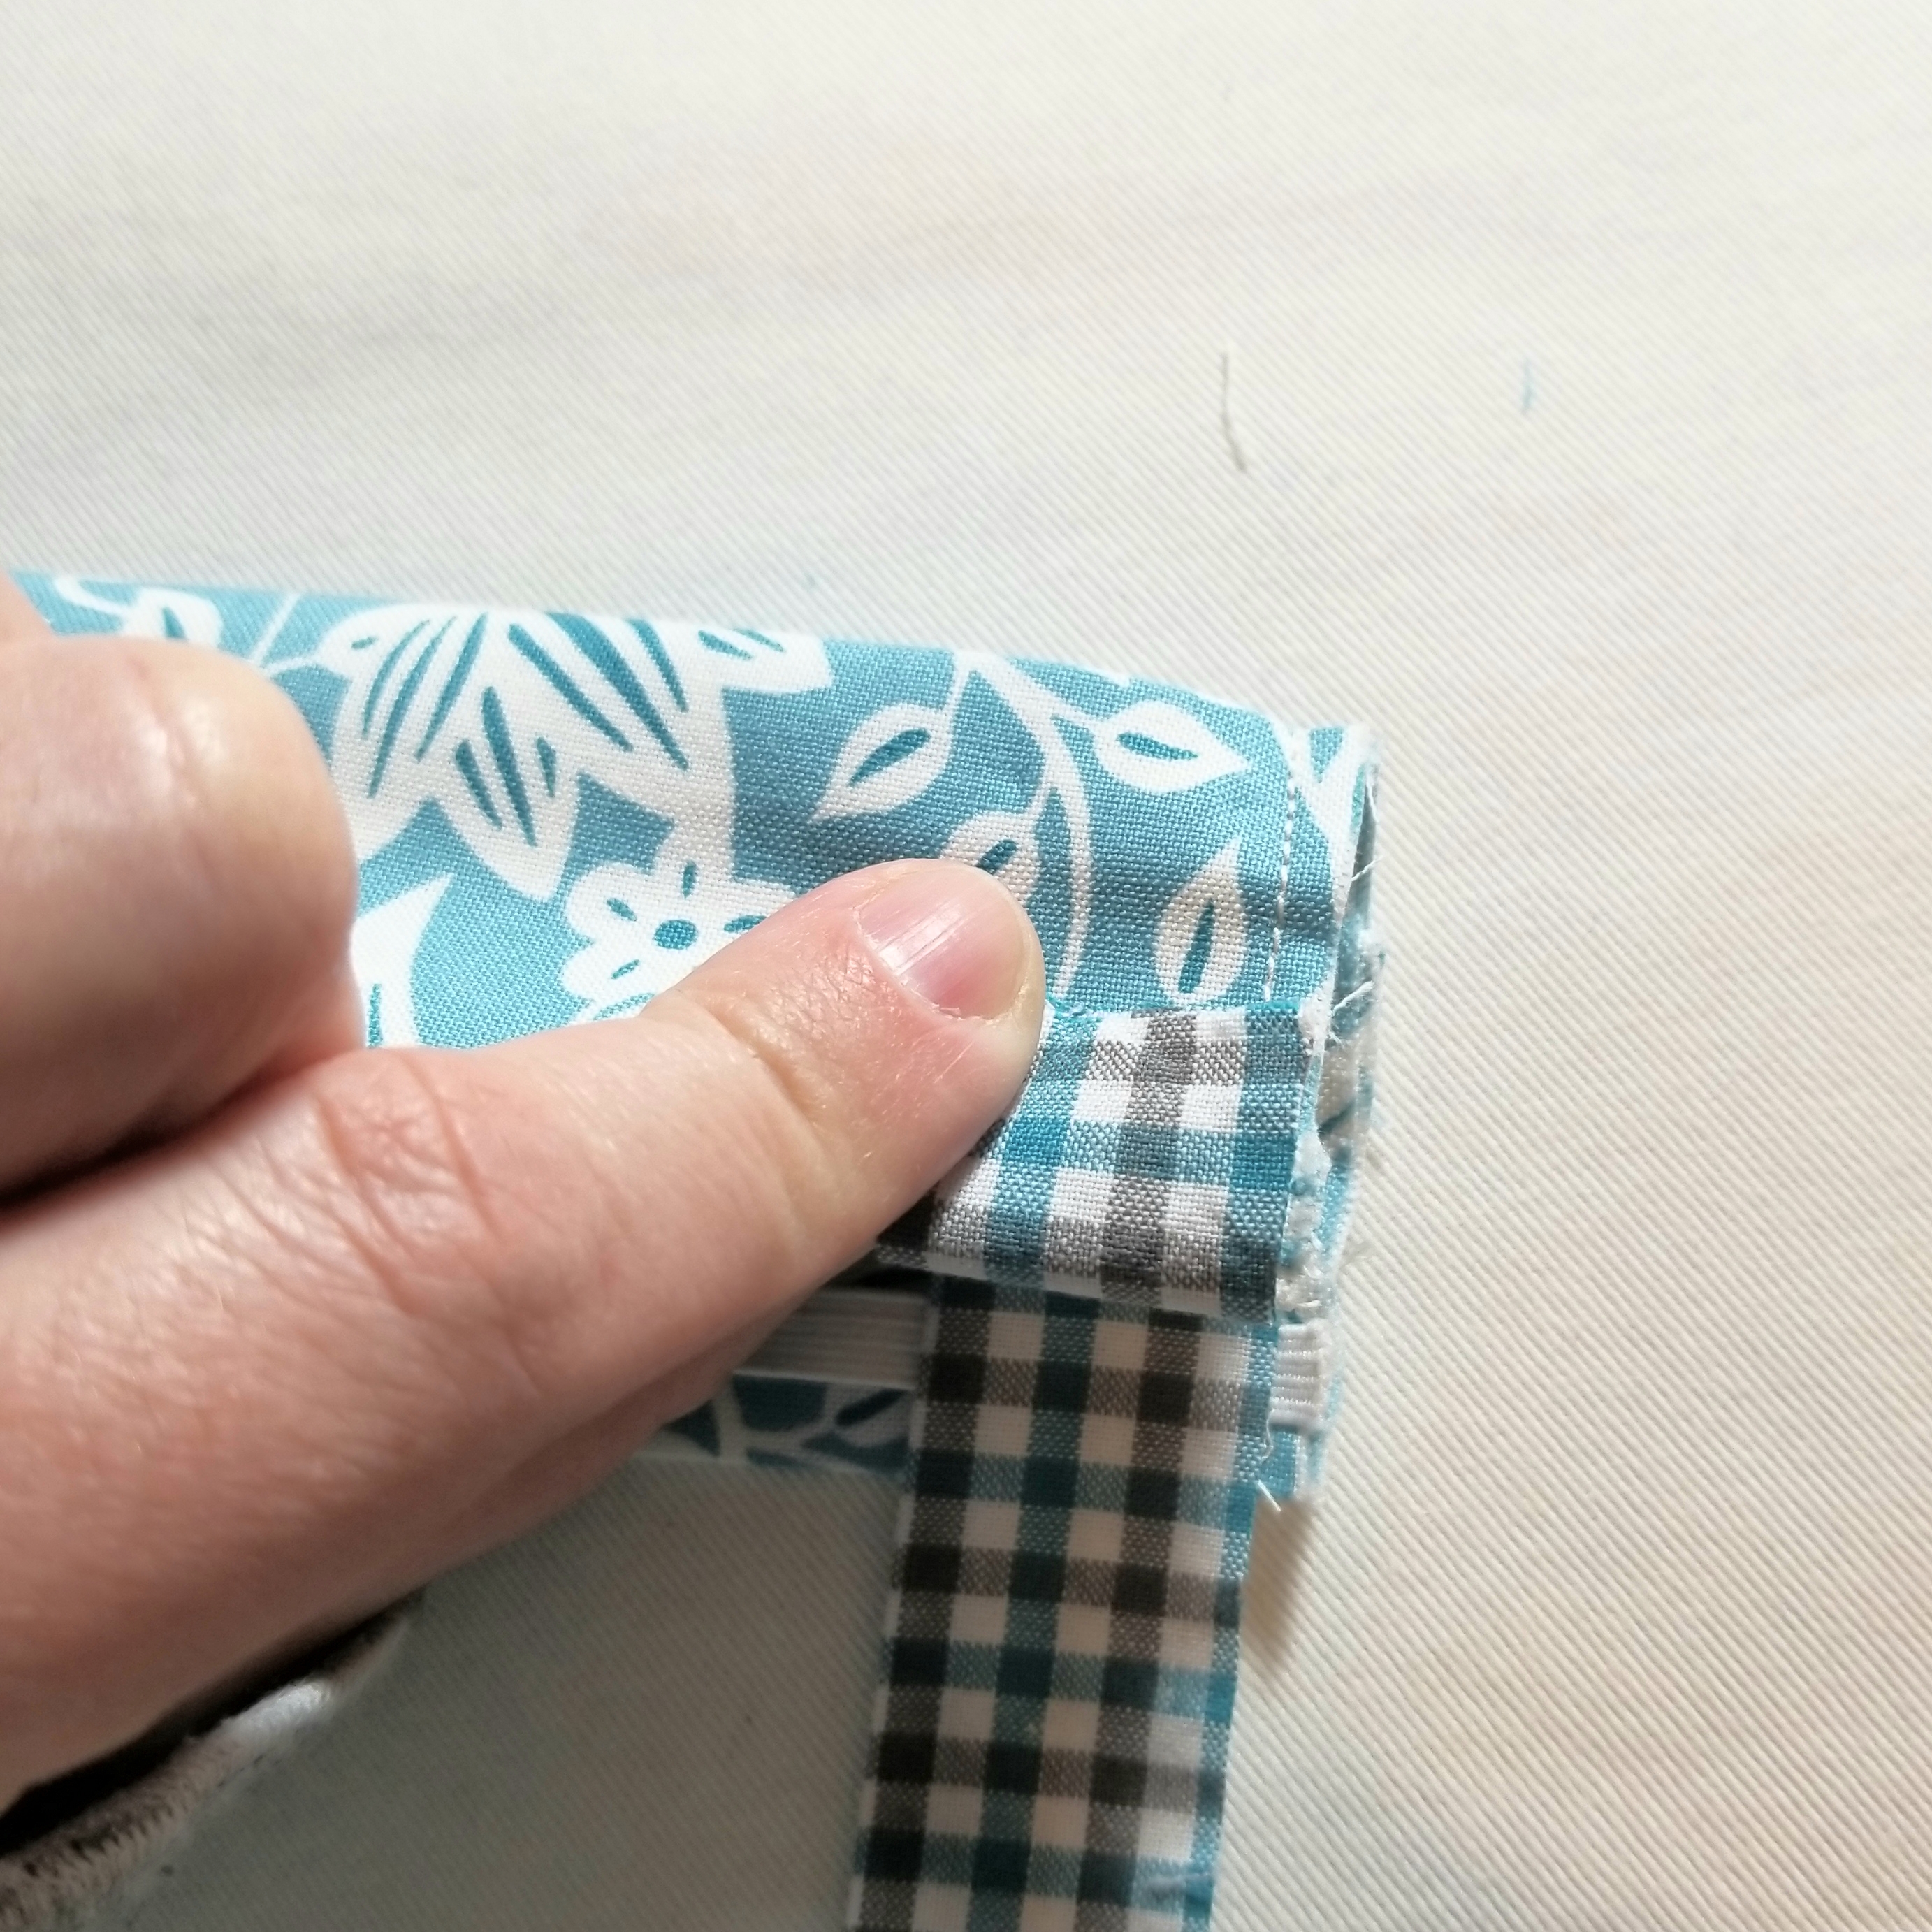
Tuck about 1/2” of the top edge to the back as shown in the picture above.
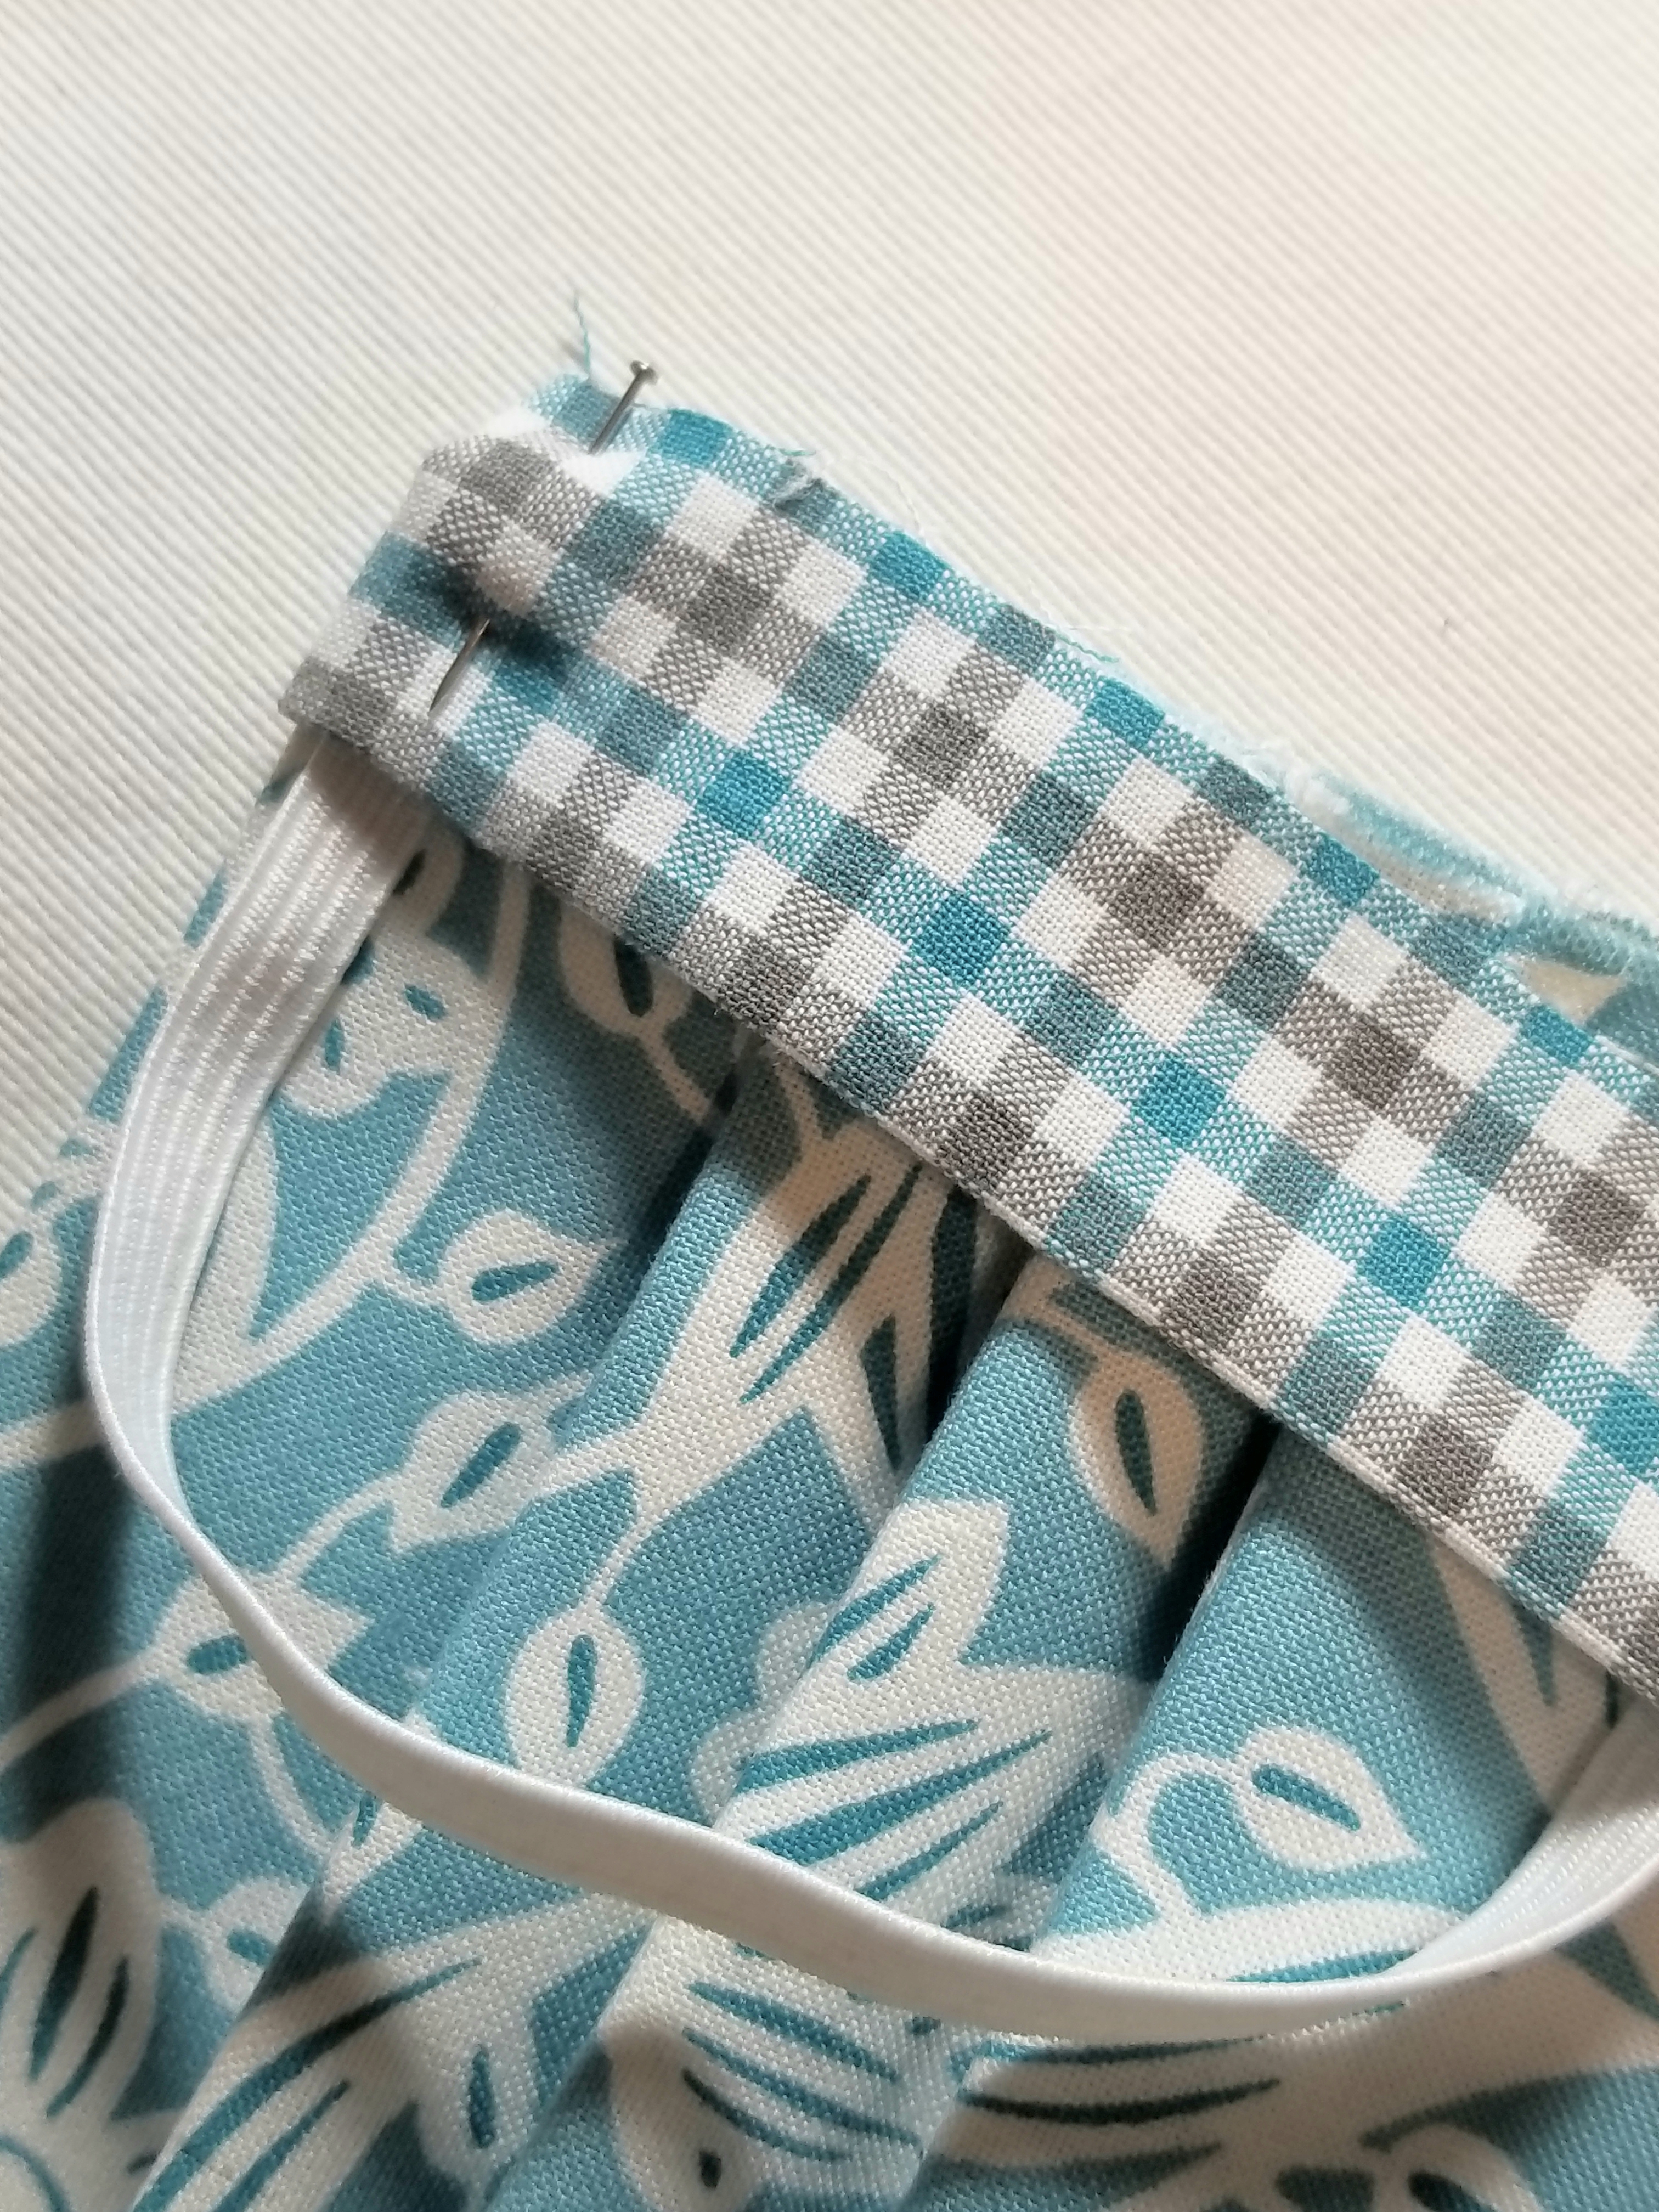
Pin all layers in place.
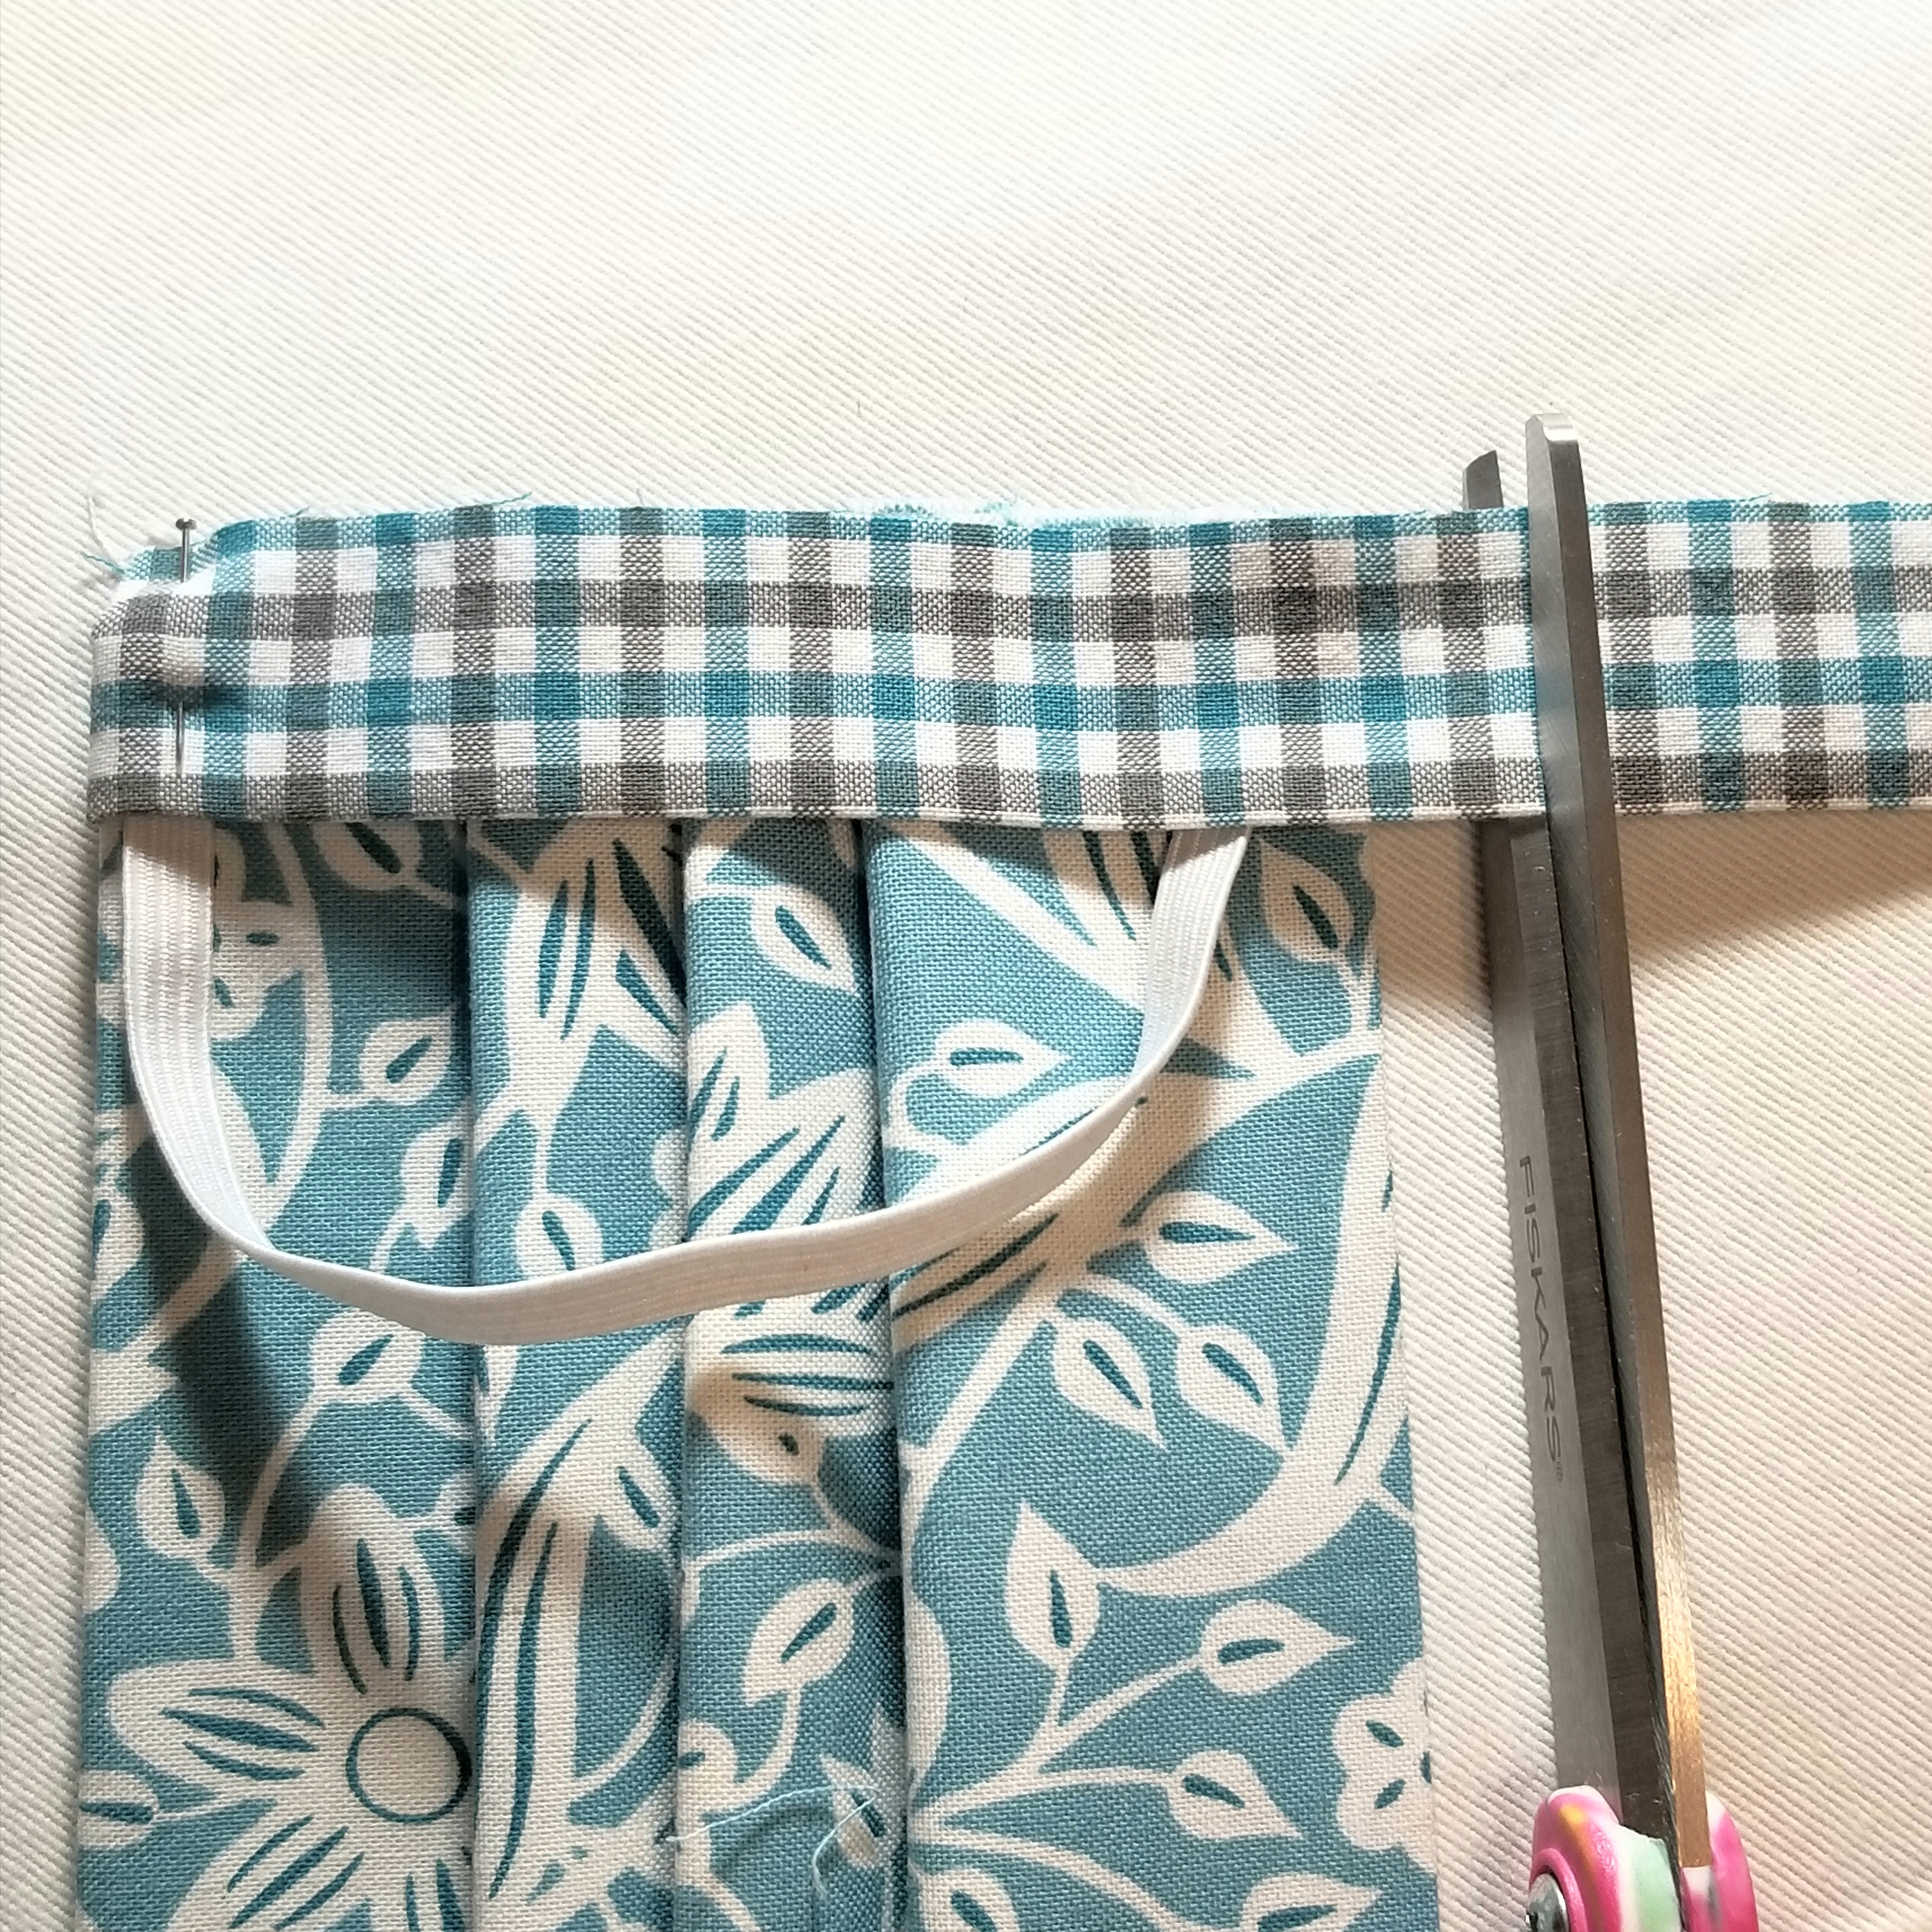
Trim the other end of the accent strip, so that it is about 1/2” longer than the bottom edge of the main pleated piece.
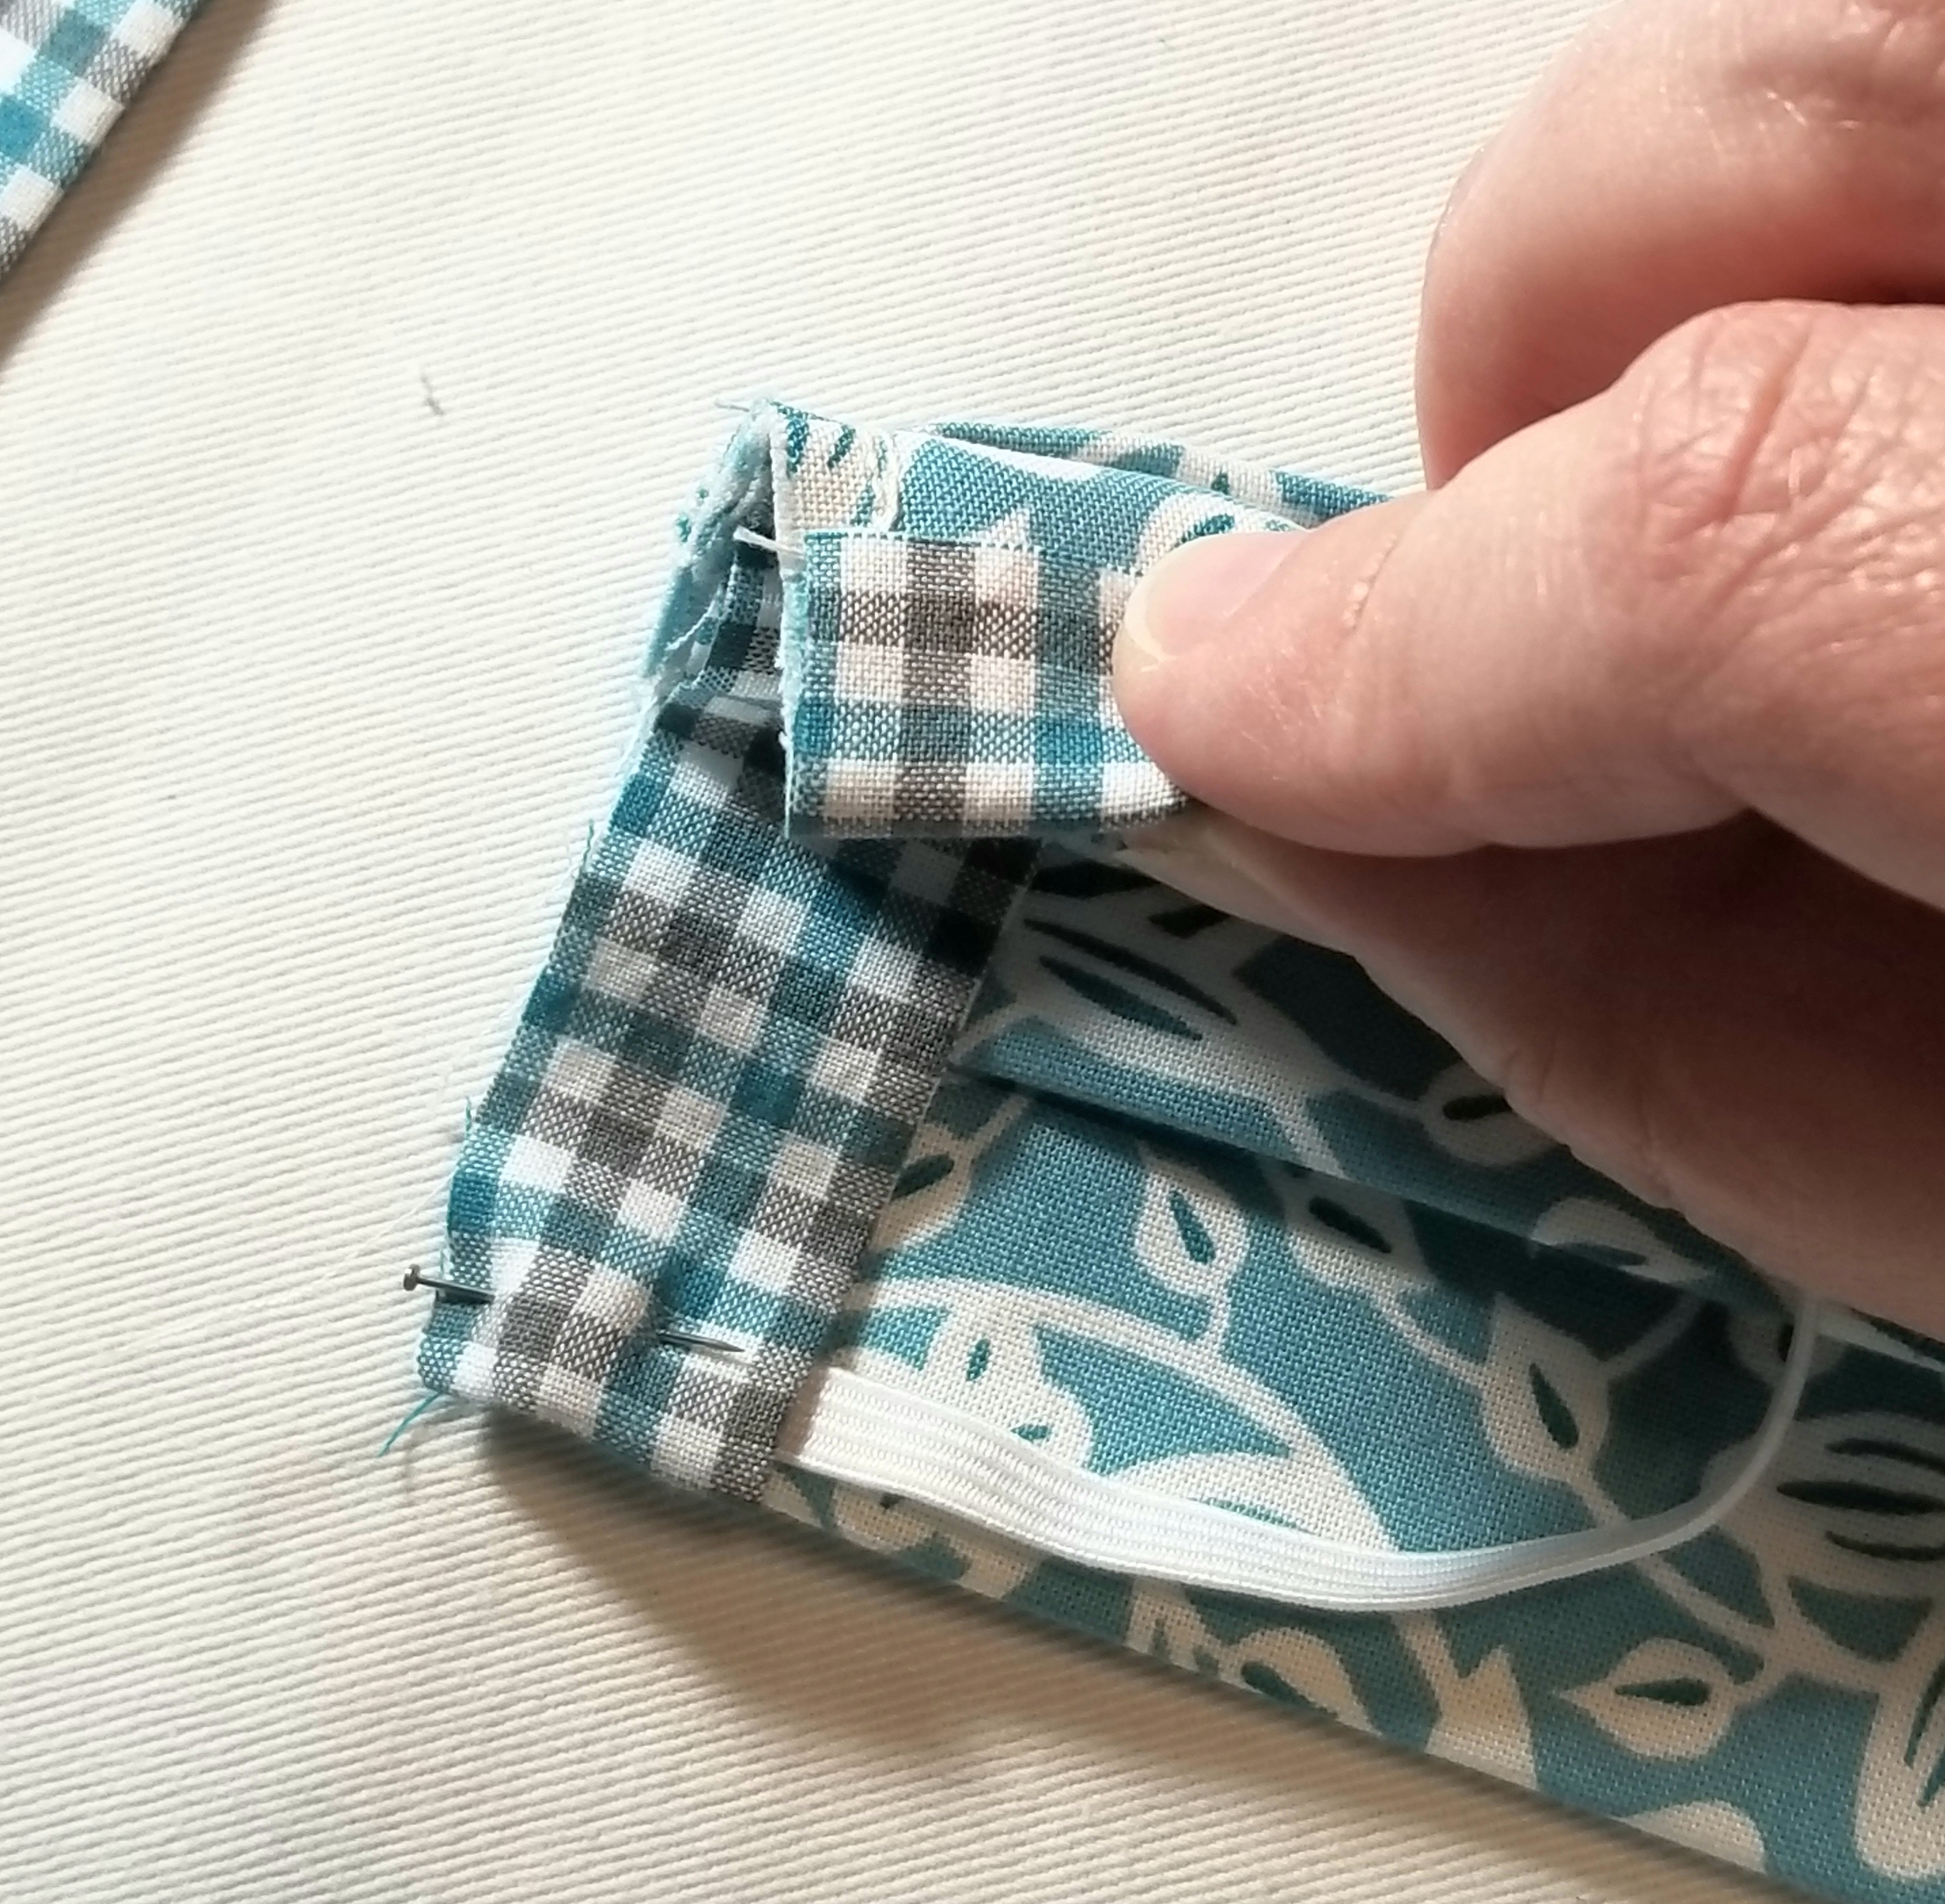
Fold the bottom edge of the accent fabric strip to the back, just as you did with the top edge.
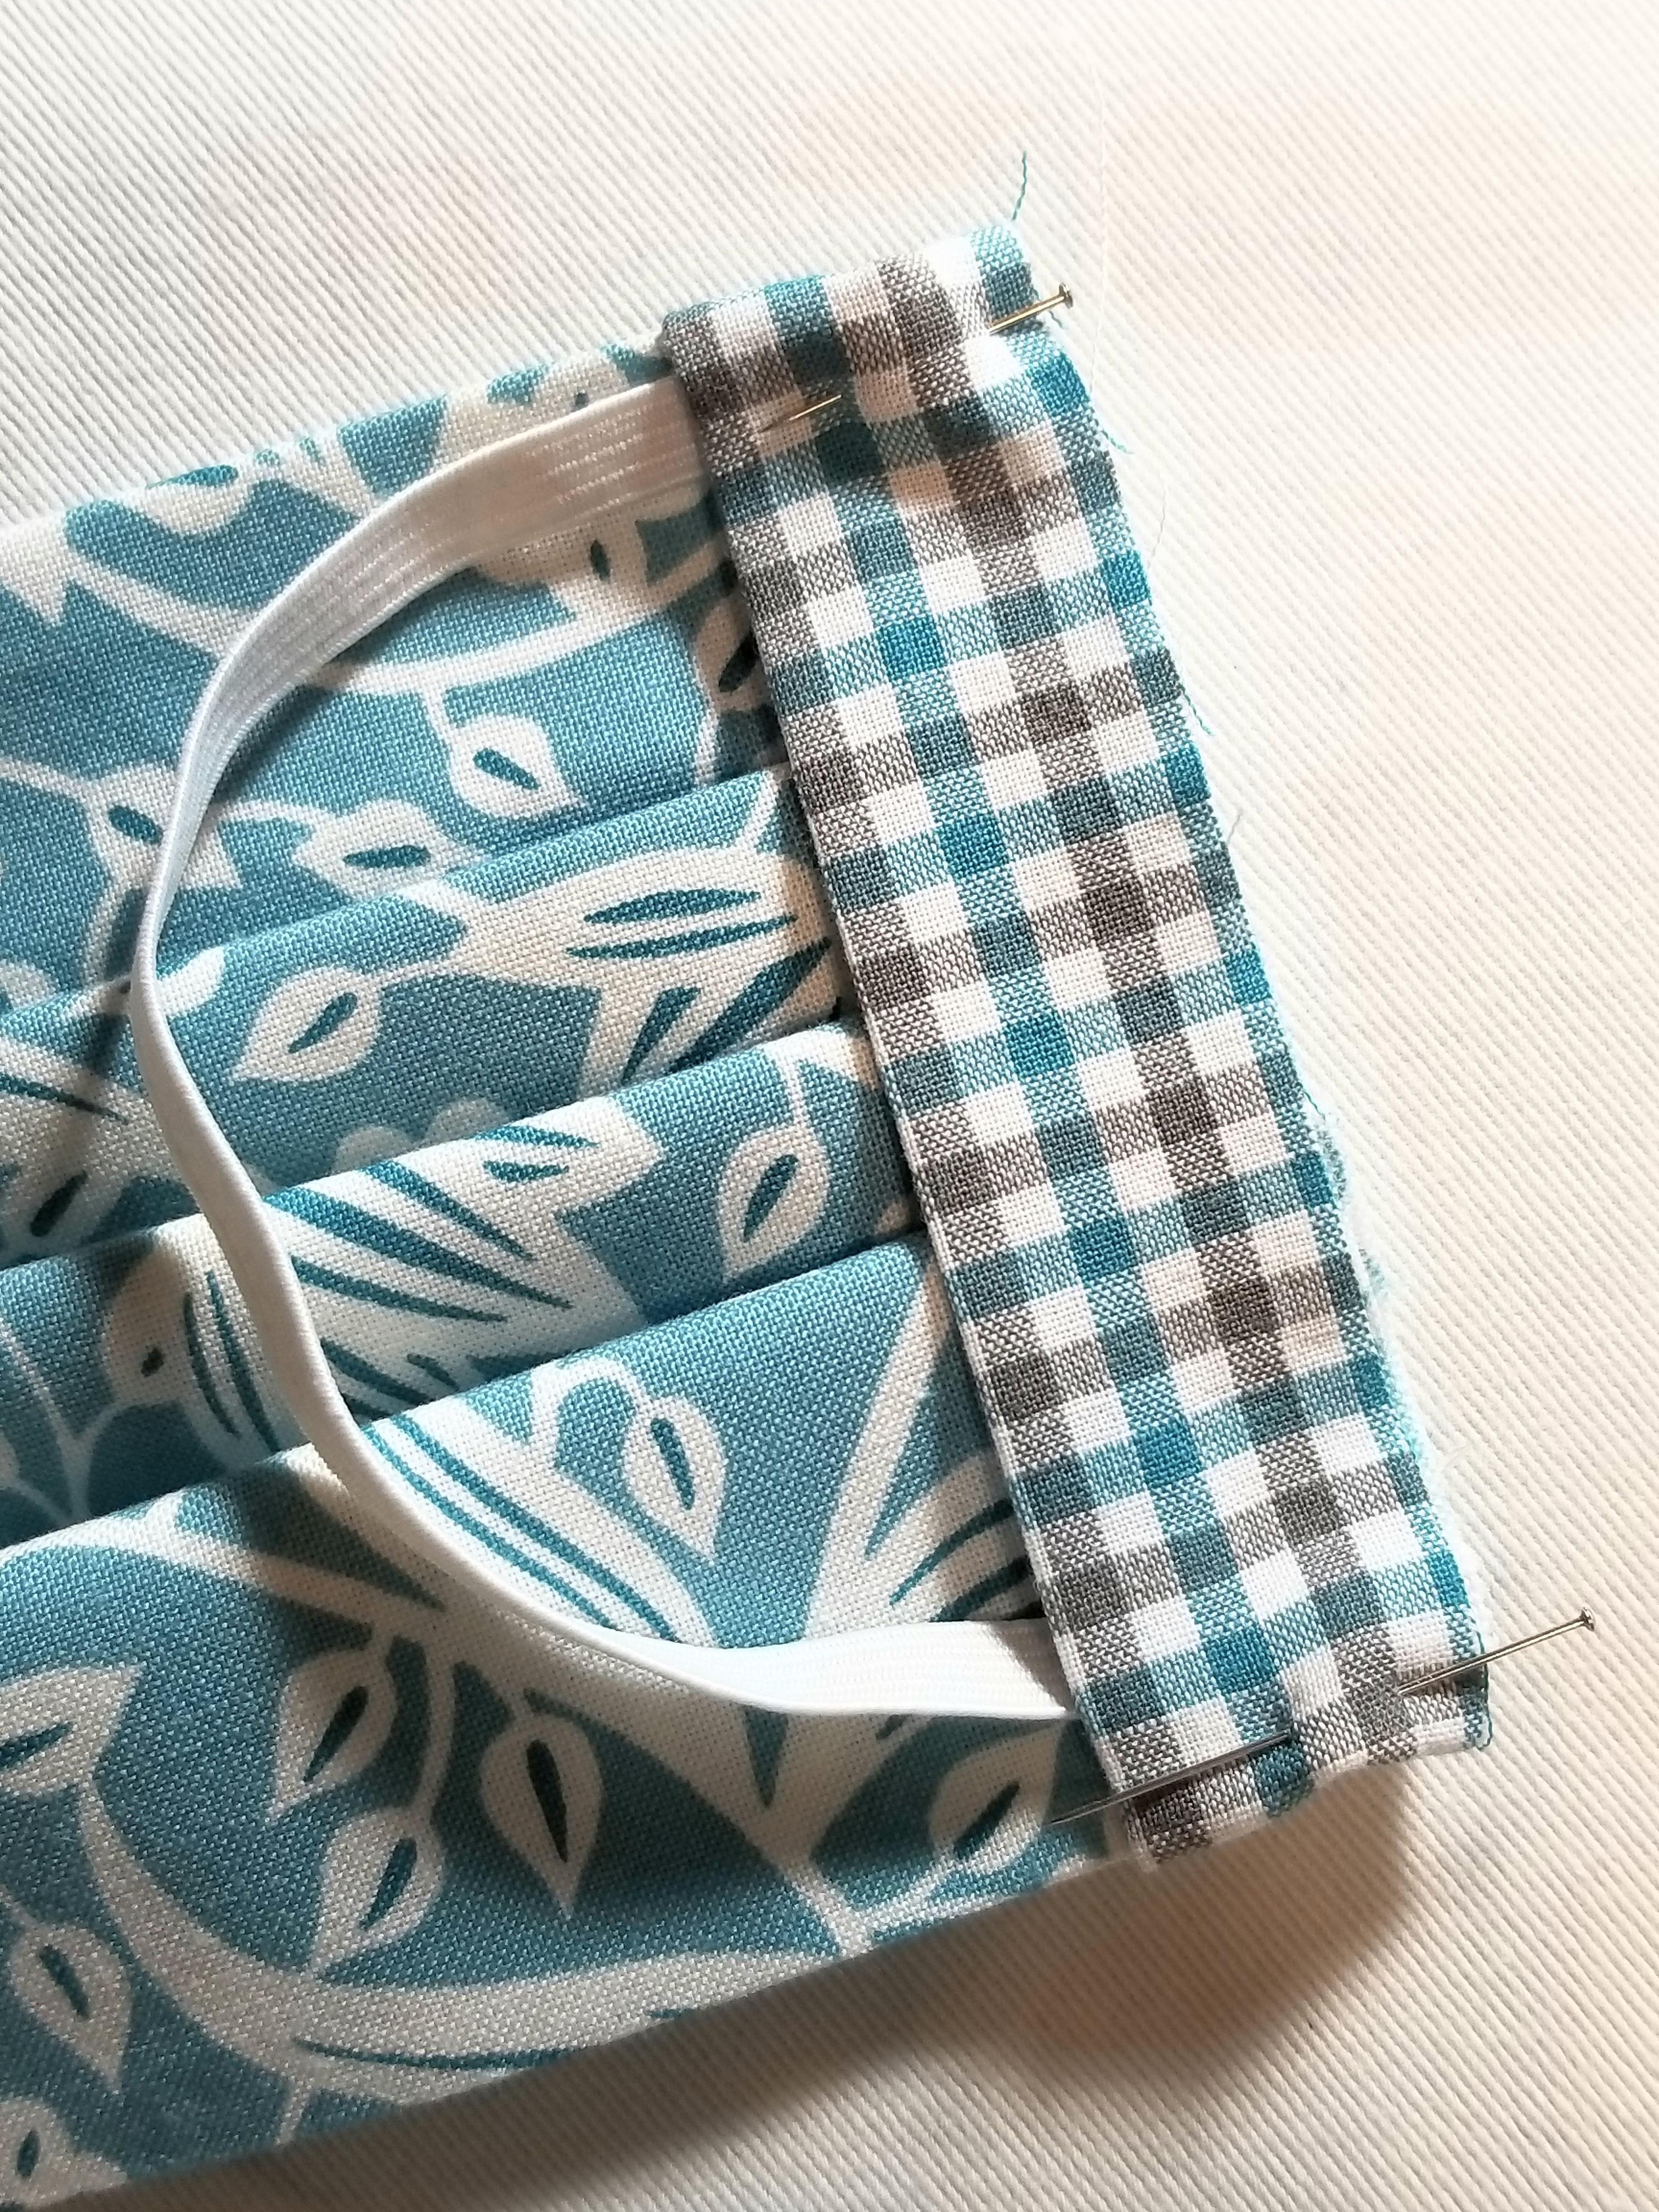
Pin both ends in place.
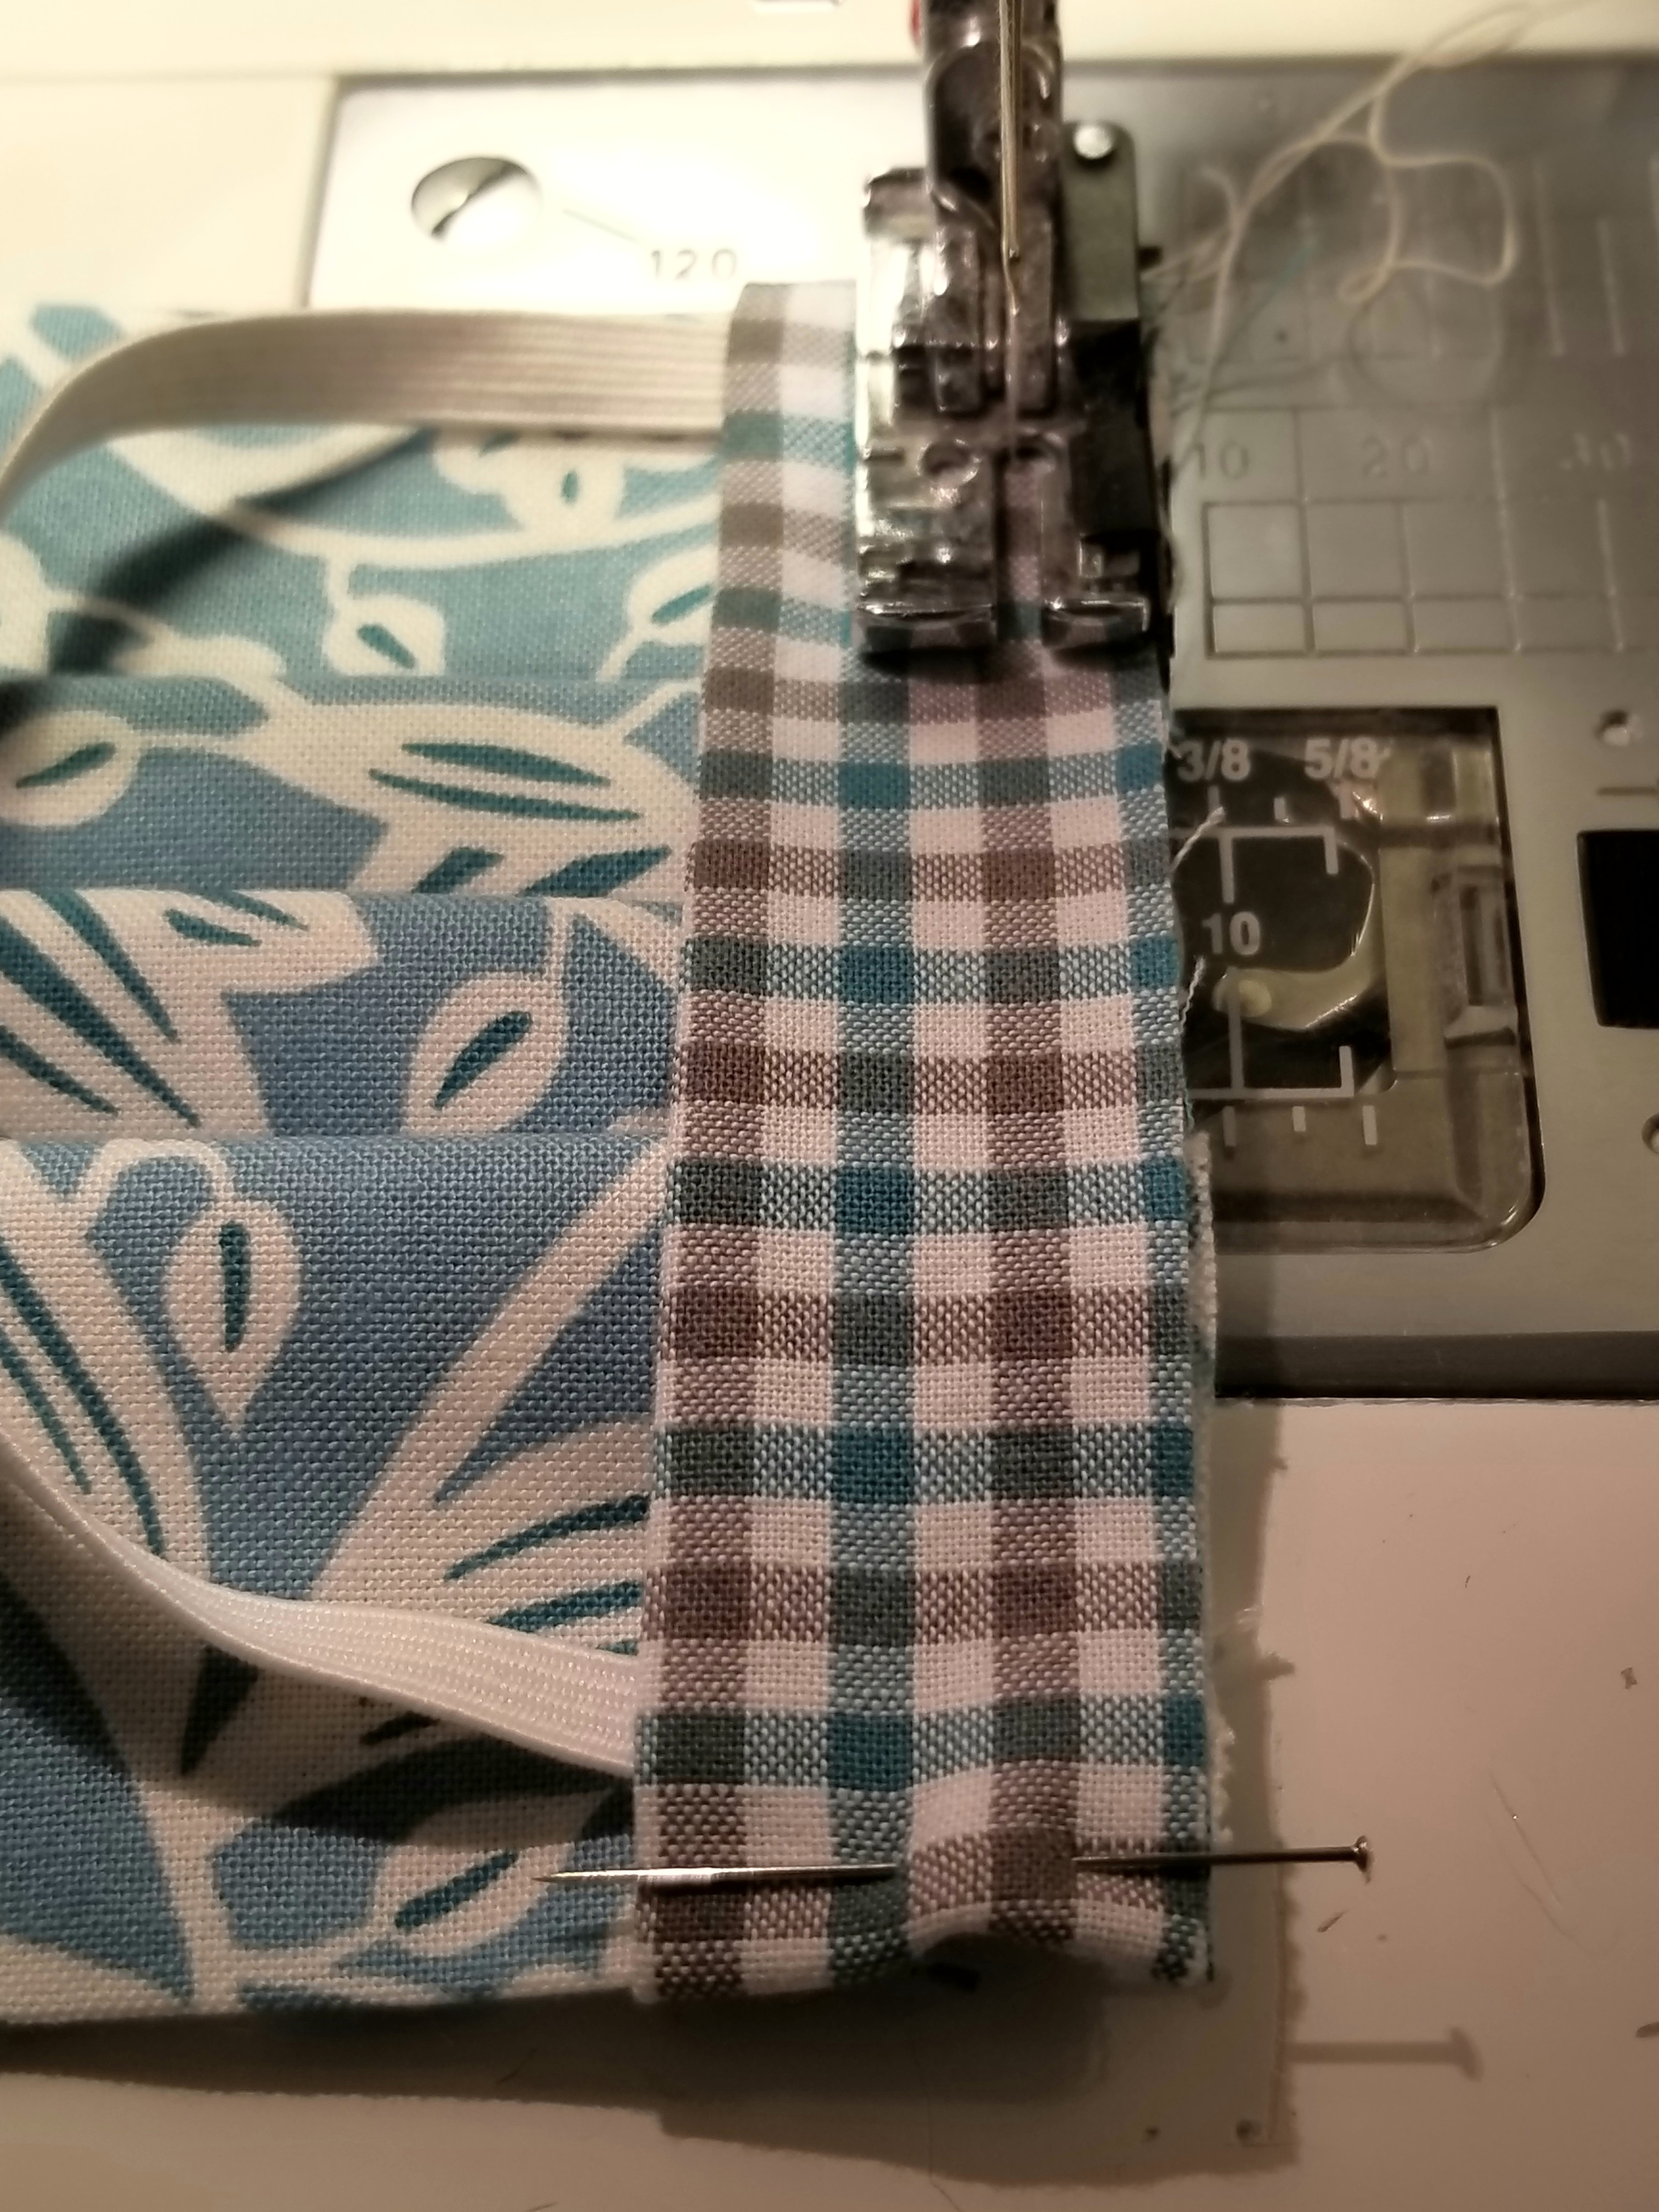
Using a 1/4 inch seam allowance, stitch the length of the entire edge, making sure to back stitch at the beginning and end.
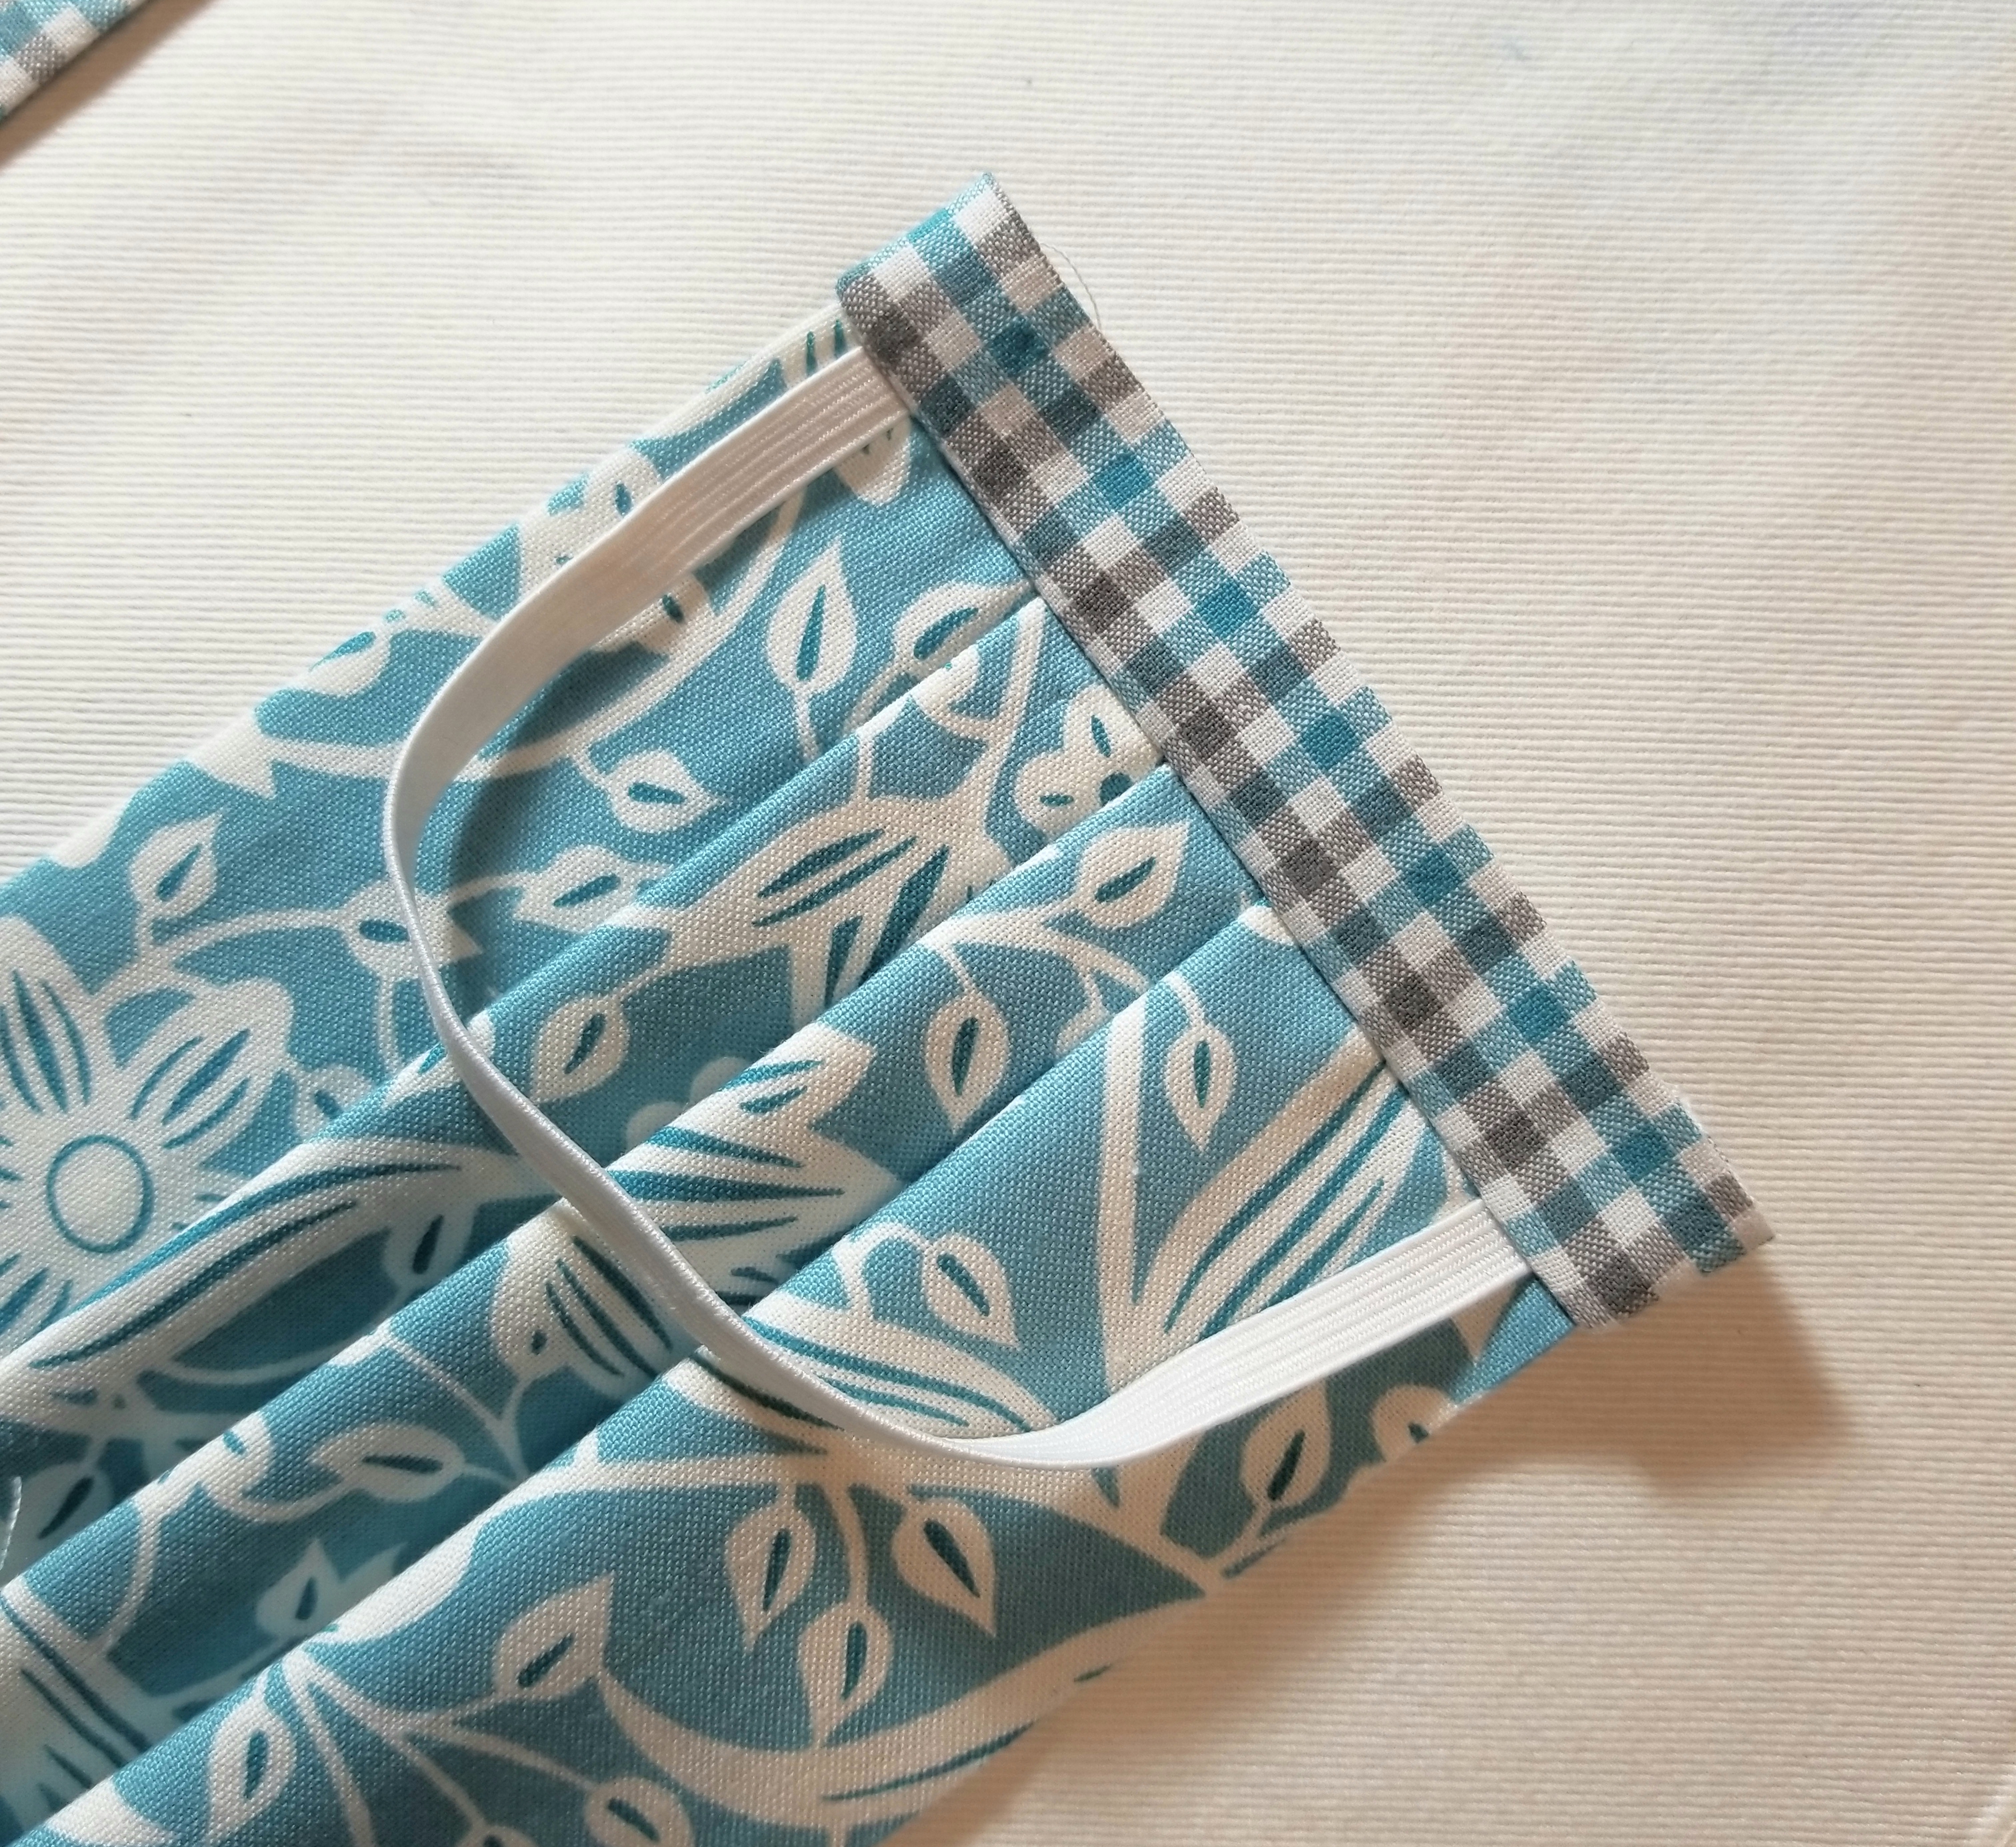
Open the the accent fabric strip seam by flipping it outward away from the main pleated piece, then press.
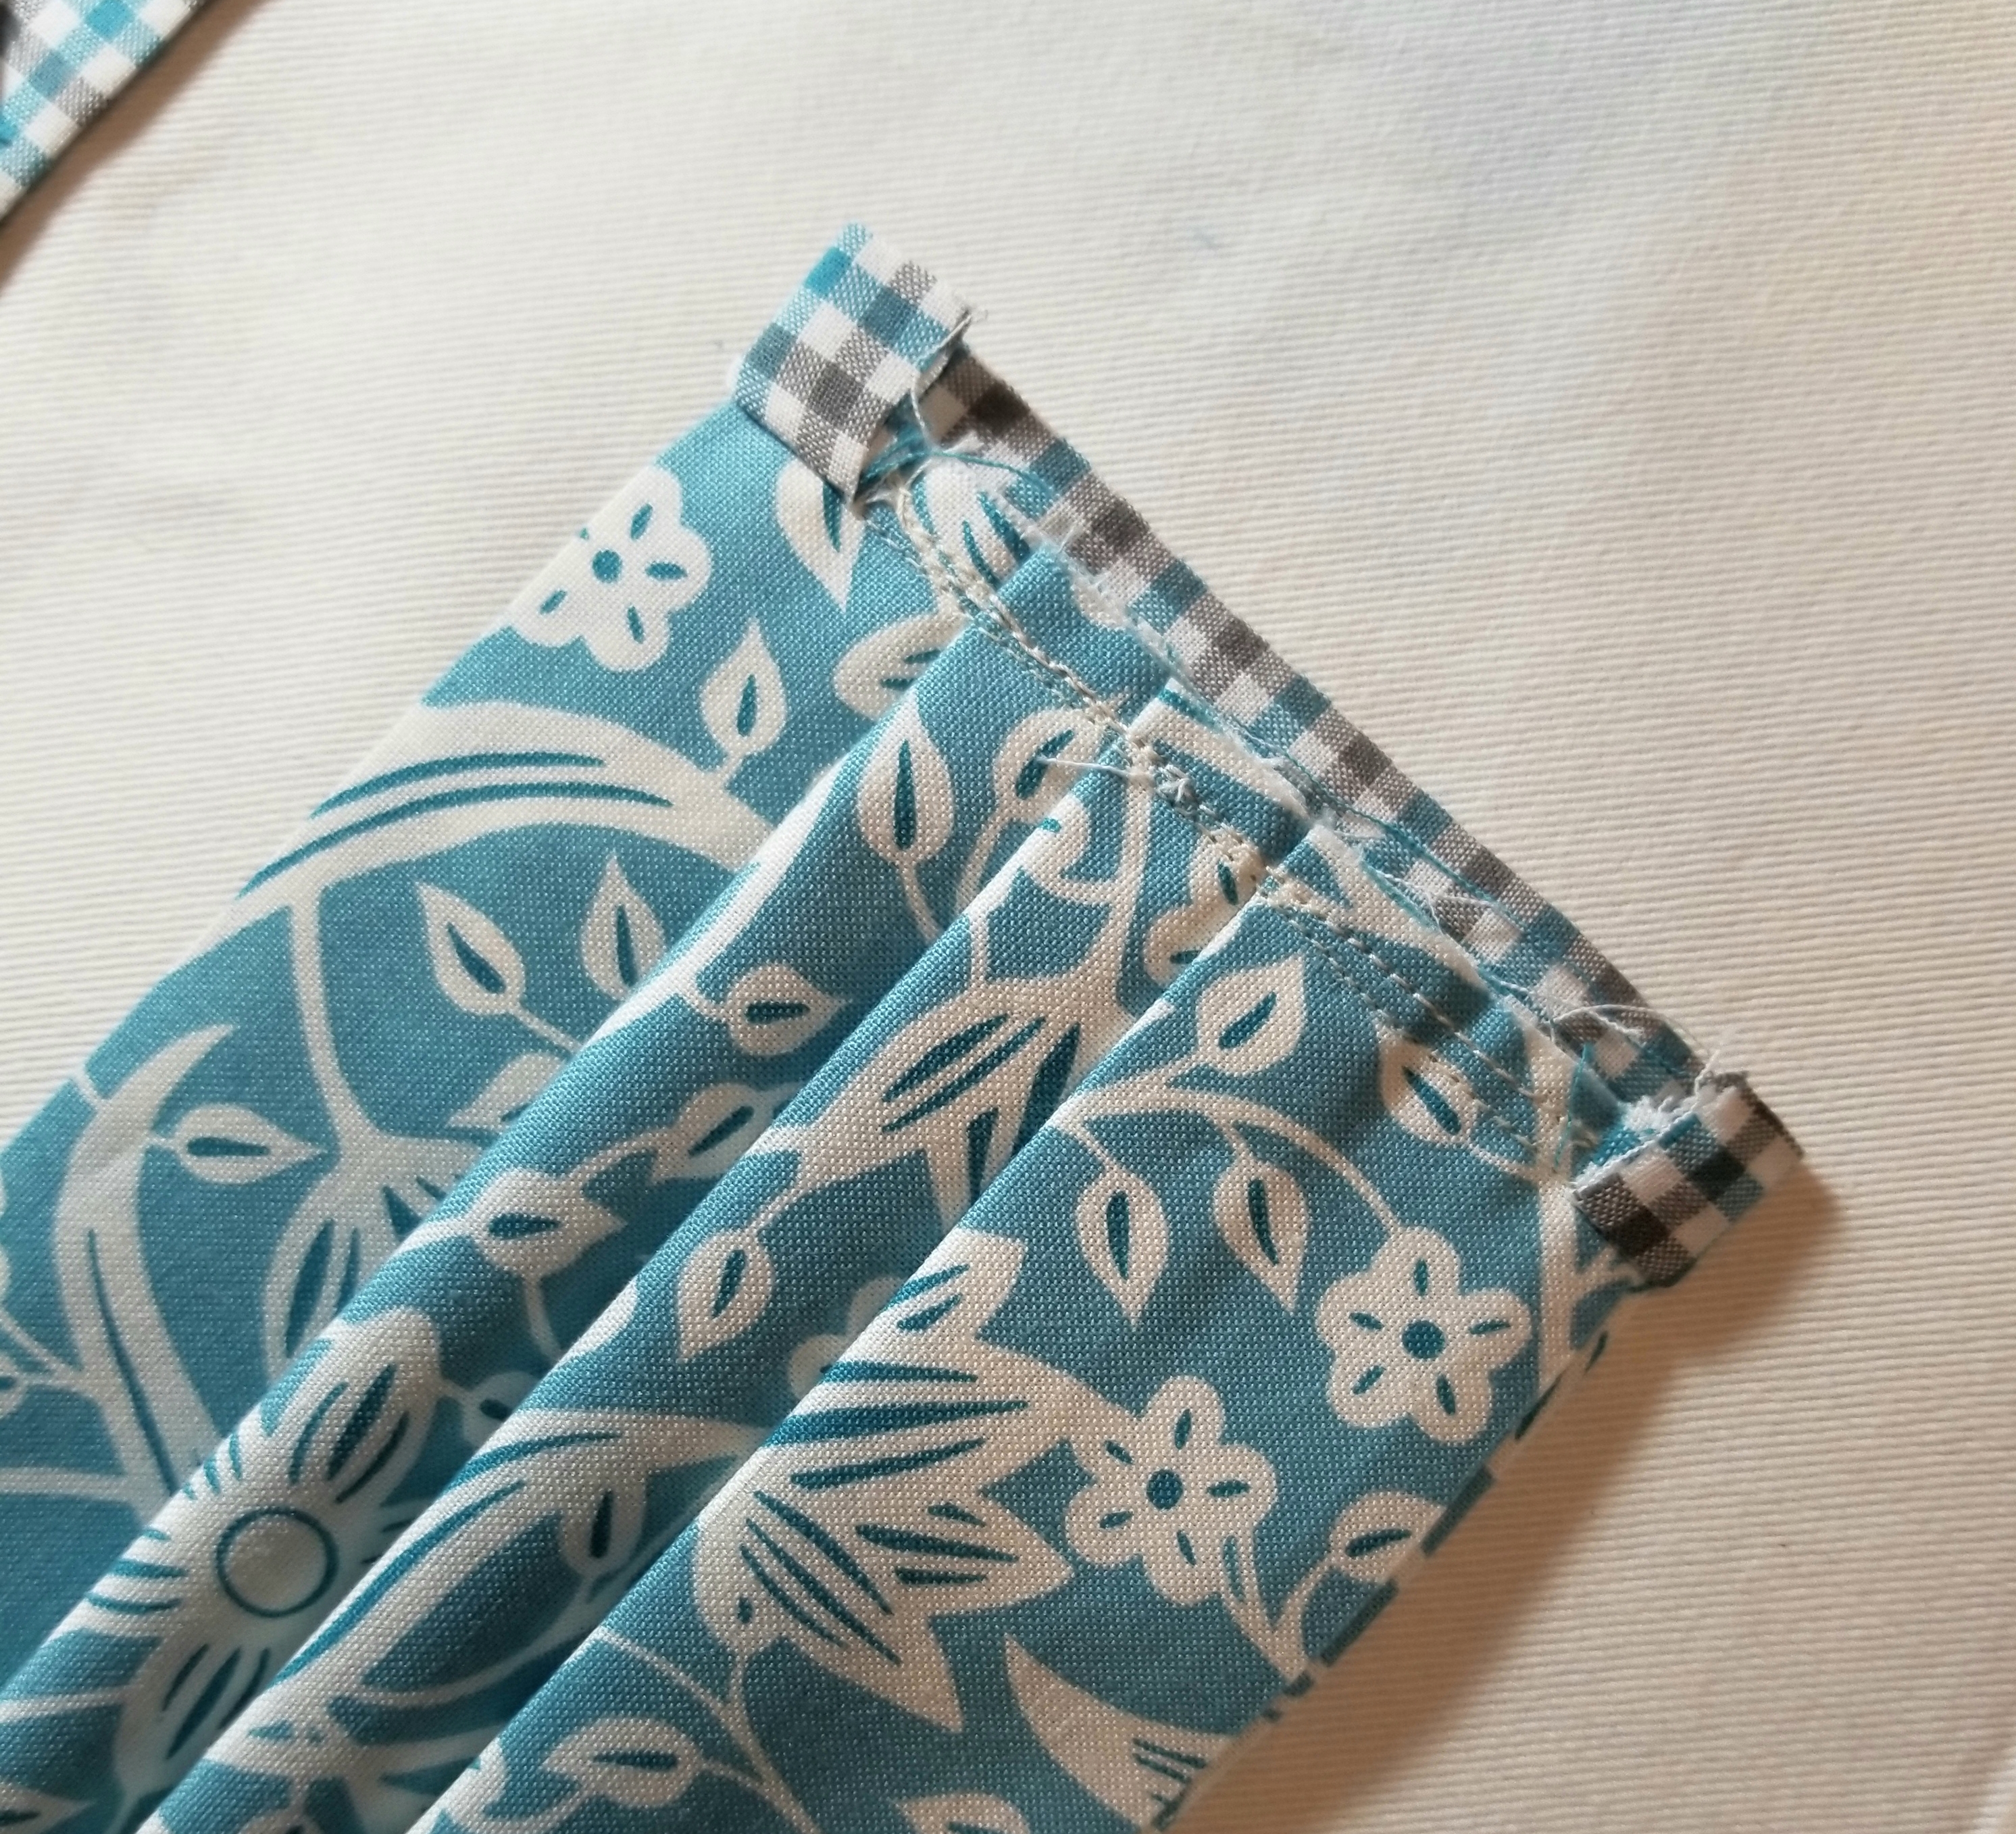
This is what the mask should look like if you flip it over.
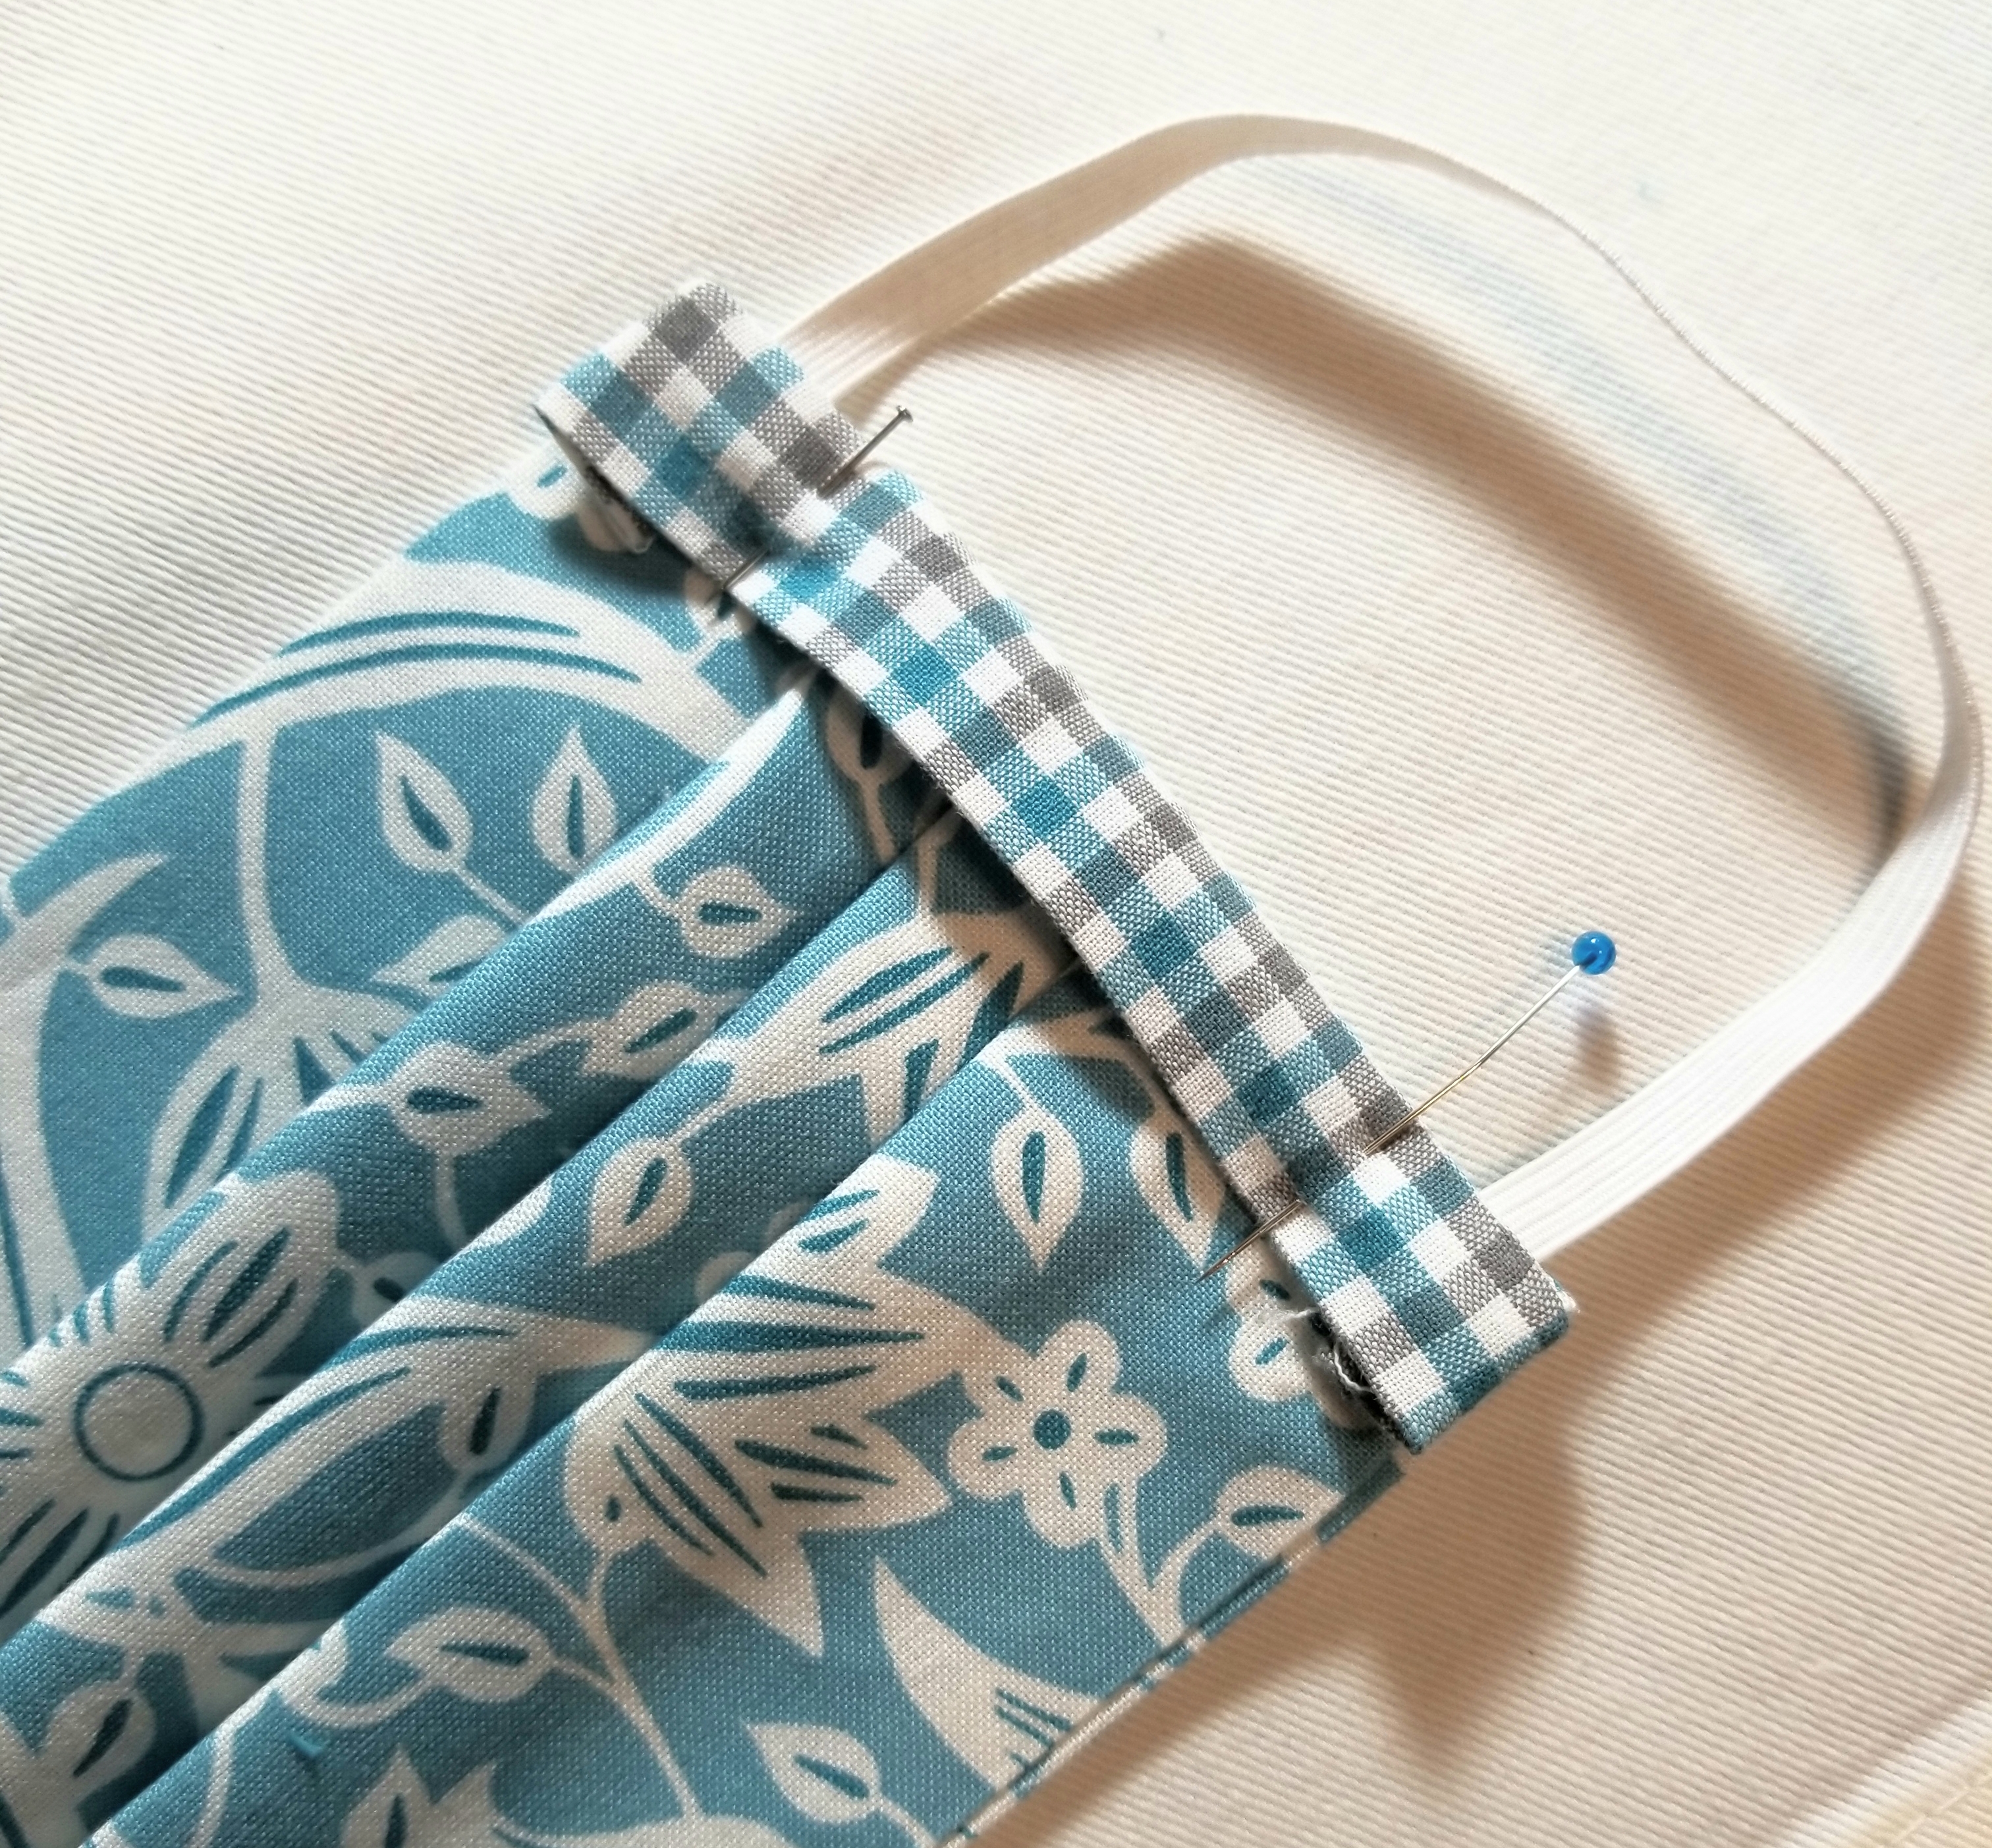
fold the ENTIRE accent piece down toward the main pleated piece, encasing the raw seam. You will now see the accent piece on this side, but not at all on the flip side. Press. Pin edge down.
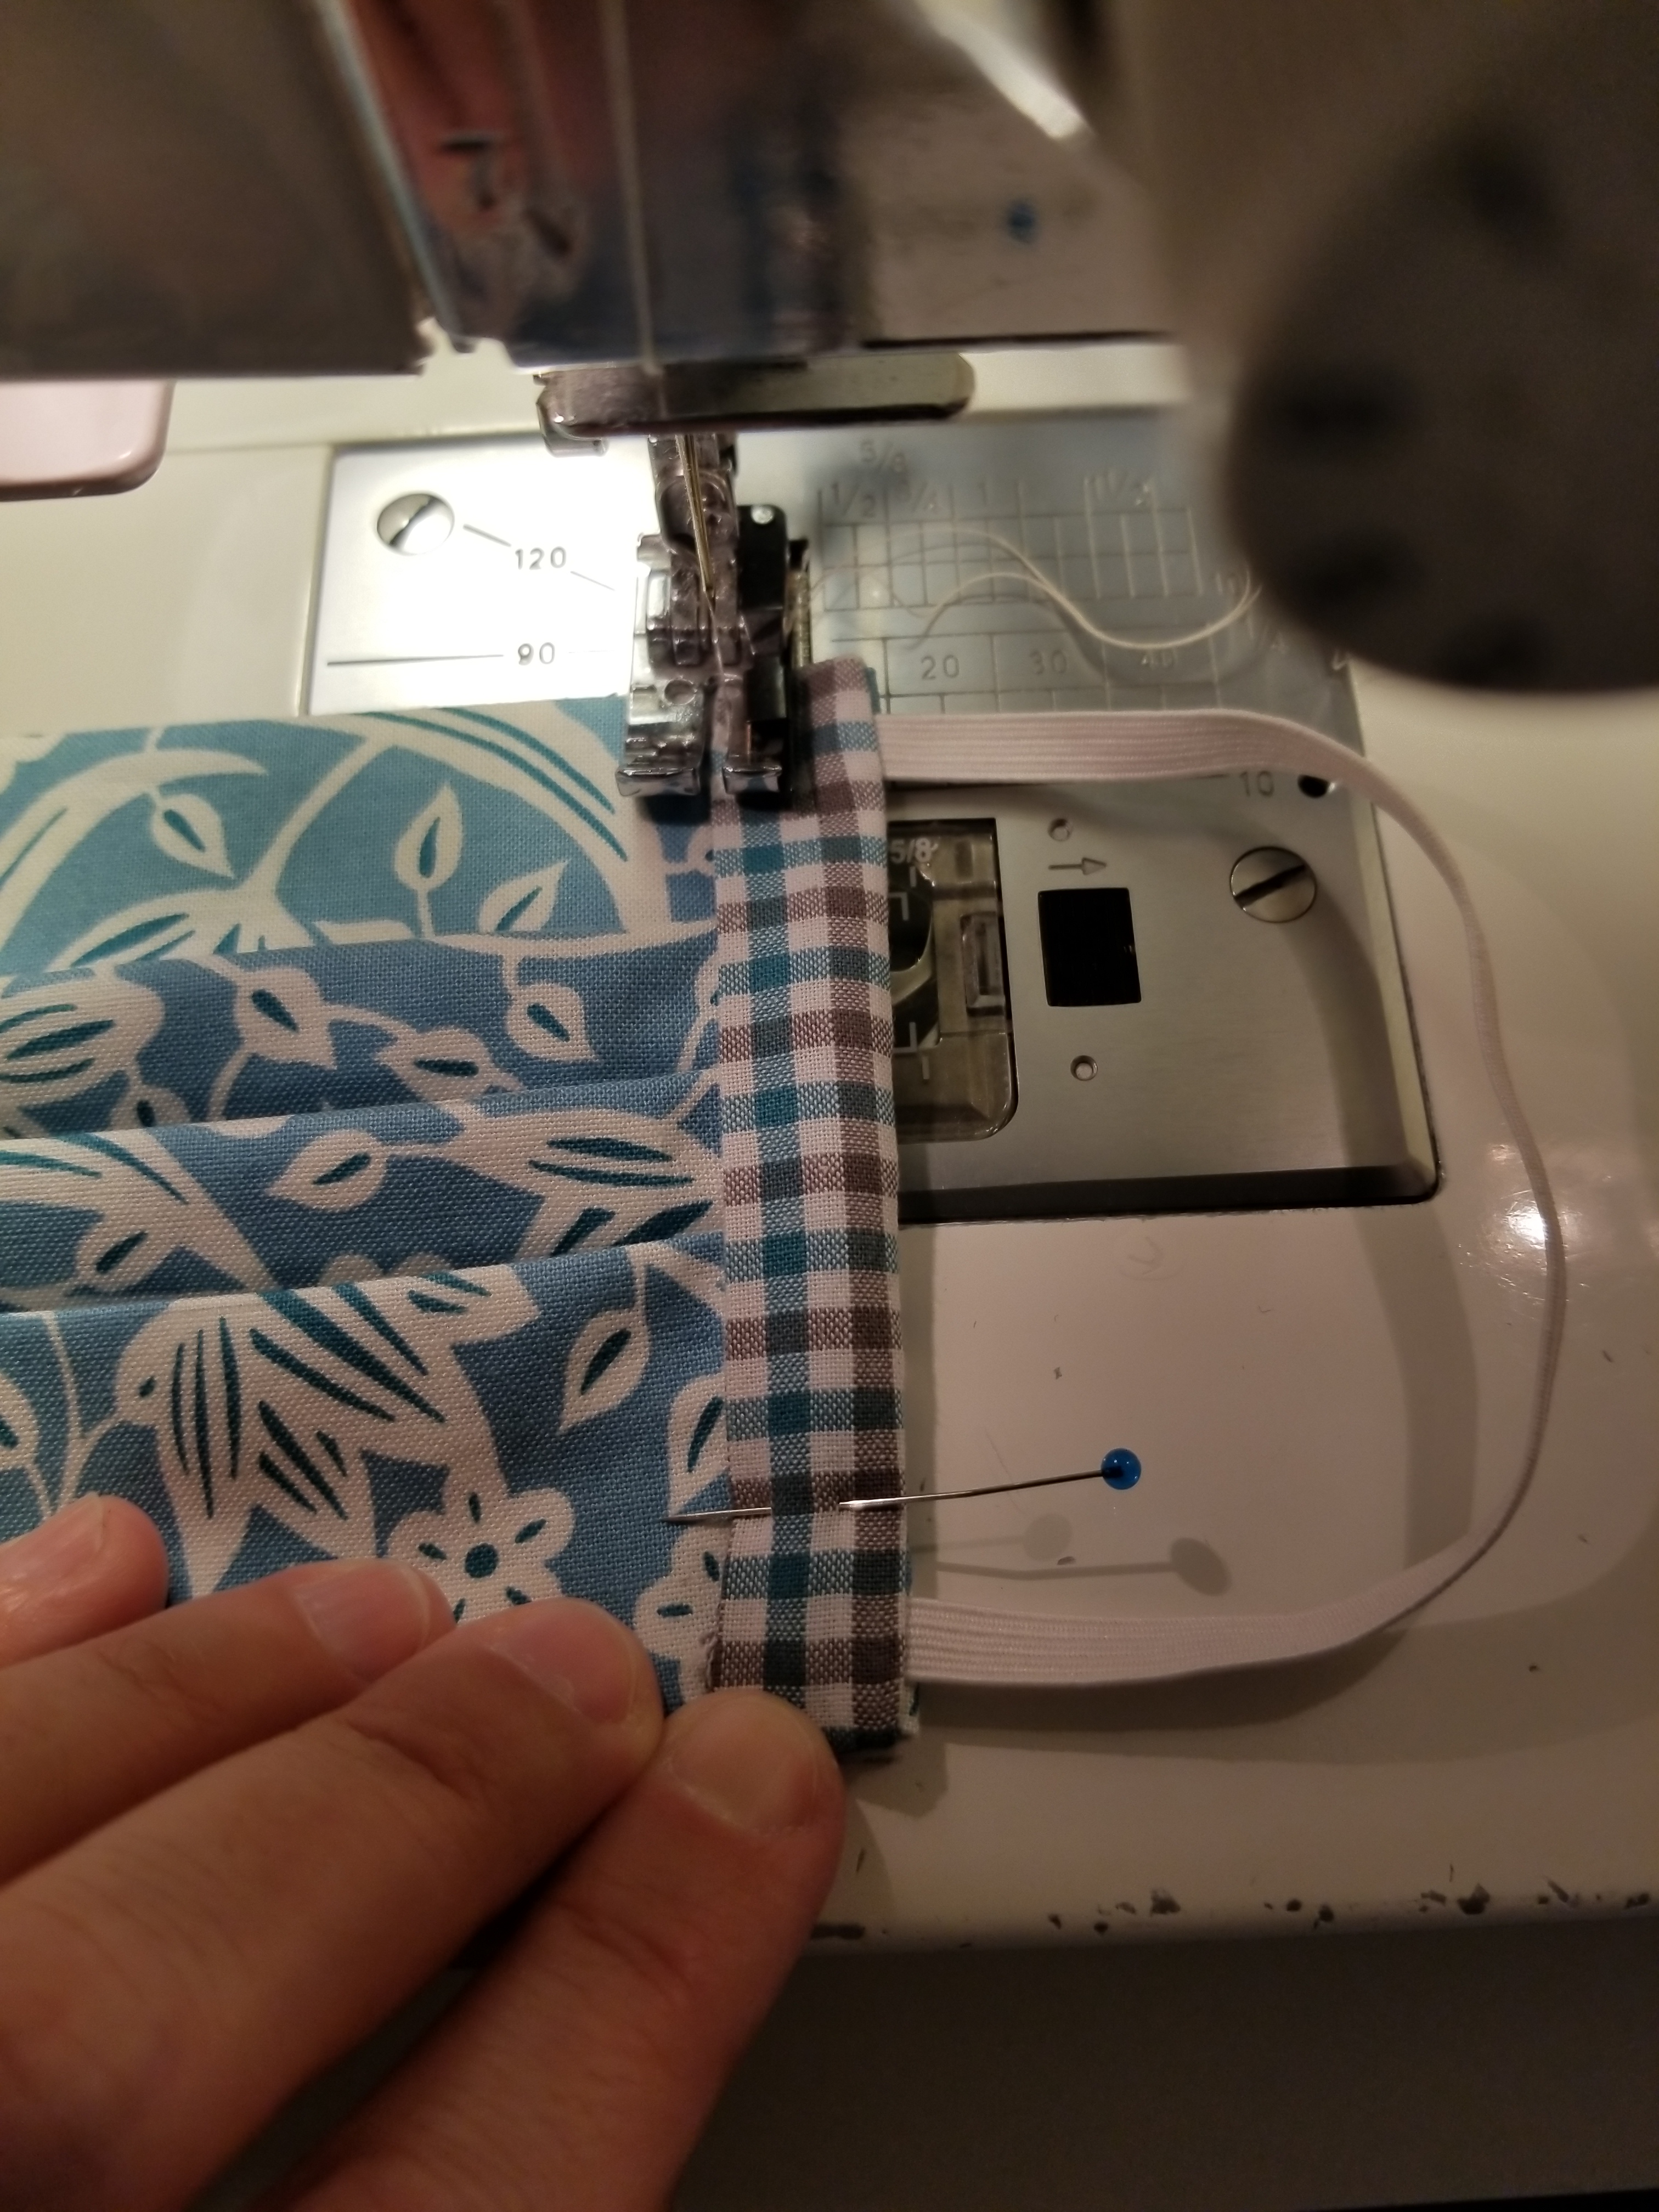
If you are a good sewist, you will change out your presser foot to a straight stitch foot. If you are lazy, like me, you will keep that 1/4″ presser foot on your machine and struggle your way through this next step. 😀 Stitch this accent strip down to the main body of the mask, sewing along the edge, making sure to back stitch at the beginning and end.
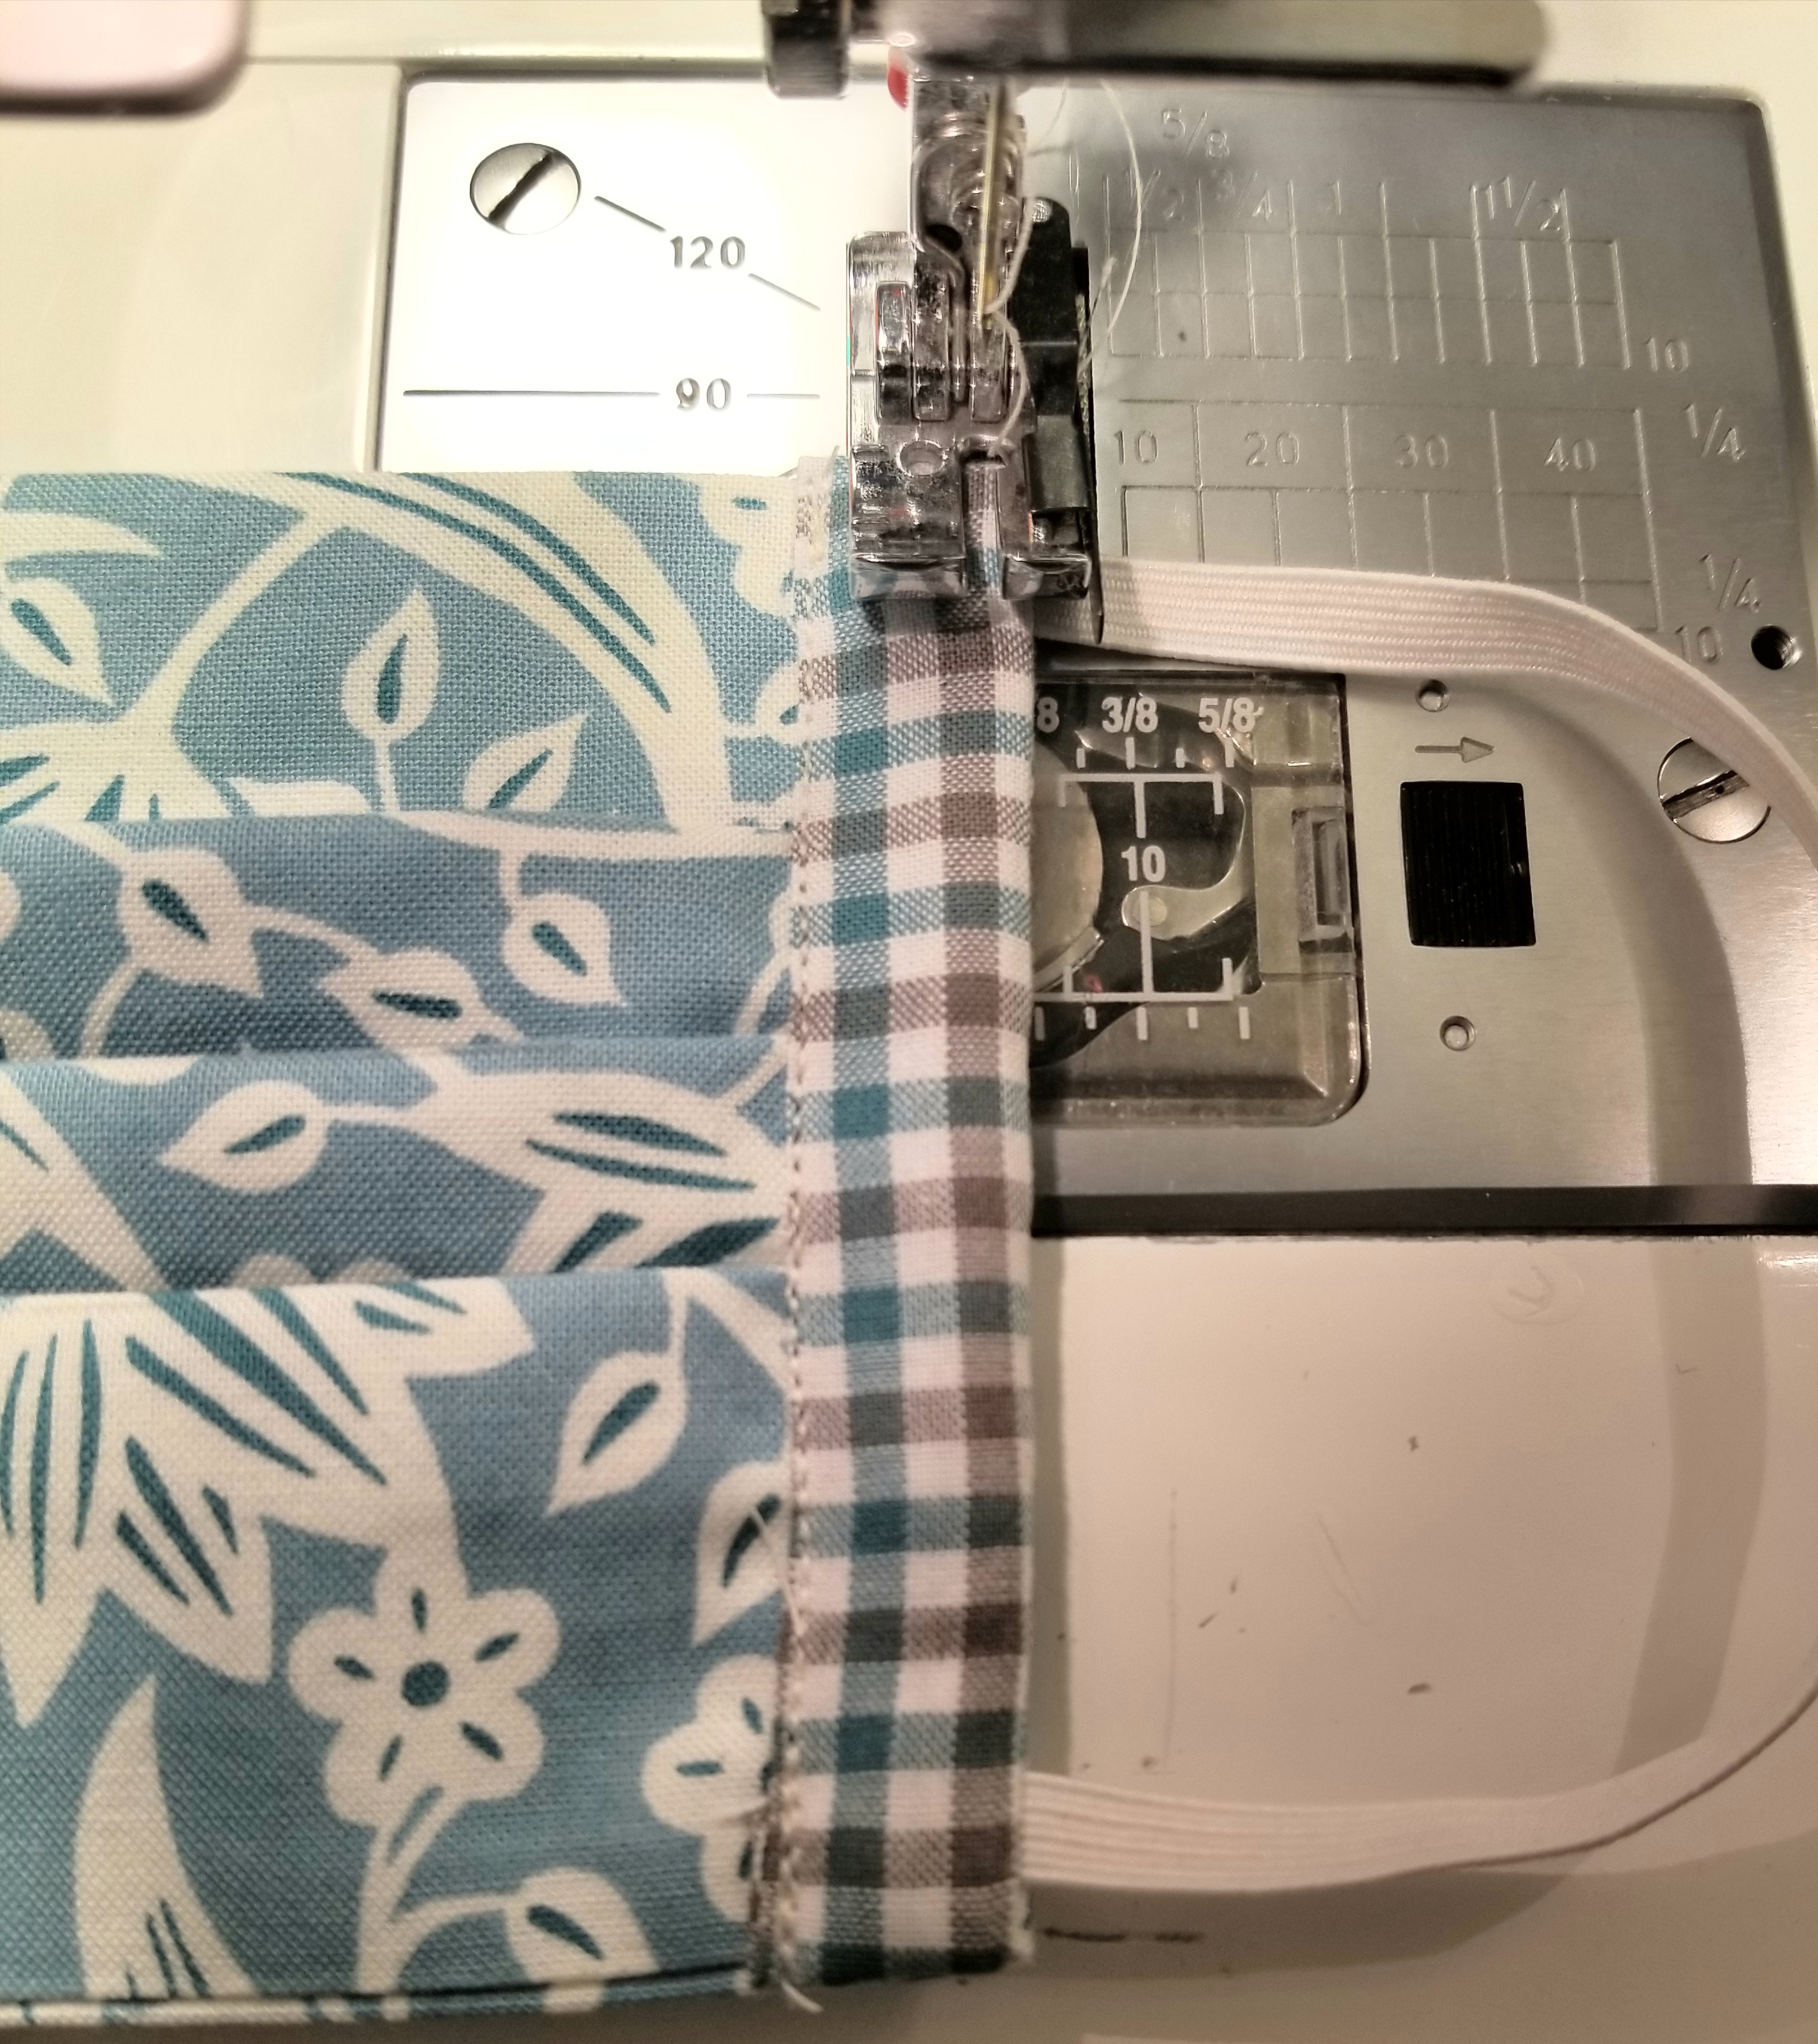
This step isn’t necessary. It just gives it a nice finished look, and helps to give that elastic a little extra stability. Stitch down the edge of the mask close to the elastic side.
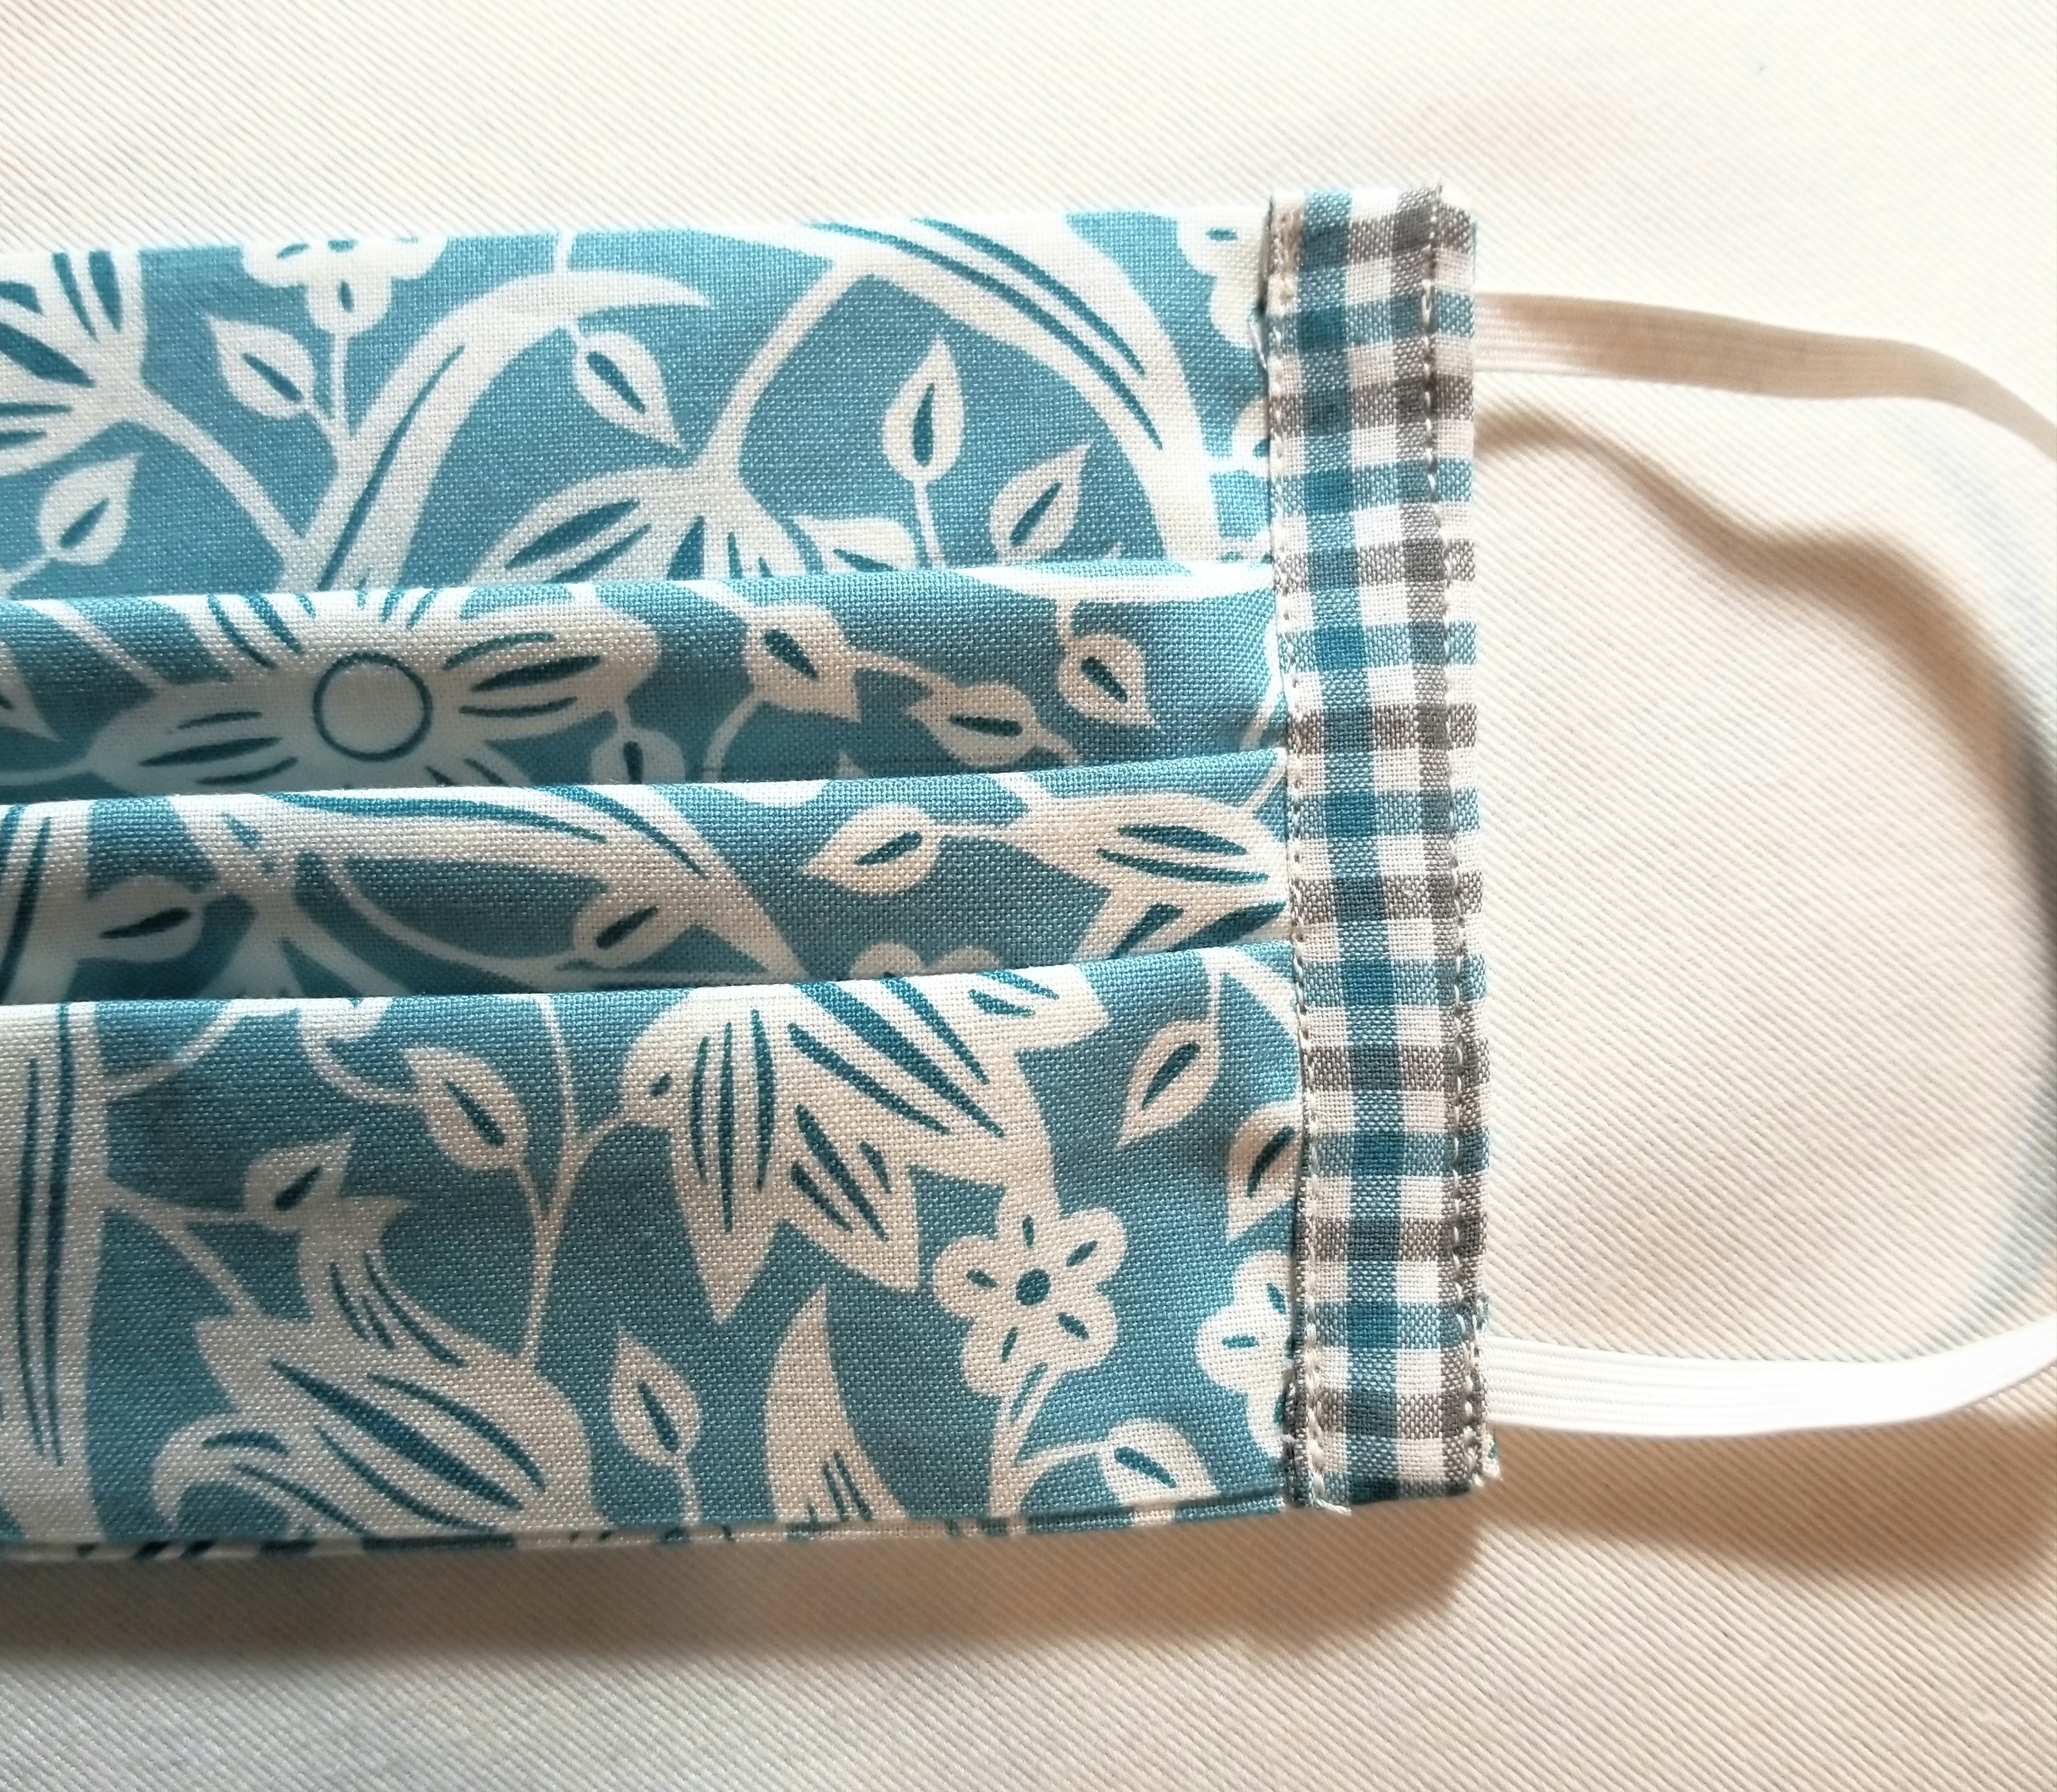
The front of your mask should now resemble the above picture.
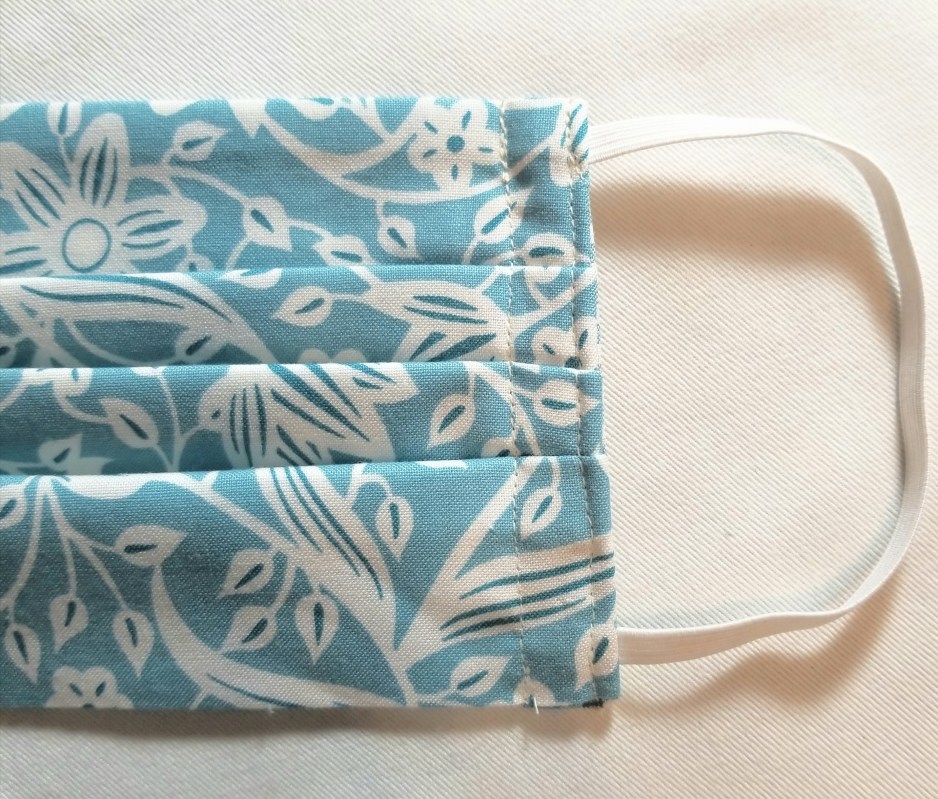
The back of your mask should look like this. Following the previous steps, attach the remaining accent fabric piece to the other end of the mask.
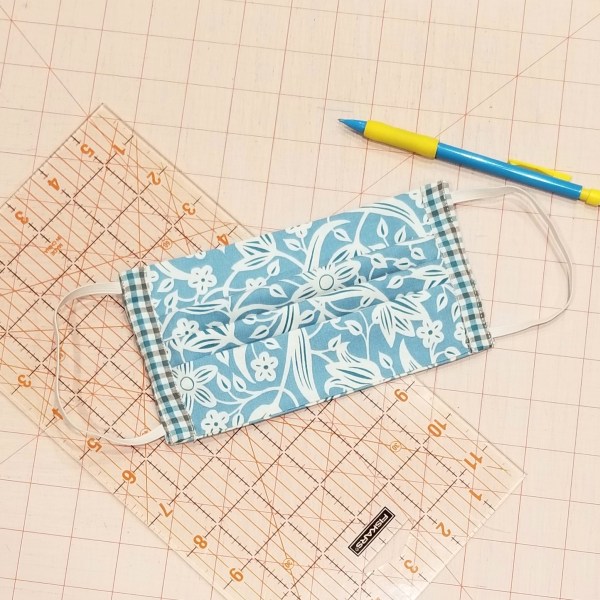
You should now have a reusable, washable mask that measures approximately 4″ x 7″ (unopened).
It took a few hours to put this free tutorial together for you. For this reason, I am greatly appreciative for any mentions that you can give me if you should use this tutorial. If you post a picture on social media, you can use the hashtag: #buttoncountermask. Feel free to share this page, and please tag me in your pictures so that I can see your beautiful creations. Last, I appreciate constructive criticism, so if you notice something that doesn’t look right, or does not make sense, bring it to my attention. I am happy to clarify any steps where you may have questions.
Enjoy!
P.S. Obviously, the elastic length can be adjusted to your facial measurements.
EDIT (March 24 2020): Because this tutorial has recently been used on a large scale, I will be adding a few things here as frequently asked and answered questions, suggestions, and reminders.
- This tutorial was happily shared by me over a year ago. This is not a new tutorial created in light of the current virus pandemic. I am not in charge, nor affiliated with any organization or entity requesting masks to be made. There are multiple organizations that are using this tutorial for their requests. If you have any question regarding what their requirements are, you really, really, really need to ask them. Please understand that I cannot and will not tell you what you should use, or how you should make your mask different from my tutorial.
- Keep in mind also that there are multiple entities that are using this tutorial for their requests. One entity may have completely different requests regarding features than another entity. (for example one organization is requesting a 4 layer mask, while another is fine with the two layer, as their thoughts are that they can be doubled up or used as a cover or liner to another kind of mask.) So, there is no correct or incorrect mask. Who are you making your mask for? Those are the people to whom you direct your questions.
- CHILD OR BABY MASK: After much thought, I have decided that it is in my best interest to NOT supply a mask tutorial for anyone other than an adult. One of my reasons for this is that I feel that a mask could pose as a choking hazard, and I do not want to have any part of that scenario. My suggestion is that you really should ask each individual child’s doctor or provider what their guidelines are, and go from there.
- I will not be held responsible for any mask misuse or malfunction.
- ELASTIC OR TIES? The main reason why my tutorial uses elastic is so I don’t have to tie it behind my head and mess up my hair. That’s it. So, if you are making the tutorial, and you don’t like the elastic, or if the person who you are making your mask for, requests ties; by all means put ties in yours. My pattern is very easily adapted to your preferences. There are organizations specifically asking for elastic, and some that are asking for ties only.
- ELASTIC LENGTH: I have read that a few of you recommend longer elastic; however, mine ended up being slightly loose. Therefore, I will not alter my pattern. I have stated in the tutorial that elastic length will need to vary due to the fact that human heads are not uniform (Thank goodness).
- I don’t have a PDF or printable version of my tutorial. If I decide to do that, I will; but it will be in my own time. I have received many hateful comments (that I deleted) demanding that I provide this. I need to remind those few sour apples that I am under zero obligation to do so. If my absolutely free visual tutorial isn’t to your liking, I invite you to go find one that makes you happy. If you are a person who often finds themselves using the words ”I need you to…”, you might fall into this category.
- I am completely honored that many of you are using my tutorial, or even certain aspects of it to help people in need. Even if you are using a completely different tutorial or pattern and just stopped by to check this one out, I applaud you for being a maker during this time. I cannot express enough how happy it makes me feel to see so many humans getting together to do something for the greater good. Please continue being that human. Those are the best ones.
I am signing off now to take care of my family, who needs me now more than ever. Thank you all for your kindness and understanding. God Bless.
 Button Counter
I really feel for you with your allergies. I too have severe allergies which caused me to stop working. On the plus side, I get to do more sewing. The last thing any of us needs is advice from other people! Thanks for the tutorial. The finished product looks great.
Sue, were you able to make one of these? I hope you did! I apologize for not saying anything here, but I am so glad that you came to check this mask out. I have used these a lot. (I even have one for cleaning around the house, with really helps with those dust mite allergies!) Finally, yes, while most people have only the best of intentions, unsolicited medical advice (especially from uncredentialed sources) is very rarely helpful.
Hello, I wanted to let you know I have passed this pattern on to our volunteers to make some masks. I work for a Hospice in PA and we are looking ahead if we are unable to keep our supply of masks stocked, these will help in the interum. I will try to post once they are made. Thanks much for posting. I appreciate the step by step pictures as I am a visual learner.
I am leaving a reply because your comment section is messed up. You need to know that I shared this mask pattern on facebook because due to the COVID-19 our hospitals need help. While these are not N95 masks, those not in the COVID section of hospital could use these masks leaving N95 for the virus section. They are running out and having to reuse, I have nurses calling me begging me to get production line going. So please if you could ask your fellow seamstresses to go into production in their homes and contact their local hospitals for drop off, please do.
Thank you, Tricia. I appreciate the share. I agree that the N95 masks should not be wasted. Thank you for your input.
I found that the 1 3/4″ tab on the ends was not wide enough to cover my previous stitching. I also found it to be too thick for my machine. I used the flat piece of tab worked much better. I stitched one side to the mask, RST. Then I folded in the ends and folded over to the back and covered all my previous stitching. I pressed and pinned.. Then I stitched in the ditch from the front, back stitching at the beginning and end. That secures the back just fine. I
I love this idea. I work in a hospital in Iowa and we are in need of masks but I don’t understand how this
Thank you for your tutorial, I like the contract patterns of two different sections, It turns out just lovely.
Thank you, Edna! I hope you are getting good use of these. I am so glad this is helping others.
I’m going to have to try making this. You did a great job explaining how to DIY this. Thanks..
Thank you Eva. I often wonder if I am being clear, or if my showing is difficult for others to follow. Your feedback is very helpful. I hope that you were able to use this easily enough. Have a great day!
This si really cool. Thanks for taking the time to share!
You are so welcome, Ann Marie. I am glad that you were able to use it.
Hello! I absolutely love this!! I was wondering if you had time to get the kiddo’s mask measurements yet?I have a 5 year old that could use some of these. Thank you!!
Jackie, yikes!!! I never did. Guess what I am going to do today, other than decorate the Christmas tree? Yep, measure, cut, sew. Thank you so much for kindly reminding me. I appreciate your reminder. Thank you!
Any child measurements yet? 🙂
Did you figure out fabric measurements for 4-5 yr olds. Thank you so much.
Shirley, not yet. I have been blown up helping people with questions, etc, but I will figure something out using similar directions, but smaller dimensions.
Thank you so much. My friend has no immune system due to cancer treatments. This just popped up.
Paulette, I wish that no one had to endure cancer treatments. What a wonderful friend you are that you were able to share these. I hope they were at the very least useful, but I imagine that your friend was thankful to have these from you.
I don’t have allergies (but I feel for you), but every time I fly on an airplane I catch a cold! When we went to Australia earlier this year I wore a storebought face mask and low and behold NO cold on this trip. So I am going to start wearing one whenever I fly. I was wondering if you find the homemade ones as effective as the store-bought ones?
Thank you for your kind comments. I hope these have been helpful to you on your trips. I was surprised to come to the conclusion that the homemade ones were just as effective as the store bought ones; probably even better is that they don’t gap and sweat like the store bought. I have had great luck with mine. Maybe it is because they fit to the face better, and have doubled layers for filteration (?) I will state that no scientific experimentation was done to come to these conclusions, only experience. So, if any children need a science experiment idea out there… 😉
The CDC has experimented with homemade face masks in wartime / emergency situations. They found that cotton fabric masks are about 50% as effective as commercial masks, which is much better than no mask. The CDC recommend chopping up a Hanes heavy cotton t-shirt as the optimal fabric for comfort. I don’t see myself purchasing a bunch of t-shirts for this project. A poly fabric filter might help, but I wonder what gauge of polyester filter fabric would be best. Does anyone know?
I am not sure Liz, I can only say that this mask is double layered woven cotton, which might be thicker than a hanes heavy cotton t-shirt. My mask has (very likely) not been tested in CDC’s guidelines, so I have been recommending people to talk to their own doctor for guidance in this matter. A poly fabric filter could be added as an alteration, but again, please use your own discretion.
I made a mask with a directional print. The only add in for your tutorial is to have people work on the side of the material that has the up side down motifs with the seamed edge to bottom to build the pleats. Great tutorial. Thank you for the idea.
Deb, thank you for mentioning this in my poorly monitored blog. :D. I never did get around to mentioning this to those that want the directional, and I thank you for sharing this information here. Also, I hope the tutorial has been useful to you.
I love this. My friend has to wear one of these because of her disease. I think I’m going to put in a dryer sheet after it’s gone thru dryer cycle so it will filter better but smell good. Thank you. Great explanation
I am so glad that you are able to use this. I too love that I can wash and dry it. The advantage to cotton is that it filters so well, and is soft on the skin, but the one disadvantage is the wrinkling. I don’t mind a quick press, but I can see where others might object to that step. 🙂
Drier sheet perfumes are very irritating to your lungs—not something you would force a person to breathe at every breath!
I agree. I mentioned this to another comment as well. Thank you, Whitecat.
Very cute idea, and the tutorial is excellent. If you are using this to filter pollen or dust, you need a filter medium as two layers of cotton fabric will not remove the cedar pollen. Cedar pollen is 30-40 microns (reference: human hair is 150 microns), and will quickly go through cloth. Check amazon.com for polyester filter that comes in a variety of micron sizes and is washable. A layer of filter would only be 2-3 mm, and be a much needed layer of filtration.
Absolutely correct, Cheryl. Thank you for stopping by and adding this information. The ceder pollen is so thick here in January, that quite honestly, these masks are so much better than what my alternative was, and that was not wearing one at all. The masks that filter much better tend to bother my breathing (I don’t know why, maybe my asthma is to blame? I am not sure on this one.) and when I go for my walks, the thicker ones get sweaty. I guess it boils down to the idea that I am more likely to wear the mask if it is comfortable to me. I wonder if there is a softer filter that I can insert between the two layers of fabric that I can actually use. It’s worth me trying out. I will have to play with this to try some ideas out. Thank you again for your input. It is much appreciated.
Your masks are more than 2 layers thick with the folds/pleats…making them 6 layers across your nose with the pleats. So you are getting great filtration! A layer of the thinnest interfacing could be added to the 8×7 area, as to not add much bulk, on your first step, if more is preferred. I was sent to this page by a hospital in Oklahoma which is needing facemasks for hospital visitors and “well” patients as they combat this coronavirus. They specified 4 layers for the masks. I hope to get through my fabric and get some made for my local hospital. Thanks for the tutorial!
If making these for medical use, what micron size should we order? My daughter is a physician and has asked me to make some.
Thank you so much for this excellent tutorial.
My sister has 15 years experience as an emergency room nurse lead, and is now a nurse practitioner. She states that having a mask made of cotton over your face is better than no mask at all. Years ago, masks were made of cotton, and were washed to be used again. We live in an disposable society, where people are currently reusing disposable masks that is probably causing more harm than a cotton one that may not filter as well as (higher grade) manufactured one. I hope that this helps to answer your question or at least put you at ease about just making them as is. Please respond if I failed to help you, as I genuinely want to help.
Thank you so much. Your tutorial was great!
Super! I hope it was easy to understand. I can’t wait to hear how they turned out.
This post is probably getting a ton of hits today because it’s been shared on twitter today as a mask to mask for people to use as an alternative for people in hospitals and the general public who cAnt find disposable masks – your tutorial is really easy to follow as well – so you will be making a lot of people feel safer 🙂 – I know I’ll be seeing a couple – I was thinking about adding quilting batting into the interior – would that help with filtration do you think? Someone else mentioned used Bounce sheets 🙂
I know that extra layers always provides more filteration, but if it gets too thick the air comes in around the mask, and you don’t want that either. As far as using bounce sheets, I am not at liberty to recommend, but I would worry about any chemicals that might be in the Bounce sheet as it wasn’t designed to breathe through. Just my thought, I hope this helps. Please use your own discretion.
Thank you so much for the easy directions, I haven’t made one yet but plan to make several. I have 4 autoimmune diseases so have no immune system thanks to medication and my 81 year old mother has lung cancer so we don’t go anywhere without a mask, so going to find some cute material
Thank you for this tutorial, my daughter has influenza A & the Dr advised her to wear a face mask around her family. With people hoarding them she couldn’t find any but I was able to make several in a few hours following your pattern. I did cut the main body in half so I could make the side against the face out of flannel, turned out awesome
And this post is timely once again.
My doctor told me to wear one not so much to filter germs out of the air– it won’t do that– but to keep my hands off my face. So I’m thinking ‘fashion accessory” with a practical side.
Thank you so much for the detailed instructions!
Found you via http://www.sewcanshe.com. I really like this facemask pattern with the coronavirus situation. Have you made the child size? It would be perfect for a family member’s son who has a suppressed immune system due to cancer. Thank you for your generosity in making this pattern free to us. Much appreciated
Thank you for the tutorial, i would try it and put a pic for you to see soon.
Very useful tutorial at this time of trouble worldwide. Thank you.
I am 5 years retired from a Hospital-run medical clinic,and this style is exactly like the masks used in the clinic. The pleats help keep the mask in place with different facial movements. Thank you for this tutorial.
I am going tomake a few of these today and pass them around, esp to the elderly… I plan to make them, wash them and iron them… put them in plastic zip lock bags and just hang them on the doors. Thank you for sharing this…. I have been using regular masks but am now running low. I bone marrow cancer and this has been necessary for me for a few years. Never thought of making my own.
Thank you for taking the time to share this! I understand the disclaimers but to me, if I have to go some where, this will be better than nothing. It will help to avoid facial contact and contain coughs. I plan to make a test run on one and if I get it correct, make a dozen for the elder community at my church. It’s a bonus really, because while we avoid contact we can look stylish! Add a smile for humor 😉
I am very appreciative of your time and energy in creating and sharing this!
Great job on the masks. I’m so grateful for your time to post this. I passed it along with your hashtag on it. I have a lot of fat quarters and plan on getting them out to see if the measurements work with them!!! Have a wonderful day, Ms. Button!! 🙂
Great tutorial, easy to understand, thanks and bless you for taking the time to write this out and share. I appreciate your caring and your effort!
Great tutorial. Easy to follow. I found that the size came out a little small.
This is wonderful. My daughter works in healthcare and they are running low on masks. I ma making her several. Also making a few for my granddaughter who has severe asthma. Not sure how to add a picture but the tutorial was great!!
Thank you for posting your tutorial. It makes it easier I think when there is pictures to go with words on instruction.
just right. i’ll be making more for my neighbors. only thing i would add to the tutorial is that i pressed the pleats before basting the sides. it really feels better than the paper ones that you buy?
Thank you so much for sharing this awesome tutorial. I plan on making a few of these for friends and family.
Absolutely brilliant and very pretty for a functional piece.
Just wanted to let you know what a HUGE help this post is!
I was asked by a friend to make some of these for a respite center (the patients have masks, but due to the shortage, employees did not have them — they did not need to prevent COVID-19, just another layer of protection between the employees and patients) and I just could NOT figure this thing out until I saw your post with all the wonderful photos. Thanks for taking the time!
My daughter just sent me this link. She is an ER nurse and said they are running low on face masks. I have sent your link to several friends who sew. While we are all at home, hopefully we can make several to help at the ER. Thank you for your helpful tutorial. Linda Daniels
Love this mask, I am just going to make some now, given our current health climate and I have a few dear people in my life that need to continue working in essential services. But I am just trying to find the size to make these face masks.
Great job on descriptions Look forward to making these
Interesting you are pushing a mask that is largely useless, just like the paper ones people are using. You really need a good thick multi layers of medical grade blocking materials with a hepa filter to be safe, like a good Vog mask. Even for allergies. Even for things like pollen or smoke. Bet you don’t let this comment through because it runs against your ideas. You are harming folks posting this.
Thanks so much for this. Do you know, if you prefer ties on it instead of elastic, what the measurements are for the strips?
Your pattern has been shared by a hospital that is running out of masks due to the recent outbreak. I applaud you for having this available to everyone at this time of need.
What type and weight of fabric would be suggested for this if I wanted to make several for doctor’s offices and such?
Thank you so much for posting this! One local hospital has been asking people for them. The directions are excellent, I just wish I could print them so I’m looking at a small folder instead of my laptop.
I put a wire twistie in the top for a nose bar so I can shape it to my nose.
I loved the pattern. I thought it was very easy to follow. Live in a very small community so will make some for my small local hospital. Thank you so much
Your mask is being recommended as one for people to make for hospitals to give to patients and other people on site
Thank you for showing your mask instructions. I will be baking some for family.
What a good idea. I never thought about making them for housecleaning. My allergies always flare up when I dust. I’m going to have to make one or several.
Your tutorial is the best! Love that you don’t like changing presser feet.
Very well explained, and the pictures and measurements are outstanding! I’m gonna try one with your pattern!
Love your tutorial. Very detailed. The pictures make this easy to follow!
I don’t like changing presser feet, either
Best tutorial I’ve seen so far!
Thank you so much for the tutorial. I am going to give it a try and I will be sure to post with your website for credit due! God bless.
Thank you. My tree allergies lasted for almost a month because I am also going through chemo treatments for ovarian cancer and I have no nose hair to filter pollen. My students are also suffering allergies and they can’t afford medications. And I live in a 55+ mobile home park with a lot of vulnerable people. This corona virus has people on high alert all around me. Quilting is my hobby so I have a lot of scrap fabrics. I am going to make these and give them away. Thank you again for sharing this.
Rhonda, I am so happy that you might be able to put my tutorial to good use. I get allergies so bad that they sometimes transitions into pneumonia. I really need to watch that I am not fighting allergies while avoiding the Covid-19 virus, because, as you well know, that would be frightening. My masks help my allergies, which in turn may help me fight off other things more effectively. Stay safe and away from others.
Do you have a pdf version of your mask tutorial to share with others. It has hit Facebook and news outlets. Your tutorial is great. My daughter is a 4H kid and wants to start making these and sharing with her friends in Kansas. She didn’t want to just take it off your page and share it. She wanted you to get the credit for creating the pattern. Please also add the polyester fabric filter if you could. Thank you.
Stephanie, I don’t have a pdf version of the pattern, I apologize for that. If I can get some spare moments I will certainly try to format it for PDF. I hope that sharing the link to my tutorial suffices until then.
Thank you so much. My son has Duchenne, Muscular Dystrophy and we constantly need to wear masks. I’m not a seamstress but your directions are clear so I’m going to give it a whirl just as soon as this quarantine is over. I appreciate you so much making this available.
Great tutorial, thanks!
Mamaflip, you are welcome. Enjoy.
Thank you so much for these instructions. They are clear and easy to understand; so much more attractive than the store versions.
Norma, Thank you. Yes! Breathing through flowers and plaid is always for fun than not. Enjoy.