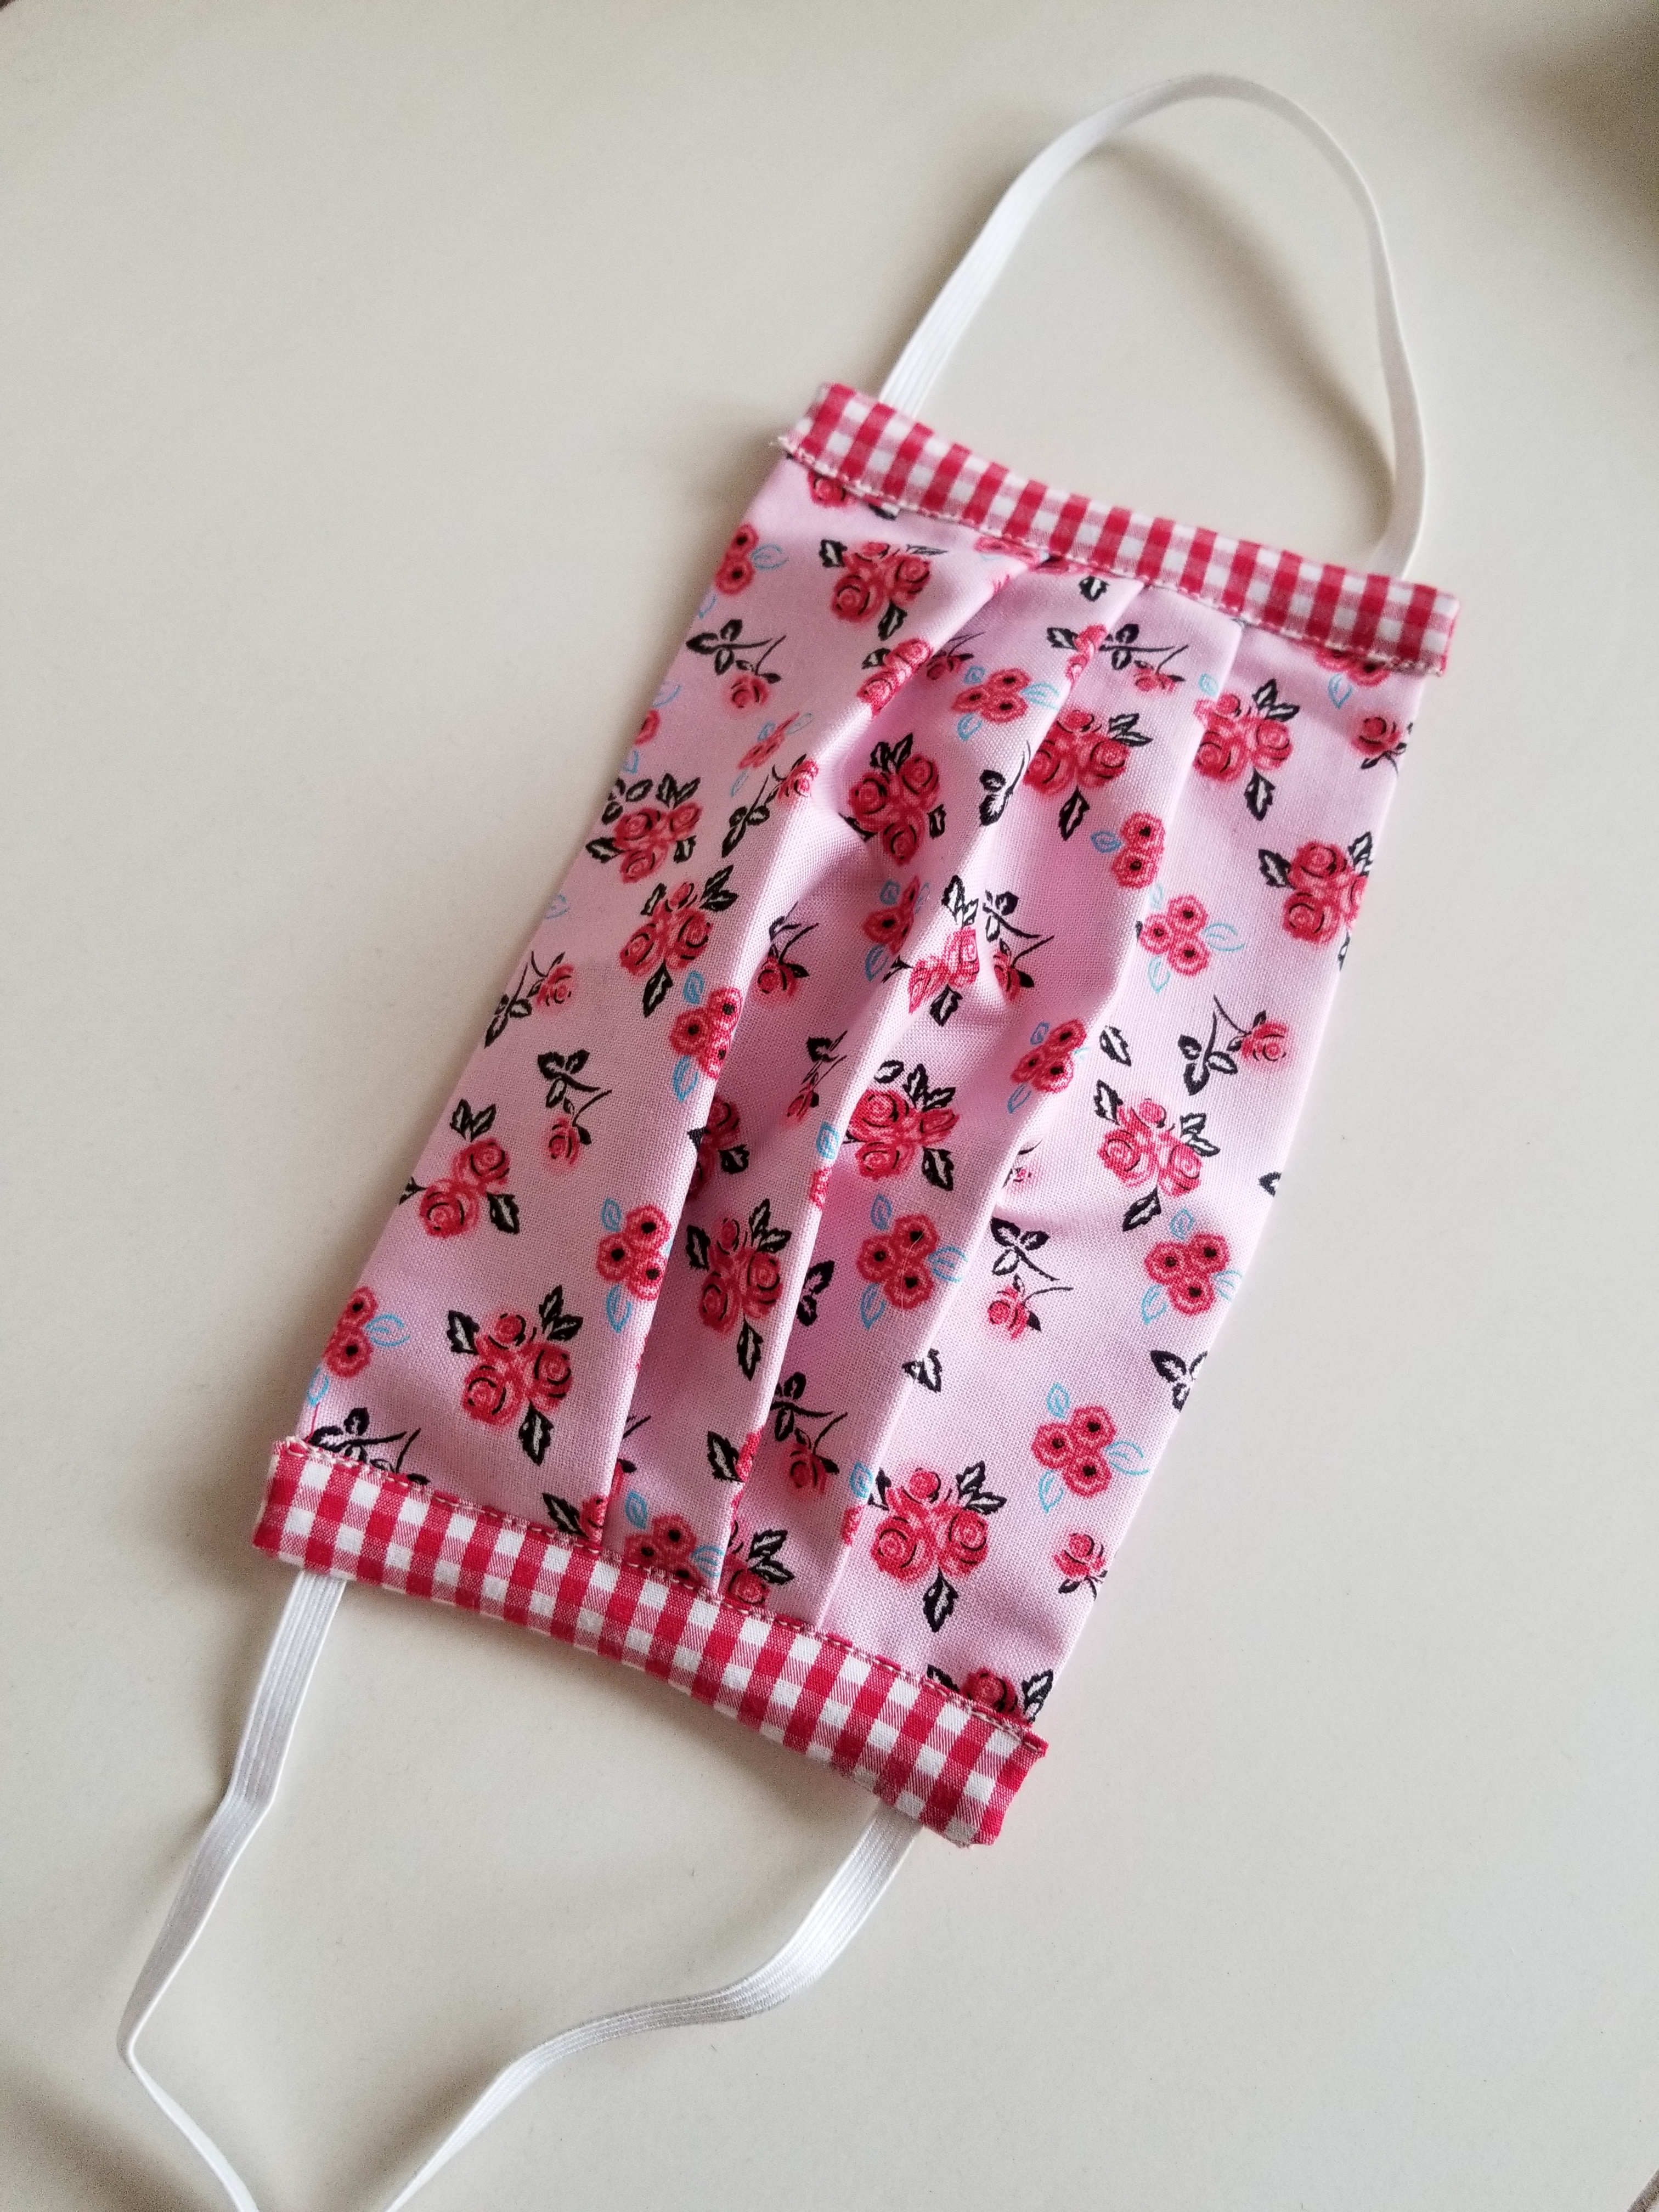
My allergies have been incredible this year, and by that I mean that they have been worse than they have ever been. (Please, please, please do not suggest medical advice here. Much appreciated.) I see an allergy specialist who gives me 2 shots, 2-3 times a week to help with my symptoms. They have helped a lot; however, Juniper Ash (Cedar Fever!) here in Austin is 6 times worse than average this year, and boy oh boy, do I feel it. She suggested that I wear a face mask when I go outside to help reduce the amount of pollen that is going into my lungs and sinuses. After going to a few different stores to purchase some, I found that many other Austinites had already bought them out. No worries, right? I know how to sew. I will just make one. When I finished, I had many requests for a tutorial, so here you go:
Materials needed:
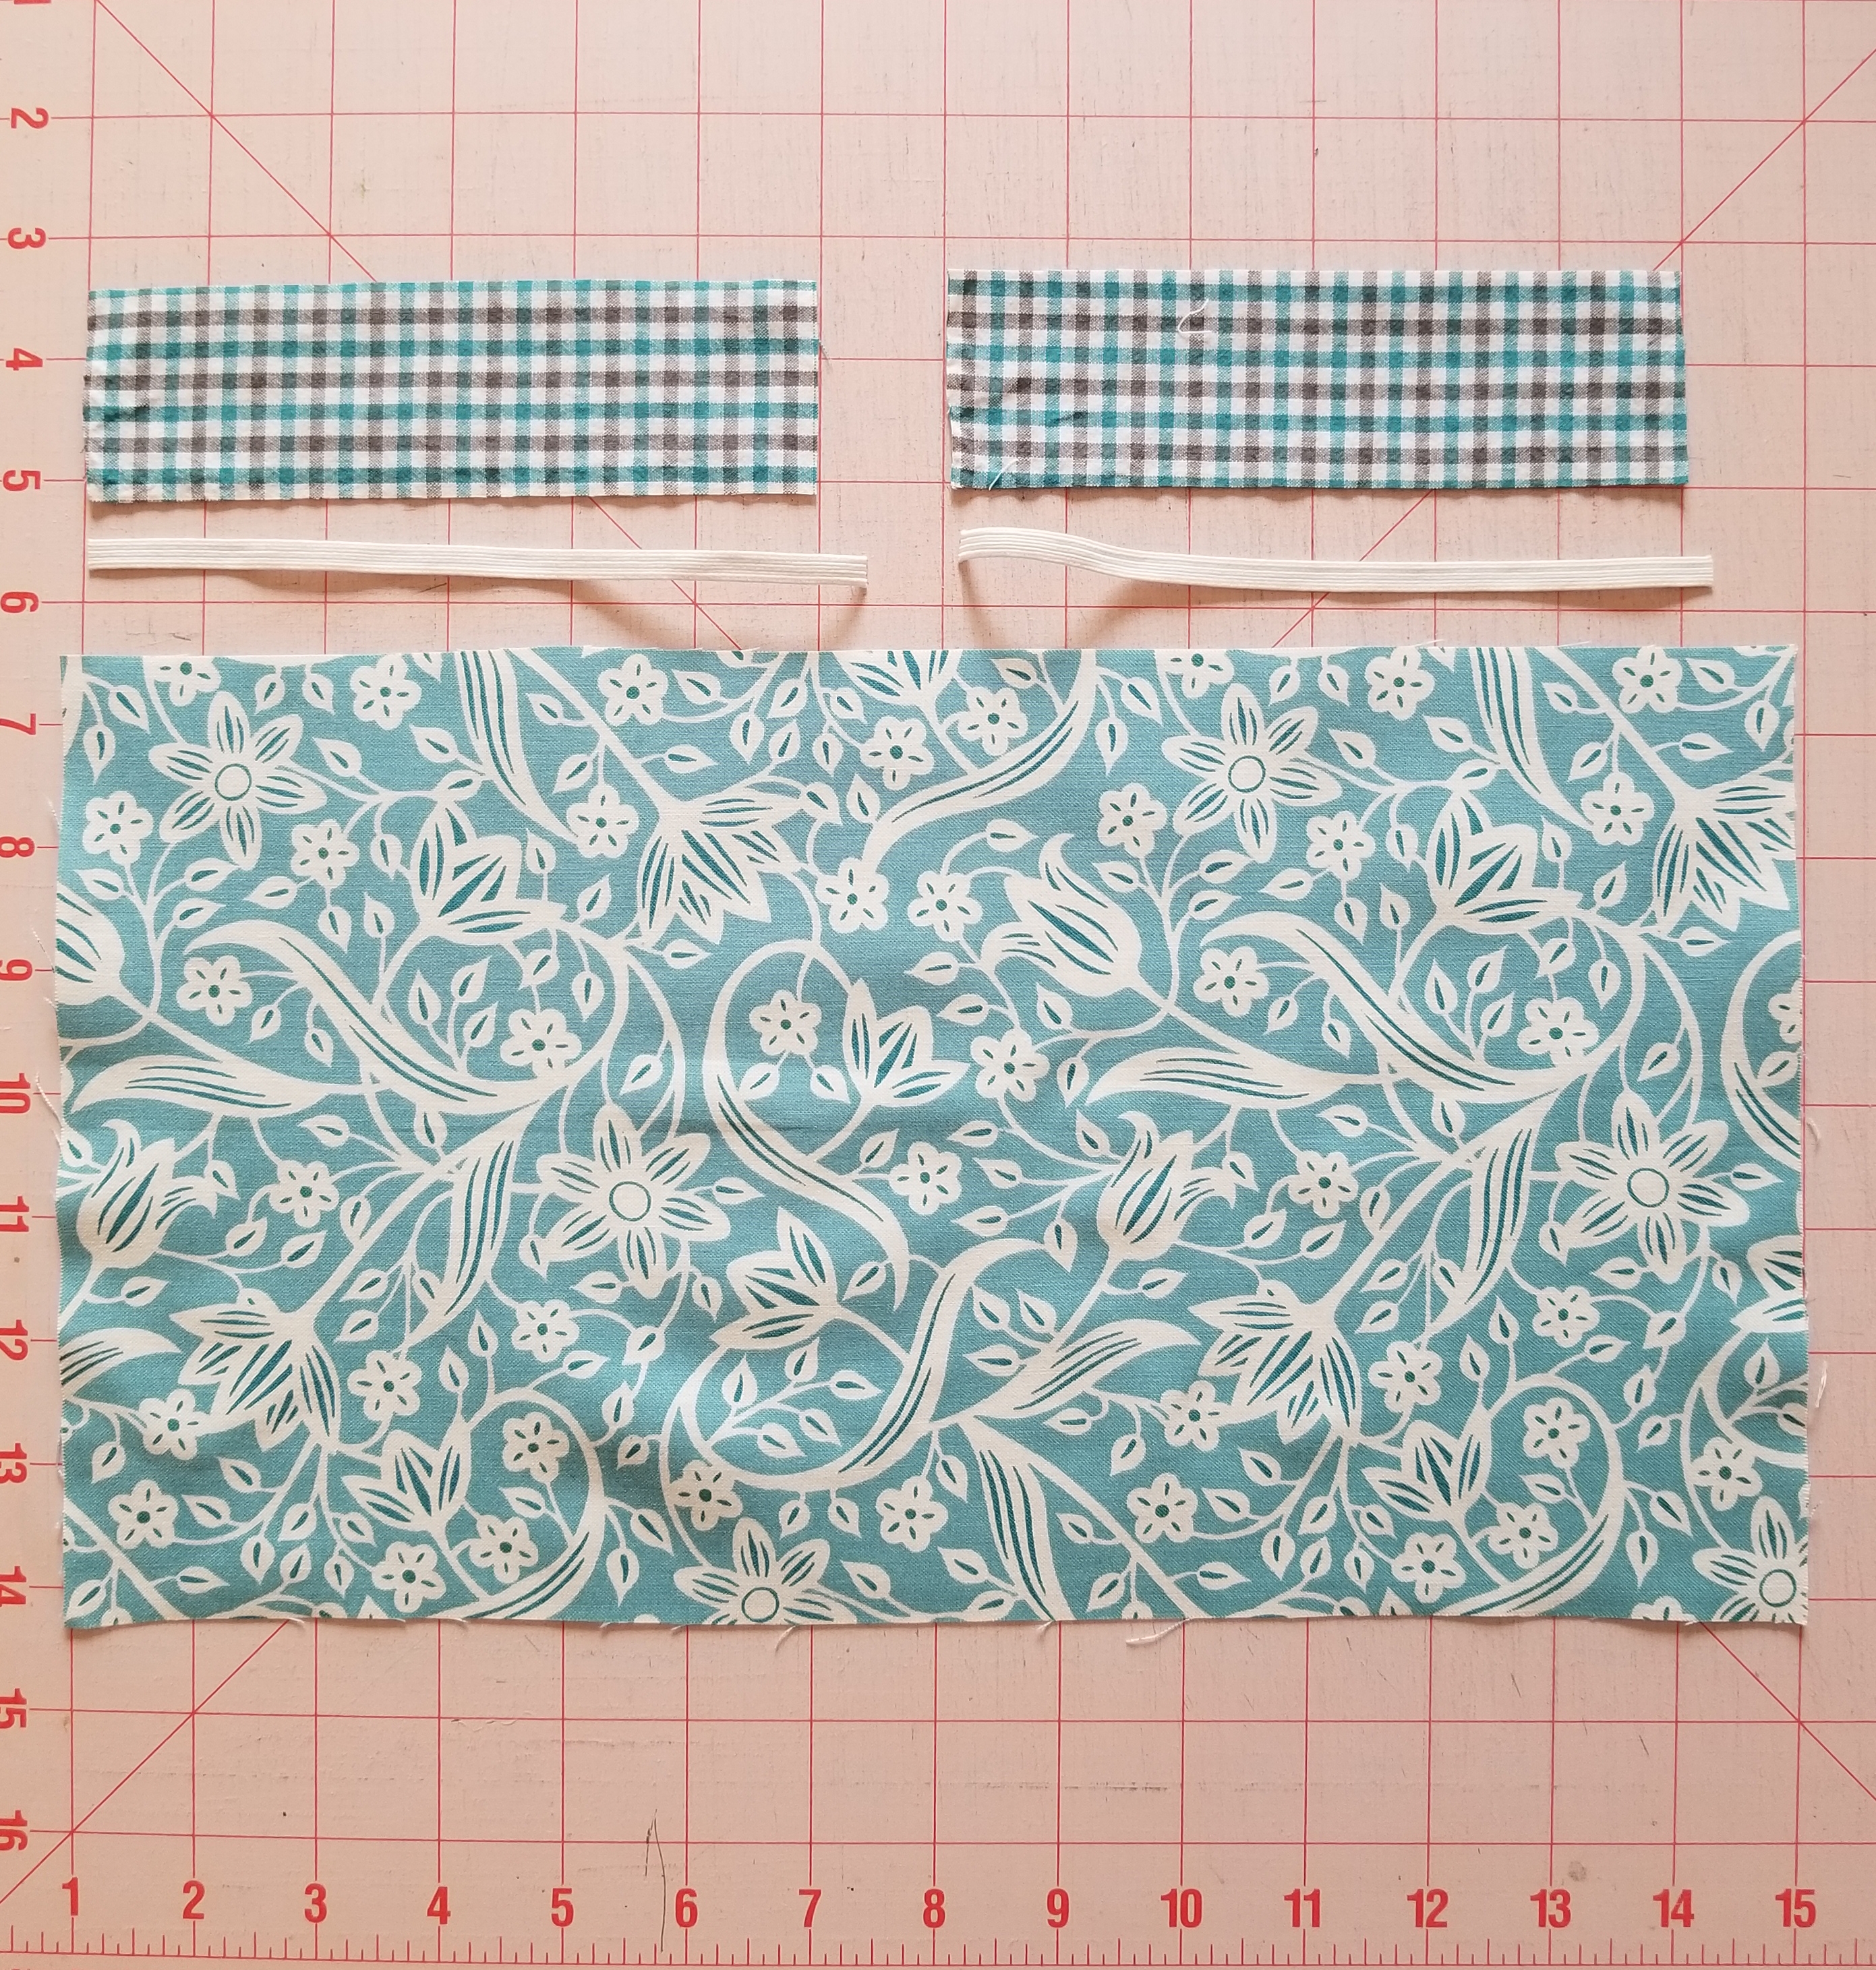
- 1 piece of fabric measuring 8” x 14”. Until you get familiar with this tutorial, I would suggest a non-directional print. One that has a scattered image printed on the surface such as the one shown.
- 2 strips of fabric measuring 1.75” (1 3/4”) x 6”. This will be the accent edge piece. It can be the same fabric as the main piece or a small-scale print or solid.
- Two pieces of 1/4” width elastic. These will be about 6 1/2” long.
- Ruler
- Fabric marking tool.
- Pins
- Scissors
- Sewing machine, threaded.
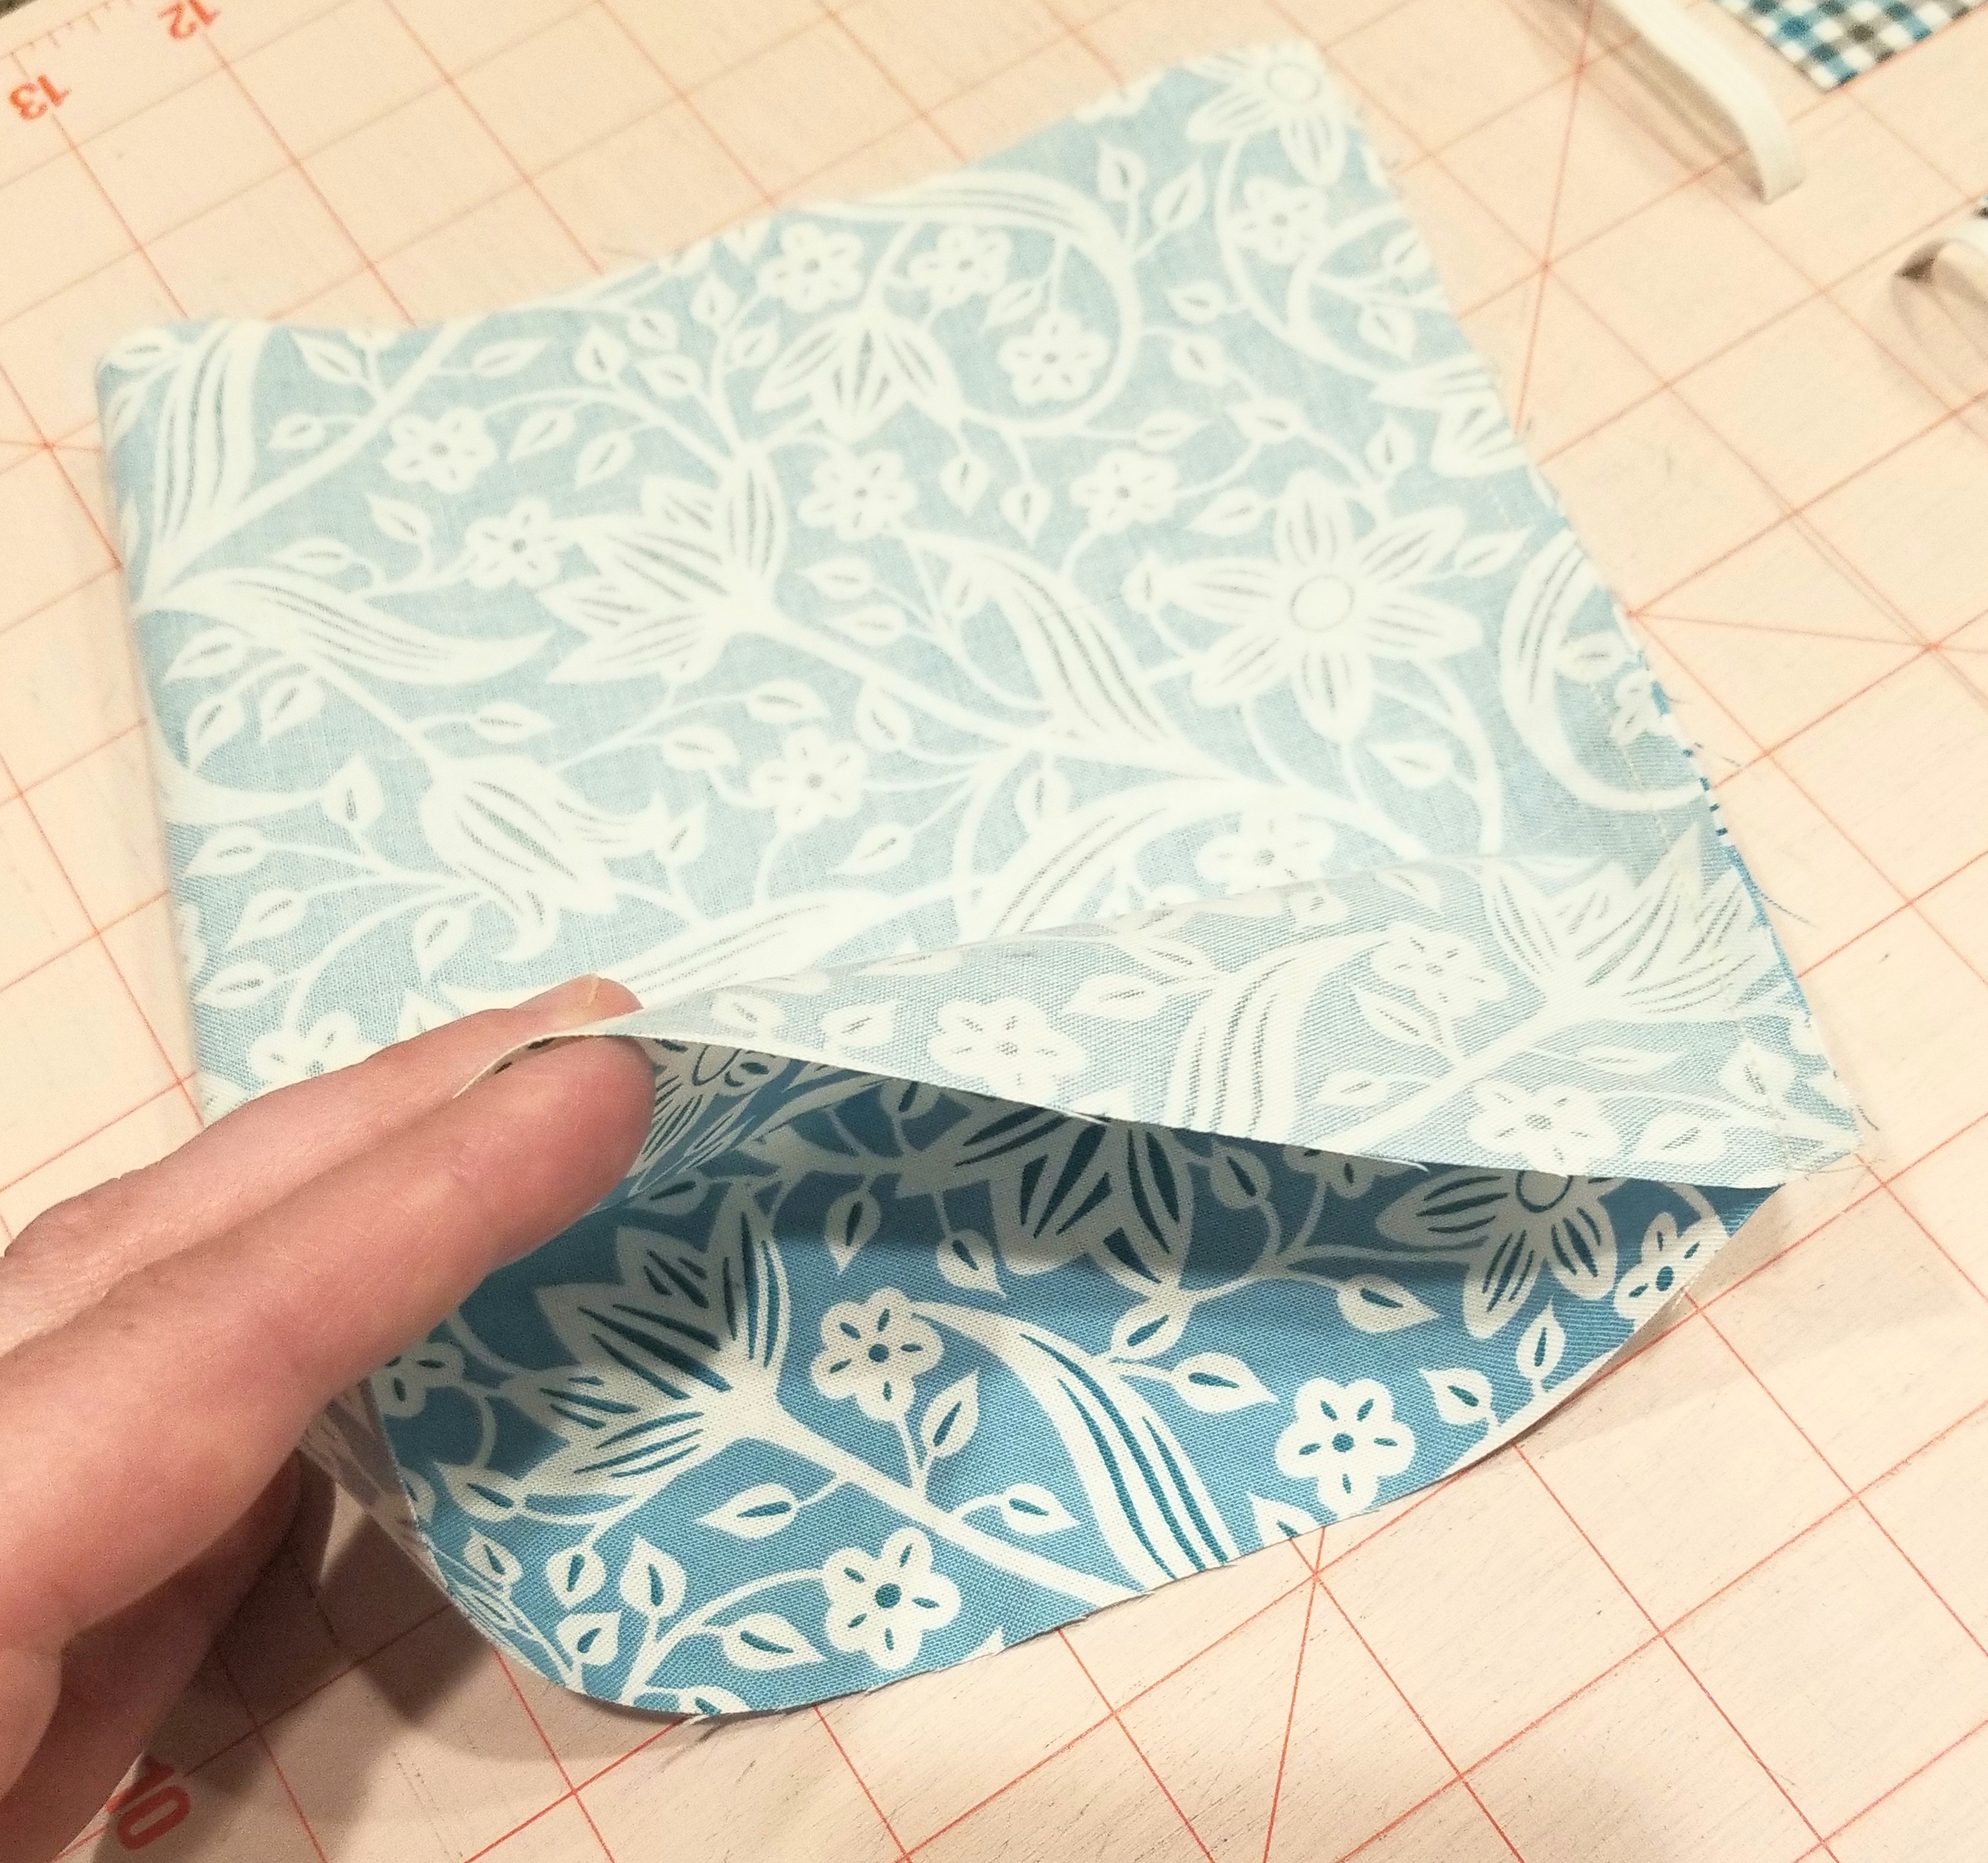
Fold the main piece of fabric in half, right sides together. Sew along the 8 inch width edge, using a 1/4 inch seam allowance.
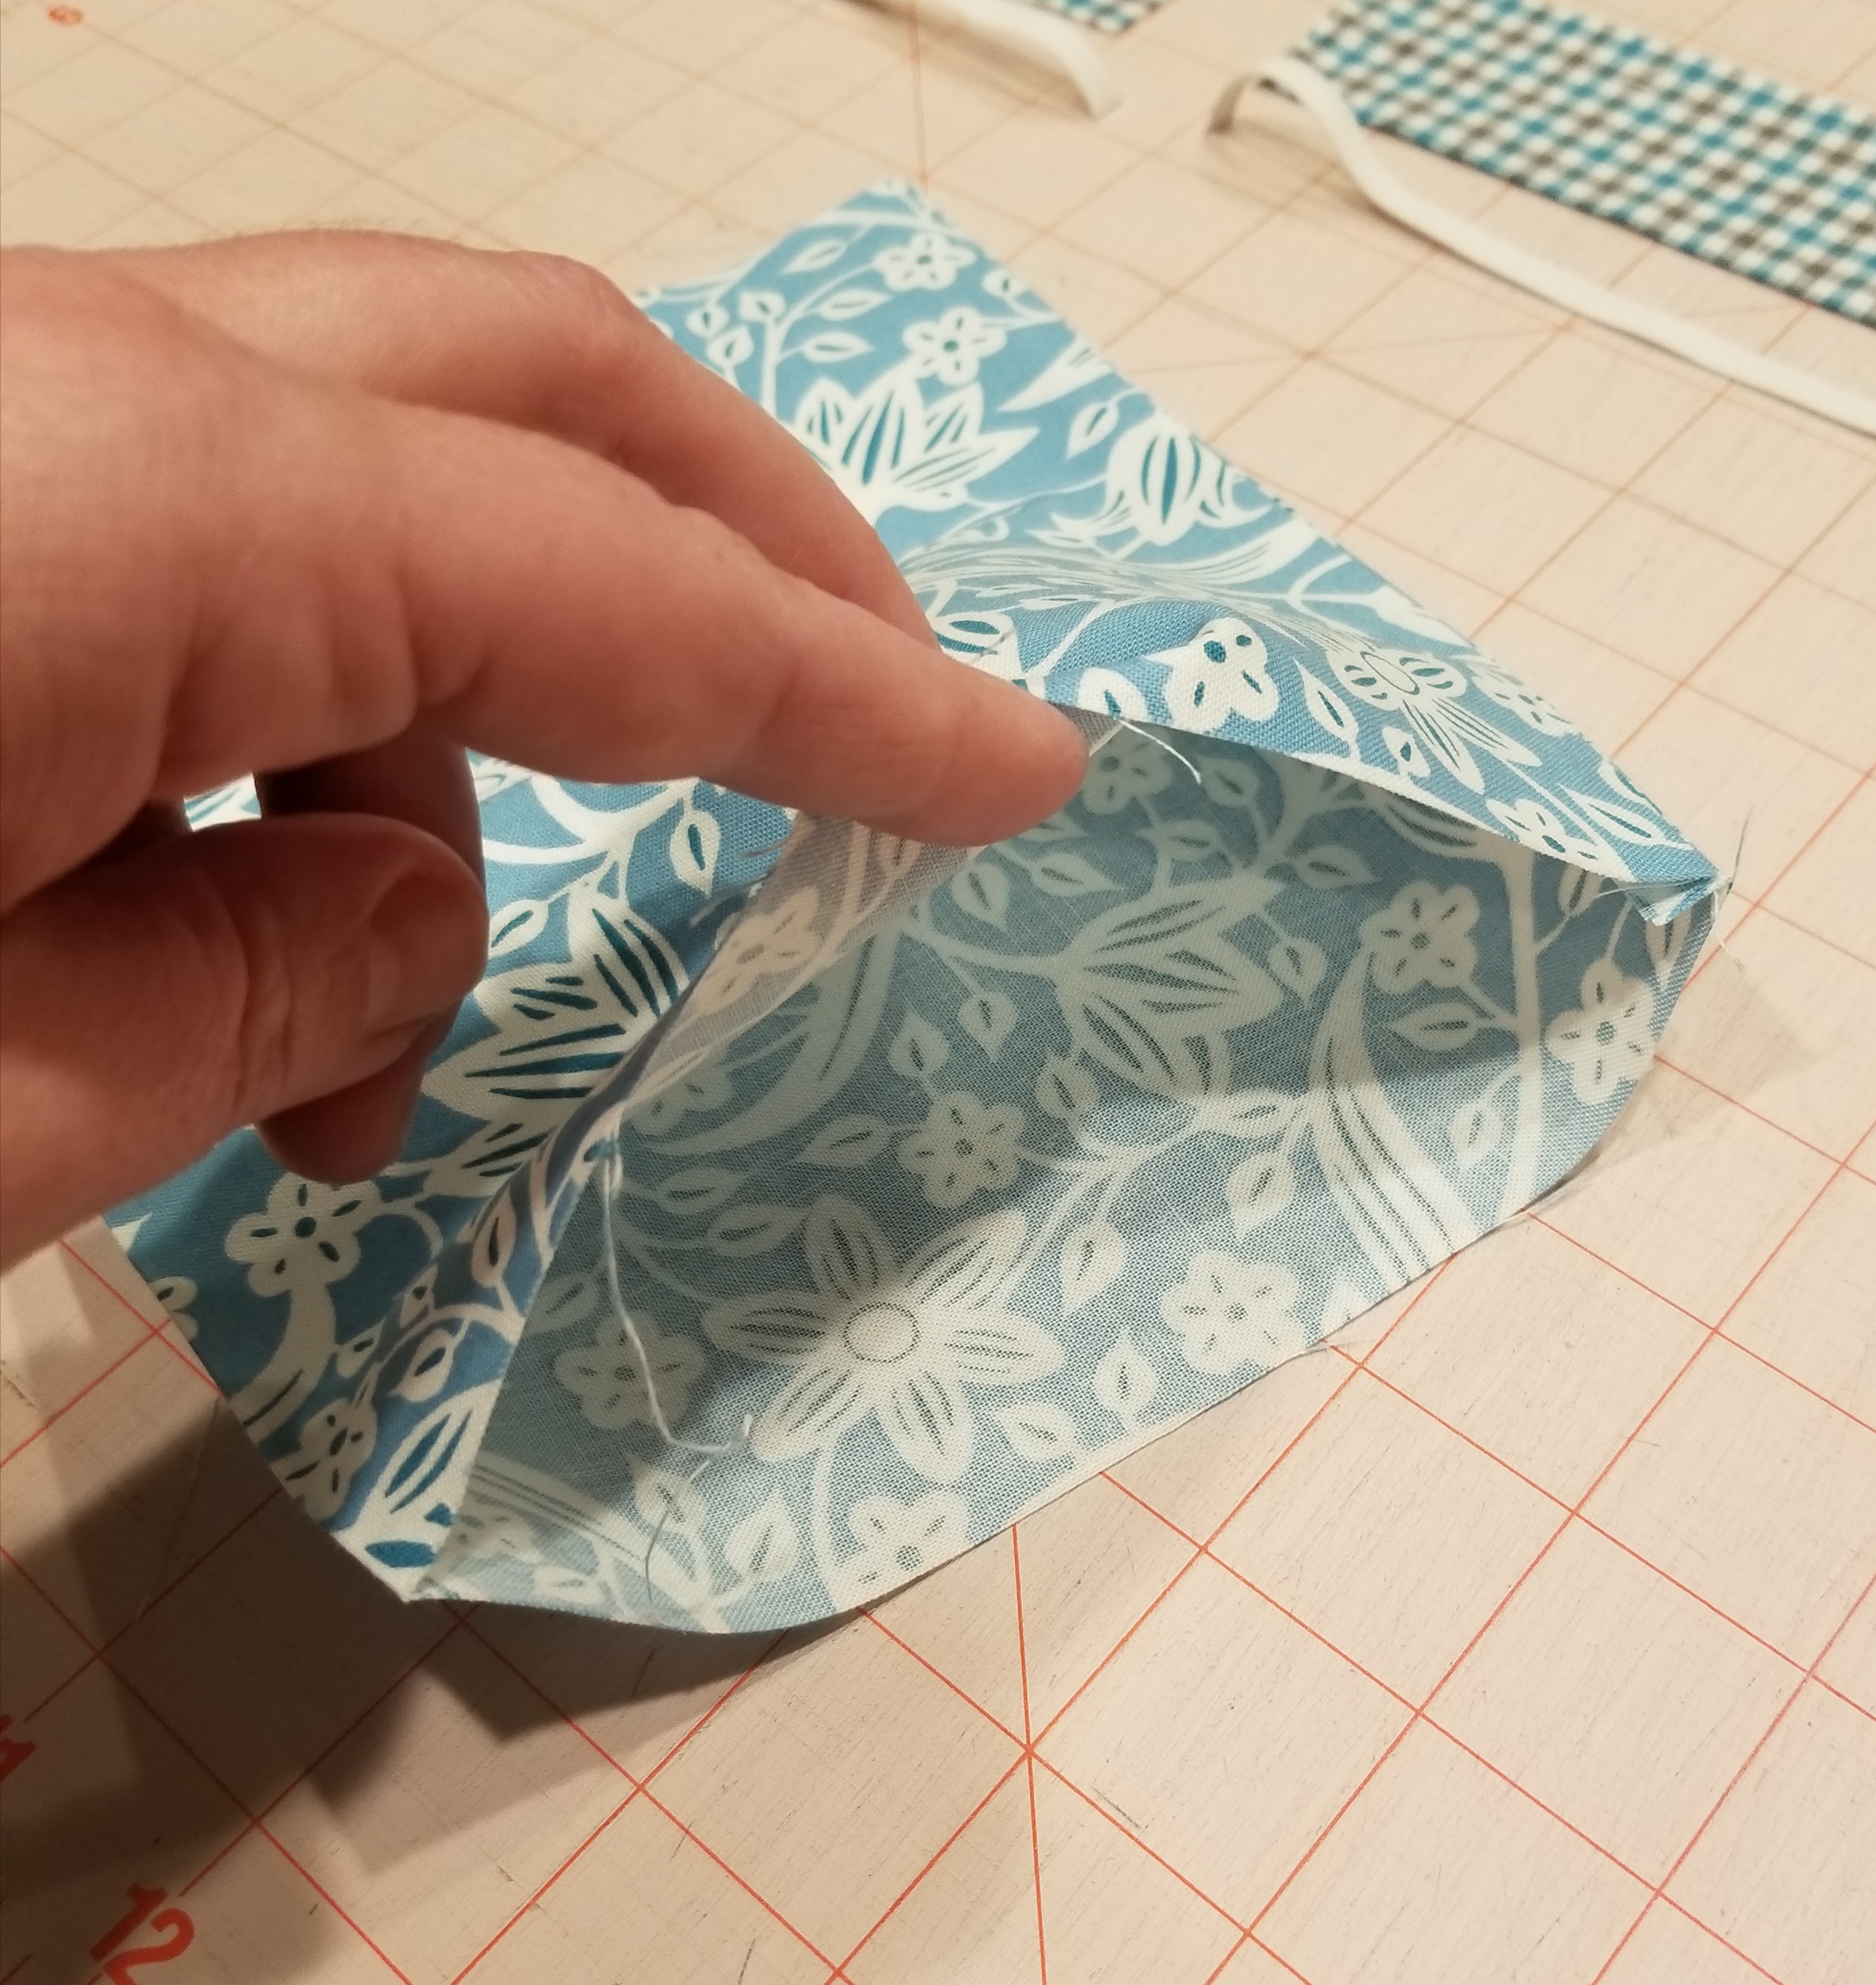
Turn this tube shape inside out, so that the right side of the fabric is now on the outside. Press this flat, keeping the seam to one end of the flattened tube.
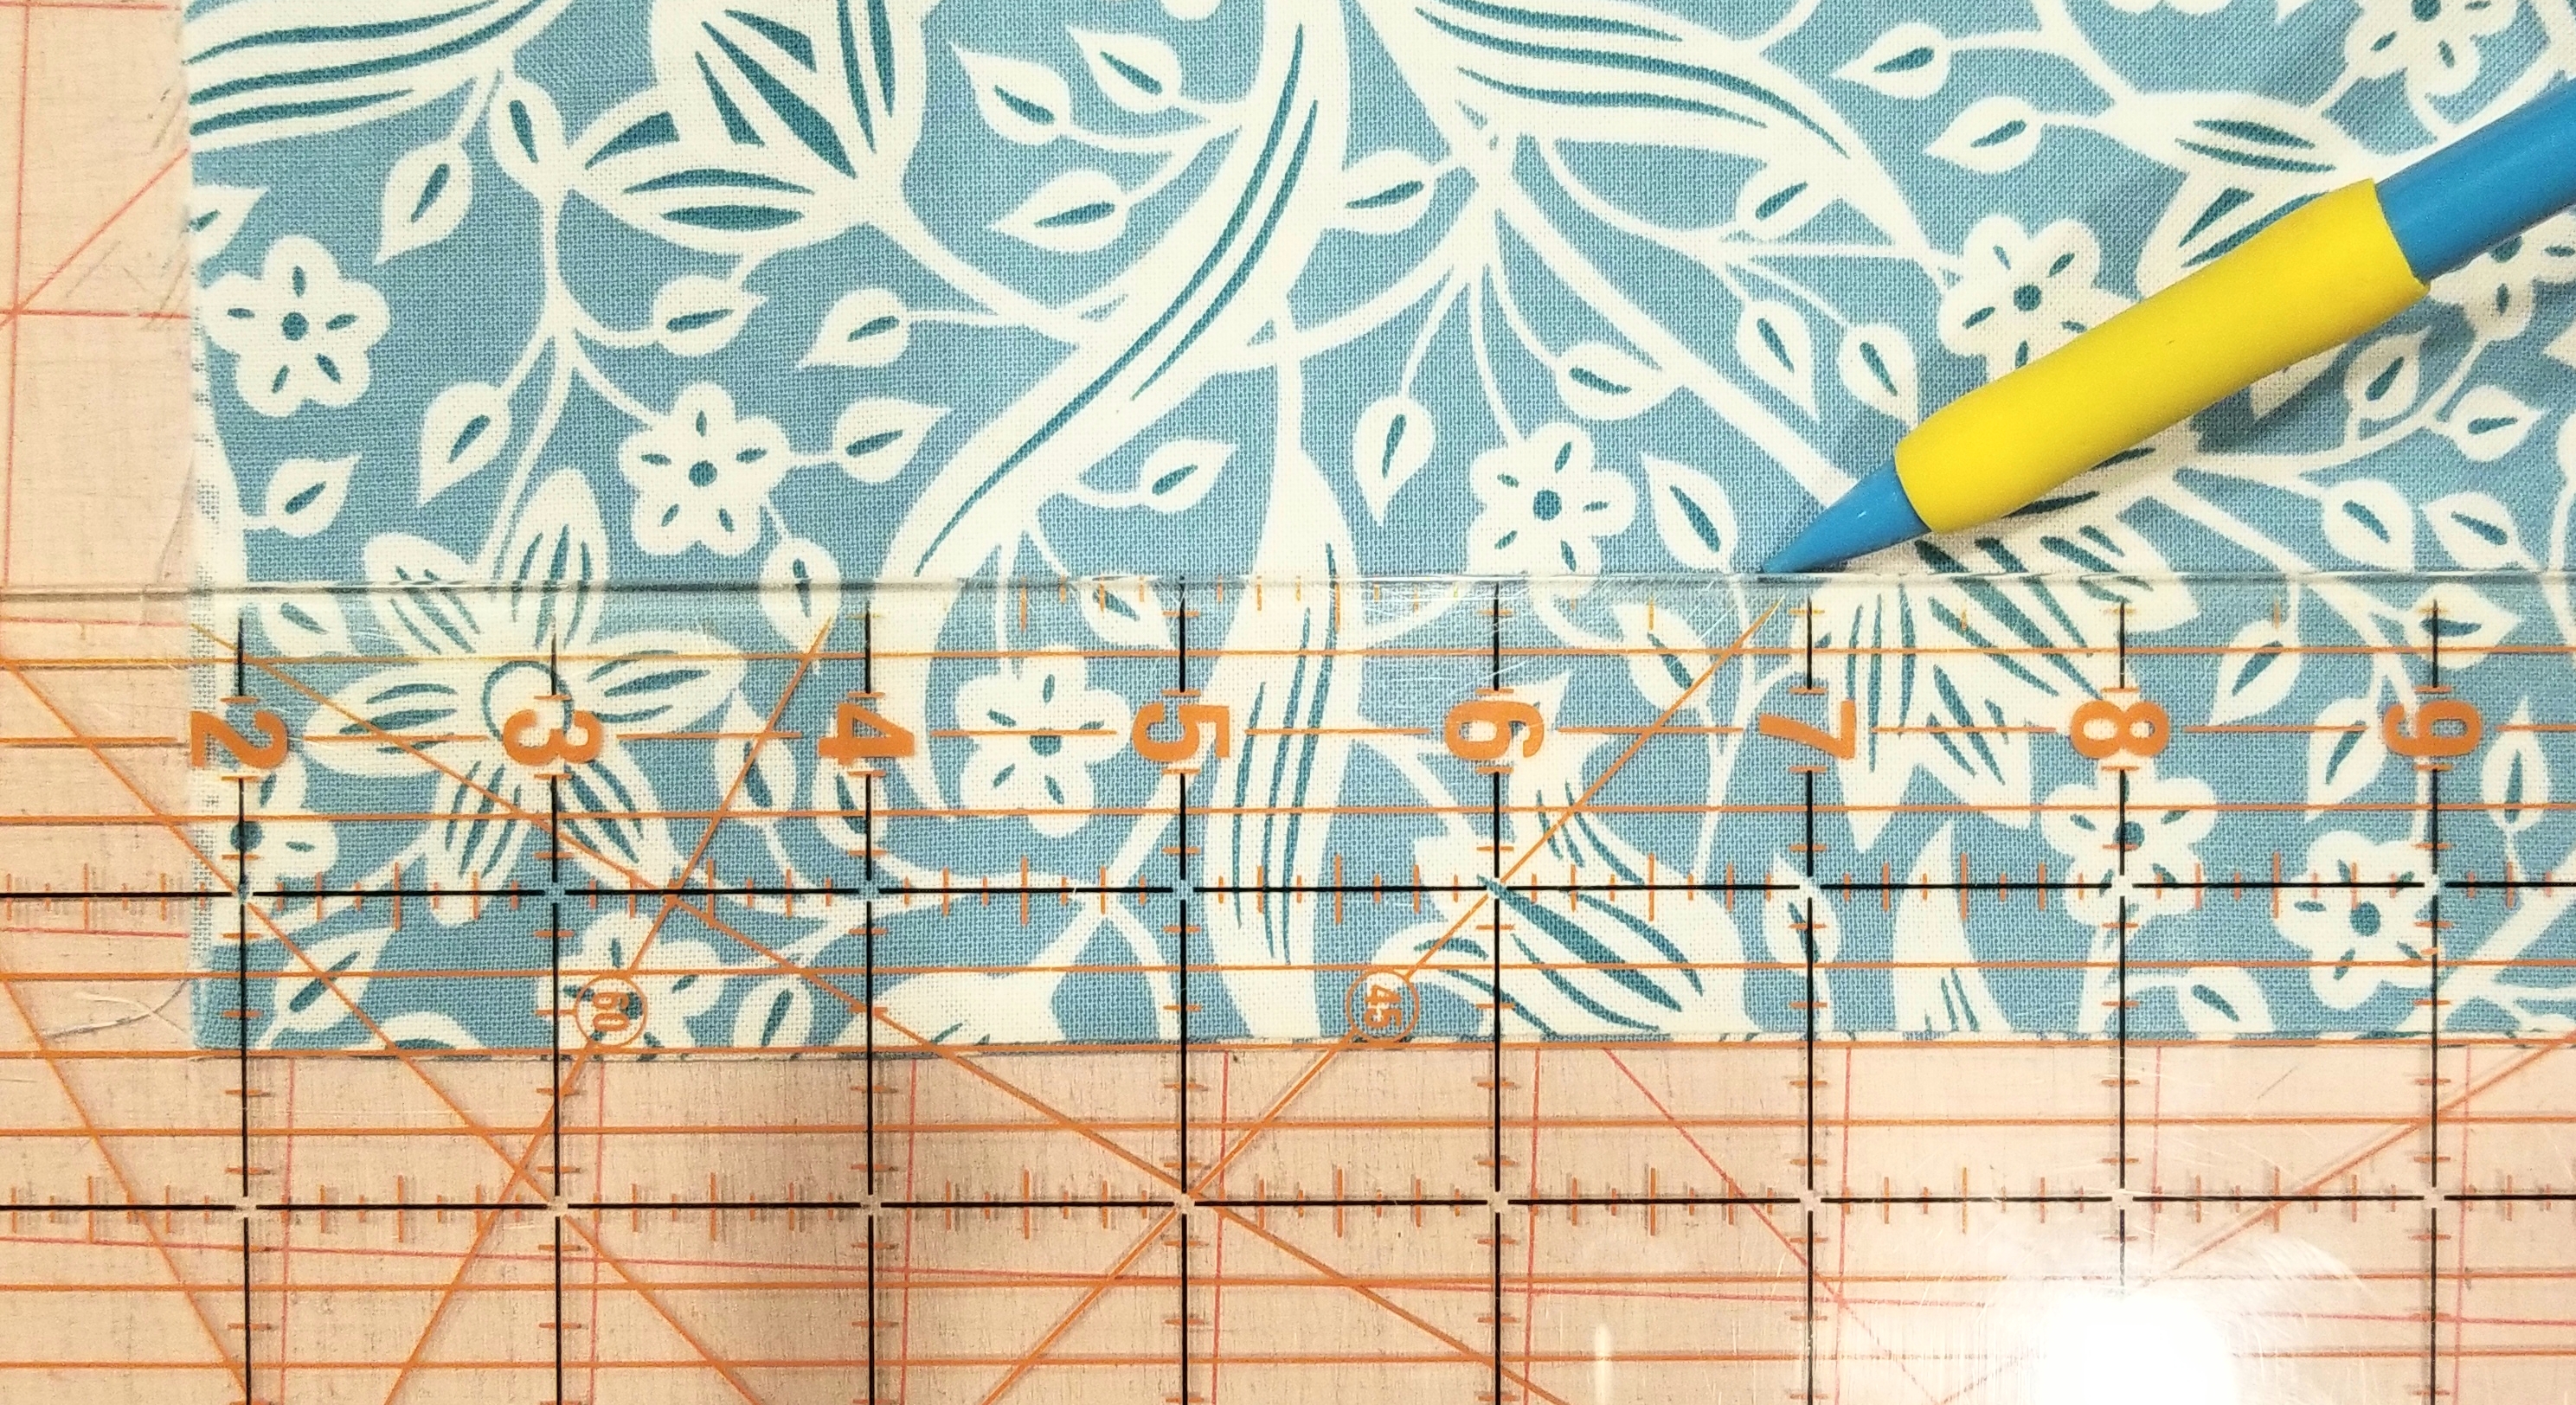
Place the tube of fabric so that the raw edges are on each side and the seam edge is at the bottom. Using a ruler, measure and mark a line 1 1/2 inches from the bottom edge. Make another line 1 inch above this line, or 2 1/2 inches from the seam edge. Don’t use a pencil as you see in the picture, use a fabric pen, or fabric chalk. I used a pencil for illustration purposes.
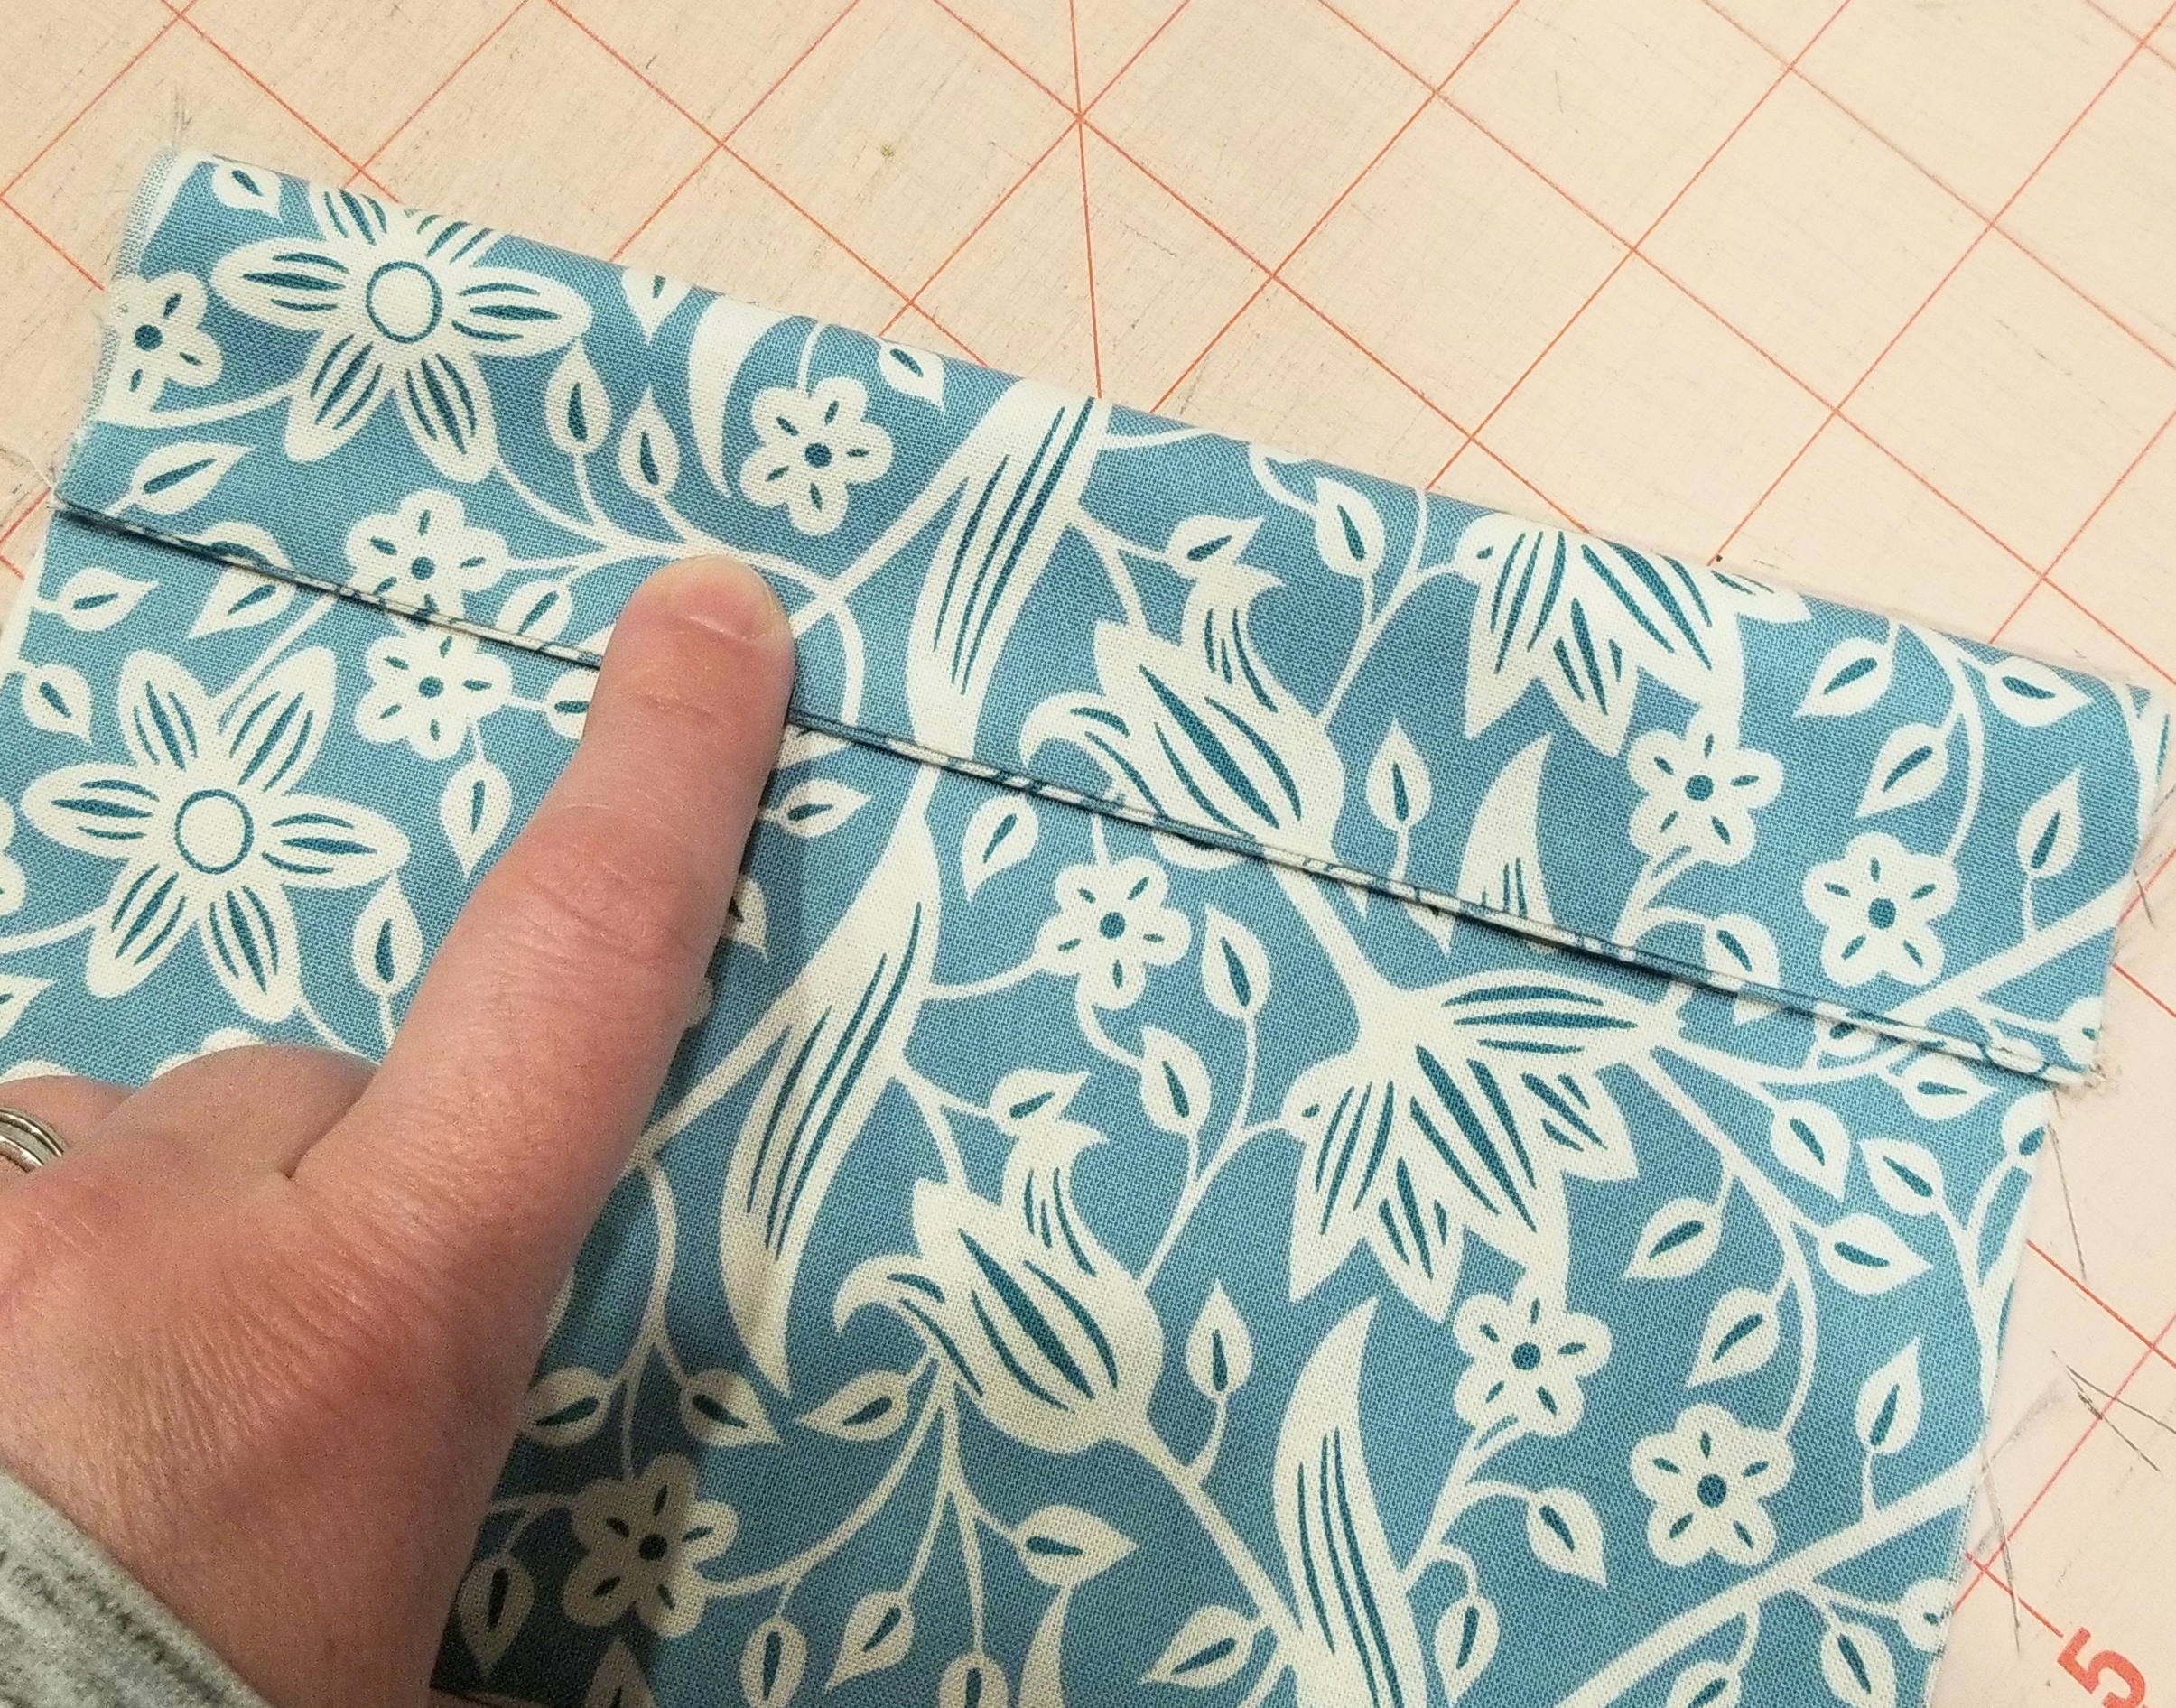
Fold the seam edge up (or down in this picture, as I turned it upside down…sorry) making the crease on the first line that you just marked. You should have 1 1/2 inch edge here.
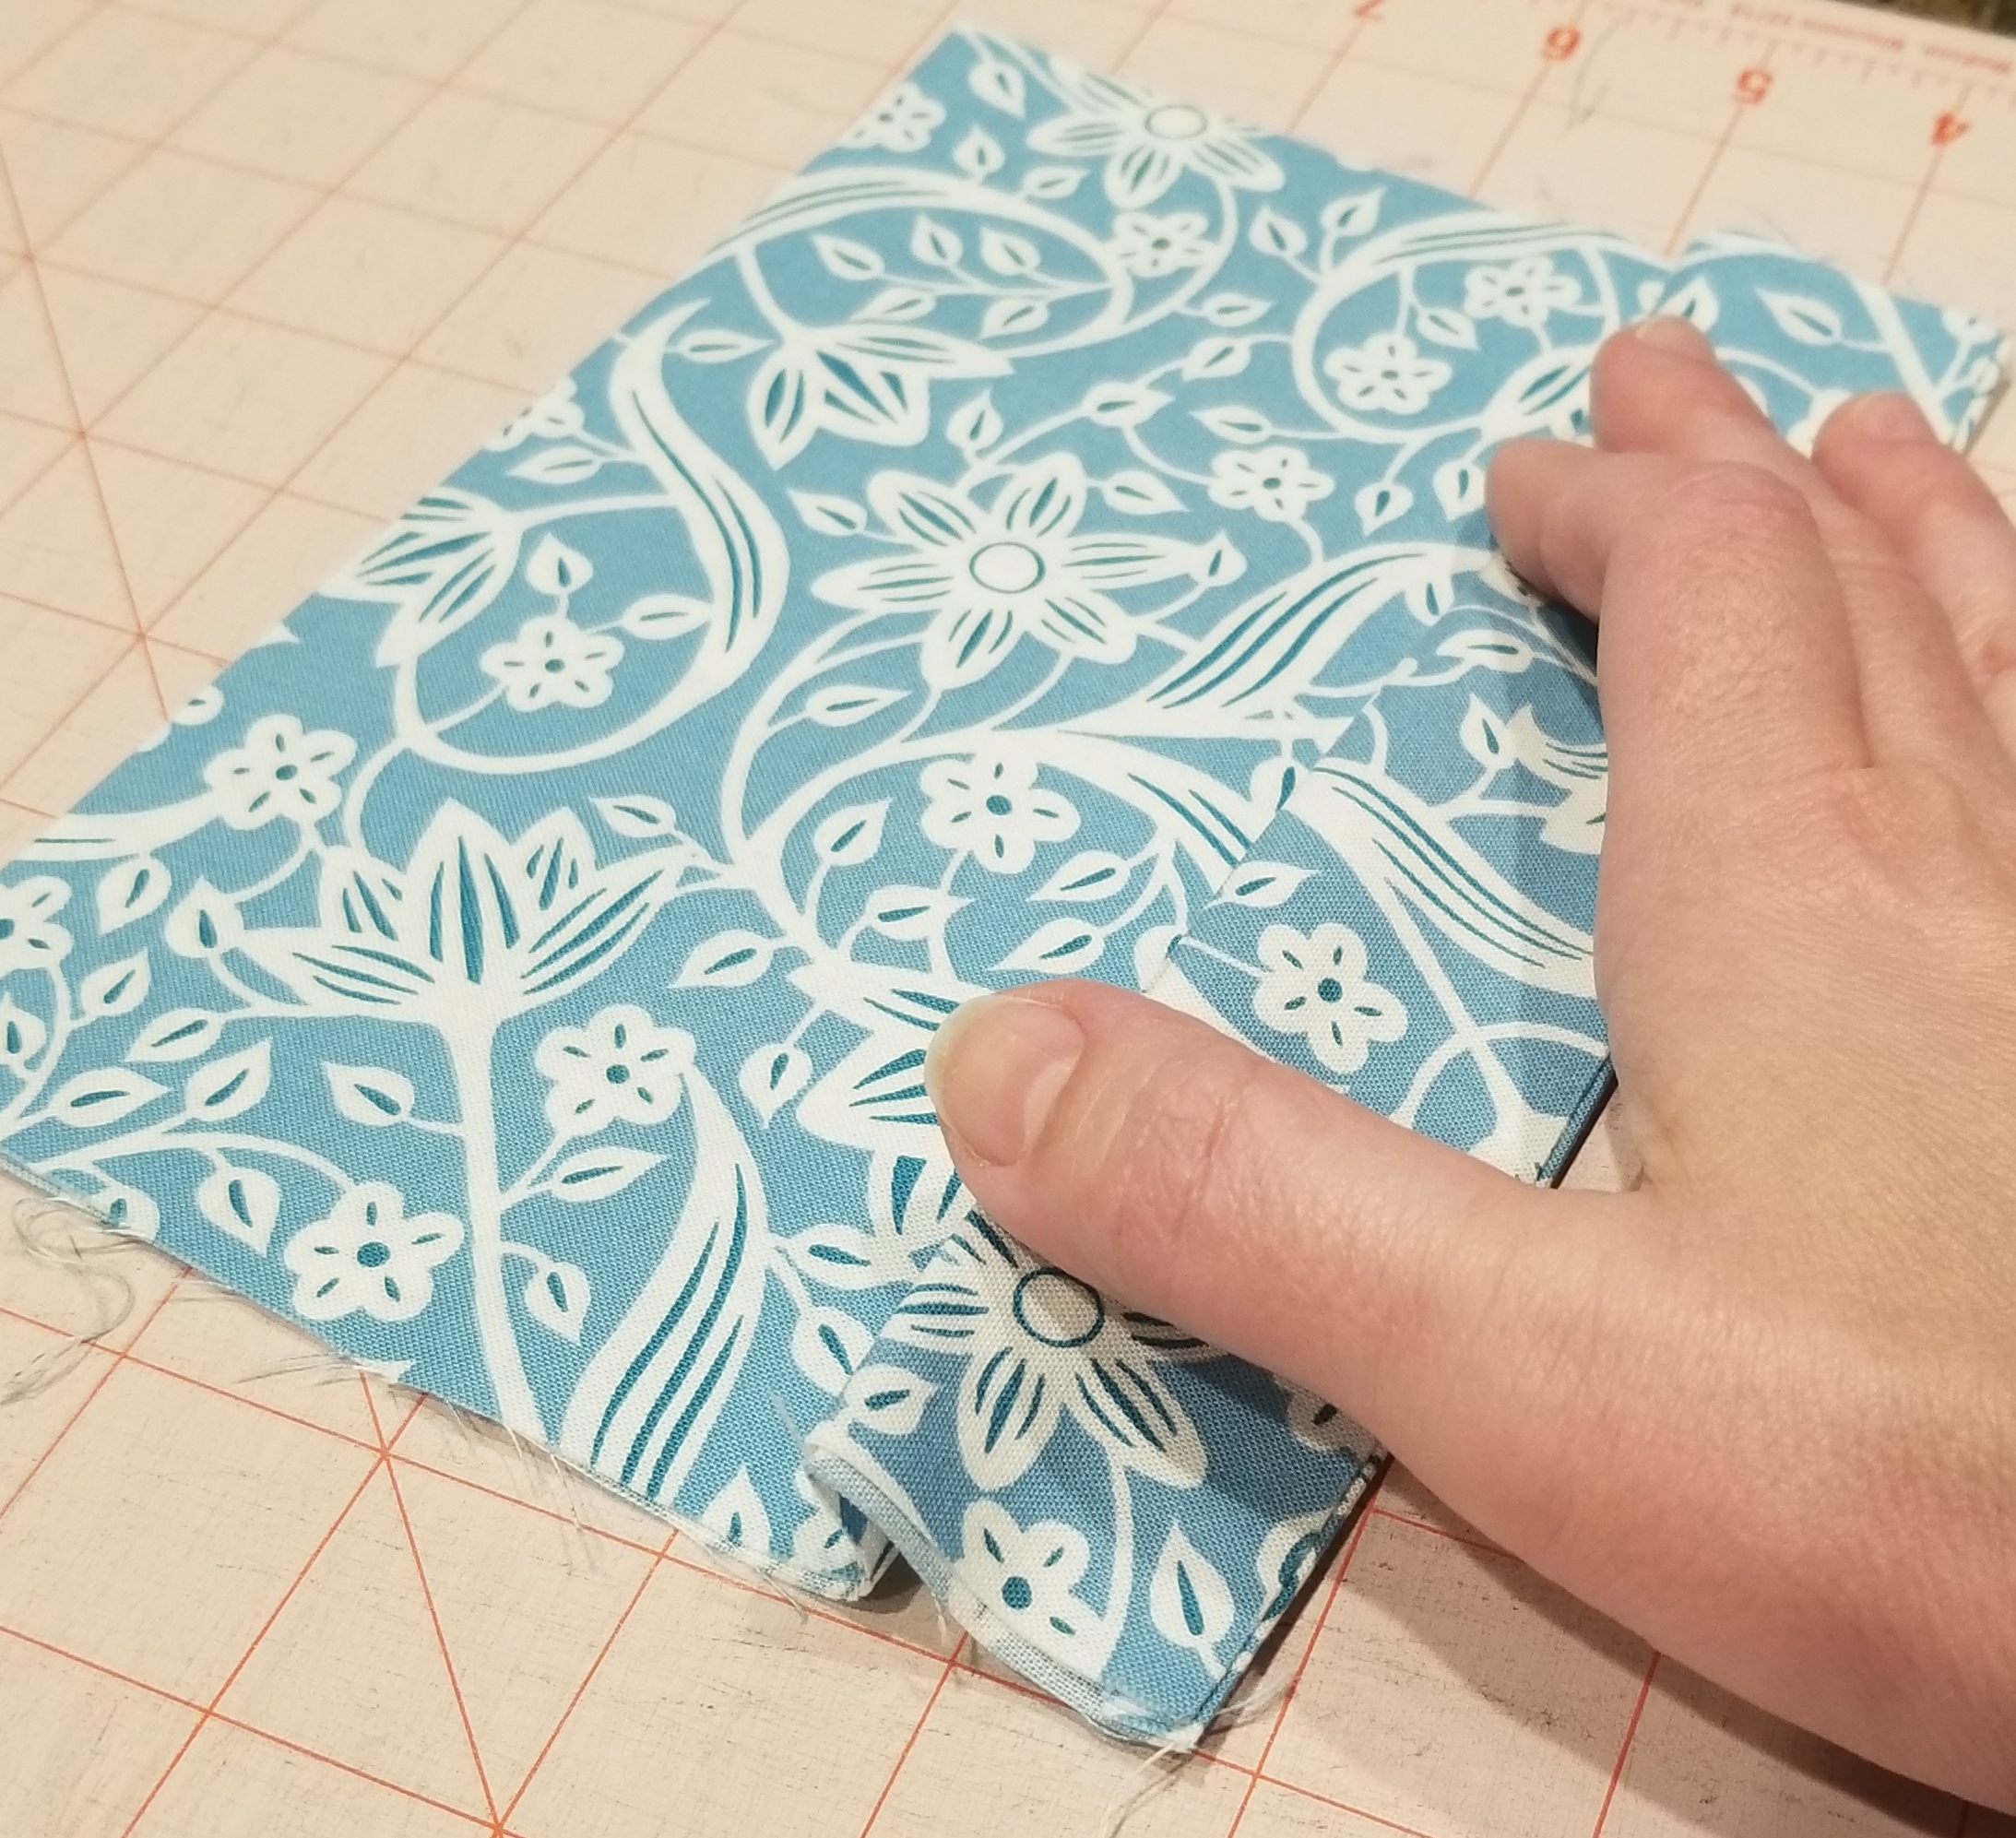
Flip the tube piece over. Match the crease edge to the second line that you made earlier. Press. The pleat that you just created will be 1/2 inch deep. Pin the pleat down on each raw edge end.
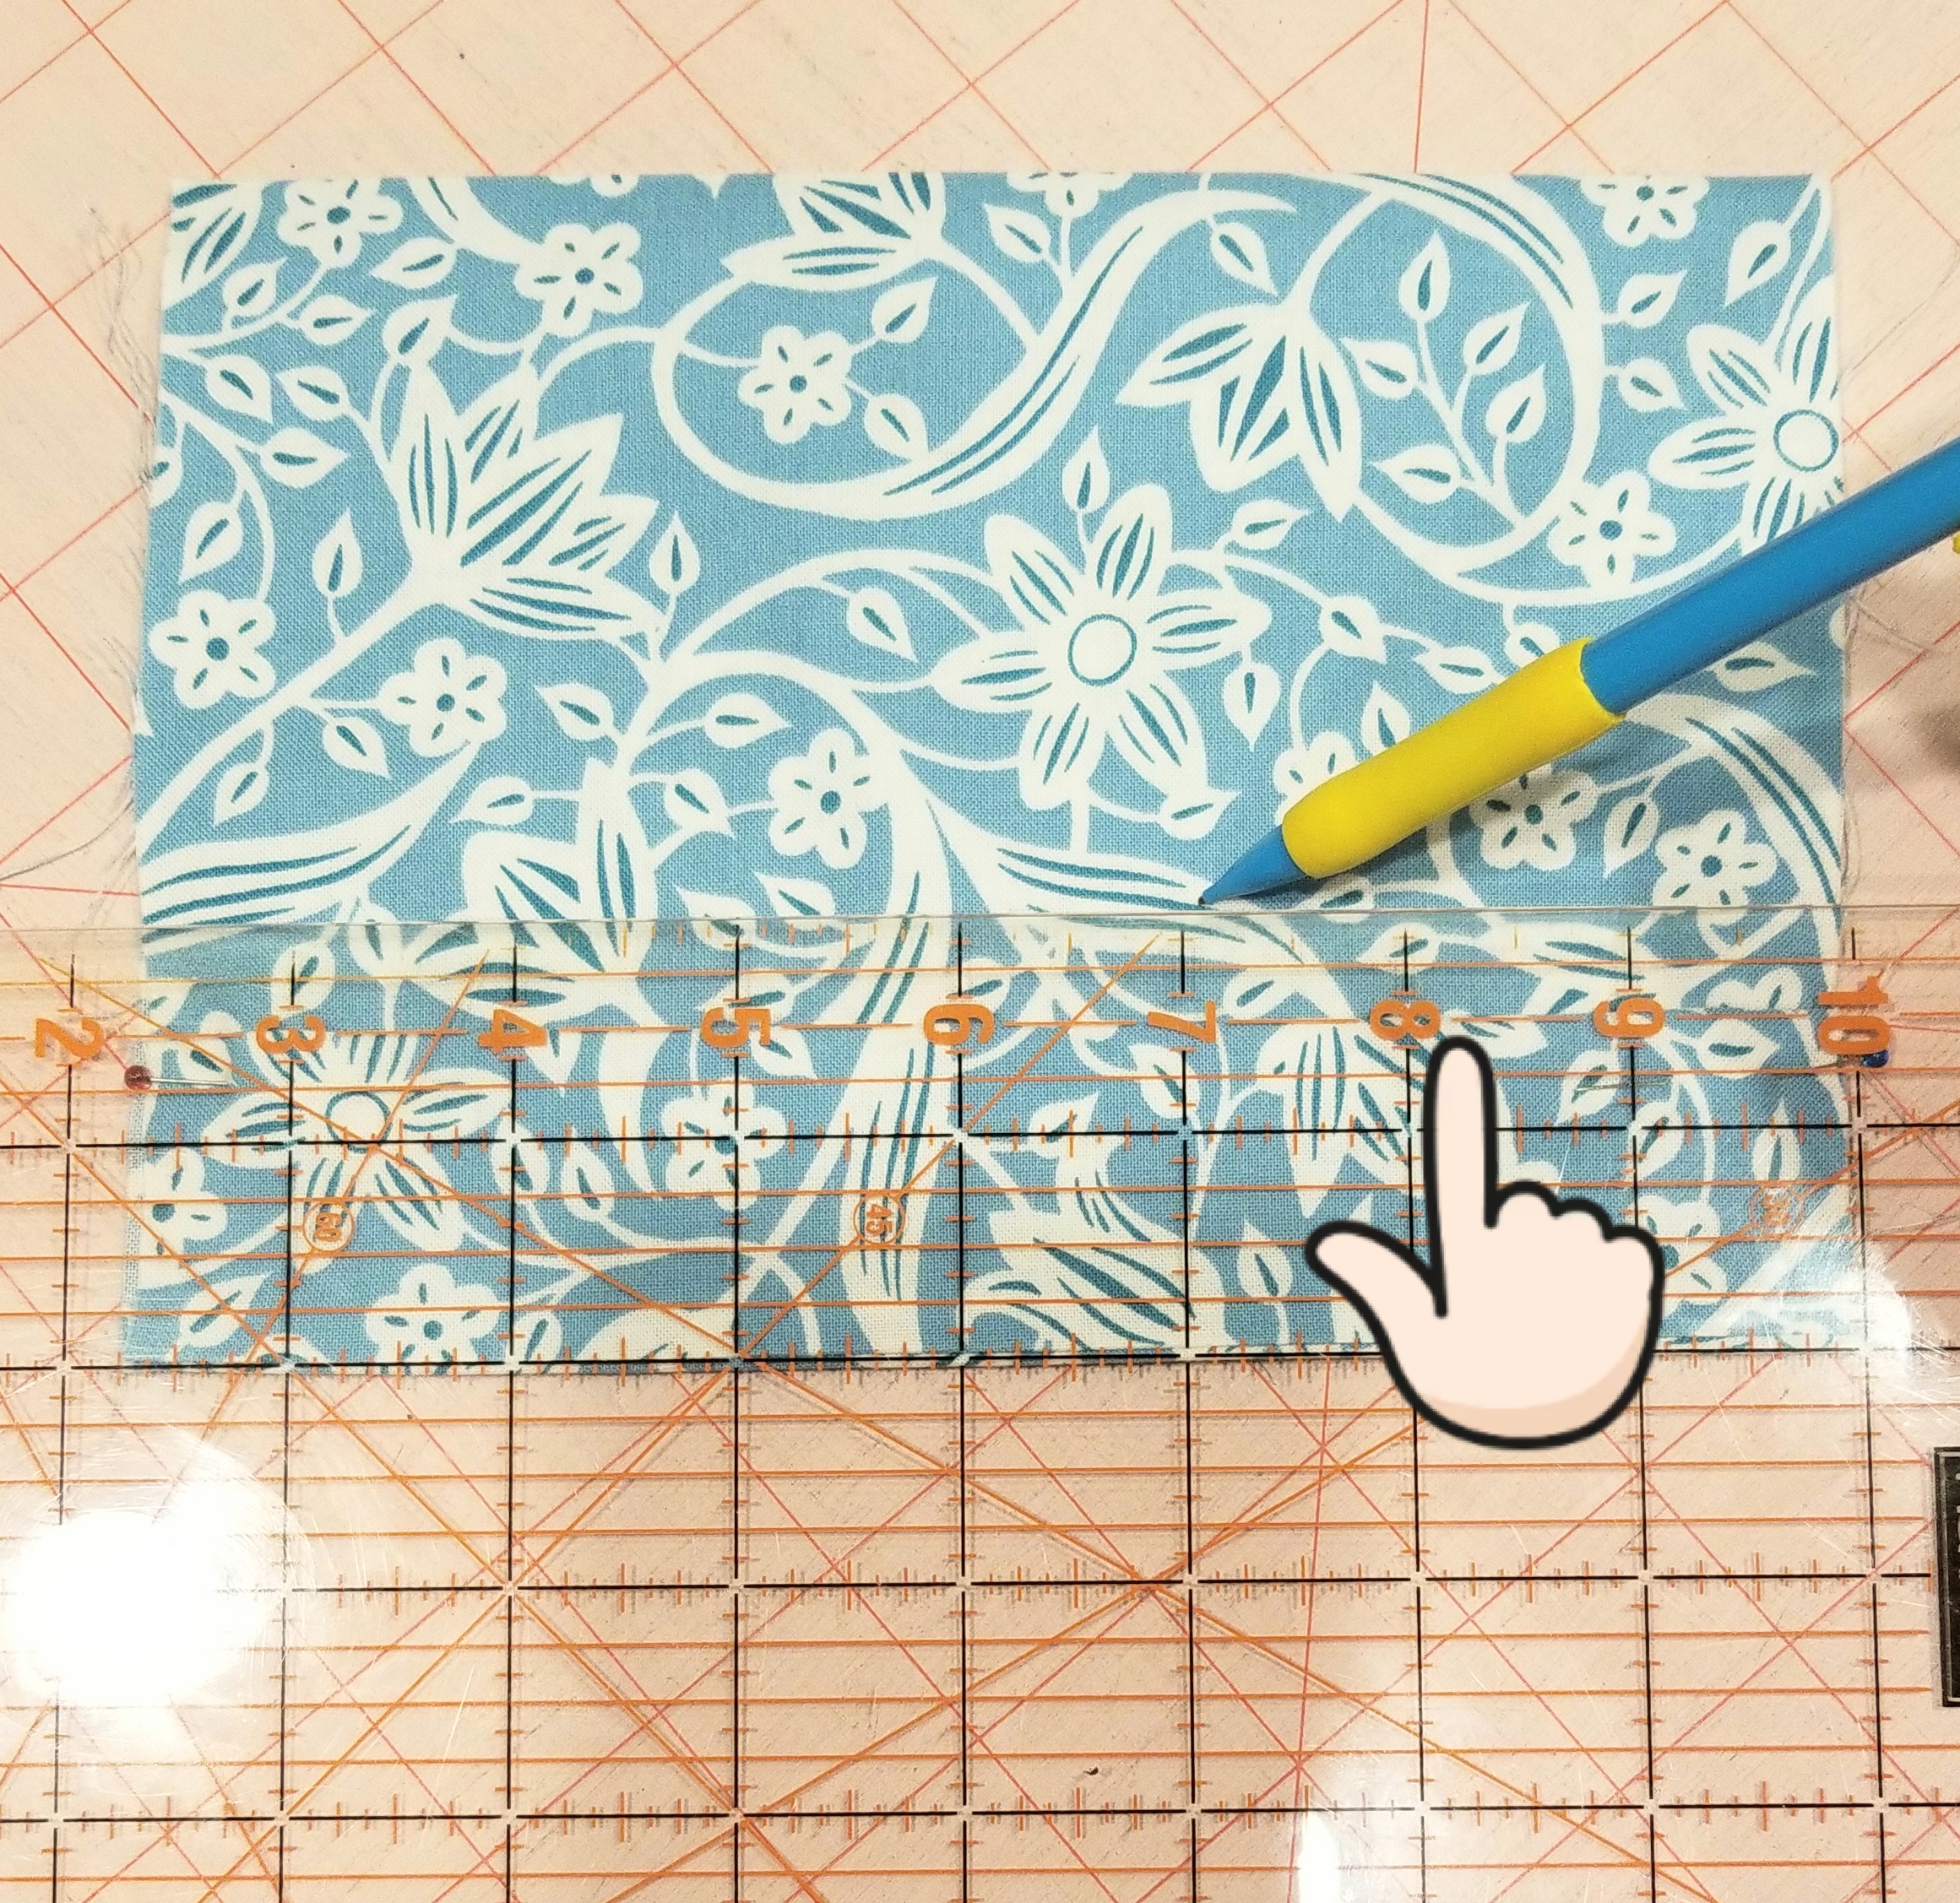
Now you will mark the lines for the second pleat. Mark a line measuring 1/2” from the top crease of the last pleat, (or 2″ from the bottom seam edge). It was difficult to see the top of the crease in this picture, so look at the finger indicator above.
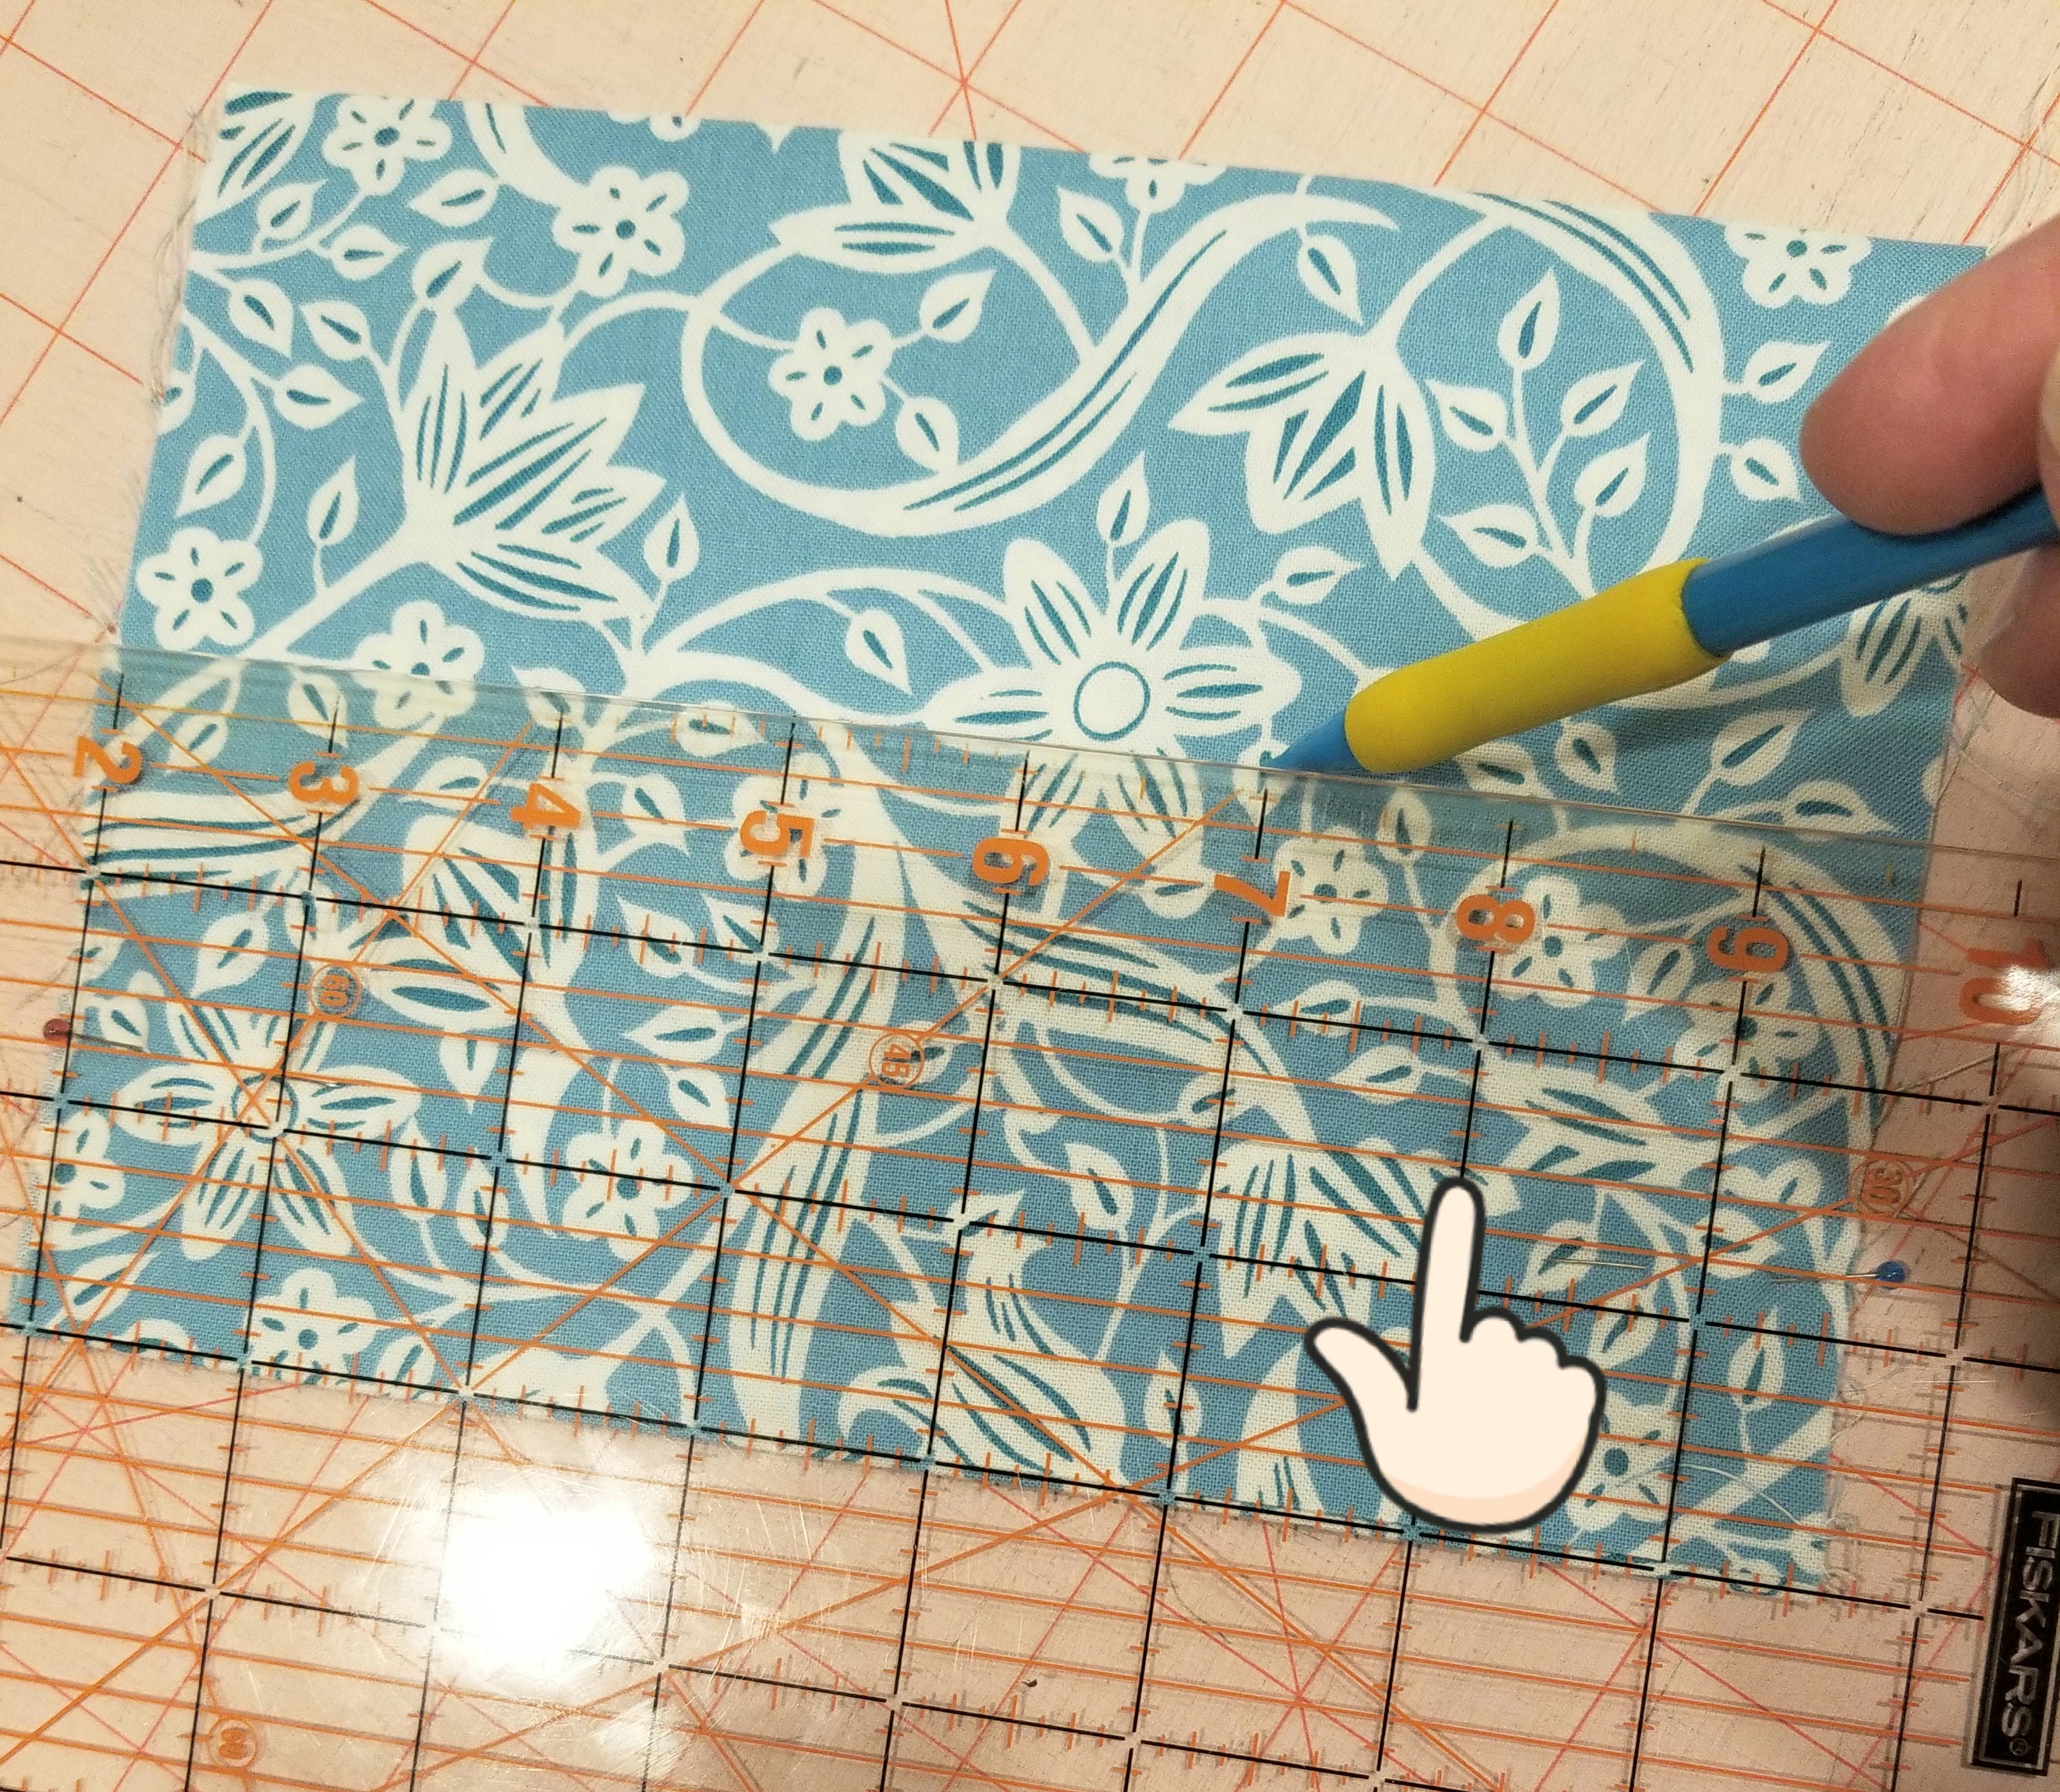
Now mark another line one inch above the last line that you made (or 3 inches above the seam edge). Using these lines as your guide, repeat the steps that you followed to make the first pleat.
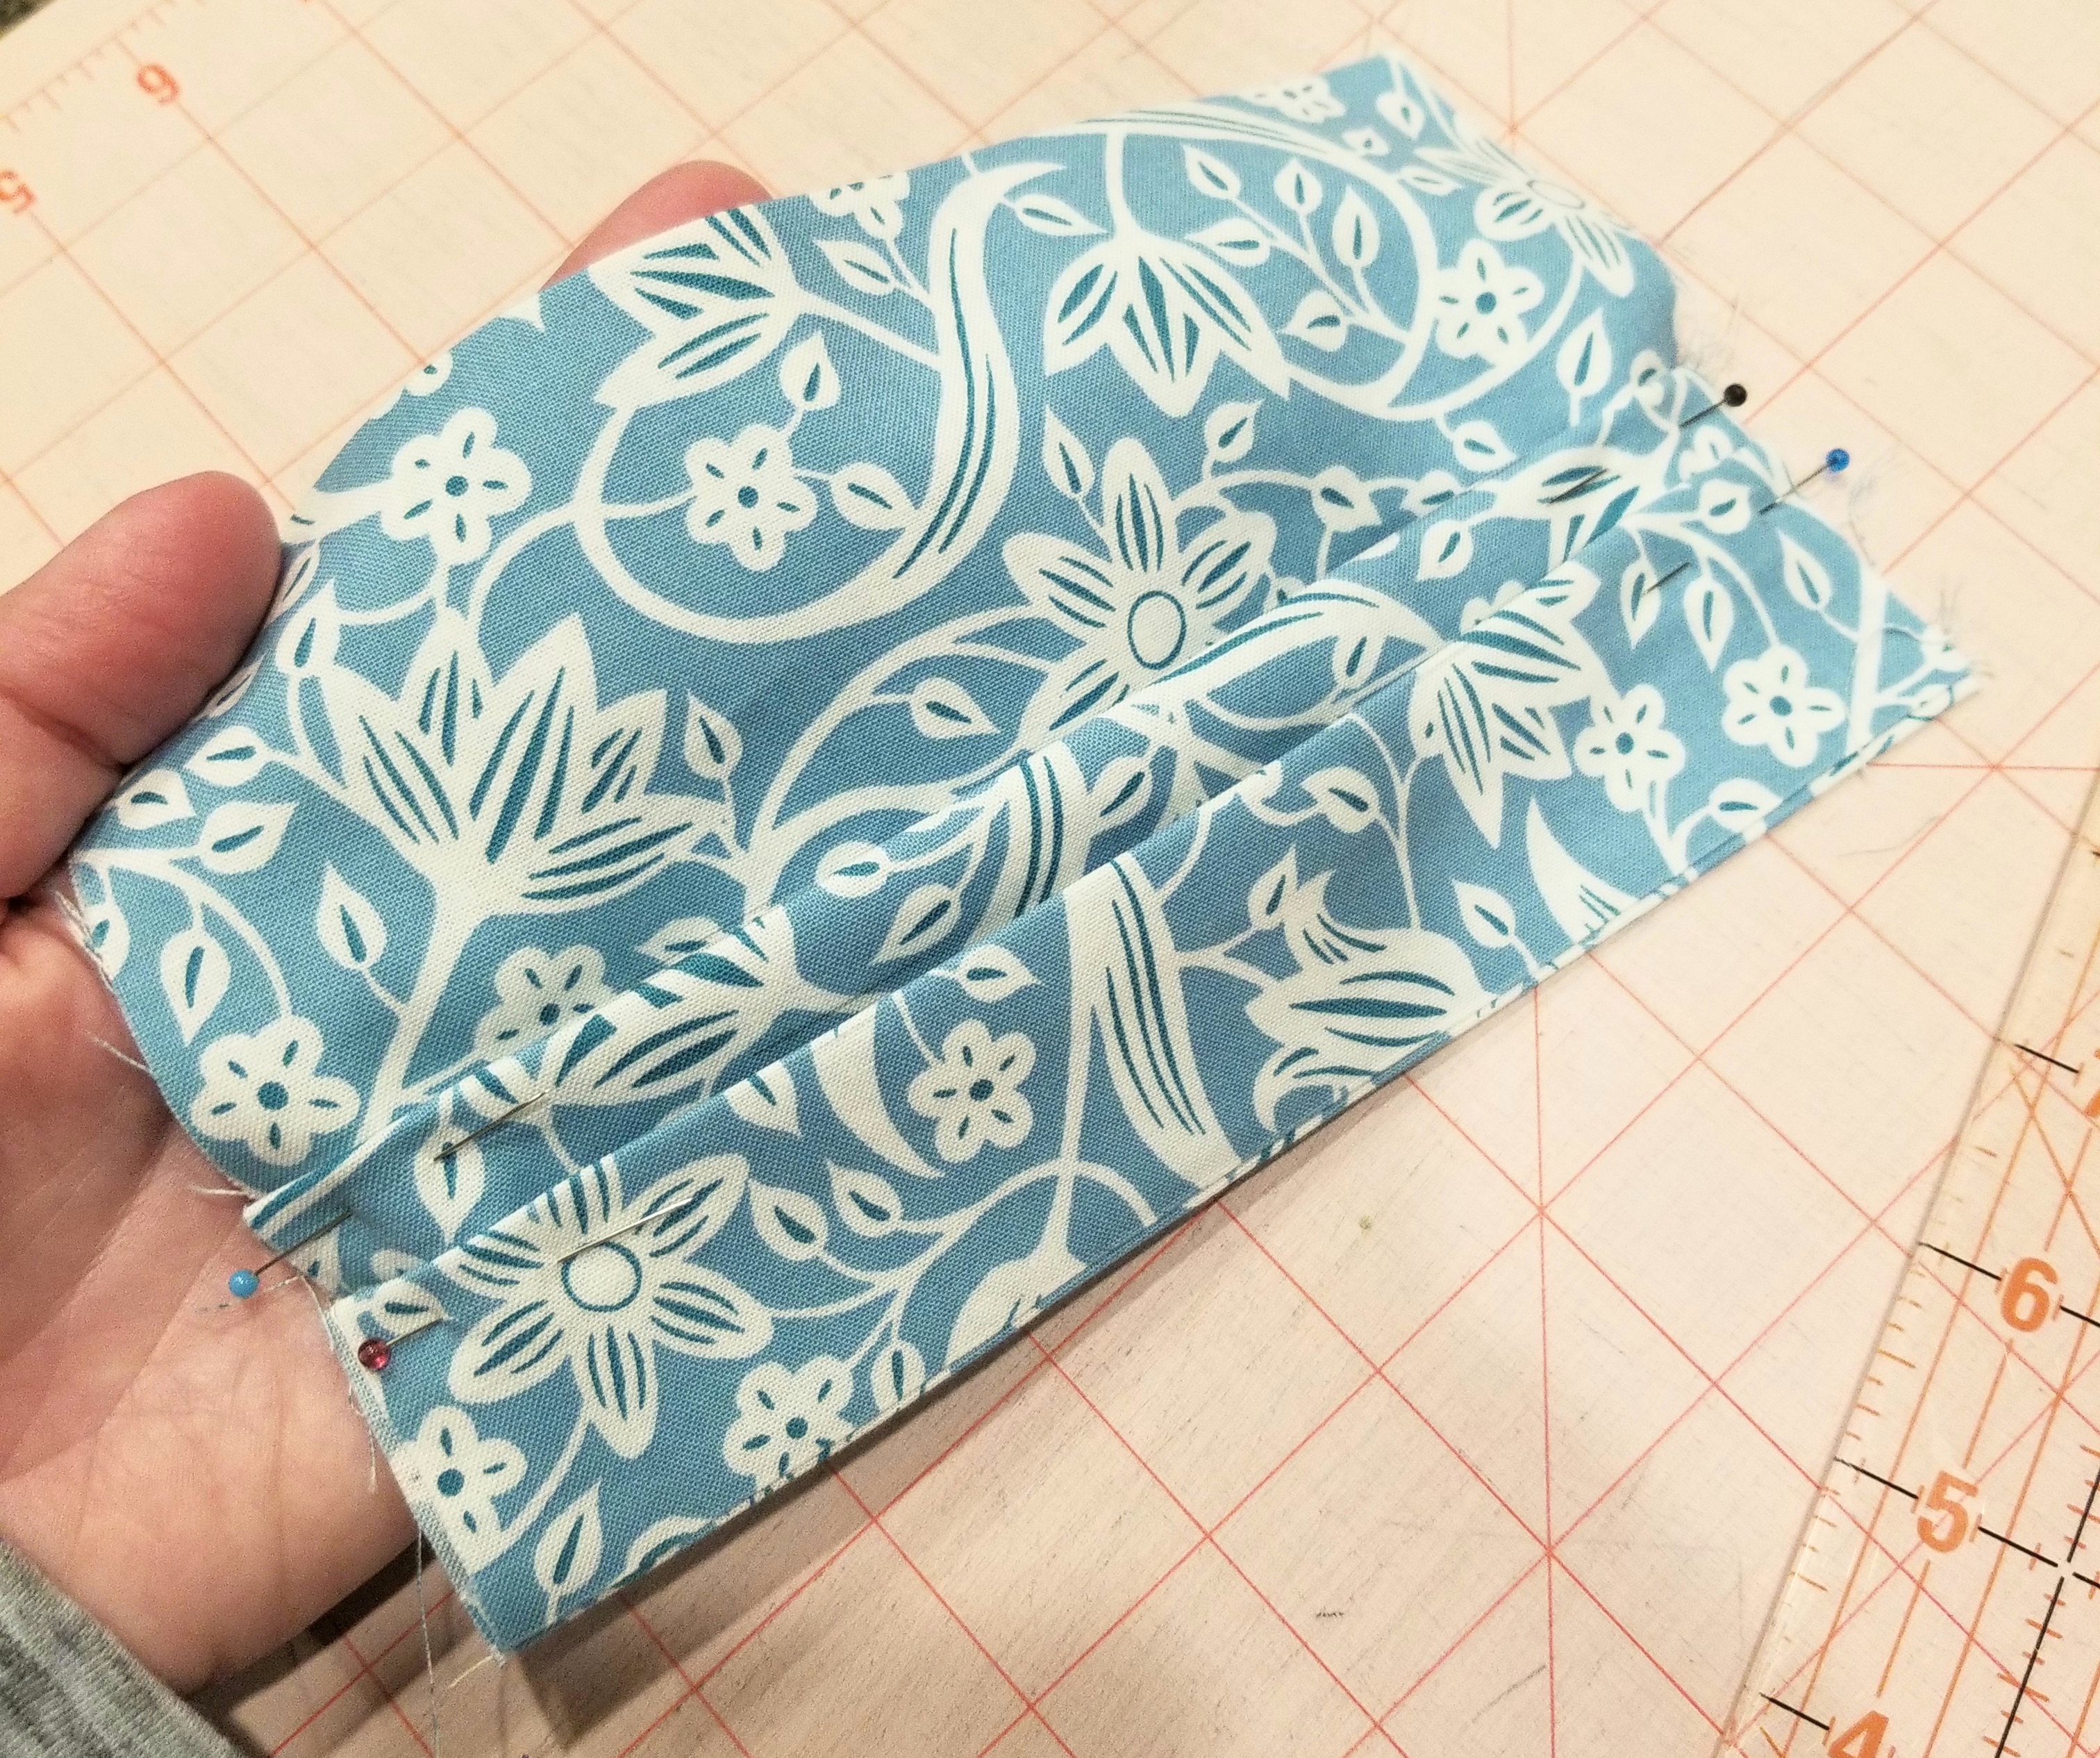
You should now have two pleats, each one being 1/2 inch deep. Repeat the steps you used to make the second pleat, so that you end up with three pleats total. Press.
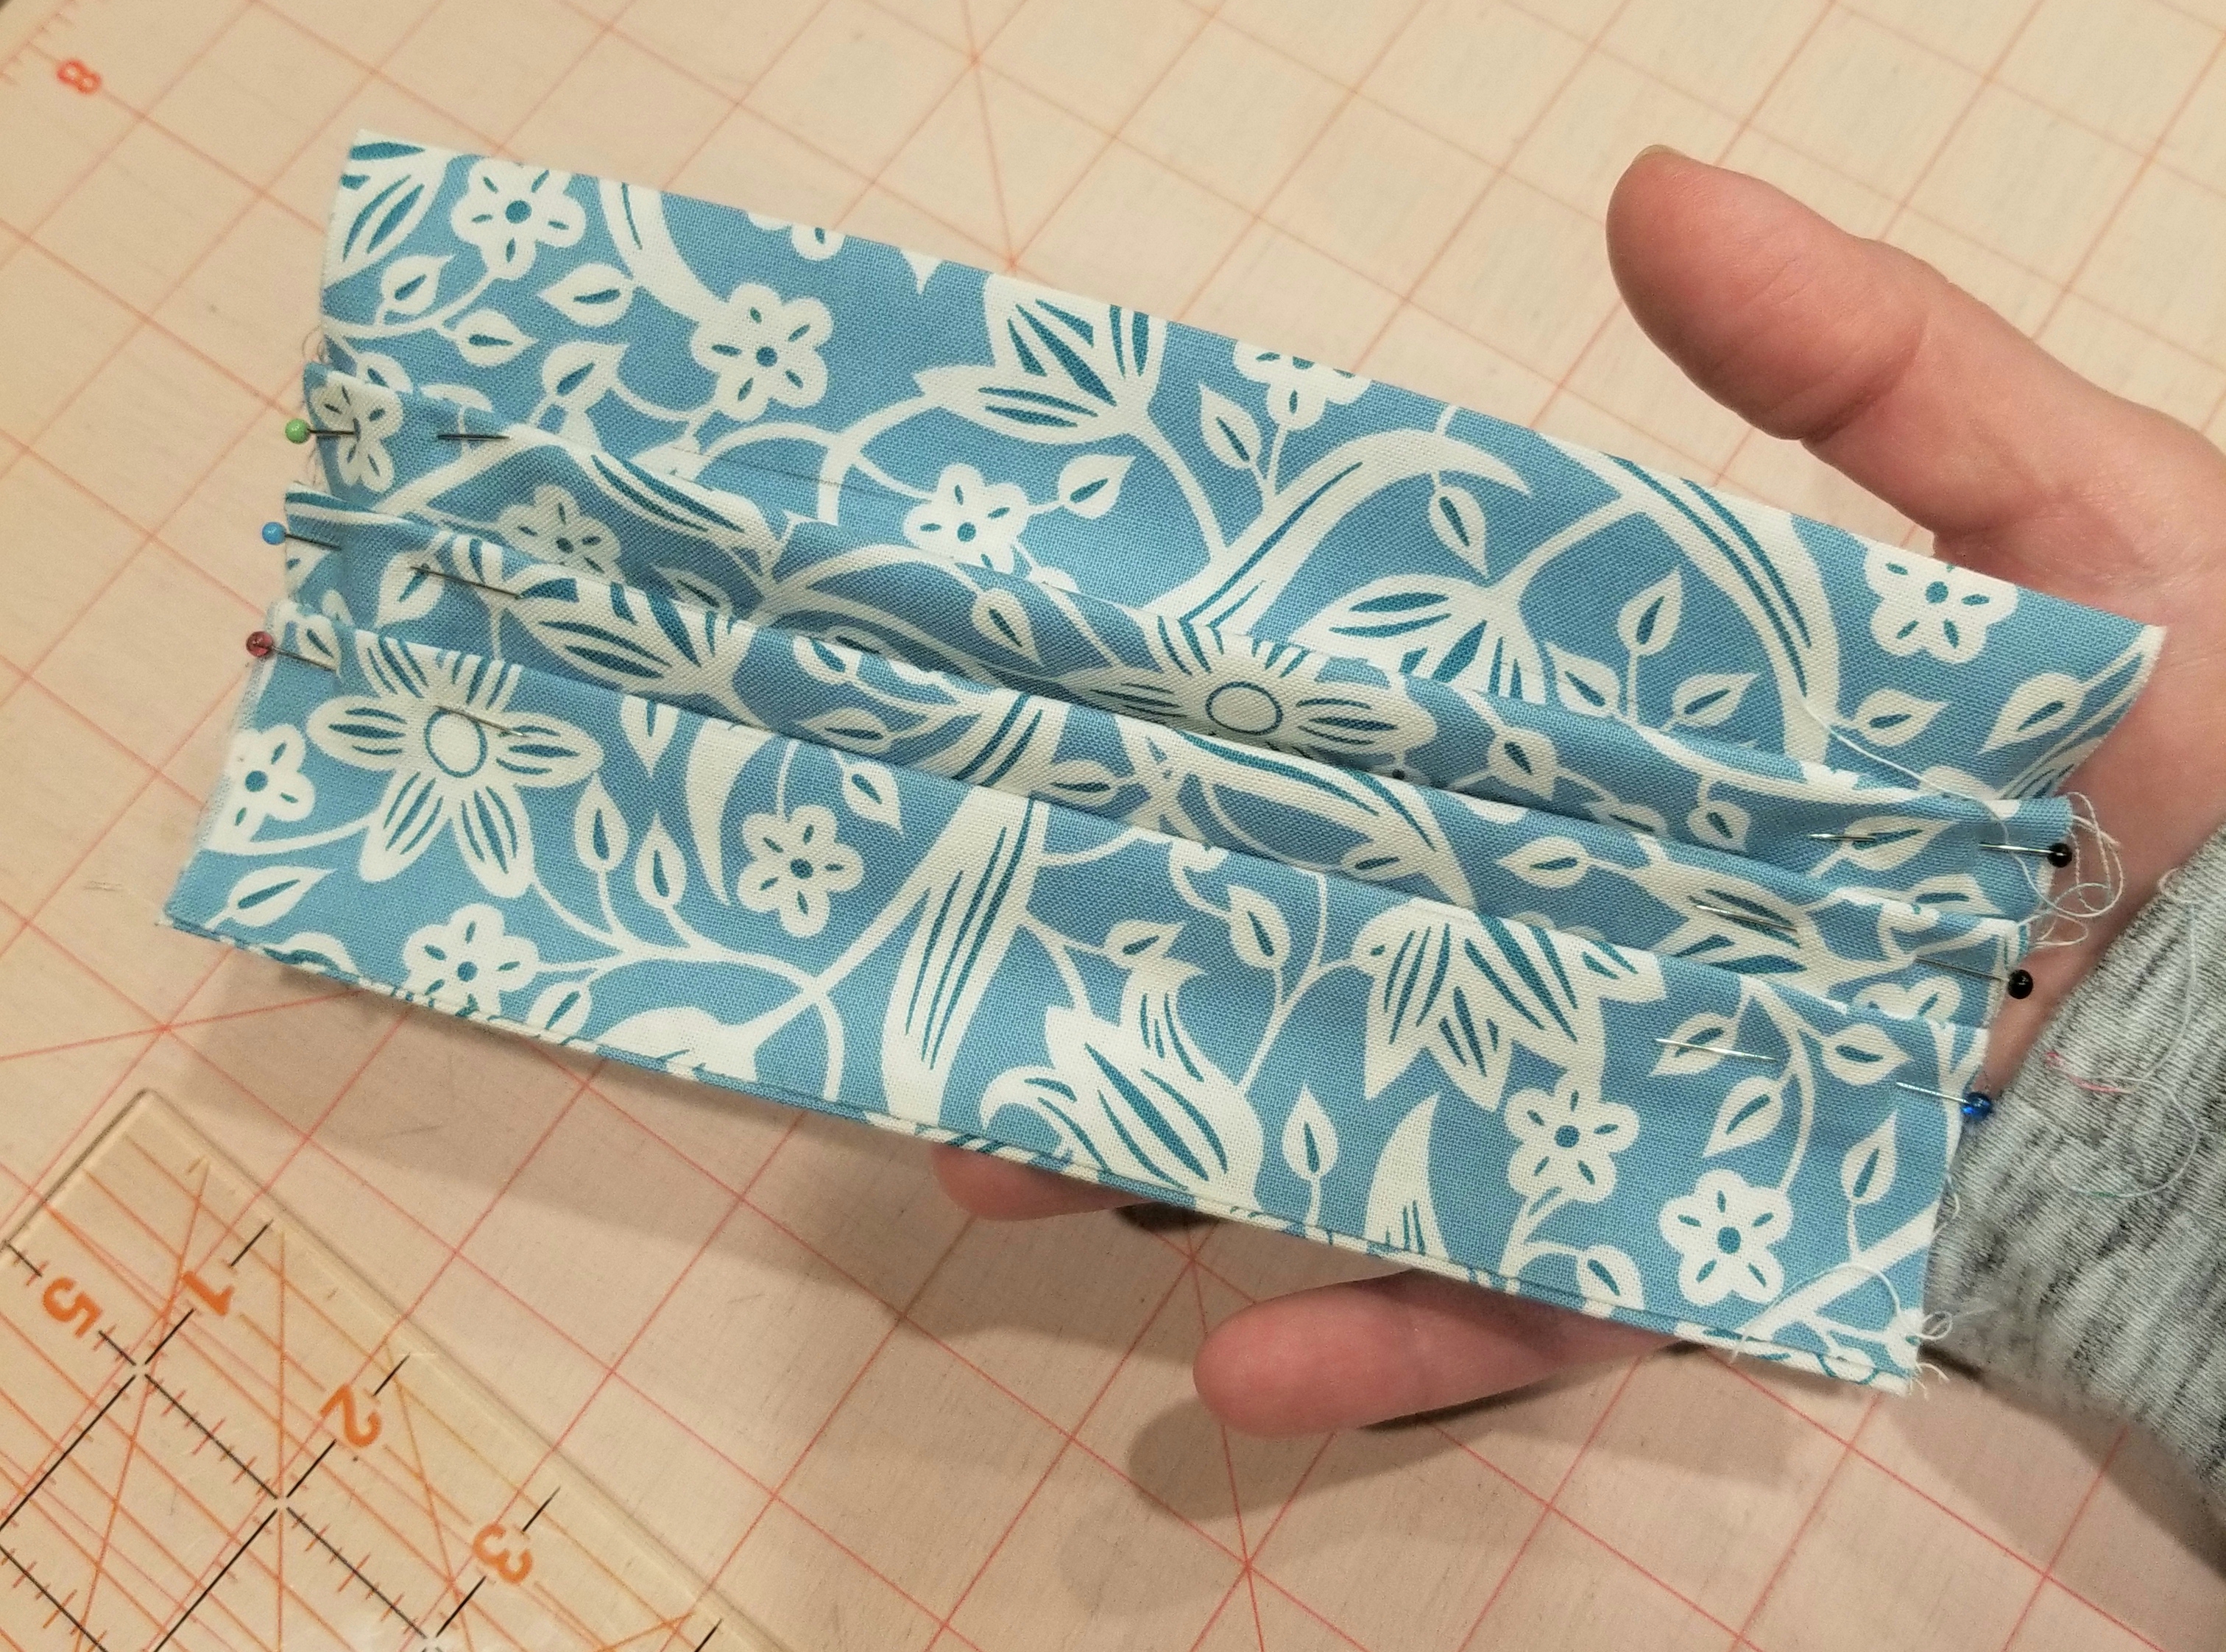
This is what your main piece should look like at this point.
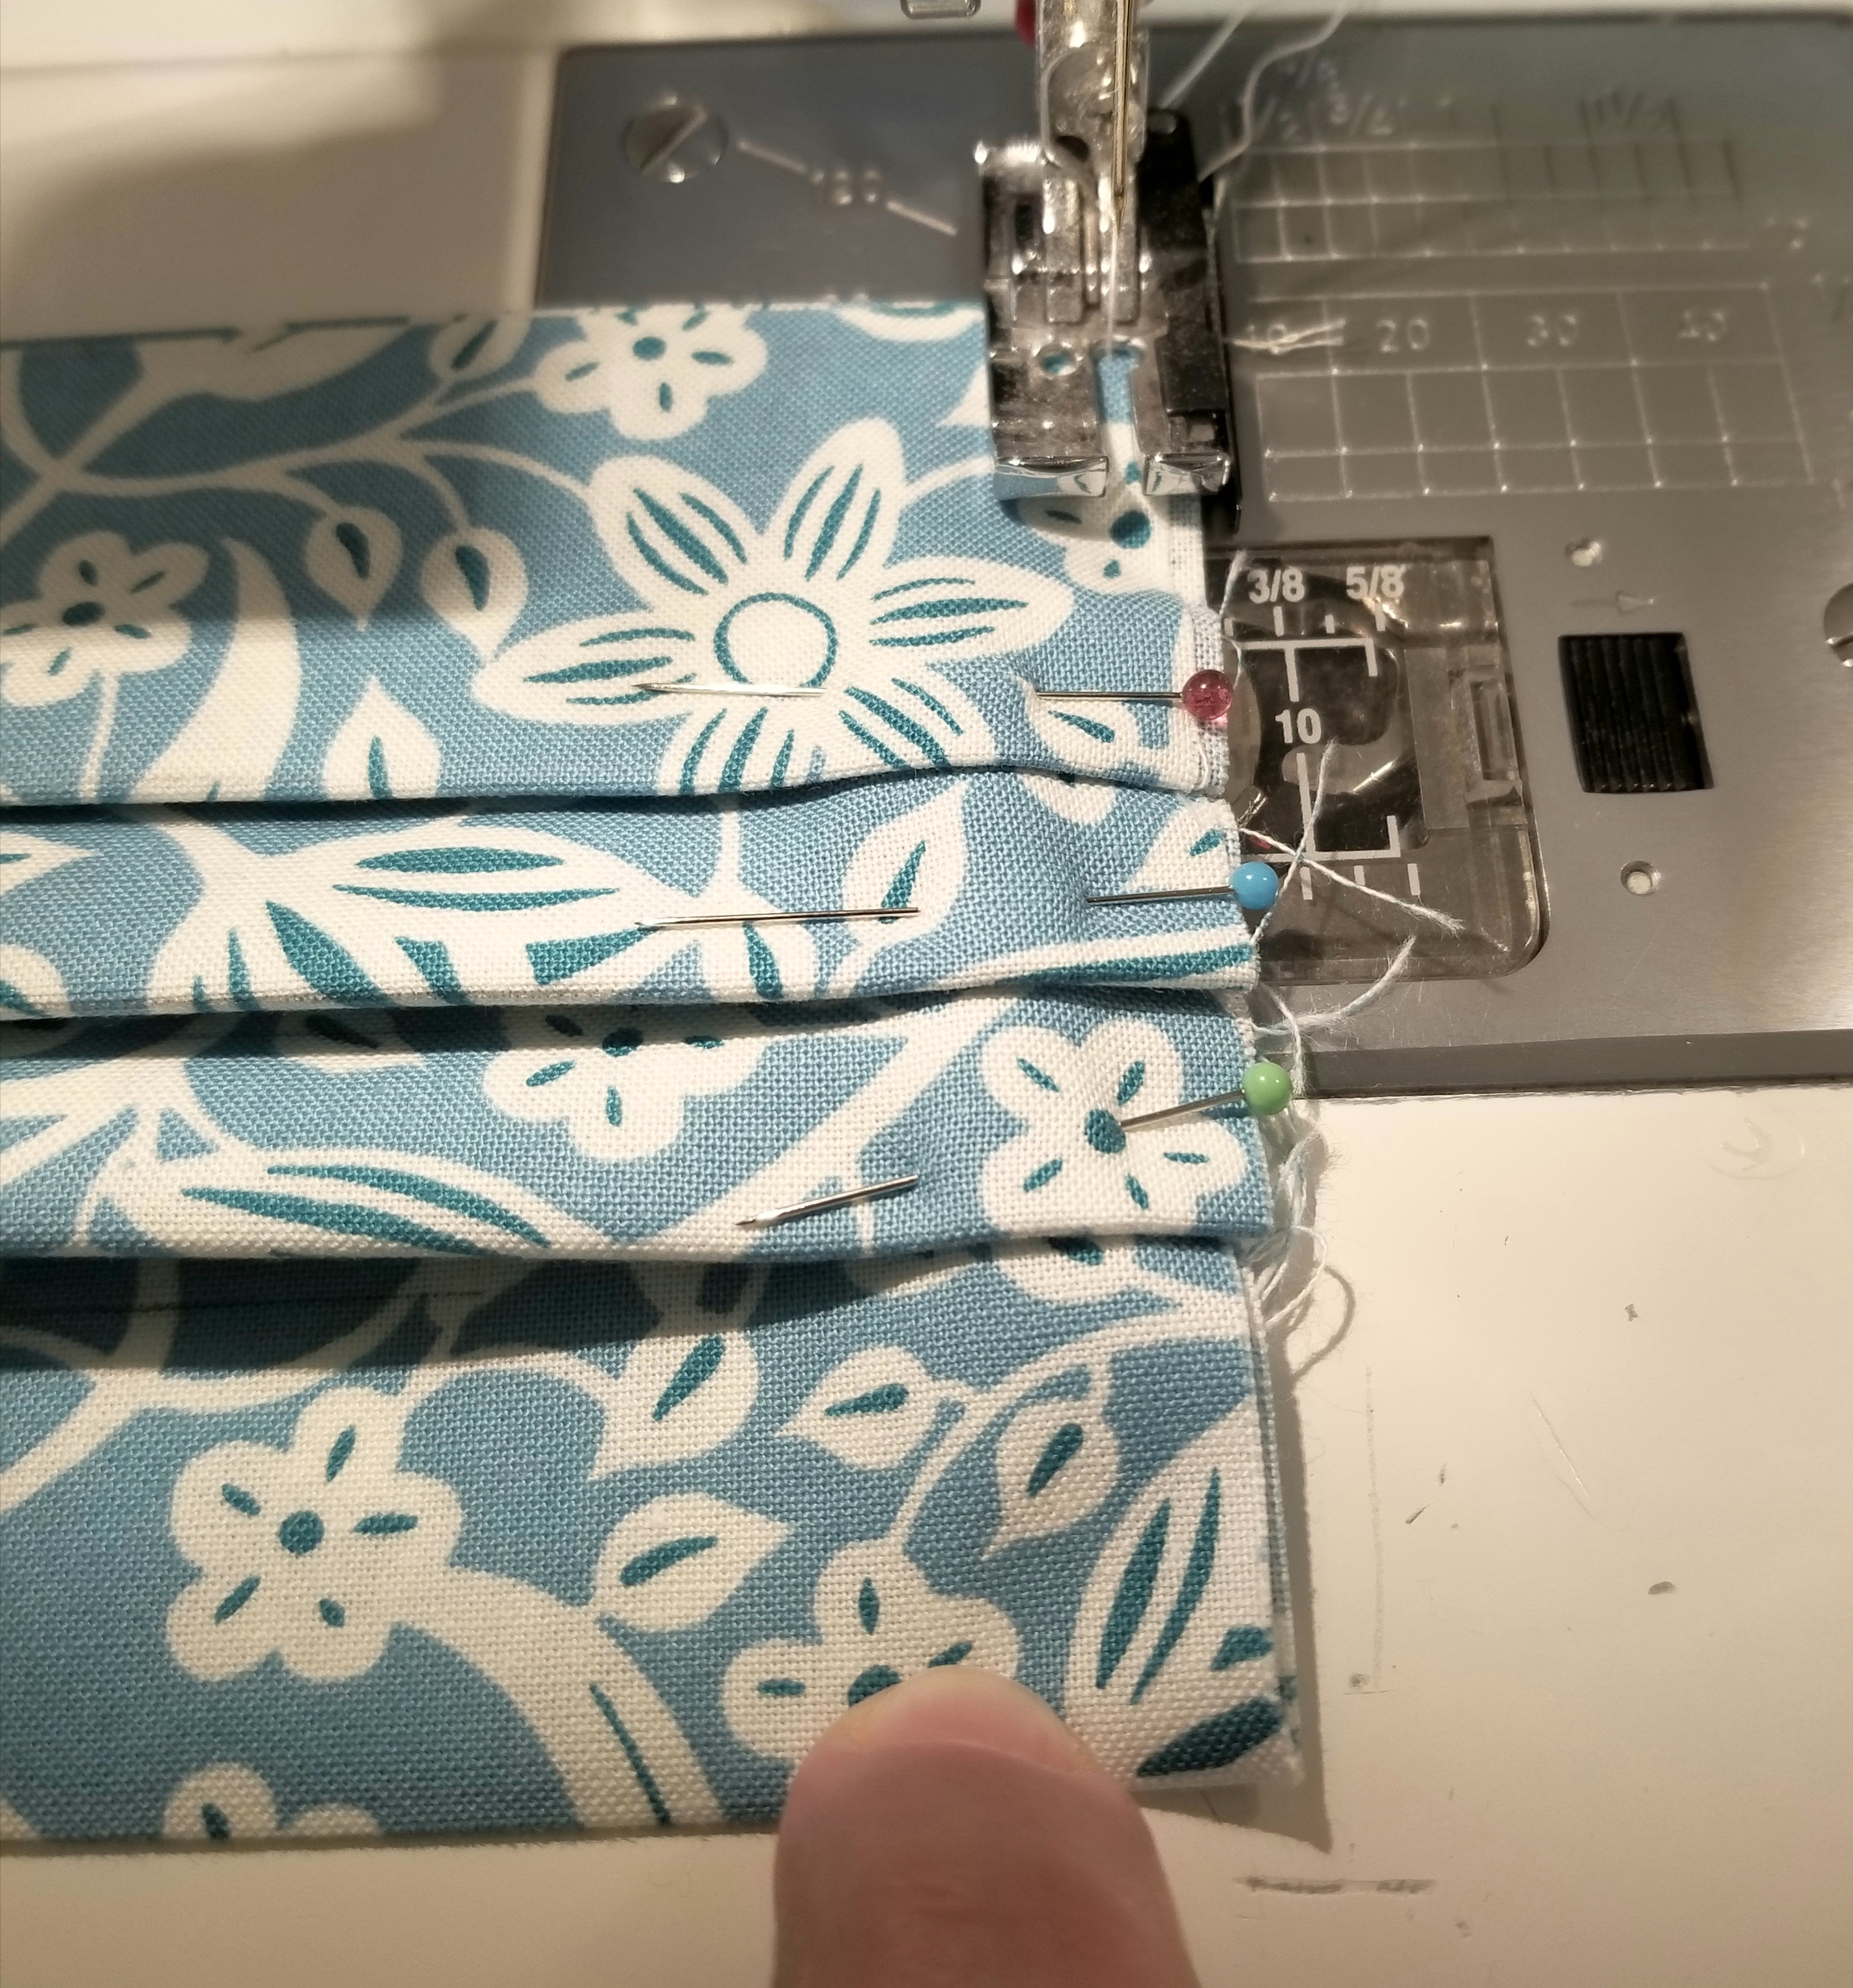
Using a 1/8” seam allowance, baste stitch the raw edges.
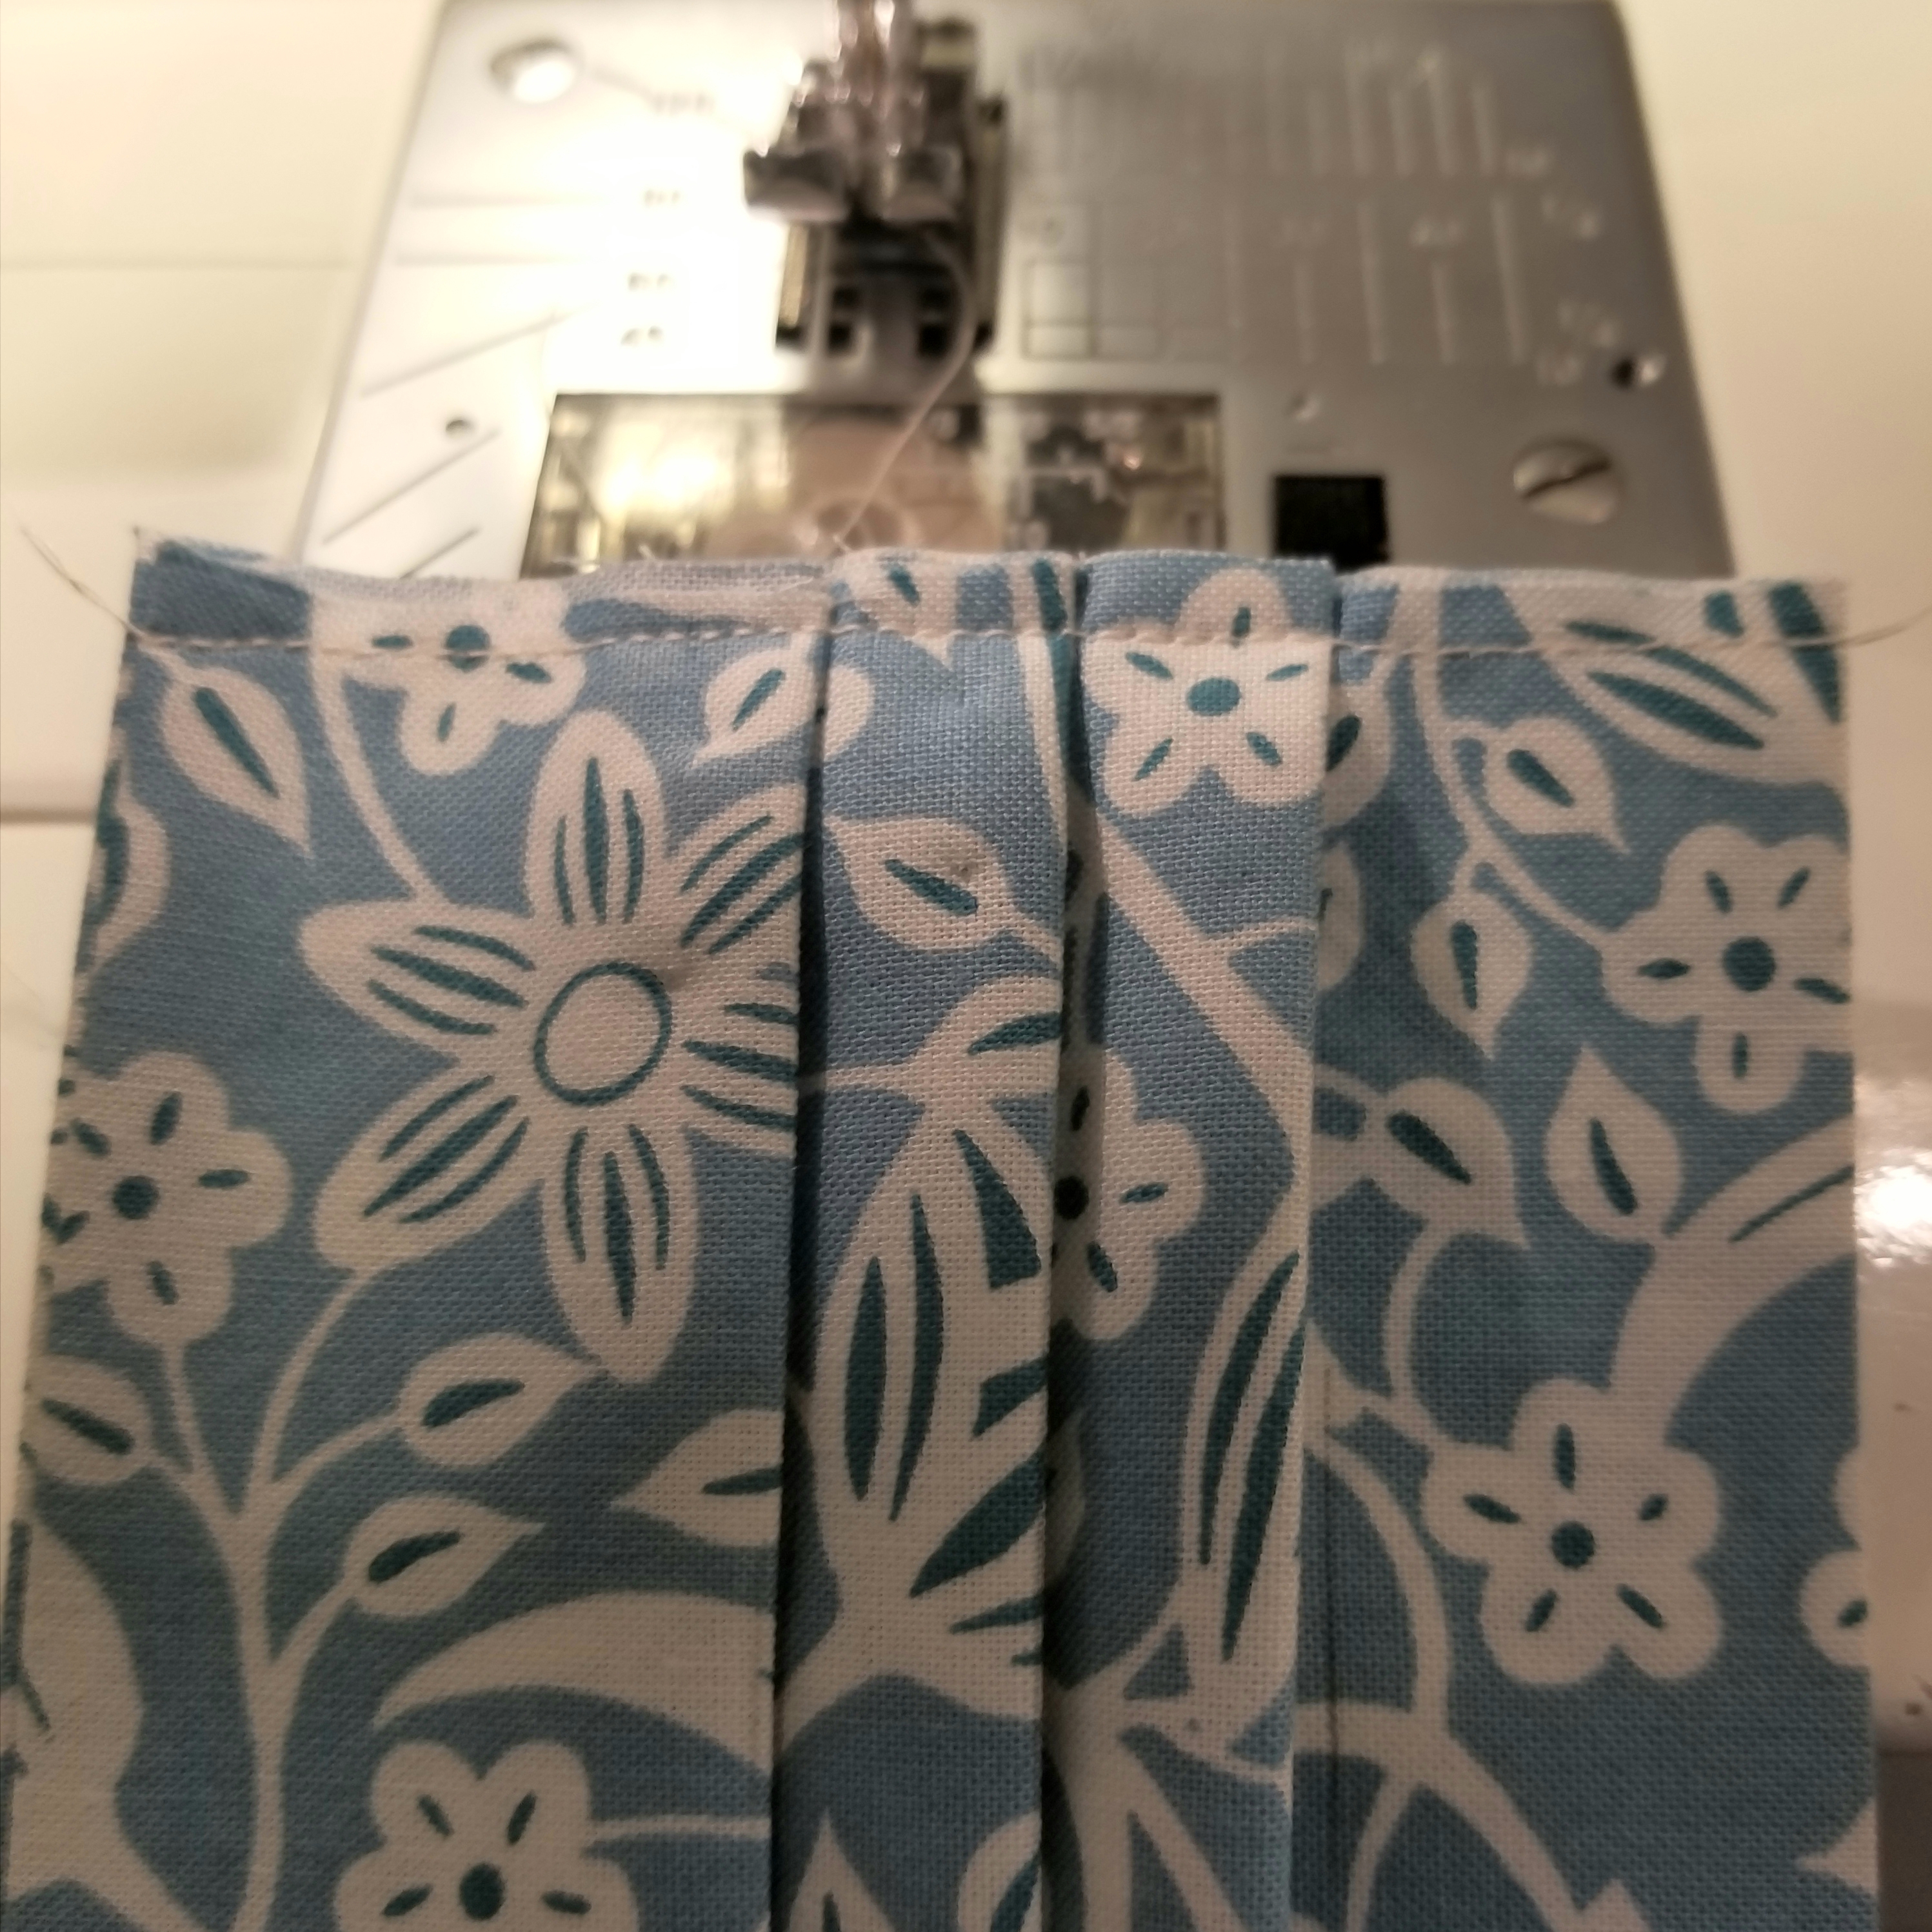
Repeat this step so that both raw edges are basted as shown in the picture above.
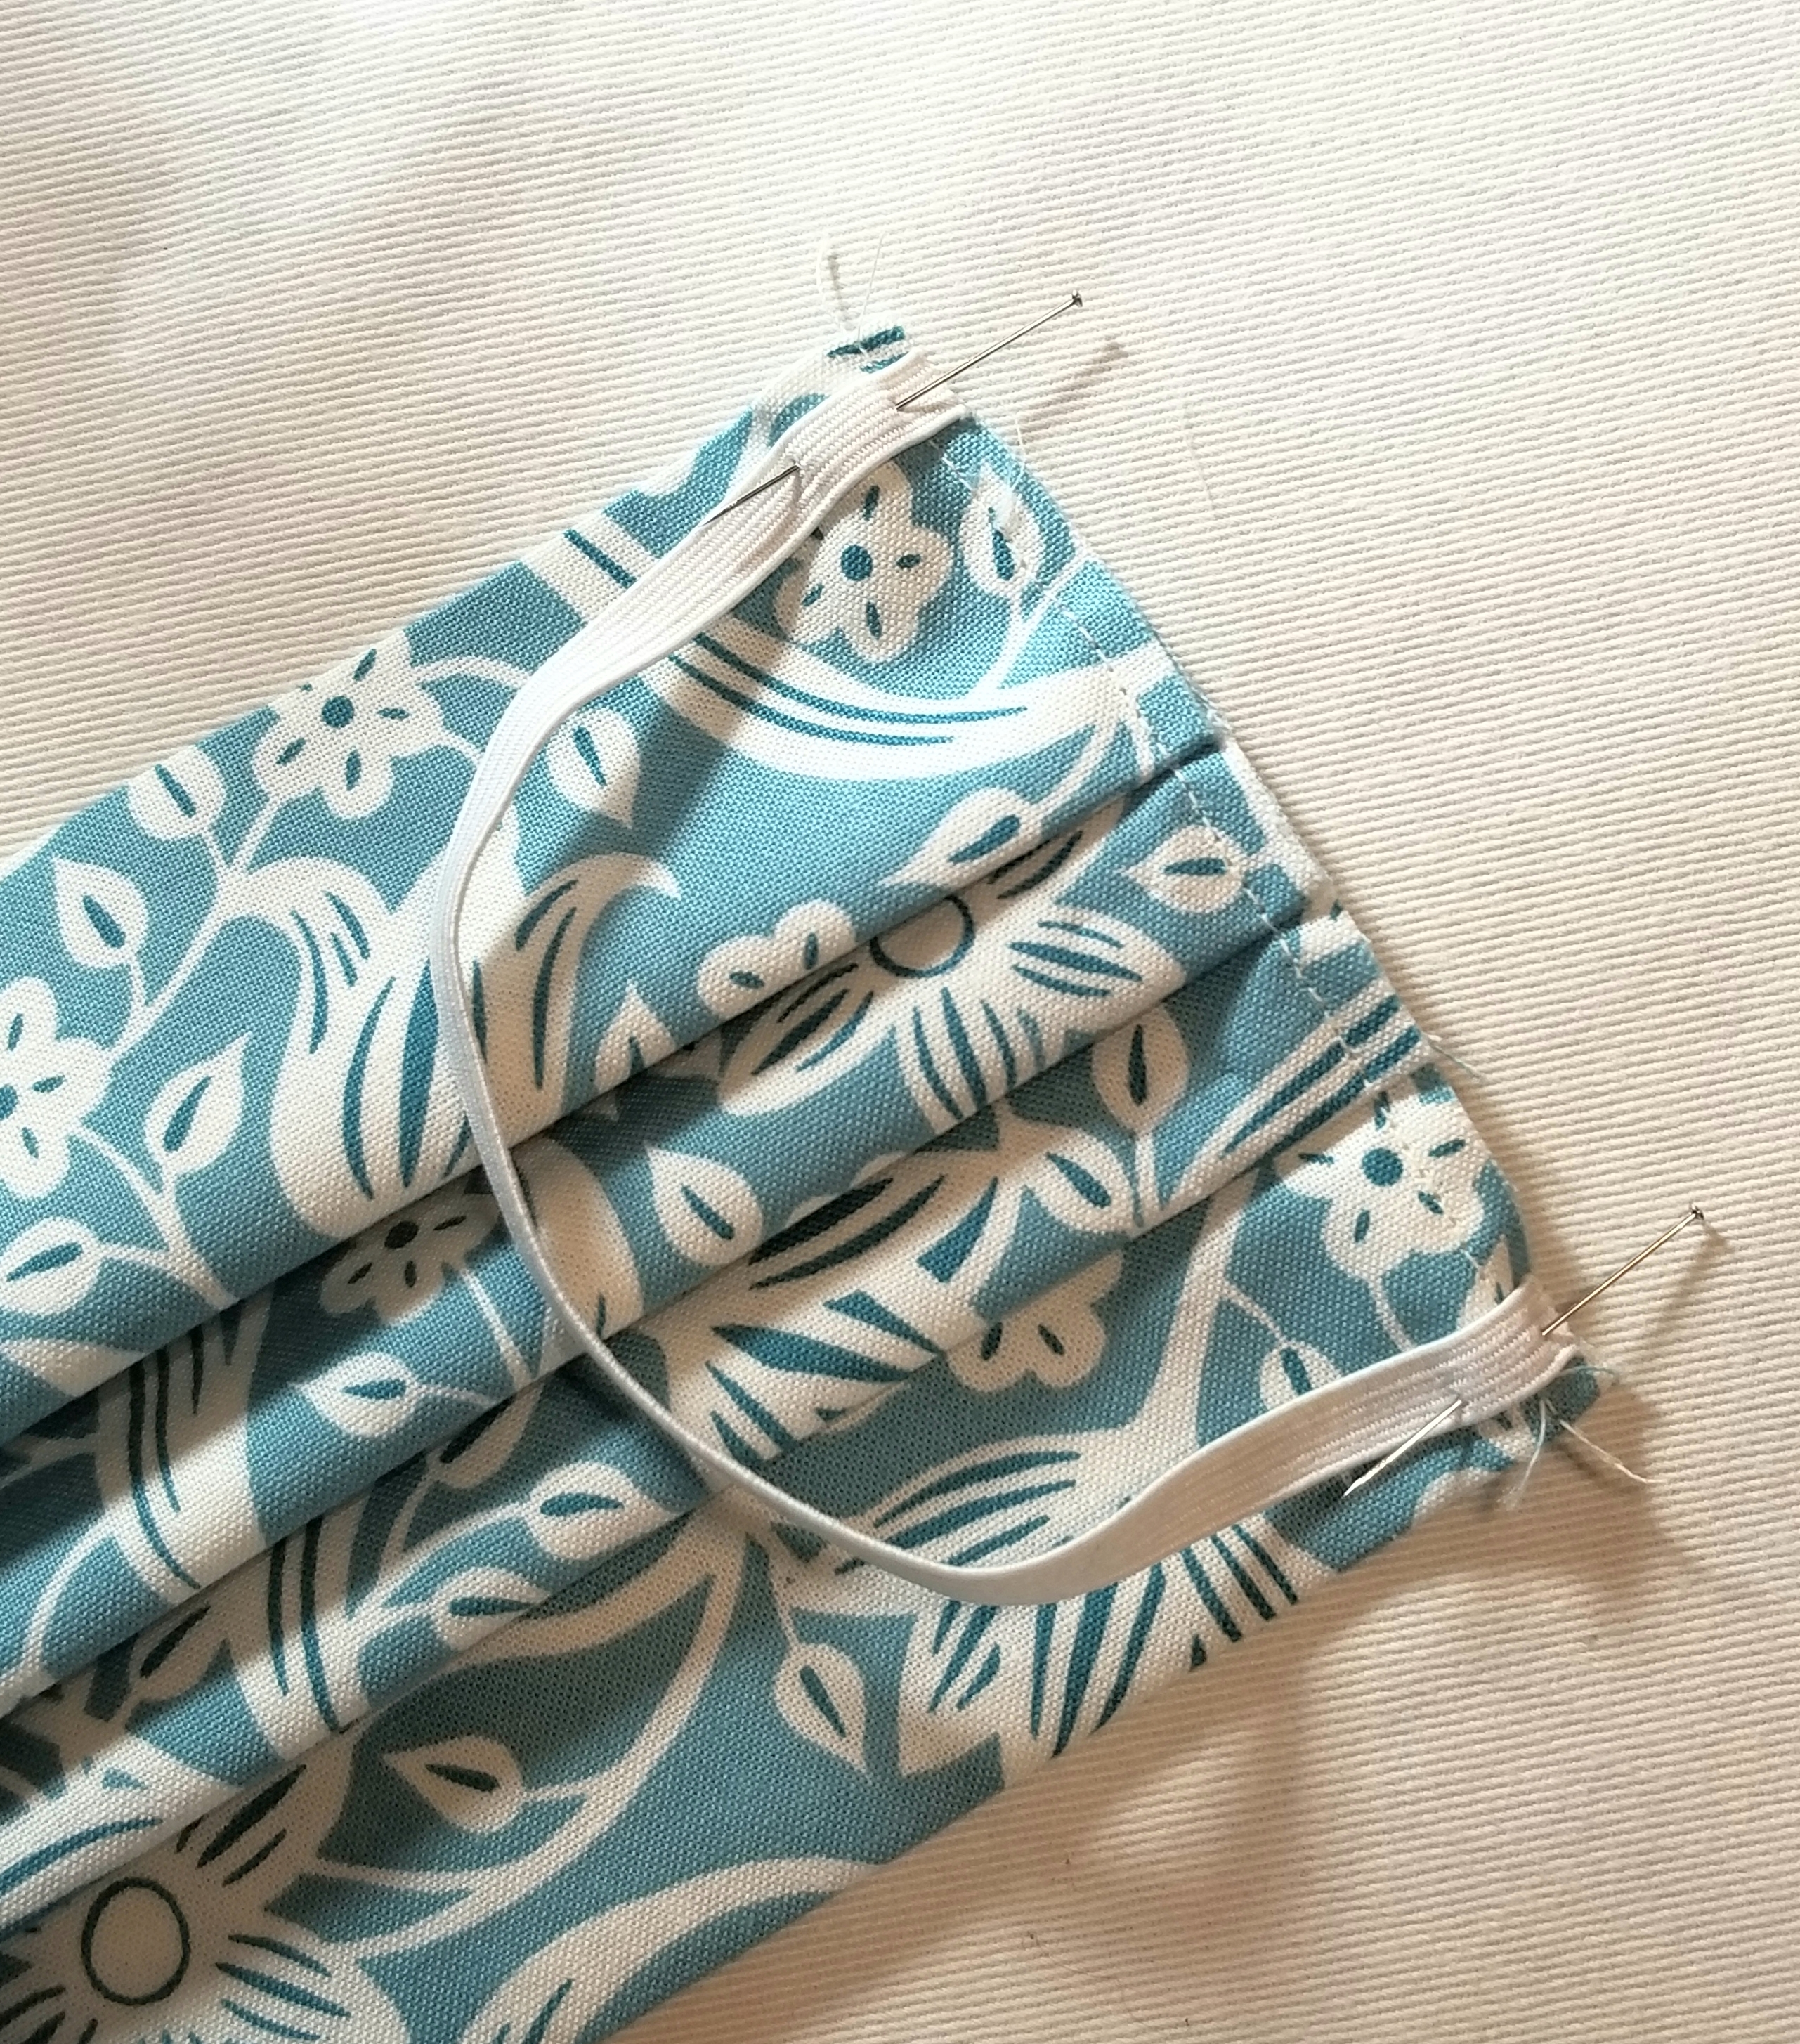
Pin one elastic piece to the raw edge, making sure not to twist it before baste stitching it to the edge at both ends. I placed mine 1/8” from the top and bottom edge of the main pleated piece. Baste elastic in place 1/8” inch from raw edge. Repeat, to attach remaining elastic piece to the other raw edge.
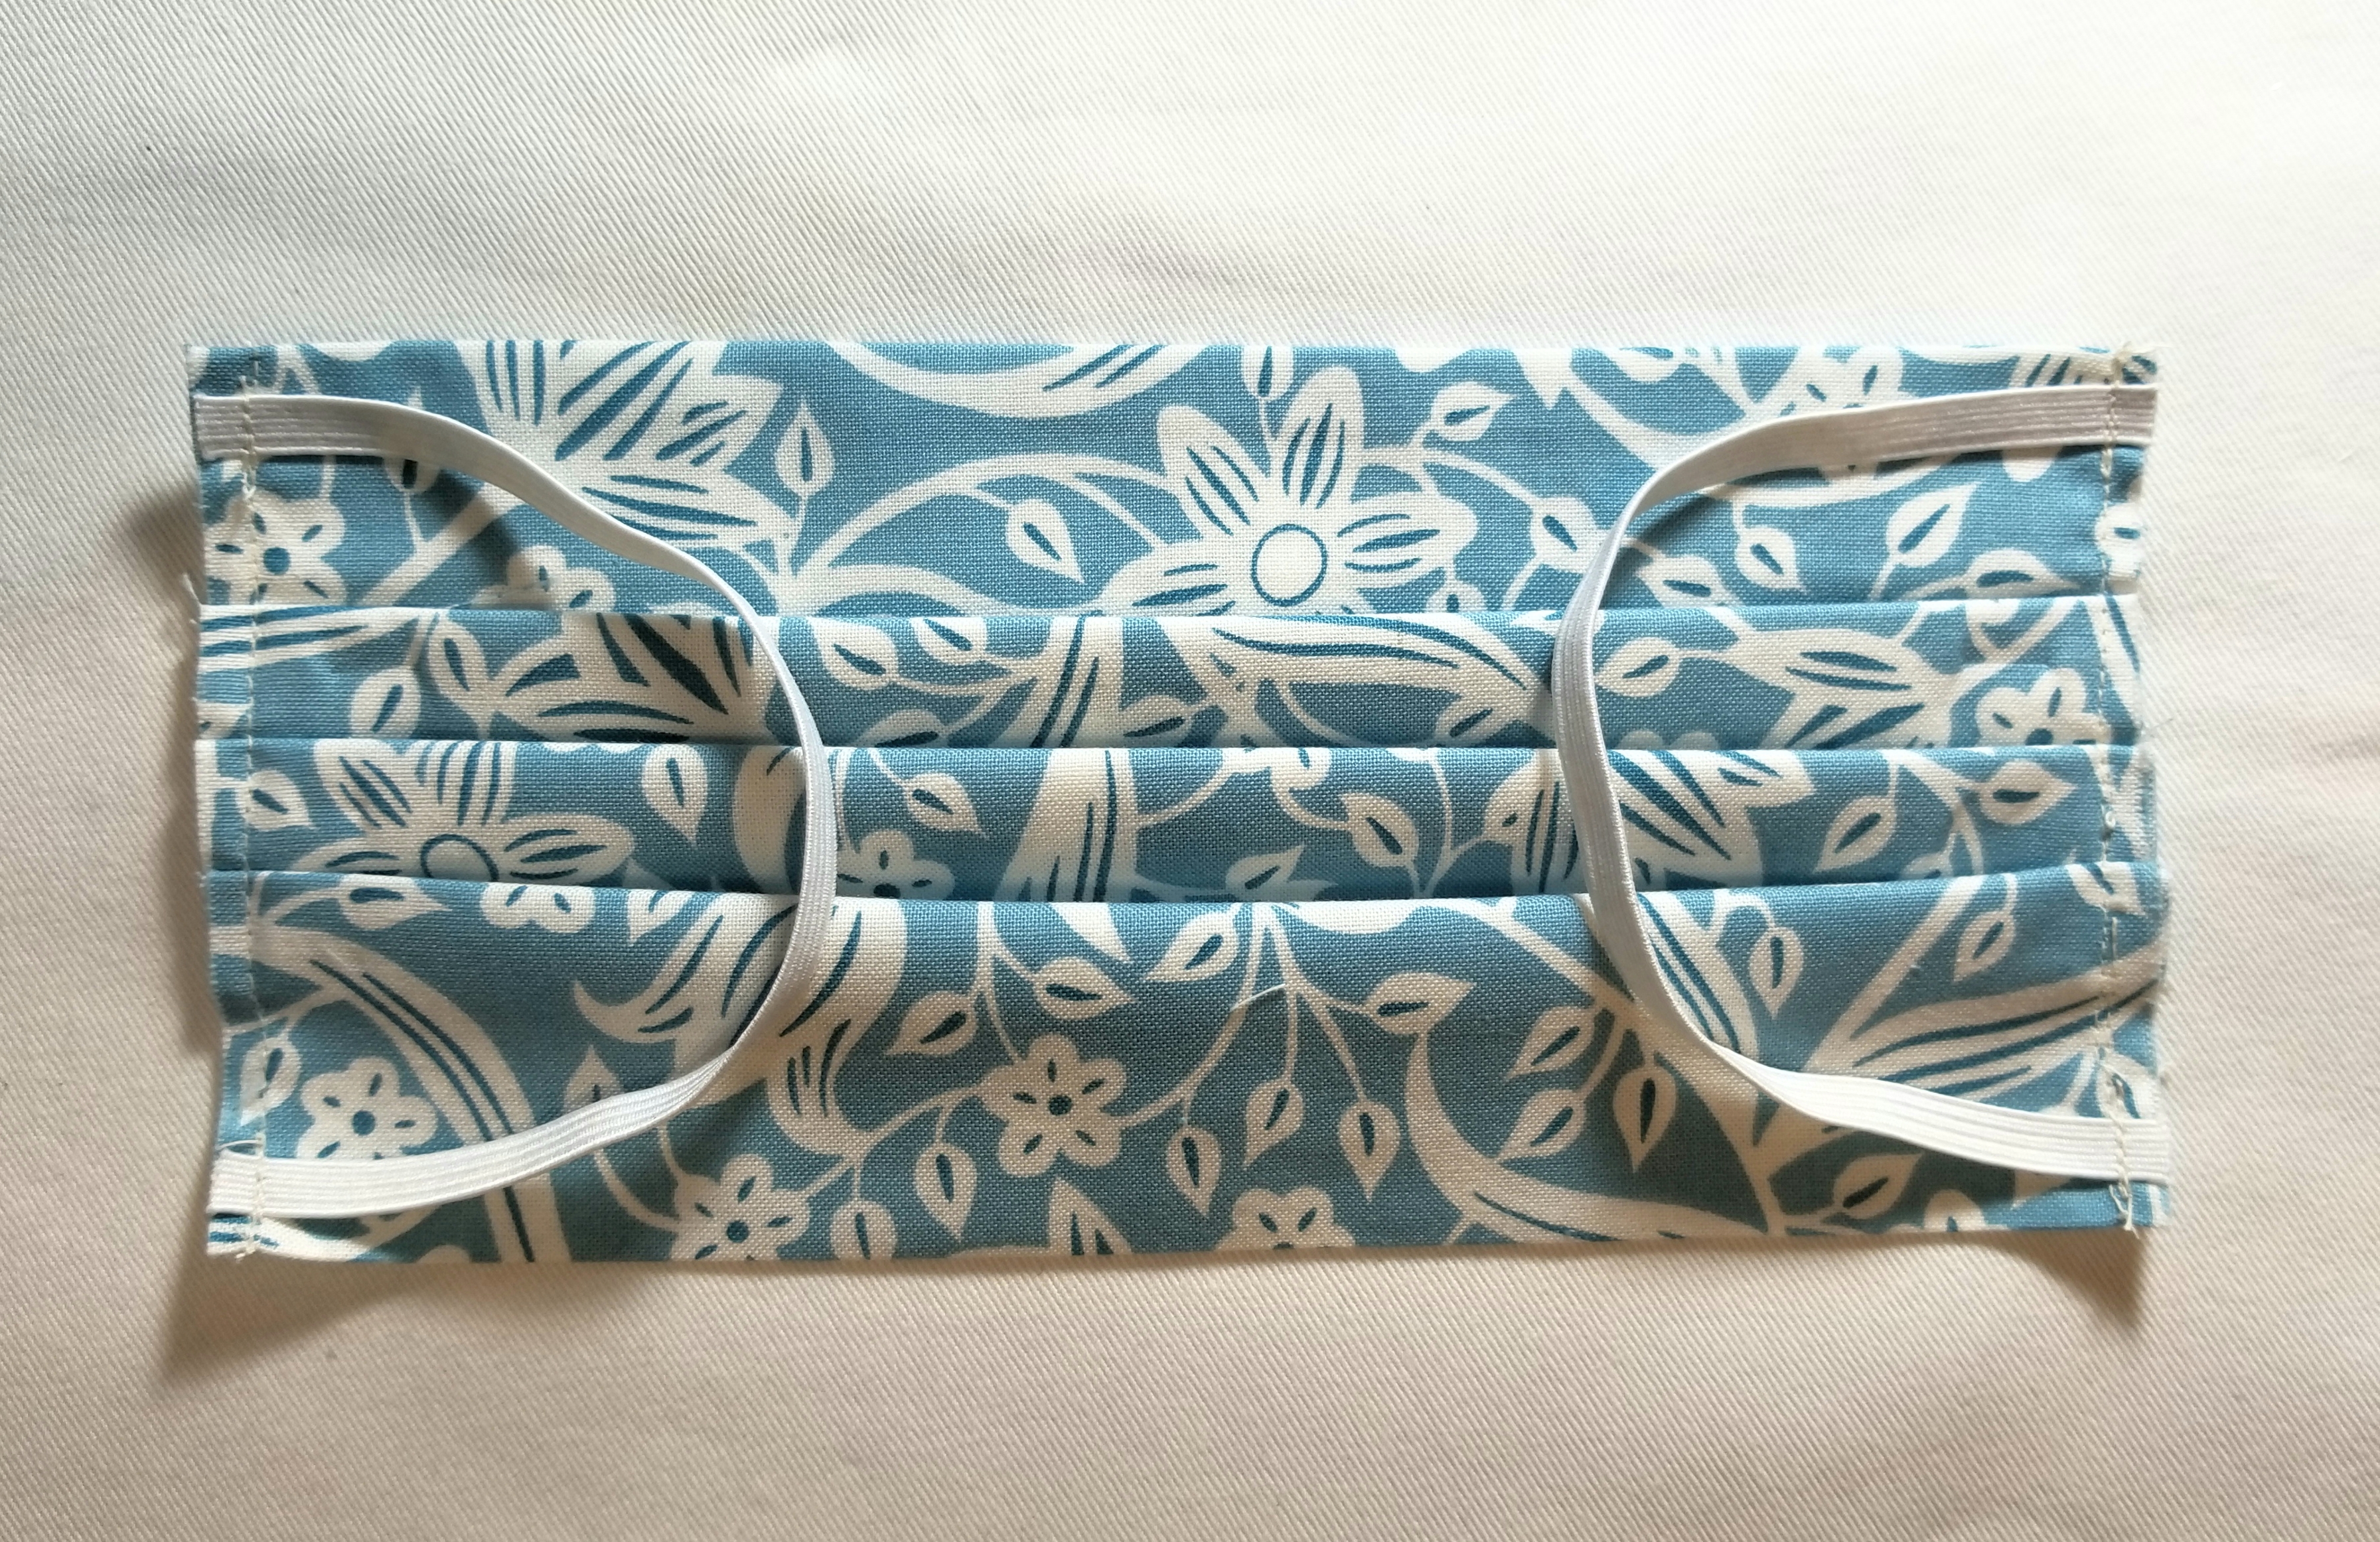
Your pleated piece should now resemble the picture above.
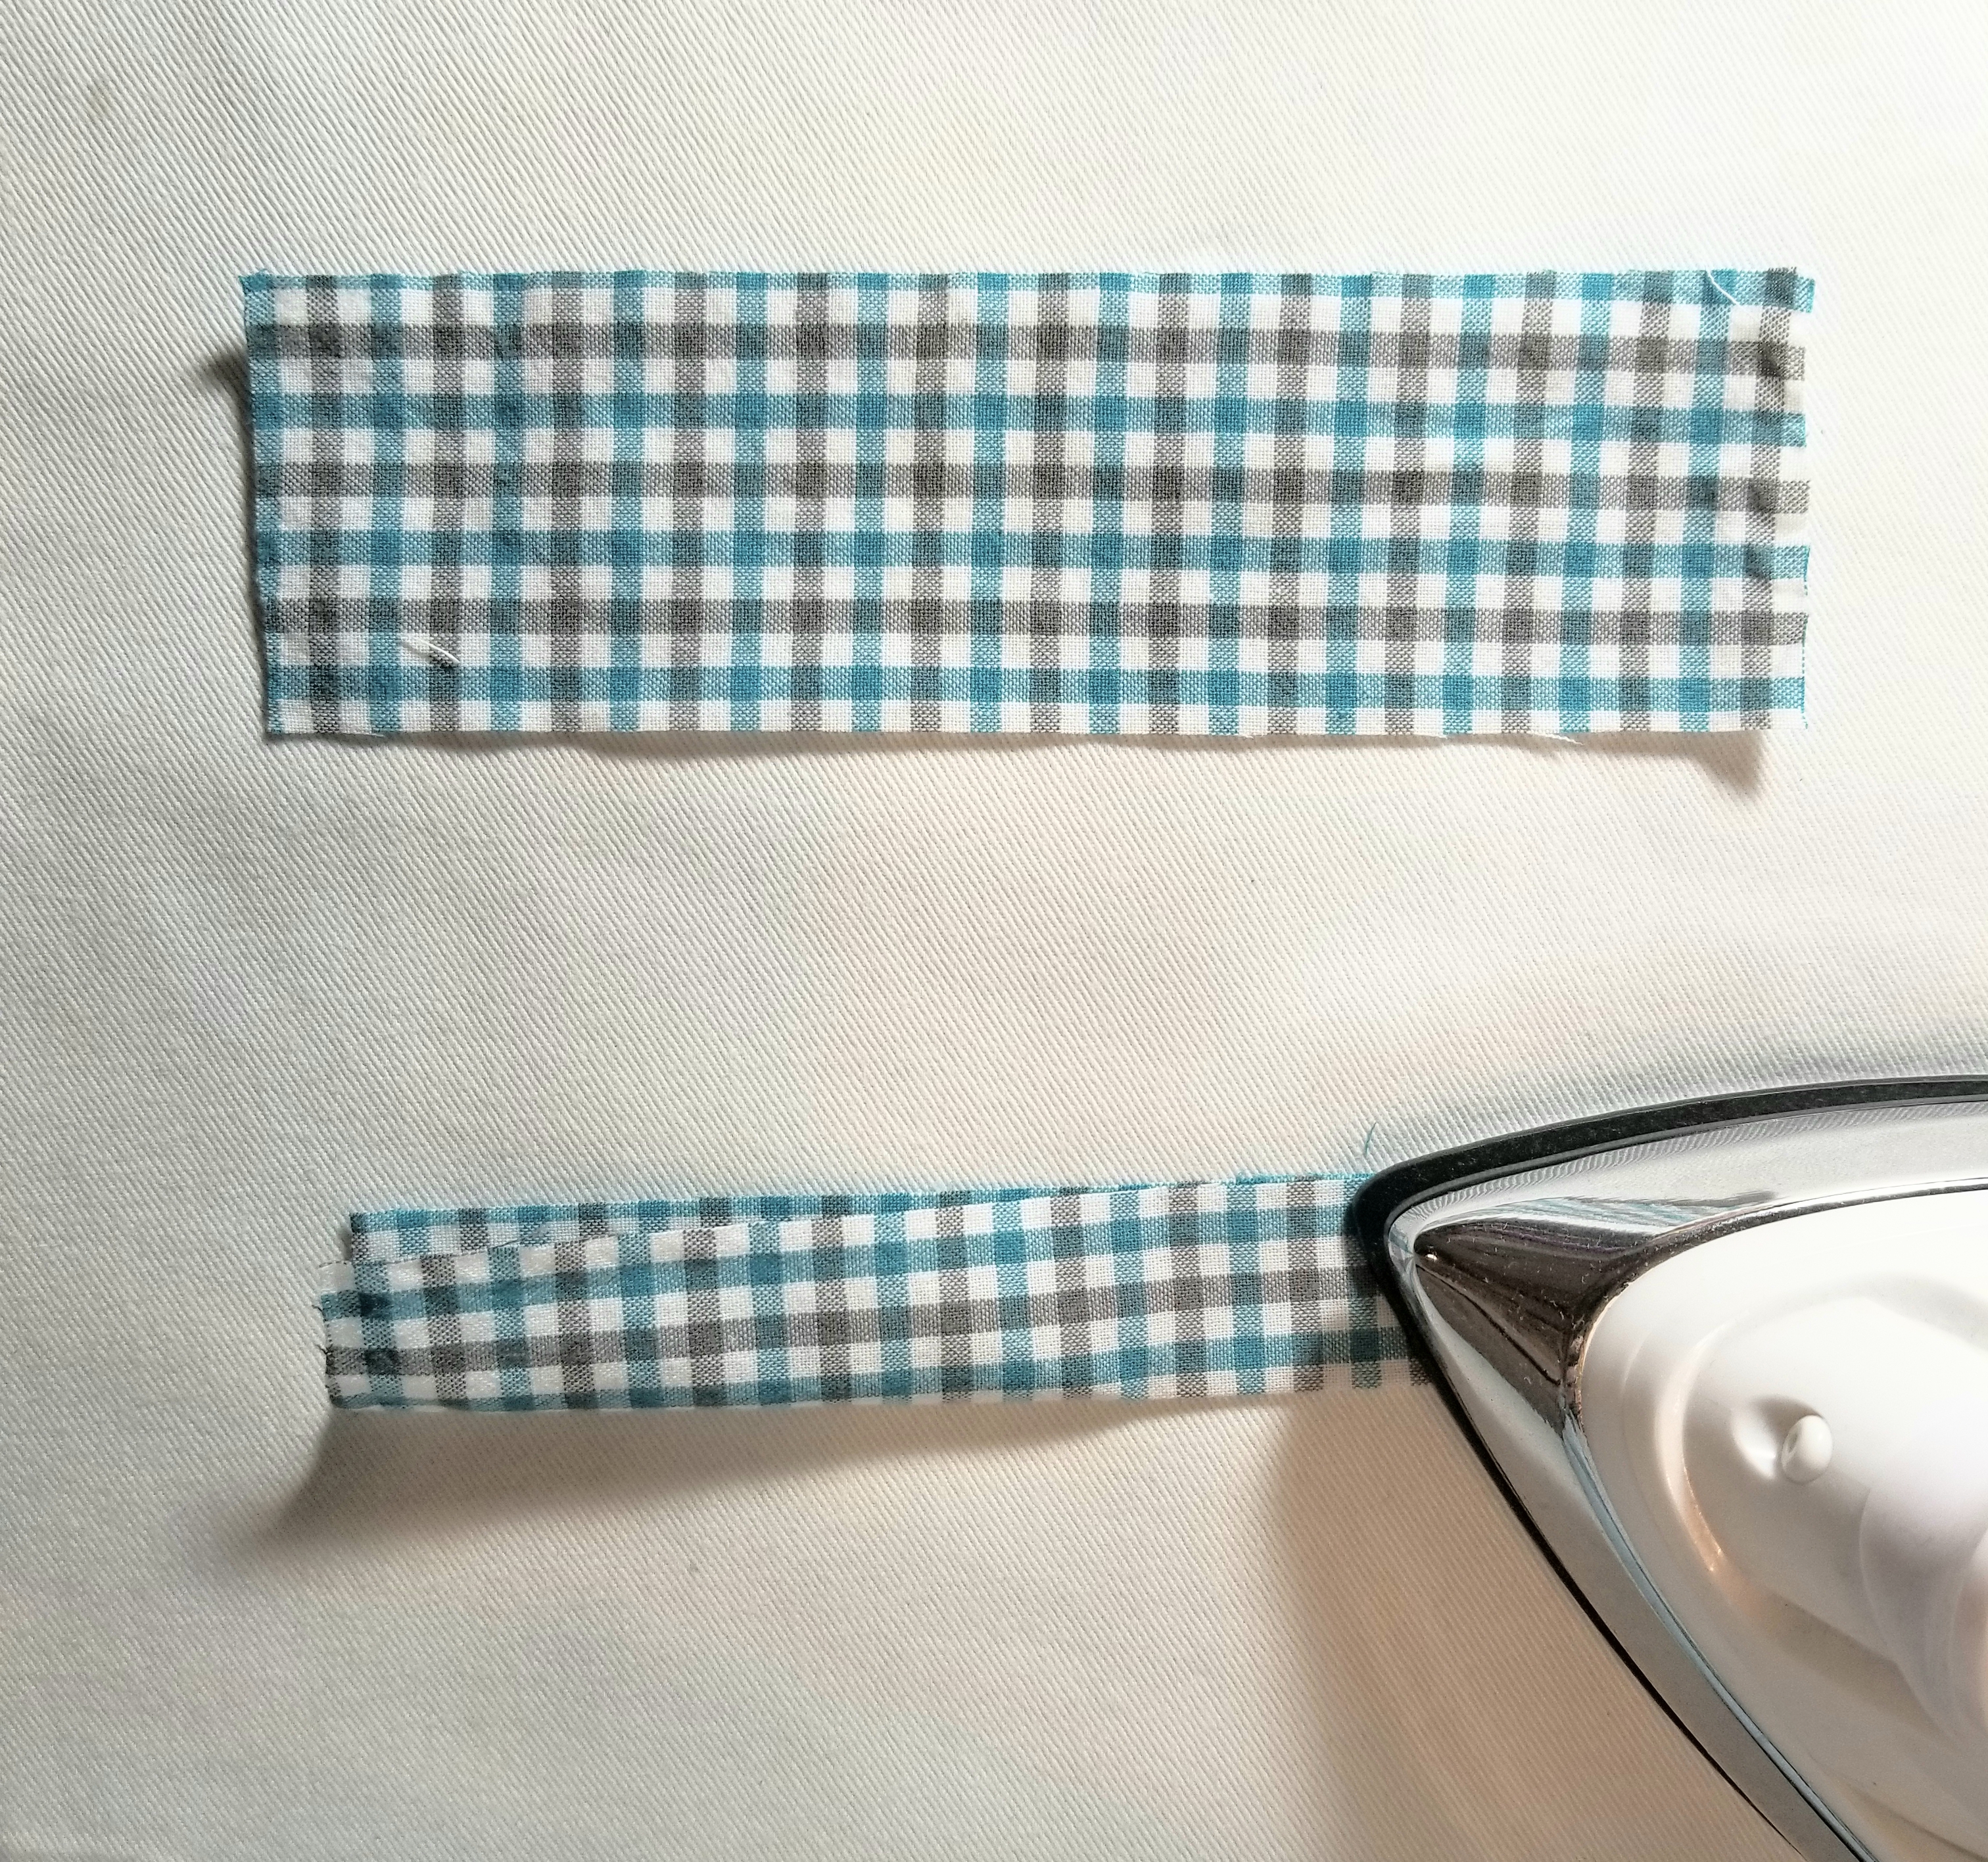
Fold each accent strip of fabric lengthwise in half, matching raw edges, as shown in the picture above. Press.
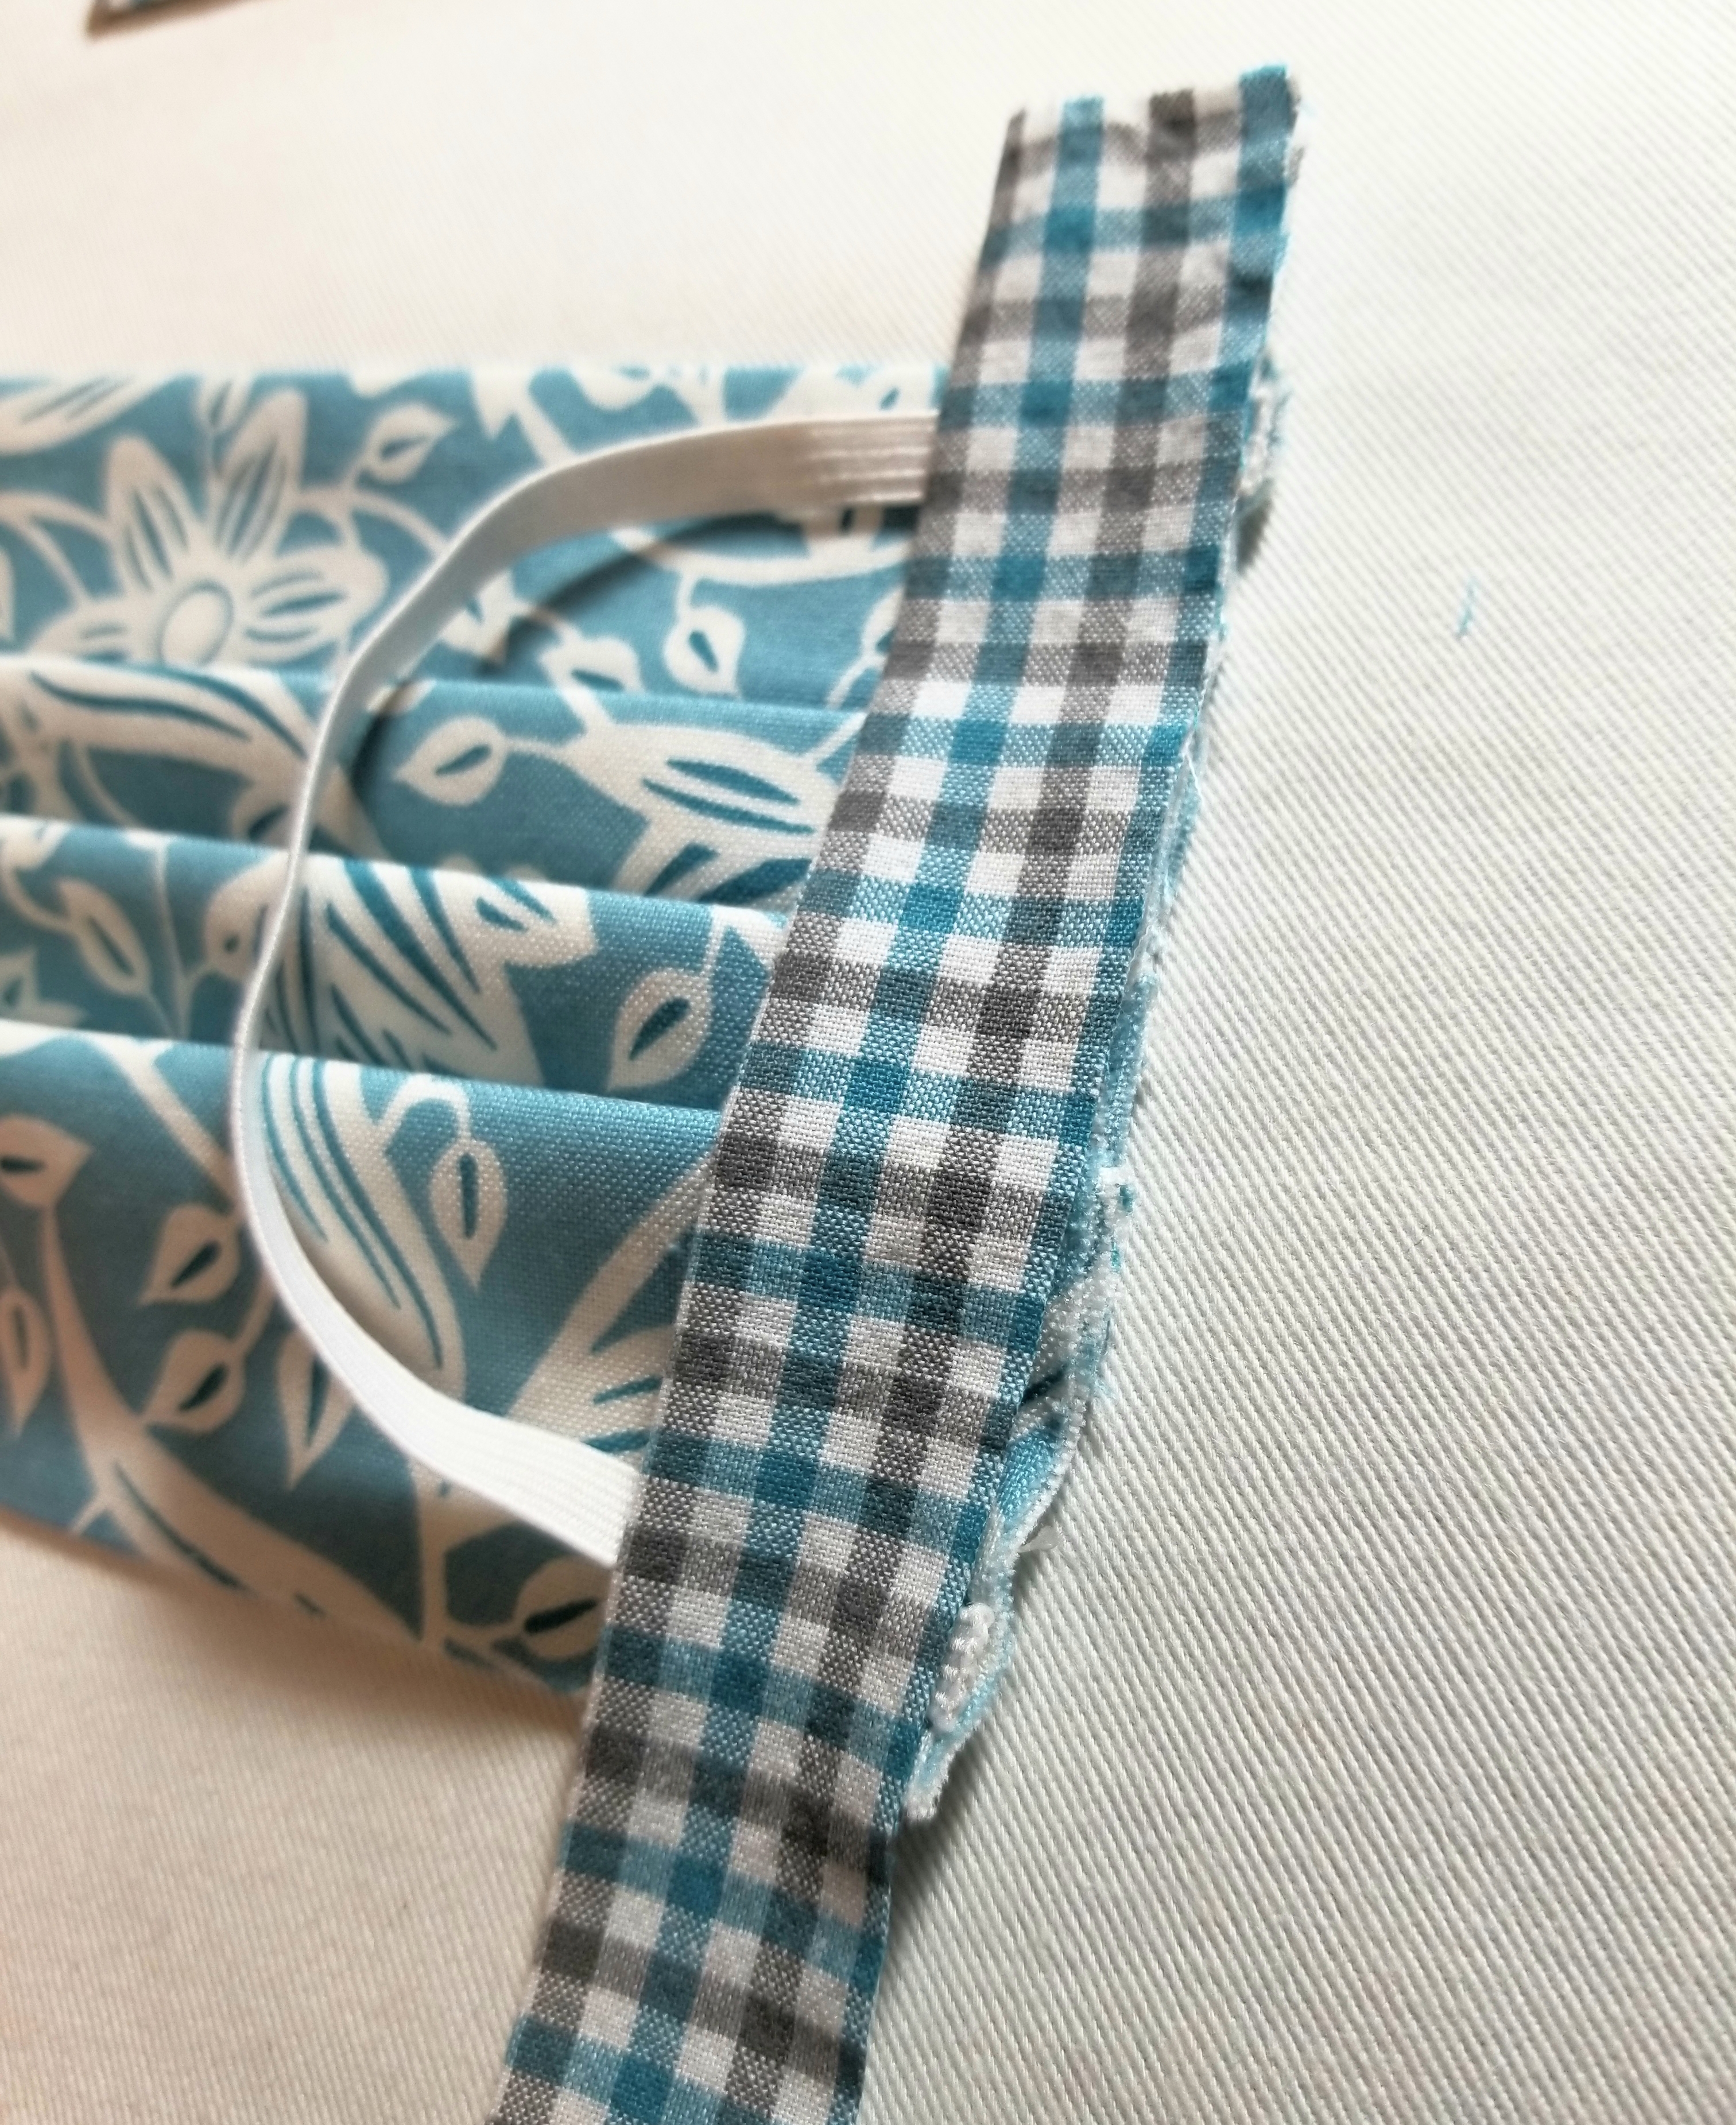
Place the strip on top of the elastic. Make sure the raw edge is facing outward, and the creased edge is facing the main body of the pleated piece. It will be a little longer on the top and bottom and that is okay, as we are going to fold some of that to the back.
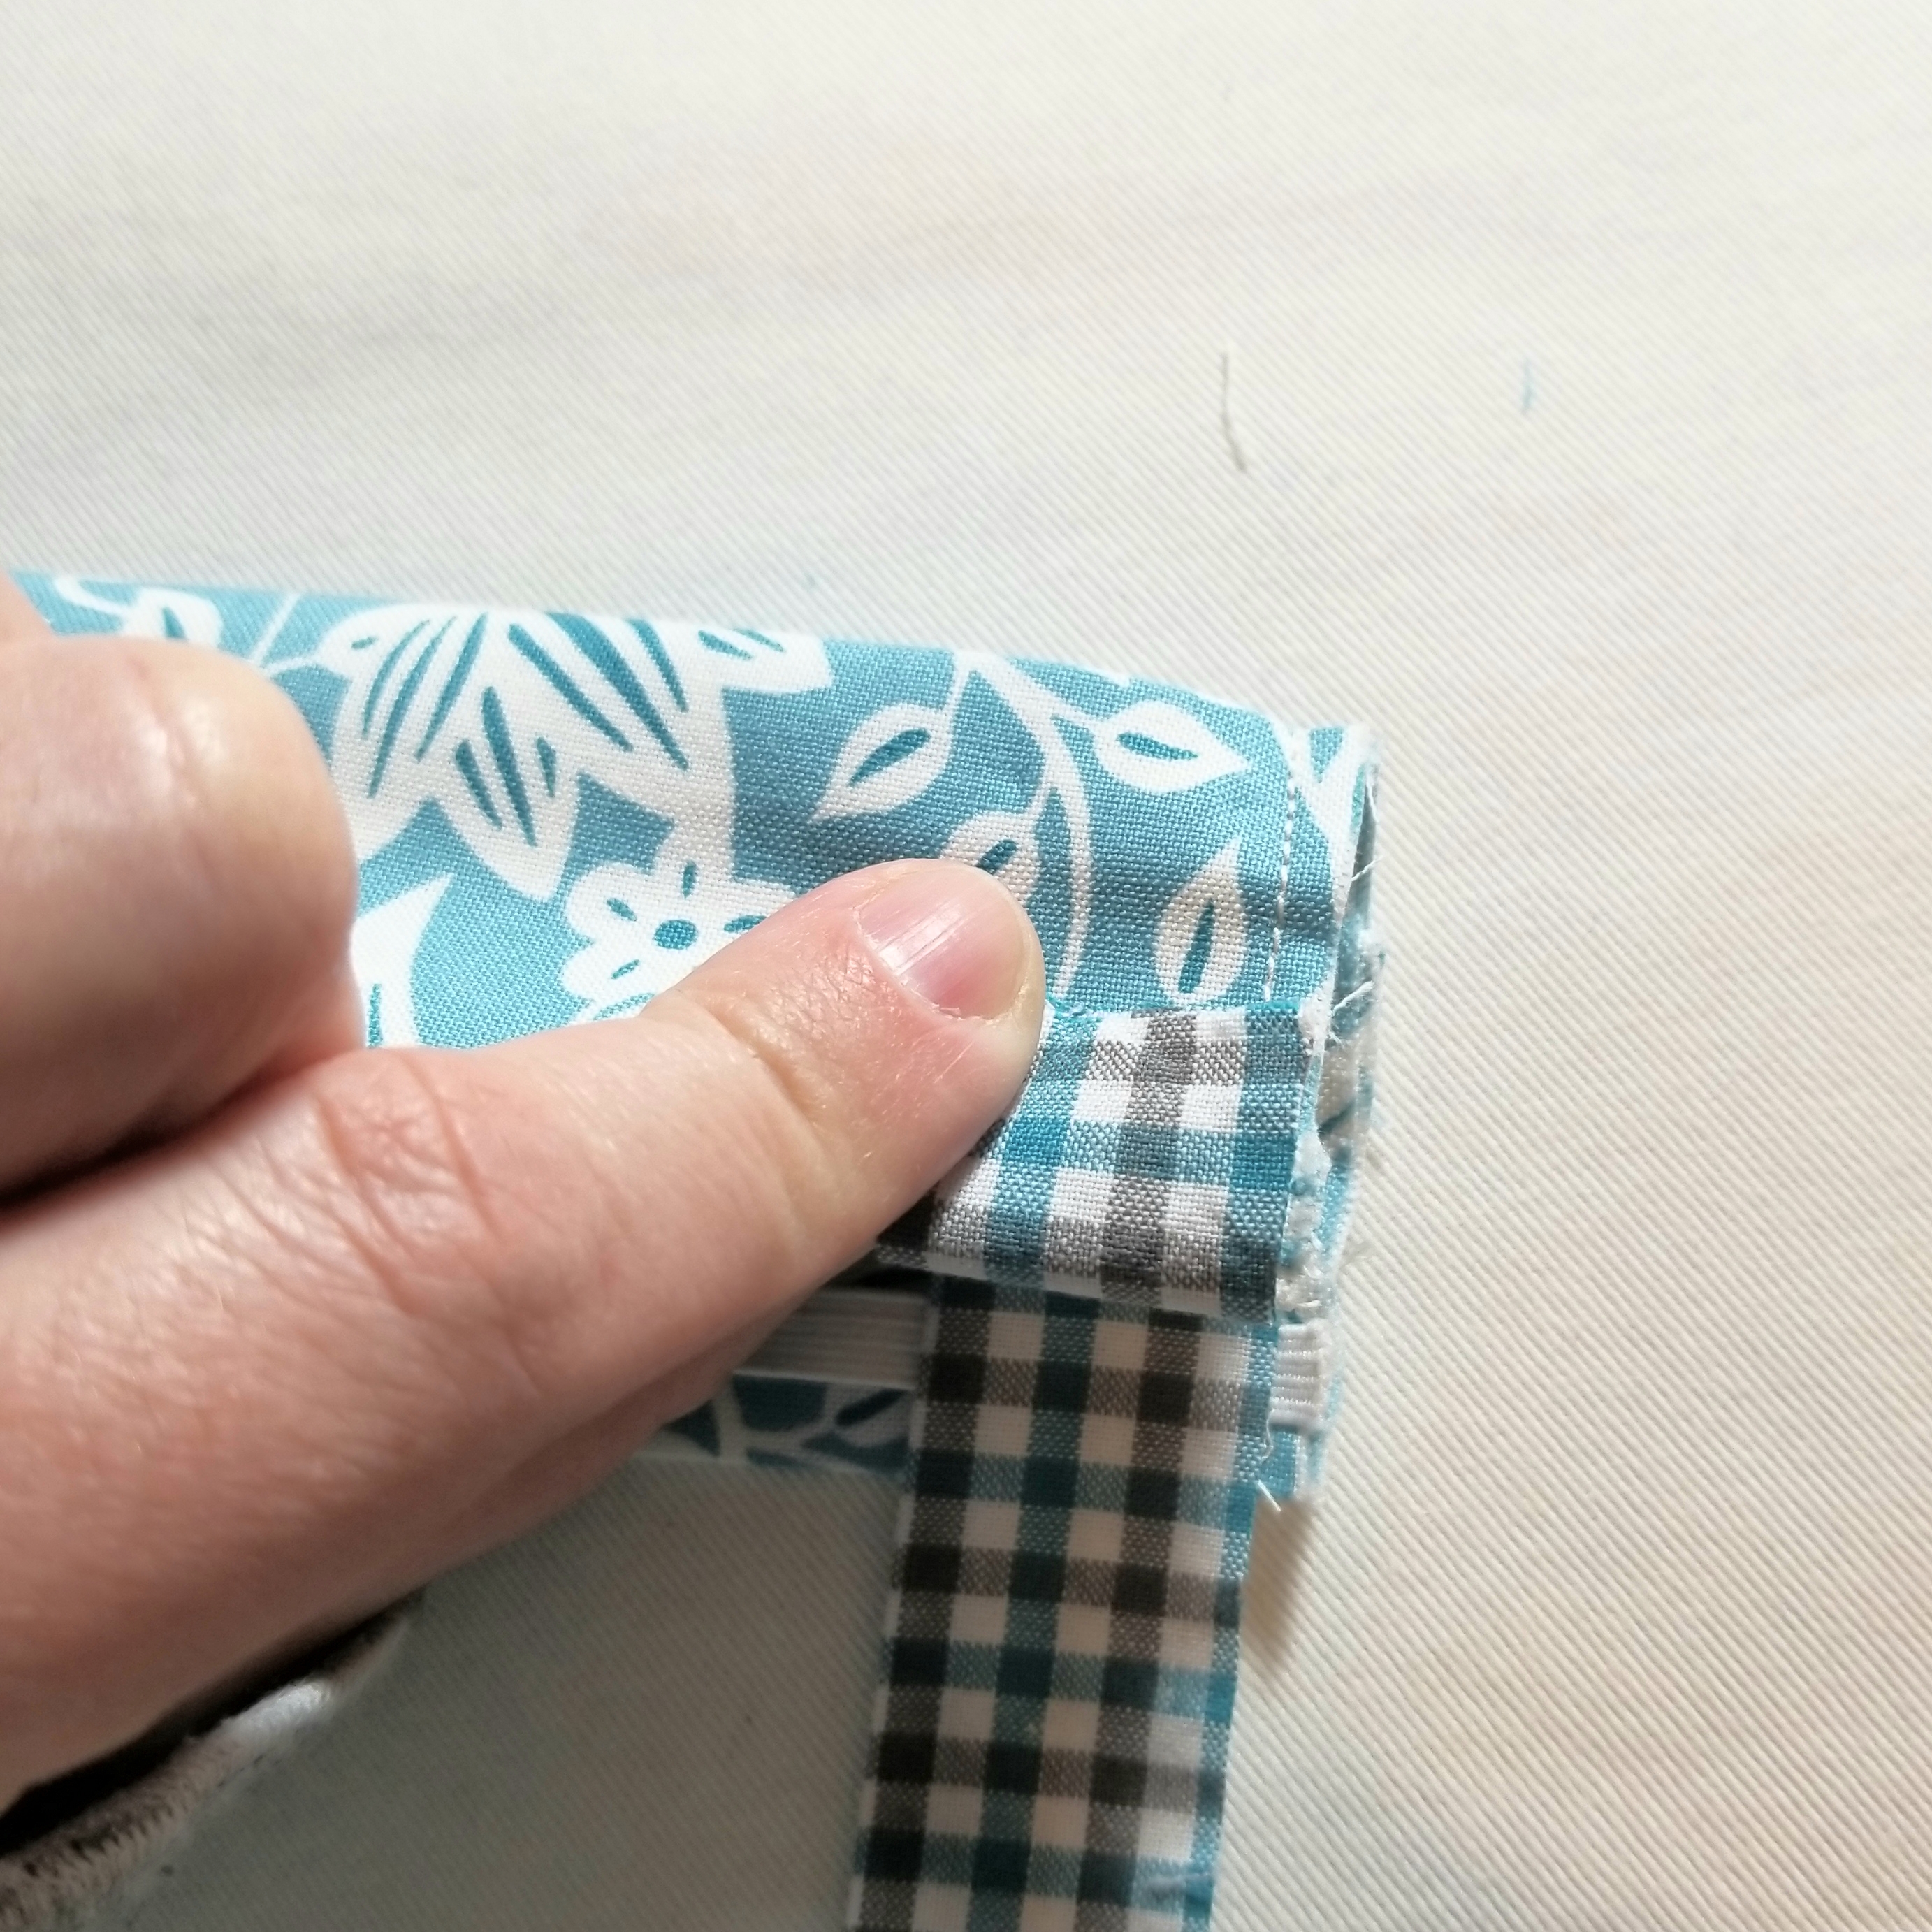
Tuck about 1/2” of the top edge to the back as shown in the picture above.
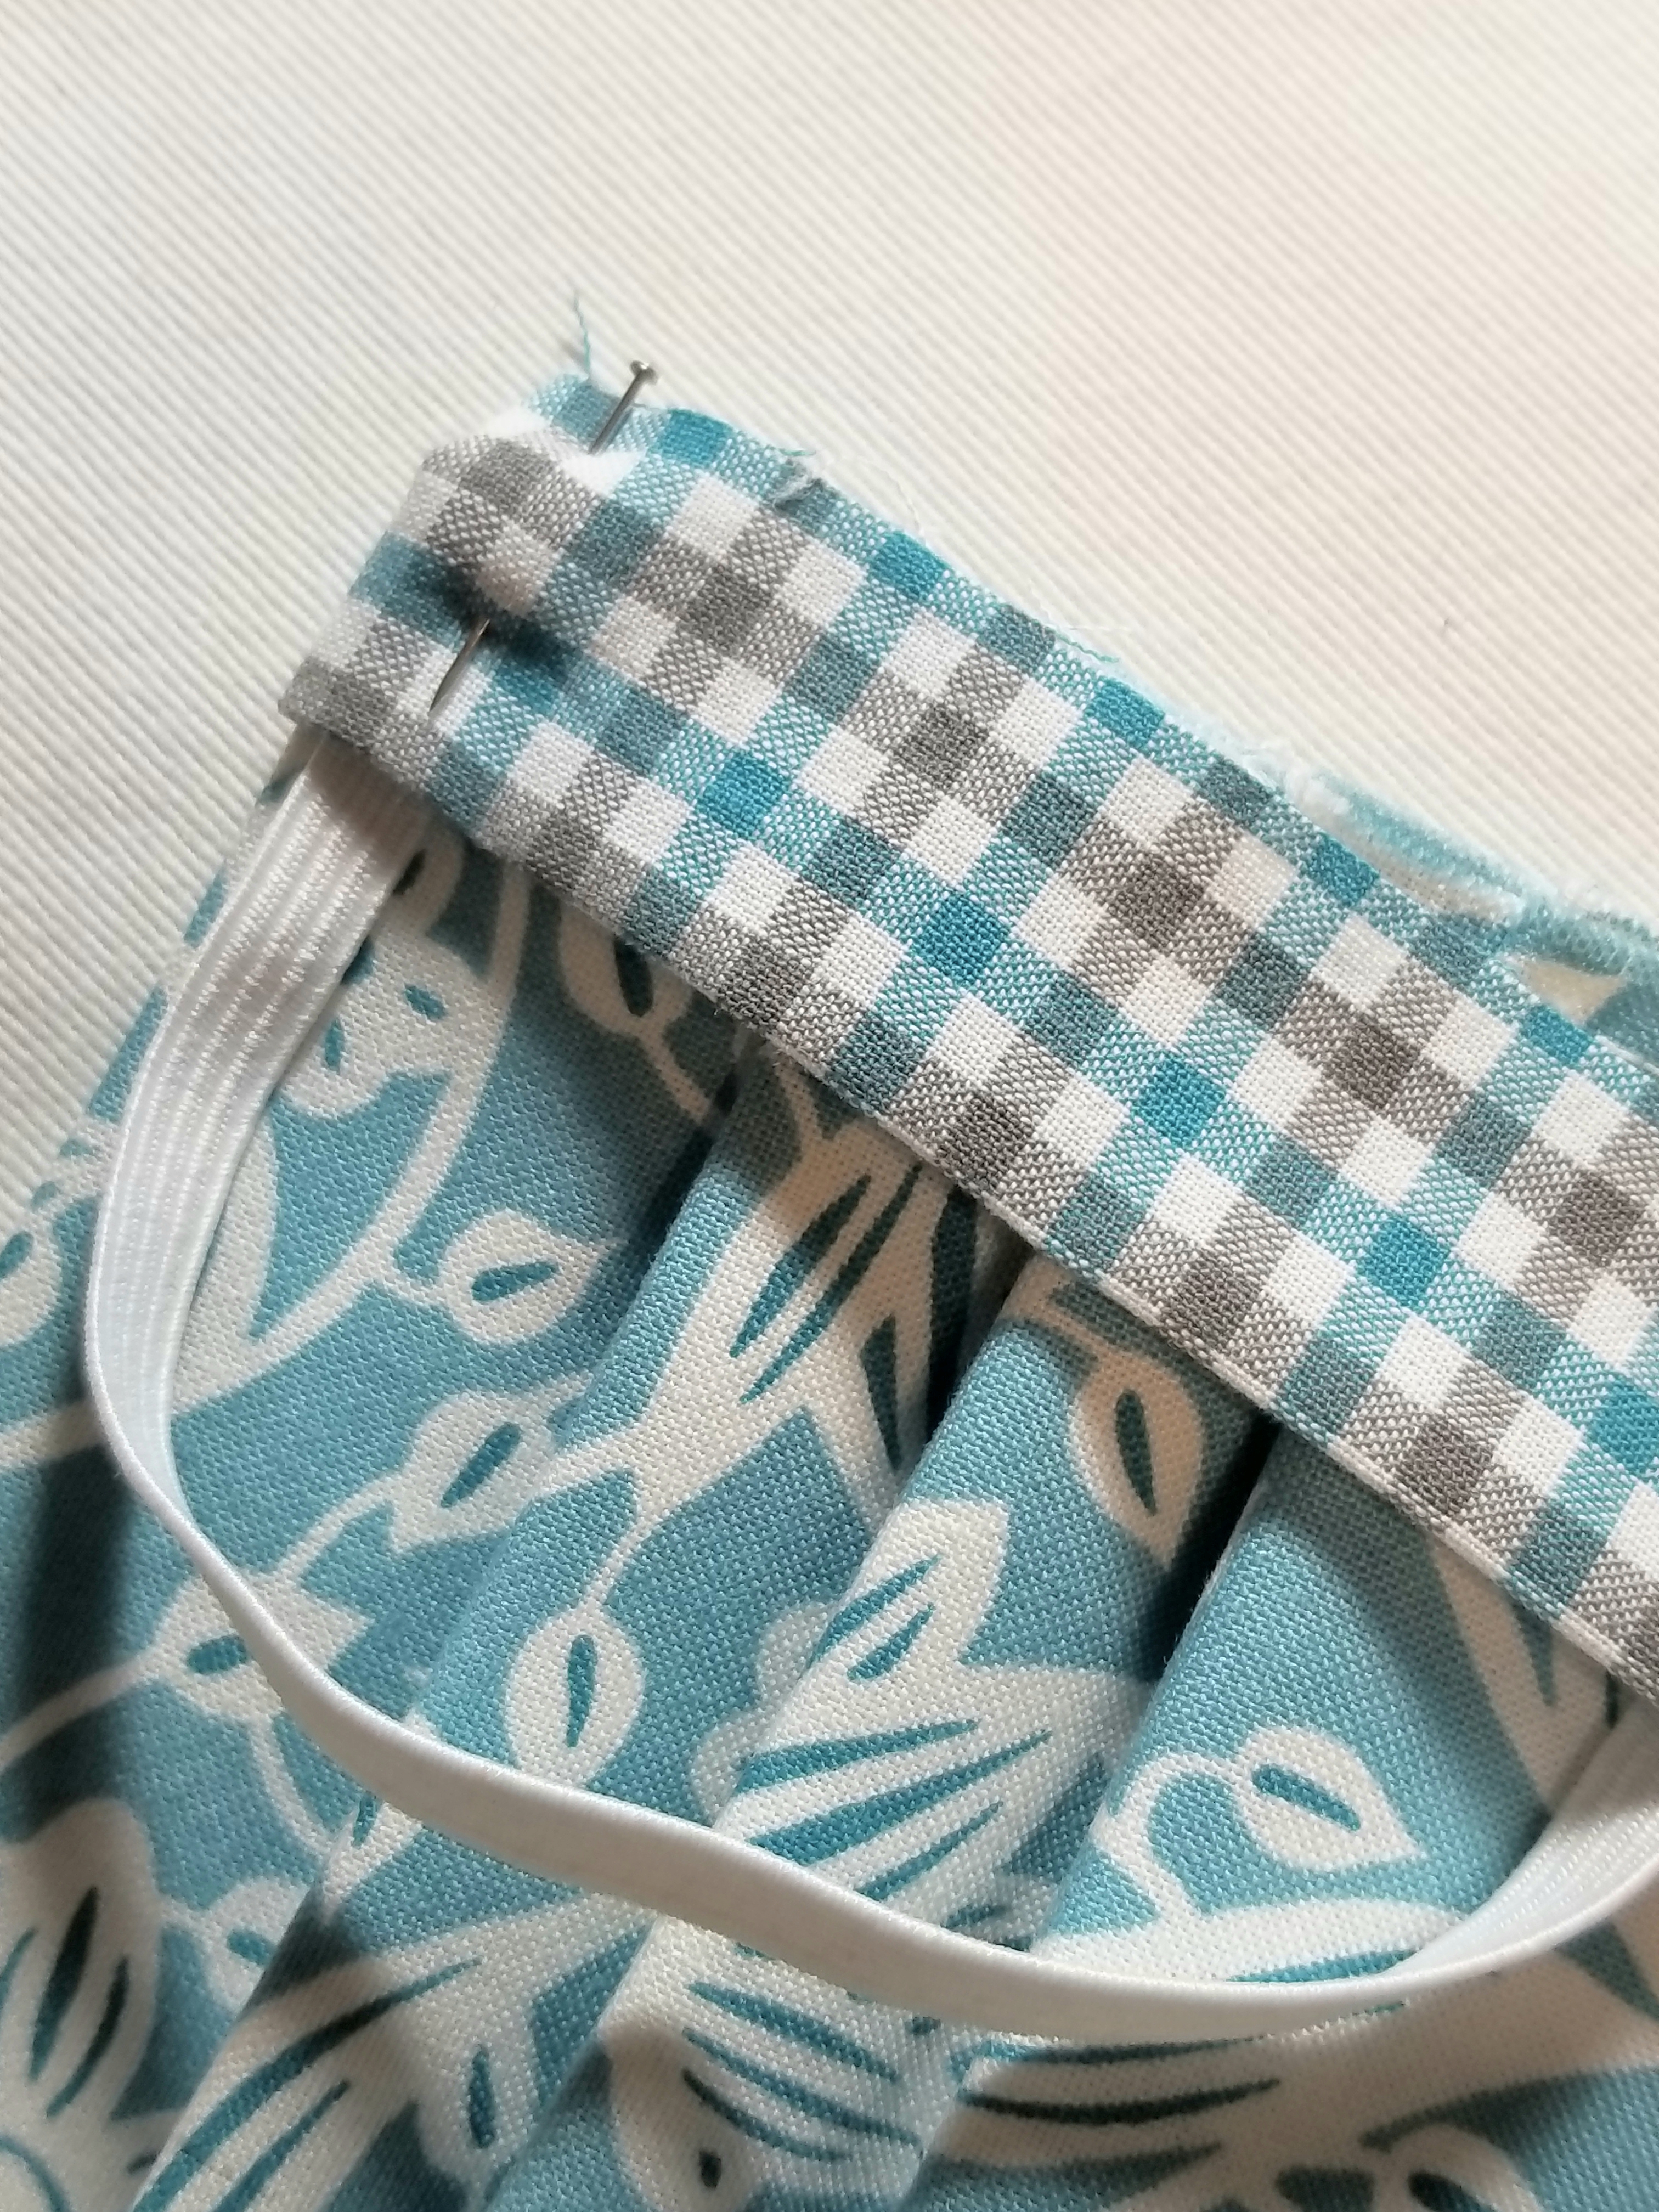
Pin all layers in place.
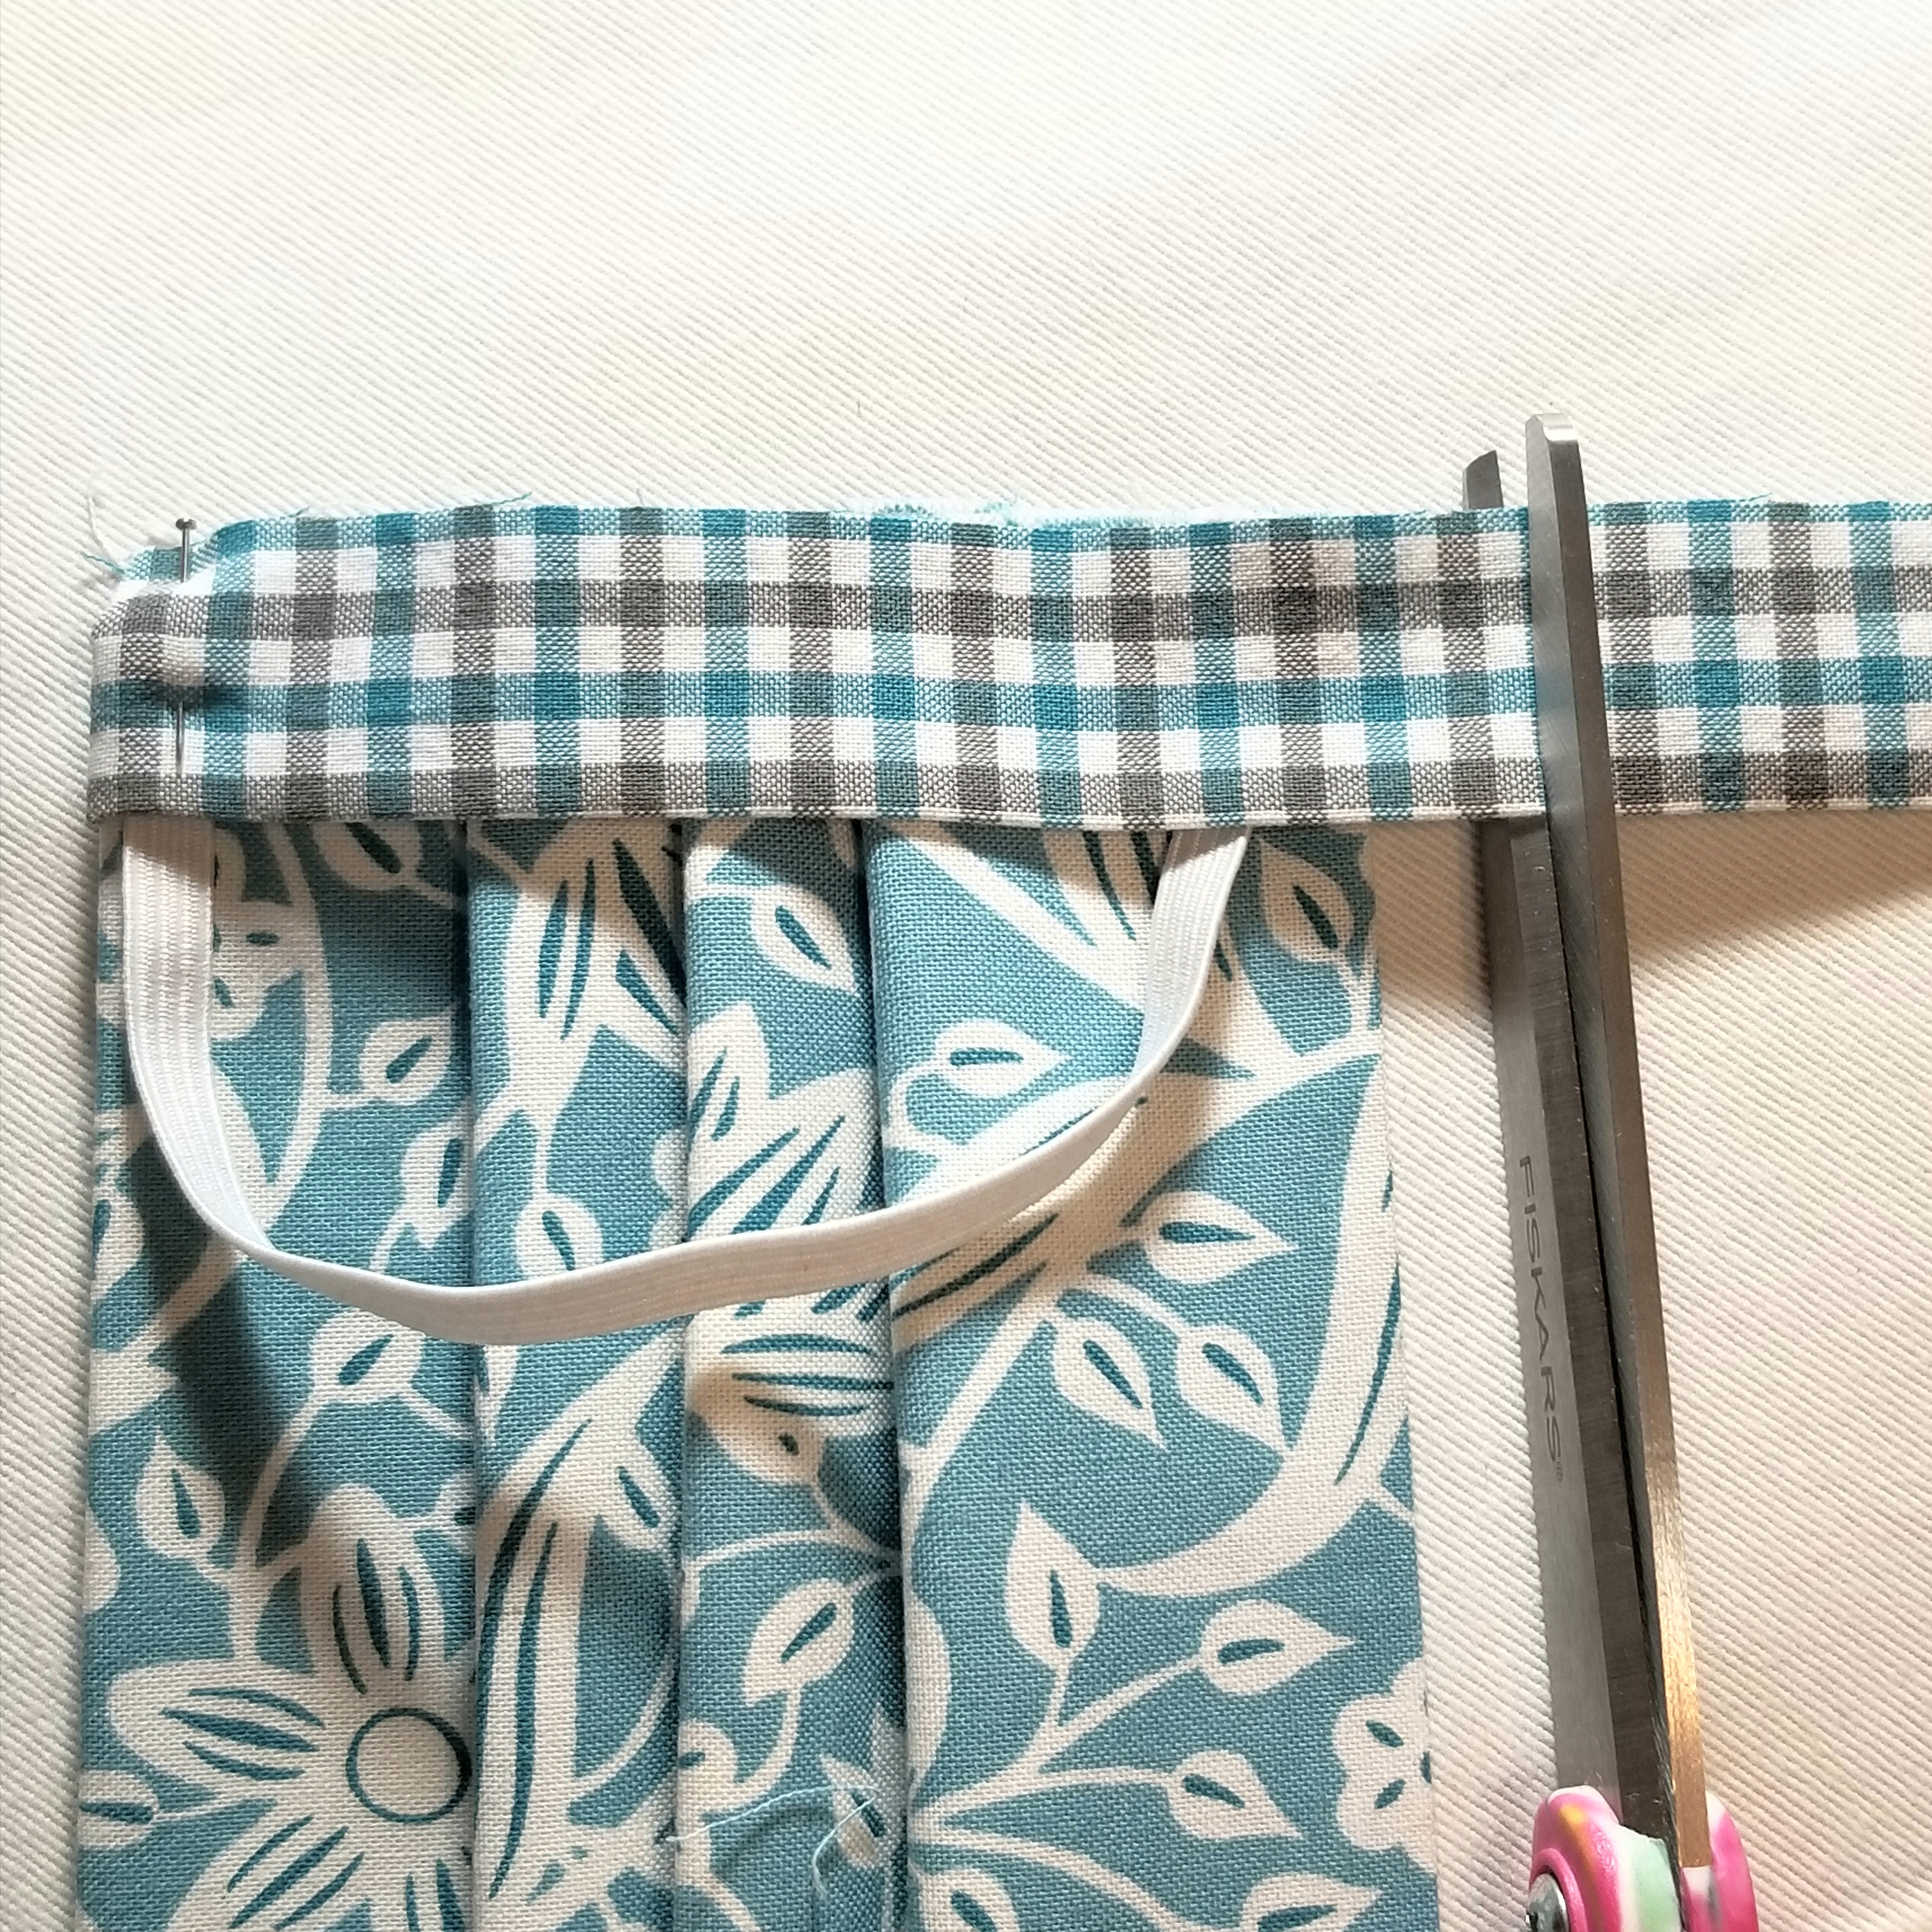
Trim the other end of the accent strip, so that it is about 1/2” longer than the bottom edge of the main pleated piece.
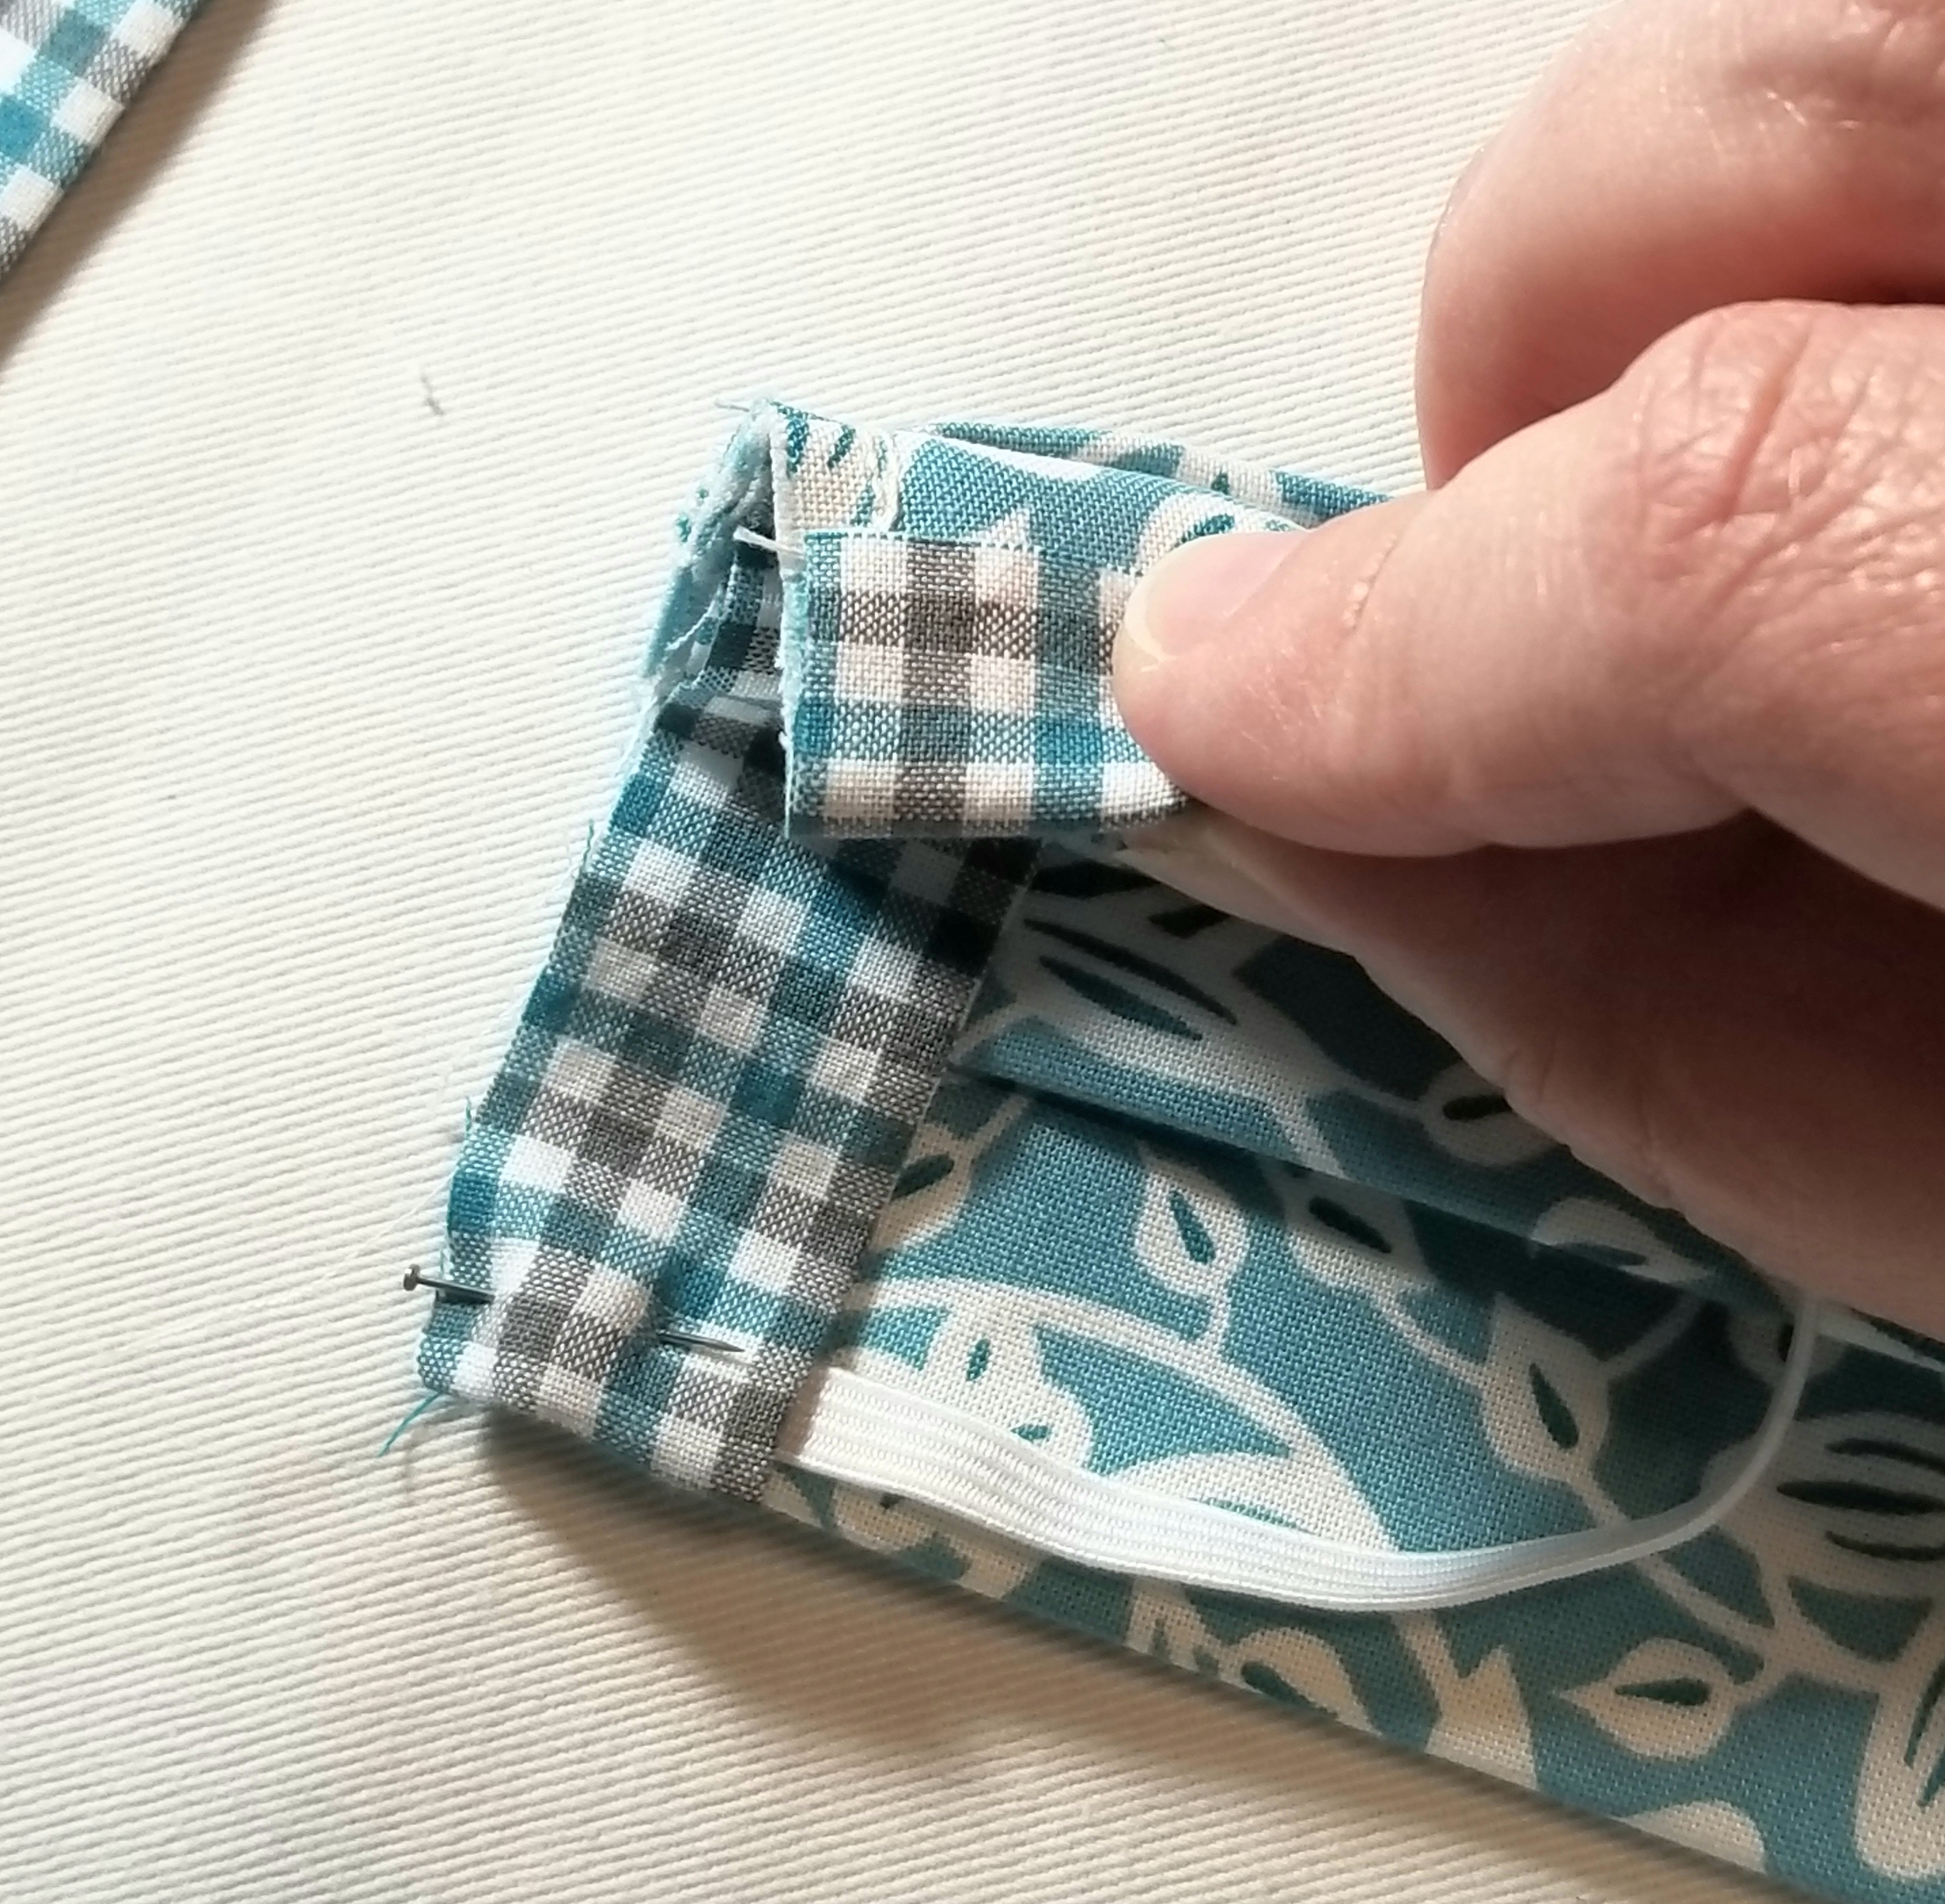
Fold the bottom edge of the accent fabric strip to the back, just as you did with the top edge.
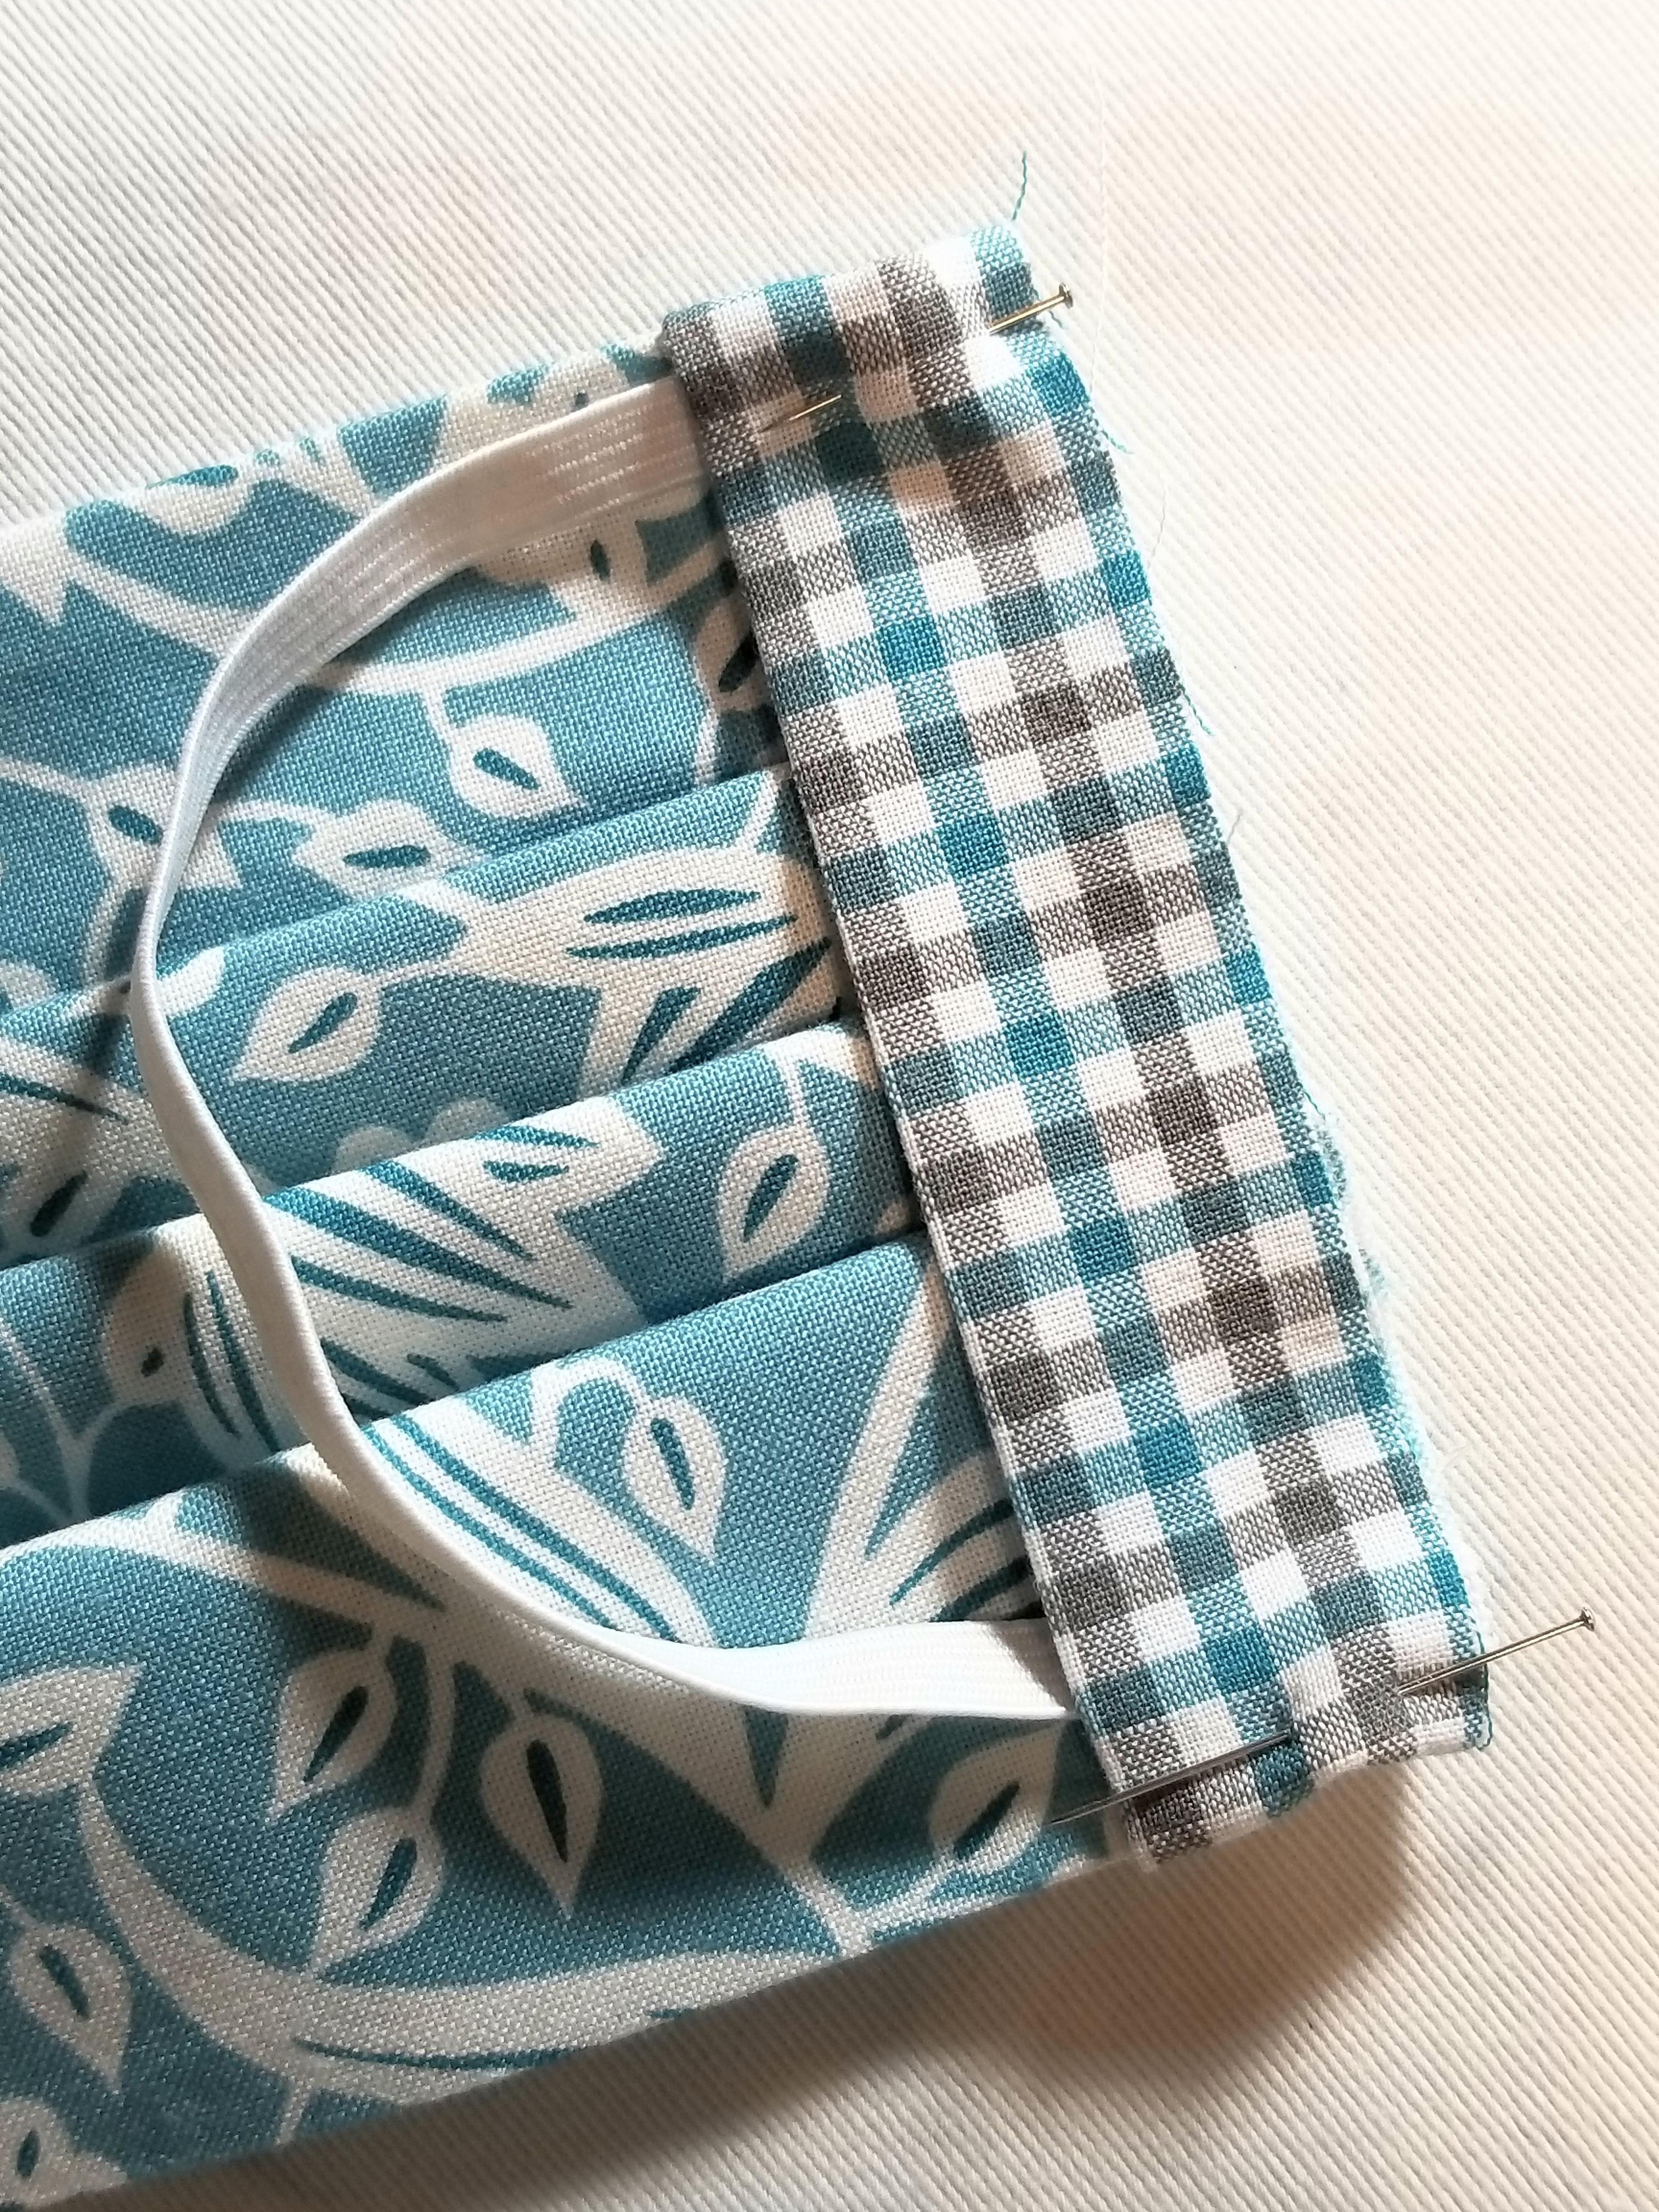
Pin both ends in place.
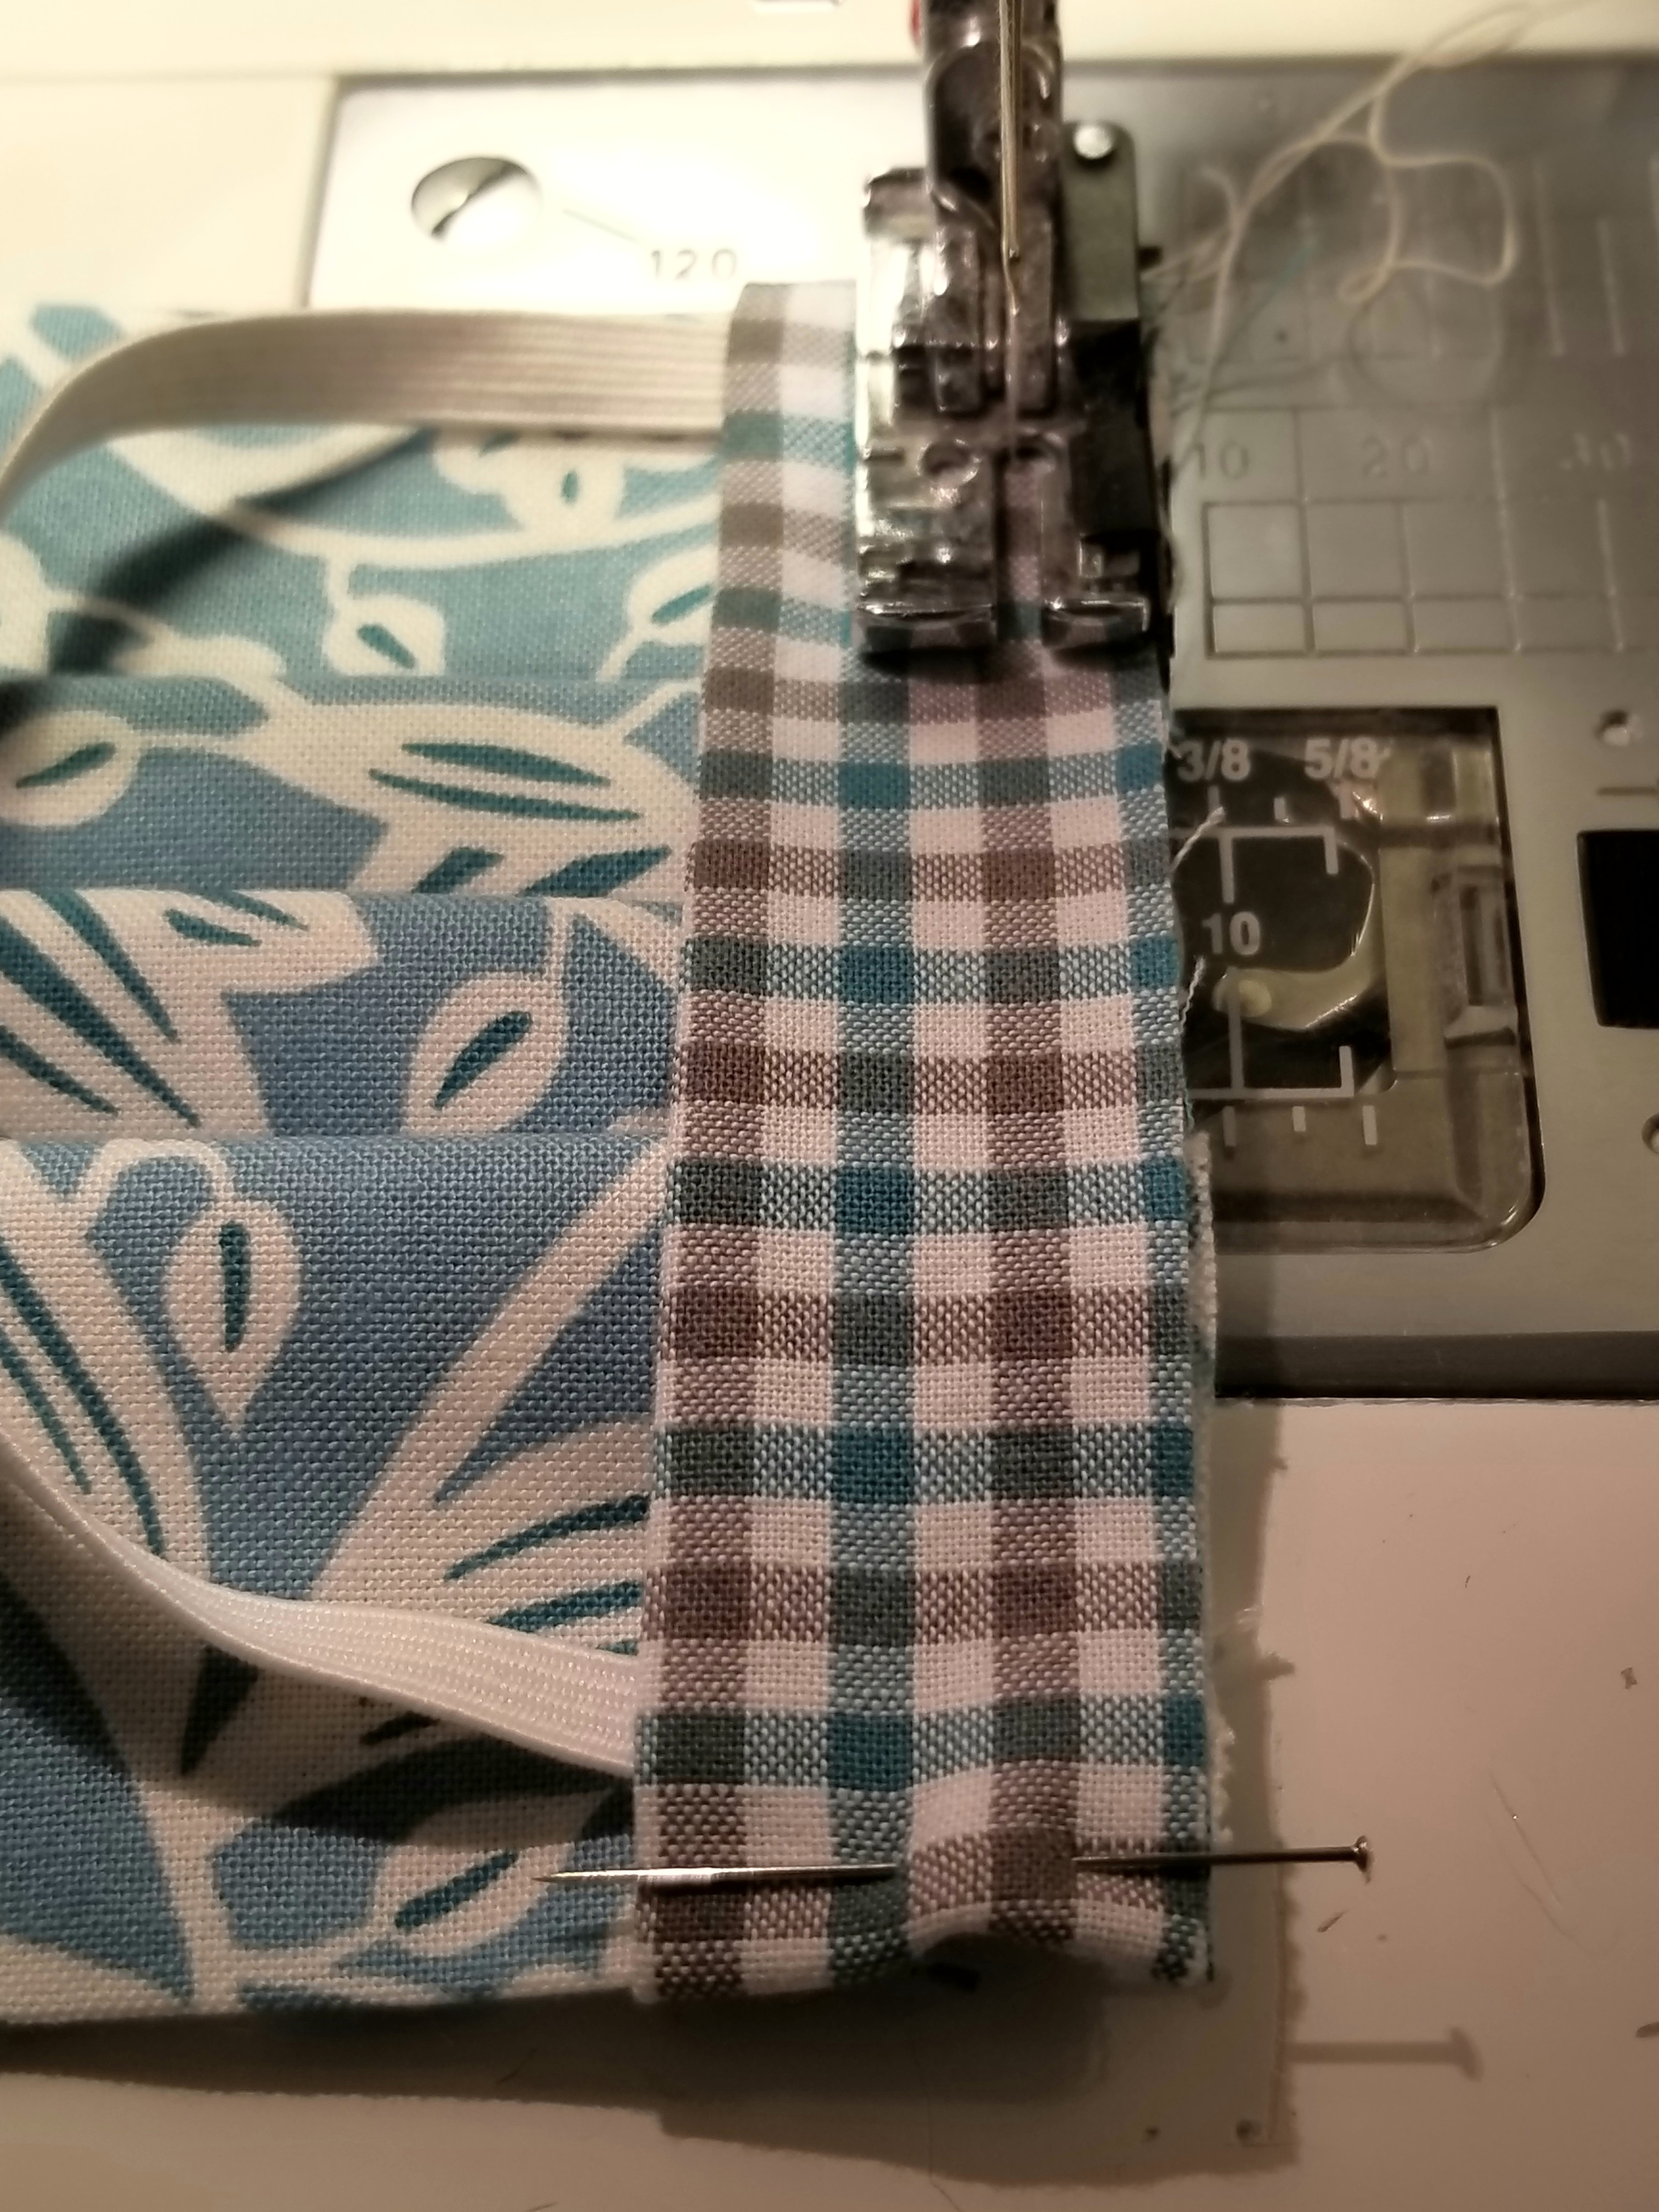
Using a 1/4 inch seam allowance, stitch the length of the entire edge, making sure to back stitch at the beginning and end.
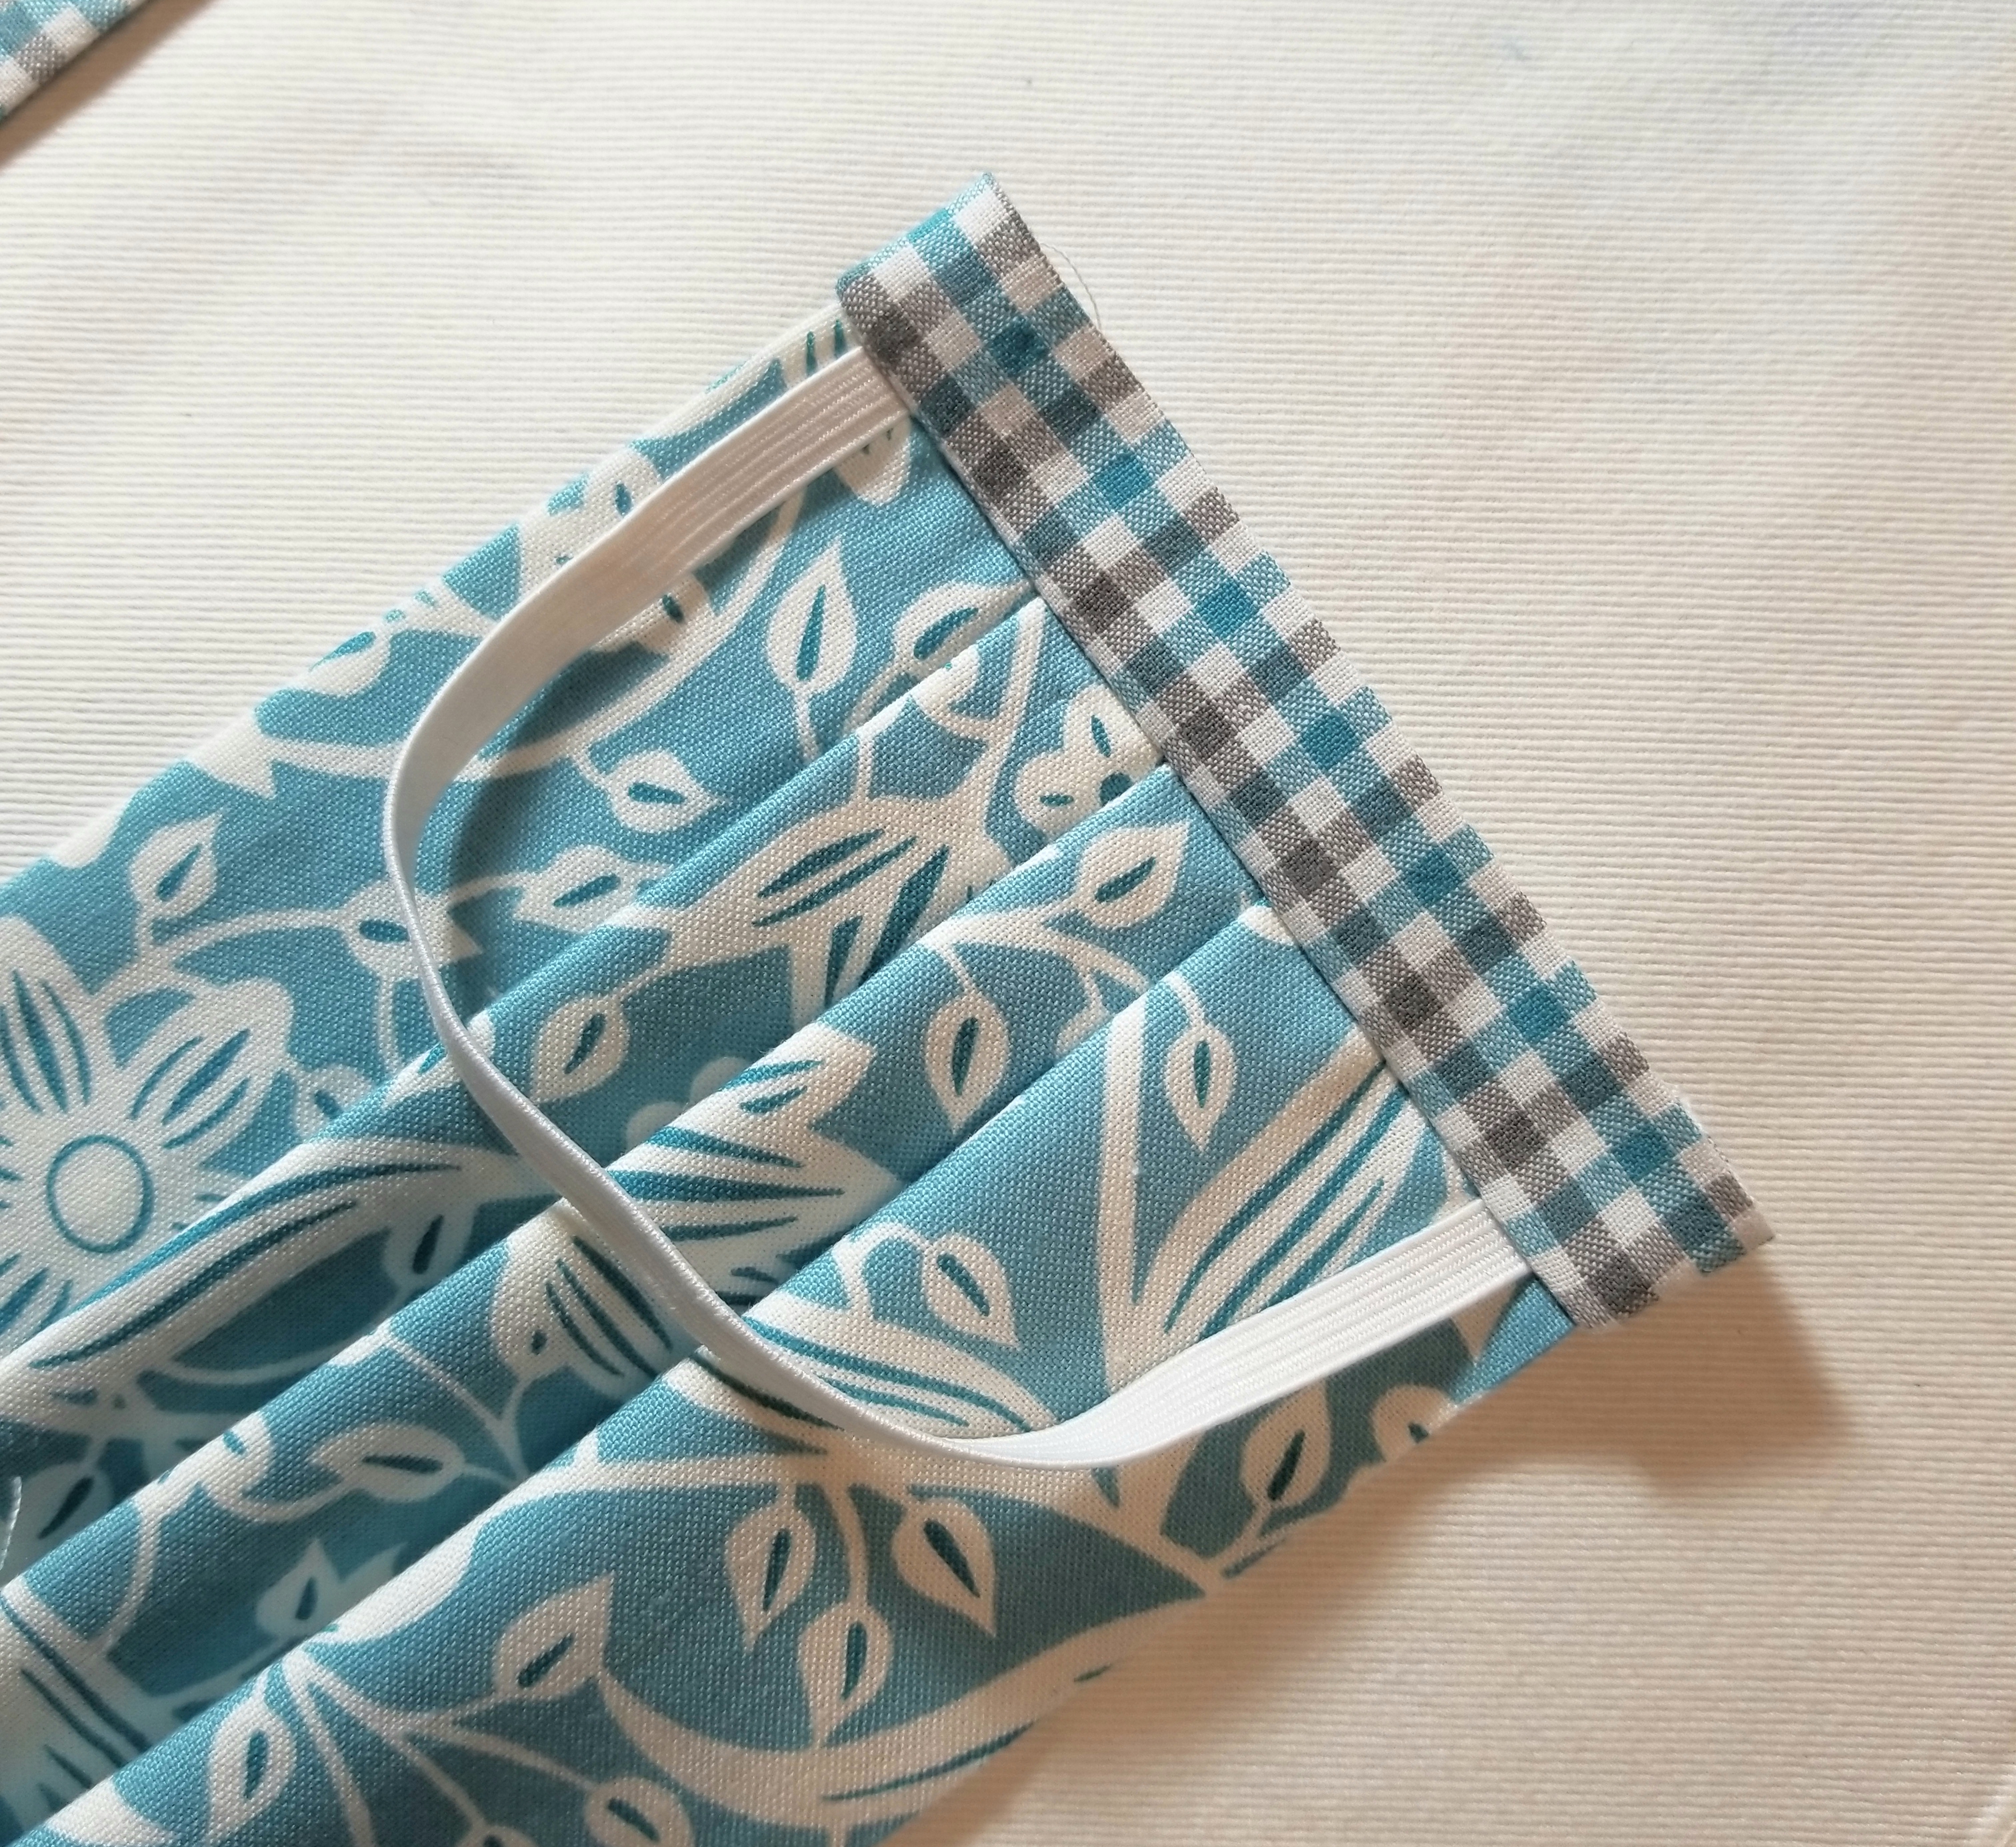
Open the the accent fabric strip seam by flipping it outward away from the main pleated piece, then press.
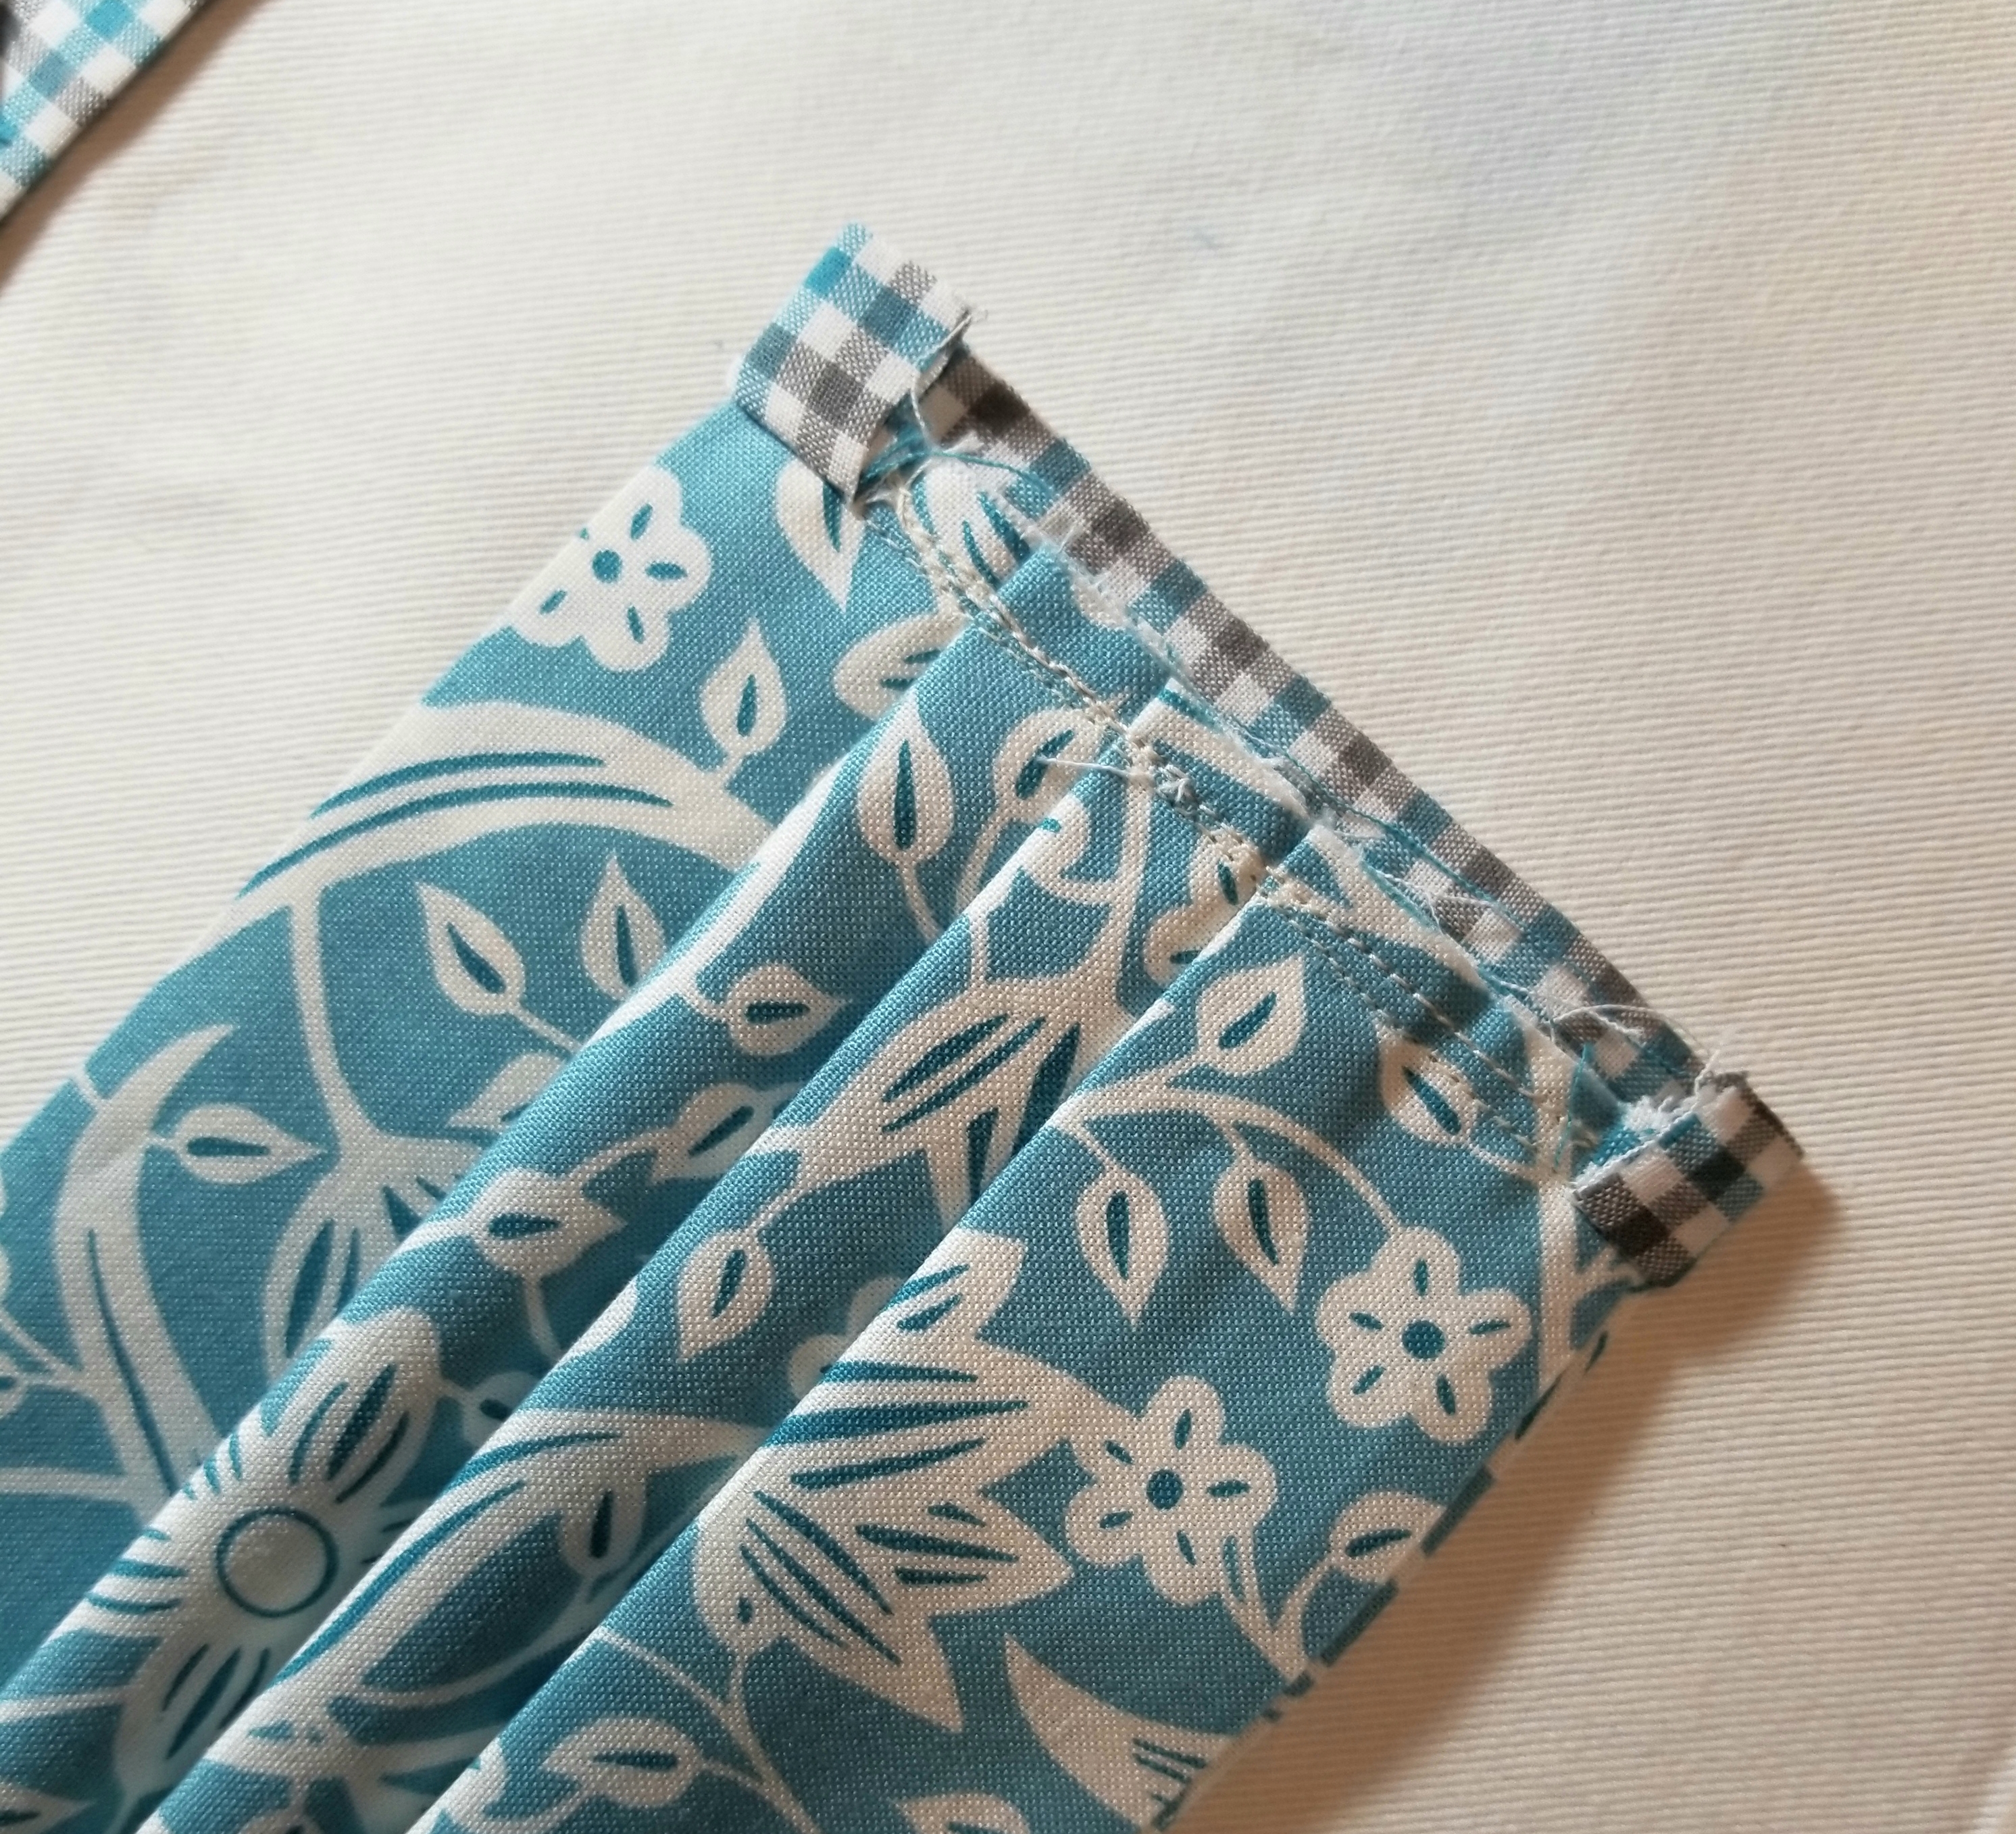
This is what the mask should look like if you flip it over.
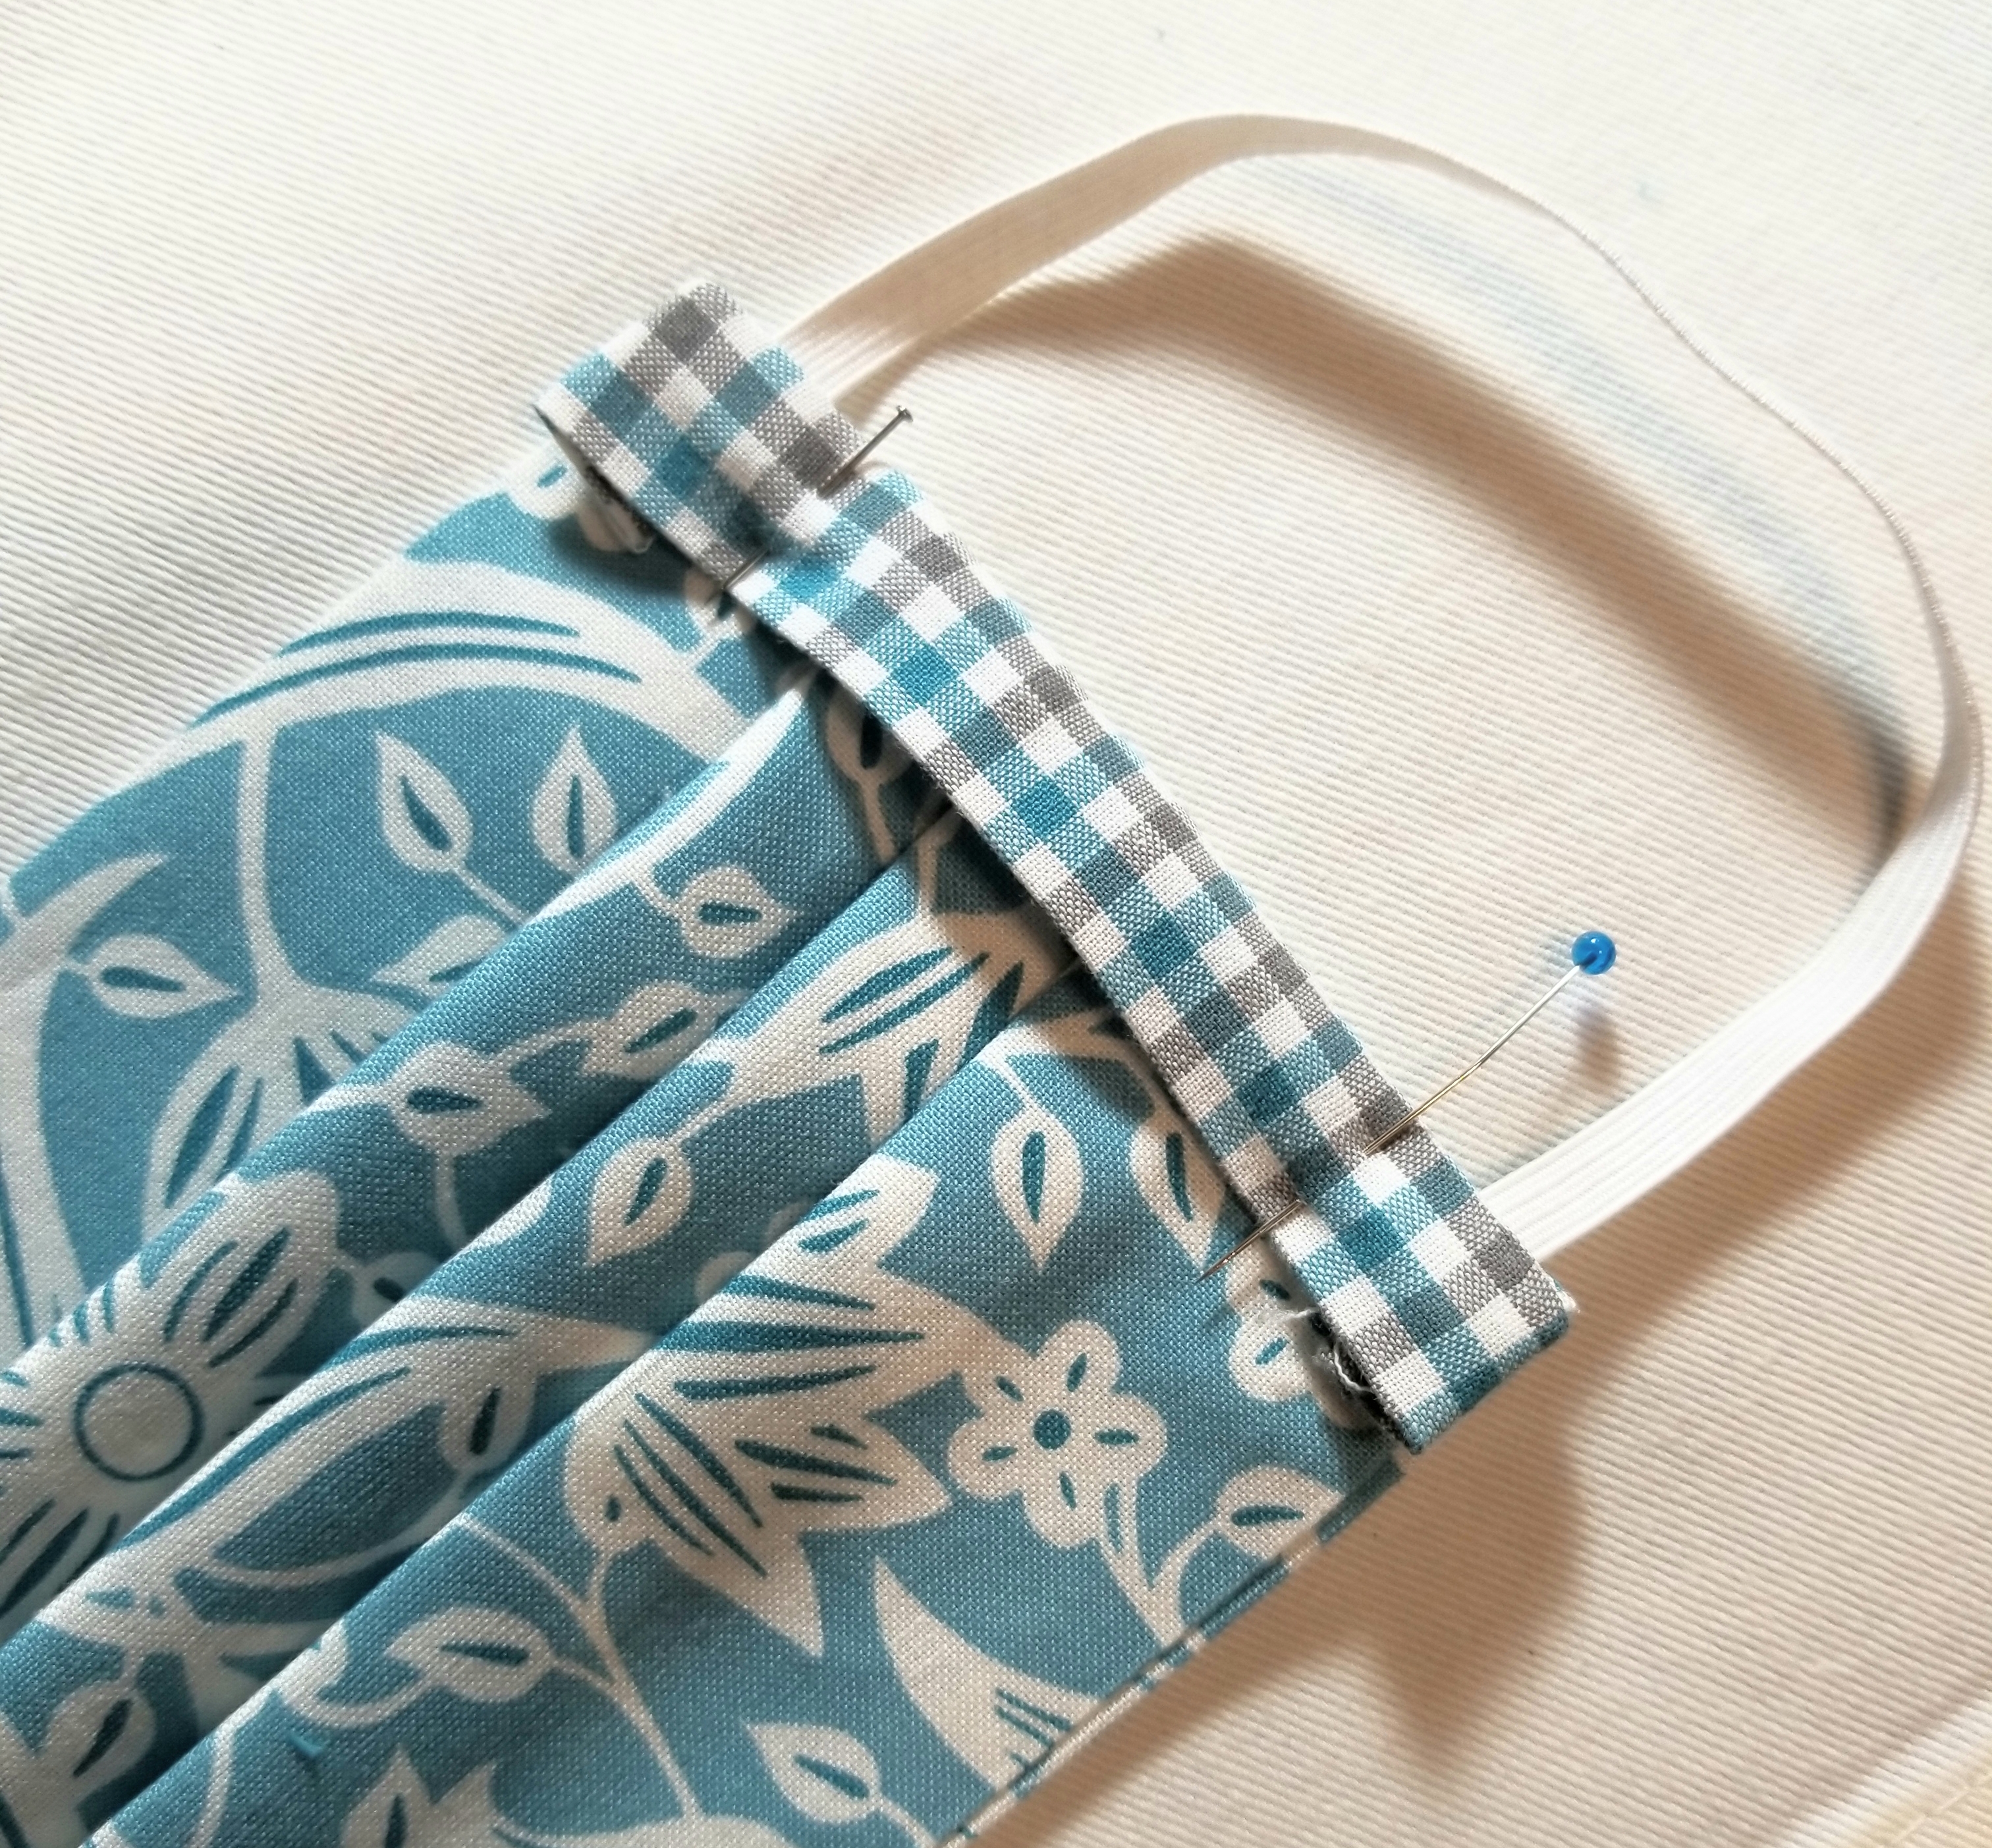
fold the ENTIRE accent piece down toward the main pleated piece, encasing the raw seam. You will now see the accent piece on this side, but not at all on the flip side. Press. Pin edge down.
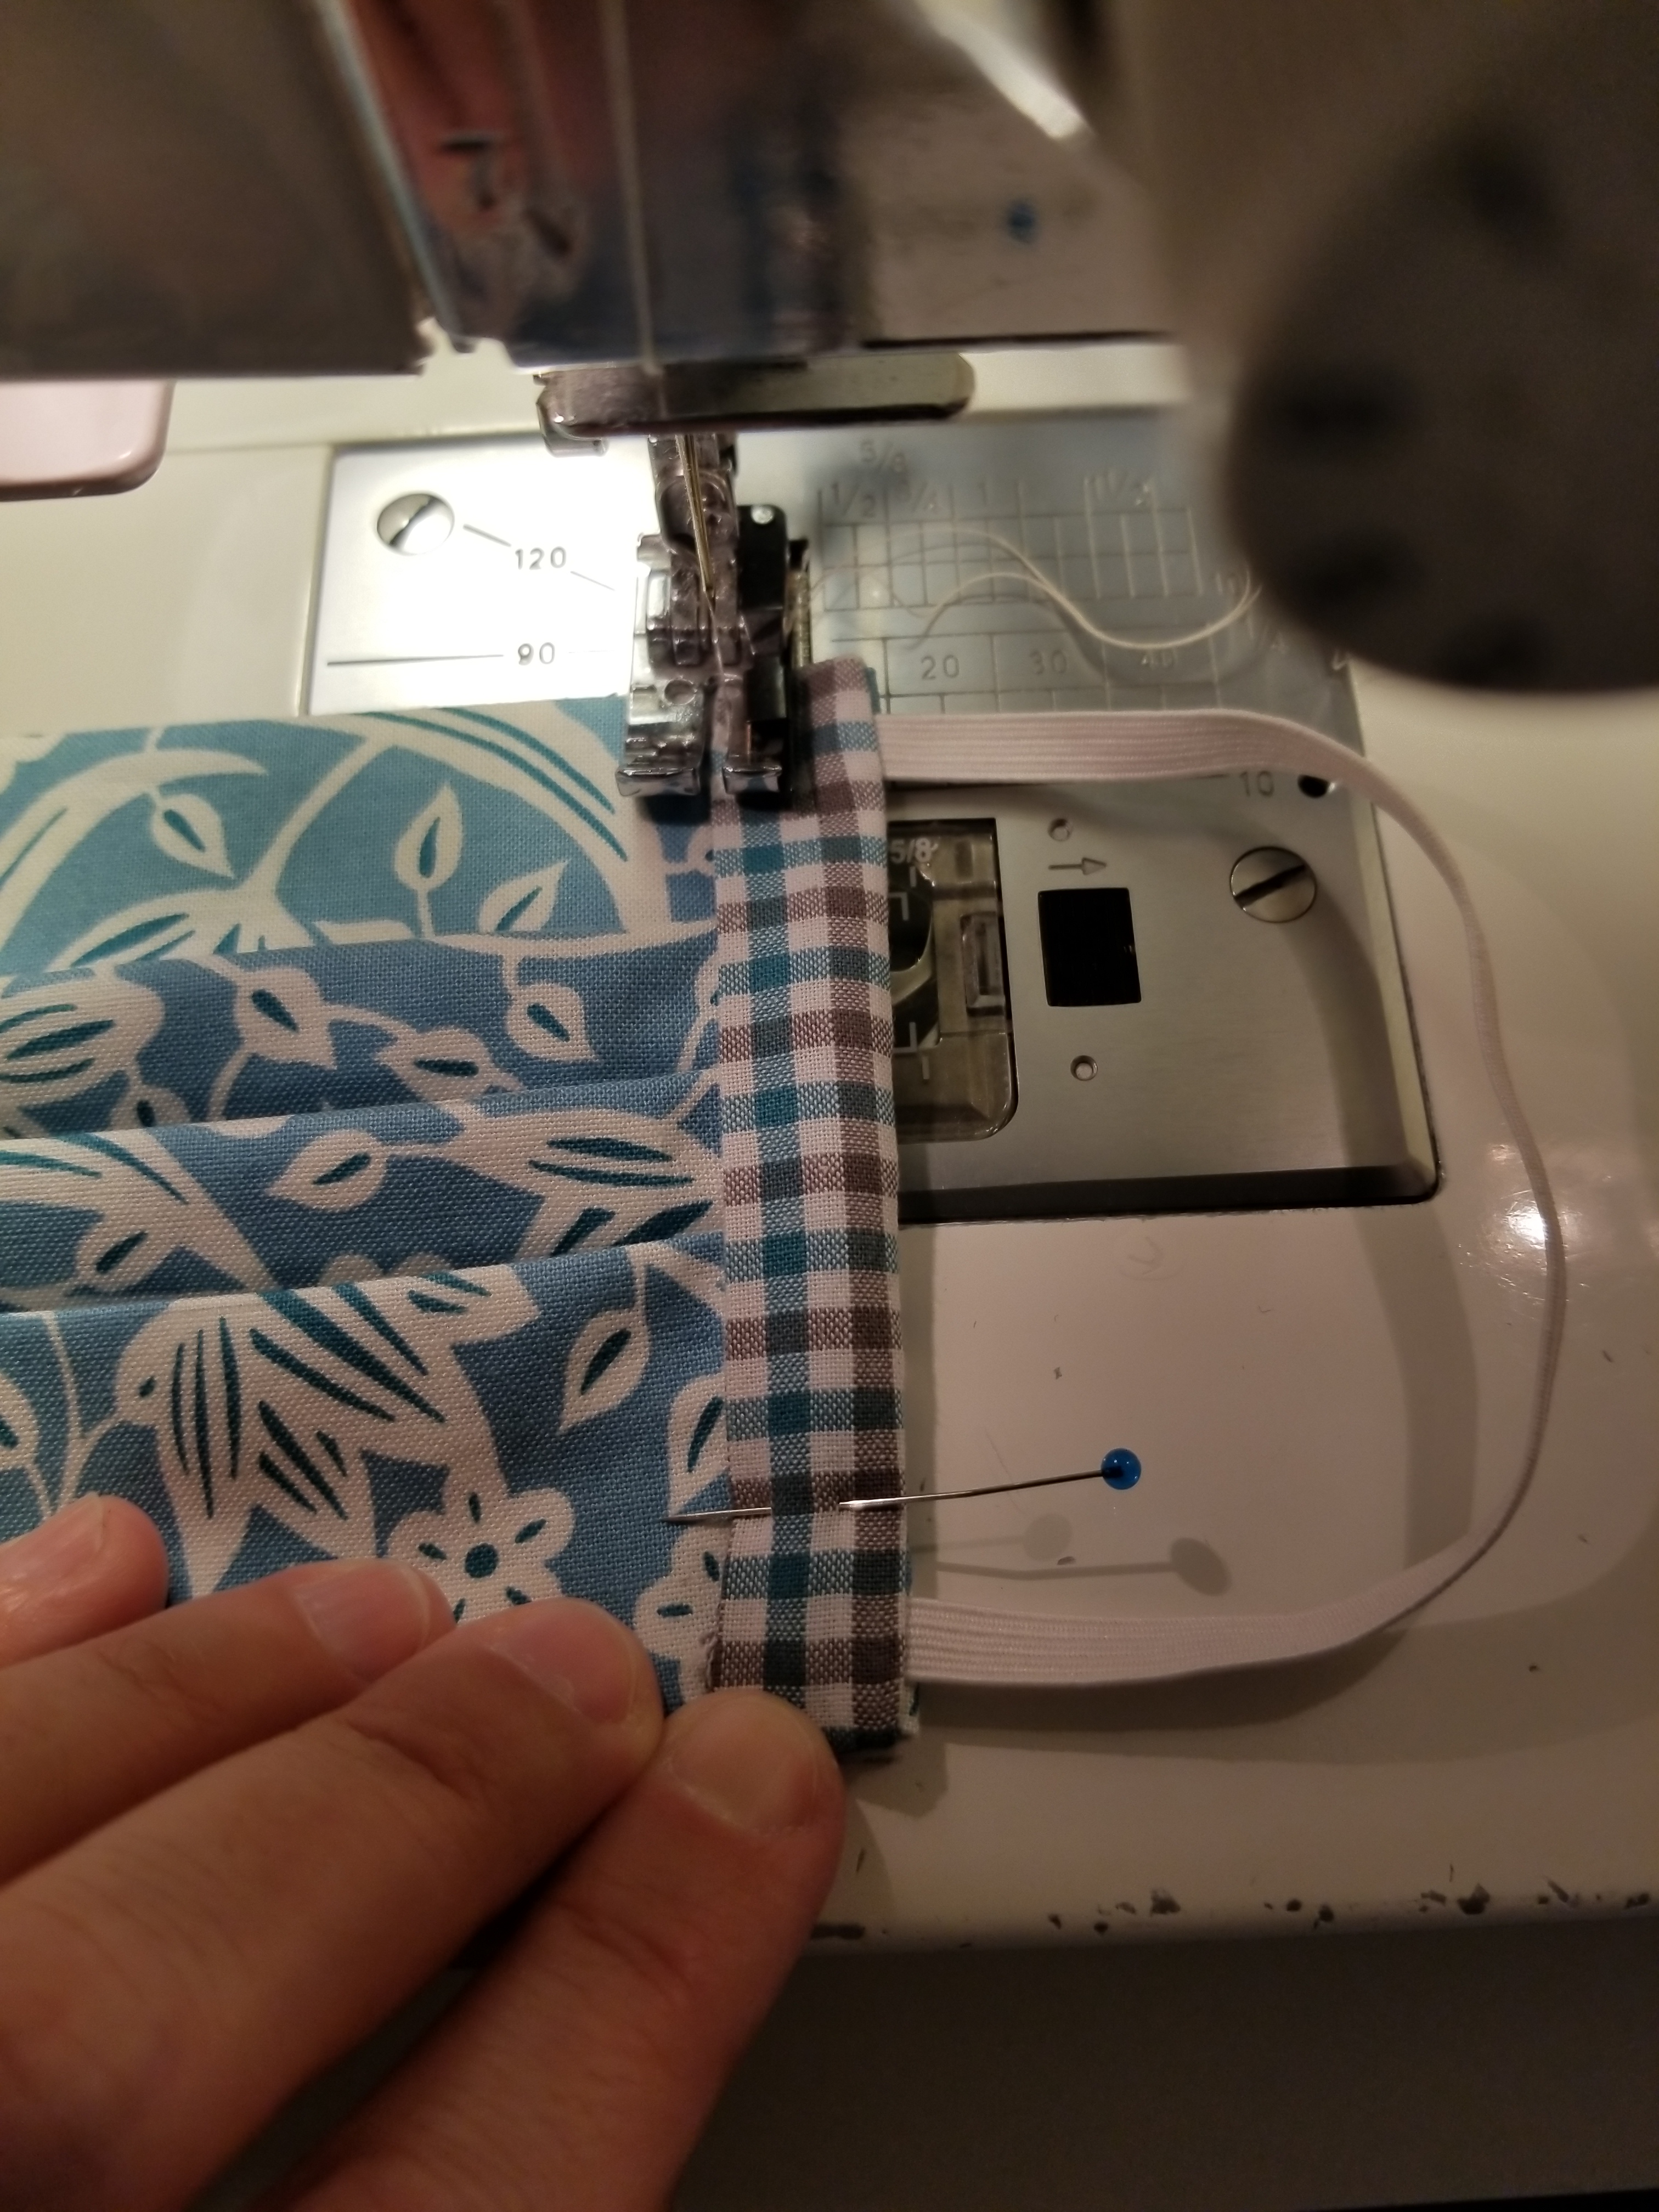
If you are a good sewist, you will change out your presser foot to a straight stitch foot. If you are lazy, like me, you will keep that 1/4″ presser foot on your machine and struggle your way through this next step. 😀 Stitch this accent strip down to the main body of the mask, sewing along the edge, making sure to back stitch at the beginning and end.
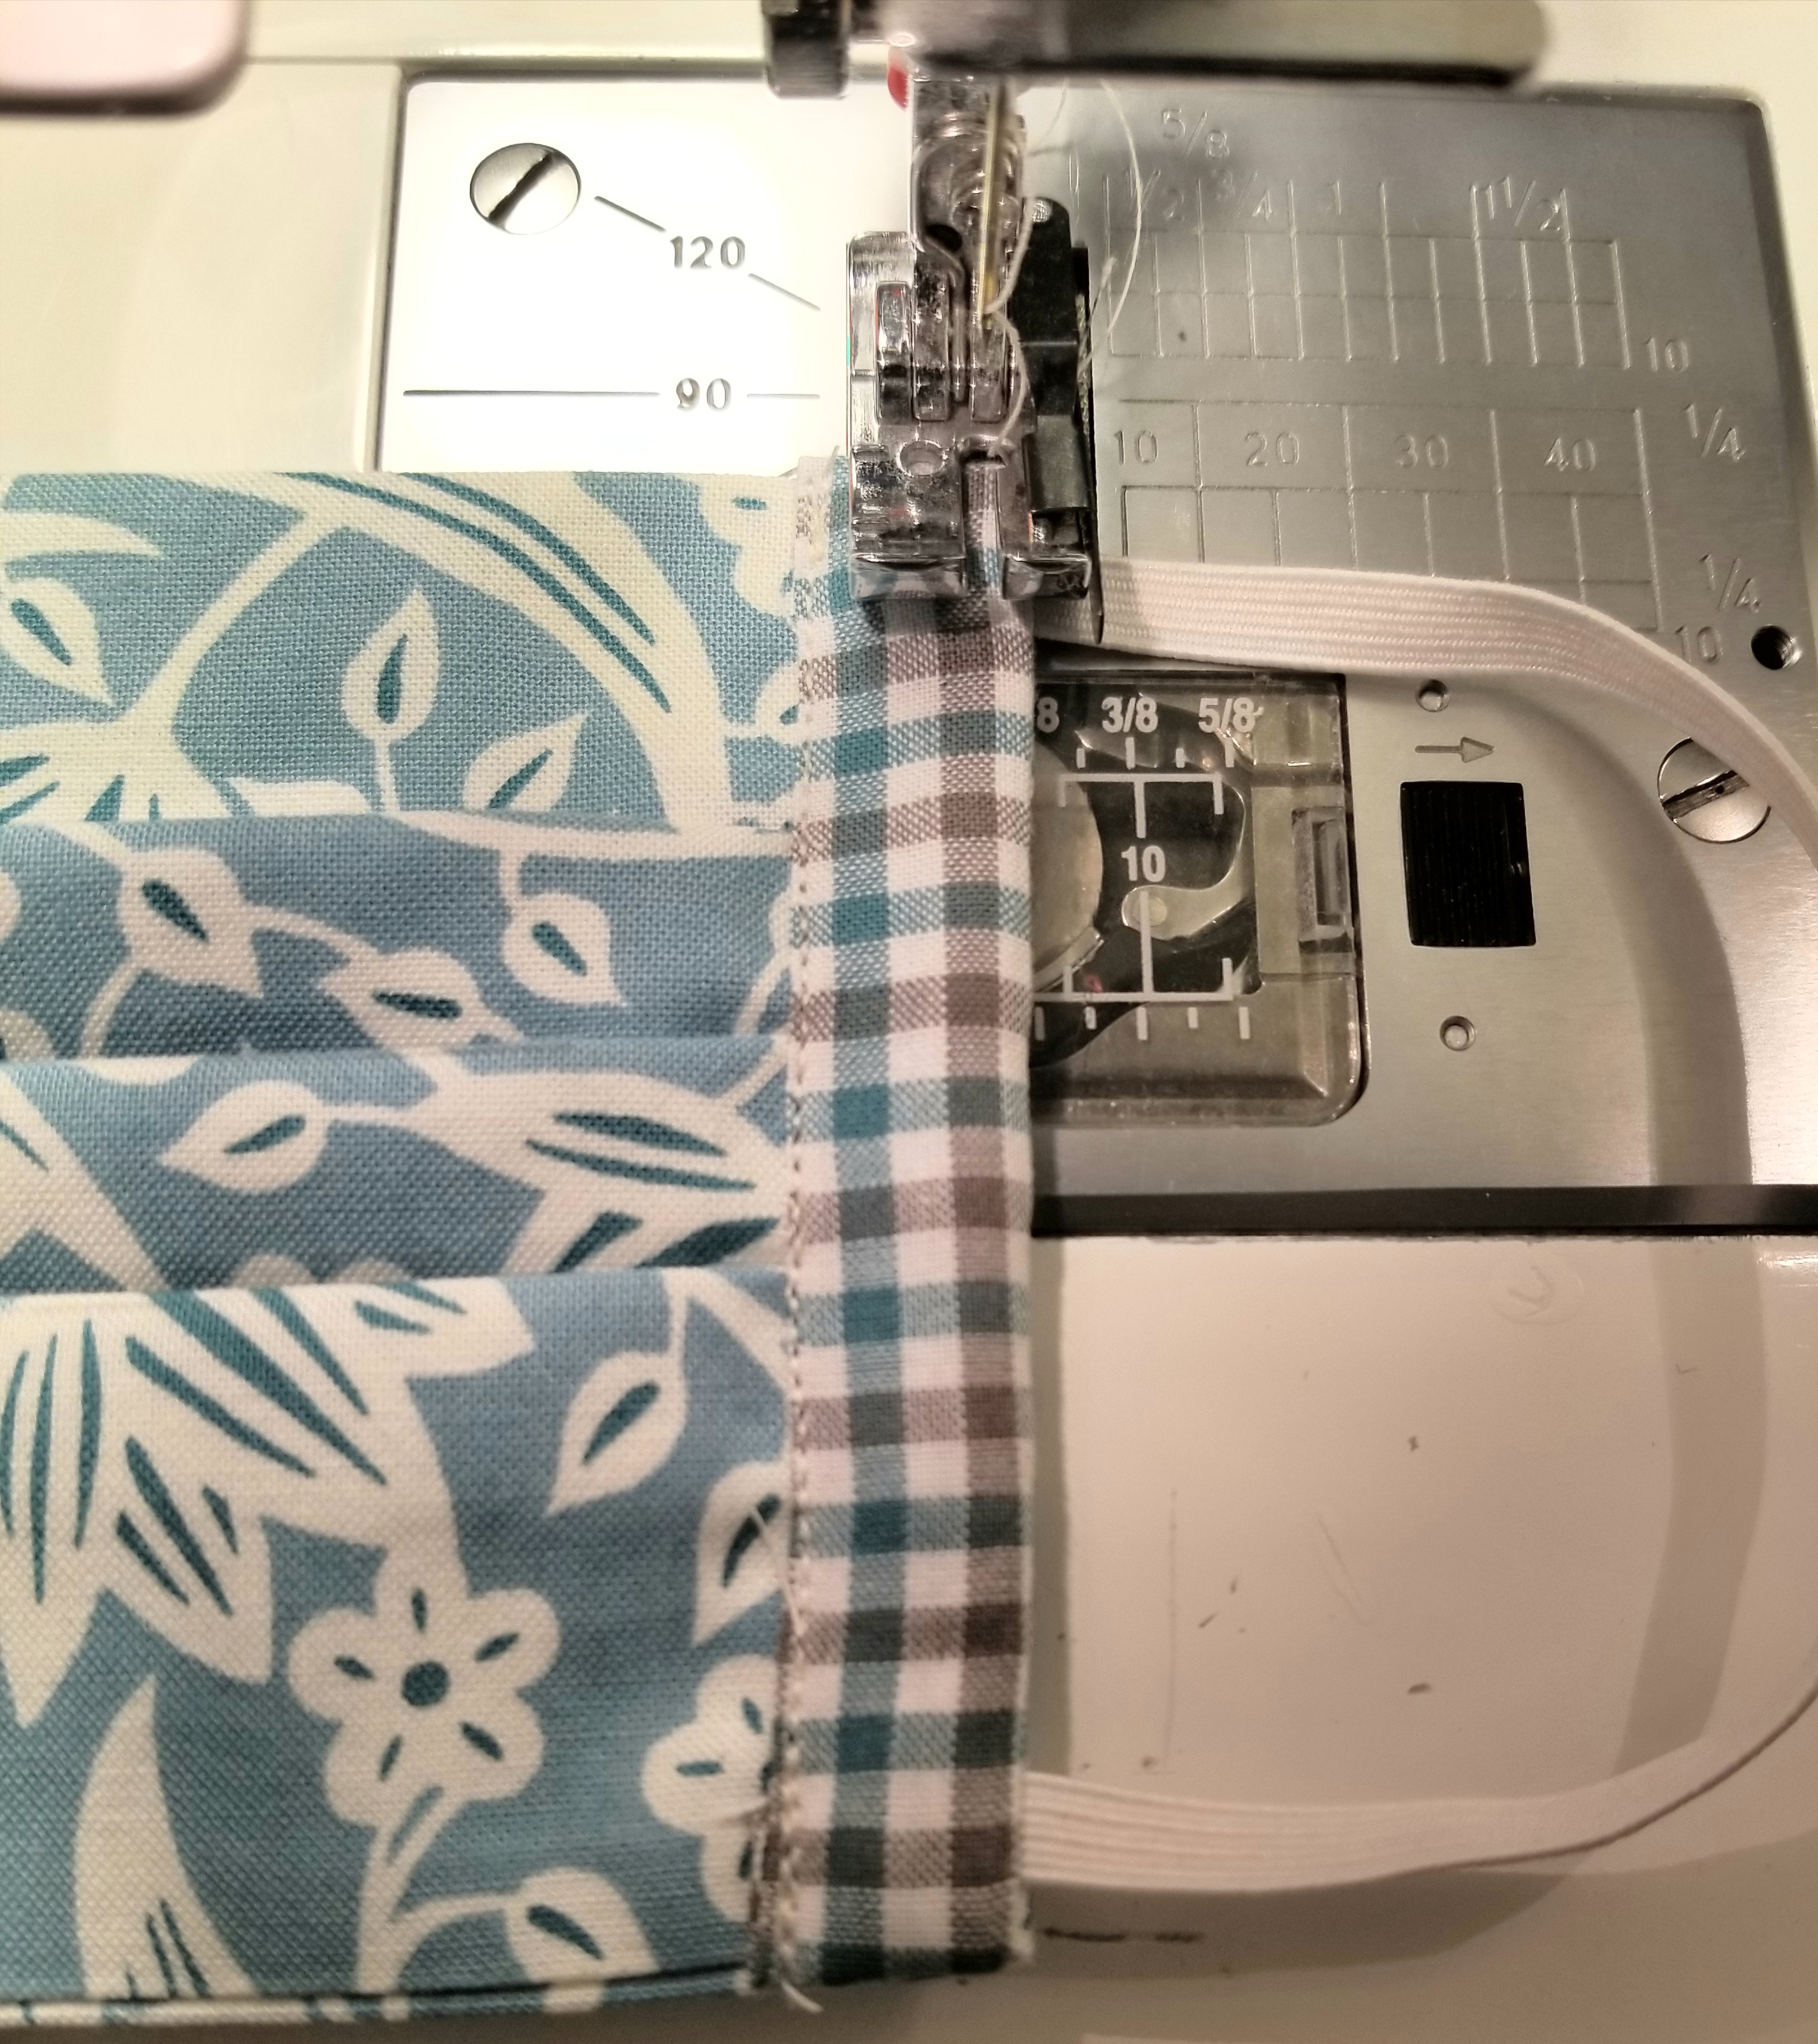
This step isn’t necessary. It just gives it a nice finished look, and helps to give that elastic a little extra stability. Stitch down the edge of the mask close to the elastic side.
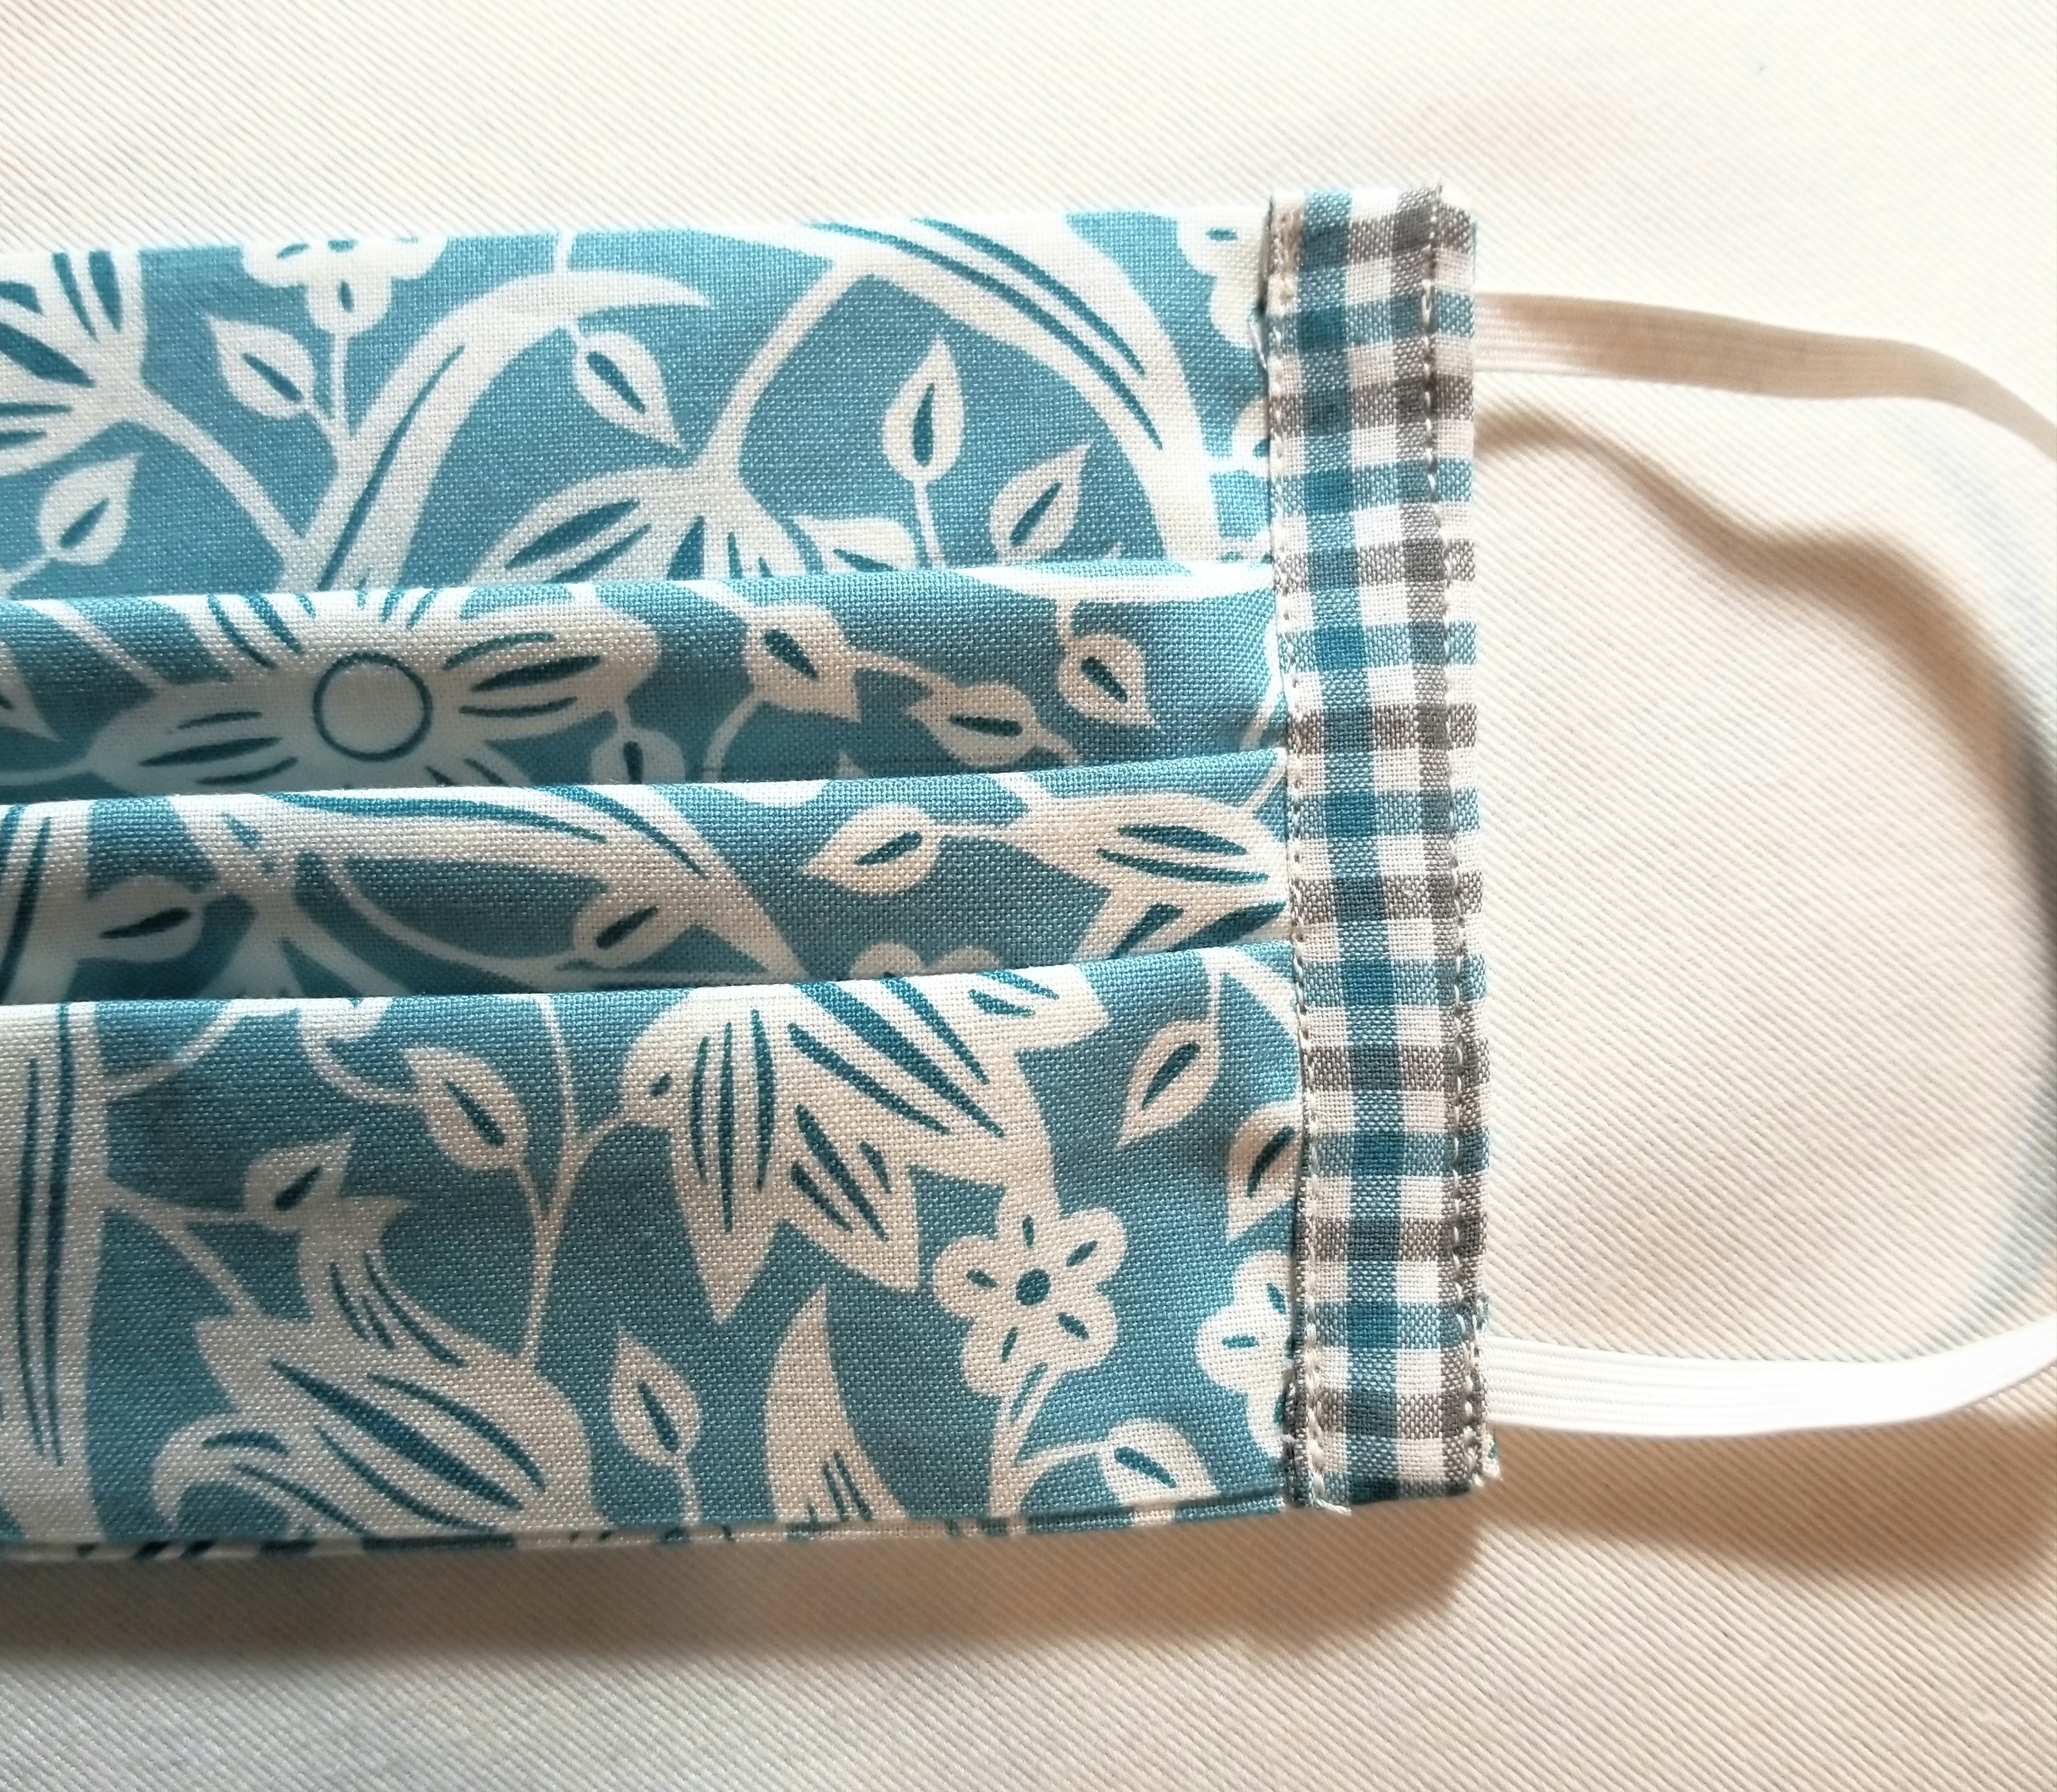
The front of your mask should now resemble the above picture.
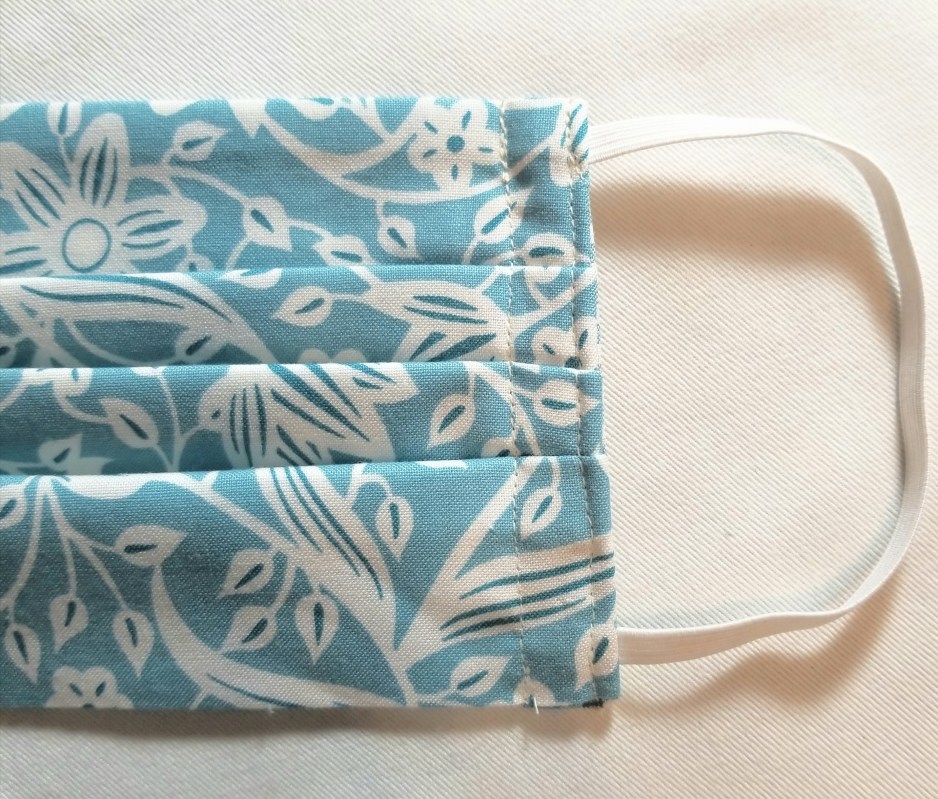
The back of your mask should look like this. Following the previous steps, attach the remaining accent fabric piece to the other end of the mask.
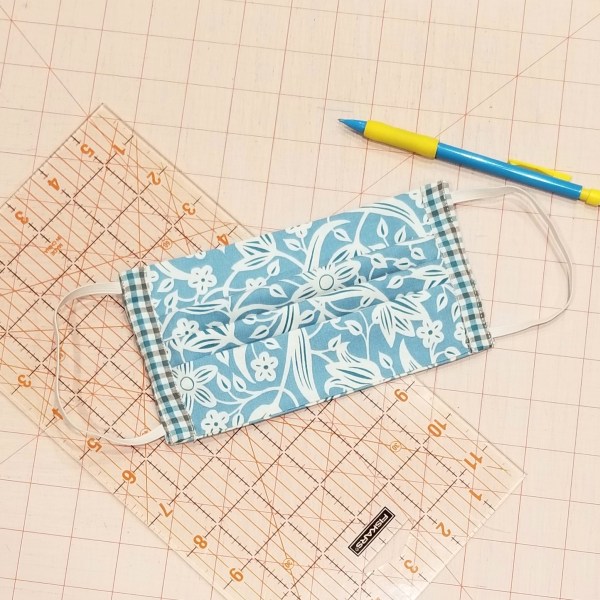
You should now have a reusable, washable mask that measures approximately 4″ x 7″ (unopened).
It took a few hours to put this free tutorial together for you. For this reason, I am greatly appreciative for any mentions that you can give me if you should use this tutorial. If you post a picture on social media, you can use the hashtag: #buttoncountermask. Feel free to share this page, and please tag me in your pictures so that I can see your beautiful creations. Last, I appreciate constructive criticism, so if you notice something that doesn’t look right, or does not make sense, bring it to my attention. I am happy to clarify any steps where you may have questions.
Enjoy!
P.S. Obviously, the elastic length can be adjusted to your facial measurements.
EDIT (March 24 2020): Because this tutorial has recently been used on a large scale, I will be adding a few things here as frequently asked and answered questions, suggestions, and reminders.
- This tutorial was happily shared by me over a year ago. This is not a new tutorial created in light of the current virus pandemic. I am not in charge, nor affiliated with any organization or entity requesting masks to be made. There are multiple organizations that are using this tutorial for their requests. If you have any question regarding what their requirements are, you really, really, really need to ask them. Please understand that I cannot and will not tell you what you should use, or how you should make your mask different from my tutorial.
- Keep in mind also that there are multiple entities that are using this tutorial for their requests. One entity may have completely different requests regarding features than another entity. (for example one organization is requesting a 4 layer mask, while another is fine with the two layer, as their thoughts are that they can be doubled up or used as a cover or liner to another kind of mask.) So, there is no correct or incorrect mask. Who are you making your mask for? Those are the people to whom you direct your questions.
- CHILD OR BABY MASK: After much thought, I have decided that it is in my best interest to NOT supply a mask tutorial for anyone other than an adult. One of my reasons for this is that I feel that a mask could pose as a choking hazard, and I do not want to have any part of that scenario. My suggestion is that you really should ask each individual child’s doctor or provider what their guidelines are, and go from there.
- I will not be held responsible for any mask misuse or malfunction.
- ELASTIC OR TIES? The main reason why my tutorial uses elastic is so I don’t have to tie it behind my head and mess up my hair. That’s it. So, if you are making the tutorial, and you don’t like the elastic, or if the person who you are making your mask for, requests ties; by all means put ties in yours. My pattern is very easily adapted to your preferences. There are organizations specifically asking for elastic, and some that are asking for ties only.
- ELASTIC LENGTH: I have read that a few of you recommend longer elastic; however, mine ended up being slightly loose. Therefore, I will not alter my pattern. I have stated in the tutorial that elastic length will need to vary due to the fact that human heads are not uniform (Thank goodness).
- I don’t have a PDF or printable version of my tutorial. If I decide to do that, I will; but it will be in my own time. I have received many hateful comments (that I deleted) demanding that I provide this. I need to remind those few sour apples that I am under zero obligation to do so. If my absolutely free visual tutorial isn’t to your liking, I invite you to go find one that makes you happy. If you are a person who often finds themselves using the words ”I need you to…”, you might fall into this category.
- I am completely honored that many of you are using my tutorial, or even certain aspects of it to help people in need. Even if you are using a completely different tutorial or pattern and just stopped by to check this one out, I applaud you for being a maker during this time. I cannot express enough how happy it makes me feel to see so many humans getting together to do something for the greater good. Please continue being that human. Those are the best ones.
I am signing off now to take care of my family, who needs me now more than ever. Thank you all for your kindness and understanding. God Bless.


I am going to give this a try. Simple instructions. Thank you
Bless you for this! I have made a few masks and have not been happy with the results. Your instructions were helpful to me. I am headed back to my sewing machine to make a new and improved version. Thank you.
TWO WORDS: THANK YOU
Thank you. I found your tutorial very helpful and not too complicated, I’m a beginner sewer and I will attempt this pattern. Thanks again. 🙂
Thank you for sharing your tutorial. It was a very nice visual walk through. ❤️
Use a pipe cleaner across the top. Put in right before you bast for the pleats. Sew right underneath the pipe cleaner to hold it in place. This will help mark fit snug to your nose.
Ditto to the above comment!! Thank you so much!!
Thanks – Amazing! I had never heard of Cedar Fever before I visited Austin from Australia a few weeks ago. My son and his family have relocated from Australia to work there. I am an asthmatic and have allergic reactions to “stuff” 😂 …..I was constantly saying to myself is this asthma? Or the dreaded coronavirus? It was then people started telling me about spring fever in Austin 😳 – I like the look of your mask and am going to try to one this afternoon with some old fat quarters I have. I hope I love it so I can post it on Instagram 😊
You are an amazing seamstress!!
What an excellent job!! 💜💜💜
Thanks for this – it looks amazing! I didn’t know about Austin Cedar fever until I visited my family last month from Australia (my son and his family have relocated there to work) – I am an asthmatic and get allergic reactions to many things 😢And I was wondering all the time “is this bad asthma? or is this the dreaded coronavirus?” Then people explained to me that it was spring time in Austin! Well, now I’m back in Melbourne, and isolated for 14 days, so I’m going to try to make a mask this afternoon from some fat quarters I have. If I love it I will put it on Instagram for you! 😊
Dear Button Counter, you are dear for doing this for all of us who are giving sewists. To those of you who “need” her to do something for you, she already has. Wise up. I am very grateful for this tutorial. I have made my own modifications and have made about 30 so far for family and friends. Thank you.
Thank you so much! Great tutorial. I will make as many as I have material for to give to whoever needs them.
Thank you for the tutorial! The pictures are so helpful. Thank you for taking the time and sharing it with everyone
Good morning from the England, please could I just say that I believe you have made a beautiful tutorial! Caroline
God Bless you!
Thank you so much for sharing your pattern and providing the tutorial for the much needed face masks. I am making two apiece for my family members which include children, grandchildren, sisters and their spouses, which total18! Thank you also for helping me keep my family members a little bit safer. God bless you!
My hospital is requesting these to go over their N-95 masks to help keep them cleaner longer. Since we are allowed one N-95 per day, we need to keep them as clean as possible. Thank you for posting this great pattern
❤❤❤❤ thank you for making this. I was tired of showing people lol. I am now recommending your tutorial. I was using ribbons until I saw this. Great. About to try the elastic I have tons of that thin one and this would be perfect. Thanks again !!!
You’re so thoughtful to offer your time and talent to share face mask tutorial! I say “to heck with the spoiled nay sayers”! It’s impossible to find masks and I appreciate your thoughtfulness sharing instructions, you’re a positive force with terrific intentions!
Wonderful Idea for our medical staff and ourselves to go out in the public. Have you considered larger masks for the larger person? anyway figure that one out or I will later after I have made masks for the public for JoAnns.
Thank you , Easy to follow. Sorry you had hateful comments.
Thank you for your pictorial. I have yards and yards of fabric left over from previous sewing projects. They are in the wash now. Very soon to be turned into face masks. I now have 3 different mask patterns that I can make and give away. Thank you again for sharing.🤗
I totally love your masks. Thank you for sharing. Stay safe and enjoy your day.
Thank you for providing a well written tutorial. Your time and effort is truly appreciated and very helpful for many of us during this time
Have looked at a lot of tutorials and like this one the best! Thank you so much. I am also going to try sewing the short ends of the strip and attach it the same way to make a channel to be able to put string or new elastic thru if mine stretches out.
THANKS AGAIN!!!
I enjoyed the instructions you posted, I have asthma and allergies. The instruction are simple and easy to follow. I have posted your wesite on Facebook for my family in other states.
.
Great tutorial-saves some steps over the method I was using so I will be trying it out shortly! Thanks for all the time you put into this tutorial!
Just finished 15 today for the hospital. Their non clinical personnel wanted this kind of mask. Very easy and quick. Thanks!
I really appreciate your time and efforts. This was very helpful, and I didn’t have to reinvent the wheel. So sorry for the negative/ugly remarks, hopefully the good will outweigh the bad.
Is there a way to make them if u do not have a sewing machine? Because i would like to make a few for my co workers but i do not own a sewing machine.
awesome tutorial! Ignore those trolls that are being hateful! I’m not an experienced sewer so for me this is fantastic!! Thanks so much again!
Thank you for doing this! It will save me a lot of time from designing from scratch. May I make a suggestion? Last year my daughter needed face masks for her eyes to block out light for her over-sensitive eyes because of a concussion. I copied a pattern for a beauty sleep mask but made it wider and further down onto her nose and up on her forehead. It did not block out the light beside her nose. I cut the metal strip out of dust mask and incorporated into my mask. This allowed my daughter to control how tight she wanted the mask to fit onto her nose. She loved them. This idea would also work with your masks. Again, Thank You!
Thank you for sharing. I’m actually using two different pieces of fabric with the cotton fabric being the liner on the inside. To which side do I need to pin the elastic and the accent piece, the outside of the mask or the inside/backside?
I have sent 20 of these to a friend that is a hospice CNA and I am waiting on more elastic to send her more. She and her company know it is not what they should be using in a best case scenario, but are SO grateful to have them anyway. So I wanted to give you a HUGE thank you. By sharing this you are helping me keep my chosen family alive.
And as to the issue of elastic length, I switched to a small round stretch elastic cord instead of the 1/4″. It does not roll over the top of the ear, and is easier to find right now, too. The length issue I took care of my making the elastic longer and adjustable. I sew the elastic into the top of the mask, leaving the bottom end loose. After the side pieces are sewn into place, I am sewing a 4 hole button onto the bottom corner of the mask, using 2 of the 4 holes.. The round elastic is then woven through the 2 holes that weren’t used to attach the button to mask, and knotted behind the button. This allows people to use it like a drawstring and adjust to their own faces.
I thank you so very much for your kindness and time helping others.
Did anyone figure out how to measure the human face/head to know exactly long the elastic should be?
Thank you so very much! I’ve been teaching myself to sew, and my mother suggested I attempt making some masks from fat quarters. Your instructions are concise and very easy to follow. Now I have something cute and functional to wear while riding the mower. Sending virtual hugs from Mississippi. 🤗
This is a fabulous tutorial! No big deal about not offering a .pdf file. I just copied and pasted to a word doc and now I’m going to make the pictures smaller so I don’t have 30 pages! This is just what I wanted so I can make some reusable masks for family and friends. Bless you!
Thank you for this. I was just thinking about making washable, reusable masks for myself and friends. I will get started on these tomorrow. Thank you again.
Great face mask. I made 1 this afternoon. It took me quite a while but that’s all my fault. I am happy with the result.
I used your tutorial to make 179 masks for a local nursing home. Delivered them today! Thank you for your very clear directions. Now I am making more for some friends.
This is awesome !!! Thank you so much!!!!
Thank you very much for the tutorial.
I can’t thank you enough for posting this and allowing me to find a way to help. I’m still working during this pandemic (Public Safety) but in my down time, I’ll be at my sewing machine making masks for the nurses on the front lines.
Thank you again!
Great tutorial! I work at a medical clinic and unfortunately masks are in short supply, we have been asked that if anyone can sew would we please make cloth face mask. They WILL NOT be worn during any medical procedures, (for the sour apples) but the girls at the front desk need to always be wearing masks and the medical assistants need to be wearing mask while taking a patient to the exam room, we all do all day. This way we can save the surgical masks for medical procedures. So sorry that you have to deal with sour apples, there seems to be several bushels of sour apples out there these days. I always say “Just smile and nod”
Thank you so much for this pattern! I have made several mask already and they look great! One question I have is which direction should the fabric grain be when cutting out the fabric? Or does it matter? I have tried cutting the main piece of the mask both ways: stretchy part of the grain in the direction of the nose to the chin and also stretchy part going from ear to ear? When sewing clothing such as a skirt or pair of pants, most patterns have the stretchy part going side to side to allow for stretching when your body moves. Most fabric with a directional print pattern assumes you are cutting it this way as well because that is how the print looks best. So this makes me assume that the stretch should be ear to ear. However, since the mask is pulled up over the nose and chin, does it make sense to have the stretch going that way? Not sure about the grain direction on the side accent pieces as well.
Sorry if this question has already been asked and answered. Thanks for your help!
Thank you!! This is a wonderful free resource and I have made masks for my family using your instructions. Ignore the dummies. They aren’t worth your time. Thank you for doing this, I’ve made a few sewing tutorials and I KNOW what it takes. It’s not simple. Stay healthy, stay safe, and much love to you and your family. ❤️
I’ve used your tutorial to make over 50 masks so far & the only thing that has me stopped right now is the lack of any elastic. As soon as I get more elastic, I will be making more!! Altho I did adopt the written pattern to add my own notes for what works best for my mind, this is a very good tutorial & I appreciate your time in writing it out, posting pictures, & allowing us to use it. It’s not easy & it is insulting to me as a crafter when people do that. Some people are just too darn lazy to figure out how to save things or research them to help figure things out. I see it happen all the time on crochet designers’ websites, always wanting a .pdf for free or complaining when a pattern that was once free has been taken down or is no longer free. They are just plain rude. Ignore them – they just woke up on the snarky side of the bed. Thank you again!!! You rocked it!!!
Thank you for being so kind and sharing this with us. I am grateful for it so that I may be a blessing to those who are in need of these. Again thank you and may God be with you and your family.
I haven’t made any of these yet but this looks super easy and fast.. I have a lot of family in upstate NY and of course none of them sew, so I need to make these fast and get them mailed off.. Thank you so much for the pattern and time you spent in sharing it for all of us! I especially like that I don’t need a pattern template since my printer isn’t working and I have no way of printing one right now.. Thanks again! You’re awesome!