

My allergies have been incredible this year, and by that I mean that they have been worse than they have ever been. (Please, please, please do not suggest medical advice here. Much appreciated.) I see an allergy specialist who gives me 2 shots, 2-3 times a week to help with my symptoms. They have helped a lot; however, Juniper Ash (Cedar Fever!) here in Austin is 6 times worse than average this year, and boy oh boy, do I feel it. She suggested that I wear a face mask when I go outside to help reduce the amount of pollen that is going into my lungs and sinuses. After going to a few different stores to purchase some, I found that many other Austinites had already bought them out. No worries, right? I know how to sew. I will just make one. When I finished, I had many requests for a tutorial, so here you go:
Materials needed:

- 1 piece of fabric measuring 8” x 14”. Until you get familiar with this tutorial, I would suggest a non-directional print. One that has a scattered image printed on the surface such as the one shown.
- 2 strips of fabric measuring 1.75” (1 3/4”) x 6”. This will be the accent edge piece. It can be the same fabric as the main piece or a small-scale print or solid.
- Two pieces of 1/4” width elastic. These will be about 6 1/2” long.
- Ruler
- Fabric marking tool.
- Pins
- Scissors
- Sewing machine, threaded.
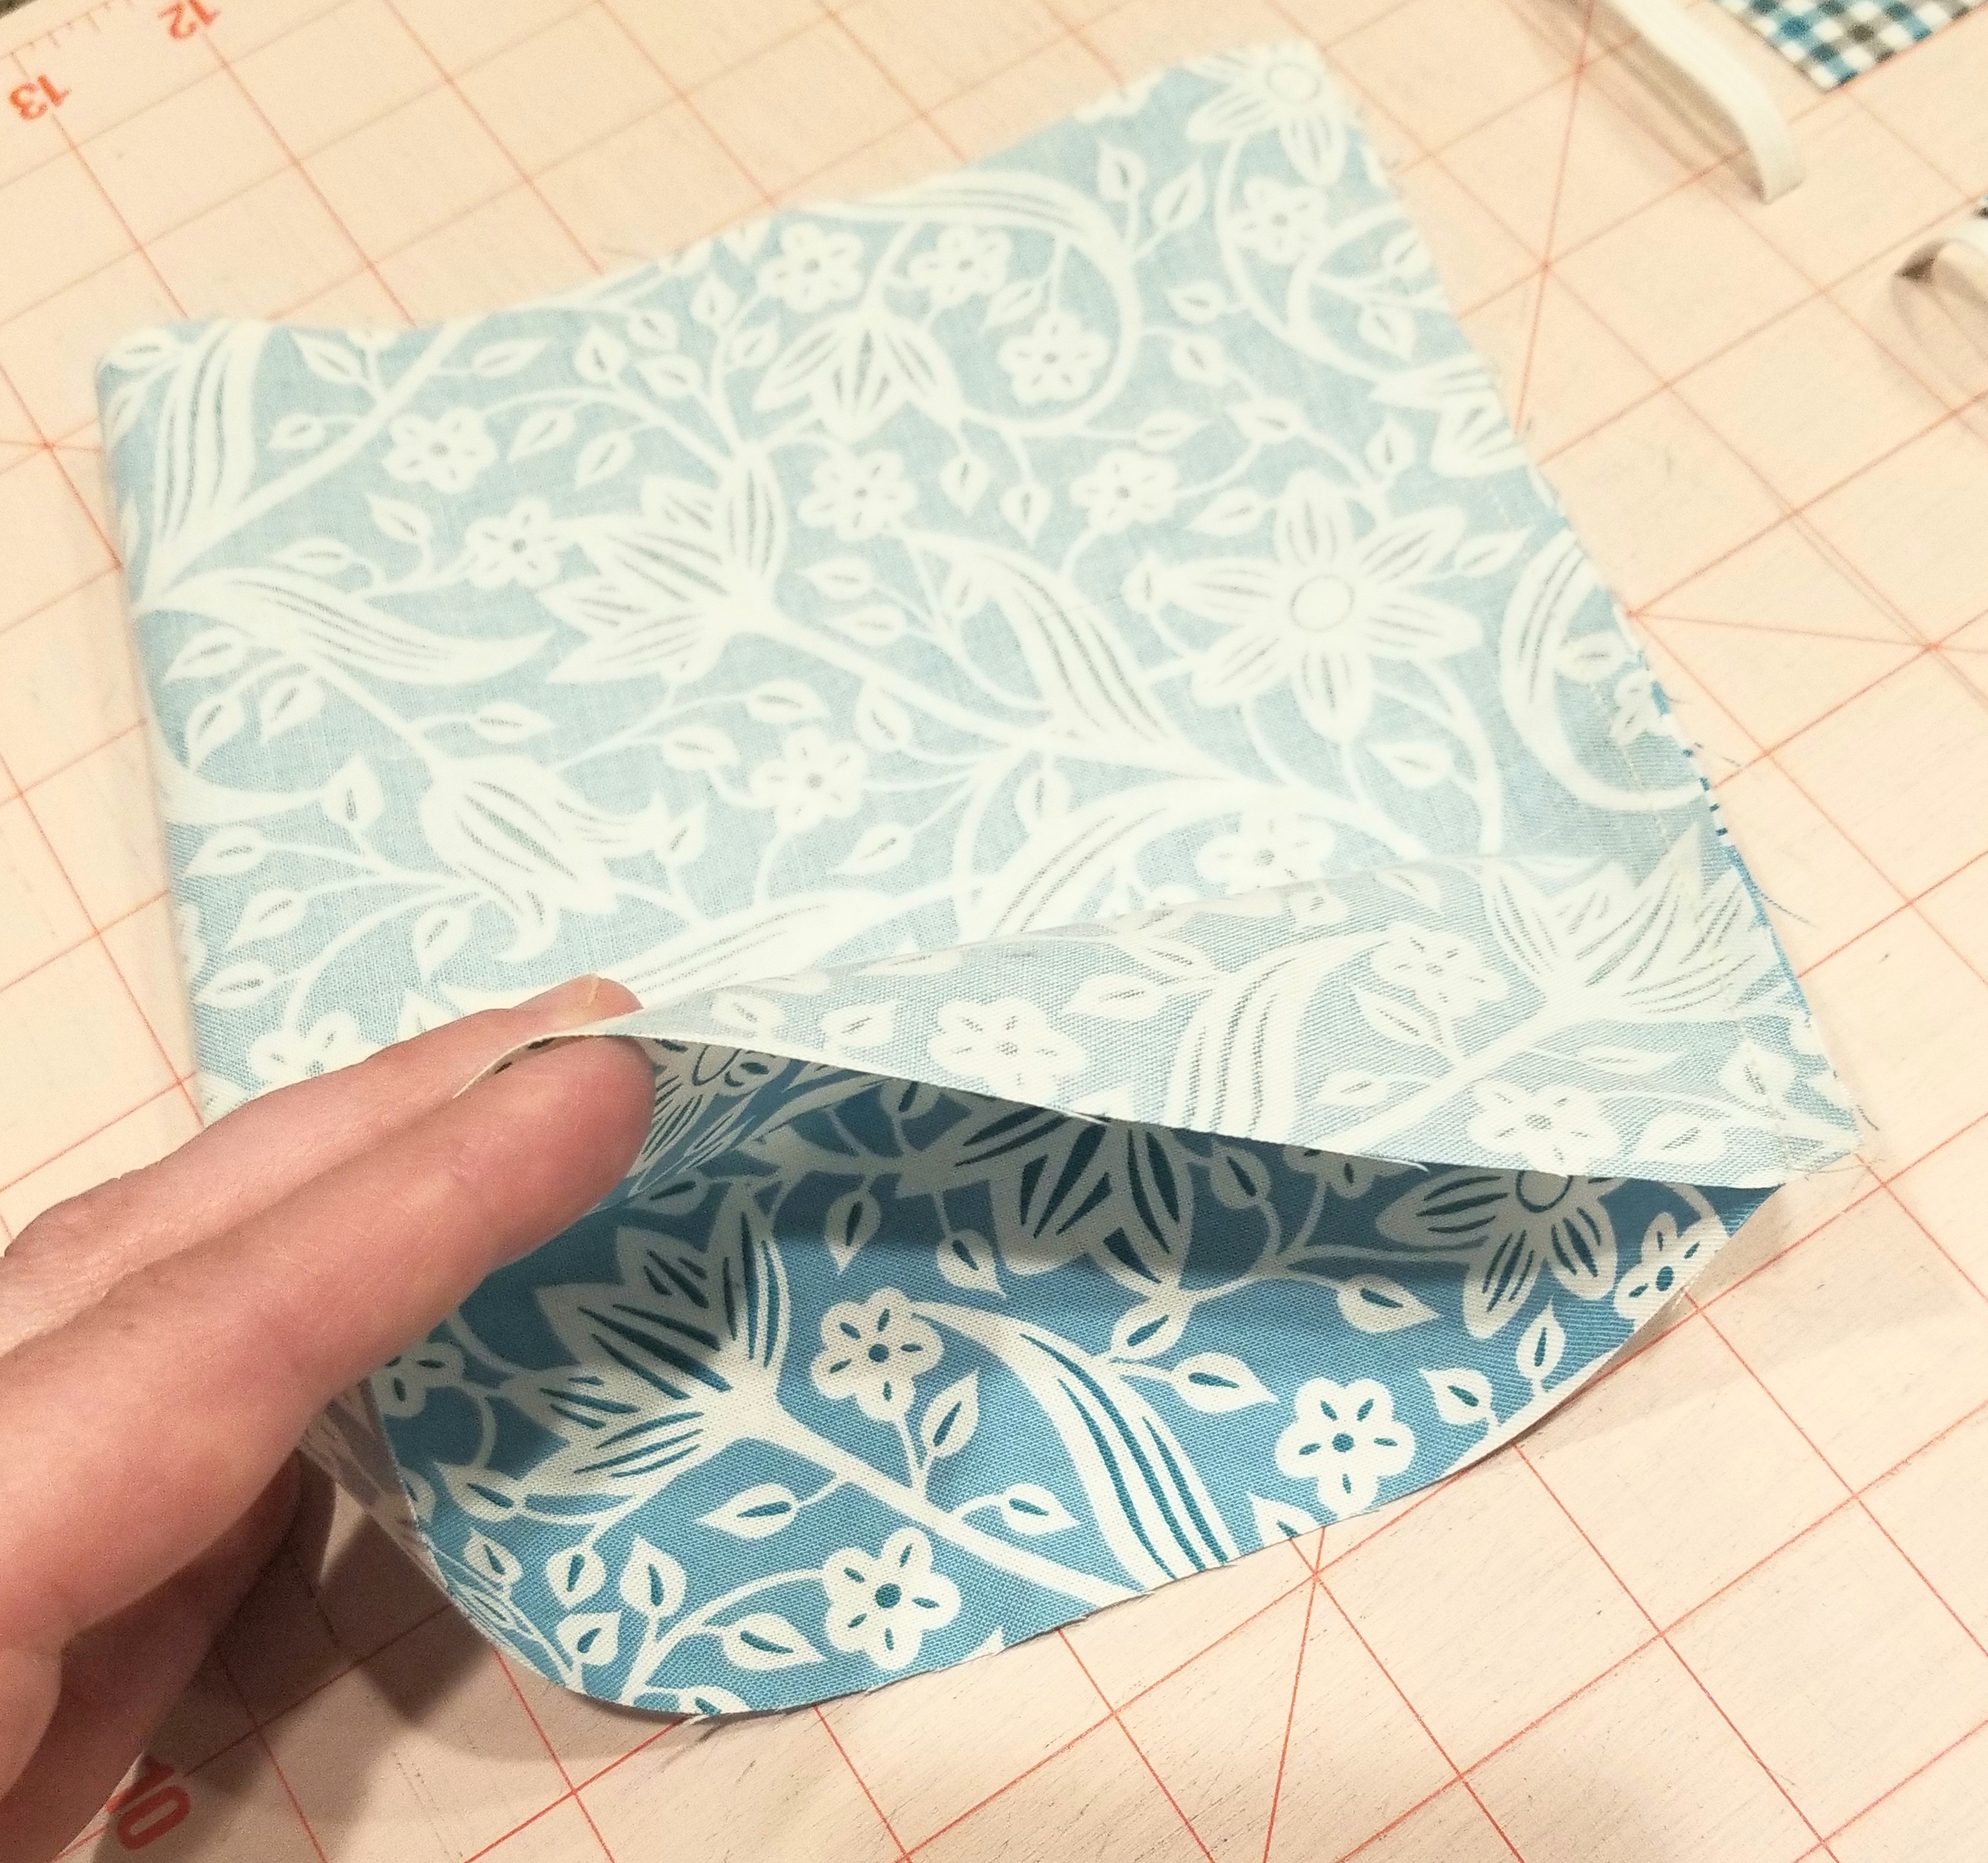
Fold the main piece of fabric in half, right sides together. Sew along the 8 inch width edge, using a 1/4 inch seam allowance.
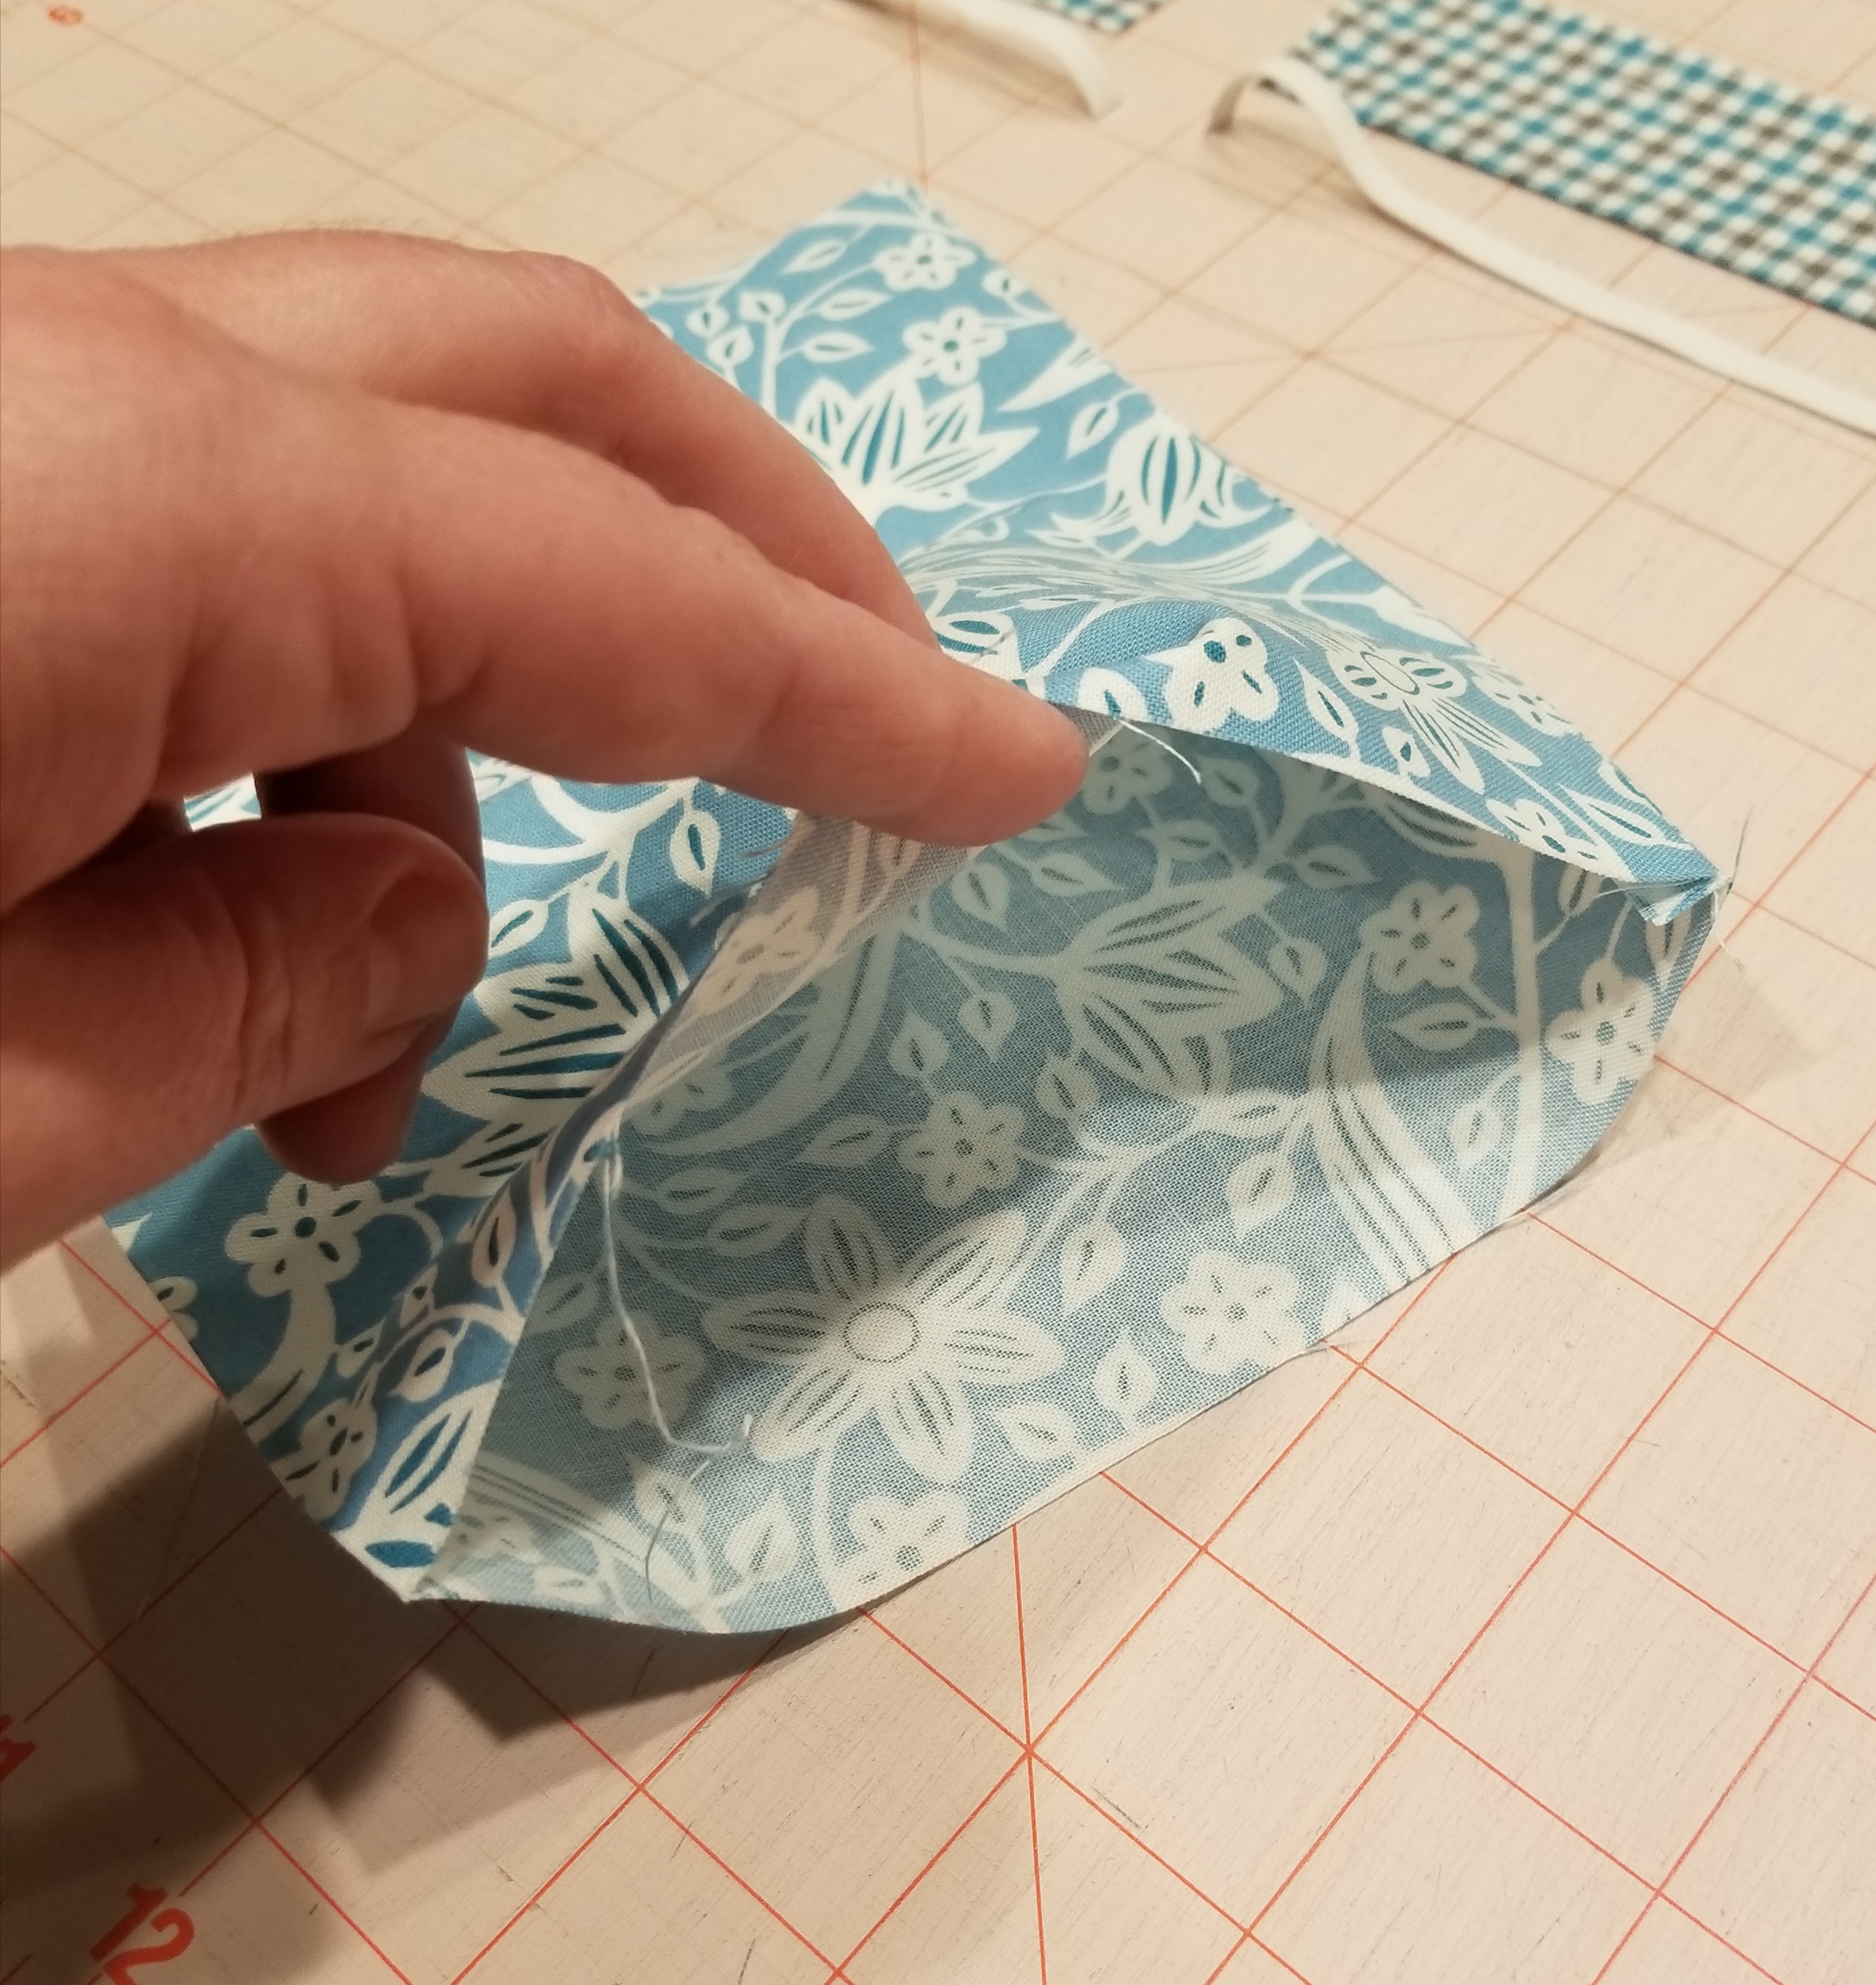
Turn this tube shape inside out, so that the right side of the fabric is now on the outside. Press this flat, keeping the seam to one end of the flattened tube.
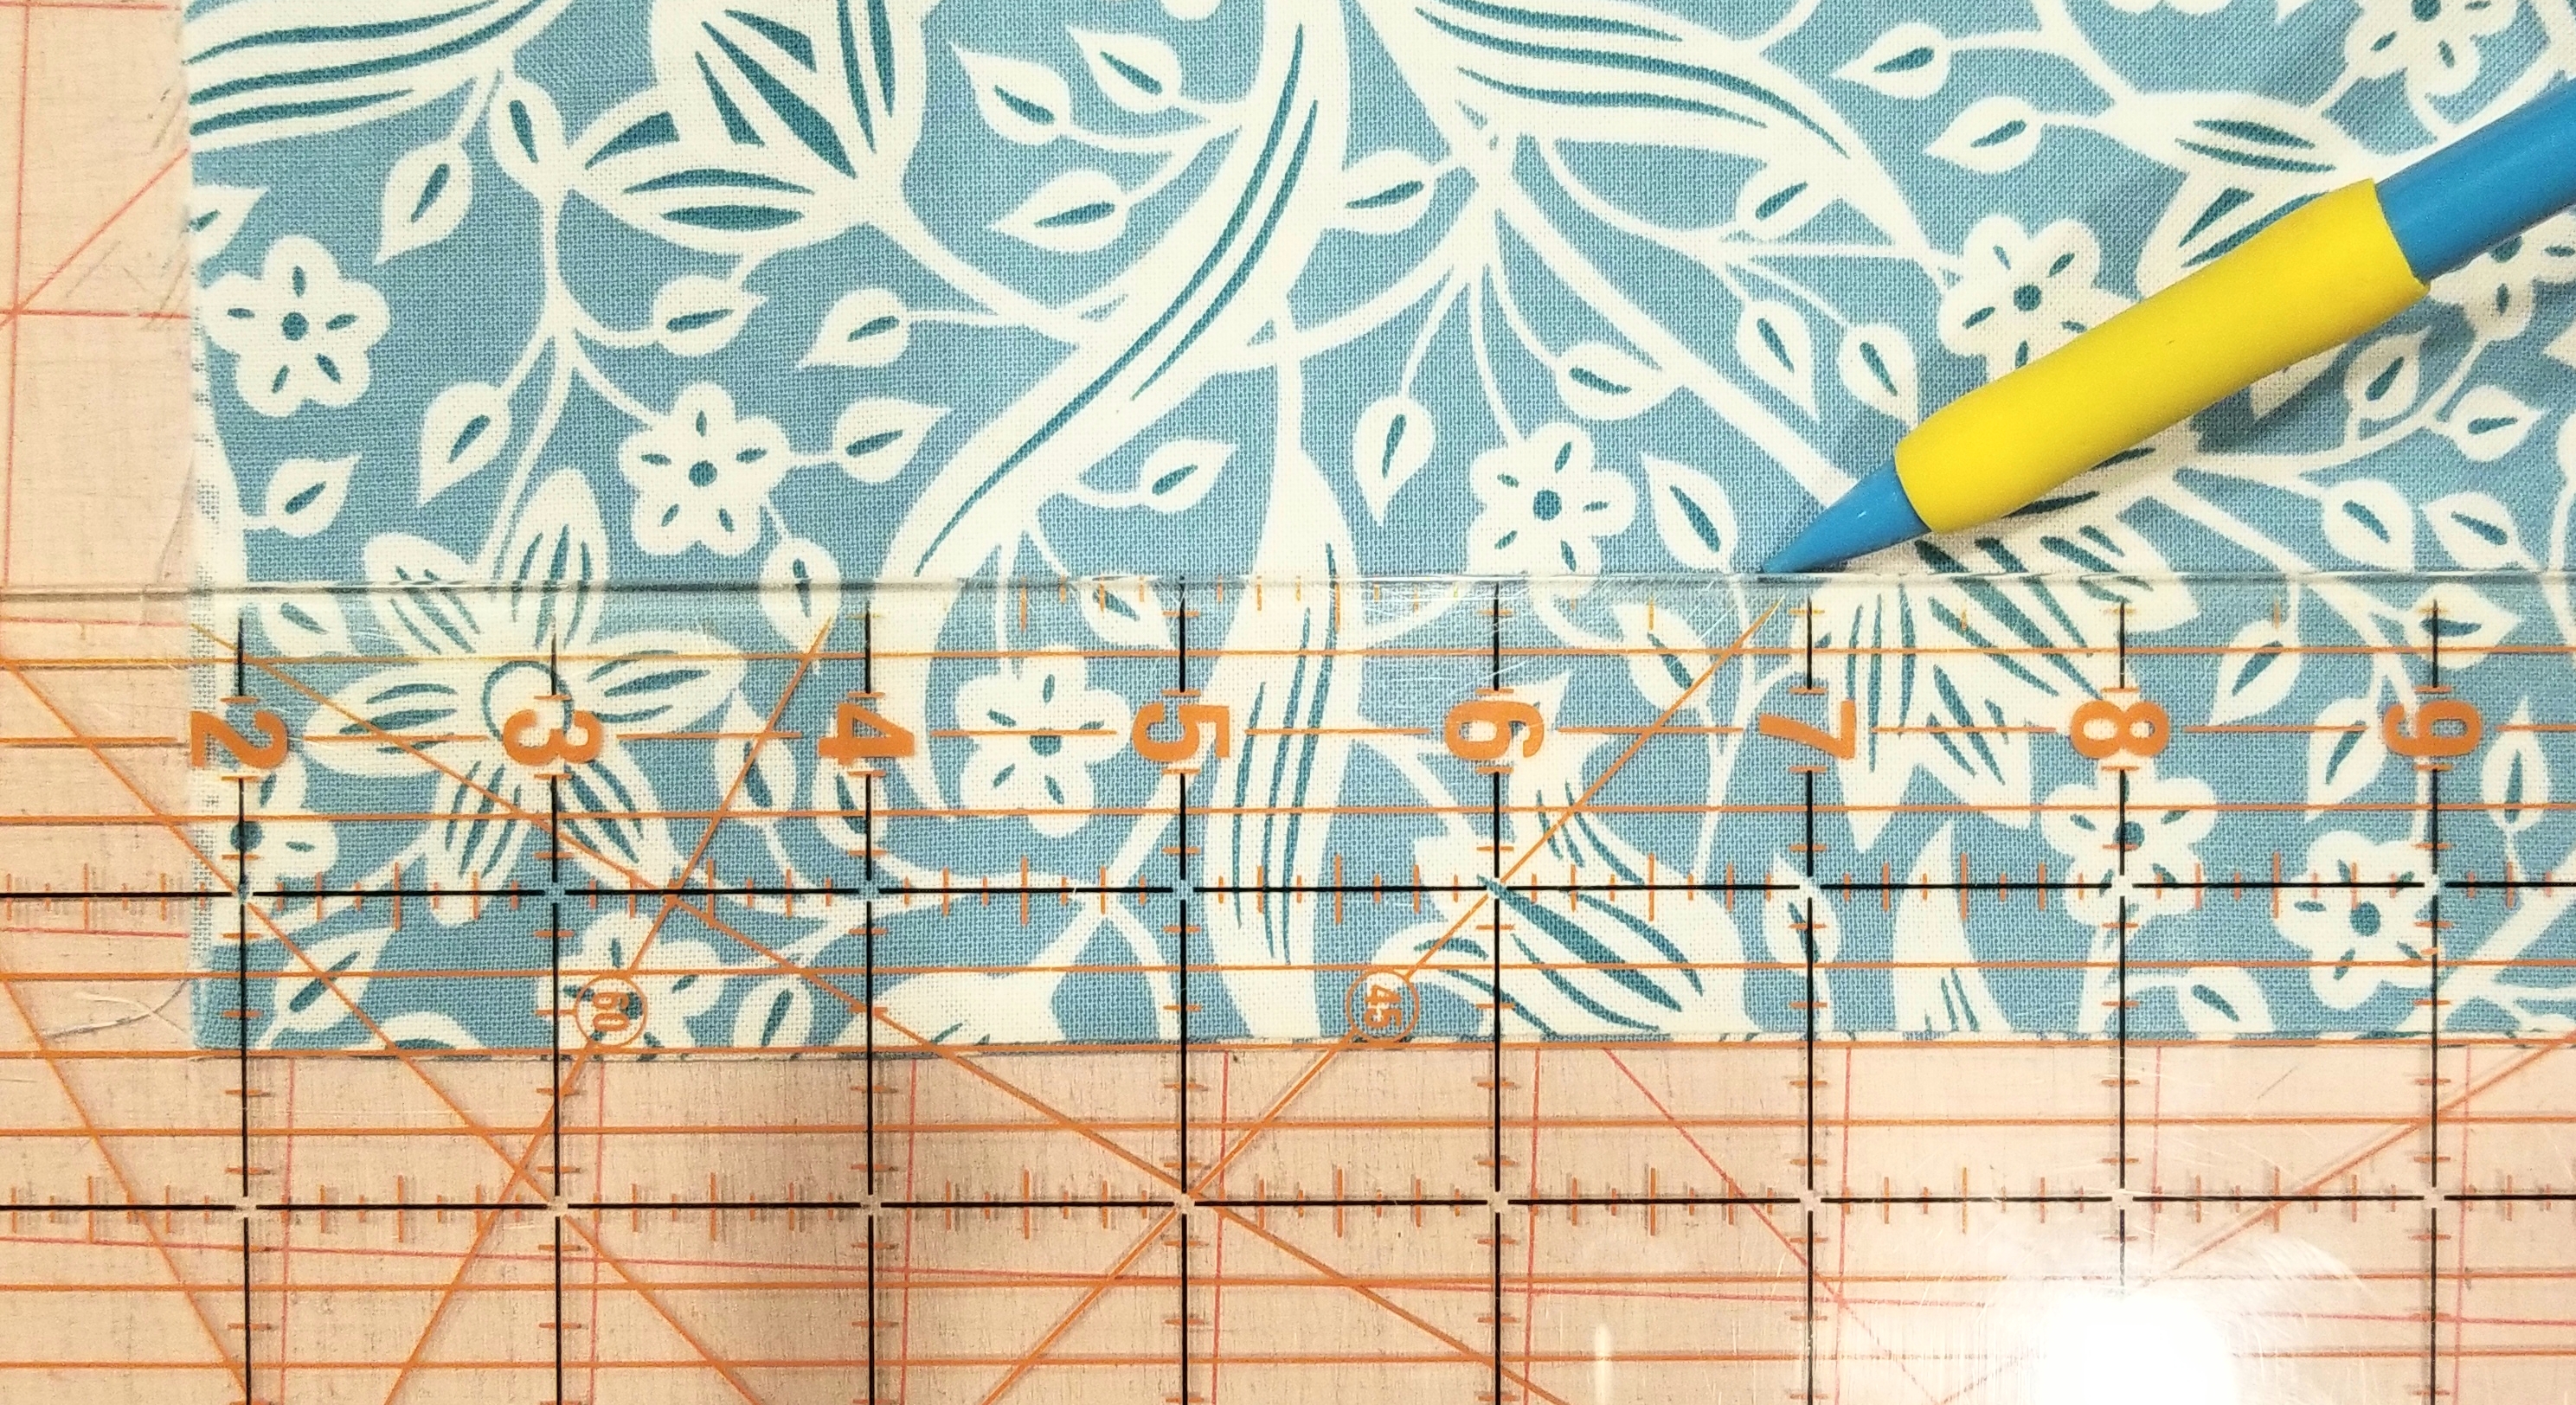
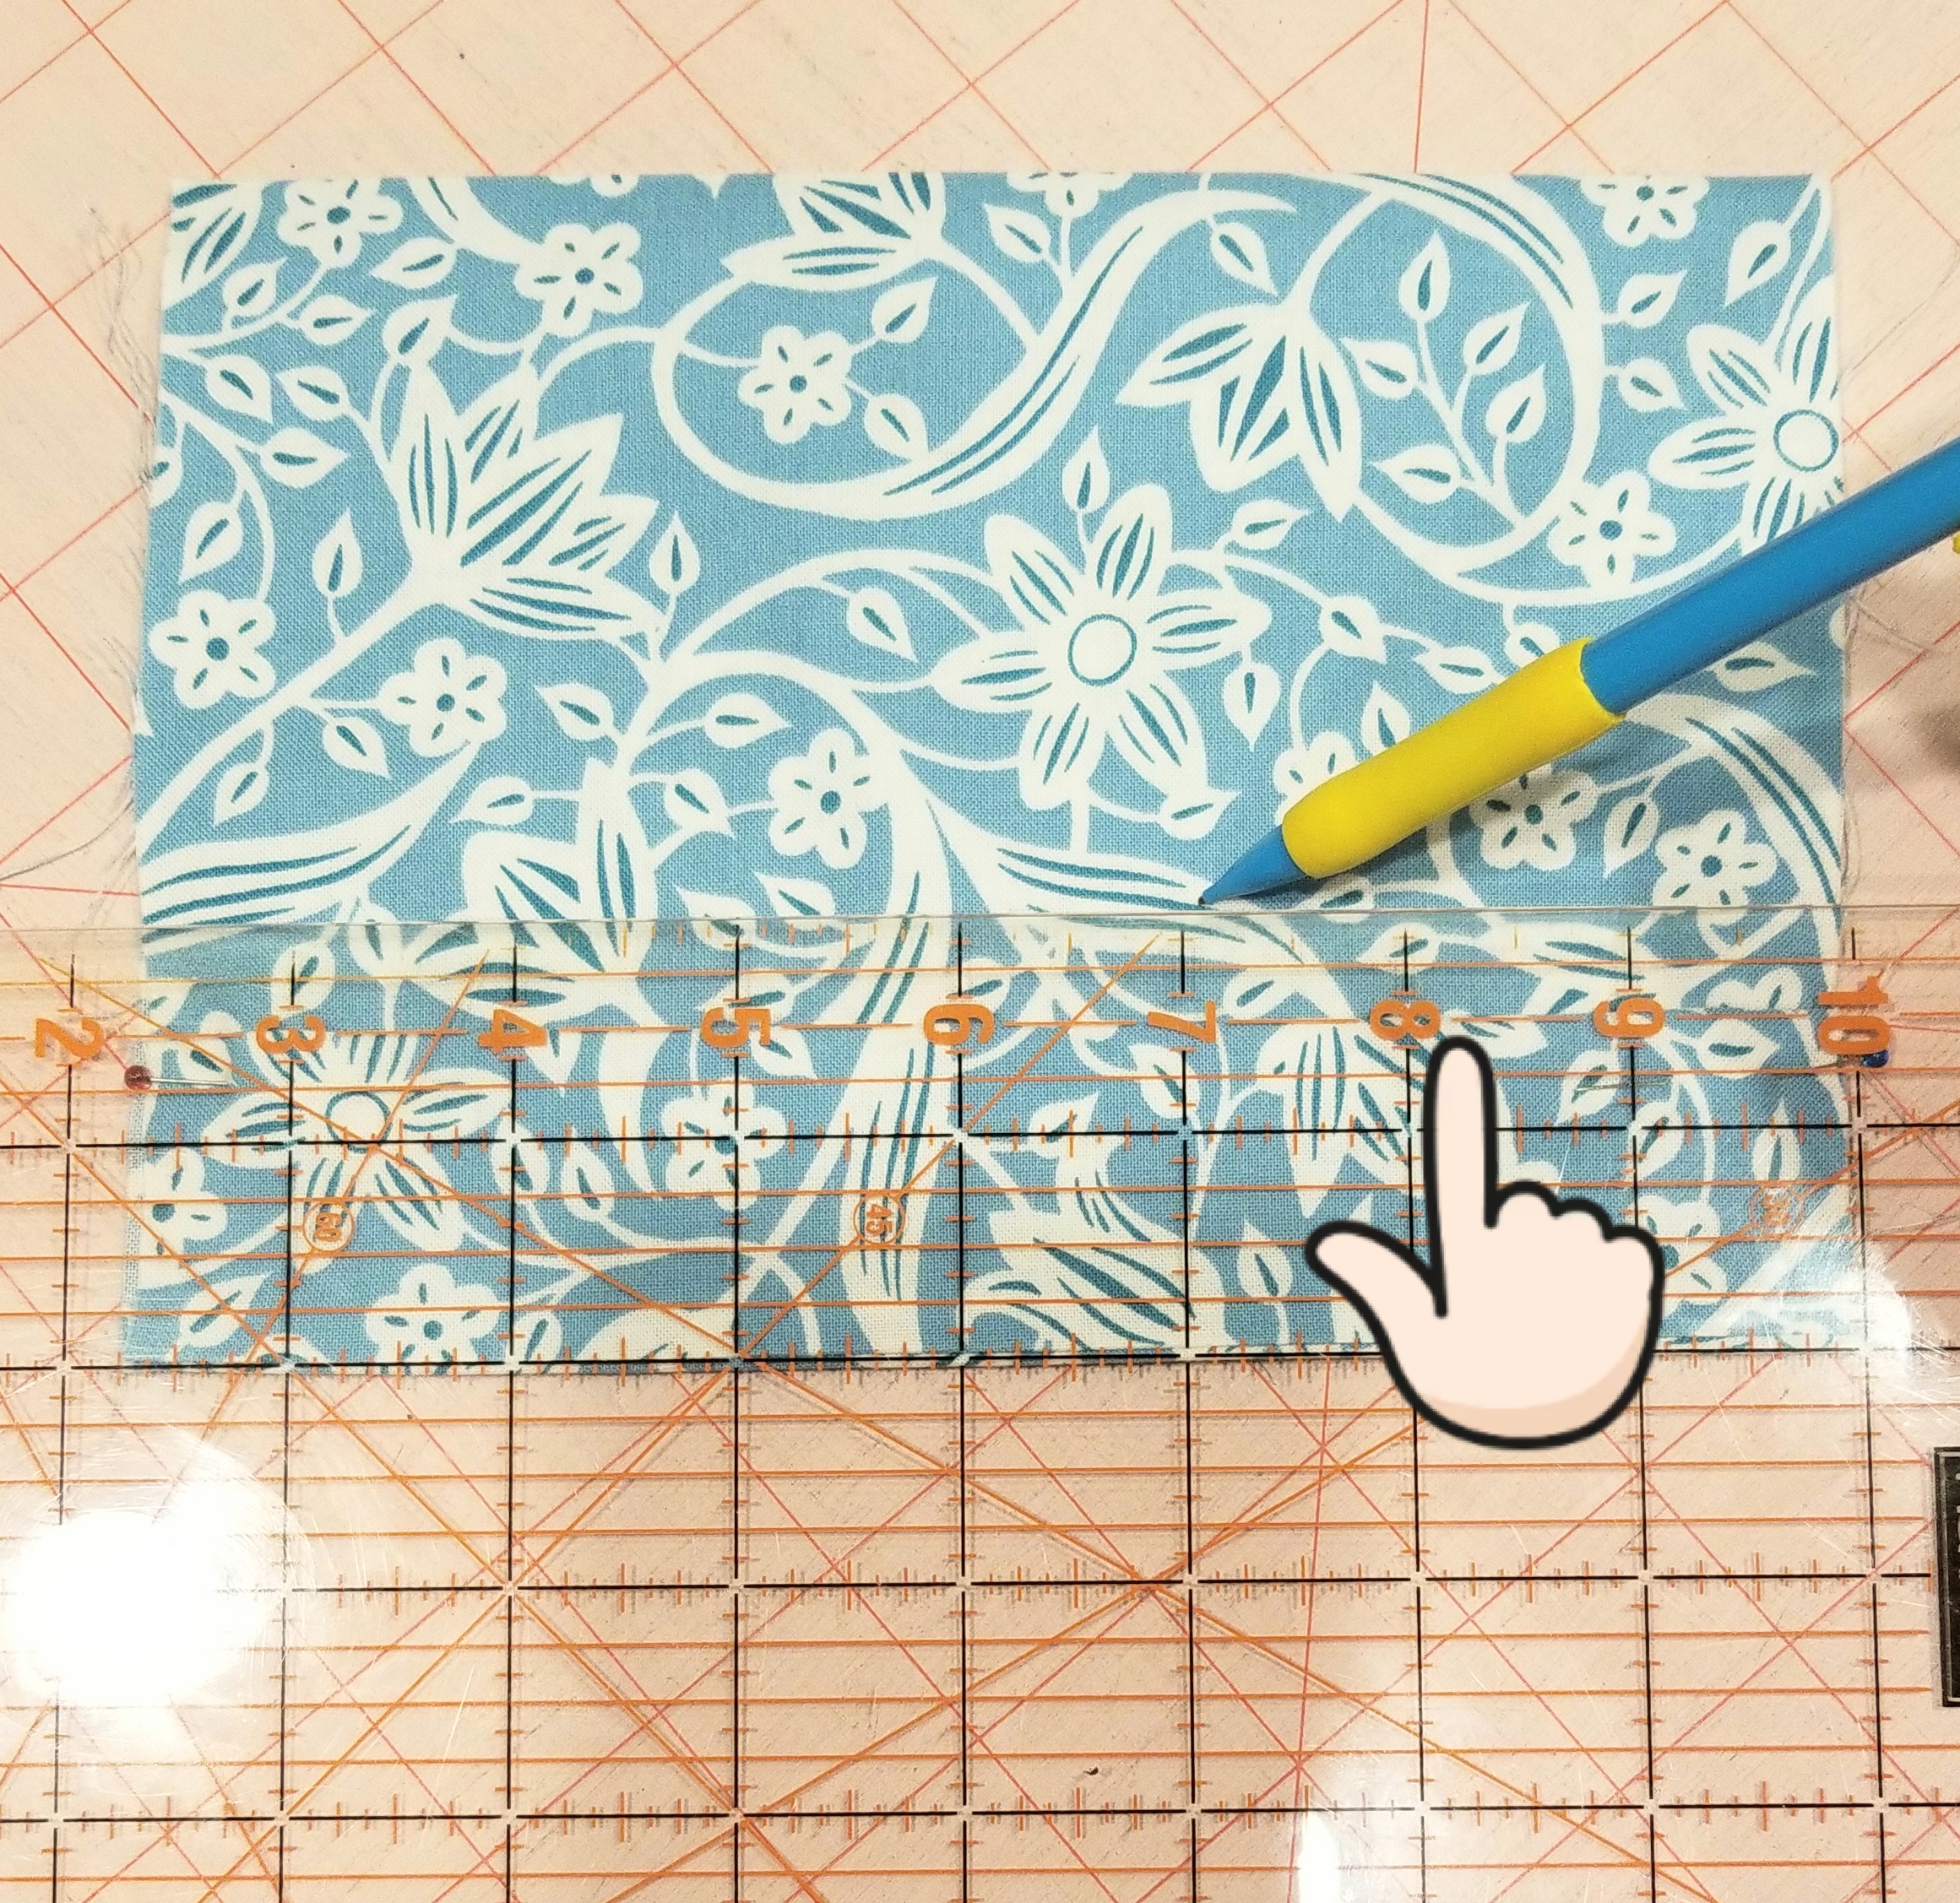
Place the tube of fabric so that the raw edges are on each side and the seam edge is at the bottom. Using a ruler, measure and mark a line 1 1/2 inches from the bottom edge. Make another line 1 inch above this line, or 2 1/2 inches from the seam edge. Don’t use a pencil as you see in the picture, use a fabric pen, or fabric chalk. I used a pencil for illustration purposes.
Fold the seam edge up (or down in this picture, as I turned it upside down…sorry) making the crease on the first line that you just marked. You should have 1 1/2 inch edge here.
Flip the tube piece over. Match the crease edge to the second line that you made earlier. Press. The pleat that you just created will be 1/2 inch deep. Pin the pleat down on each raw edge end.
Now you will mark the lines for the second pleat. Mark a line measuring 1/2” from the top crease of the last pleat, (or 2″ from the bottom seam edge). It was difficult to see the top of the crease in this picture, so look at the finger indicator above.
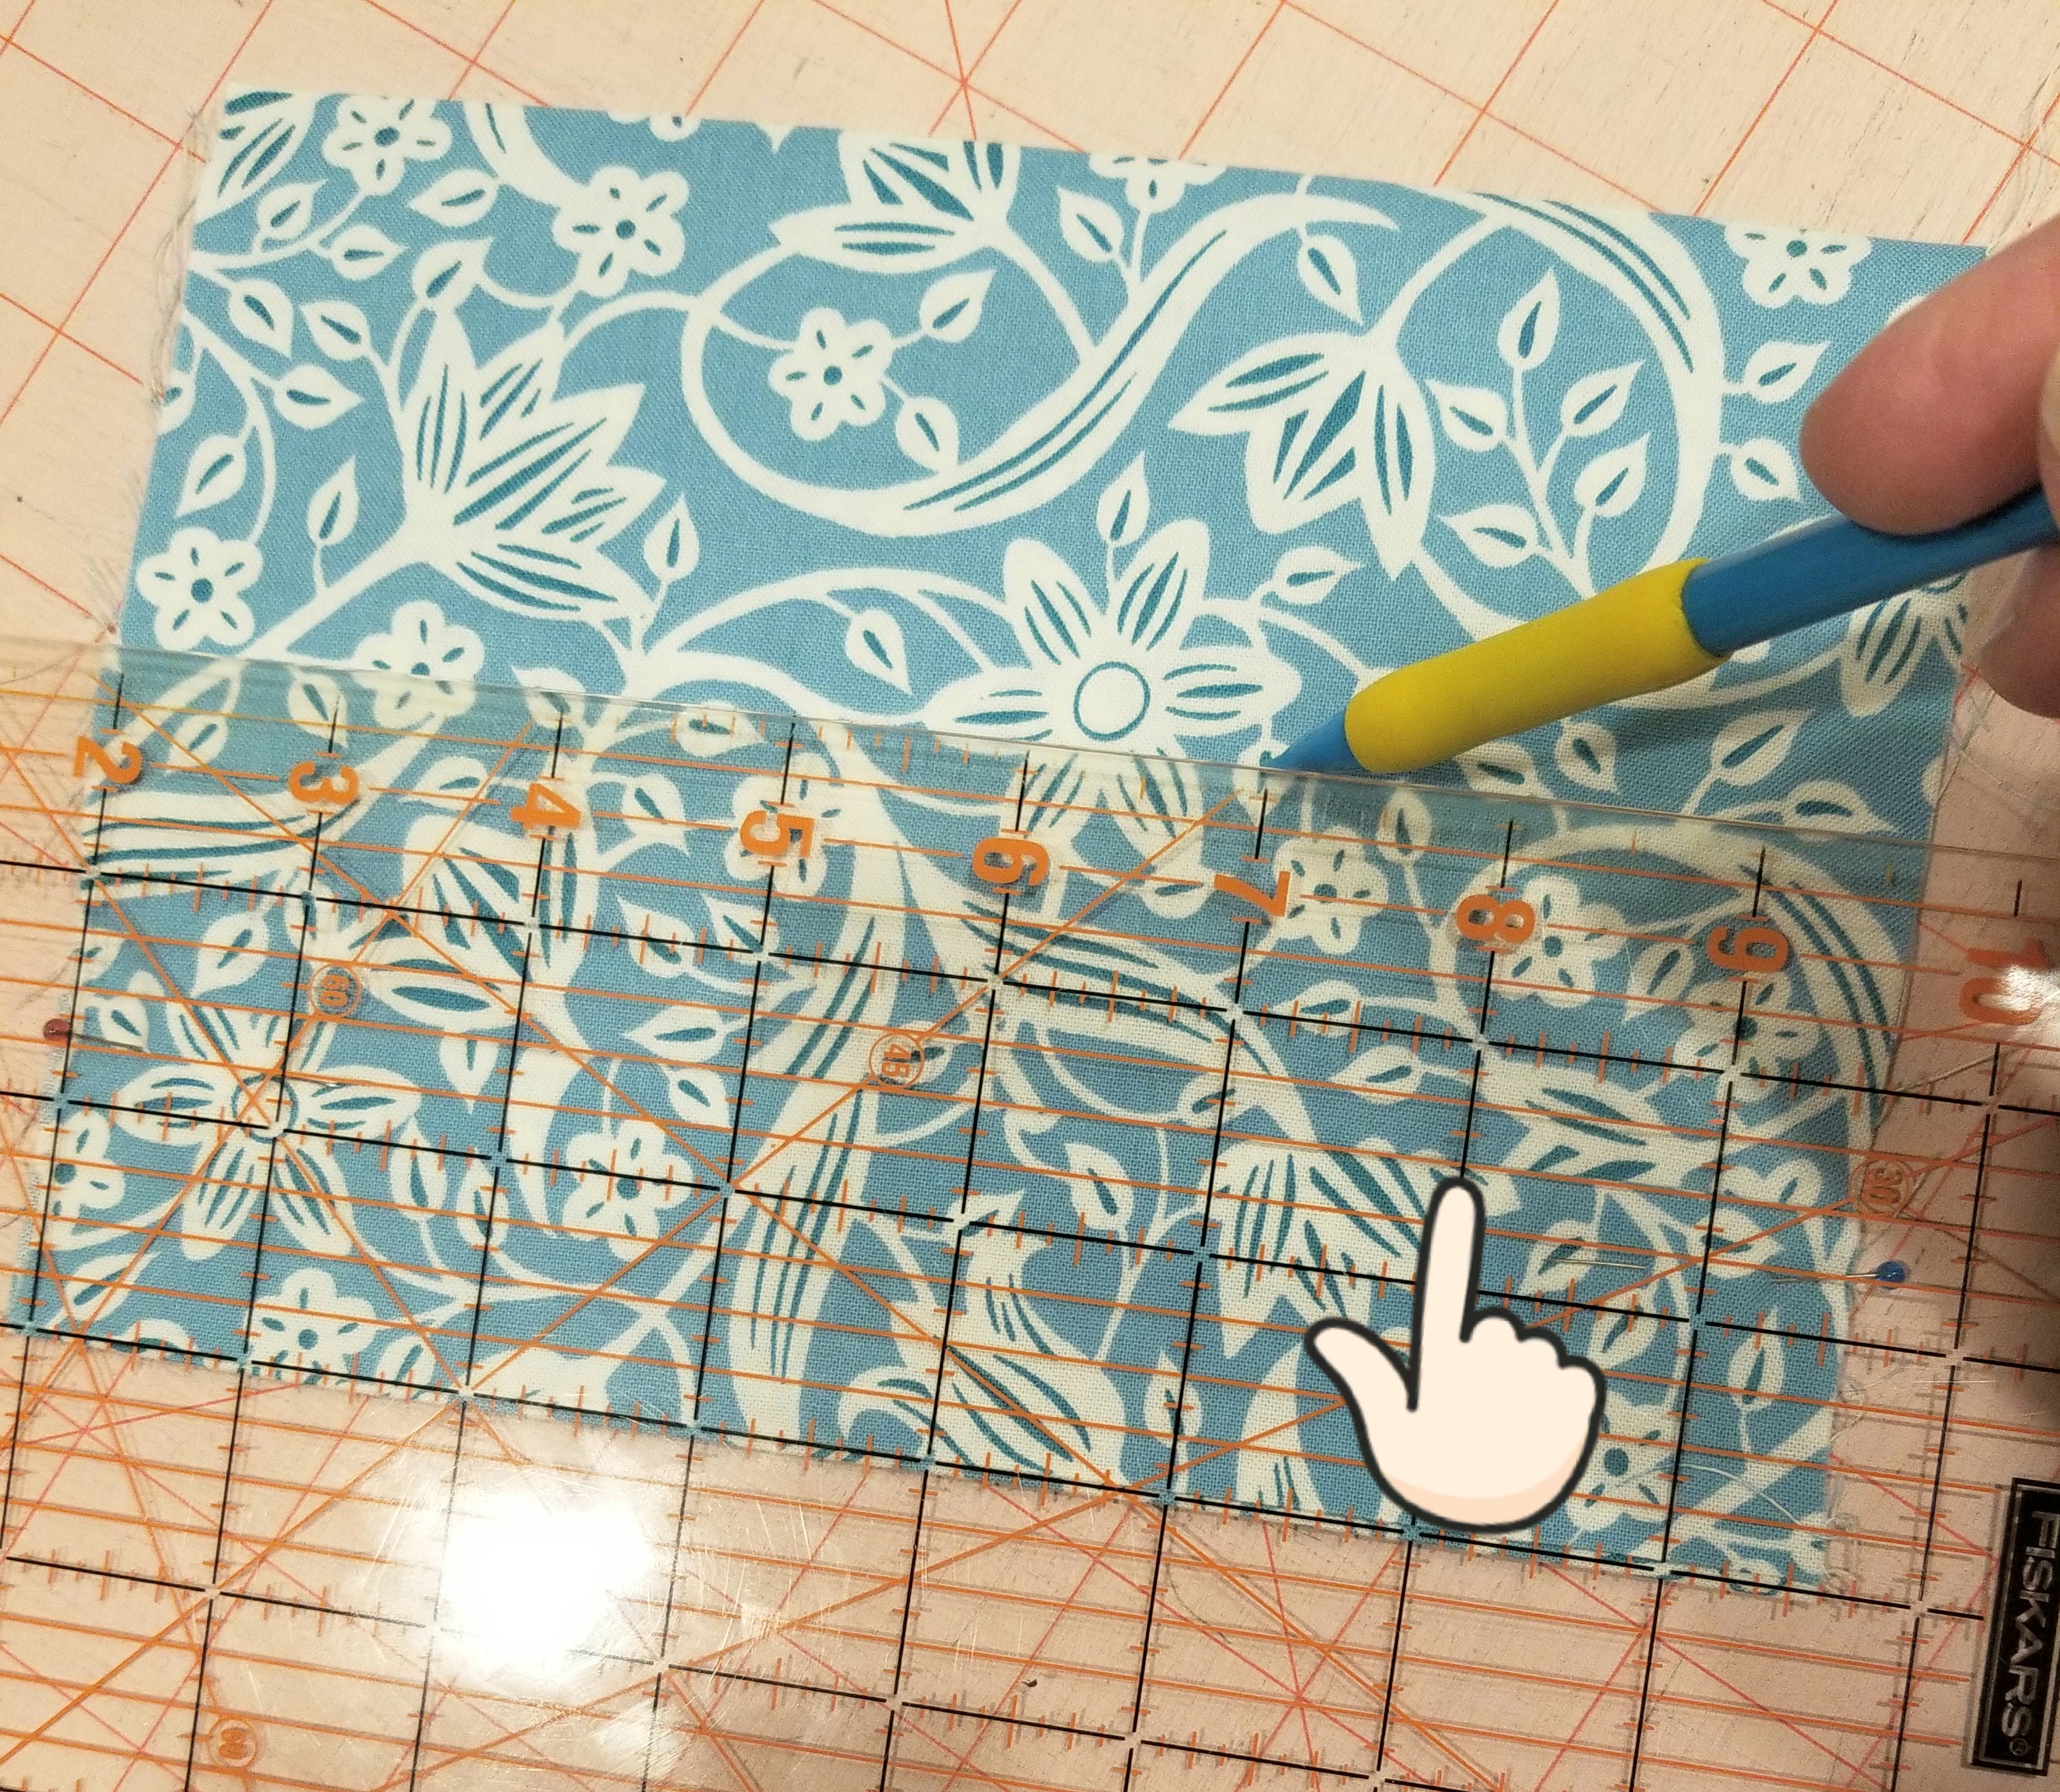
Now mark another line one inch above the last line that you made (or 3 inches above the seam edge). Using these lines as your guide, repeat the steps that you followed to make the first pleat.
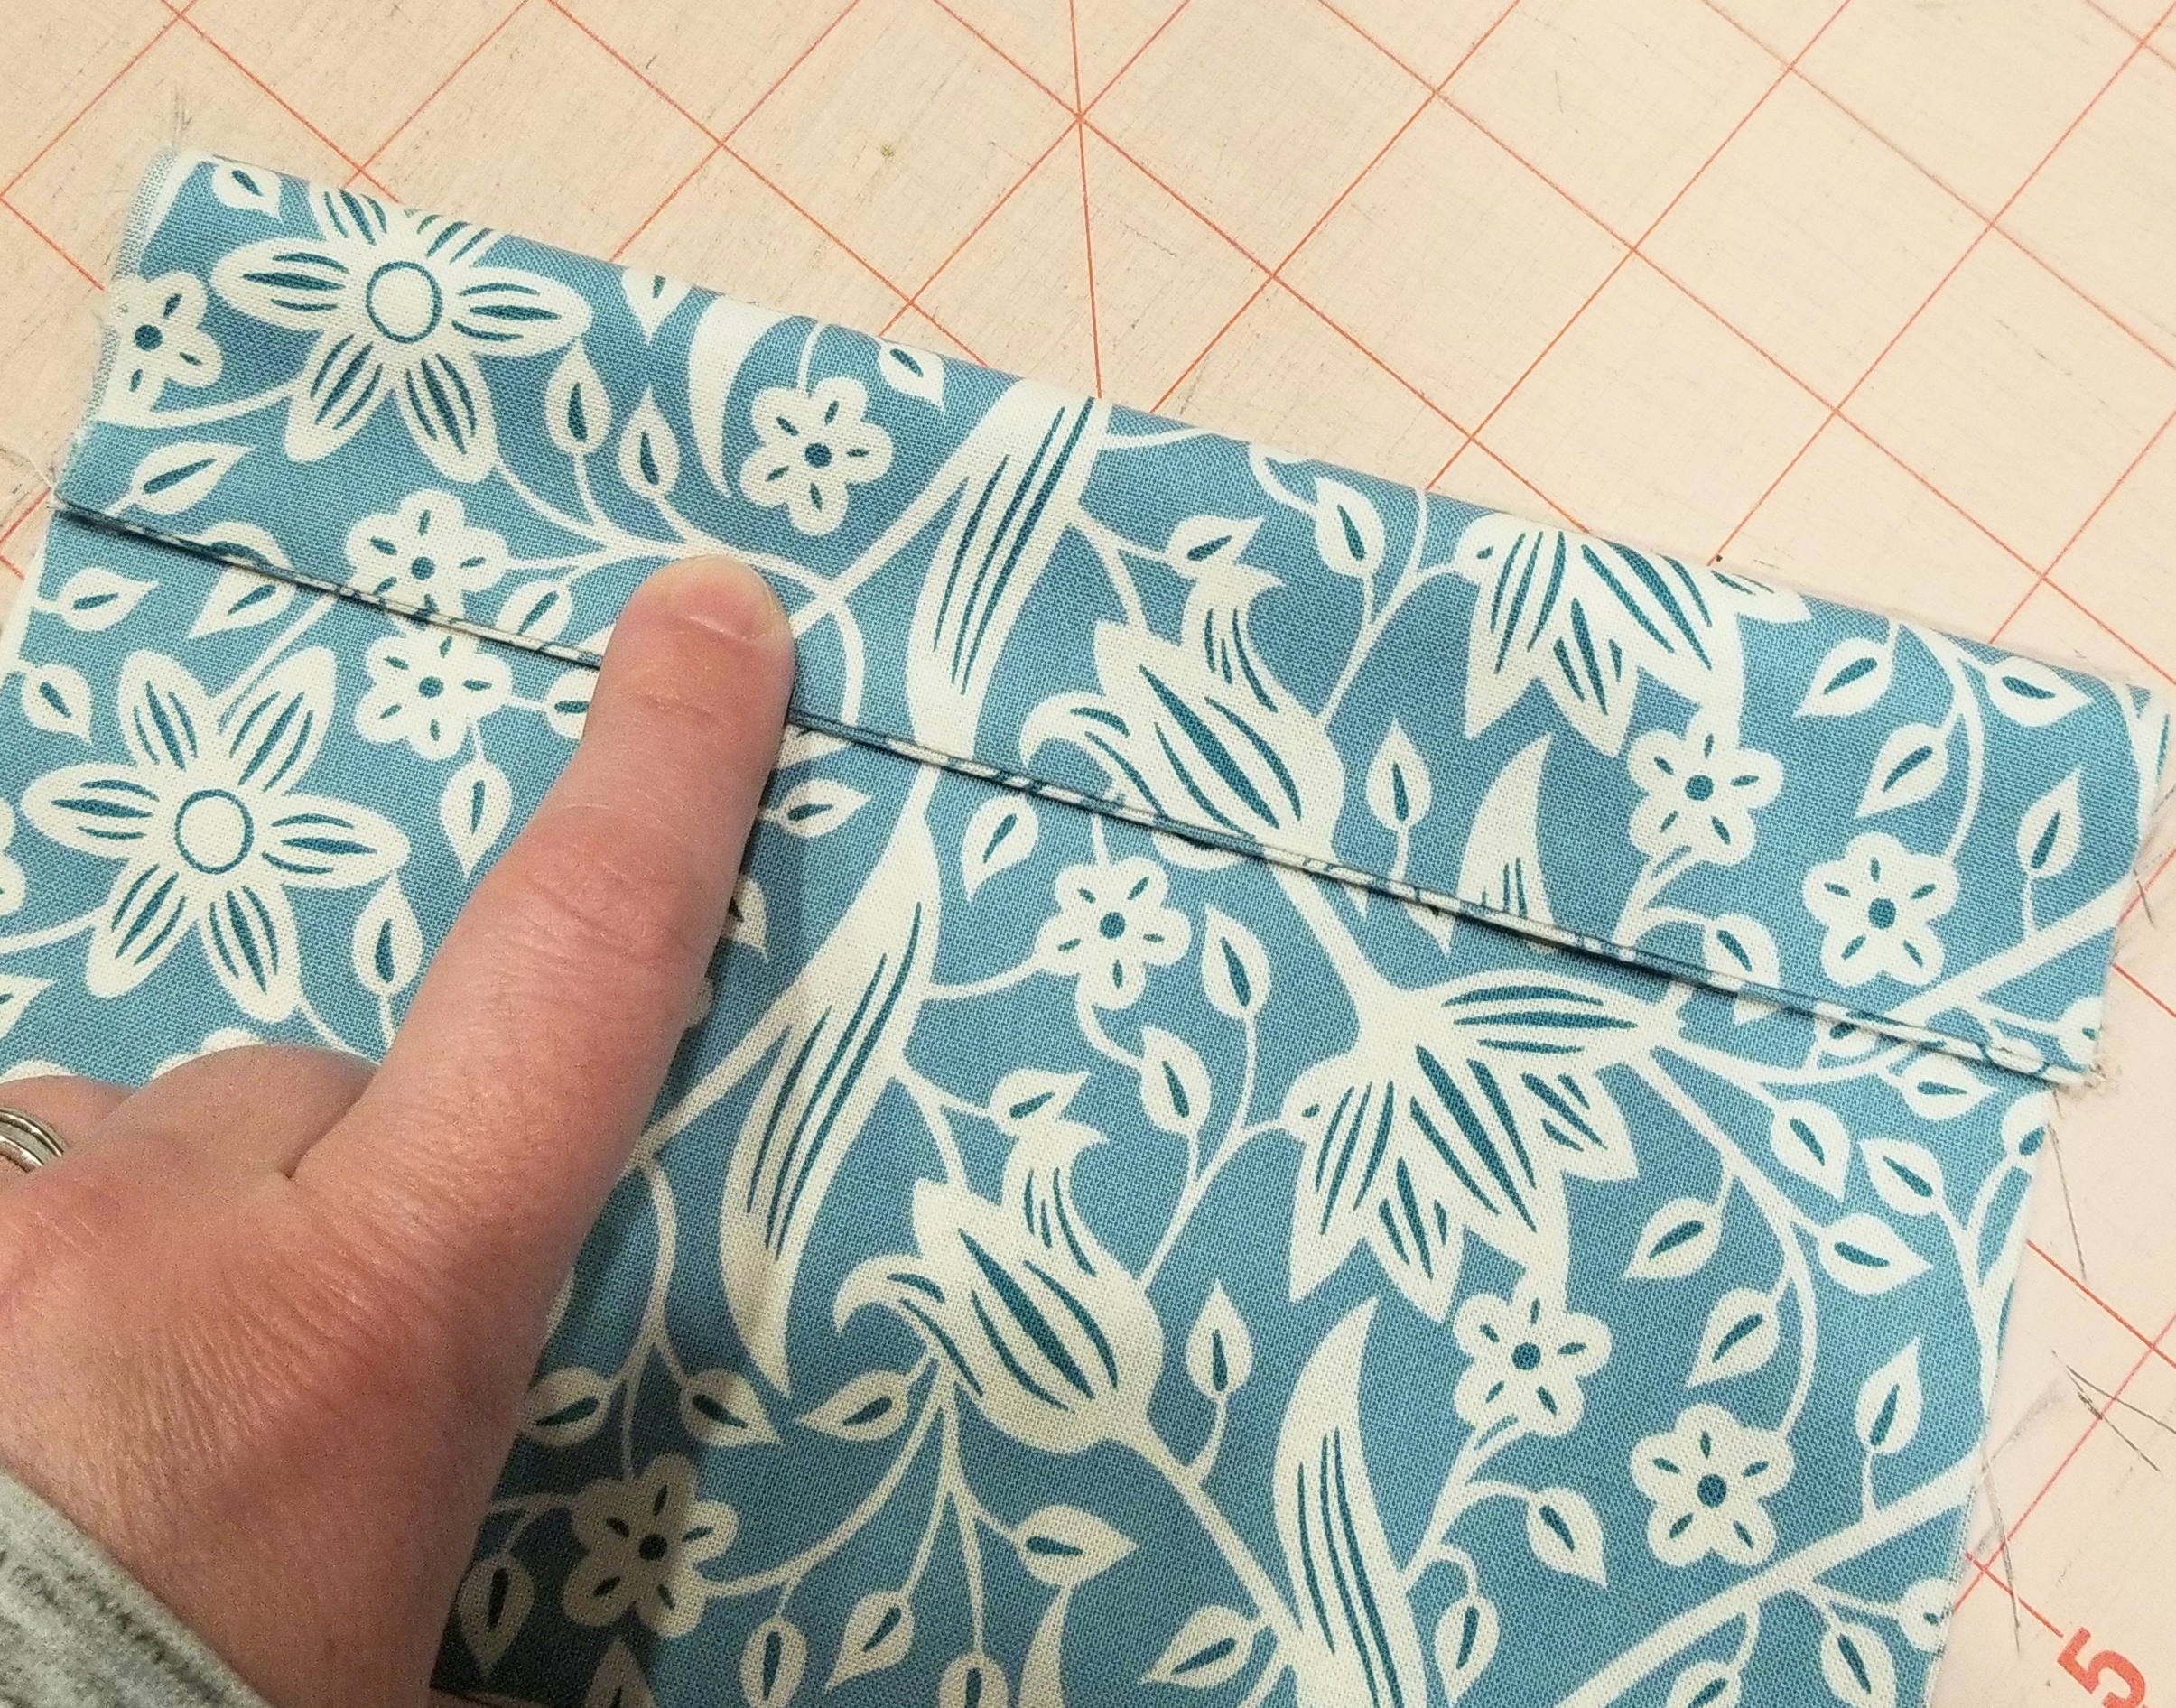
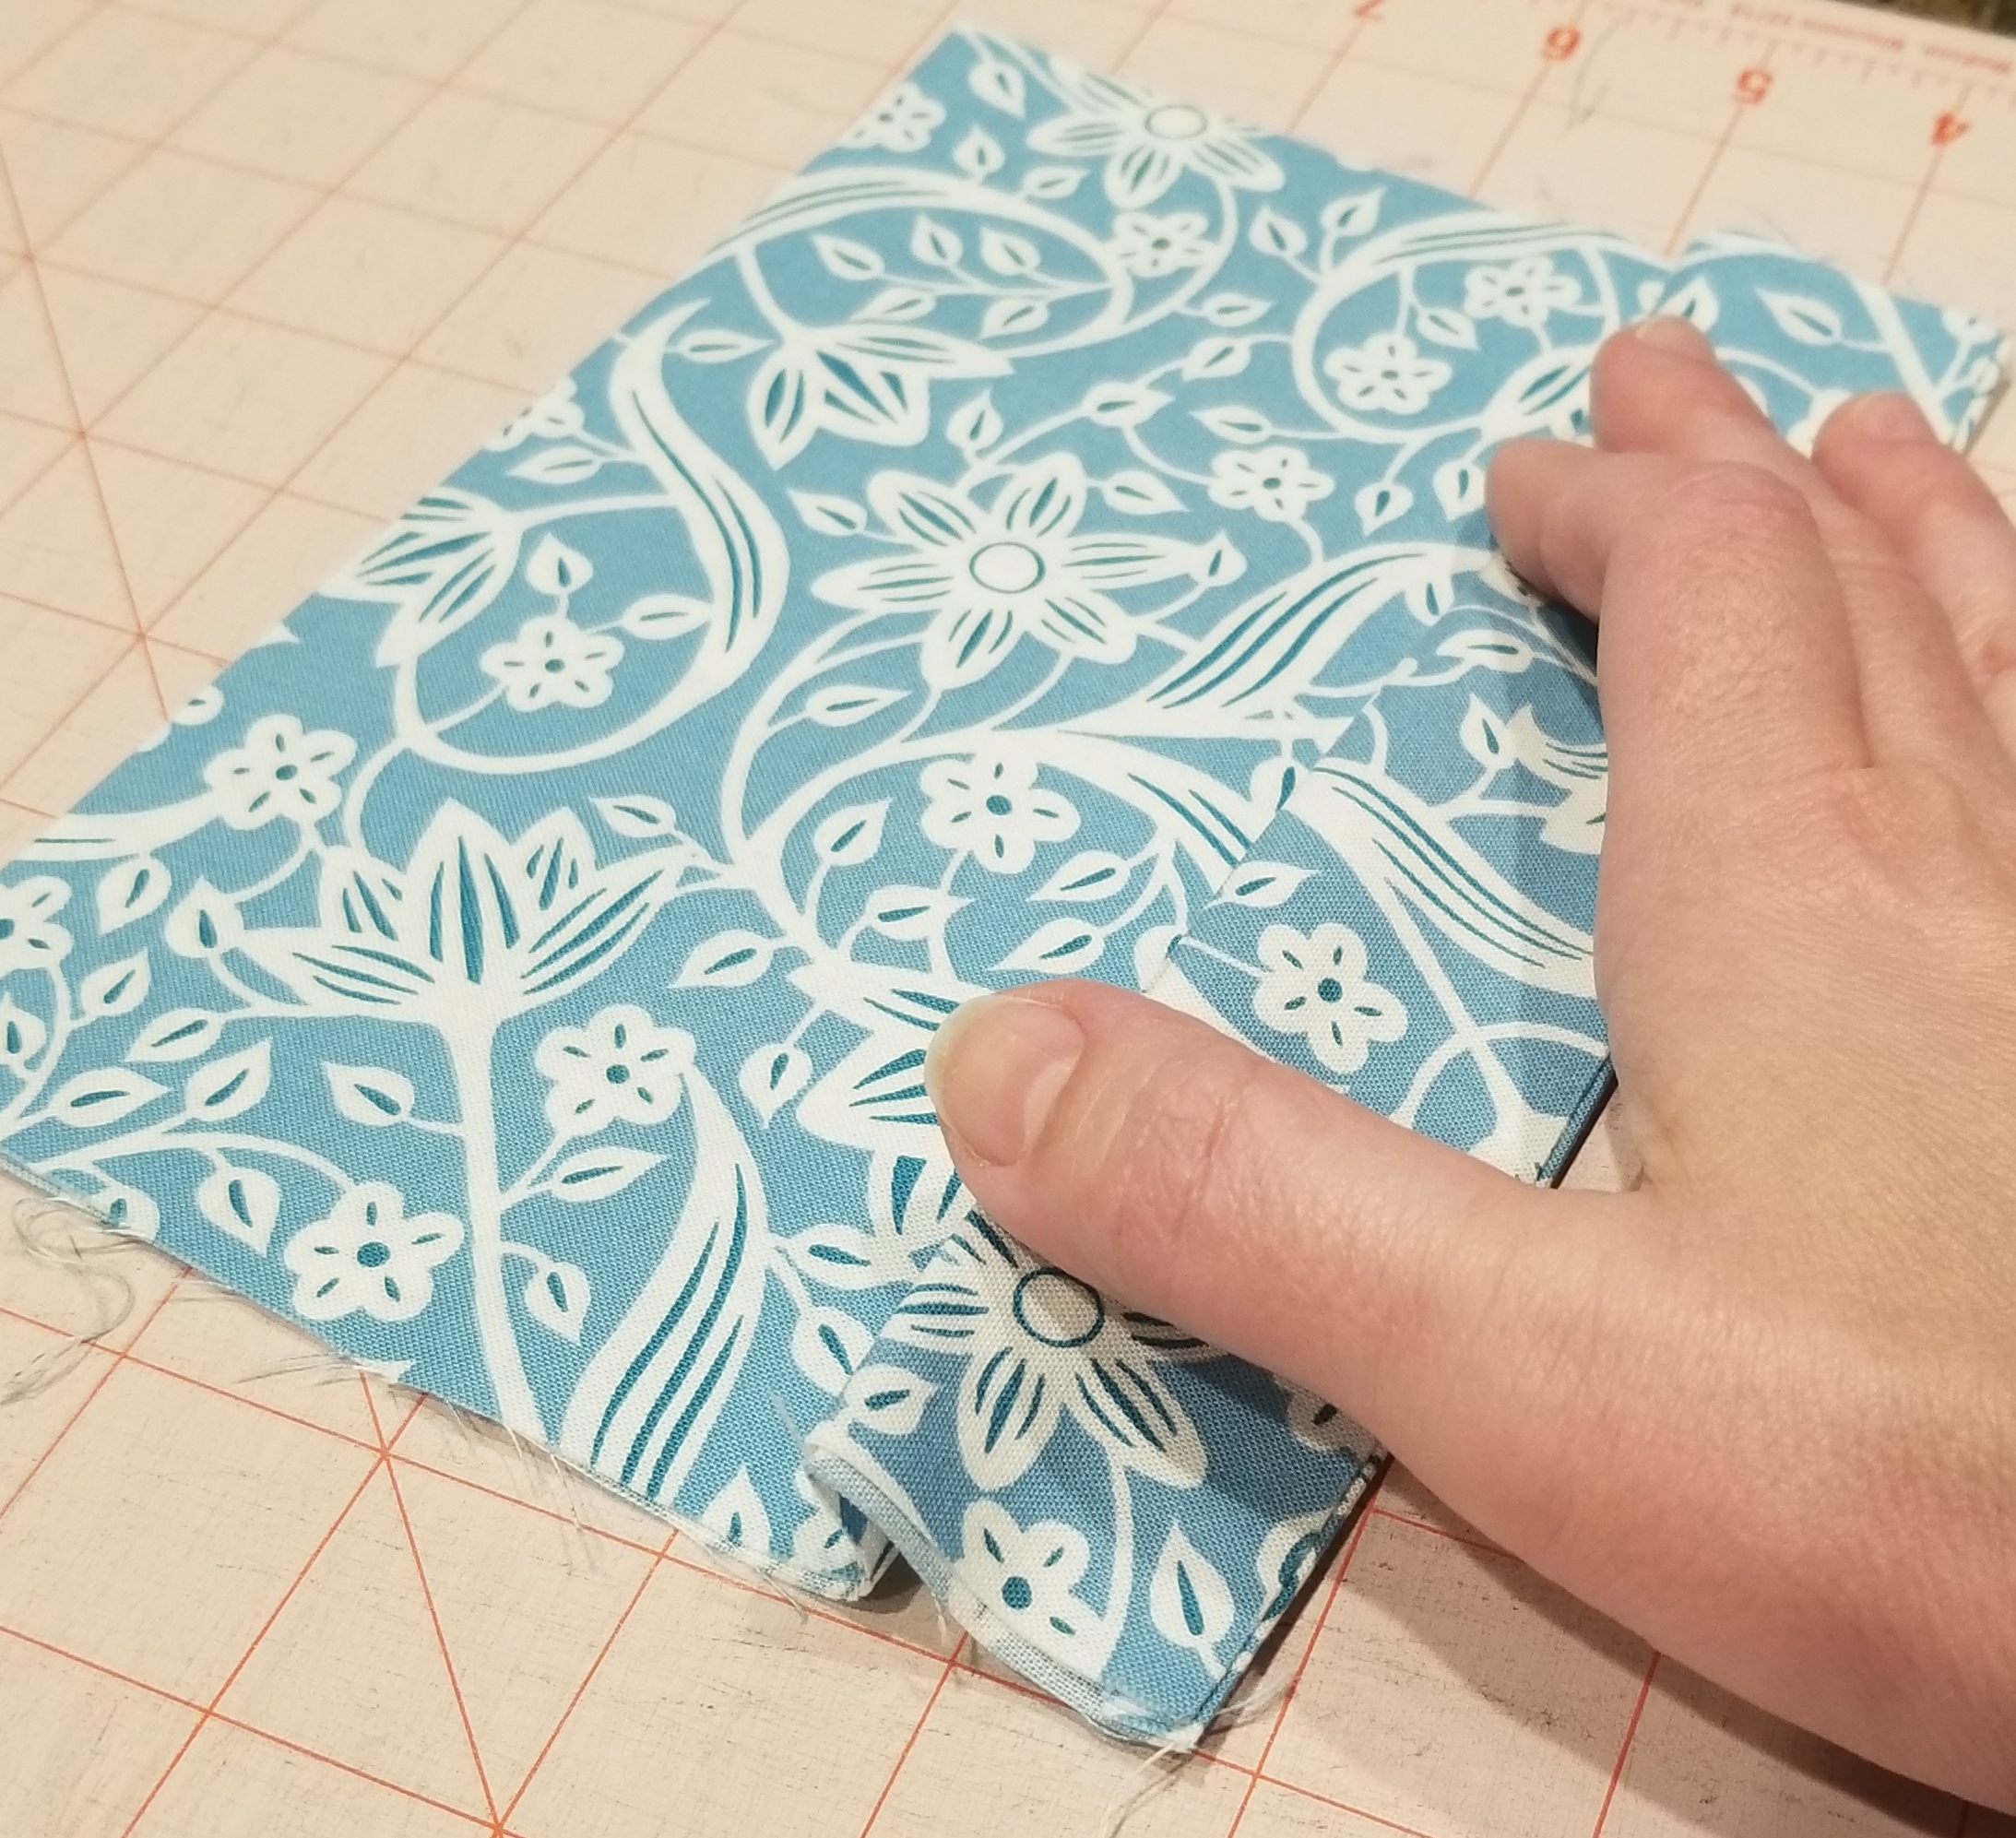
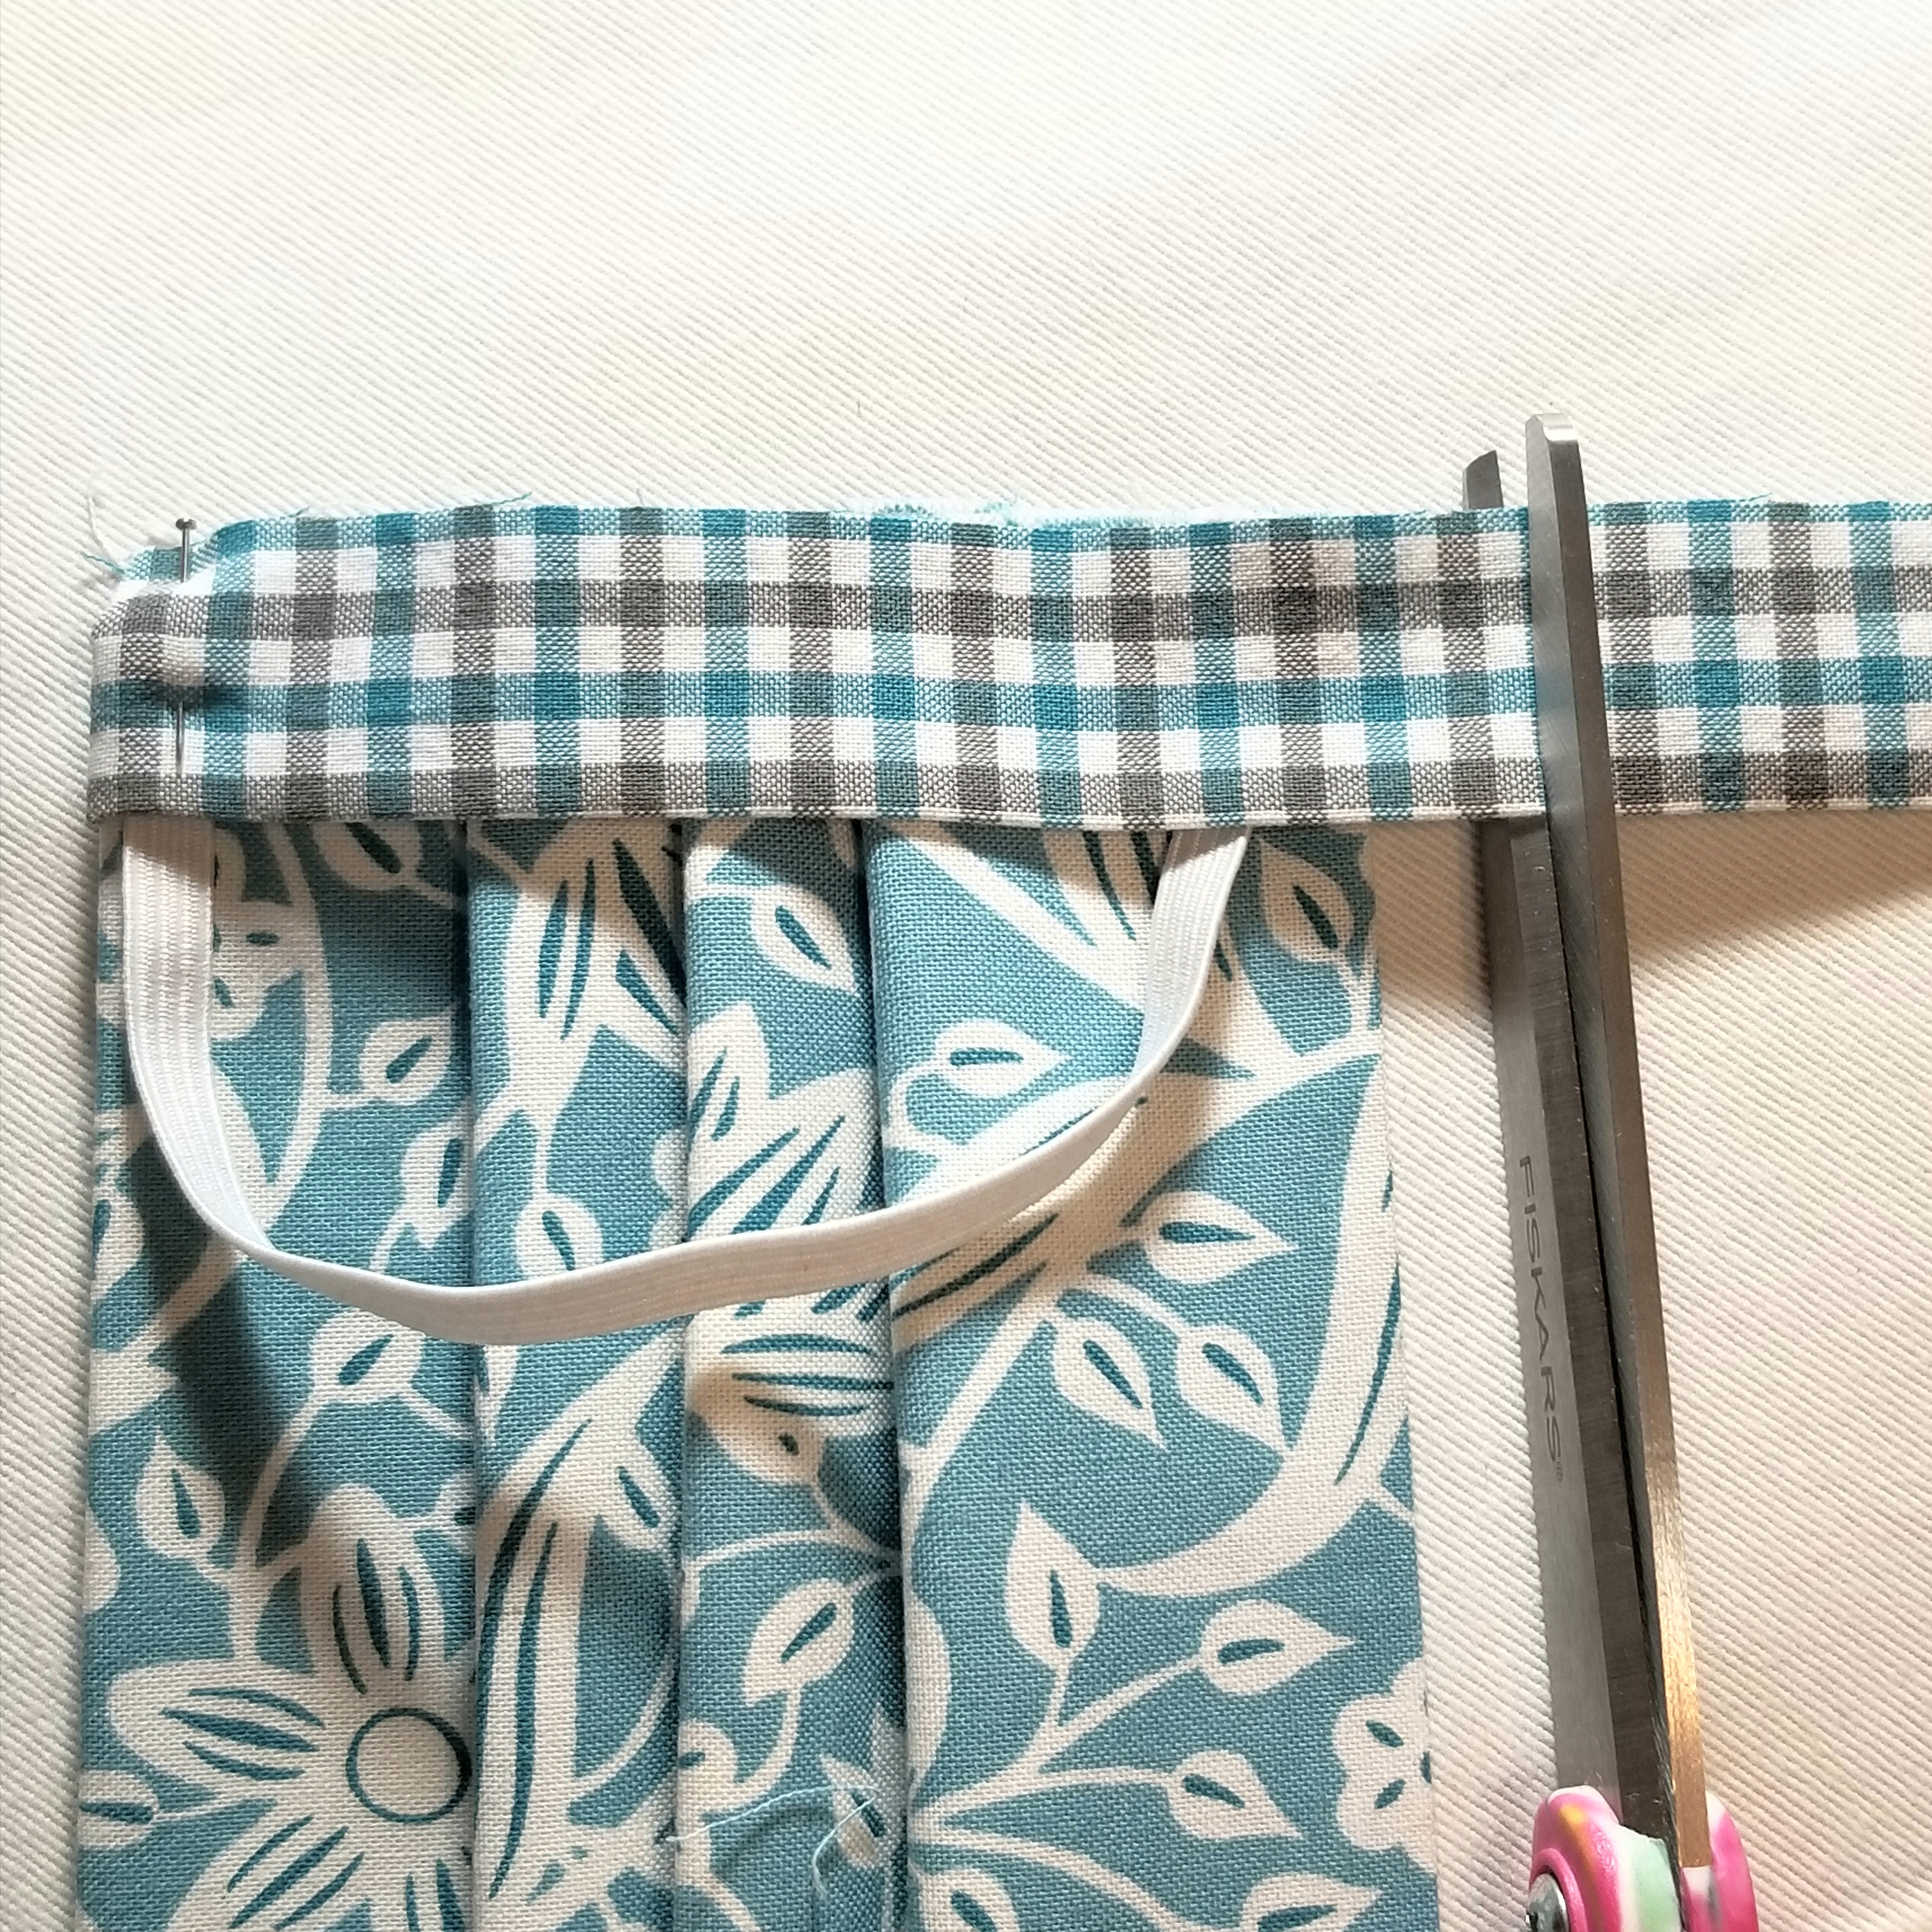
You should now have two pleats, each one being 1/2 inch deep. Repeat the steps you used to make the second pleat, so that you end up with three pleats total. Press.
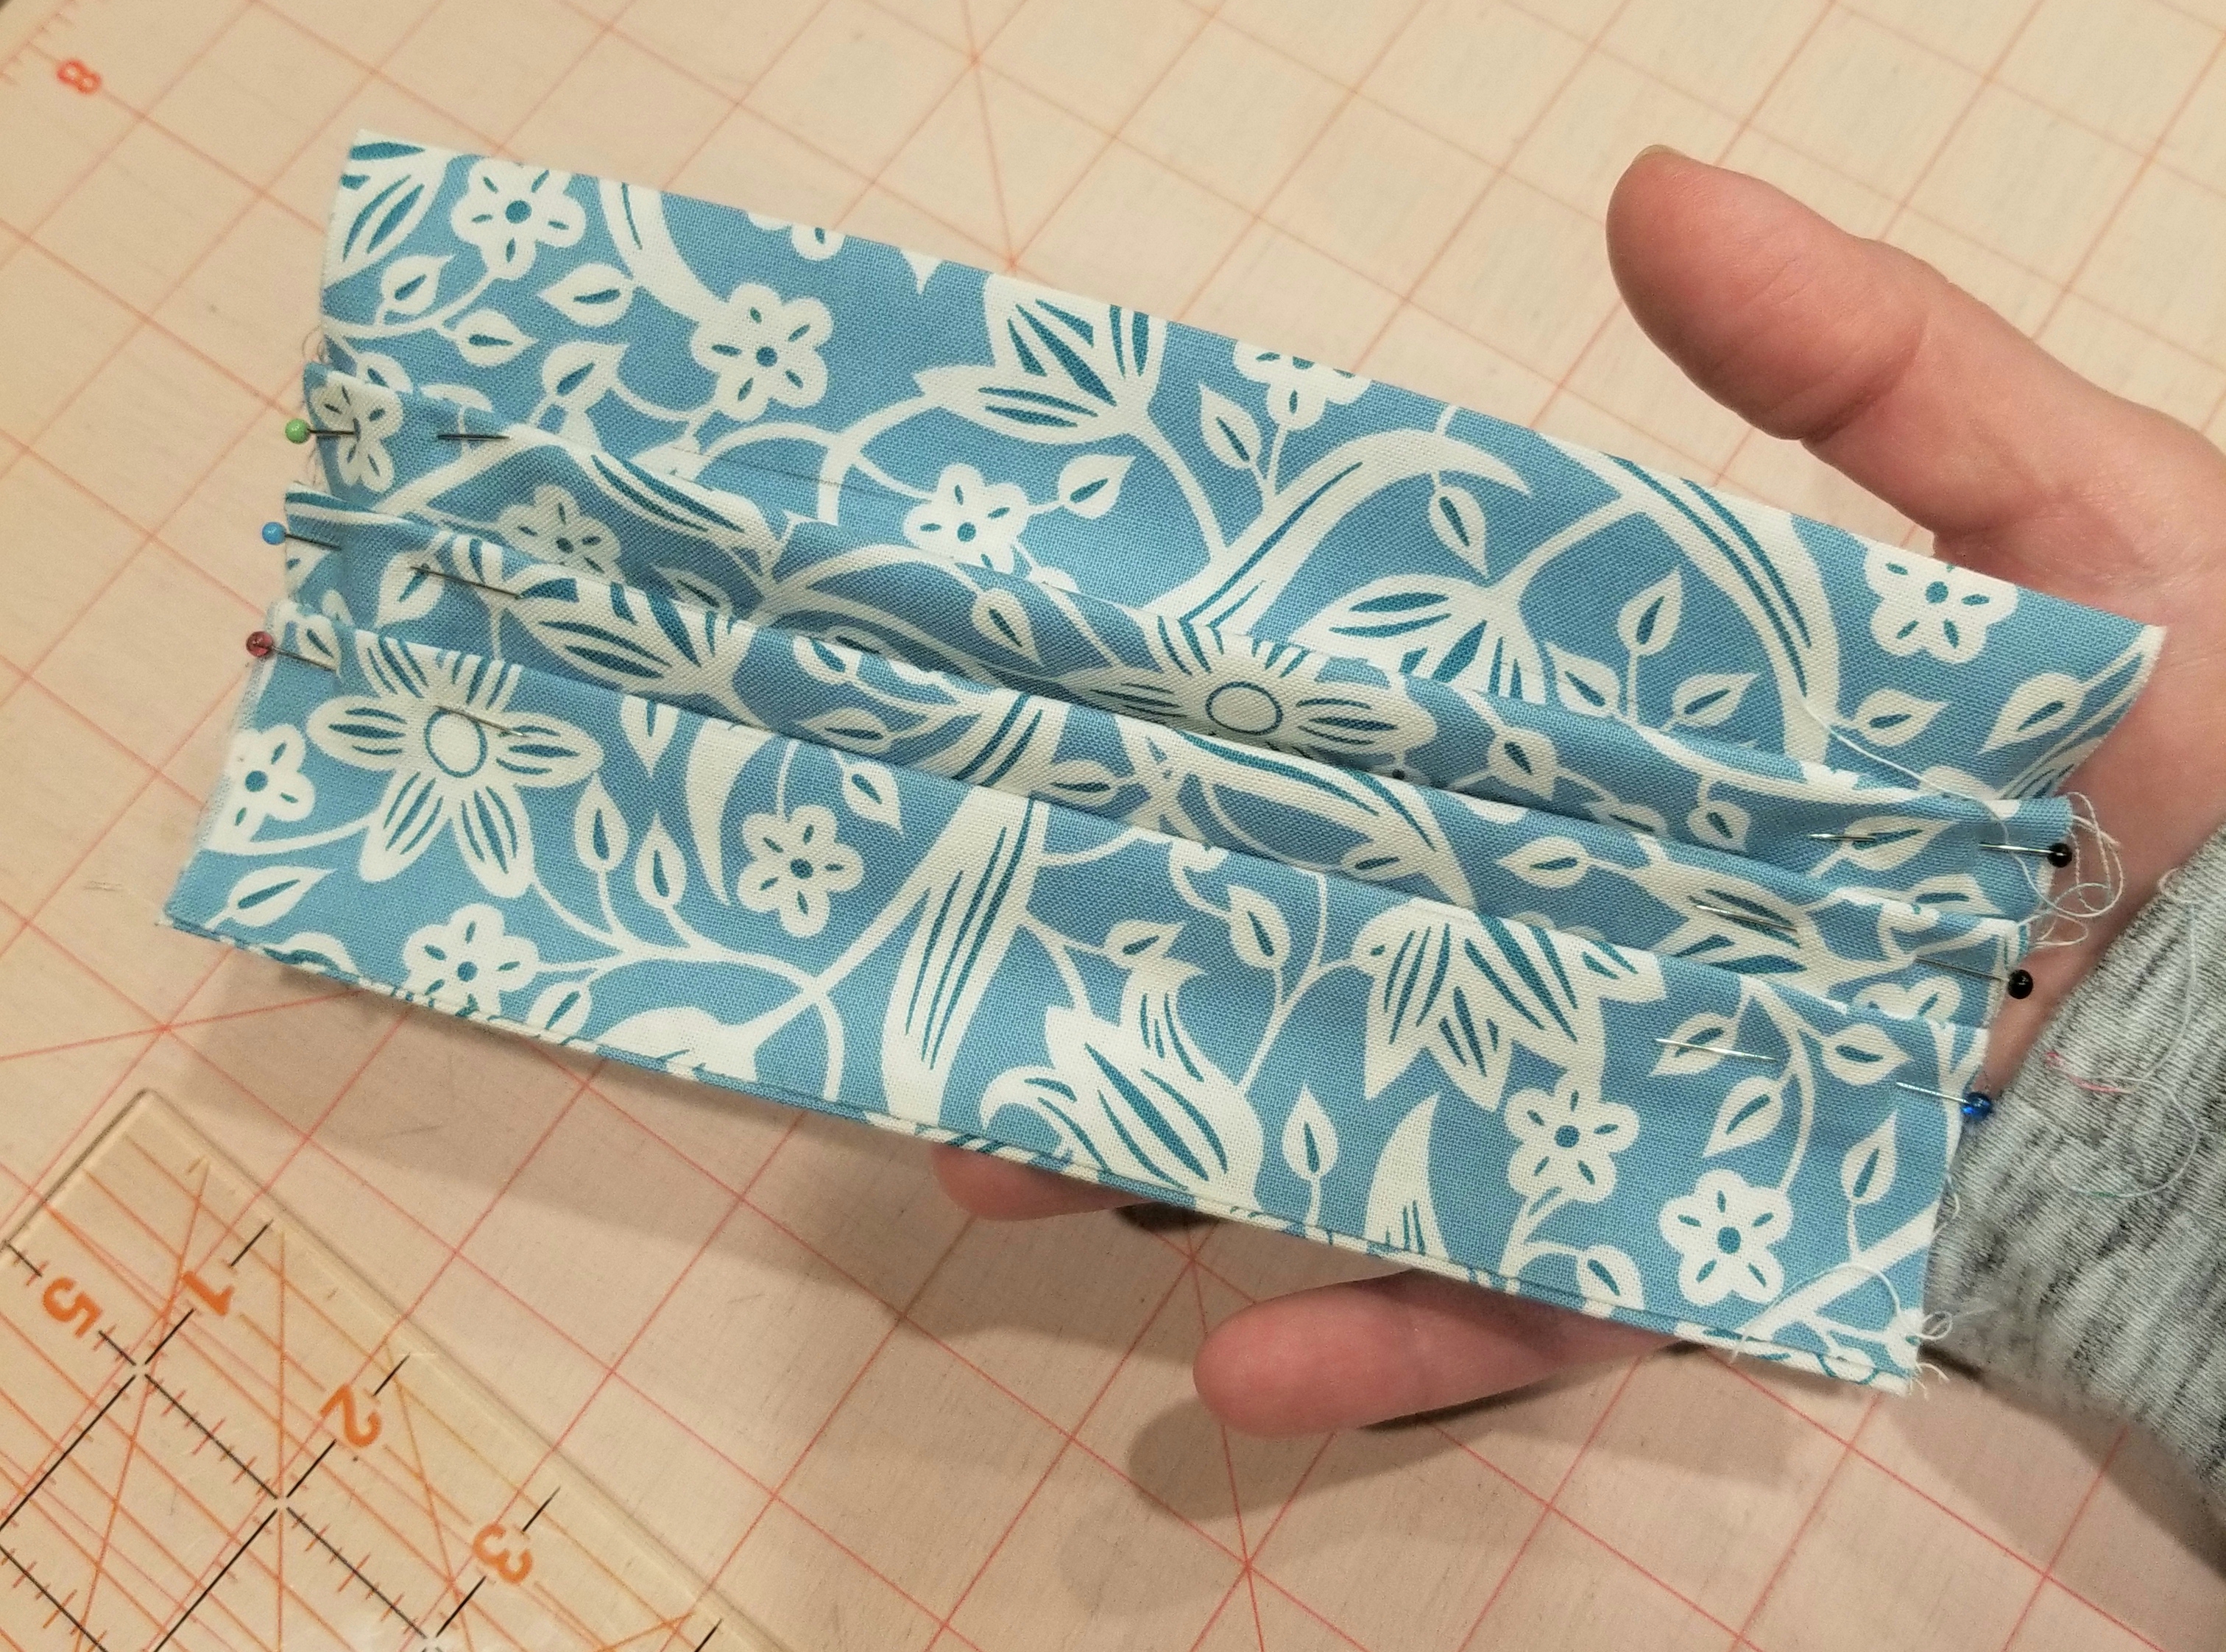
This is what your main piece should look like at this point.
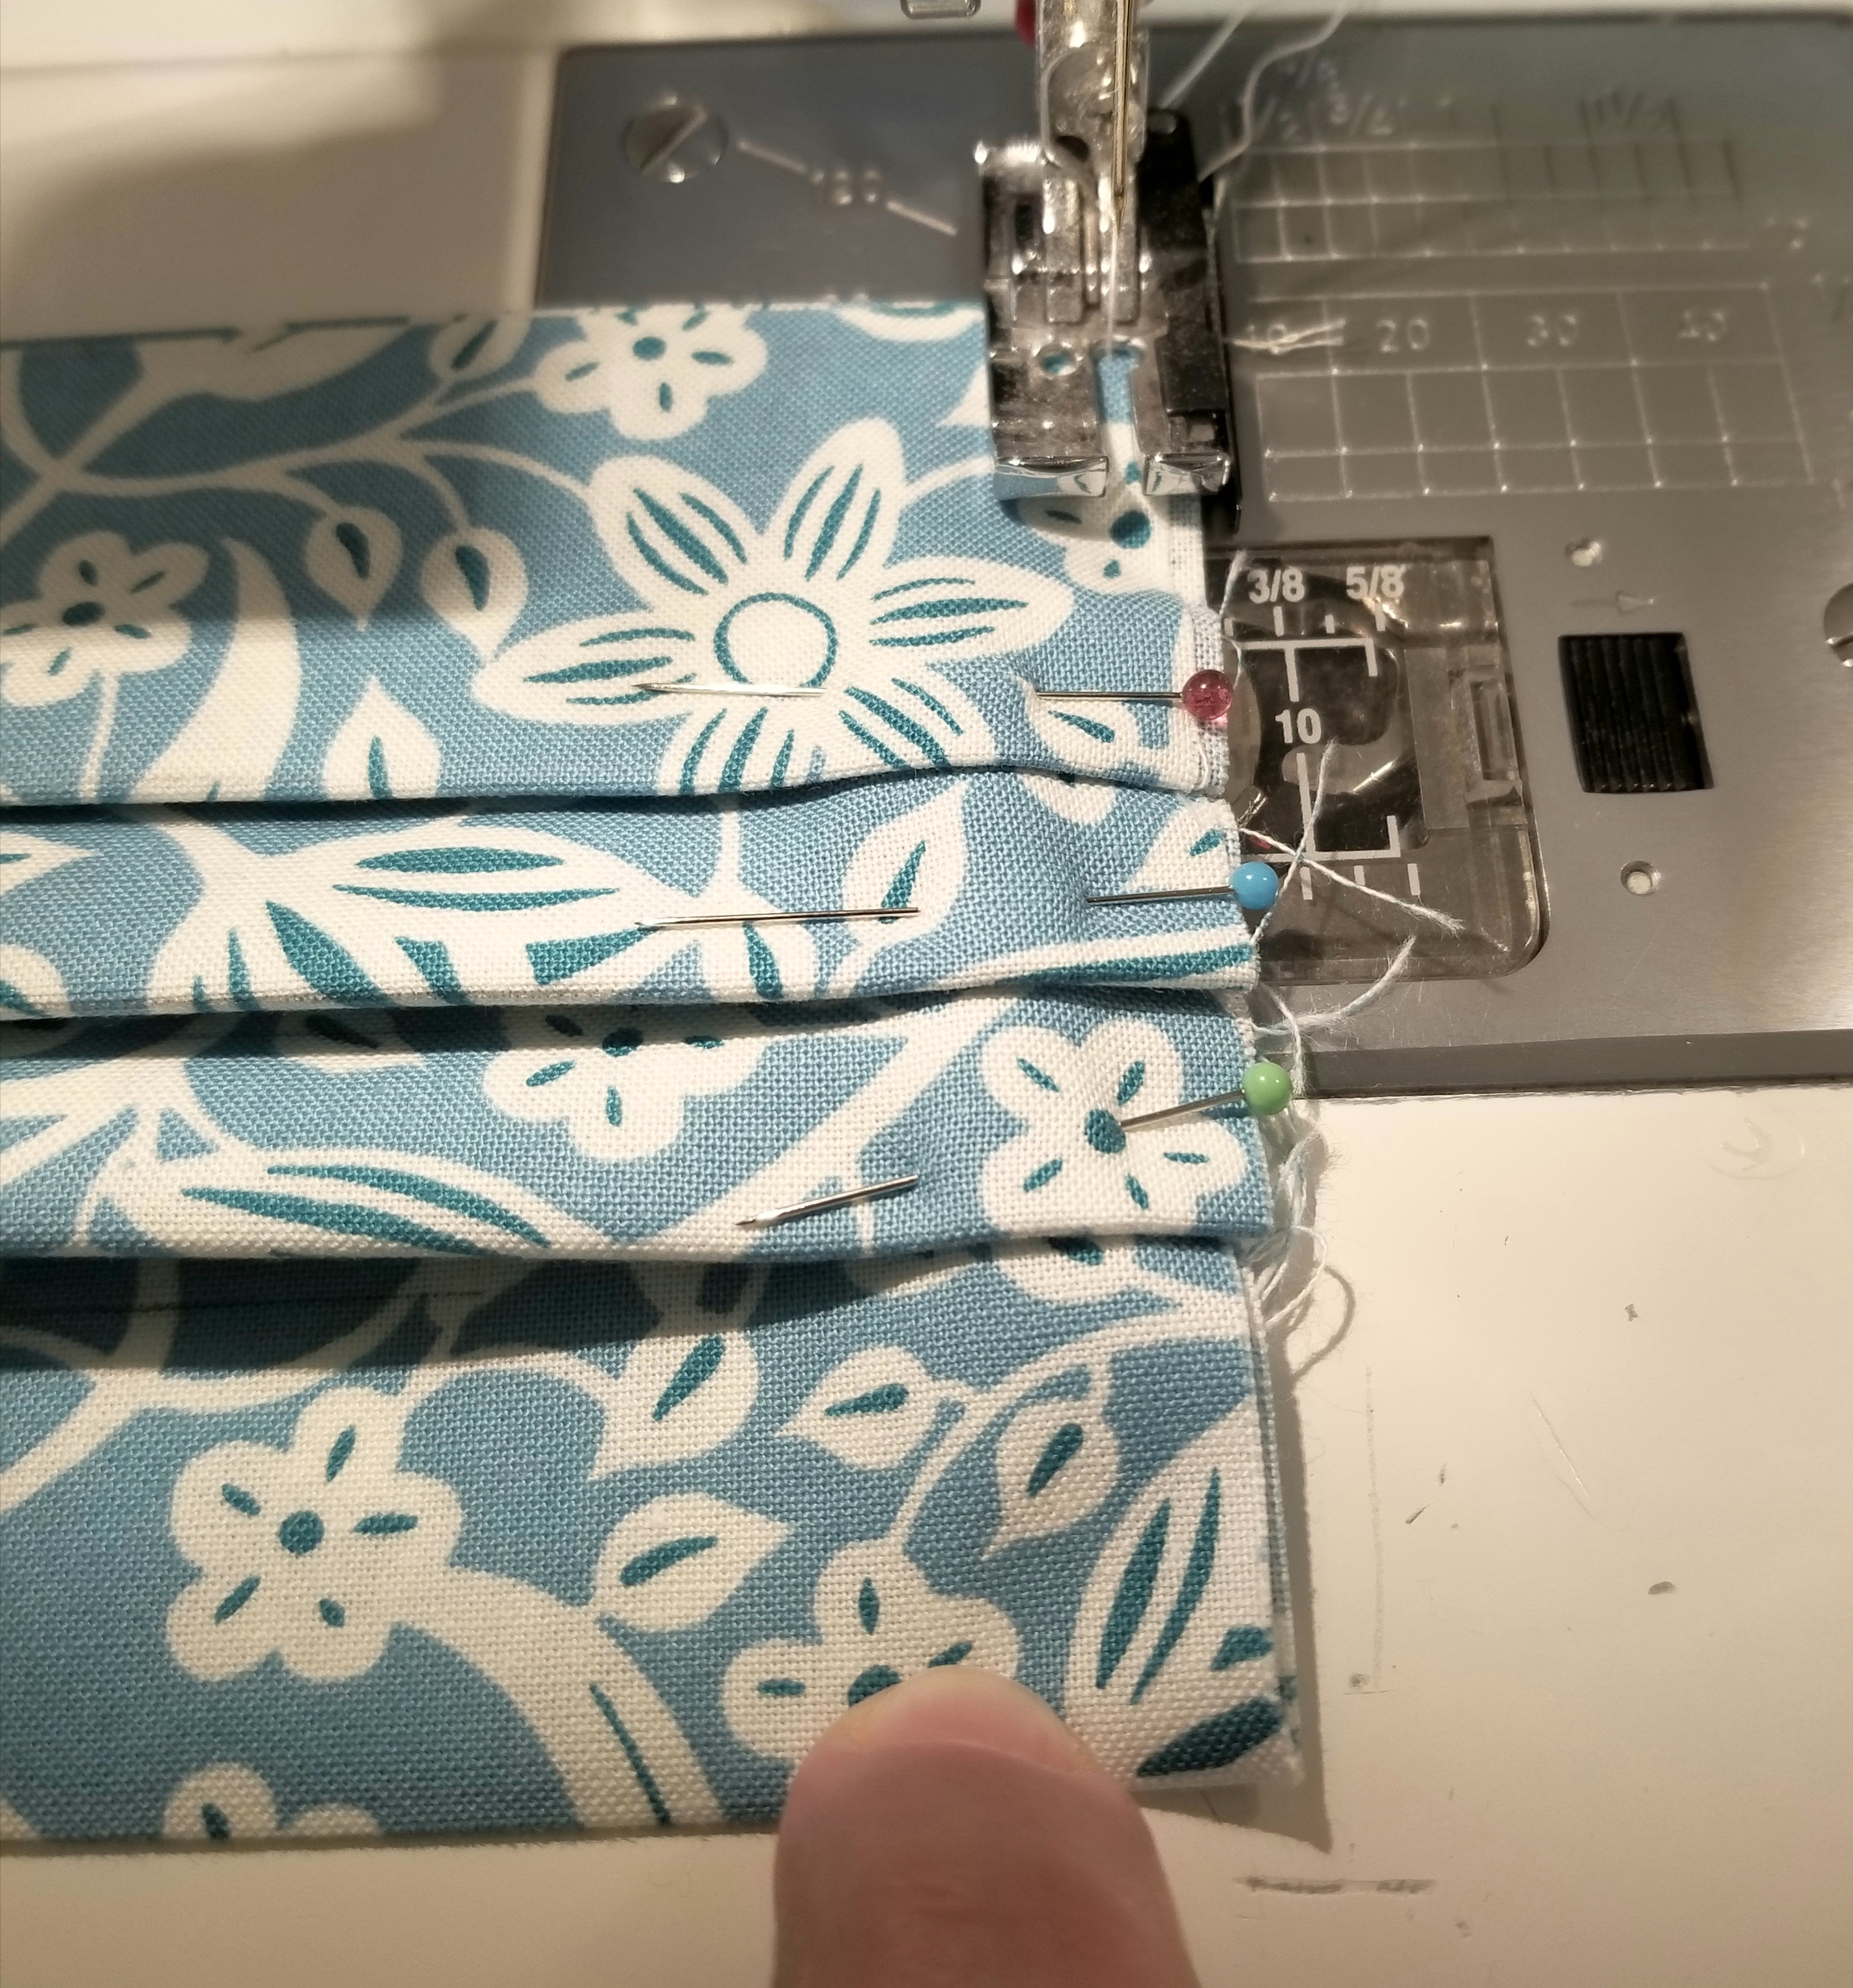
Using a 1/8” seam allowance, baste stitch the raw edges.
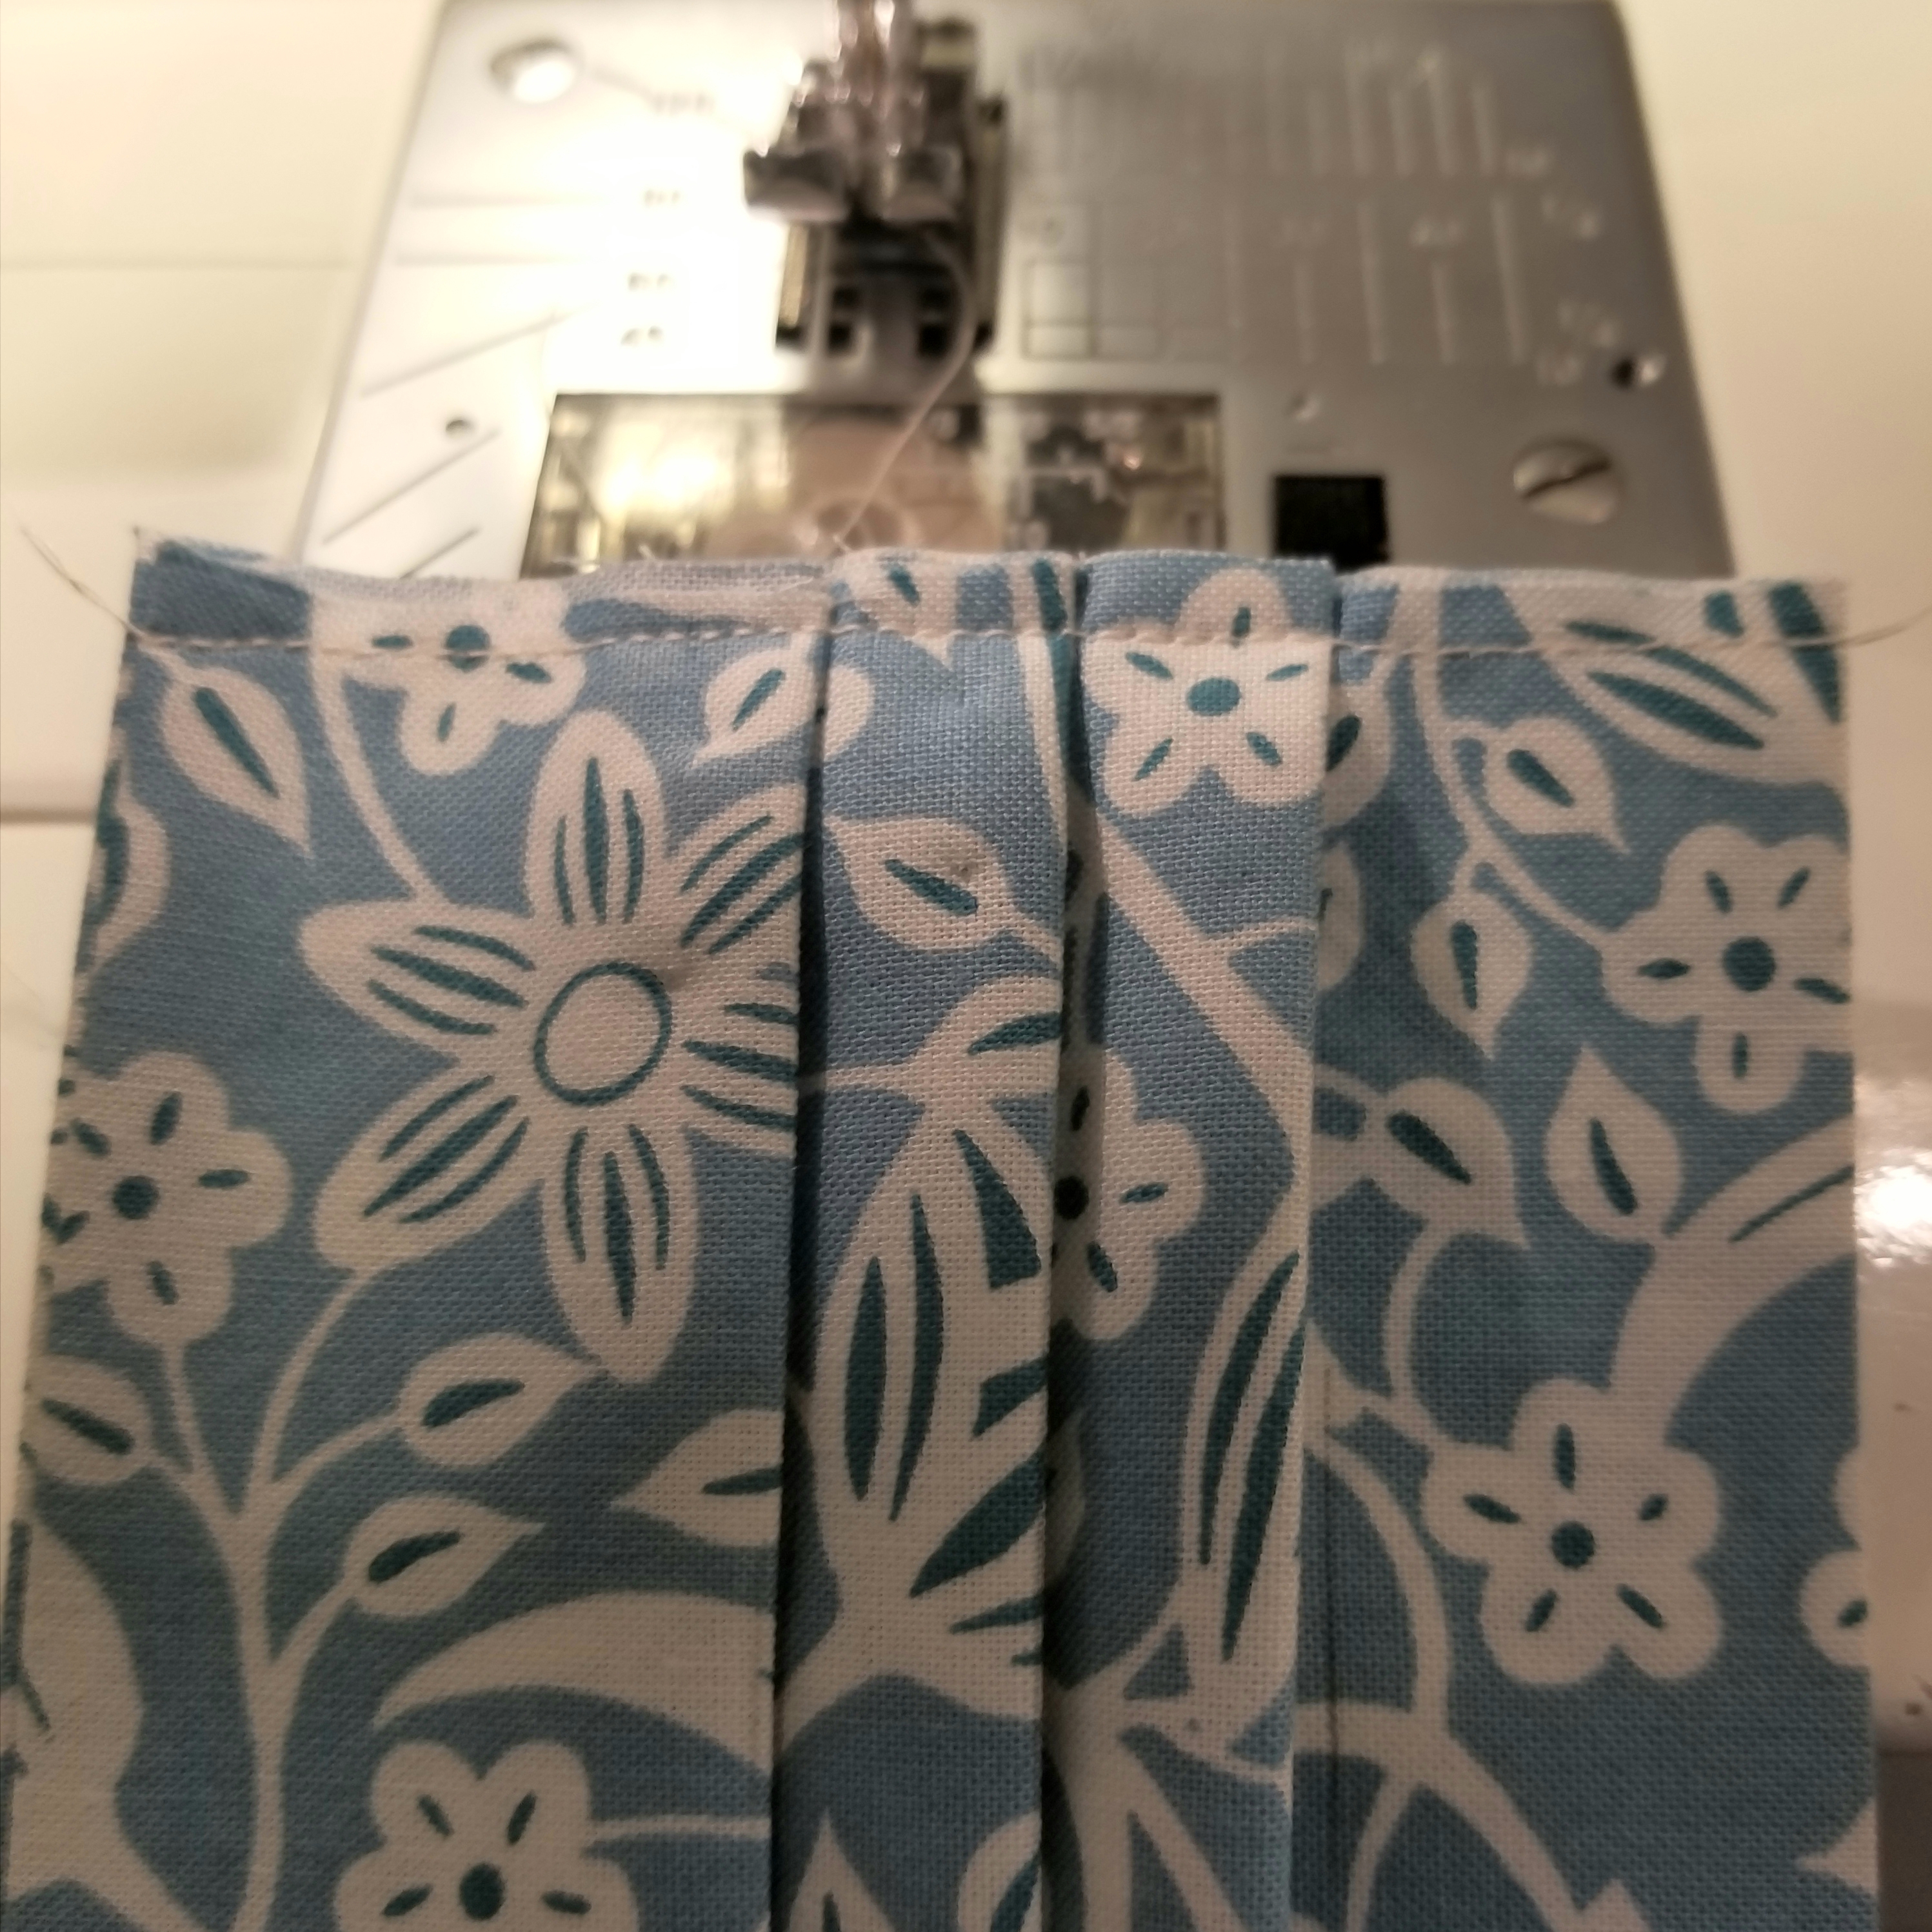
Repeat this step so that both raw edges are basted as shown in the picture above.
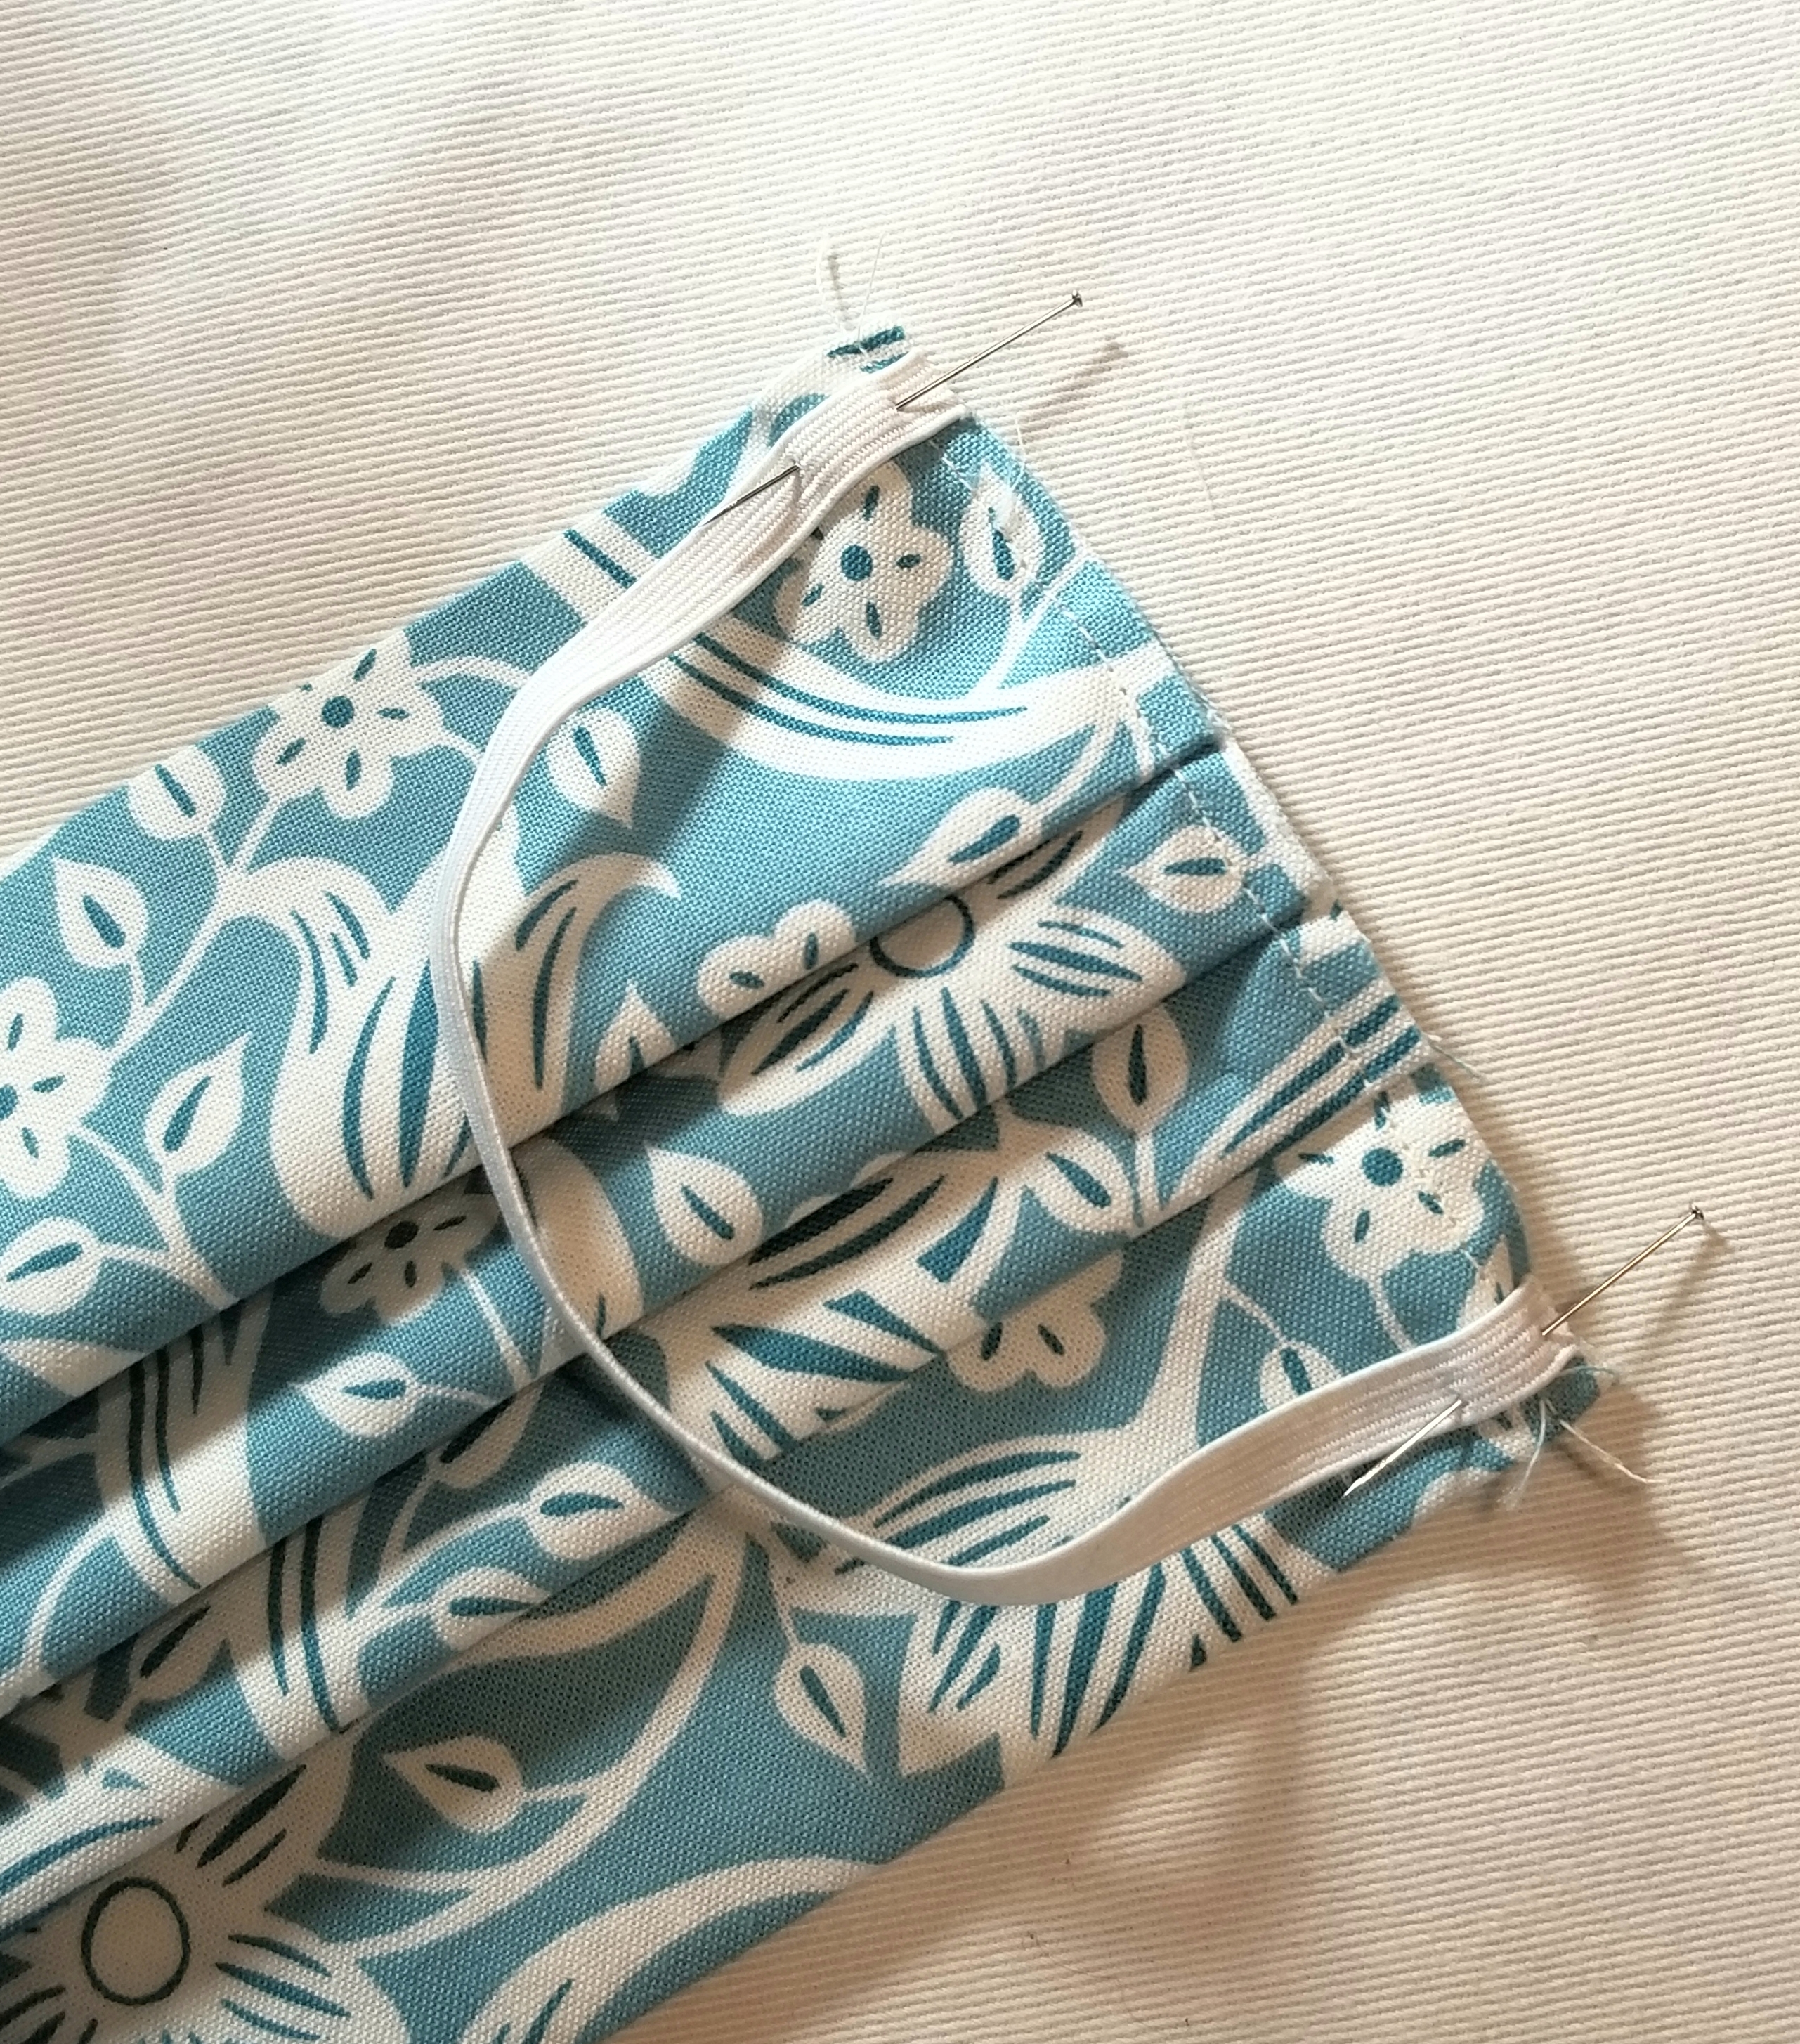
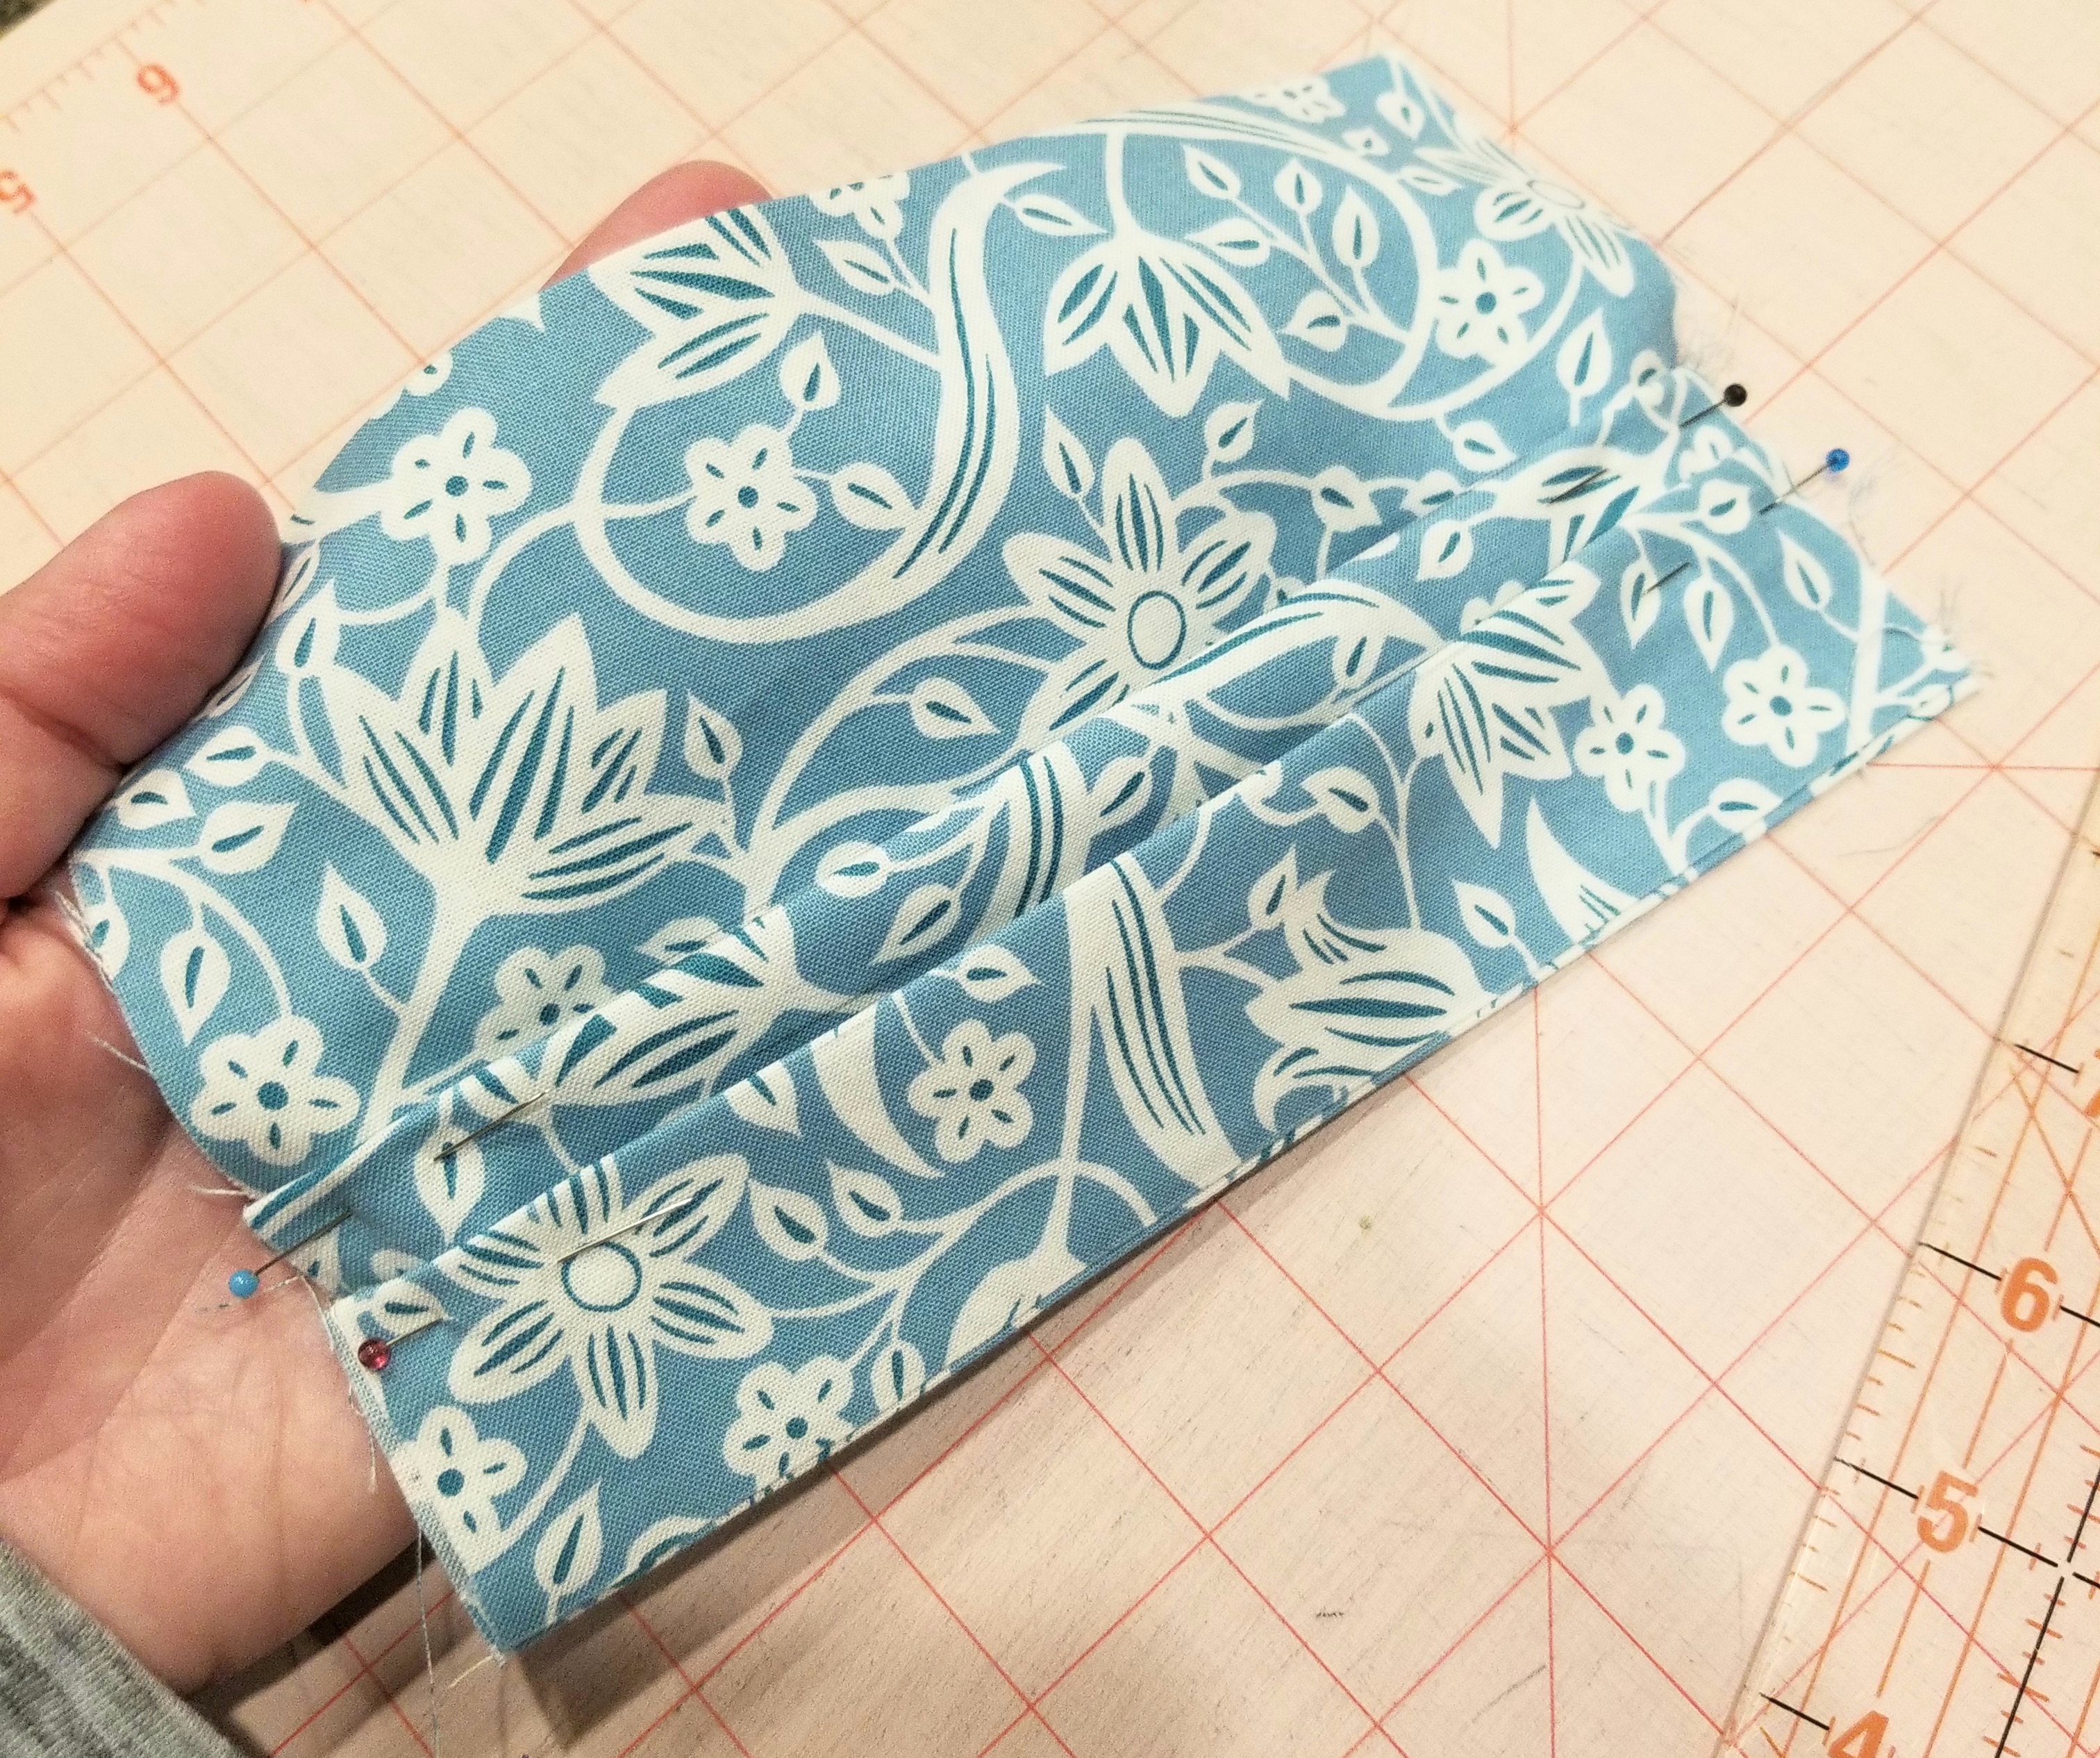
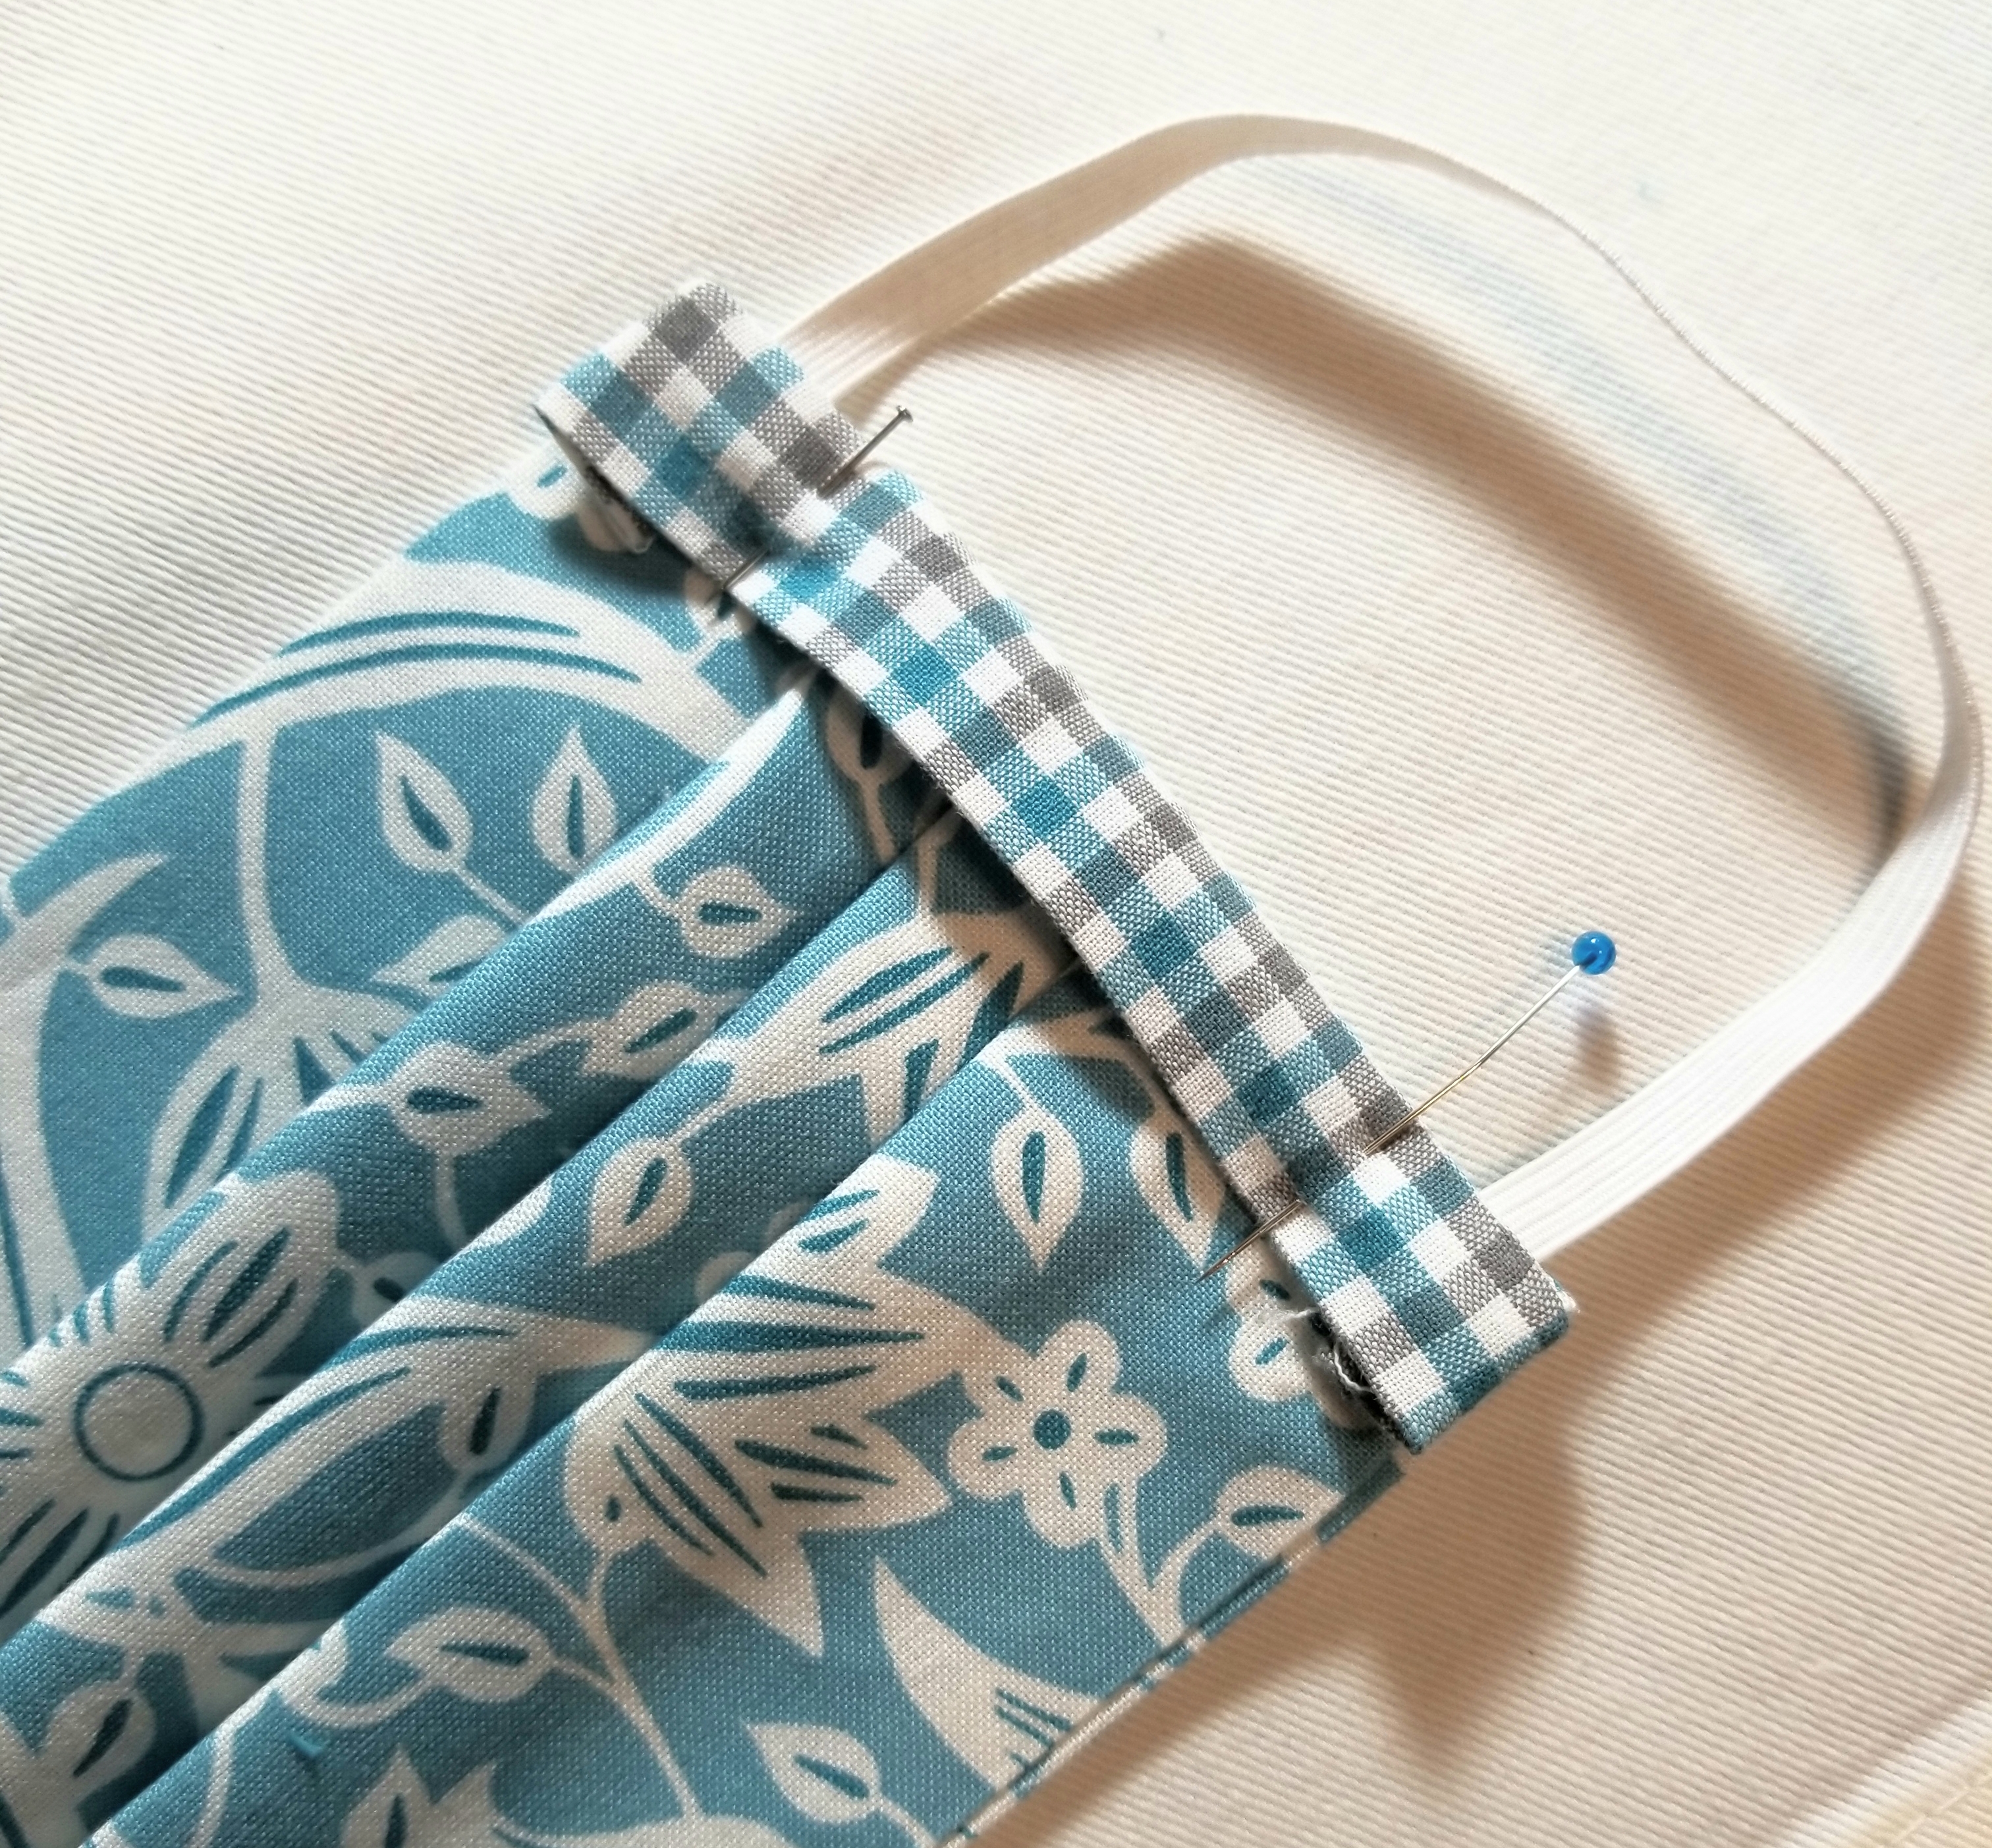
Pin one elastic piece to the raw edge, making sure not to twist it before baste stitching it to the edge at both ends. I placed mine 1/8” from the top and bottom edge of the main pleated piece. Baste elastic in place 1/8” inch from raw edge. Repeat, to attach remaining elastic piece to the other raw edge.
Your pleated piece should now resemble the picture above.
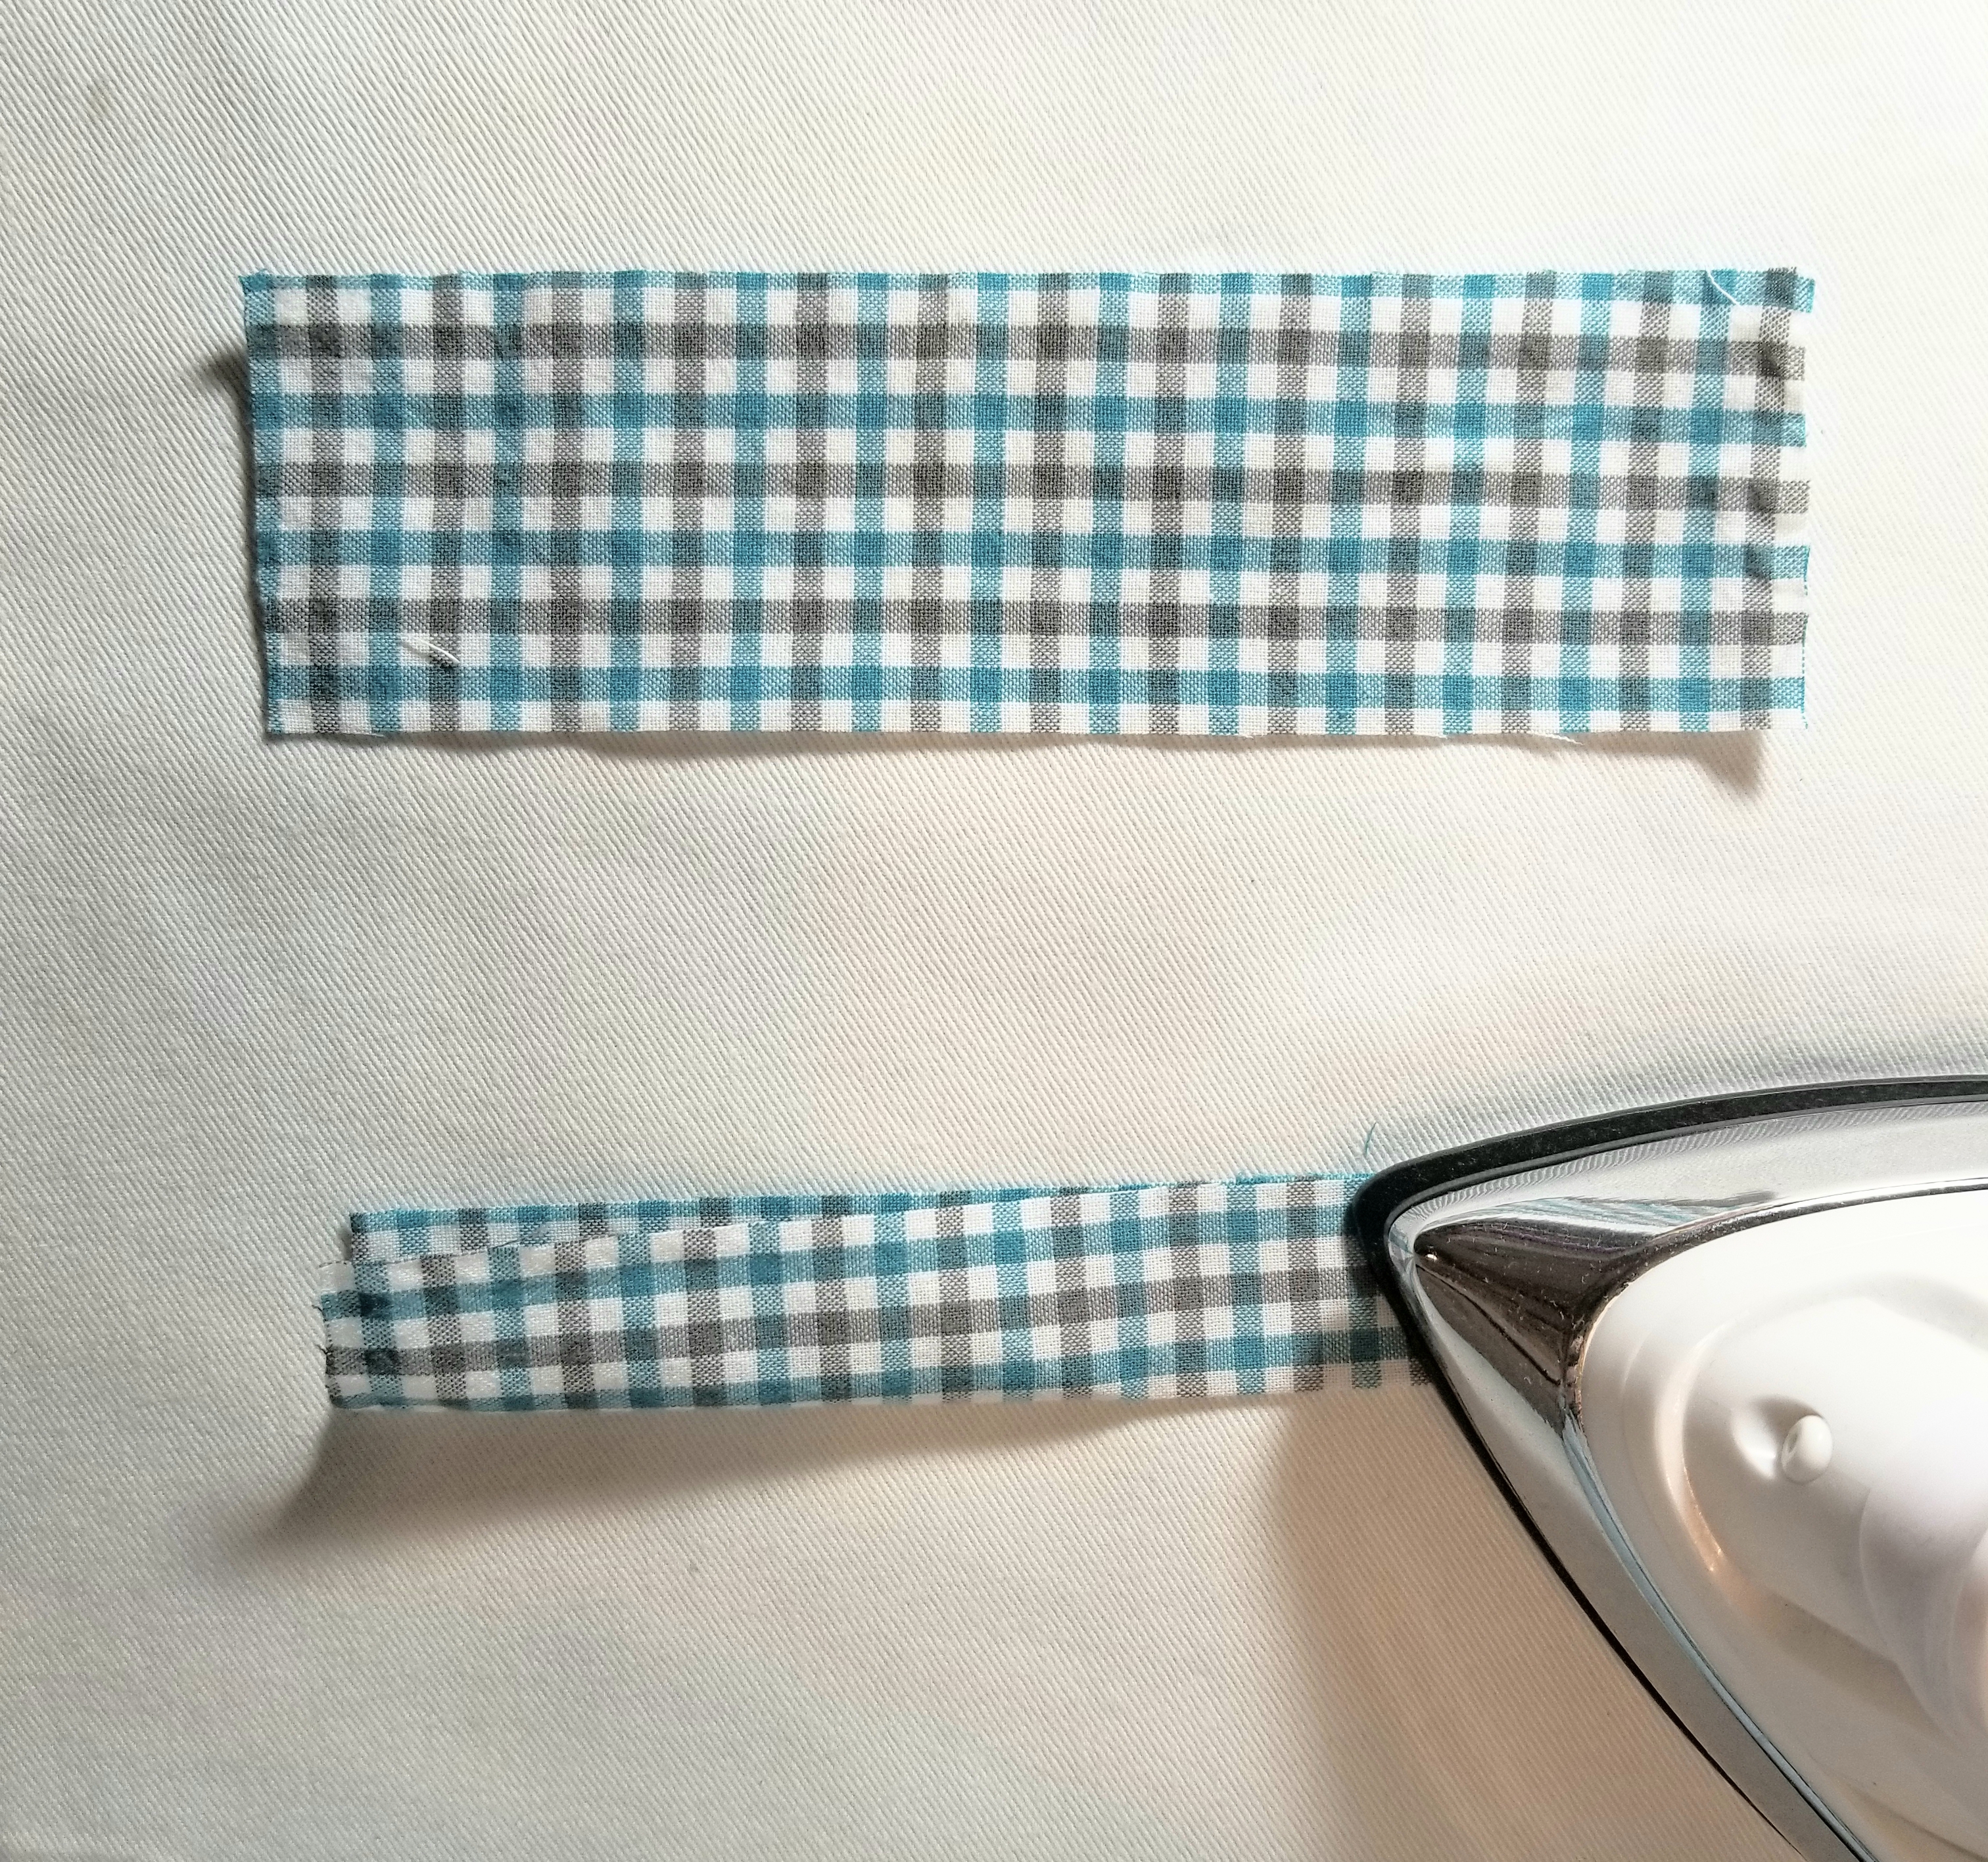
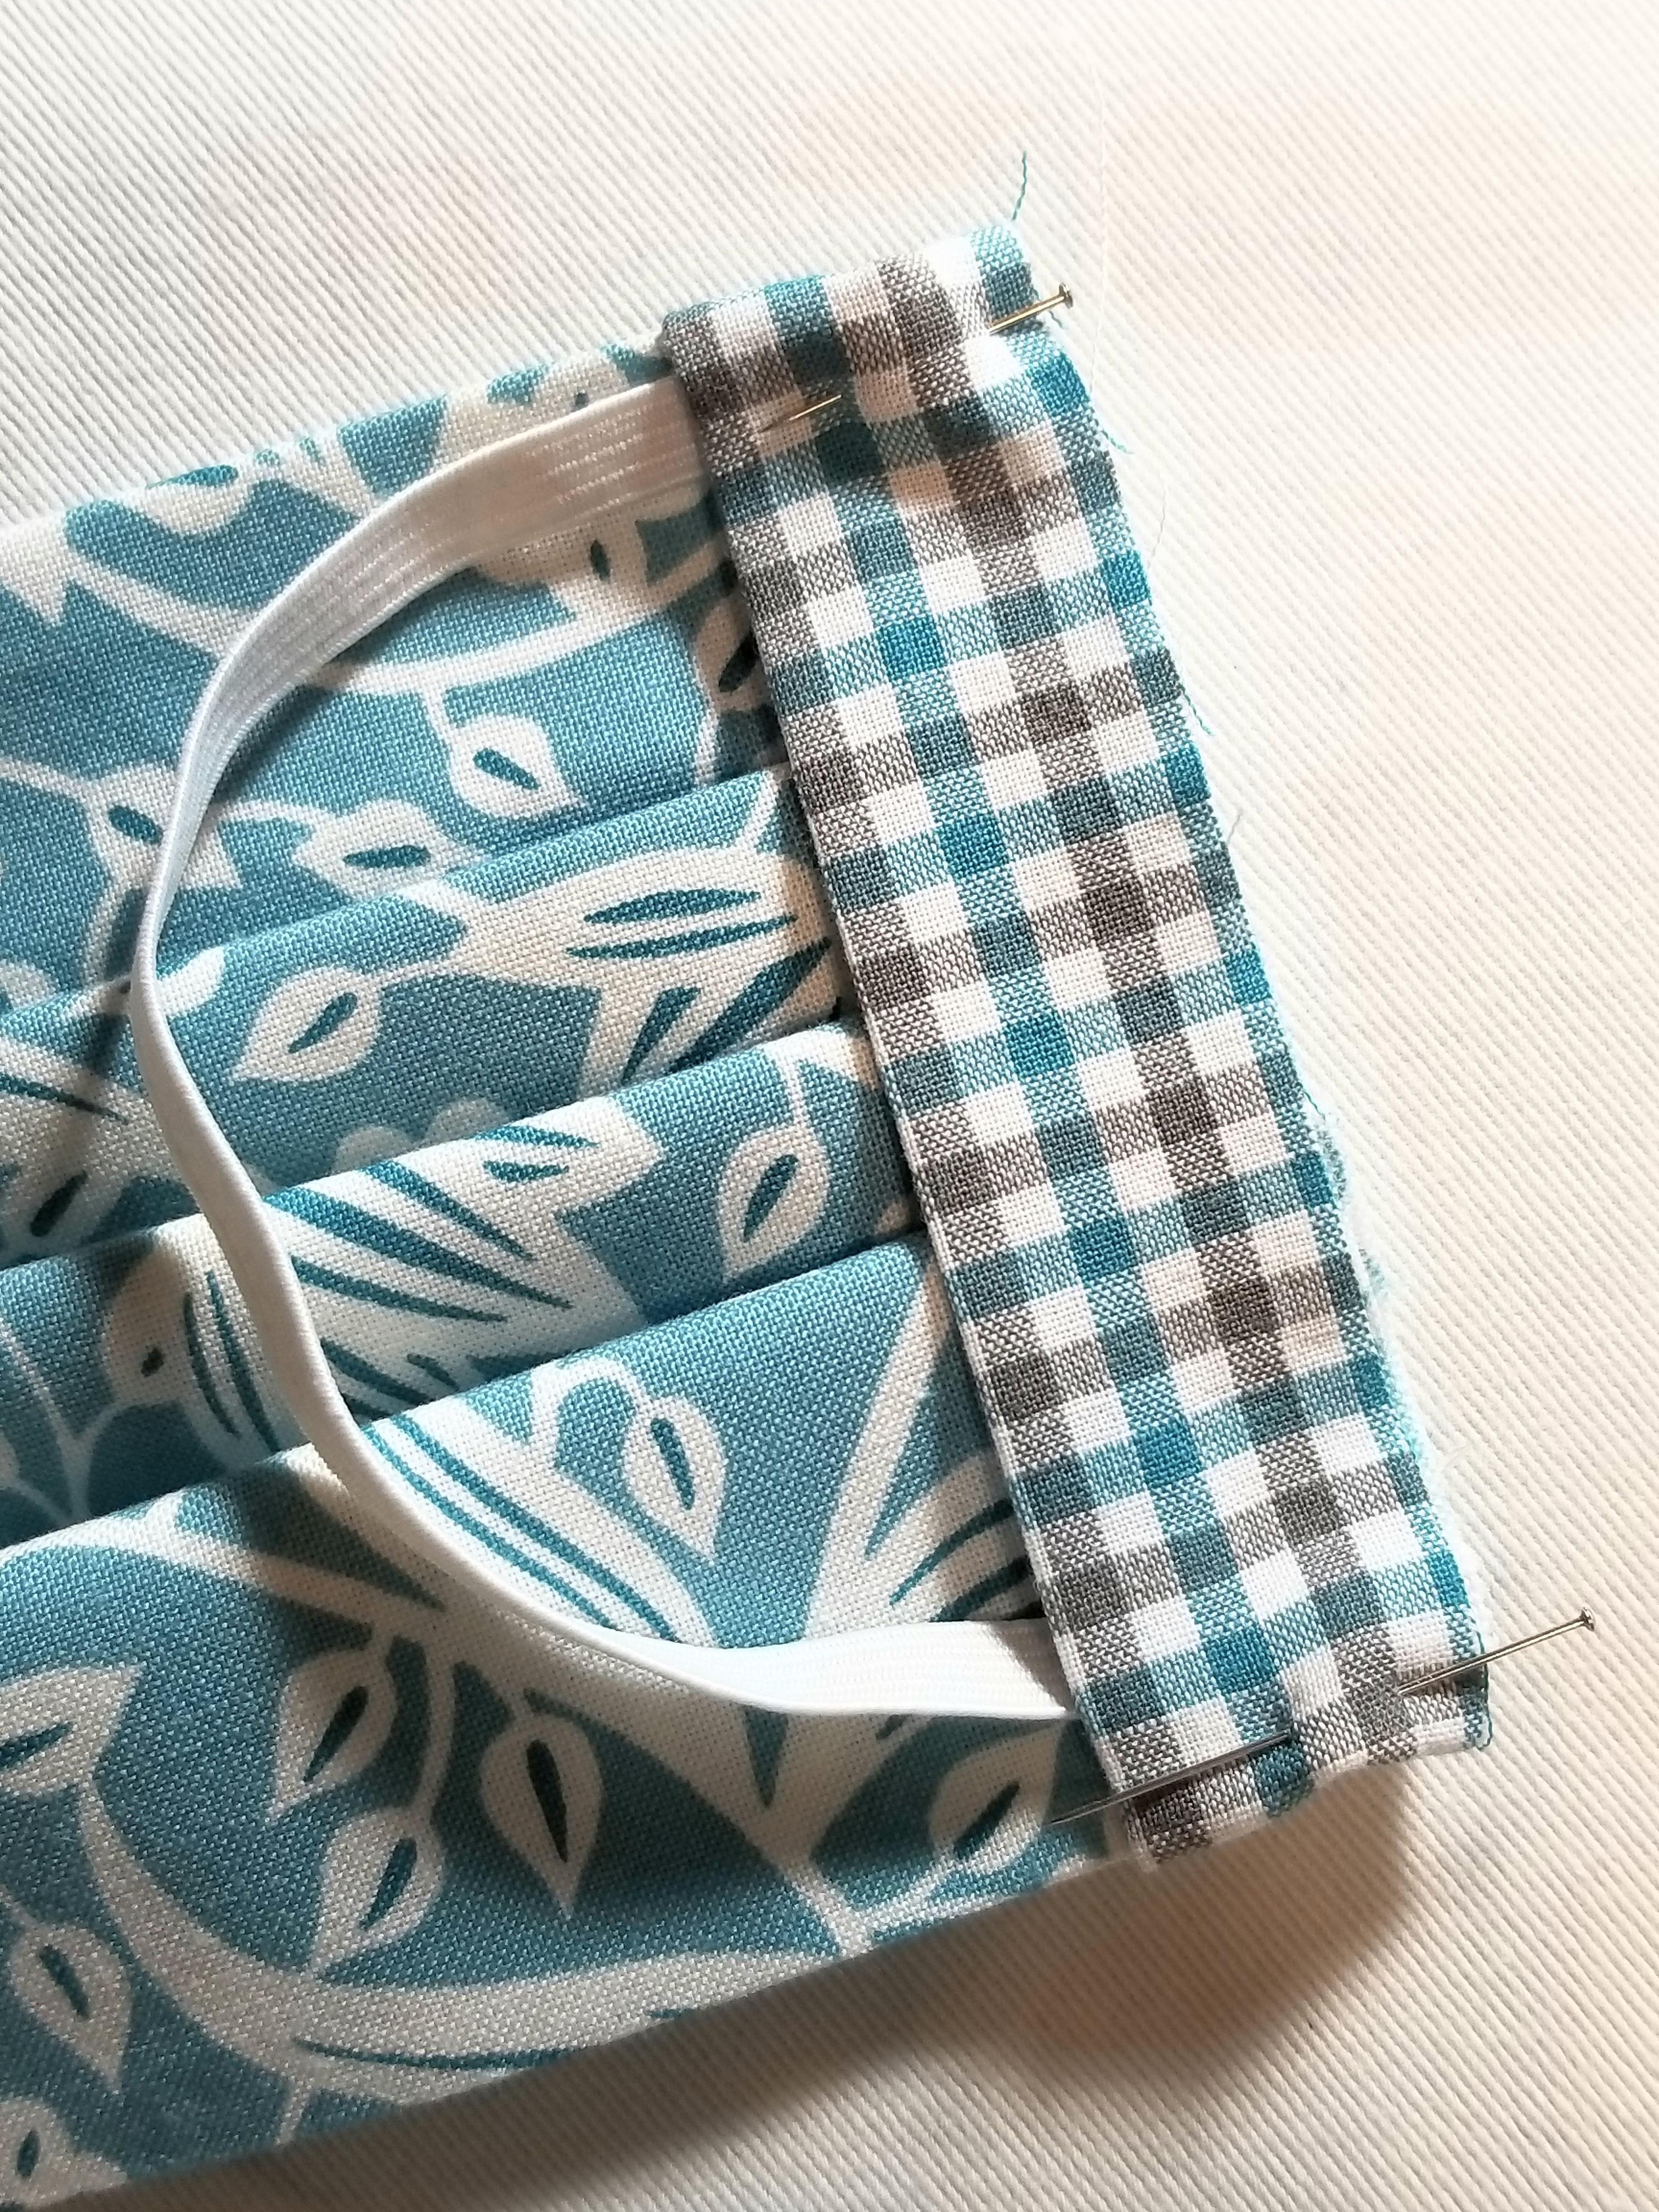
Fold each accent strip of fabric lengthwise in half, matching raw edges, as shown in the picture above. Press.
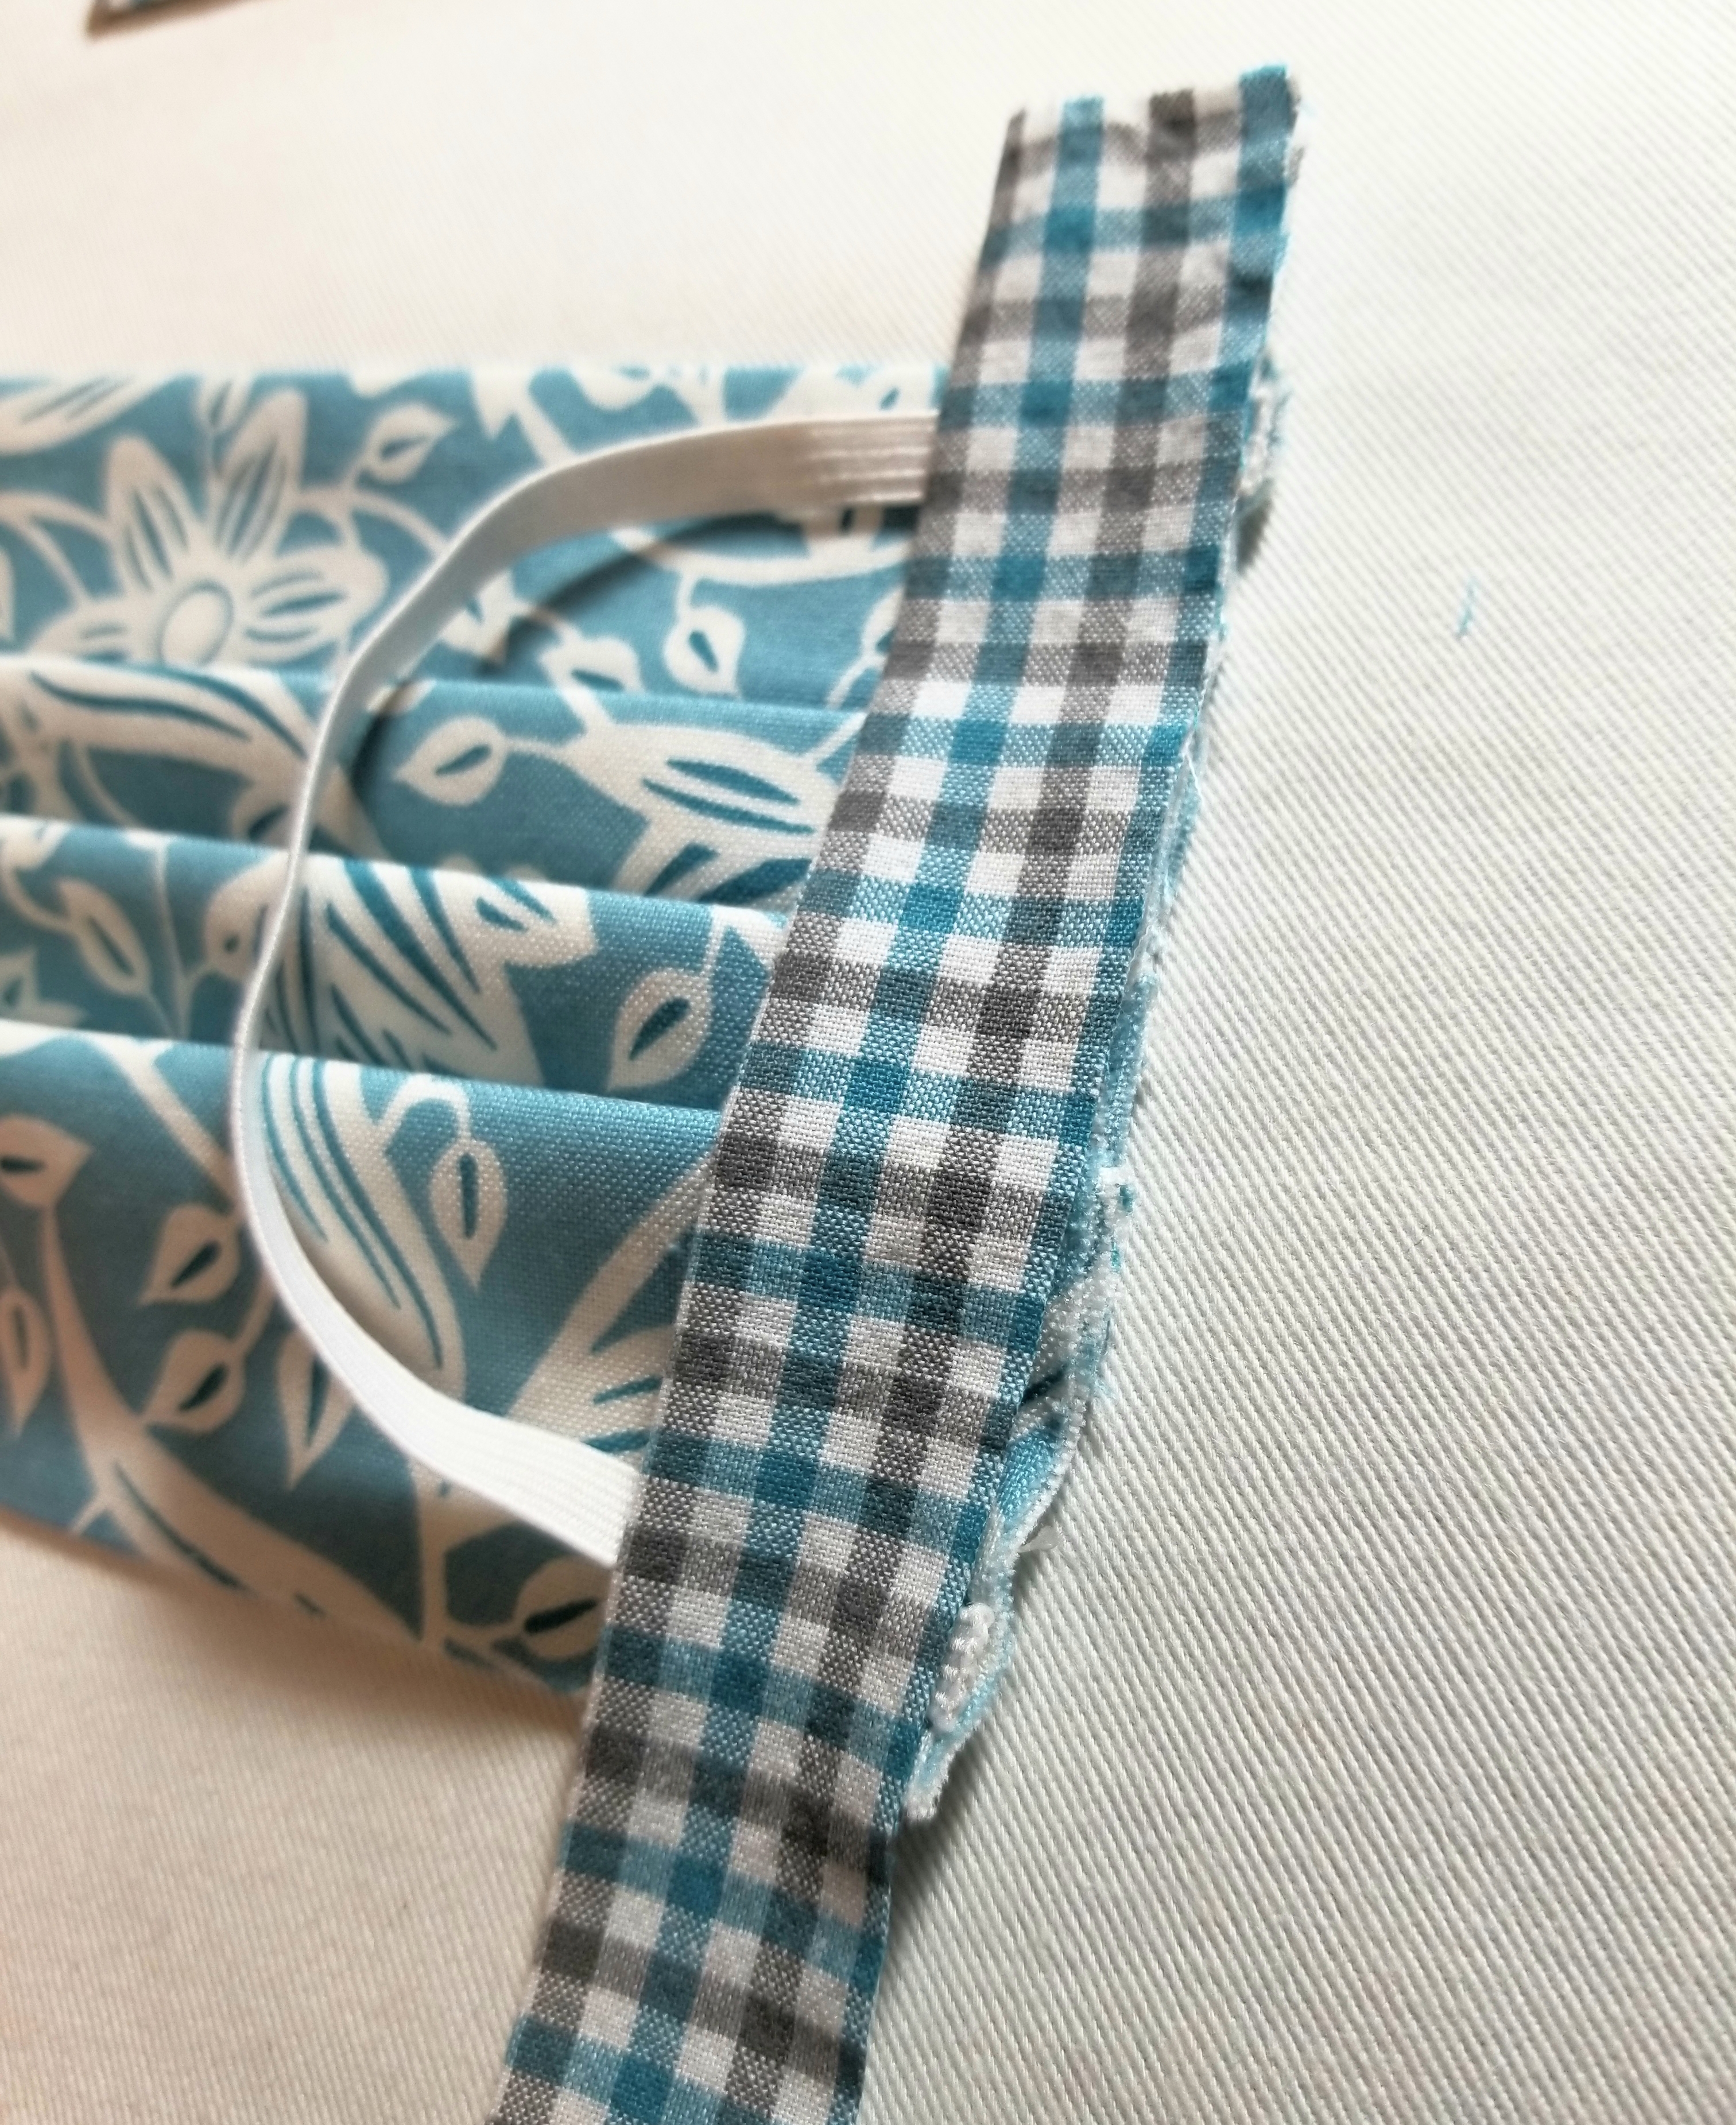
Place the strip on top of the elastic. Make sure the raw edge is facing outward, and the creased edge is facing the main body of the pleated piece. It will be a little longer on the top and bottom and that is okay, as we are going to fold some of that to the back.

Tuck about 1/2” of the top edge to the back as shown in the picture above.
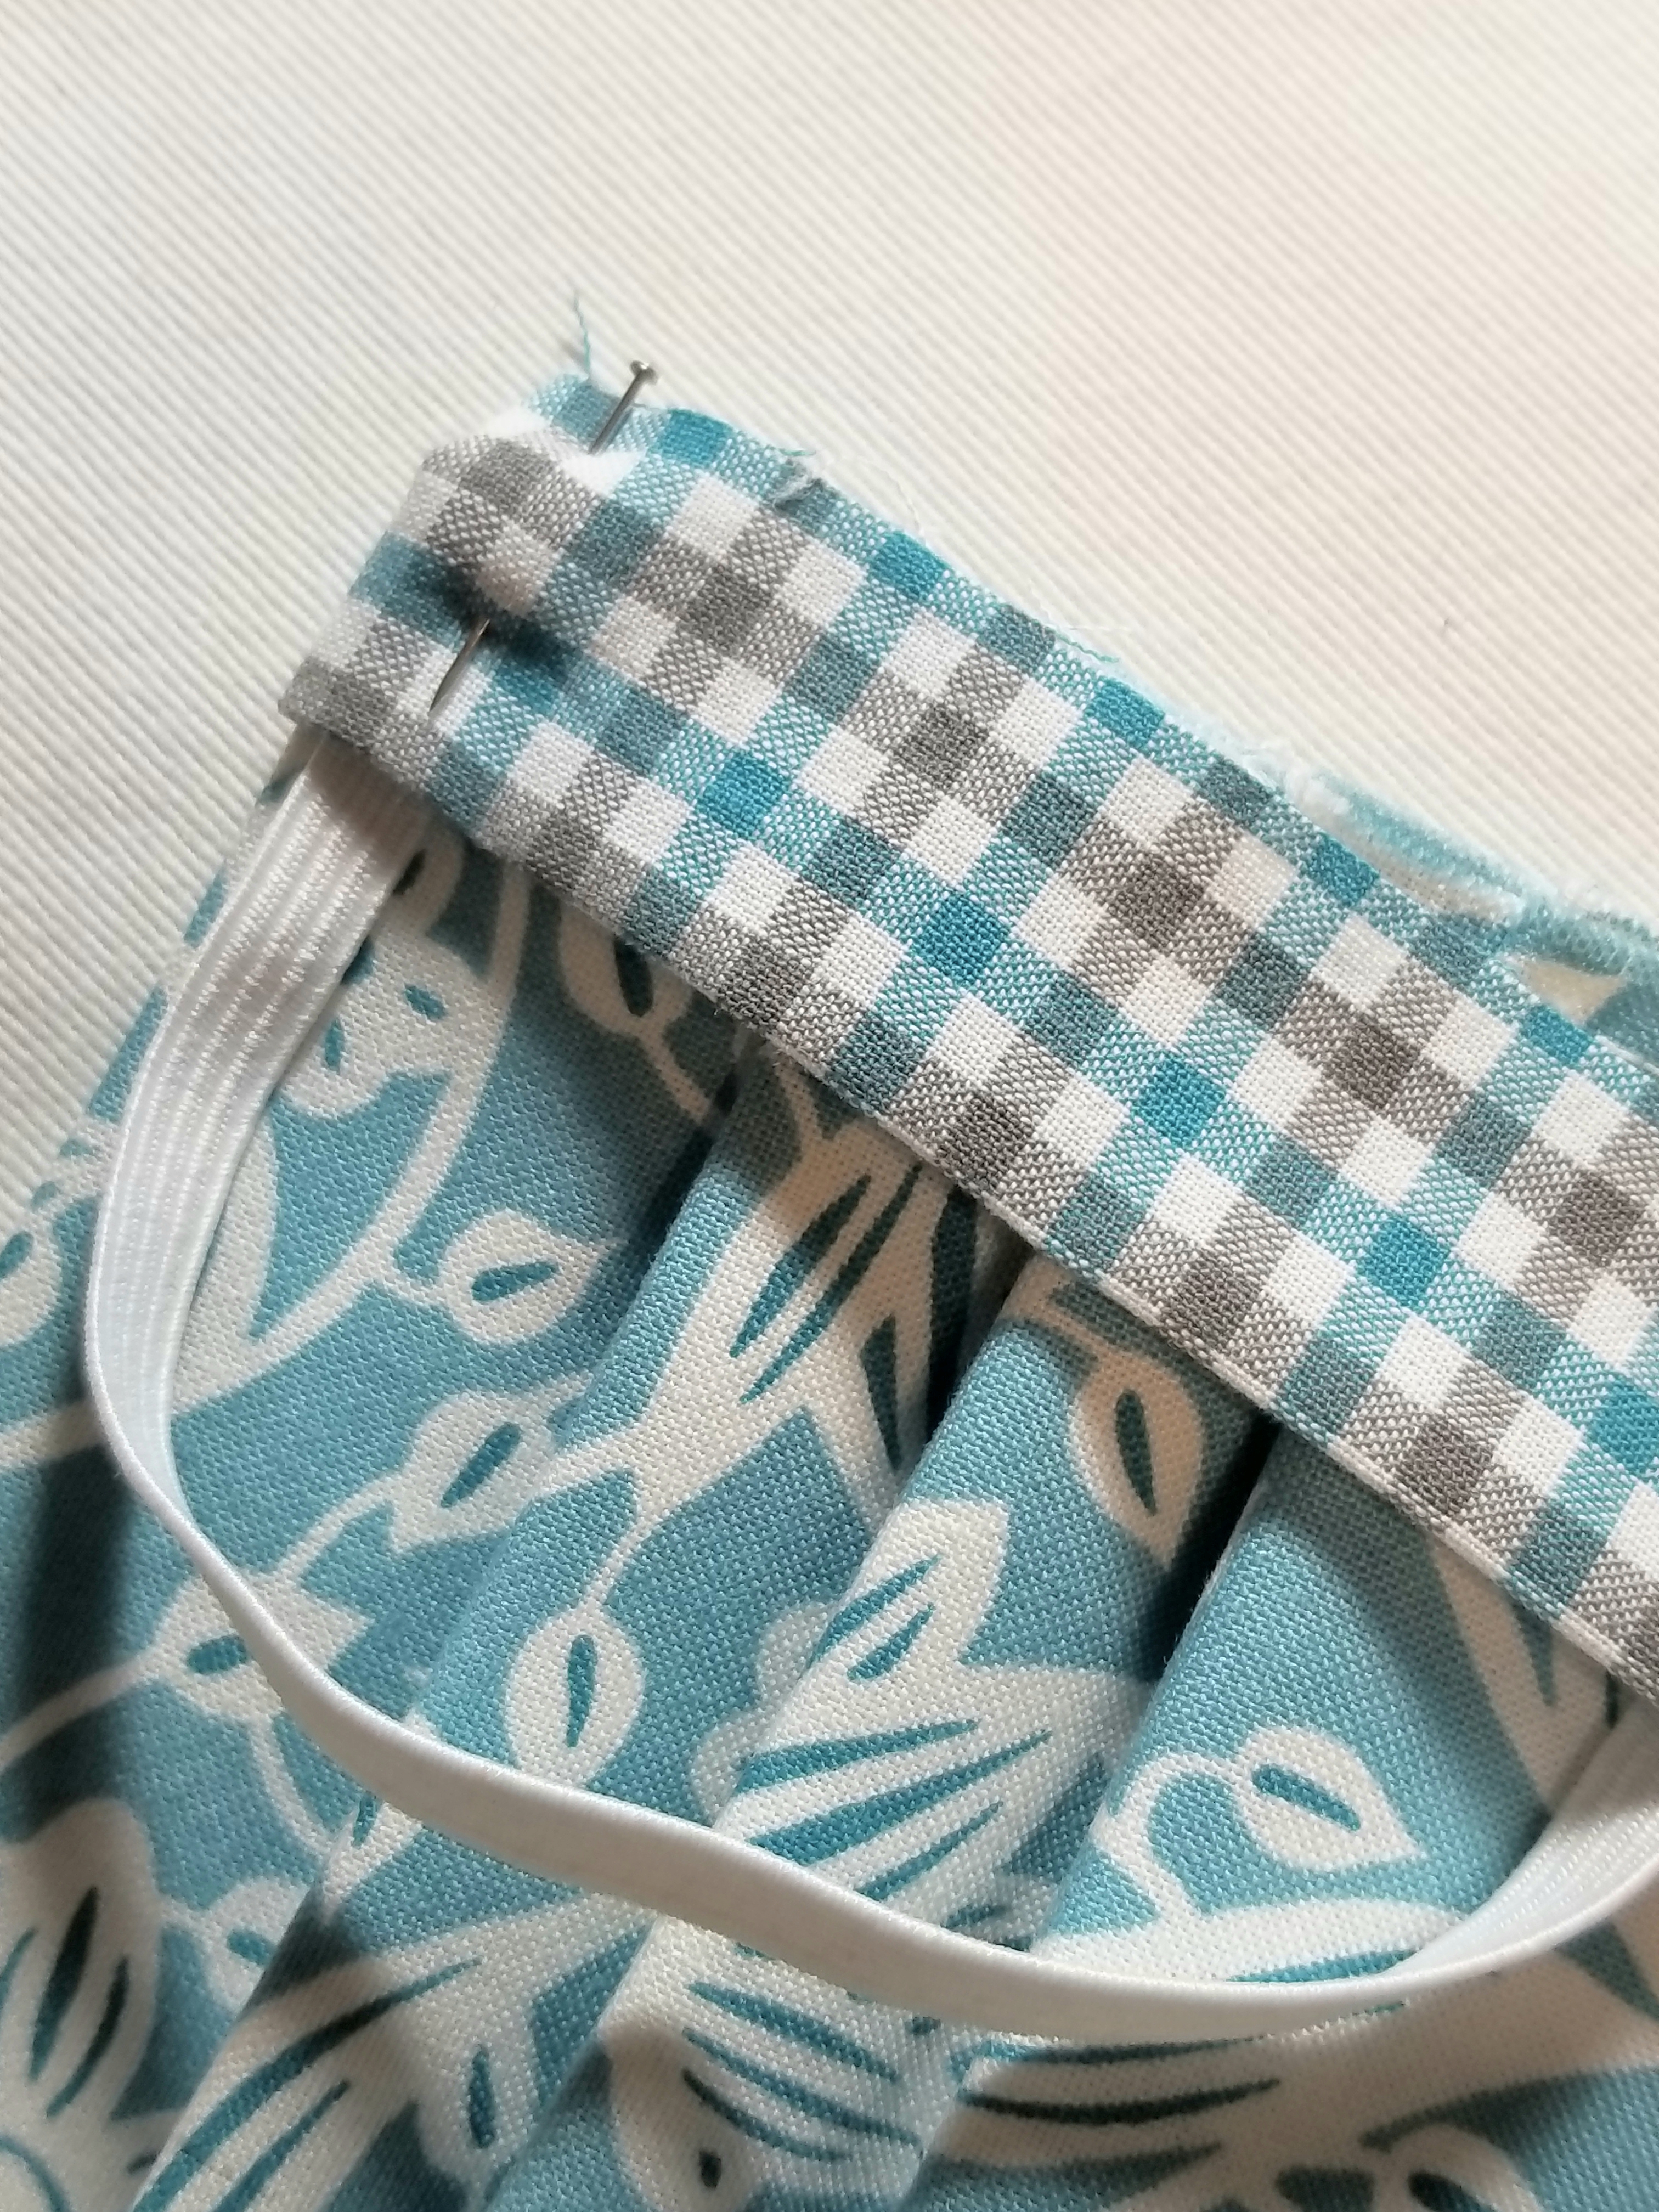
Pin all layers in place.
Trim the other end of the accent strip, so that it is about 1/2” longer than the bottom edge of the main pleated piece.

Fold the bottom edge of the accent fabric strip to the back, just as you did with the top edge.
Pin both ends in place.
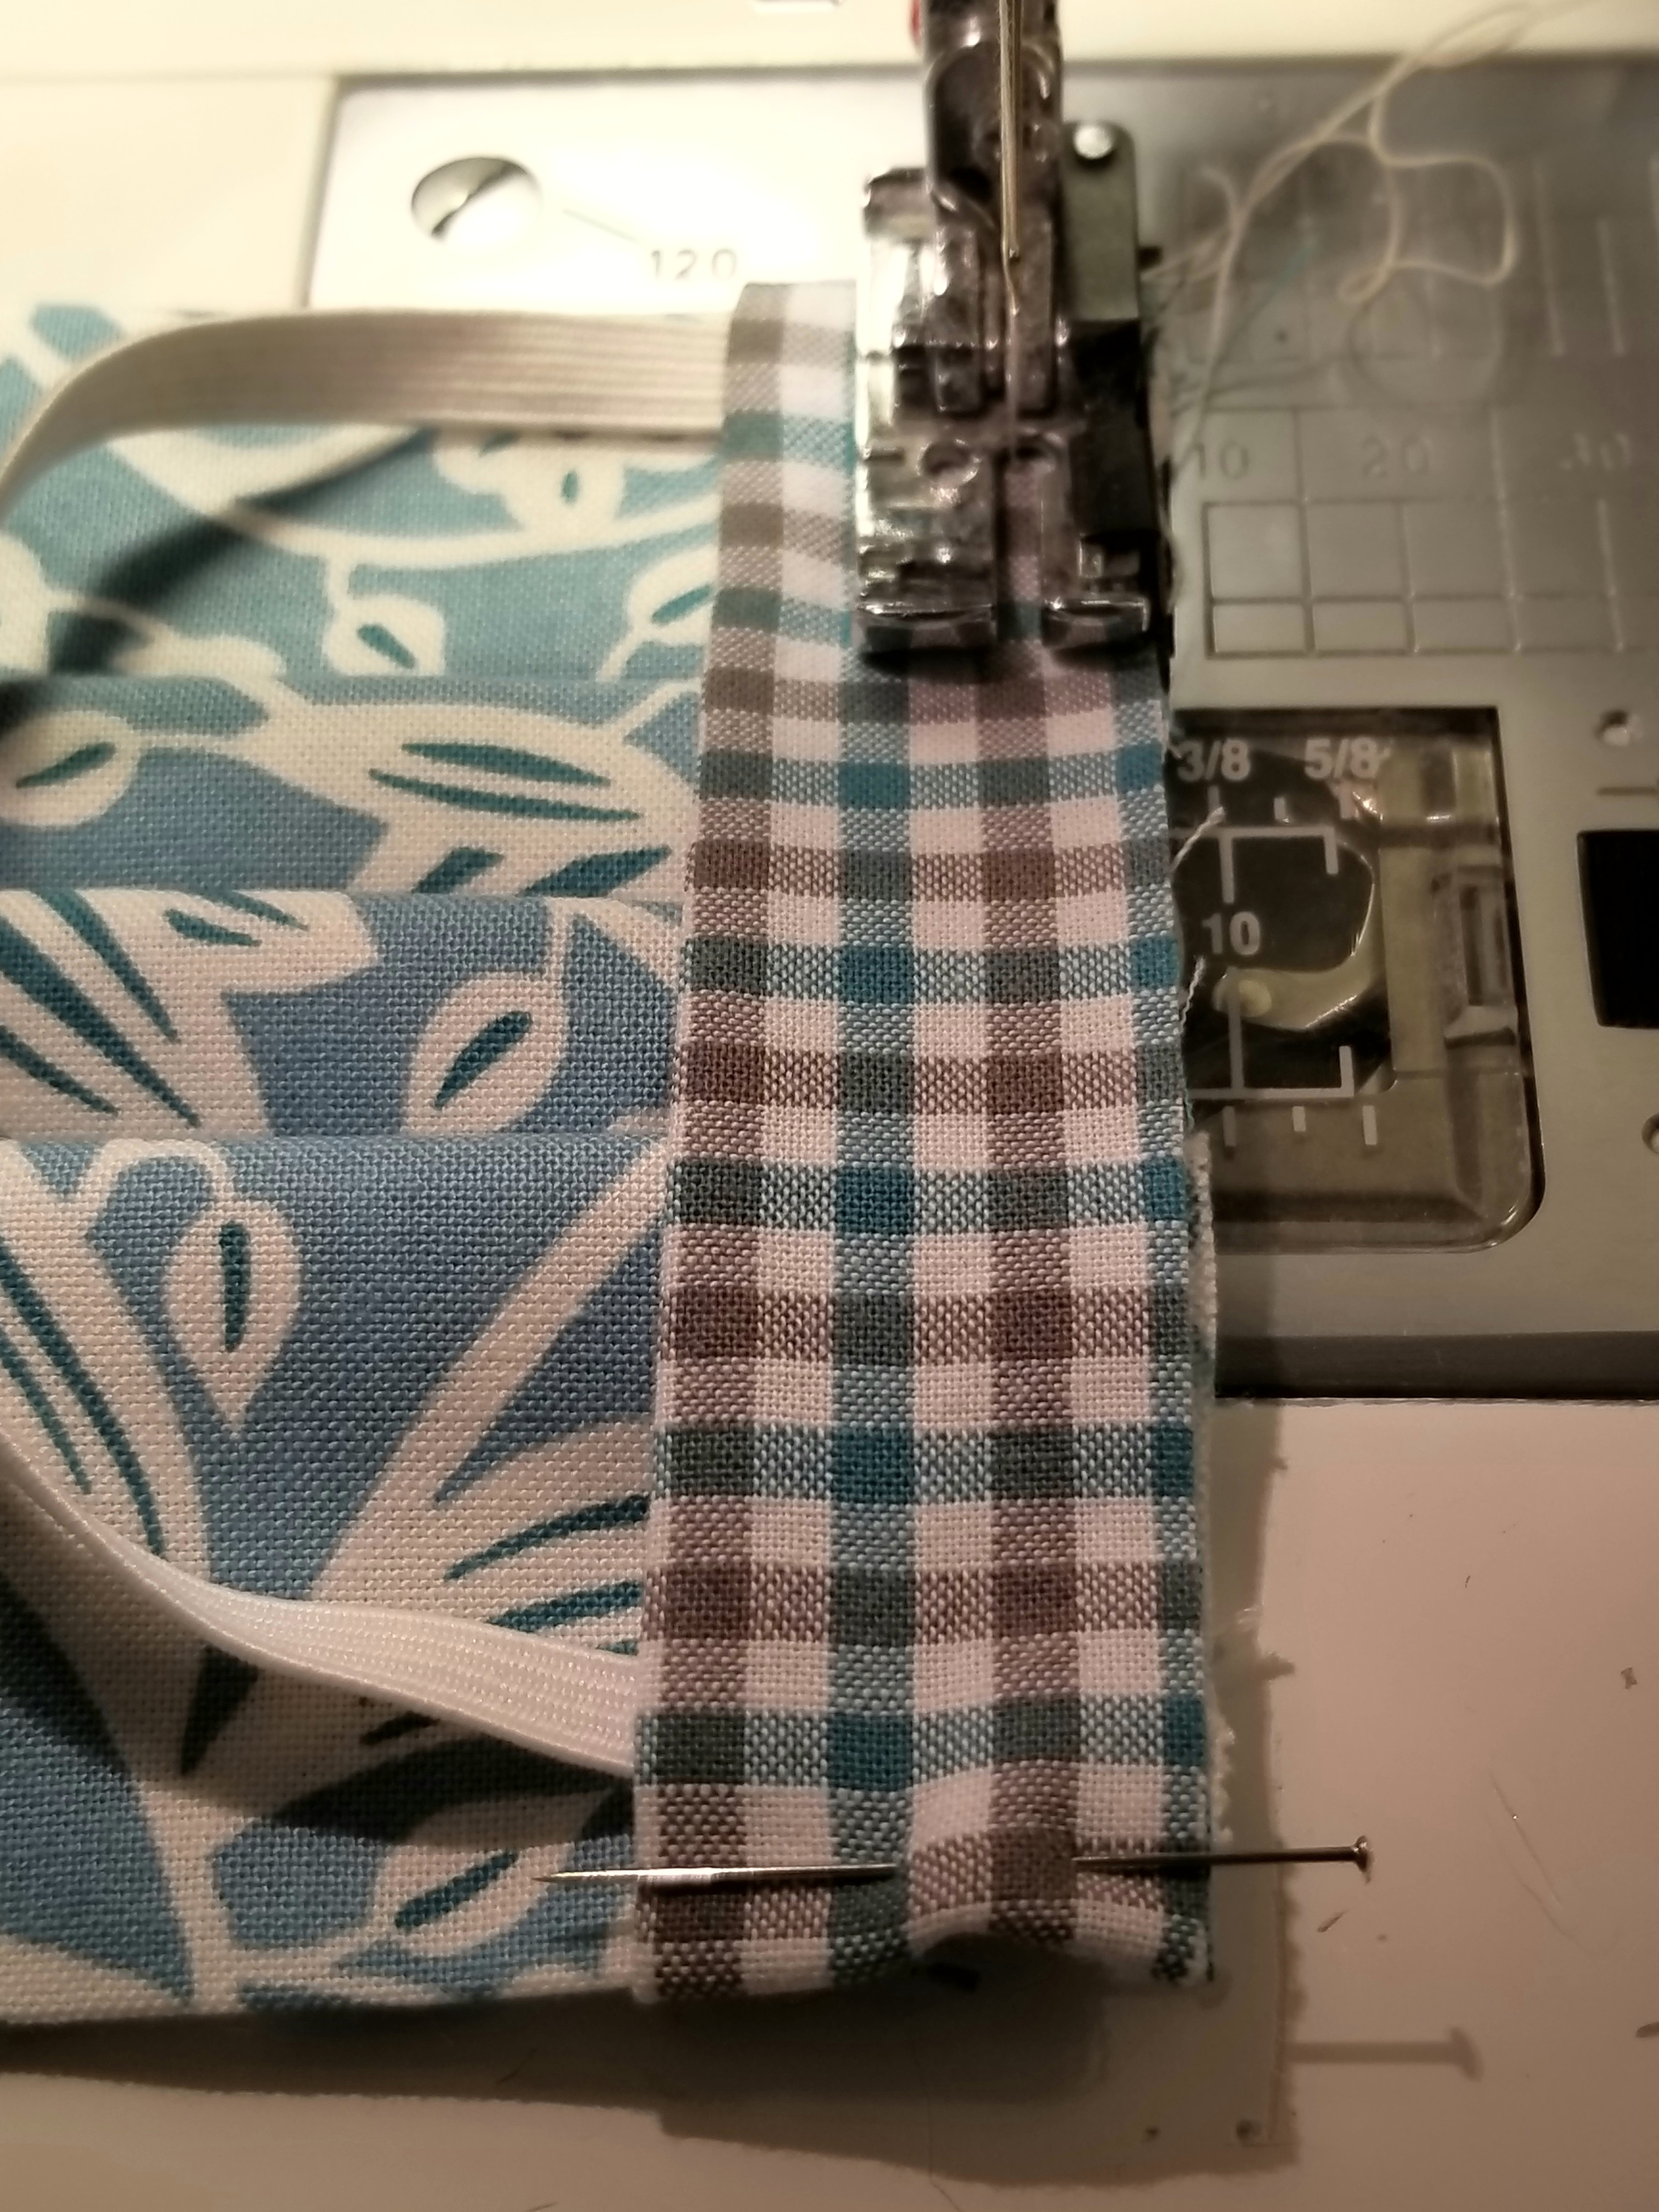
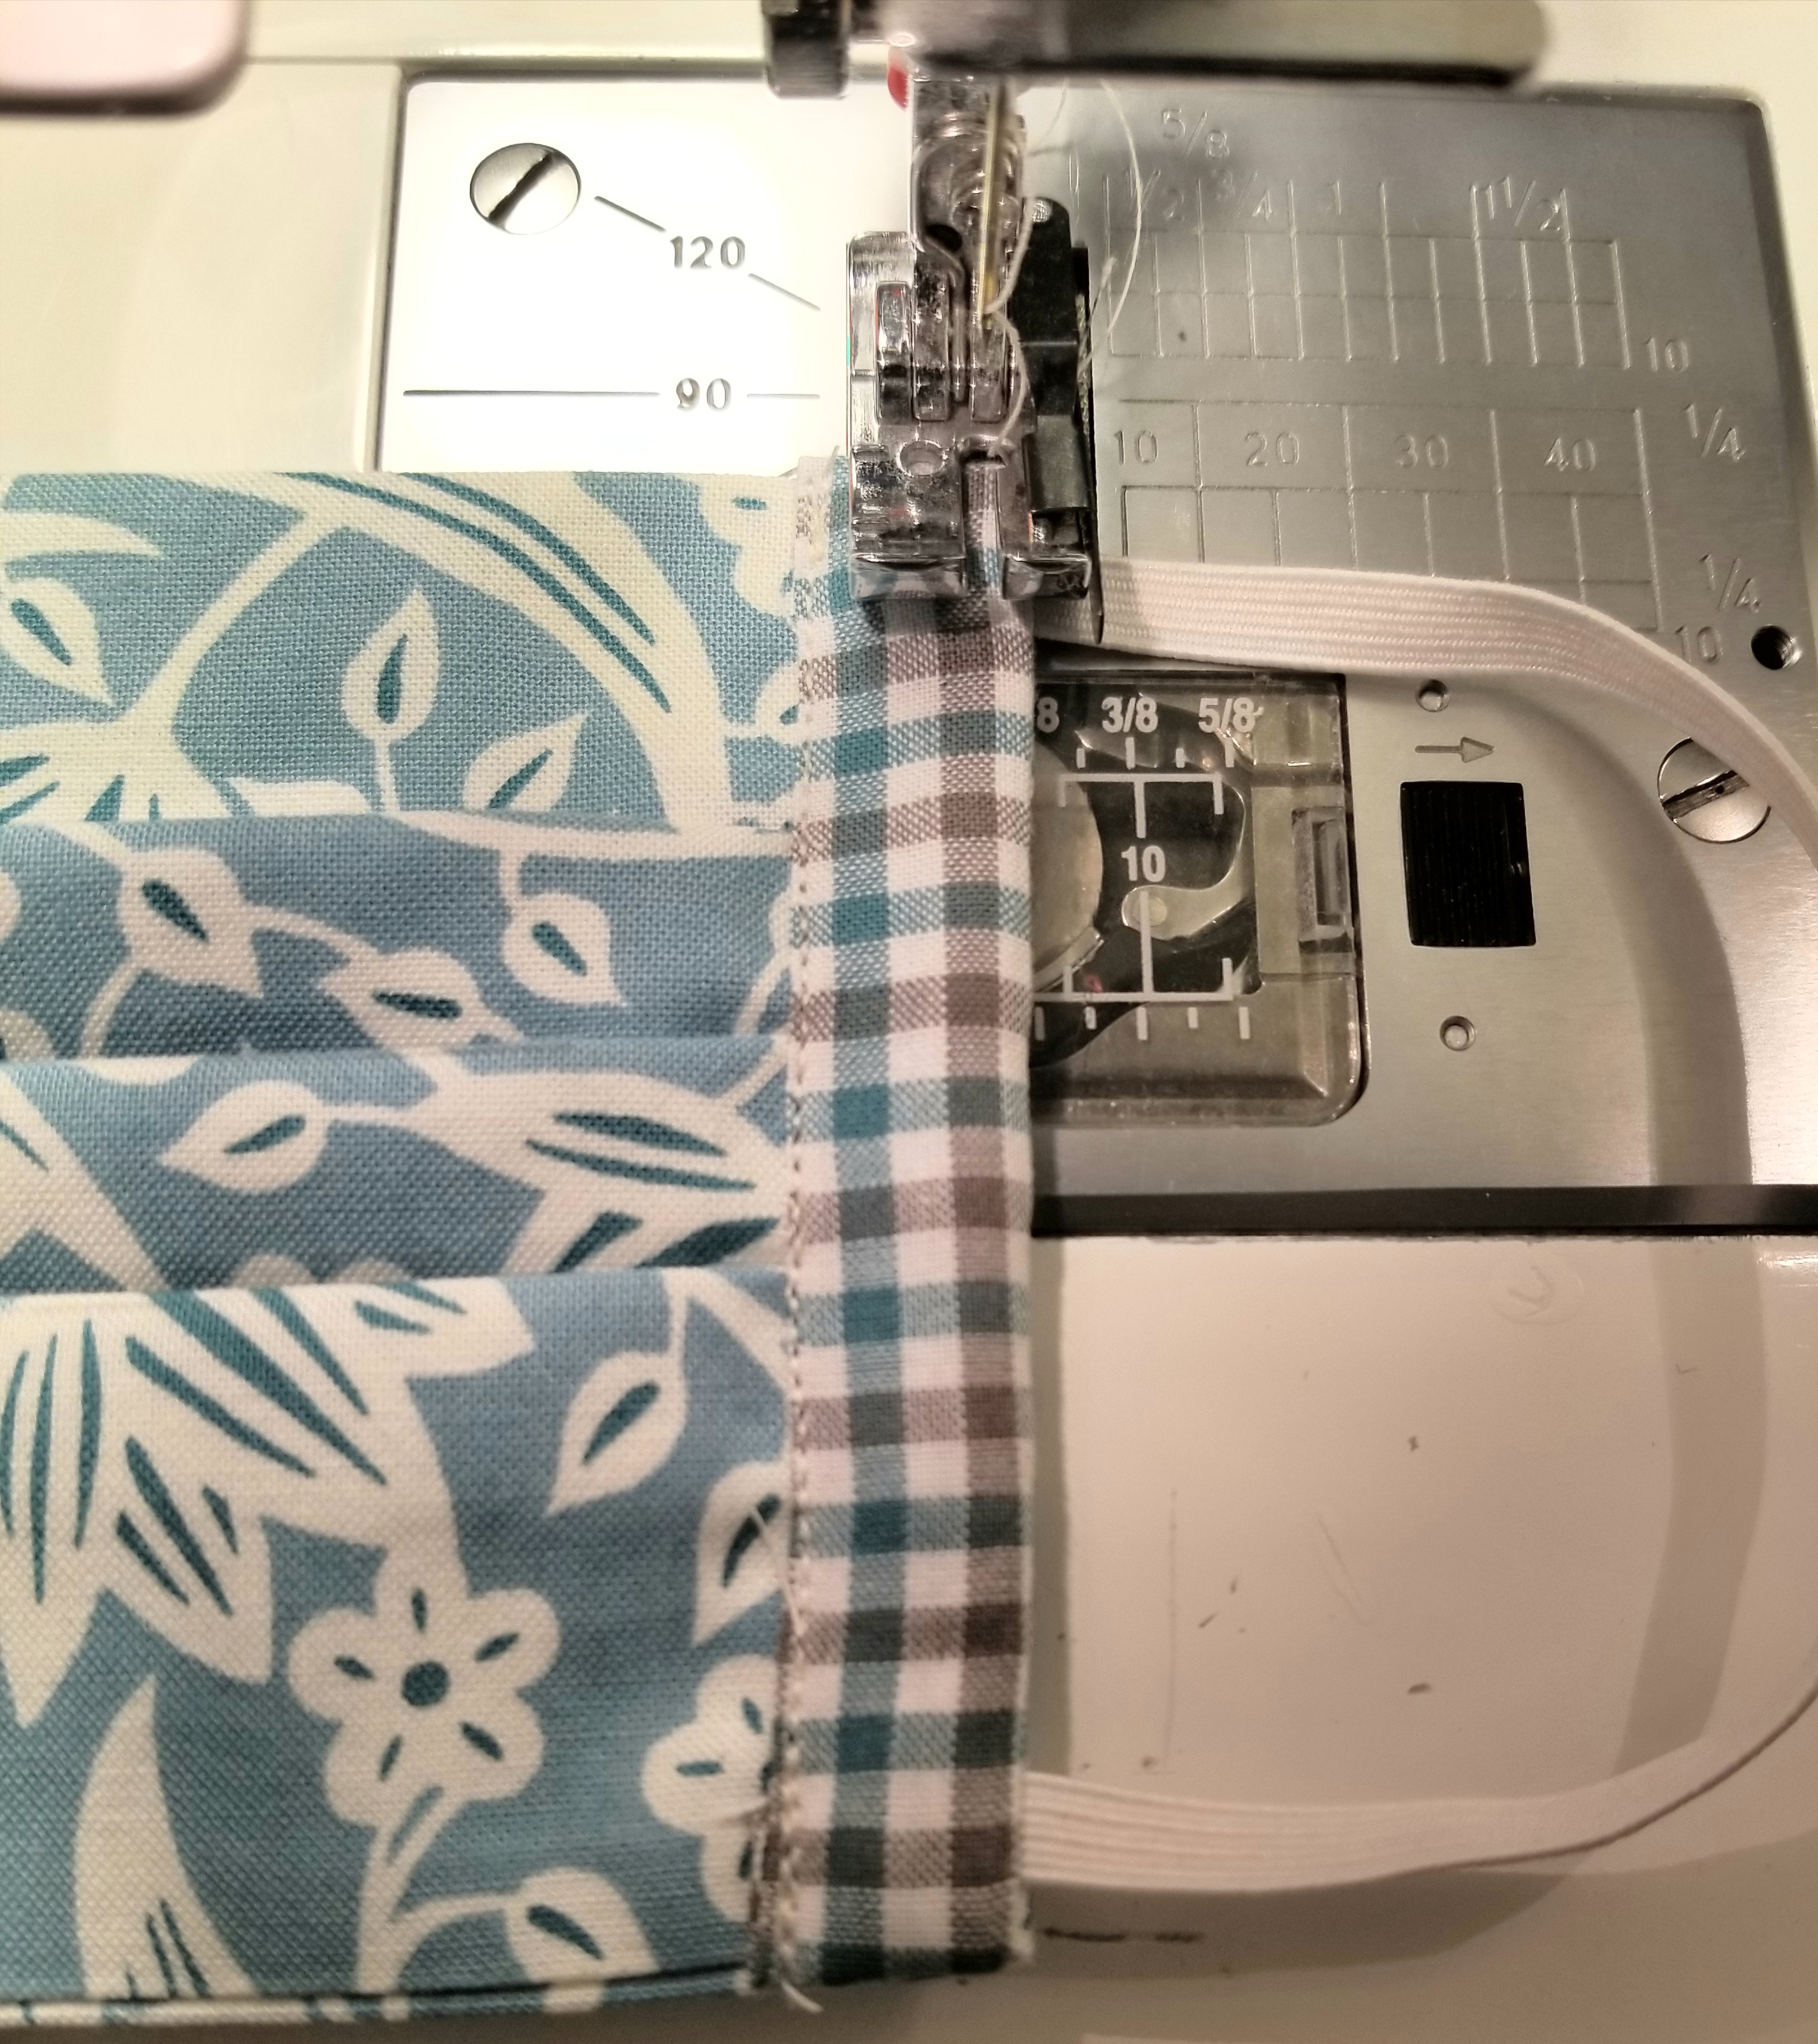
Using a 1/4 inch seam allowance, stitch the length of the entire edge, making sure to back stitch at the beginning and end.
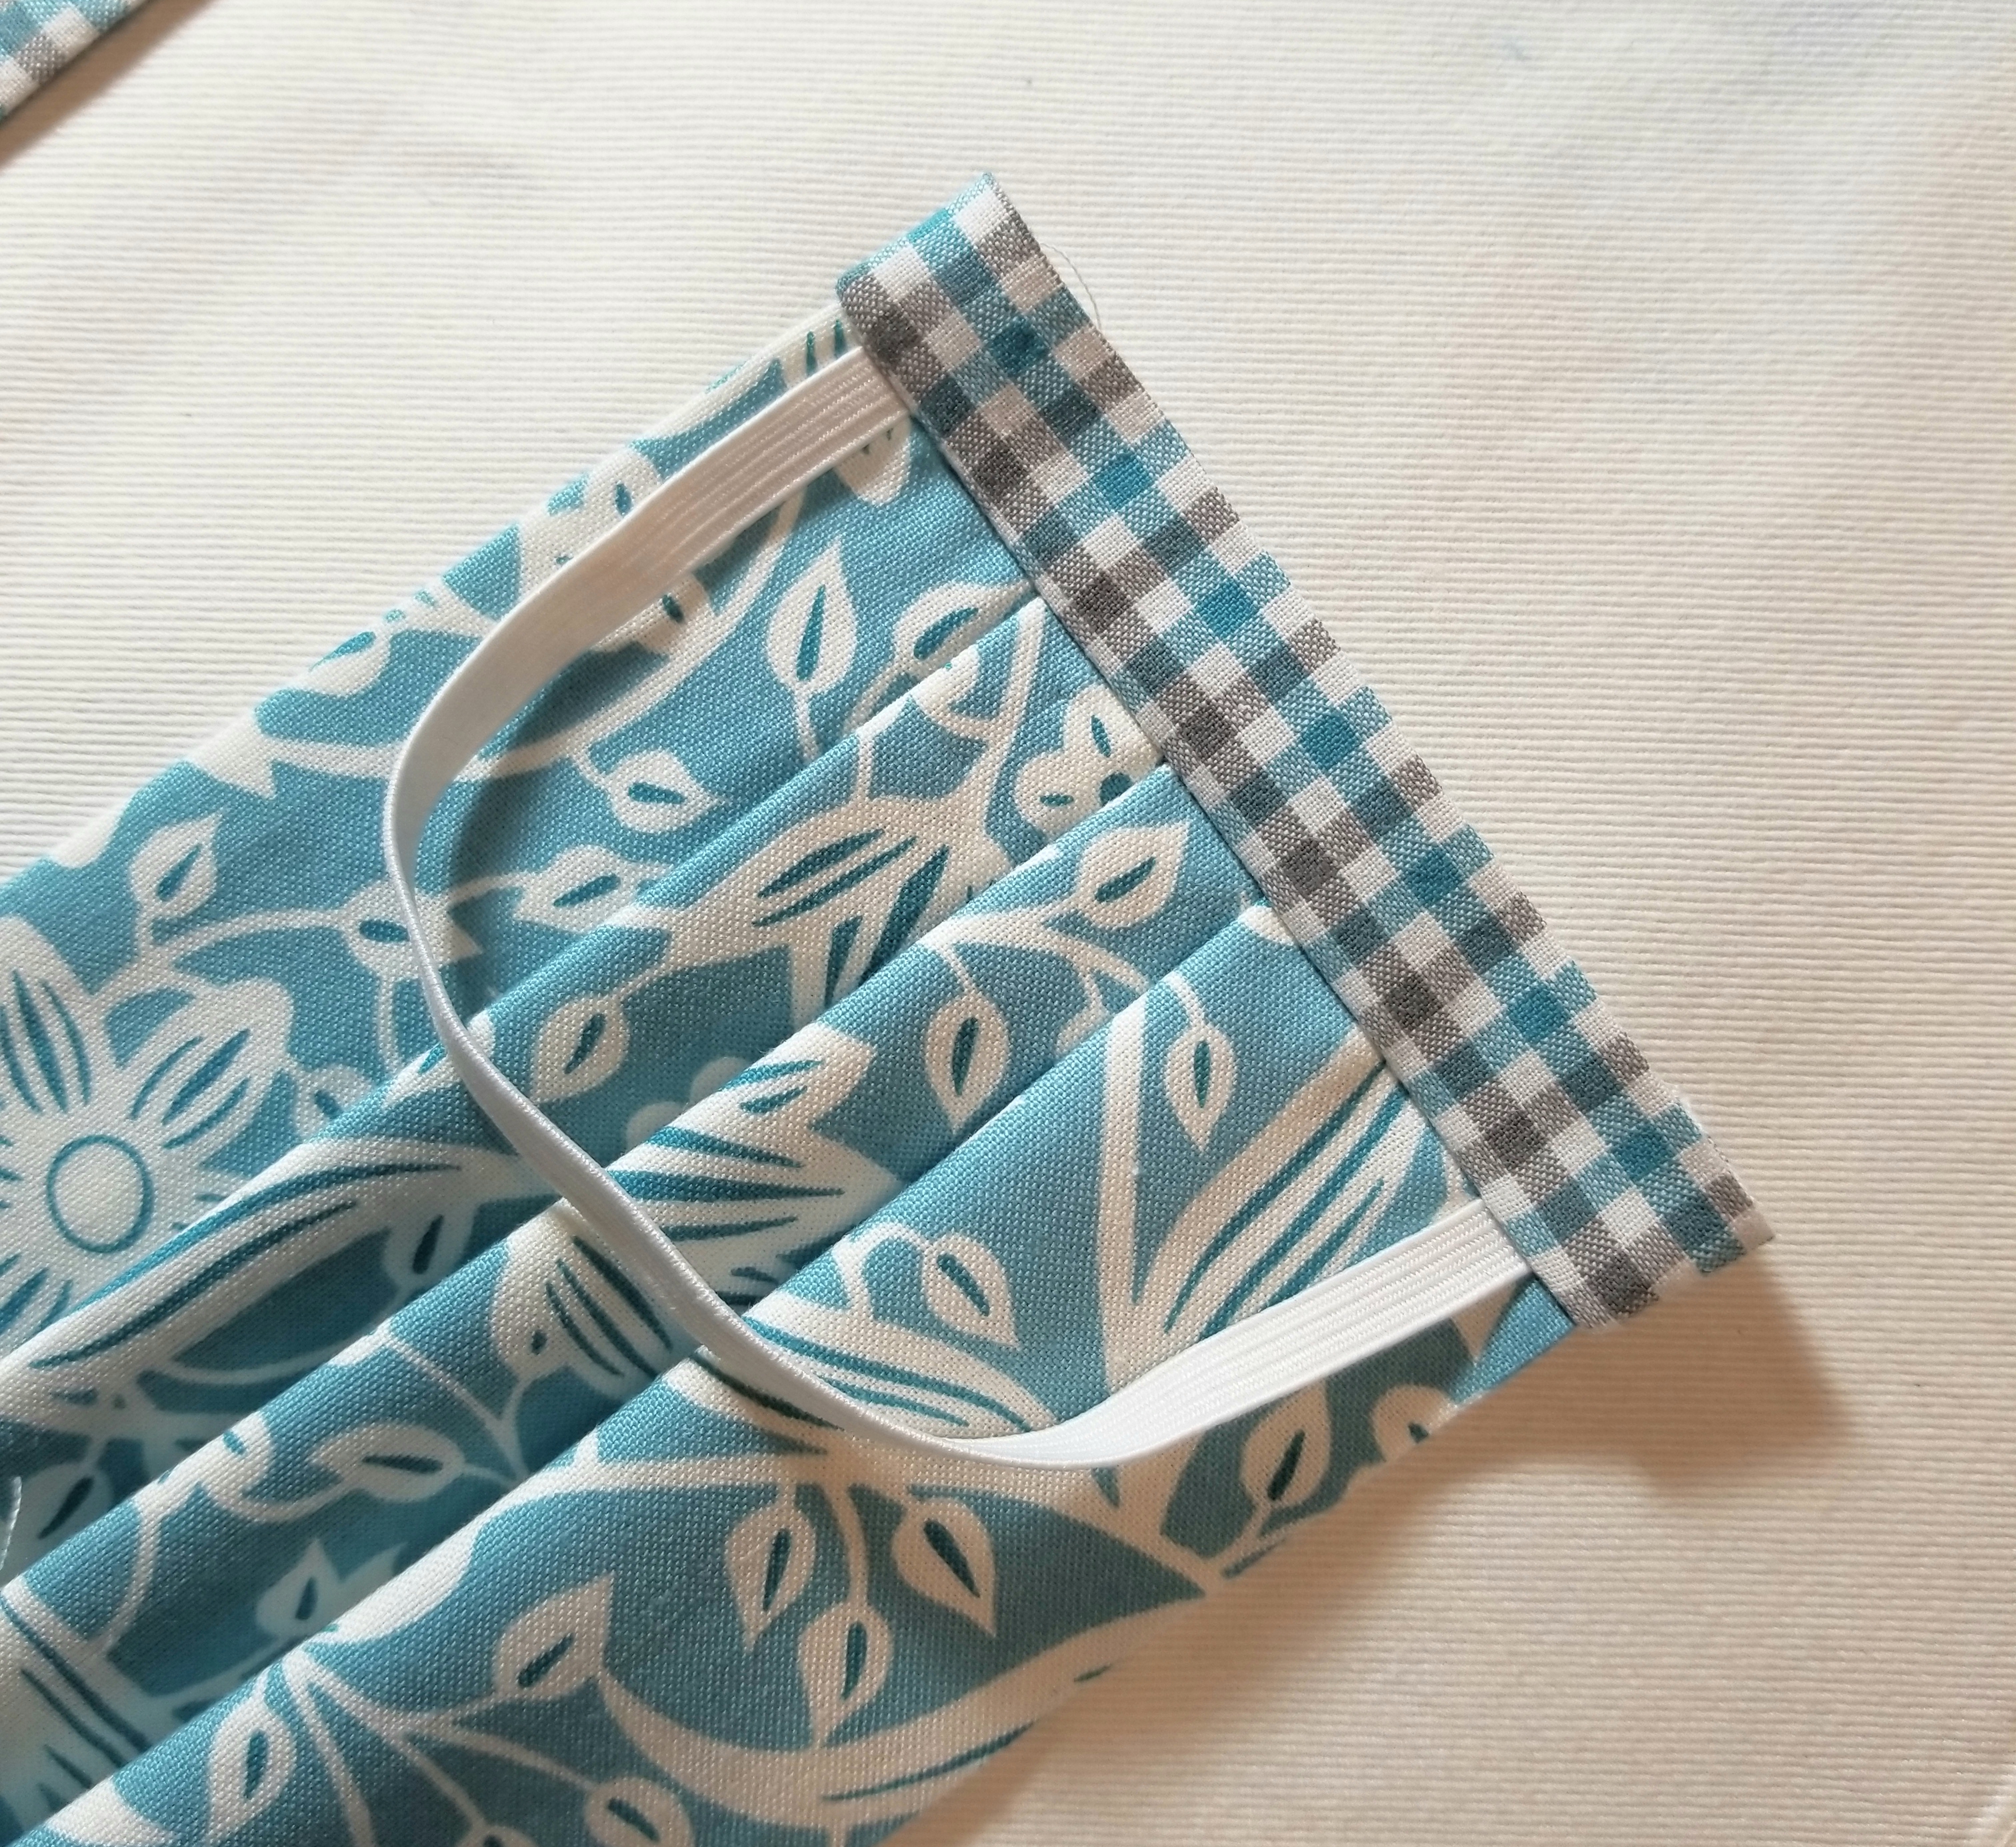
Open the the accent fabric strip seam by flipping it outward away from the main pleated piece, then press.
This is what the mask should look like if you flip it over.
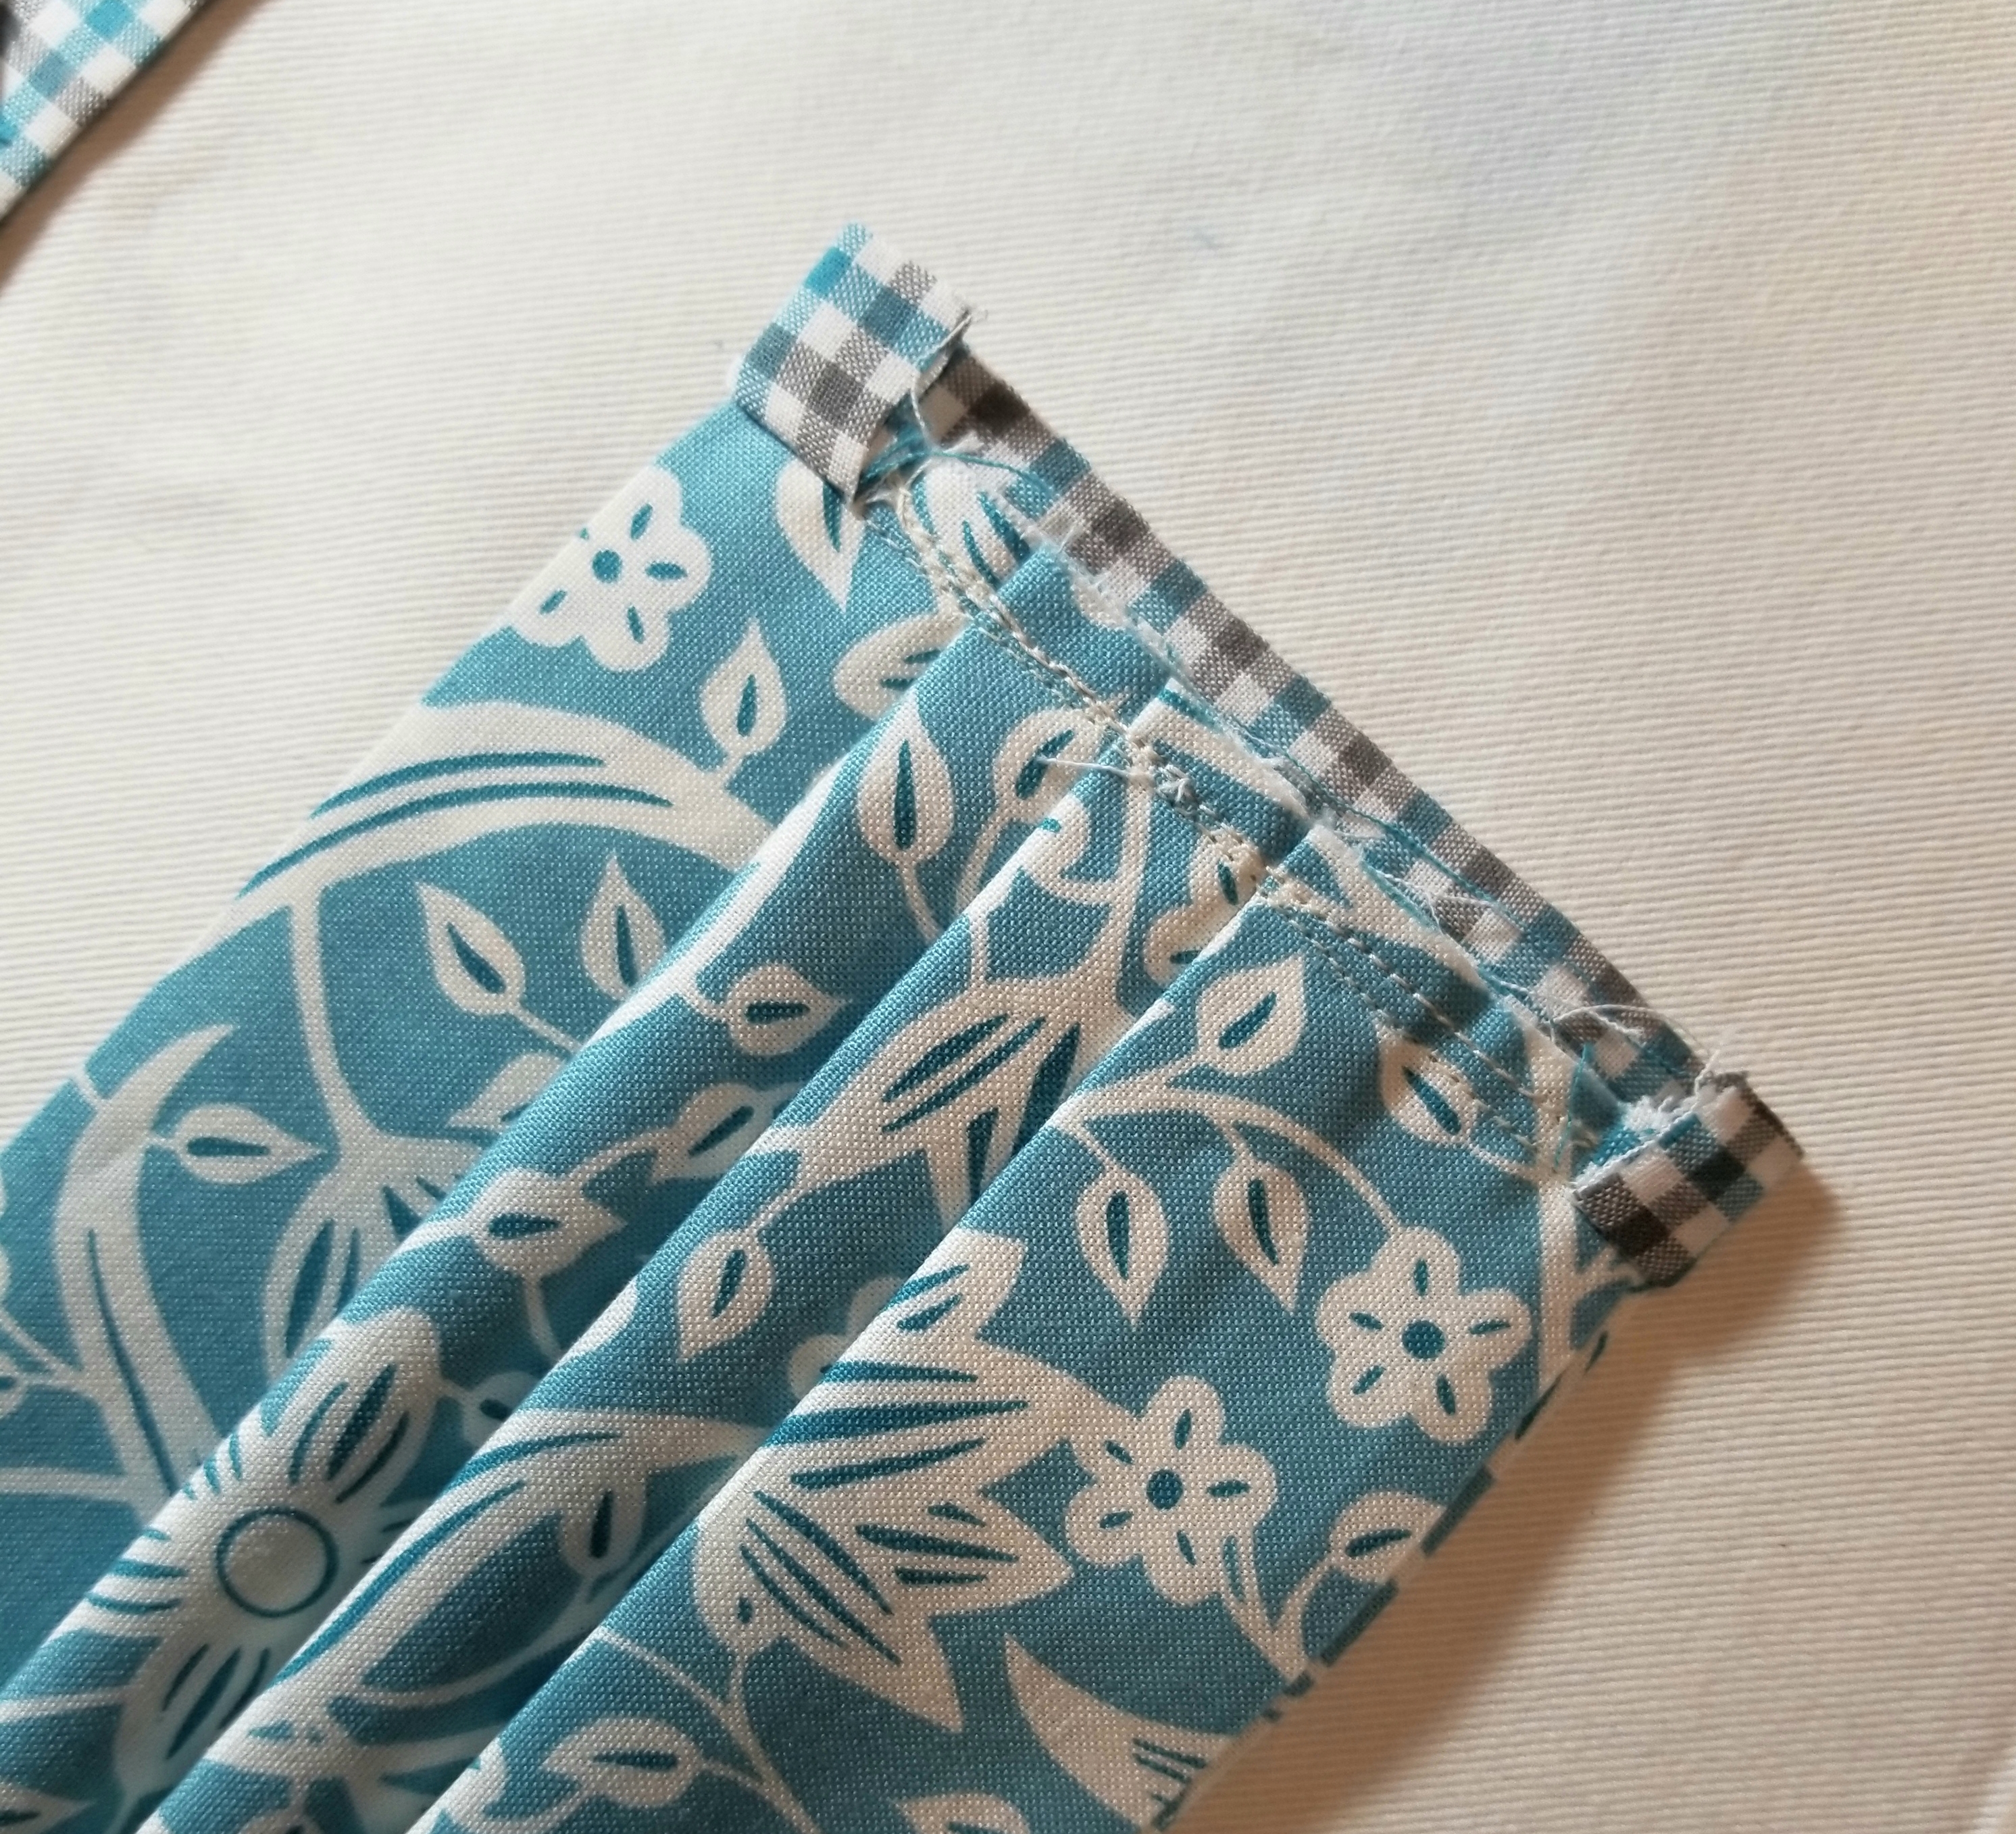
fold the ENTIRE accent piece down toward the main pleated piece, encasing the raw seam. You will now see the accent piece on this side, but not at all on the flip side. Press. Pin edge down.
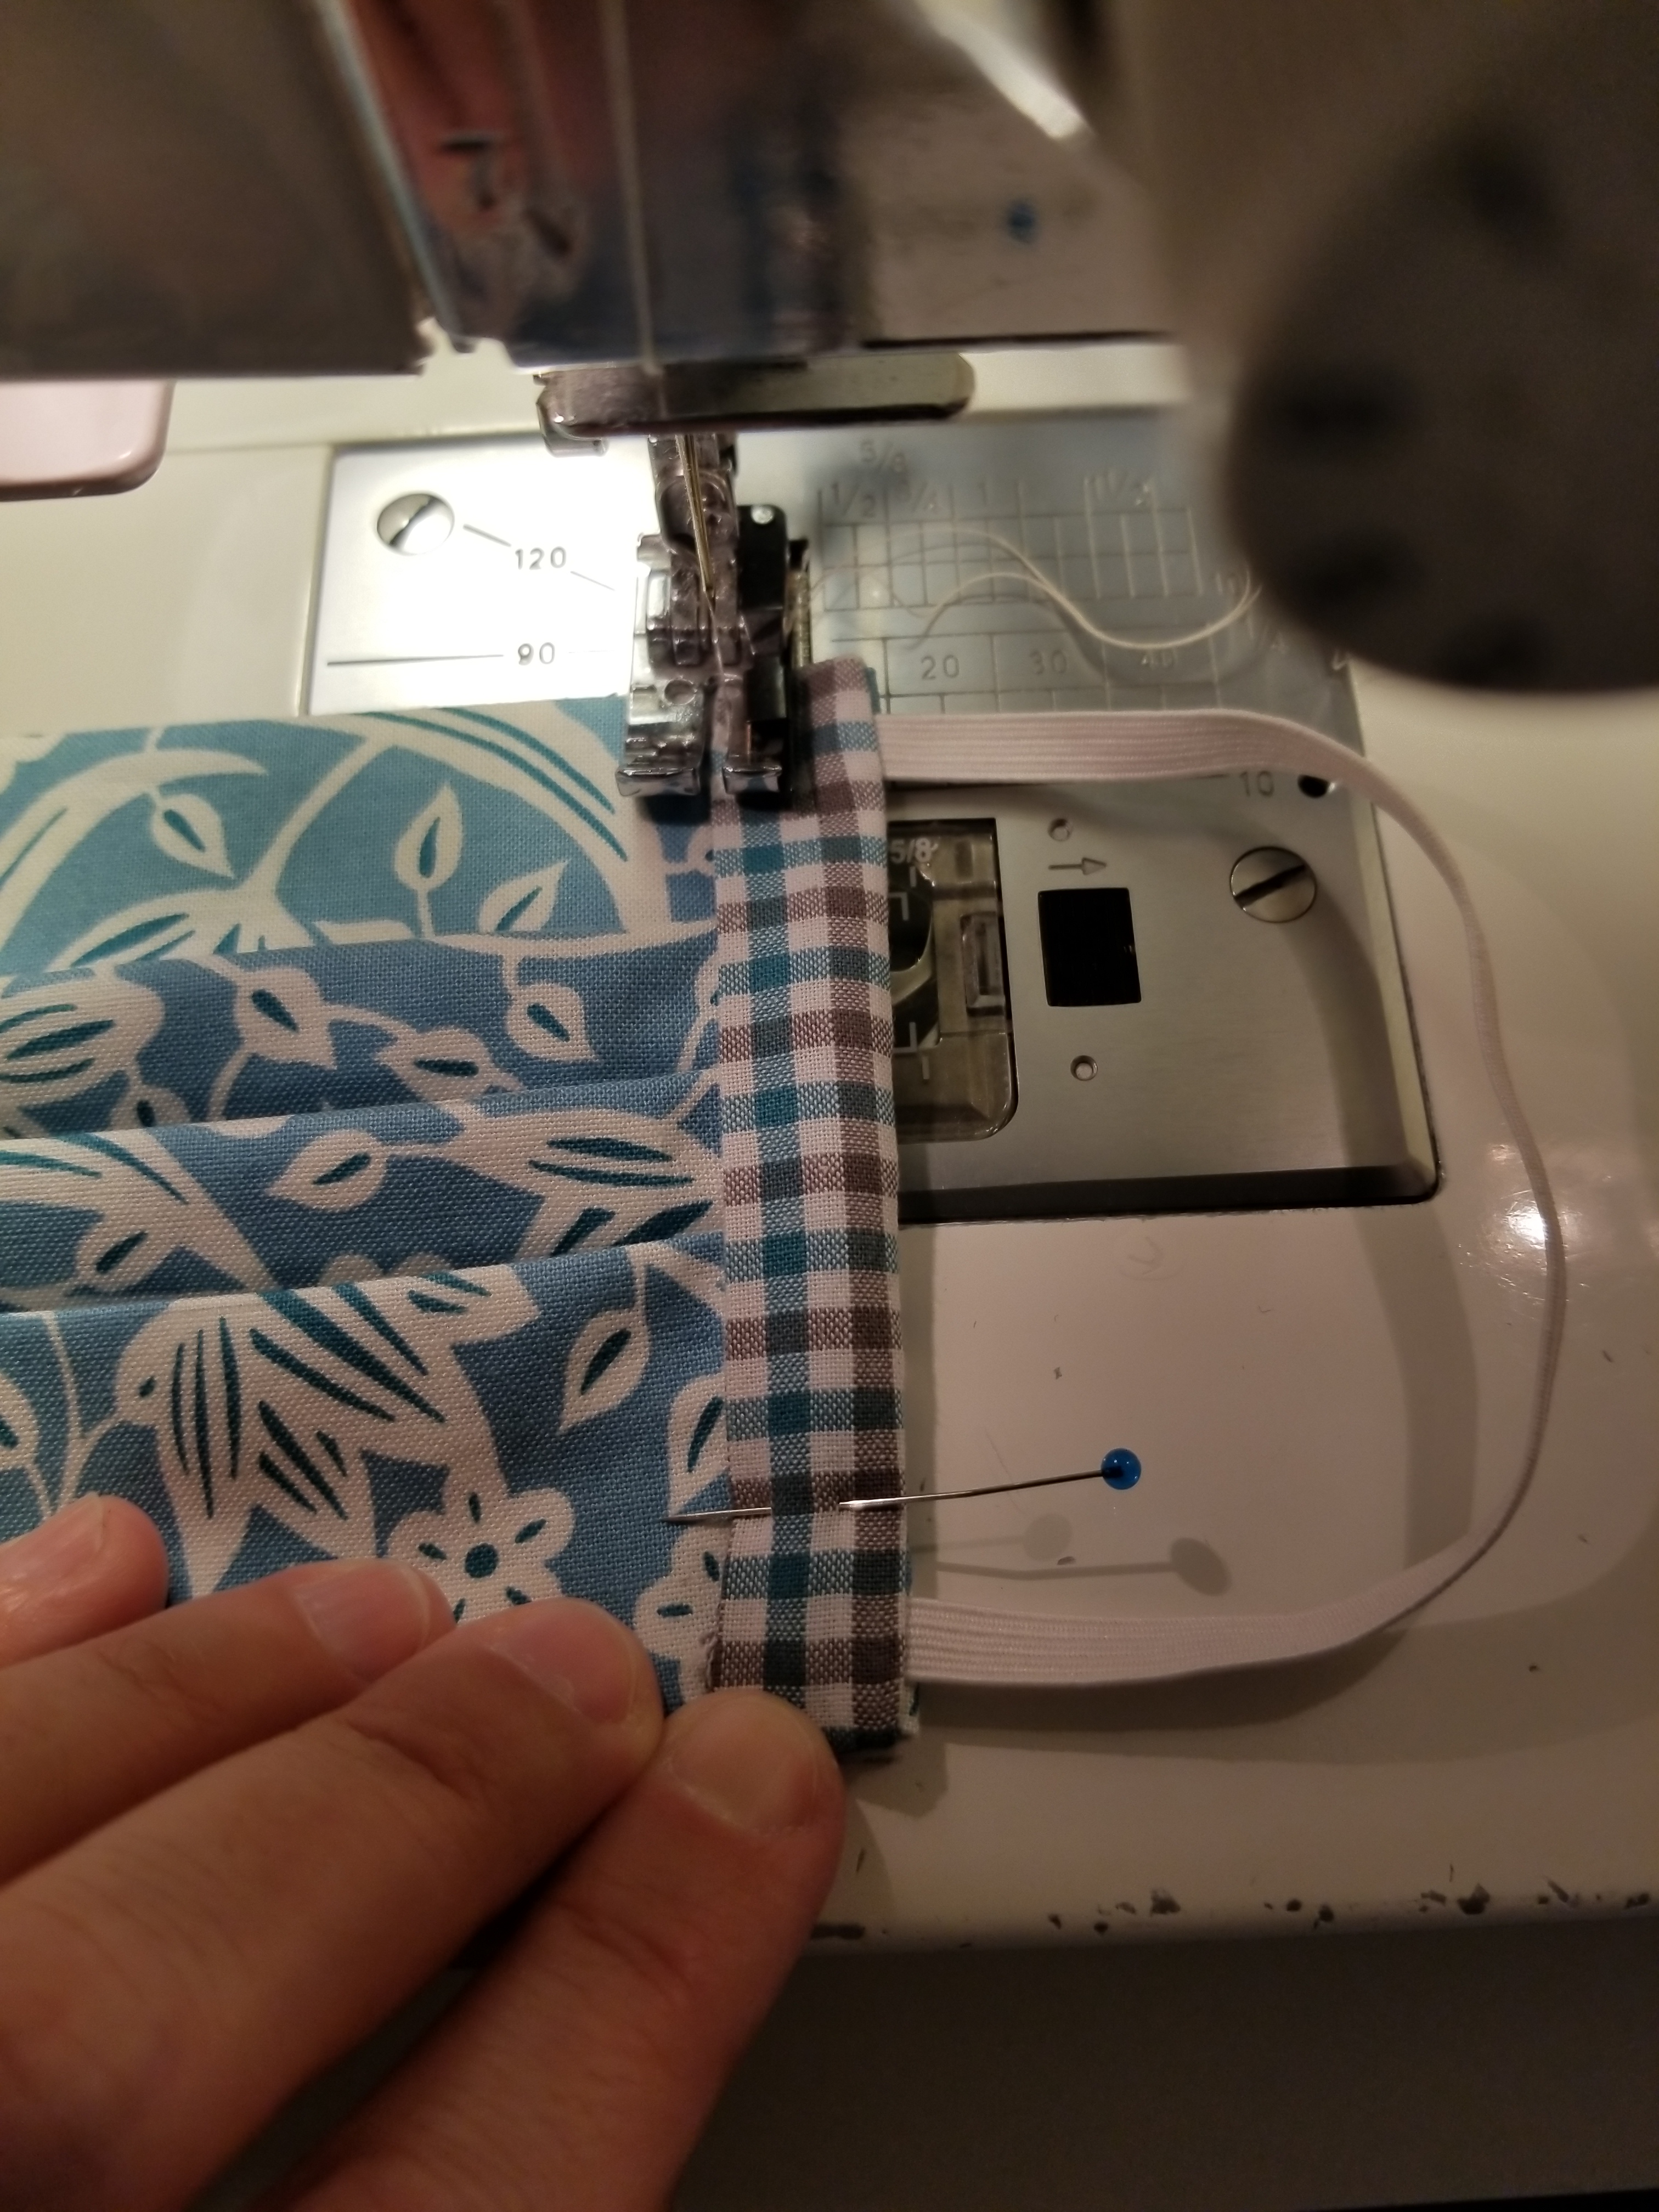
If you are a good sewist, you will change out your presser foot to a straight stitch foot. If you are lazy, like me, you will keep that 1/4″ presser foot on your machine and struggle your way through this next step. 😀 Stitch this accent strip down to the main body of the mask, sewing along the edge, making sure to back stitch at the beginning and end.
This step isn’t necessary. It just gives it a nice finished look, and helps to give that elastic a little extra stability. Stitch down the edge of the mask close to the elastic side.
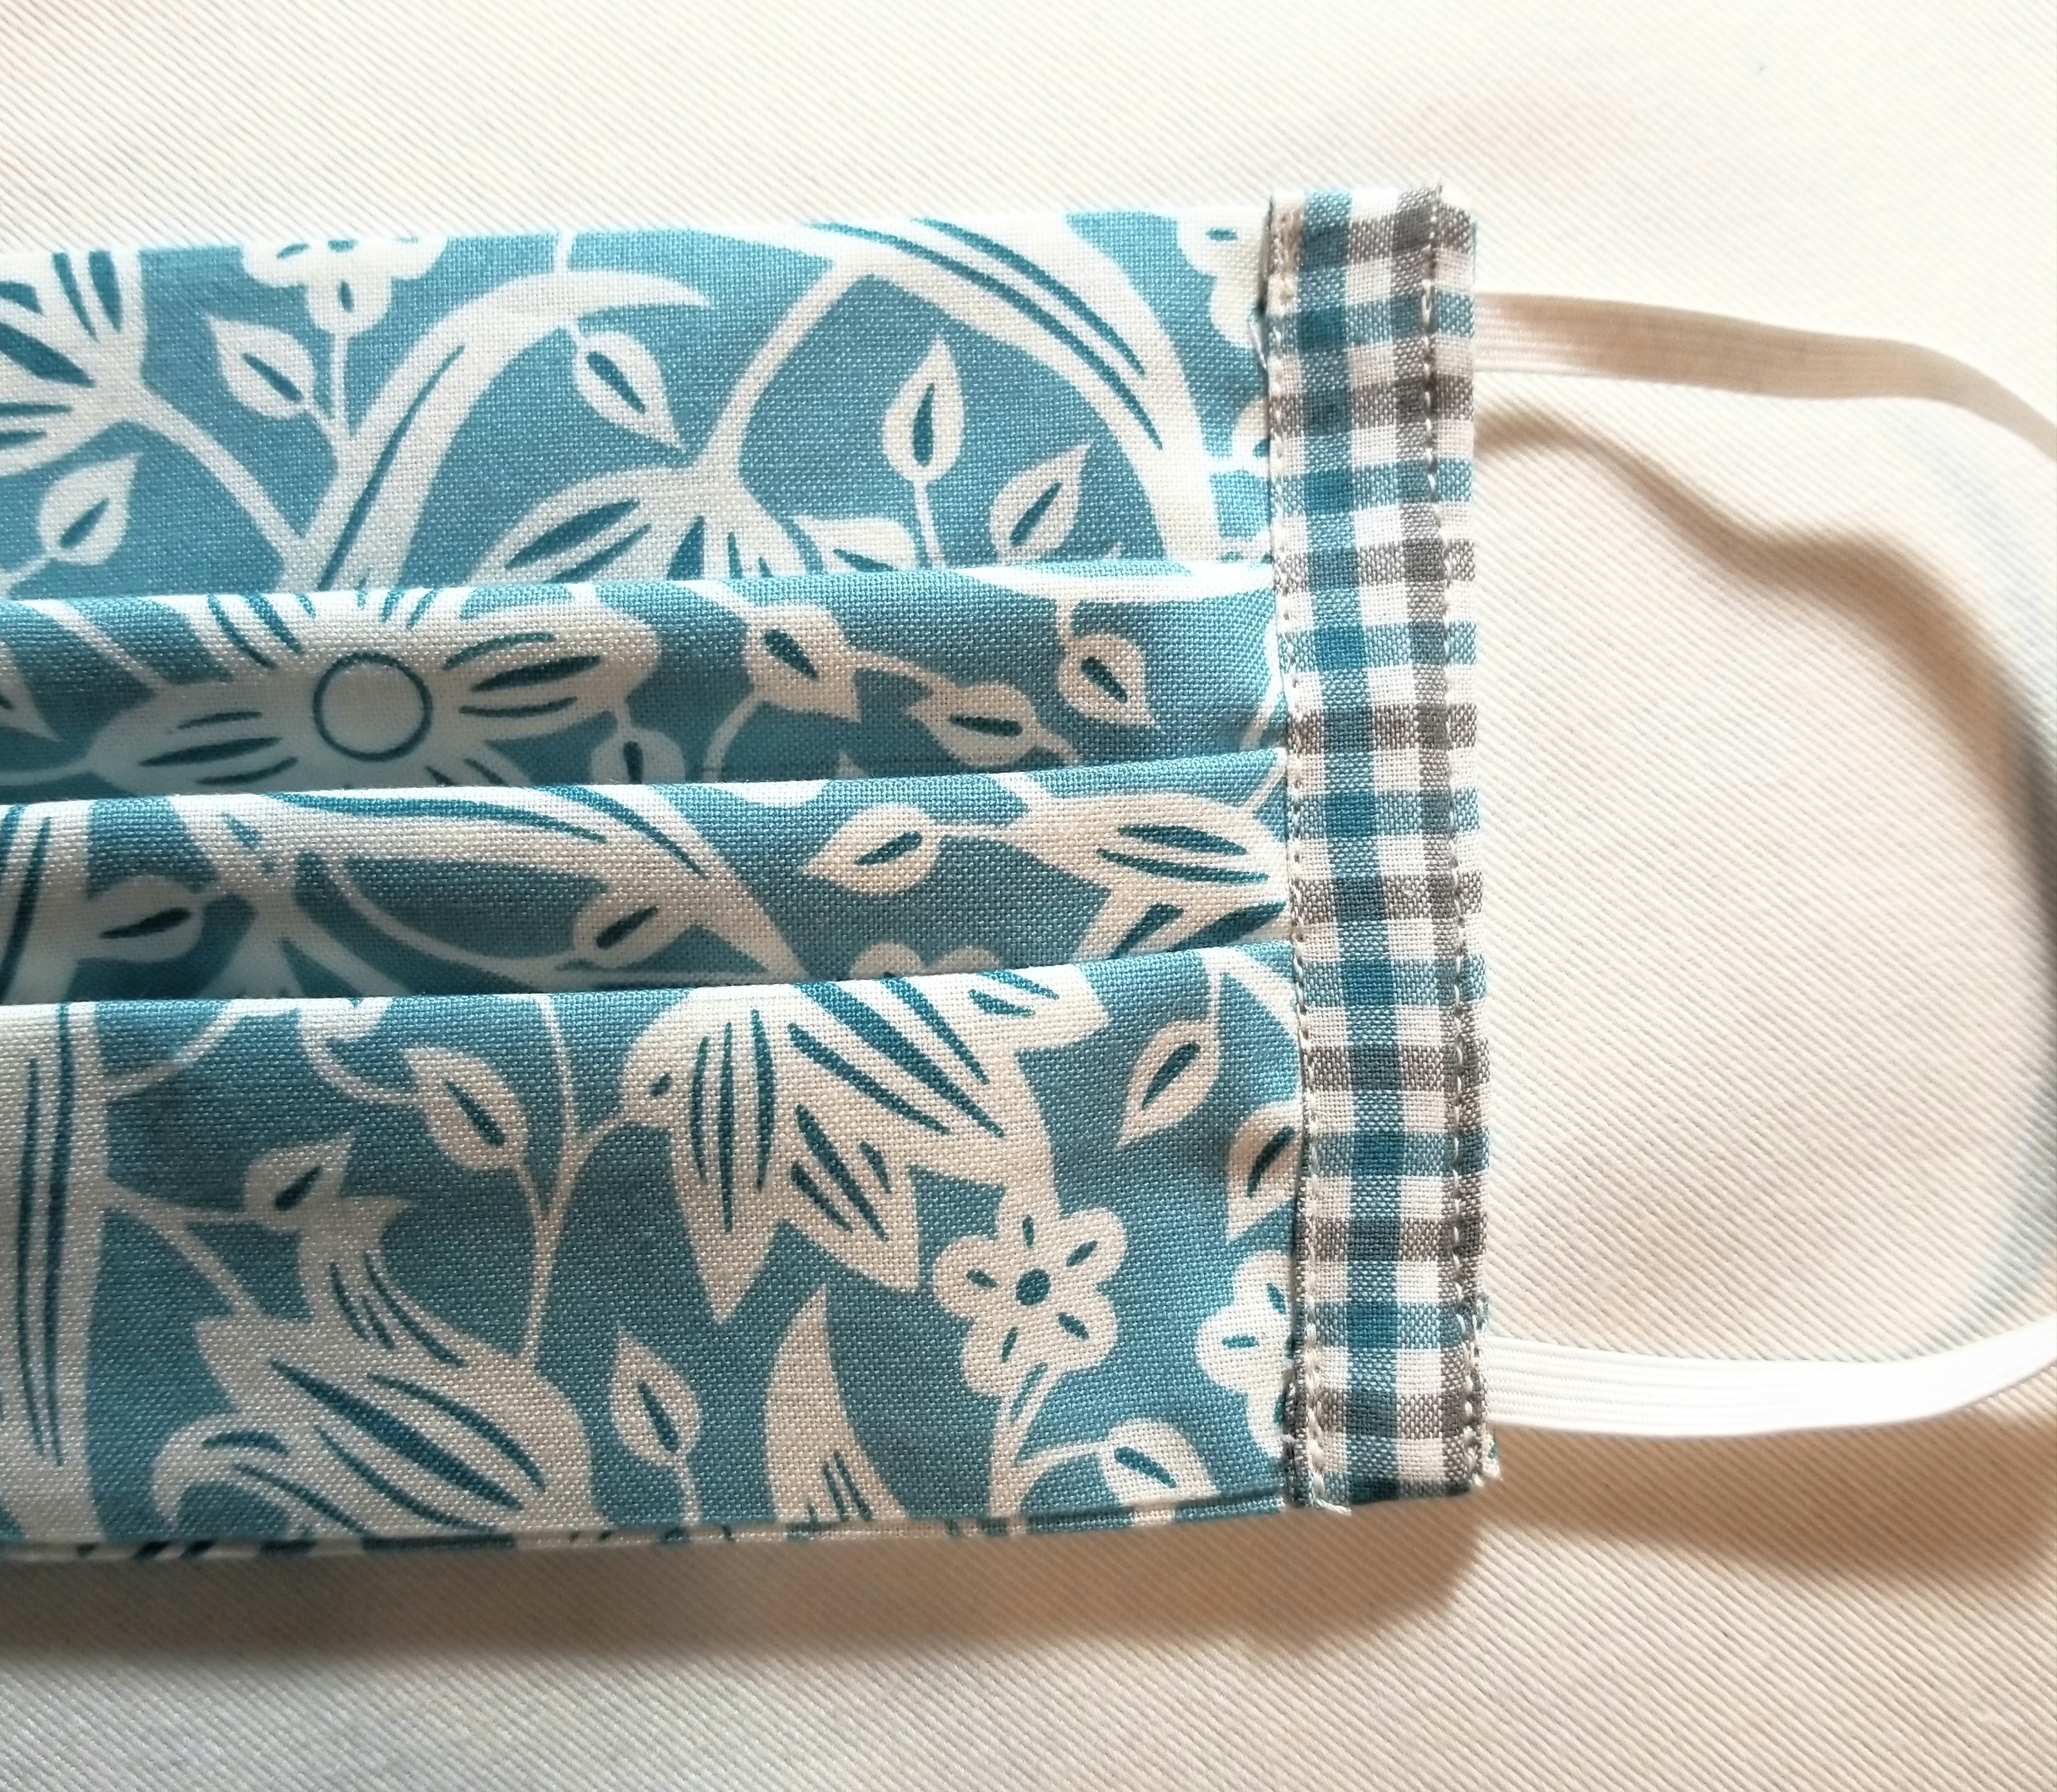
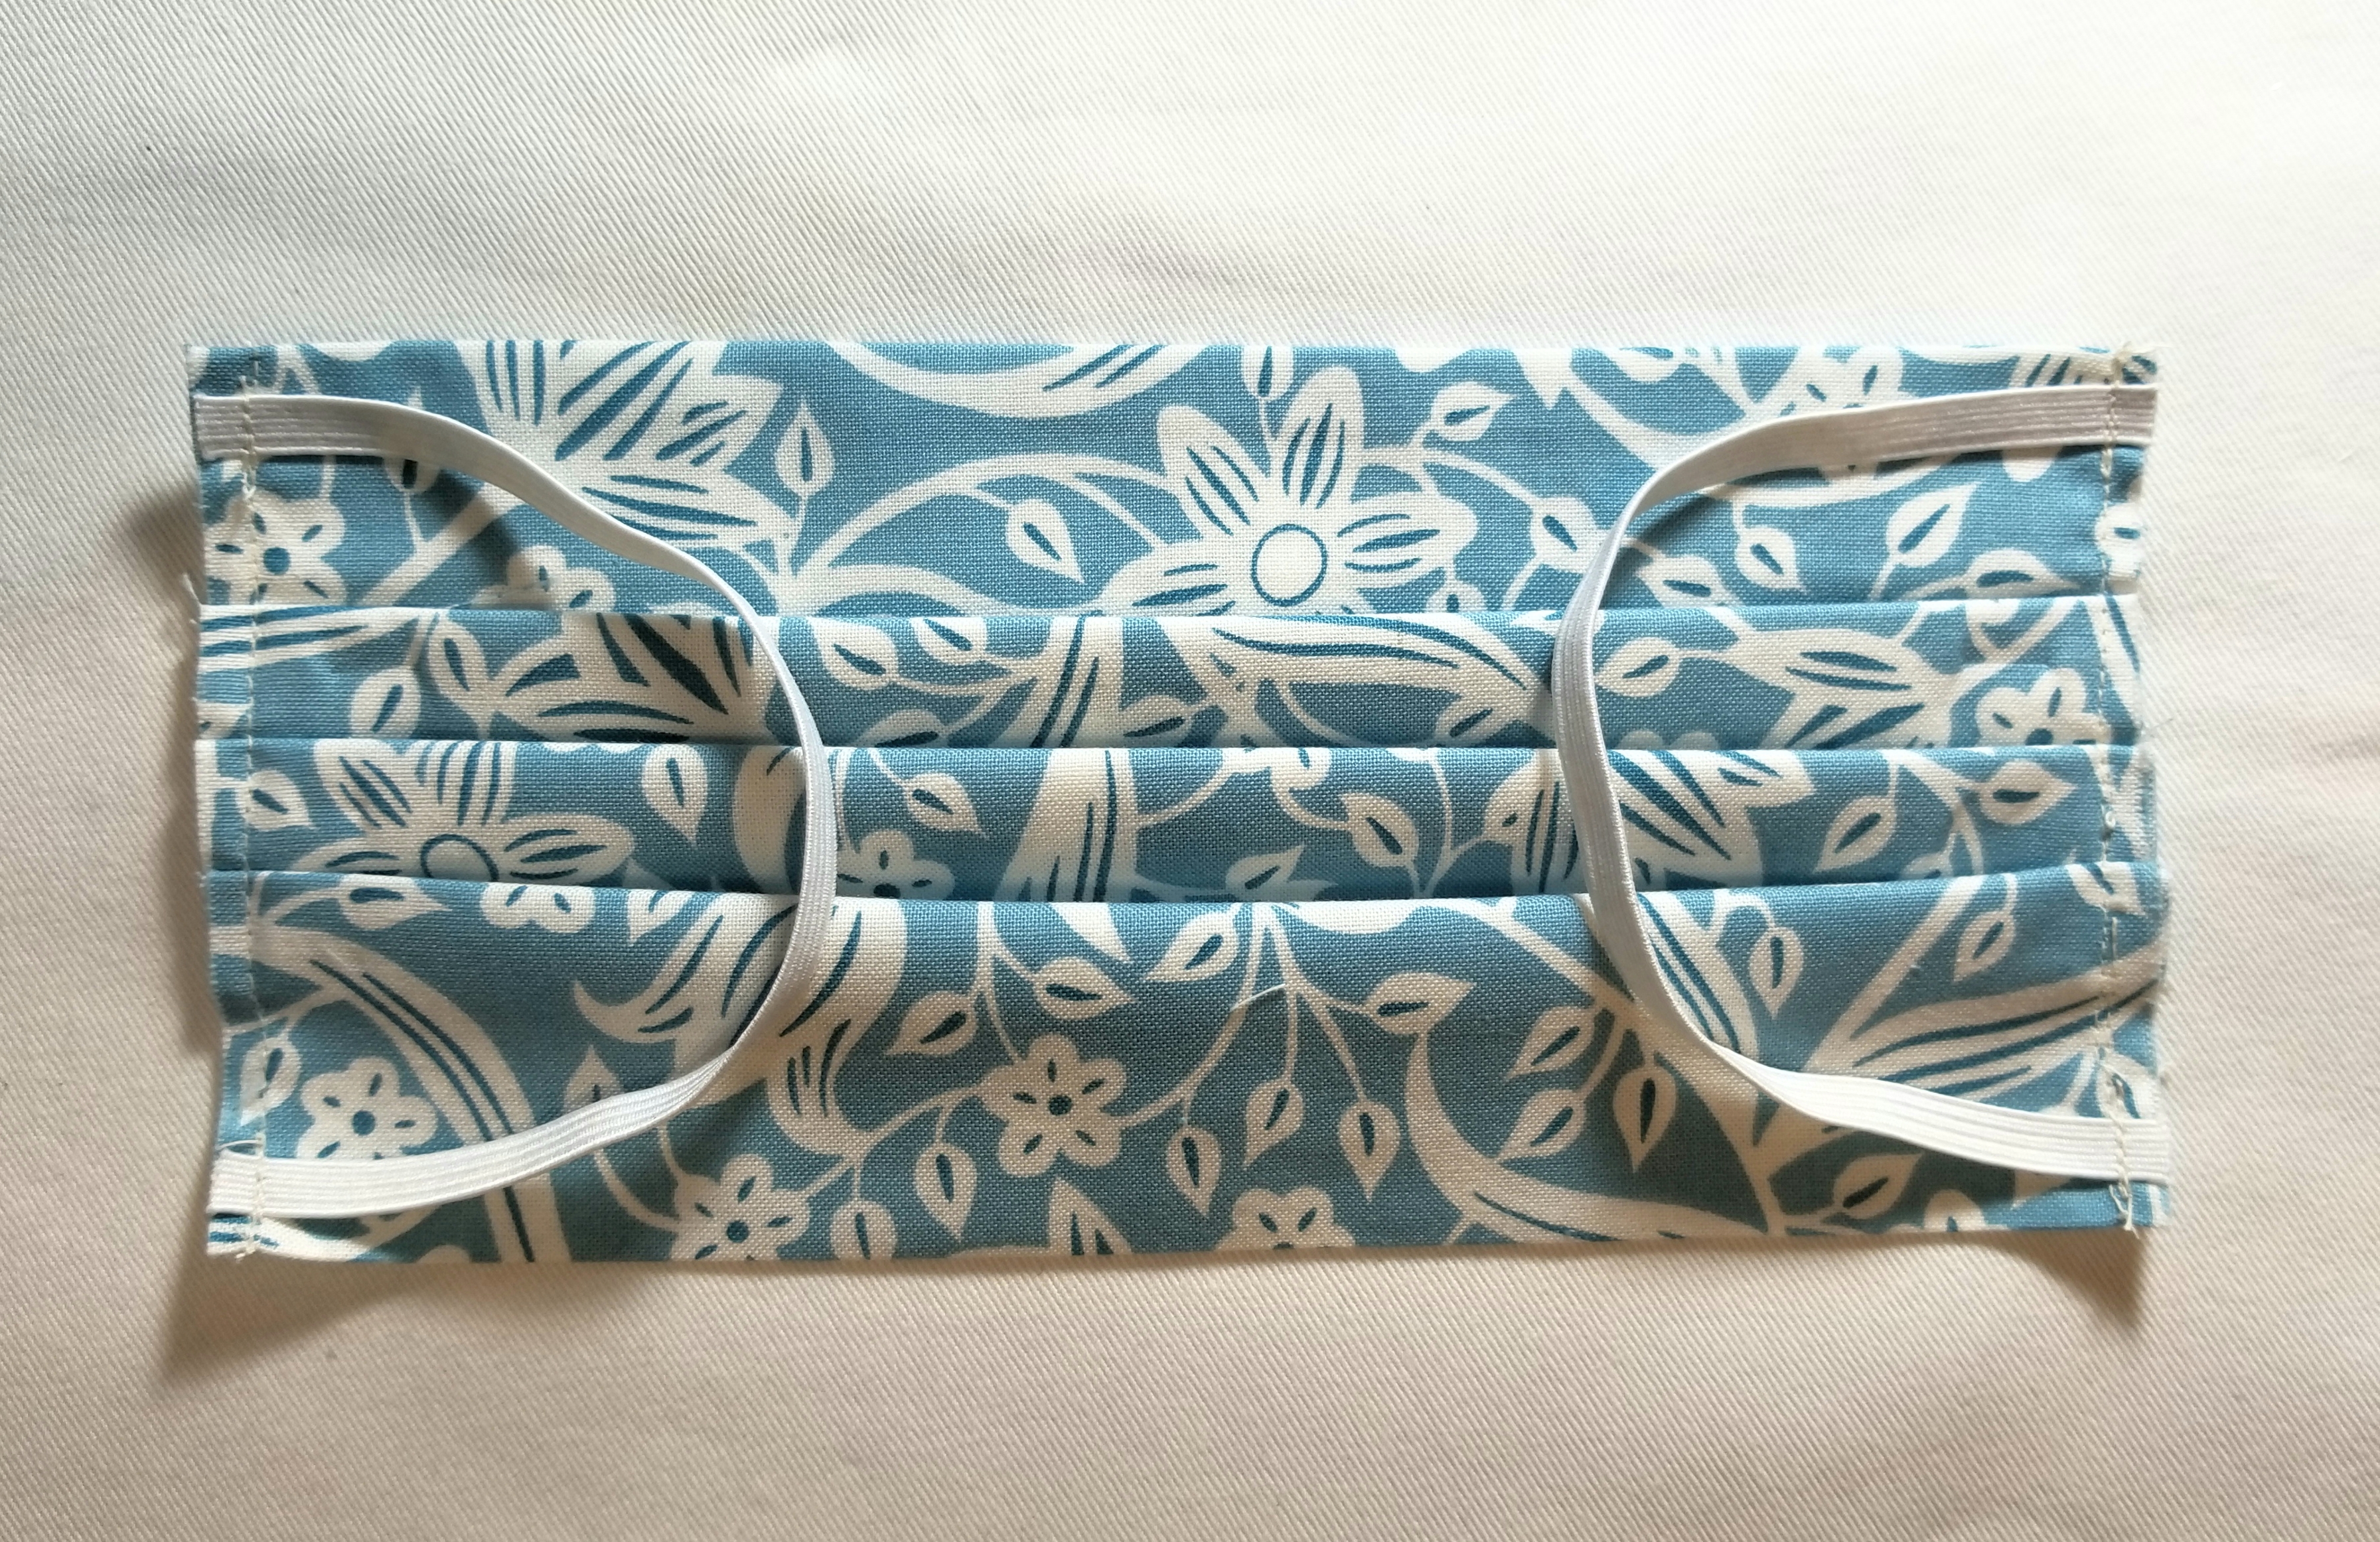
The front of your mask should now resemble the above picture.

The back of your mask should look like this. Following the previous steps, attach the remaining accent fabric piece to the other end of the mask.

You should now have a reusable, washable mask that measures approximately 4″ x 7″ (unopened).
It took a few hours to put this free tutorial together for you. For this reason, I am greatly appreciative for any mentions that you can give me if you should use this tutorial. If you post a picture on social media, you can use the hashtag: #buttoncountermask. Feel free to share this page, and please tag me in your pictures so that I can see your beautiful creations. Last, I appreciate constructive criticism, so if you notice something that doesn’t look right, or does not make sense, bring it to my attention. I am happy to clarify any steps where you may have questions.
Enjoy!
P.S. Obviously, the elastic length can be adjusted to your facial measurements.
EDIT (March 24 2020): Because this tutorial has recently been used on a large scale, I will be adding a few things here as frequently asked and answered questions, suggestions, and reminders.
- This tutorial was happily shared by me over a year ago. This is not a new tutorial created in light of the current virus pandemic. I am not in charge, nor affiliated with any organization or entity requesting masks to be made. There are multiple organizations that are using this tutorial for their requests. If you have any question regarding what their requirements are, you really, really, really need to ask them. Please understand that I cannot and will not tell you what you should use, or how you should make your mask different from my tutorial.
- Keep in mind also that there are multiple entities that are using this tutorial for their requests. One entity may have completely different requests regarding features than another entity. (for example one organization is requesting a 4 layer mask, while another is fine with the two layer, as their thoughts are that they can be doubled up or used as a cover or liner to another kind of mask.) So, there is no correct or incorrect mask. Who are you making your mask for? Those are the people to whom you direct your questions.
- CHILD OR BABY MASK: After much thought, I have decided that it is in my best interest to NOT supply a mask tutorial for anyone other than an adult. One of my reasons for this is that I feel that a mask could pose as a choking hazard, and I do not want to have any part of that scenario. My suggestion is that you really should ask each individual child’s doctor or provider what their guidelines are, and go from there.
- I will not be held responsible for any mask misuse or malfunction.
- ELASTIC OR TIES? The main reason why my tutorial uses elastic is so I don’t have to tie it behind my head and mess up my hair. That’s it. So, if you are making the tutorial, and you don’t like the elastic, or if the person who you are making your mask for, requests ties; by all means put ties in yours. My pattern is very easily adapted to your preferences. There are organizations specifically asking for elastic, and some that are asking for ties only.
- ELASTIC LENGTH: I have read that a few of you recommend longer elastic; however, mine ended up being slightly loose. Therefore, I will not alter my pattern. I have stated in the tutorial that elastic length will need to vary due to the fact that human heads are not uniform (Thank goodness).
- I don’t have a PDF or printable version of my tutorial. If I decide to do that, I will; but it will be in my own time. I have received many hateful comments (that I deleted) demanding that I provide this. I need to remind those few sour apples that I am under zero obligation to do so. If my absolutely free visual tutorial isn’t to your liking, I invite you to go find one that makes you happy. If you are a person who often finds themselves using the words ”I need you to…”, you might fall into this category.
- I am completely honored that many of you are using my tutorial, or even certain aspects of it to help people in need. Even if you are using a completely different tutorial or pattern and just stopped by to check this one out, I applaud you for being a maker during this time. I cannot express enough how happy it makes me feel to see so many humans getting together to do something for the greater good. Please continue being that human. Those are the best ones.
I am signing off now to take care of my family, who needs me now more than ever. Thank you all for your kindness and understanding. God Bless.

Personally I love this mask! I think it’s great that you took the time to share it and even took step by step pictures which are SO helpful! For those entitled people out there that can’t appreciate ones time, effort and generosity all I can say is please don’t spoil it for the rest of us who CAN and DO appreciate those who share!
Thank you very much
Marcelle
Thank you for this tutorial. This was so easy to follow and the best I have found. You are very kind and unselfish to share this with us. God Bless you..
Thank you very much for the excellent and informative tutorial, your efforts are very much appreciated.
Monica J! (I am Monica J as well…middle name Jean) You are welcome. It makes my day to know that the mask tutorial is being used and appreciated by people like yourself. Have fun with it, and sew on.
Thank you SO much for this easy-to-follow tutorial! I am a fairly novice seamstress, so this has been SO very helpful!! Truly appreciate your sharing!
Debbie,
I am so dang happy to read so many comments like your own of novice sewers that have taken this on with not only success, but little fear. It certainly helps motivate a new sewer to try other patterns. I can’t wait to see where this takes you.
Very helpful and well explained! Thank you for sharing!
Diane, You are ever so welcome. Thank you for visiting. I appreciate it. I was so glad to share.
Thank you so much for this tutorial! I much prefer picture tutorials over video ones. It was very easy to follow, and I have made many masks using your pattern for friends and family members. I tested some other mask patterns that had filter pockets or 3 layers of material, but some were hard to follow, or they did not look as nice or fit as well as your pattern. I kept returning to your pattern, and ended up modifying it to have these additional features for my masks. Again–thank you for posting this, and for helping me keep my community safe!
Cally,
I have always been a picture person too, maybe because I could sit and study a picture like a sudoku puzzle, which always ends up making sense, even if it does take a few hours. 😀
I am so glad that you were able to modify it easily enough for your preferences and needs. Thank you for your feedback.
I love your tutorial and your wonderfulmy honest spunk. Thank you for the tutorial. Margaret
Margaret,
Thank you! Although, I need to keep my spunkiness in check on a regular basis, so that I don’t frighten people off. Happy sewing.
Hi, Monica,
First, let me tell you that your words touched me to the core. I was so upset by the demanding comments and general ugly messages you had received from some negative people, that I had to share aloud with my husband. I scrolled through your beautiful tutorial, showing him photo-by-photo what must have taken HOURS of painstaking work to share with all of us so selflessly. My husband shook his head in utter dismay at the fact that you should have ever felt the need to defend your methodology and said, “This just proves my point [a discussion we have been having for some years now] that people will find a reason to leave negative/nasty comments in response to absolutely ANY topic!” In response to the free pattern for face masks?
Anyway, please allow me to thank you for taking the time to share your skill and expertise in mask-making; breaking the steps down into bite-sized, understandable chunks; and then availing the entire kit and caboodle free of charge to anyone who dares to try! I appreciate it more than you can possibly know, and MANY will benefit from my learning from you:
I am an American Sign Language interpreter (and teacher) in the medical field—interpreting medical information between deaf and hard of hearing patients and their healthcare workers. I am not a skilled seamstress, but I’m about to try your pattern because I don’t want to have to endlessly purchase disposable masks for work (plus, I have a bunch of clients and several octogenarian family members who need them). I only use masks for a few minutes in conjunction with a clear face shield. When I get to the patient’s room, I have to pull down my mask to expose my mouth for lip reading purposes, but the shield is still in place, and everyone else is masked. We are all protected. Crazy times.
The last of my components arrived today (pliable metal pieces for the nose), so I’ll be getting busy tomorrow at the sewing machine. Thank you again. Please know you have helped many people. As for those who who have been hyper-critical, they clearly have too much time on their hands and have nothing better to do. Don’t let THEIR negativity alter the kind person YOU clearly are. Keep up the great work. May G-d bless you and your family with good health, happiness, and prosperity for many years to come.
-Laura-
Laura,
We have a large population of hearing impaired people here in Austin, due to the School for the Deaf (I am not even sure they call it that anymore, but it has been here since the 1800s) One of the first alterations that I saw of these mask patterns, and not only of my own, but other designs as well, was a clear window sewn in so that hearing impaired could read lips. I thought that was such a kind thing to do. I hope that this pattern is able to help you with your masks, and I applaud you for being an interpreter. Thank you for your kind comment, and for taking your time to write. I appreciate folks like you, as you are the fire that keeps me going. Many blessings to you and yours.
Monica
Monica, thank you for your kind words of encouragement. I had seen a design with a clear window as you describe, but I’ve not been able to find it since. I’ve come up with my own, but the problem is fogging. Cleaning with shampoo (No More Tears formula) helps, but long-term hot breath against a tiny piece of plastic is still hot breath against a tiny piece of plastic. I’m sure over time, as a community, we will come up with something more adaptable. I just received a welder’s-type helmet (not quite as heavy as a welder’s helmet, but not as flimsy as the little face shield). This will be a start for me long-term.
And yeah, we don’t use hearing-impaired anymore because that implies a condition of something broken that requires fixing; most Deaf people are very comfortable with who they are and feel there is nothing about them that is “impaired.” But it is most definitely still called Texas School for the Deaf. Given your proximity to the school, do you have access to the pattern you mentioned? I have not seen it again since February, and OUR school for the Deaf is hundreds of miles away. We do have a Deaf population down here, but not nearly as strong as yours. (I’ll explain capital [D]eaf at another time if you’re interested.)
Many thanks in advance!
Pingback: The Ultimate List of DIY Face Mask and Scrubs Patterns and Tutorials - Chamelle Photography, Travel and Lifestyle Blog in Melbourne
Thanks! Great, clear directions! I have a suggestion you might like.
Mark off your pleat measurements on a piece of cardboard or the back of a notepad. I made little notches at each mark. Then, I just lay it on top of my mask and mark off the location for the folds. Helps when making many masks. Thanks again!
Nancy, yes. In fact, I just make my marks on the mask all at once. 🙂
Thank you so much for this clear and easy to understand tutorial…I was prompted to comment simply because I read that you had received some negativity…I can only say how sad I am that anyone could behave this way and I am sure they must be in an absolute minority….you have taken time out to provide a fabulous tutorial, at no cost to the user, only sharing something which you yourself found helpful….thank you very much
Alicia, Thank you. I promise that it won’t stop me from sharing in the future. Enjoy.
Awesome tutorial. Easy to make a paper pattern with your directions, reminds me of my grandmother designing at the dining room table. Thank you and be safe!
Thank you, Lorraine. I hope that you were able to make one of these with success.
Hi Monica!
I love this tutorial and have made quite a few masks using it. I also live in Austin and yes allergies are killer here!
I do have a question IF you’re able to help me…I finished my mask pressed it and accidentally melted my elastic!! Literally near tears here… is there anyway to fix/replace the elastic without taking the mask apart?
Really great tutorial. Thank you so much.
You’re very welcome.
How would you recommend putting a nose piece (pipe cleaner) inside the top of the mask? Your instructions are thorough and the finished product is very nice.
I don’t recommend anything as far as changes go, but there are plenty of others here in comments that changed my pattern to their own specification and alterations, this being one of them. I hope they are able to shed some light on your request.
I just came across you tutorial for a face mask — it is by far the best I have found — very detailed and easy to follow. Thank you so much.
Thank you, Patty. I hope that you didn’t have to sew a bunch of different ones before you found this. It makes me happy to know that you like this one. Happy sewing.
I like this pattern but why do the directions say 8 x 14 when your picture shows 8 x 15
Because the fabric starts on the number 1 line, and not the zero in the picture. 🙂
Well thought out and clear! Thank you for fabulous instructions!!
I am so glad that you were able to use this, Sandra. Thank you so much for trying it out. Enjoy.
This was a great help! Thank you for your time and energy put into this. I did have a thought while sewing I added a folded in half pipe cleaner and stitched it in with a zig zag stitch at the top and it forms to your nose from inside the mask if you sew in the beginning before flipping. Thanks again!
I love the tutorial! I’ve been making a variety of styles using a variety of patterns over the past few months with some successes and an equal number of fails. This pattern elevates my favorite method to a higher level with the stylish accents on the sides.
For people wanting ties instead of elastic, I could suggest a method that’s worked well for me. Take a t-shirt and lay it flat and smooth. With a rotary cutter and ruler, remove the hem. Then cut a one-inch strip across the whole width of the bottom of the t-shirt. Repeat this, so now there are two loops. Cut both ends of each loop to give you four strips. Stretch out each strip as long as you can. They will curl and lengthen. Now simply use one of these strips in each corner in place of the elastic.
Really clear…. pictures are great and my way to learn… And I teach quilting. 🙂
My only question/concern… why is it so wide? I fell like I’m missing something.. it’s really pretty and finished, by really wide. Can you let me know if I’m missing something….
It should only be about 7 inches wide when finished, is that what you are ending up with?
Dumb me…. Just goes to show you – READ the directions!
Carrie, however you got that idea in your head, get it out. You are smart. Without question.
Agreed! I appreciate your taking the time to call this out. I am too quick to call myself dumb, even though I know that I just forgot something or misunderstood. Sometimes, it takes someone like you to point out that I am not really dumb, and putting myself down doesn’t help anything!
I’ve come to the conclusion that because we read or understand instructions differently..doesn’t make us dumb!! We always learn from our sewing mistakes and lots of time can come up with another way to do it. Lots of times I get my best solutions when I’m laying in bed.
Thank you so much, Monica, for posting this tutorial. Even if it was over a year ago, it’s so helpful in our present situation. I love all the photos to help along the way, I appreciate your suggestions, and I haven’t even started yet. I have all the material and supplies, and I can’t wait to get started.
Too bad about the sour apples! Some people just don’t appreciate a good thing when it’s right there.
I love this tutorial and find the step by step photos and instructions perfect. I’ve made dozens of masks for family and friends using this pattern. Thank you so much for taking the time to post this.
I know I missing something, but when I apply the contrast piece on the side, the elastics are in toward the mask. How do I get the elastics to go out to the side? Can’t quite figure it out.
Janet, I don’t think I can help you until I understand which step you are on. Have you basted the elastic to the mask? Have you pinned the accent strip down on top of the elastic, folding the top and bottom end to the other side? Have you sewn through this ‘elastic sandwich’ (the mask, the elastic, and the accent strip)? Have you turned that seam out to expose the elastic? Did you press? Did you fold the accent fabric to the other side of the mask completely so that it shows only on one side of the mask and not at all on the other? Did you sew this accent flap down? Please let me know which one of these steps you are on. I am happy to help you out.
Same here! That’s what I get too. I did it on eight masks before I tried one on and discovered that I have missed a step or did one incorrectly.
This must be the step I’m doing incorrectly:
Open the the accent fabric strip seam by flipping it outward away from the main pleated piece, then press.
Tamara, once you sew that accent strip on, you need to cover up that raw edge. You do that by flipping the just sewn accent strip all the way over to the other side of the mask. All the way over…so you only see the accent fabric on one side of the mask and not the other.
Thank you for your patterns. God bless you and your family.
Thank you for giving us the gift of your time and knowledge. You are the “Johnny Appleseed” of masks! (Johanna …. Sew-seed? Sow-mask?)
I like the way you address the edges, neat and efficient, better than the CDC pattern posted on line.
Peace!
Clare,
Thank you very much! Yes, most of the mask tutorials, videos, and designs that look similar in shape to mine, actually started here. People and organizations made changes, tweaking the pattern, and adjusted it to their requirements, then produced their own version of the pattern. I had stated from the beginning, that I was happy that so many people were able to utilize this tutorial, and to use it as a vaulting point for their own pattern or uses. Thank you for your kind feedback. Enjoy.
I think I understand niw. When you turn the accent strip to the other side, that becomes the front. I’ll try that and see if it solves my problem. Thanks
Yes, really, there is not front or back, as the mask is reversible. It can also be turned upside down. While making the pattern, it can be very hard for the pattern maker to describe how to ‘turn a piece over’ because some readers perceive that as turning it top to bottom, or side to side, or flipping it over. Every person’s understanding is different. The picture of the finished mask on my blog, shows the accent strip side of the mask, so it is easier to call that the ”front” for visualizing the end product. Thank you for your response. I hope you have no trouble getting your mask out of this. 🙂
This GREAT much easier than I’ve try. Thank you
Thank you
Excellent tutorial. Pictures illustrate well with the instructions.
Thank you! Great job and very appreciated.
This is a lovely tutorial. Your pictures and the verbal descriptions are very useful and friendly. Thank you so much! I’m not a seamstress by any means, but I think I will be able to follow this quite easily.
Hi, Monica
I am super excited about making my own. I have purchased fabric and have just finished washing it all. Your pattern is great and you did a great job on the videos as well. I hope you are doing well along with your family! I am excited to begin, just waiting on my elastic. I ordered material from Joann’s and it has been delivered in 5 different shipments from all over the country.
All the best to you and yours.
Darlene Dickens
Georgia
You and your tutorial are the best! Thank you for your excellent detailed instructions that were free!😃 this is the most stylish one I have seen so far. Your frankness in response to the sour apples made me laugh. Keep up the good work❣️
Thank you 🙂
With a few tweeks, this is the EASIEST home made mask to sew. I added a 1/4″ top stitch channel to the top and bottom of the mask at the point when the two pieces are turned right side out; then slid a 6″ pipe cleaner (ends folded over to prevent poking) into the top channel (to shape around the nose area), then sewed the elastic ends and the pleats at the same time. What the mask will stop is the droplets that you shed when you speak – you still need to be six feet away from others!
I LOVE YOUR DESIGN! I think you are a genius!
Thank you so much! I have been using your guide for my friends and family but converted to metric so used 1.3cm pleats and 3mm – 6mm seam allowances, instead of 1/8″ and 1/4″ ❤
Thank you for your very detailed and easy to follow tutorial. No doubt it was time consuming to make and as you noted, NOT required by any means. Hopefully those who found it necessary to criticize will find some other pattern that better suits their needs and move on. I appreciate your willingness to share this. Thanks again. Patti
You are my sweetie…forever. I am going to be 80 in two months and have sewed intermittently across the years. I have made two or three masks lately but wasn’t real happy with either. I bought the paper throw aways and they are not only hard to breath with but don’t feel as safe on as the cloth ones do. I think I can manage to adopt you. giggling. My oldest child (?) is 61. I am so overjoyed to find this pattern. I have so many scraps and can use them up this way, I bet. Just bought a paper roll of triangles on a roll and I am going to make some pretty face masks for me and mine. Are you an angel? I bet you are! I have 4 simplistic books on amazon and kindle (one about Alzheimers (Lost father to that) plus trying to learn to draw and paint. Life is good and I’m planning to enjoy whatever the good Lord plans on giving me. Thanks a million.
Vicky, you have just become a new mother. 😍 Don’t worry, I come already potty trained, and I make my own bed. Love you!
Not sure what I did but the edges bagged out when I put it on, I threaded the elastic through the narrow side fabric and it did fit my face better. Might try a slightly smaller size next. Great tutorial, easy to follow, thank you
Julia, I am glad you were able to make improvements for your specific needs. I love that people are able to alter this design so easily. Thank you for your feedback.
I’m sharing this with your hashtag because your instructions were so diligently constructed. I am experienced in sewing but I believe an inexperienced person would be successful when followed the great instructions and photos. Thank you.
Thank you so much for your lovely pattern and I’m sorry you’ve experienced hurtful comments. I have made probably 25 masks using a variety of fabric scraps – including giraffe and elephant prints and they’ve been very gratefully received. I now do batch sewing, which is really fun… One person asked me to make a gap for her to insert a filter – and it was easy to do that, too. Her in London we’ve now been told to use masks when on public transport , so I expect I’ll get many more requests
Dear Monica-
Thank you for a cute, stylish and fashionable spin on the hospital style masks. I have made many masks over the last months, but this is my go to. Easy to make with all the nice touches. Thank you for the easy to follow directions. I am finally putting the fabric stash to good use.
I very much appreciate the ad free context, but most importantly you putting this out in the virtual world with love.
Sending love and hugs and stitches back your way.
Hi! I love the tutorial and appreciate the time you spent making it and offering it for free! With NO ads, too!!! After reading some of the comments, I thought I’d help you out a bit and have turned your file into a PDF if you would like it.
i found this to be a wonderful tutorial – pictures are such a help – thank you for your time and effort in producing and sharing them – best instructions I have seen thus far. Thank you!
I have made dozens of these now for our village church community and beyond. We have made £700 or more for charity. They are hard on machine needles but this makes them stronger and easy to wash. Went mad with sequins lace and velvet as I got bored with the plain original. It’s kept me sane over recent weeks but hubby’s had enough now. It will be fun seeing them walking towards me. Excellent instructions. Thank you Cynthia
Made two masks tonight and they turned out great! Thanks so much for the easy to follow directions! Once I figured out the folds it was a breeze! I did have to make my elastic 7.5 inches. I guess I have chubby cheeks! Lol! I’ll be making a few more so that I have some options and some to share with my family. We’ve been working from home for the last three months. Today was my first day back at work and wearing the paper mask sucked! I had to find an alternative and your tutorial came up in my search! So big thank you!!
Thank you for your pictorial tutorial! I found it very useful and love the ability to use scraps for accent fabric. Anyone who complains about the lack of PDF or usability of this tutorial should look for another pattern. That is all…
Thank you so much for your tutorial! It was extremely helpful to me!
I like your tutorial. I would like to know if the pleats should be in the downward position when wearing. A lot of the tutorials show it this way. I just need to know if I’m making one in a directional fabric.