

My allergies have been incredible this year, and by that I mean that they have been worse than they have ever been. (Please, please, please do not suggest medical advice here. Much appreciated.) I see an allergy specialist who gives me 2 shots, 2-3 times a week to help with my symptoms. They have helped a lot; however, Juniper Ash (Cedar Fever!) here in Austin is 6 times worse than average this year, and boy oh boy, do I feel it. She suggested that I wear a face mask when I go outside to help reduce the amount of pollen that is going into my lungs and sinuses. After going to a few different stores to purchase some, I found that many other Austinites had already bought them out. No worries, right? I know how to sew. I will just make one. When I finished, I had many requests for a tutorial, so here you go:
Materials needed:

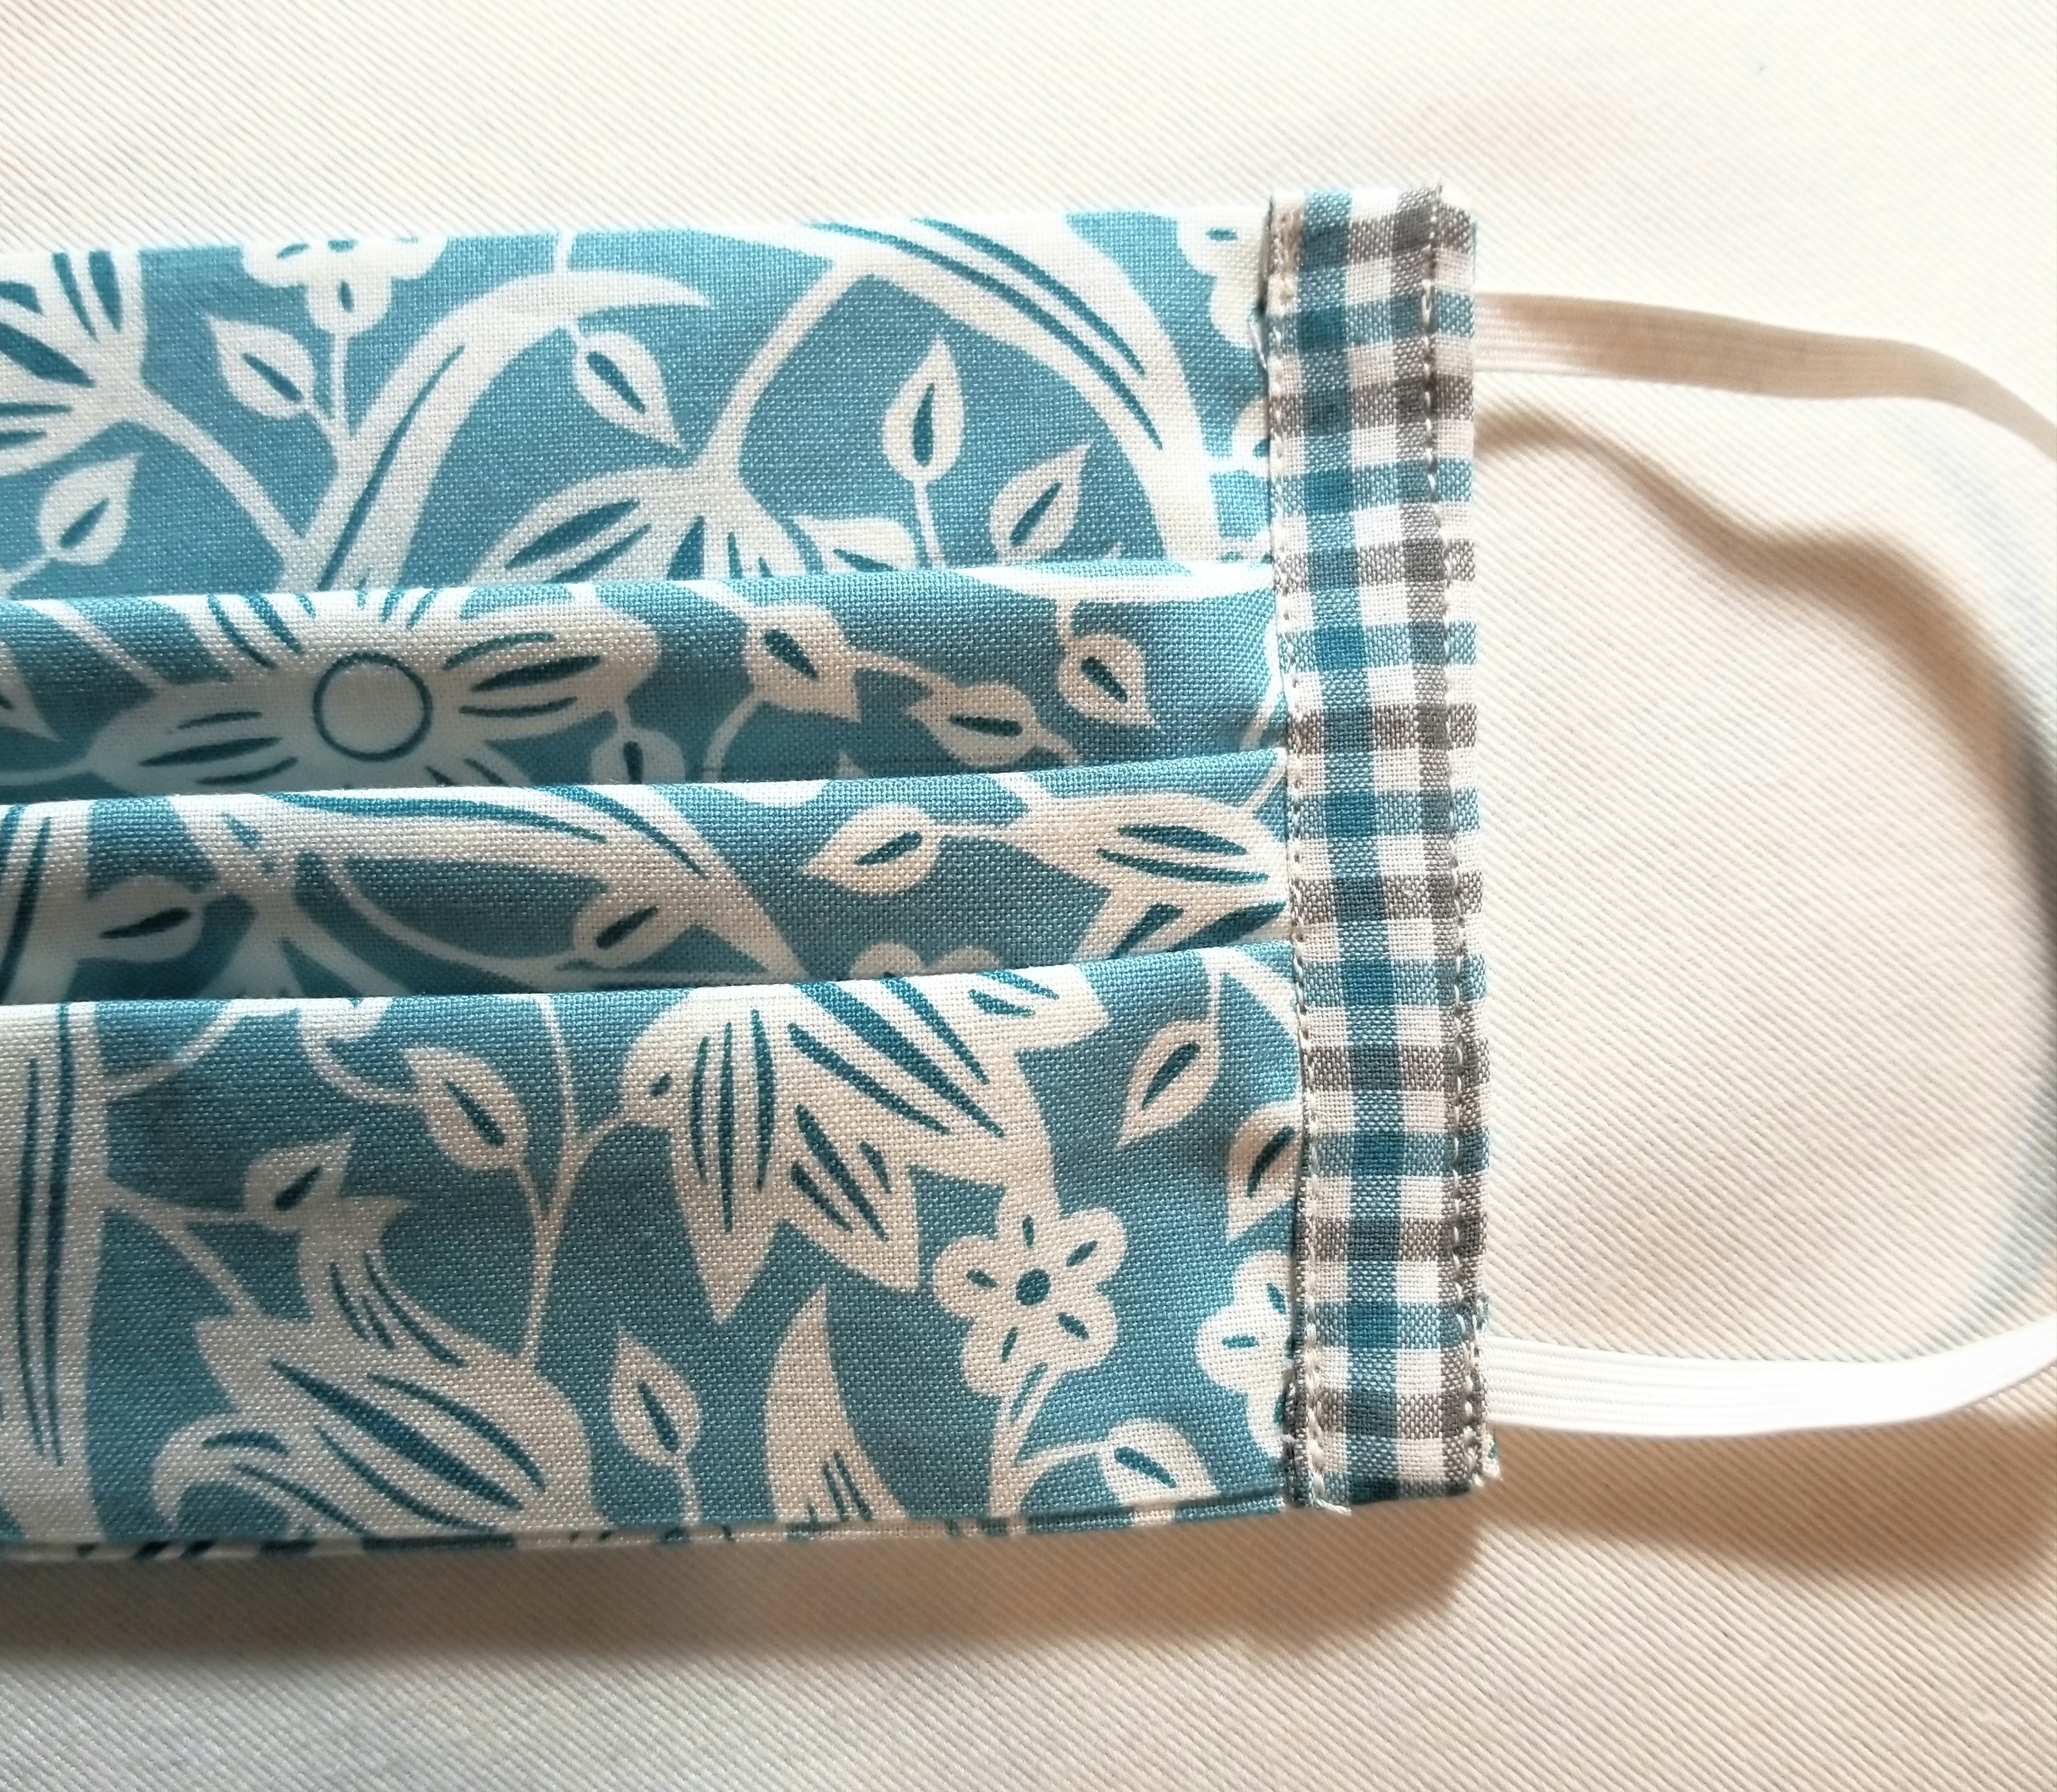
- 1 piece of fabric measuring 8” x 14”. Until you get familiar with this tutorial, I would suggest a non-directional print. One that has a scattered image printed on the surface such as the one shown.
- 2 strips of fabric measuring 1.75” (1 3/4”) x 6”. This will be the accent edge piece. It can be the same fabric as the main piece or a small-scale print or solid.
- Two pieces of 1/4” width elastic. These will be about 6 1/2” long.
- Ruler
- Fabric marking tool.
- Pins
- Scissors
- Sewing machine, threaded.
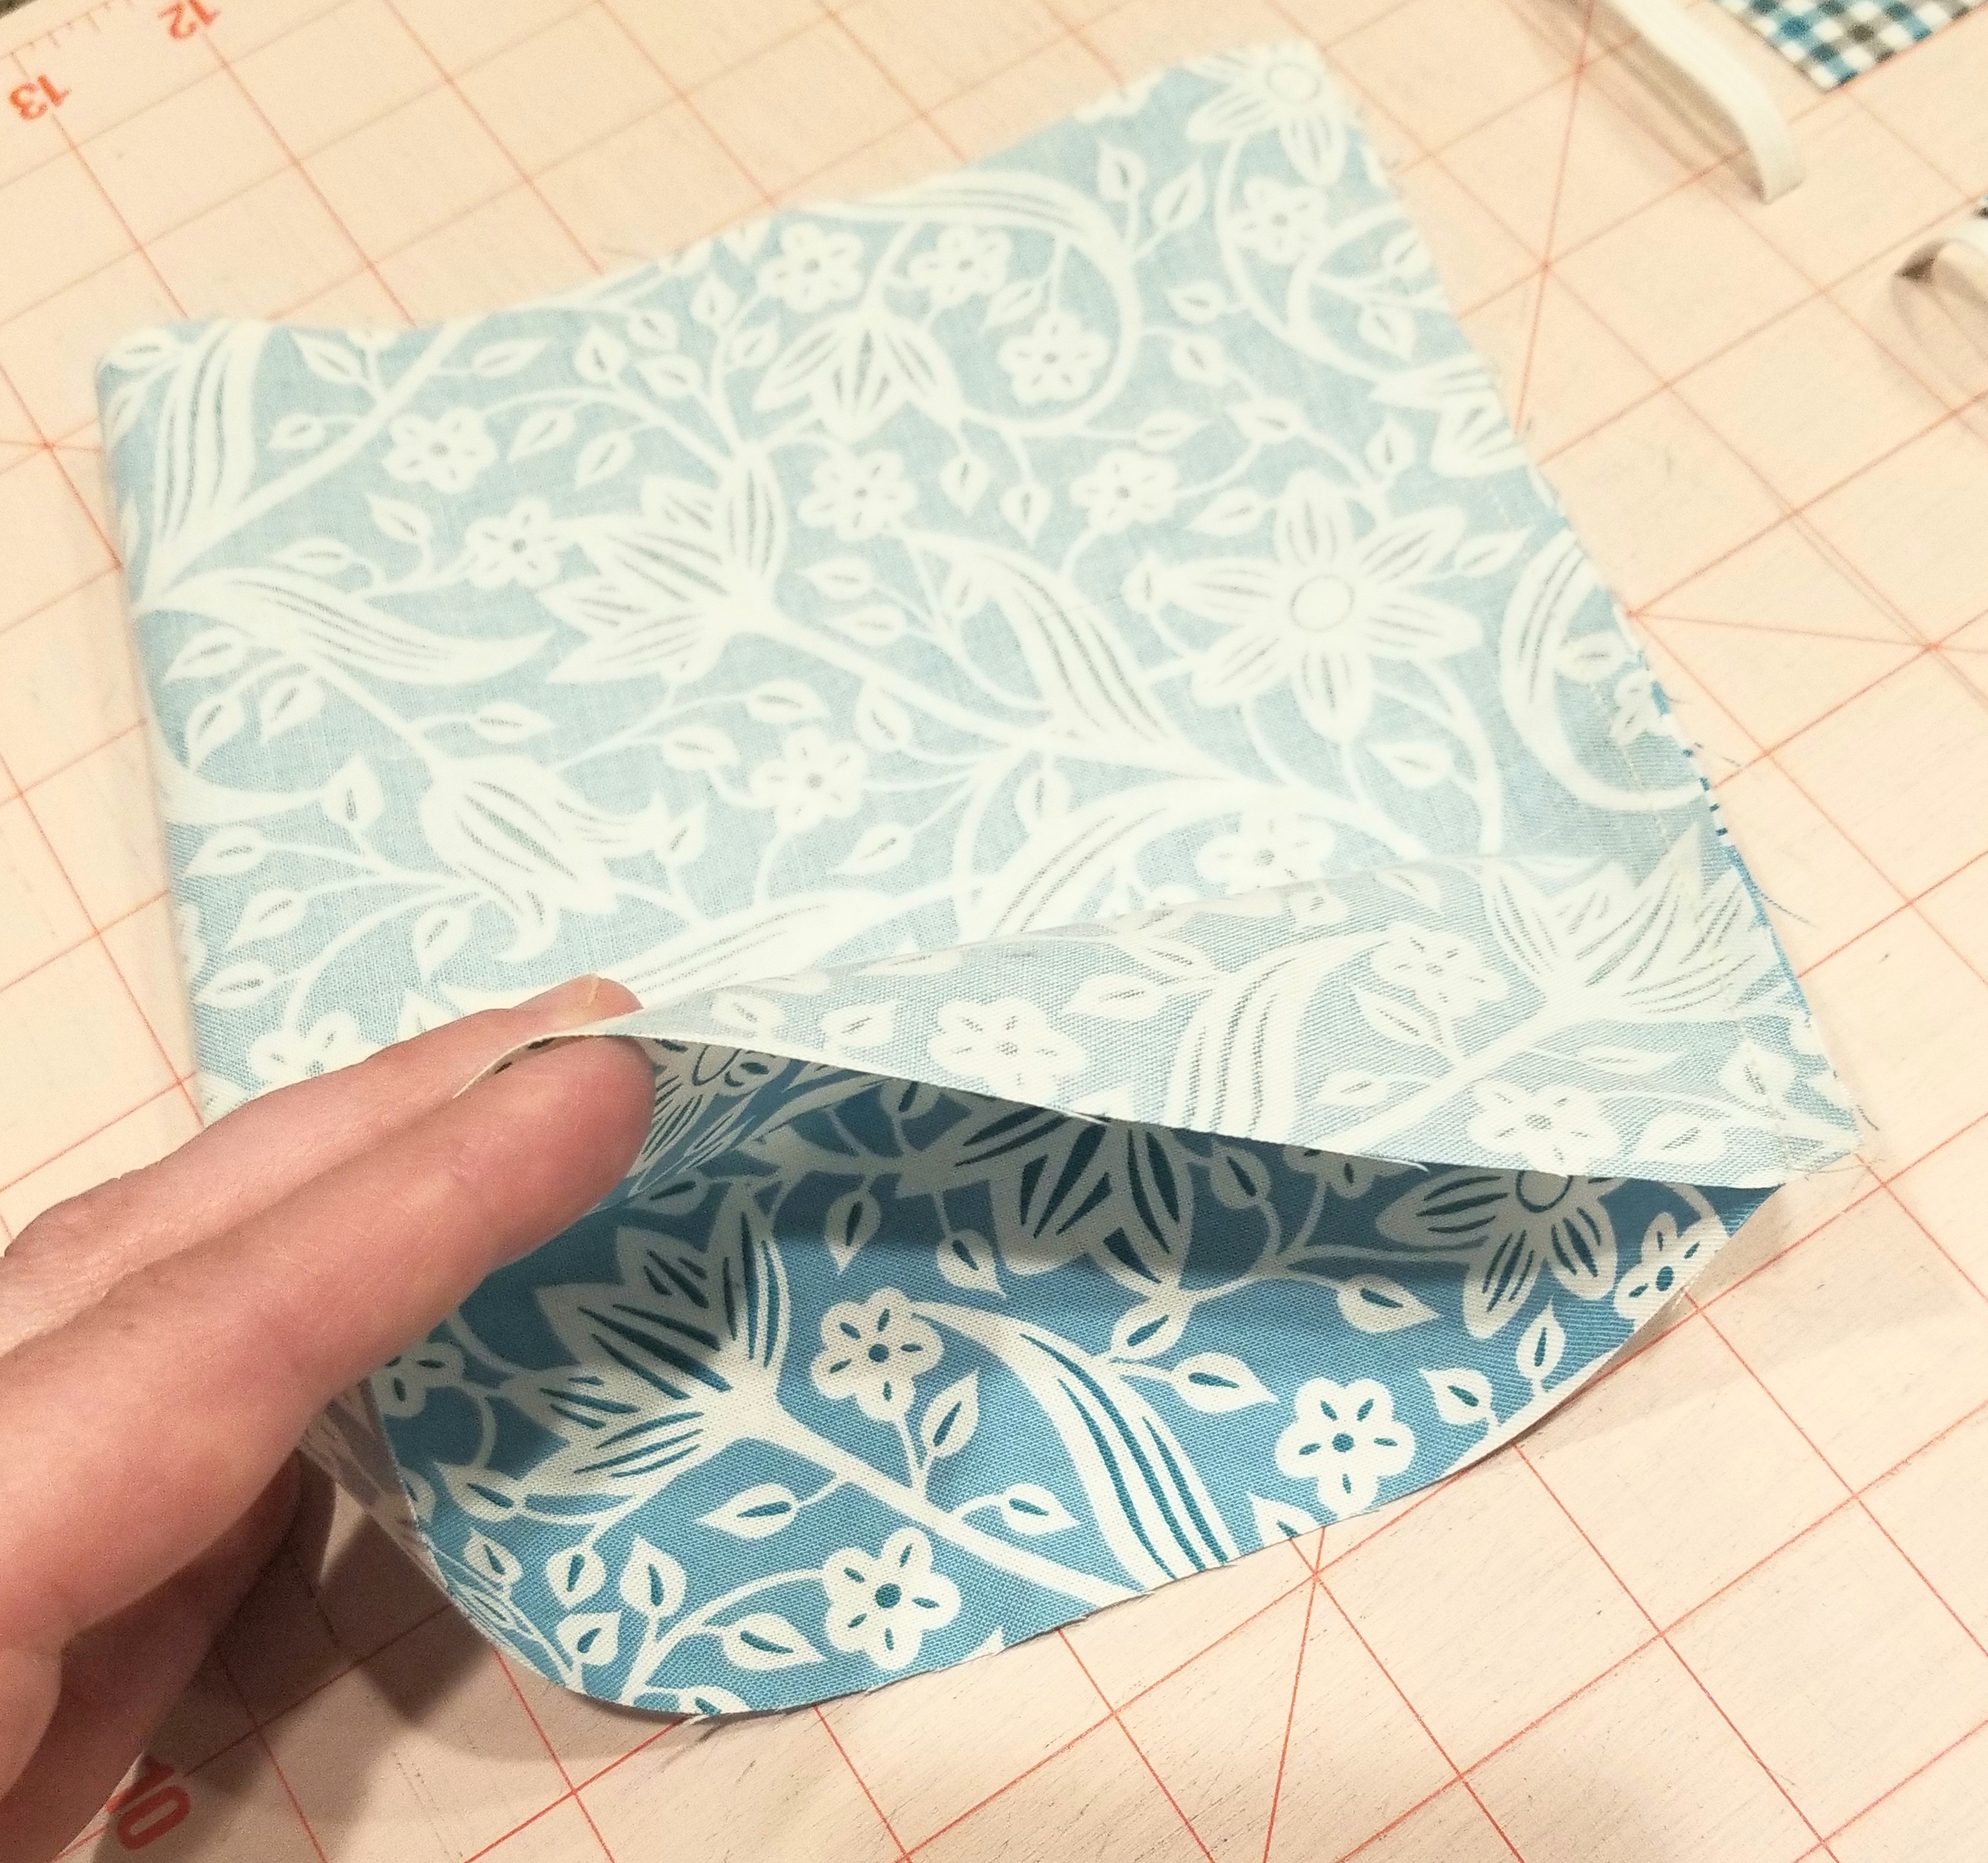
Fold the main piece of fabric in half, right sides together. Sew along the 8 inch width edge, using a 1/4 inch seam allowance.
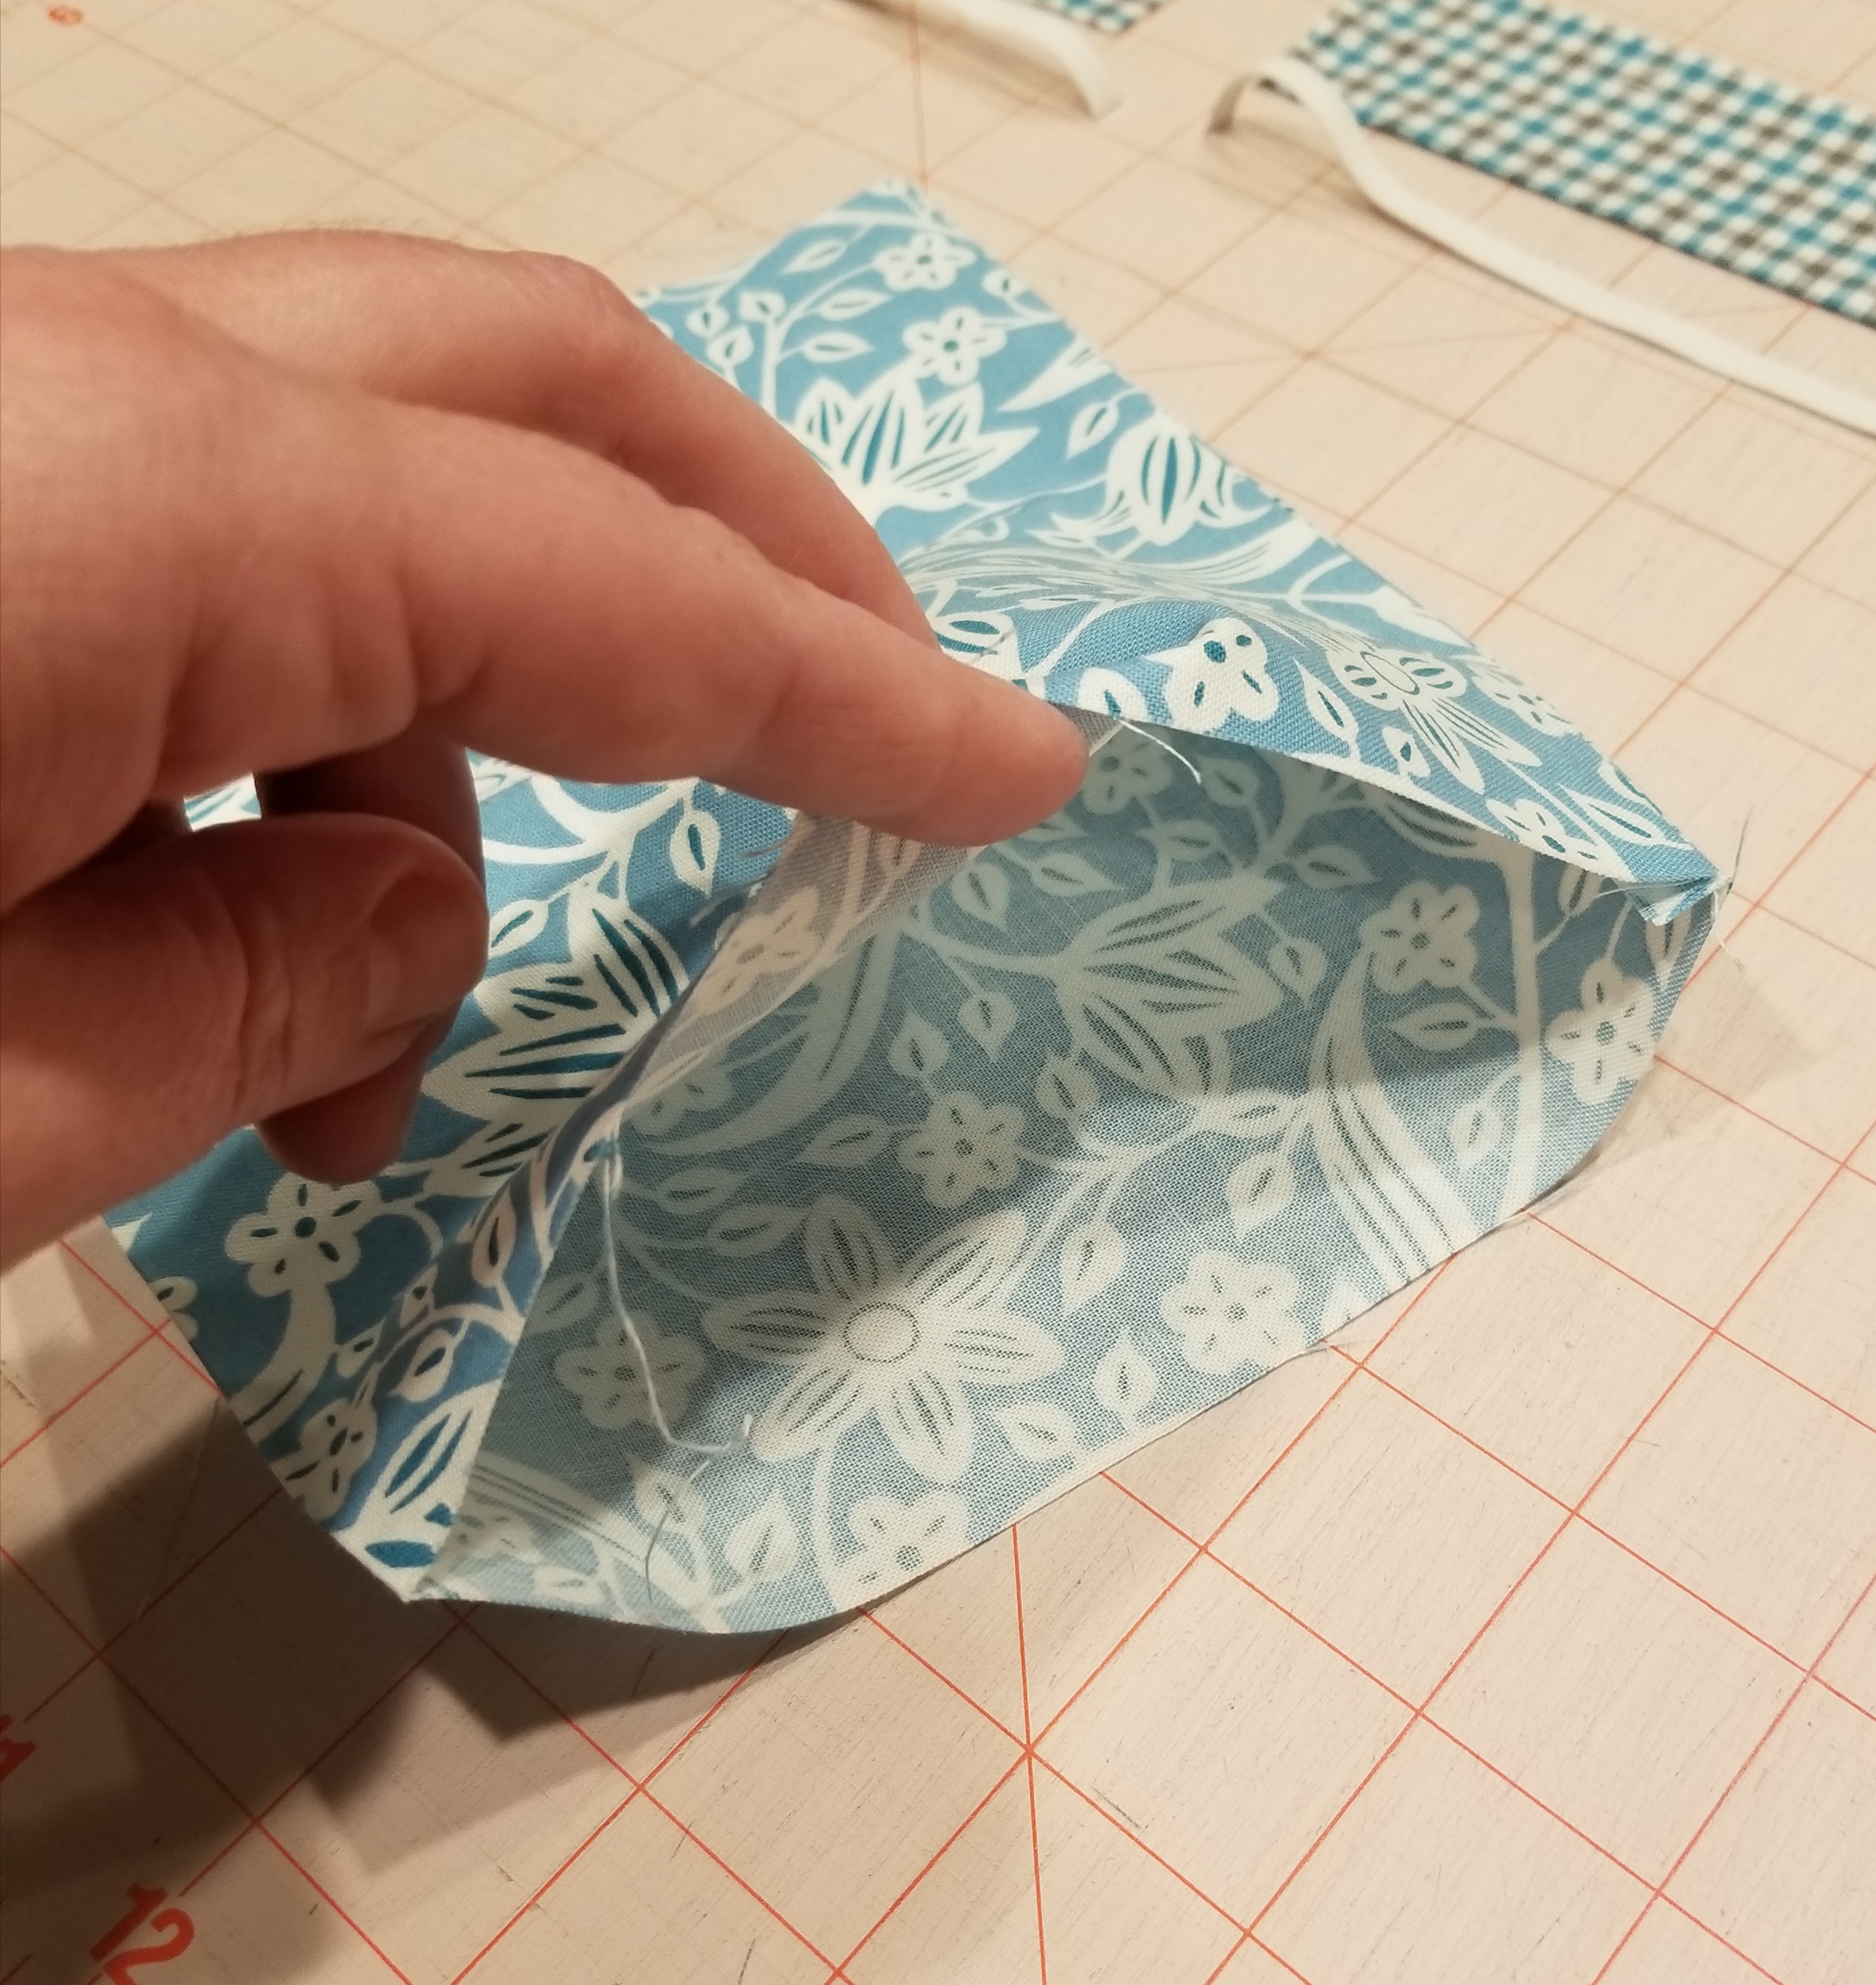
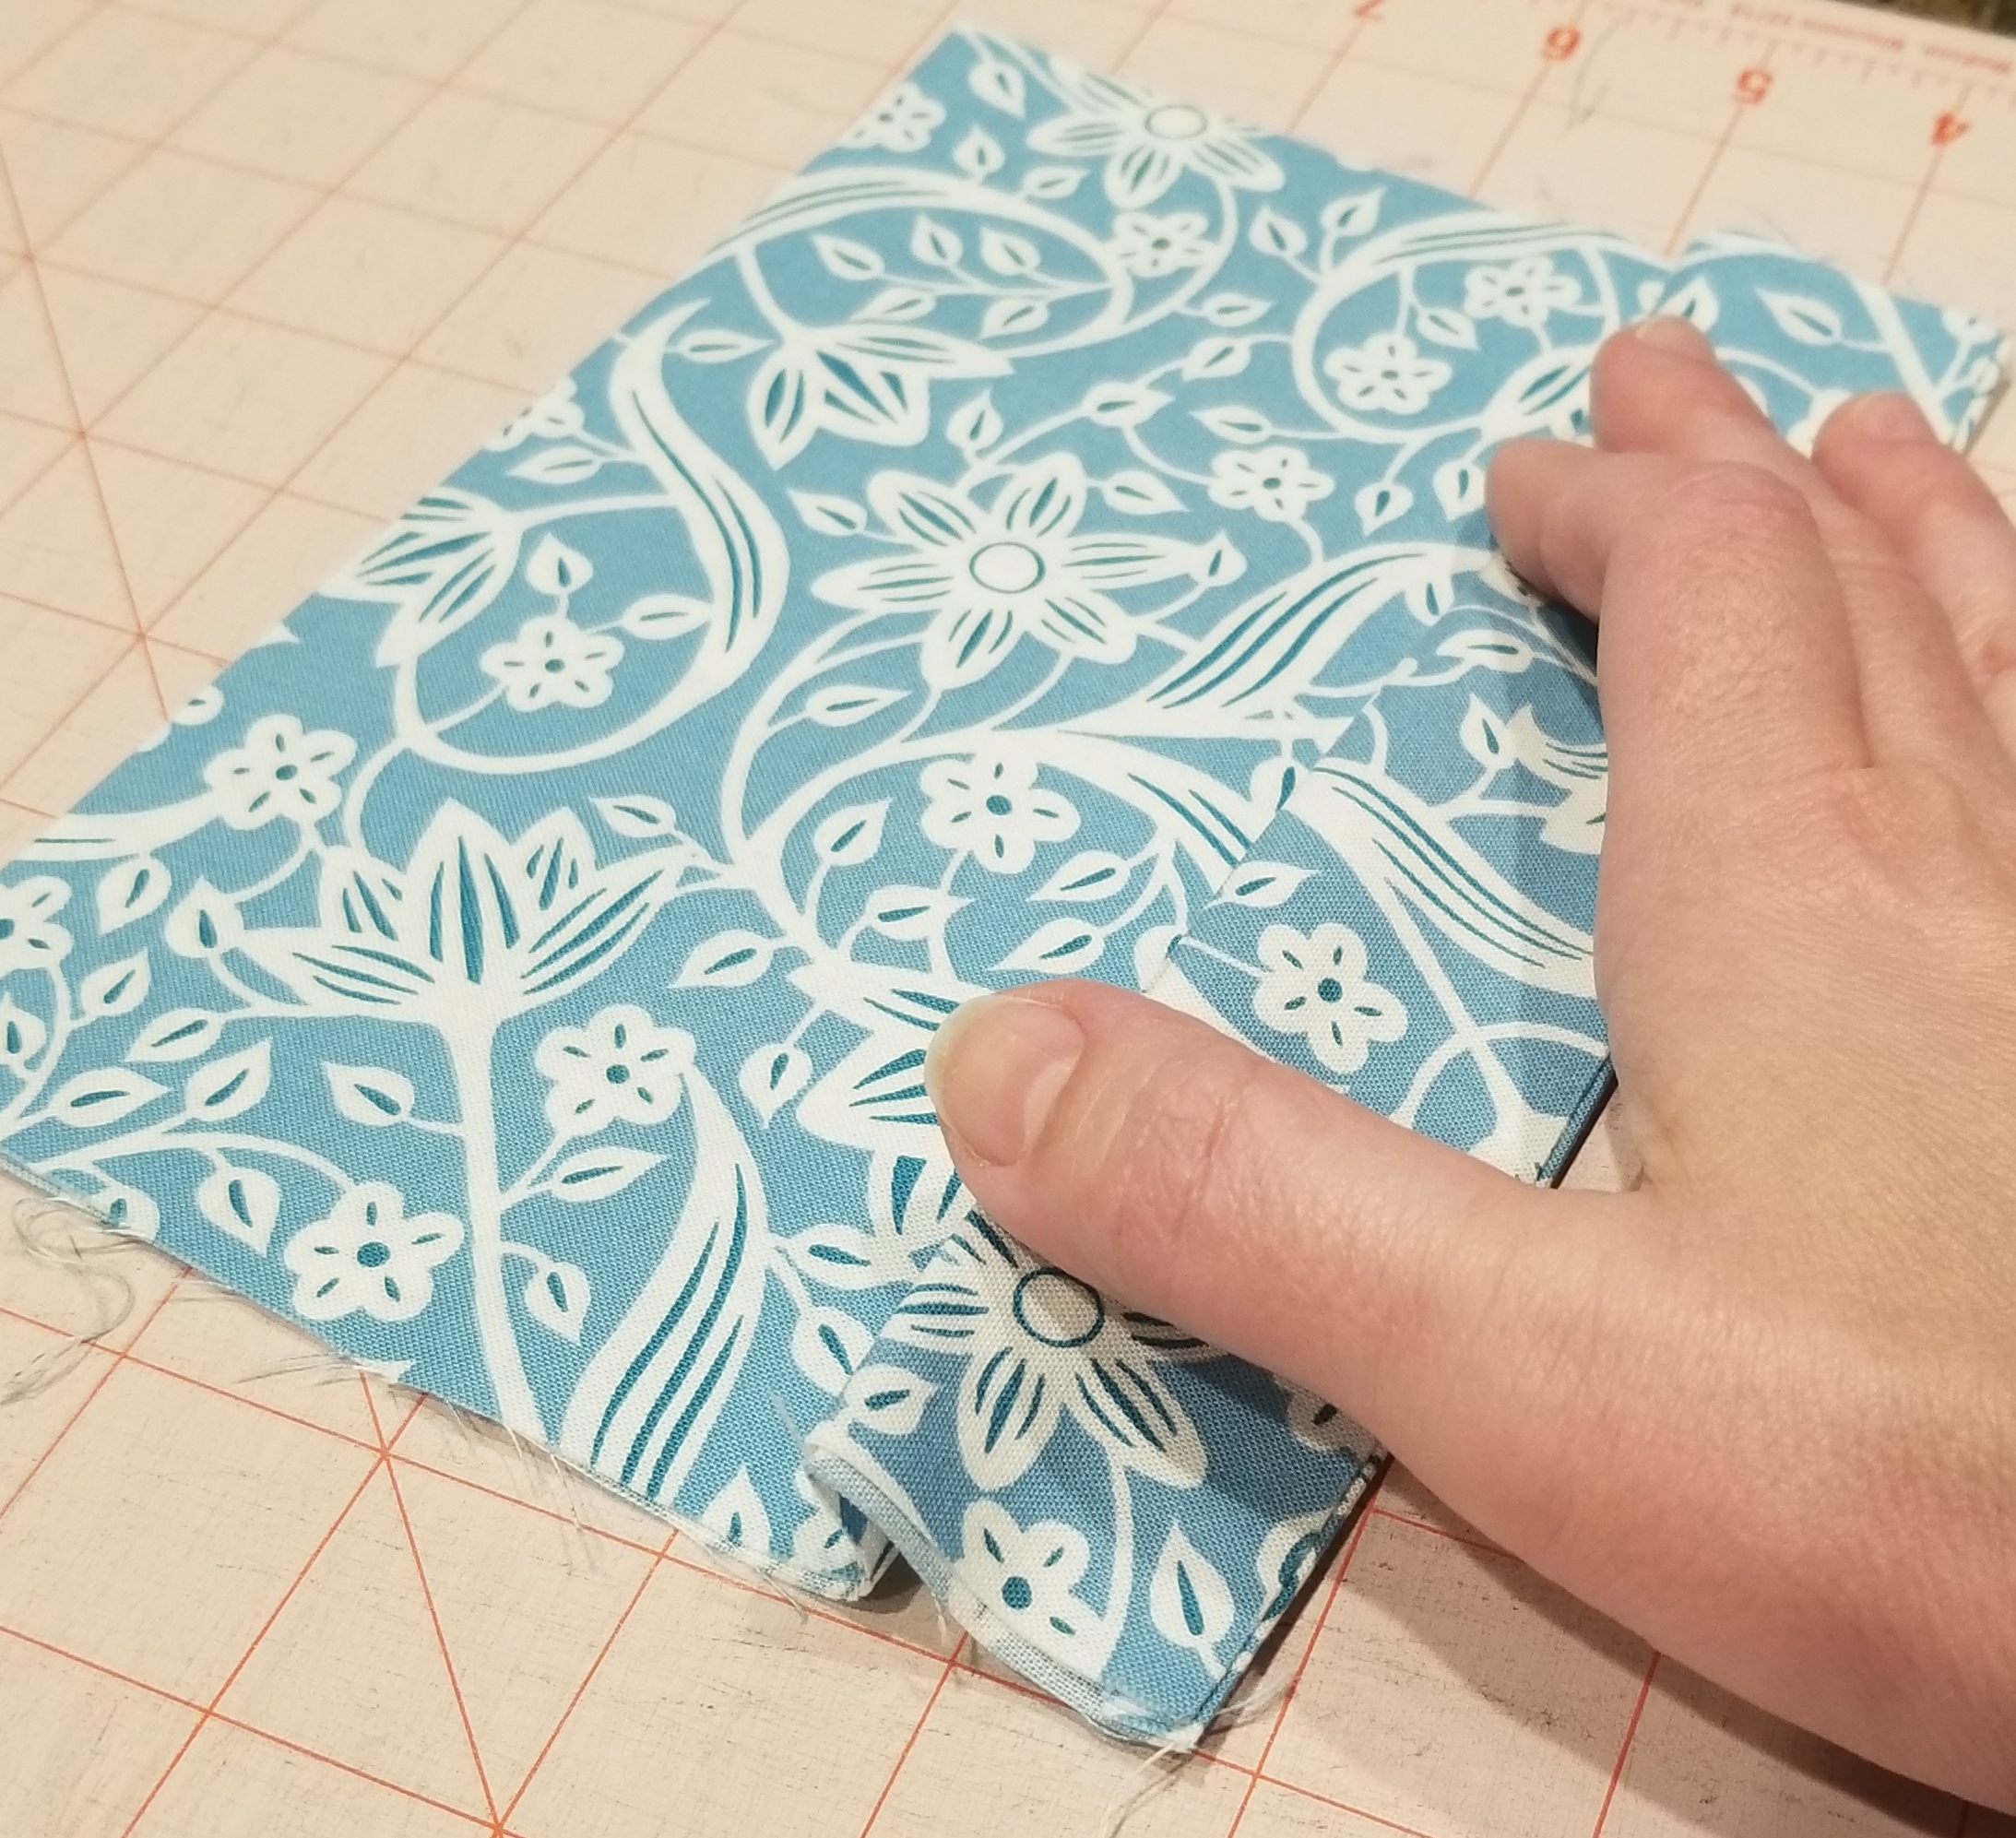
Turn this tube shape inside out, so that the right side of the fabric is now on the outside. Press this flat, keeping the seam to one end of the flattened tube.
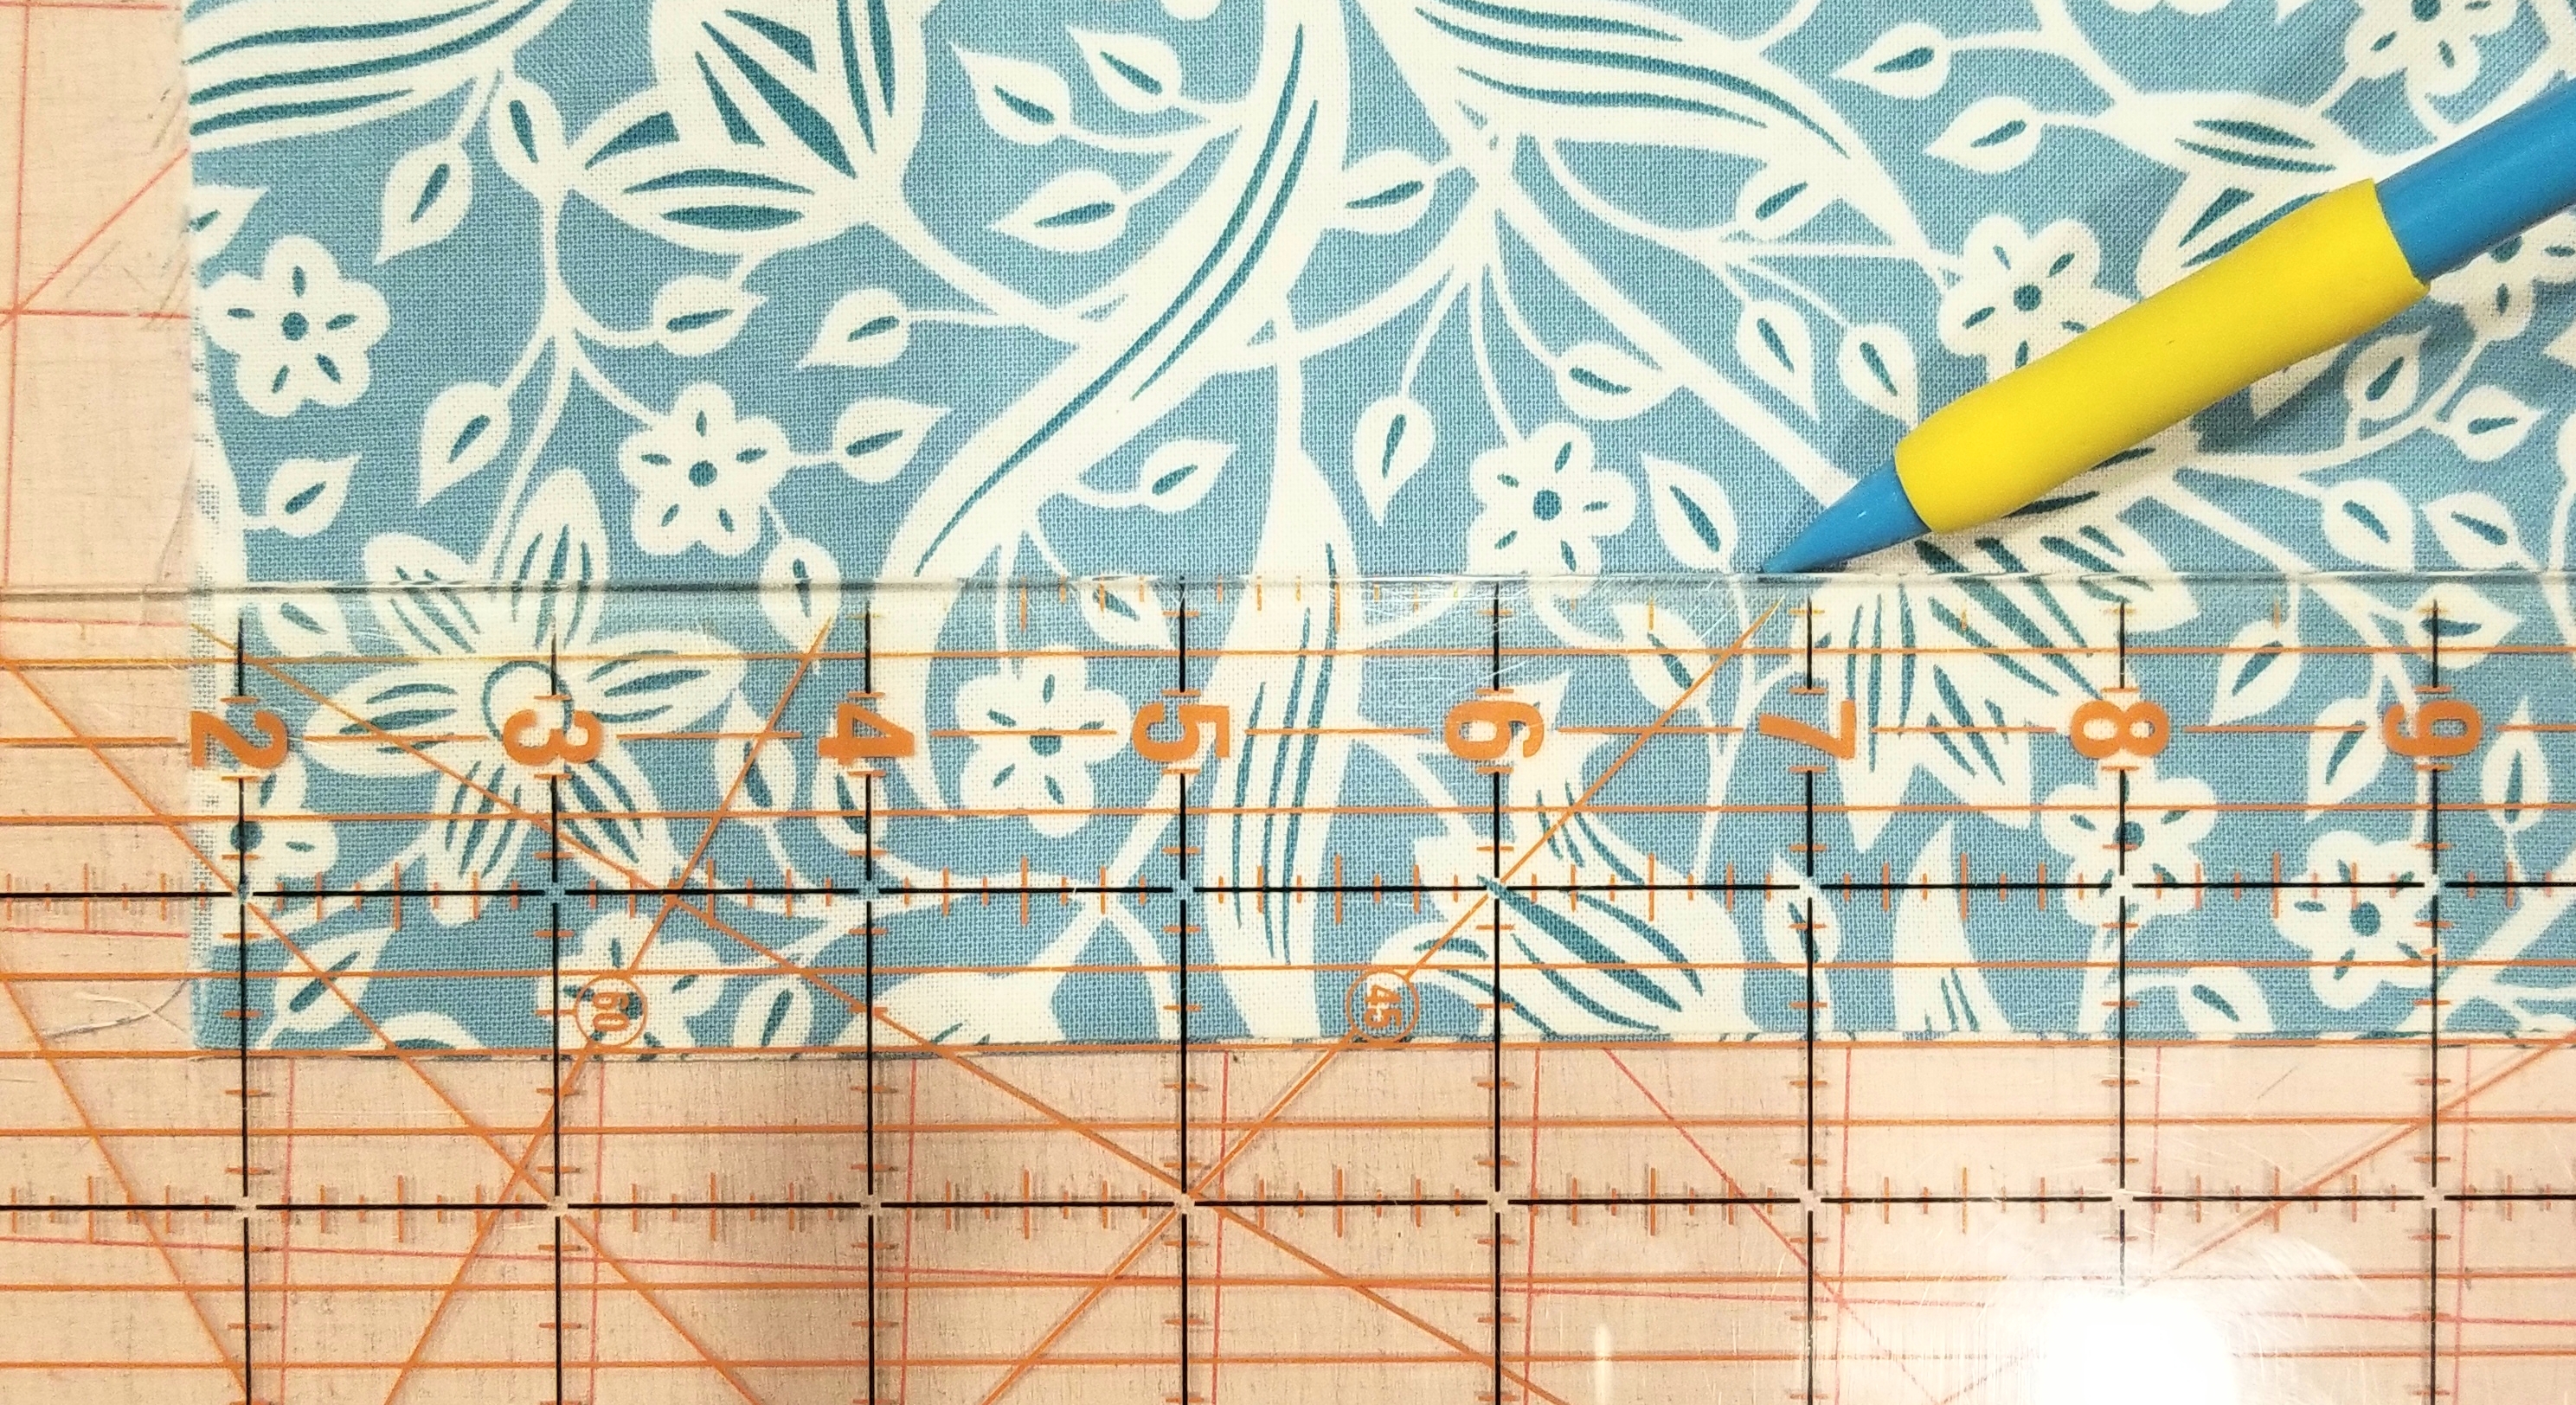
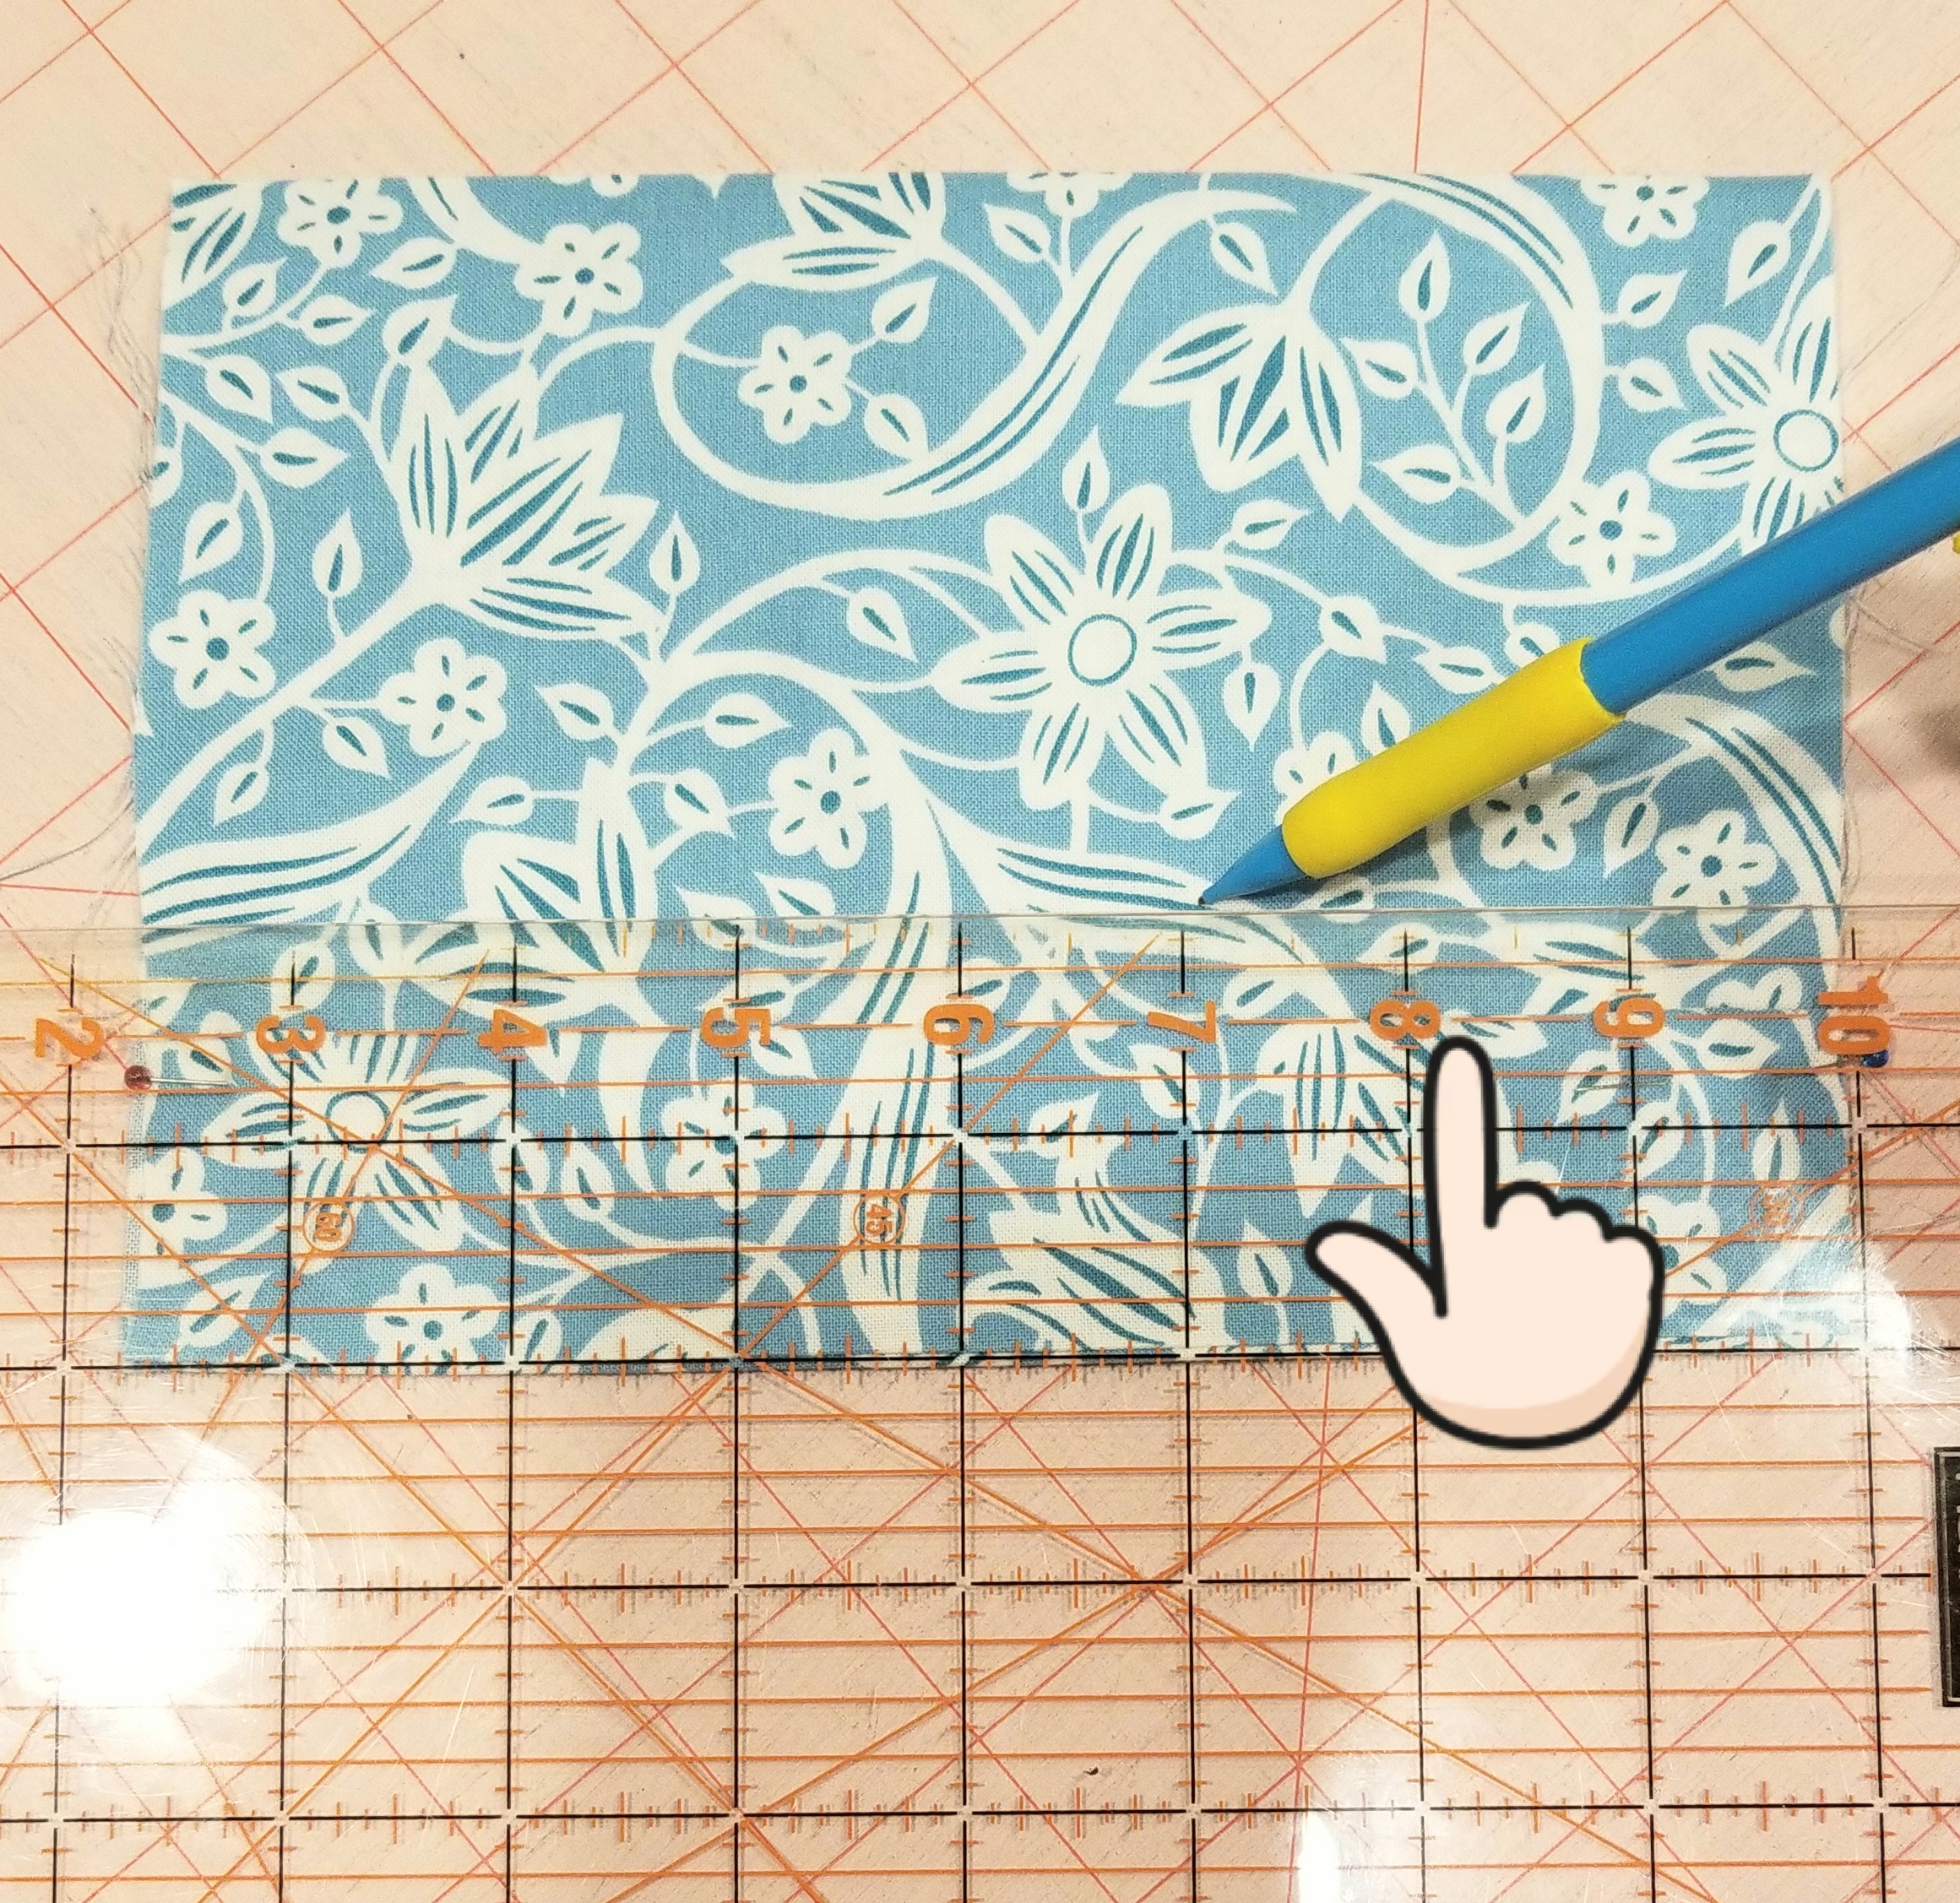
Place the tube of fabric so that the raw edges are on each side and the seam edge is at the bottom. Using a ruler, measure and mark a line 1 1/2 inches from the bottom edge. Make another line 1 inch above this line, or 2 1/2 inches from the seam edge. Don’t use a pencil as you see in the picture, use a fabric pen, or fabric chalk. I used a pencil for illustration purposes.
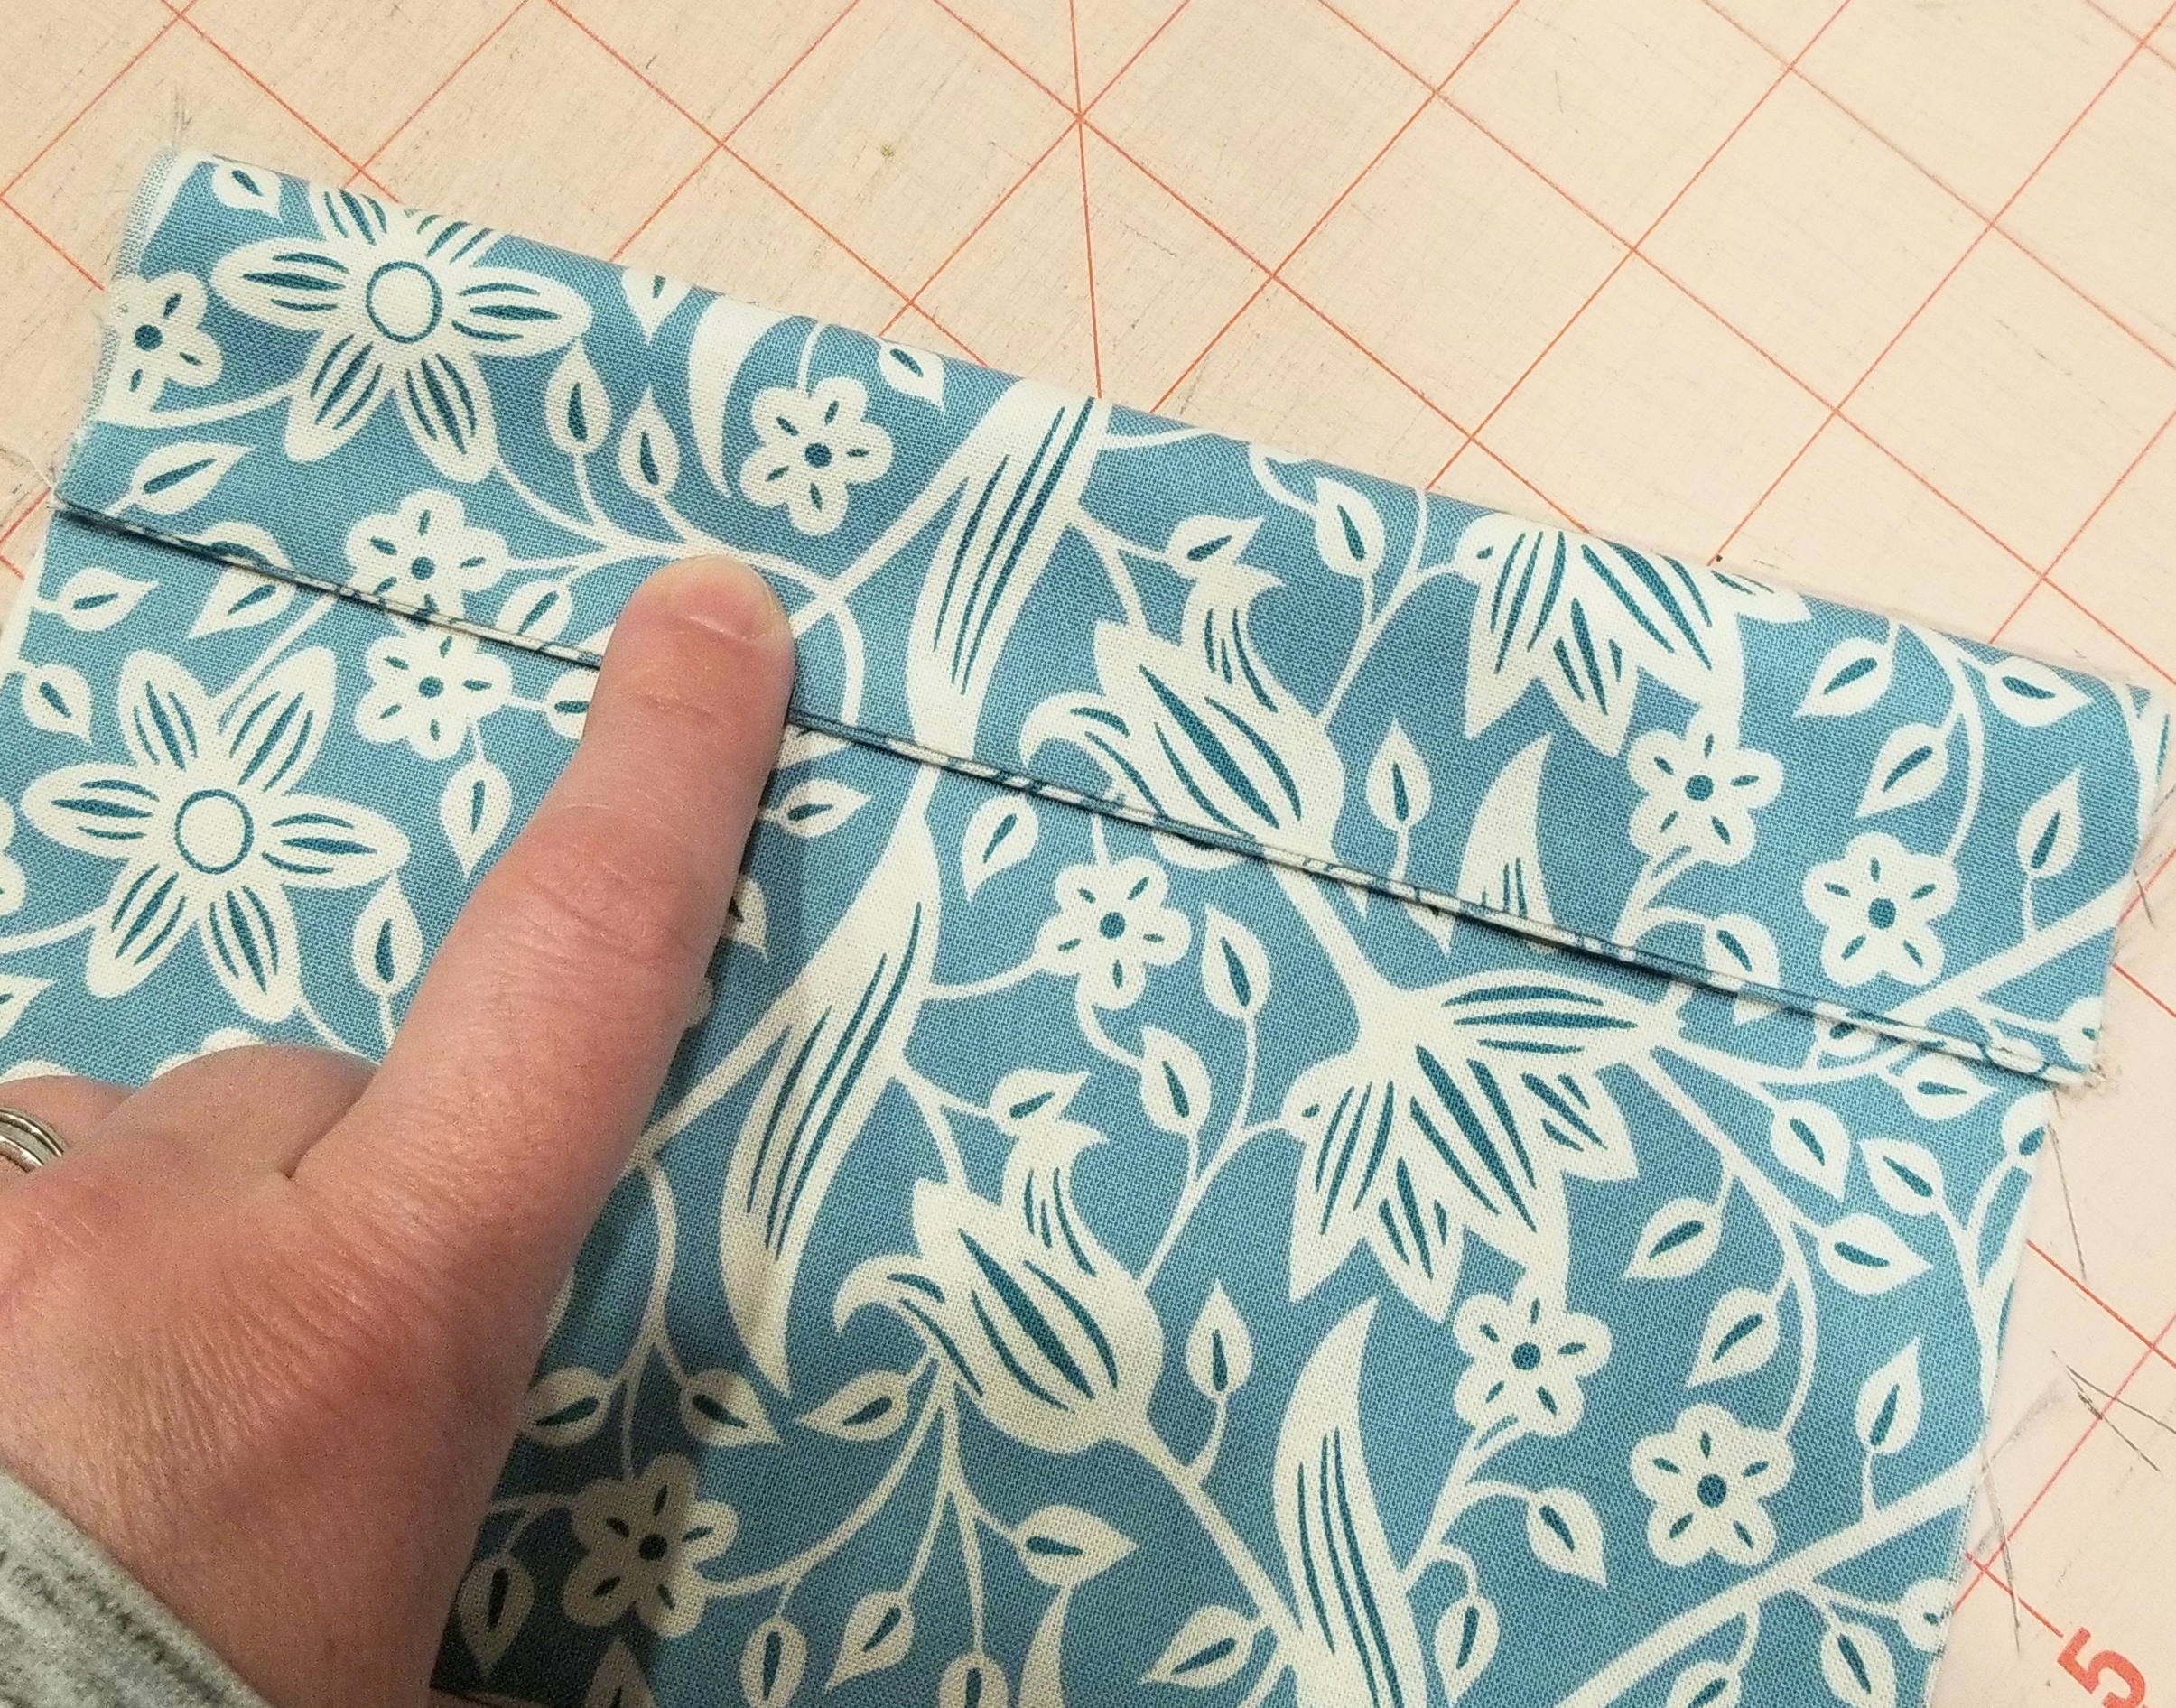
Fold the seam edge up (or down in this picture, as I turned it upside down…sorry) making the crease on the first line that you just marked. You should have 1 1/2 inch edge here.
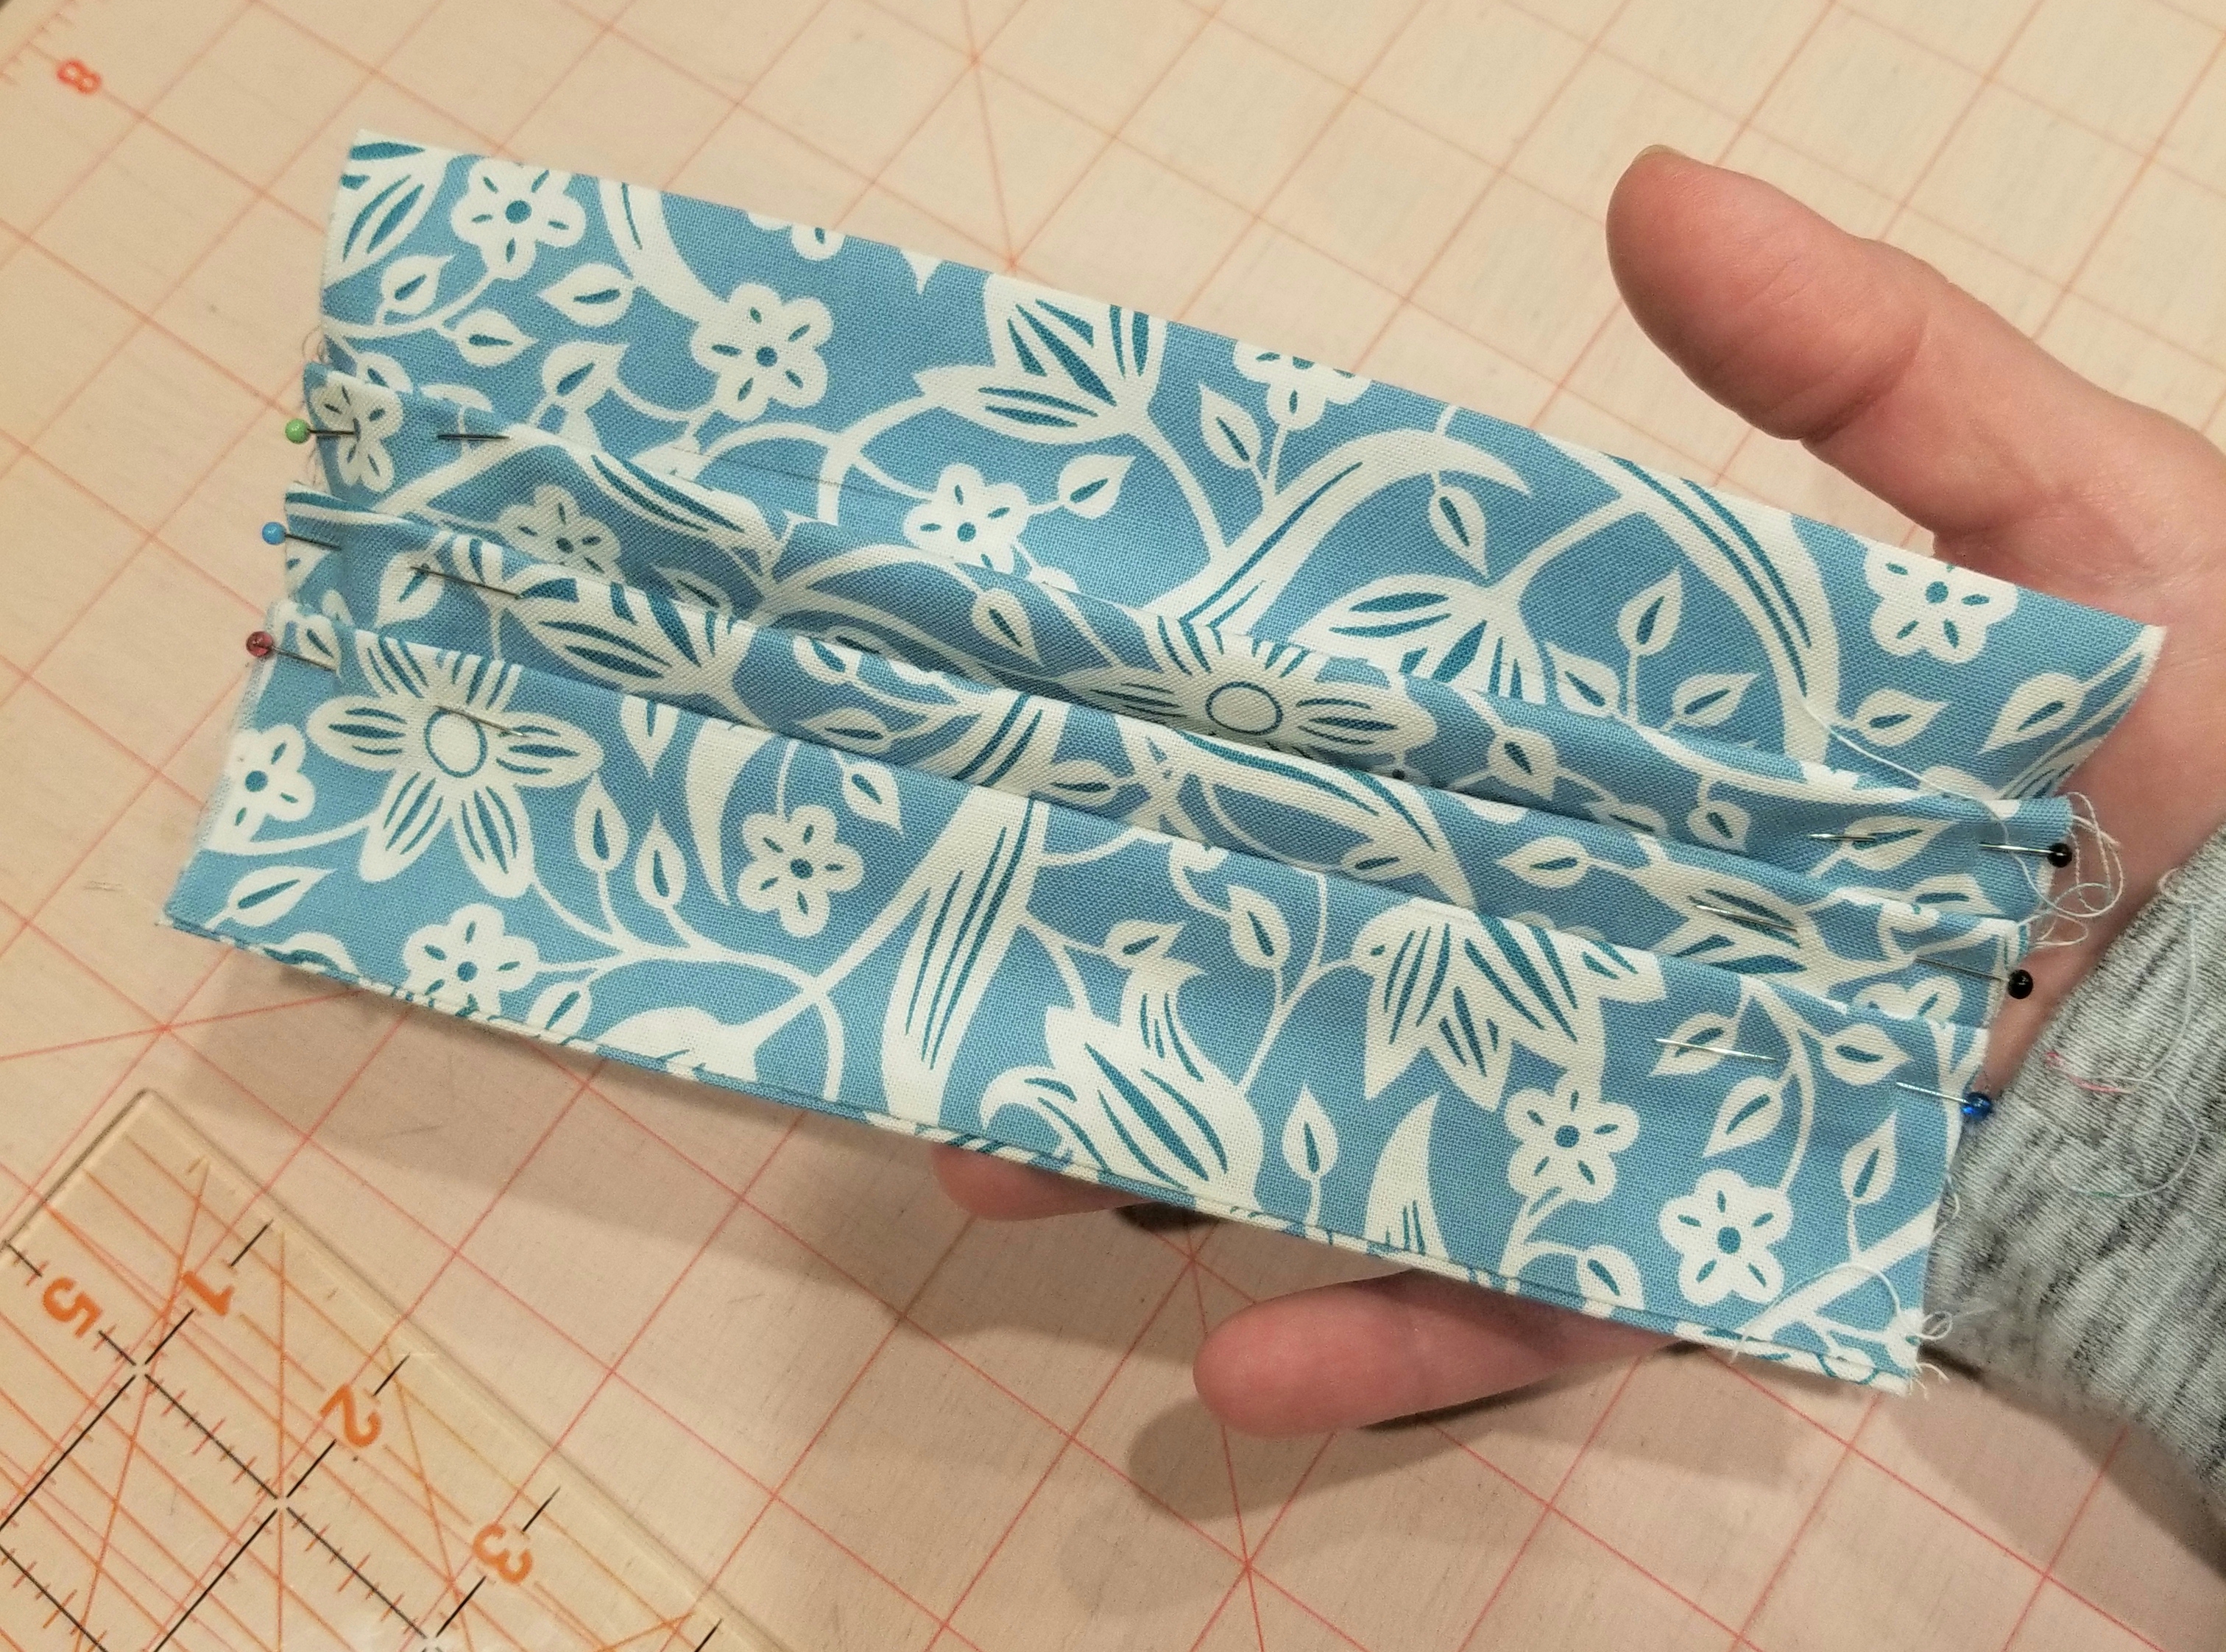
Flip the tube piece over. Match the crease edge to the second line that you made earlier. Press. The pleat that you just created will be 1/2 inch deep. Pin the pleat down on each raw edge end.
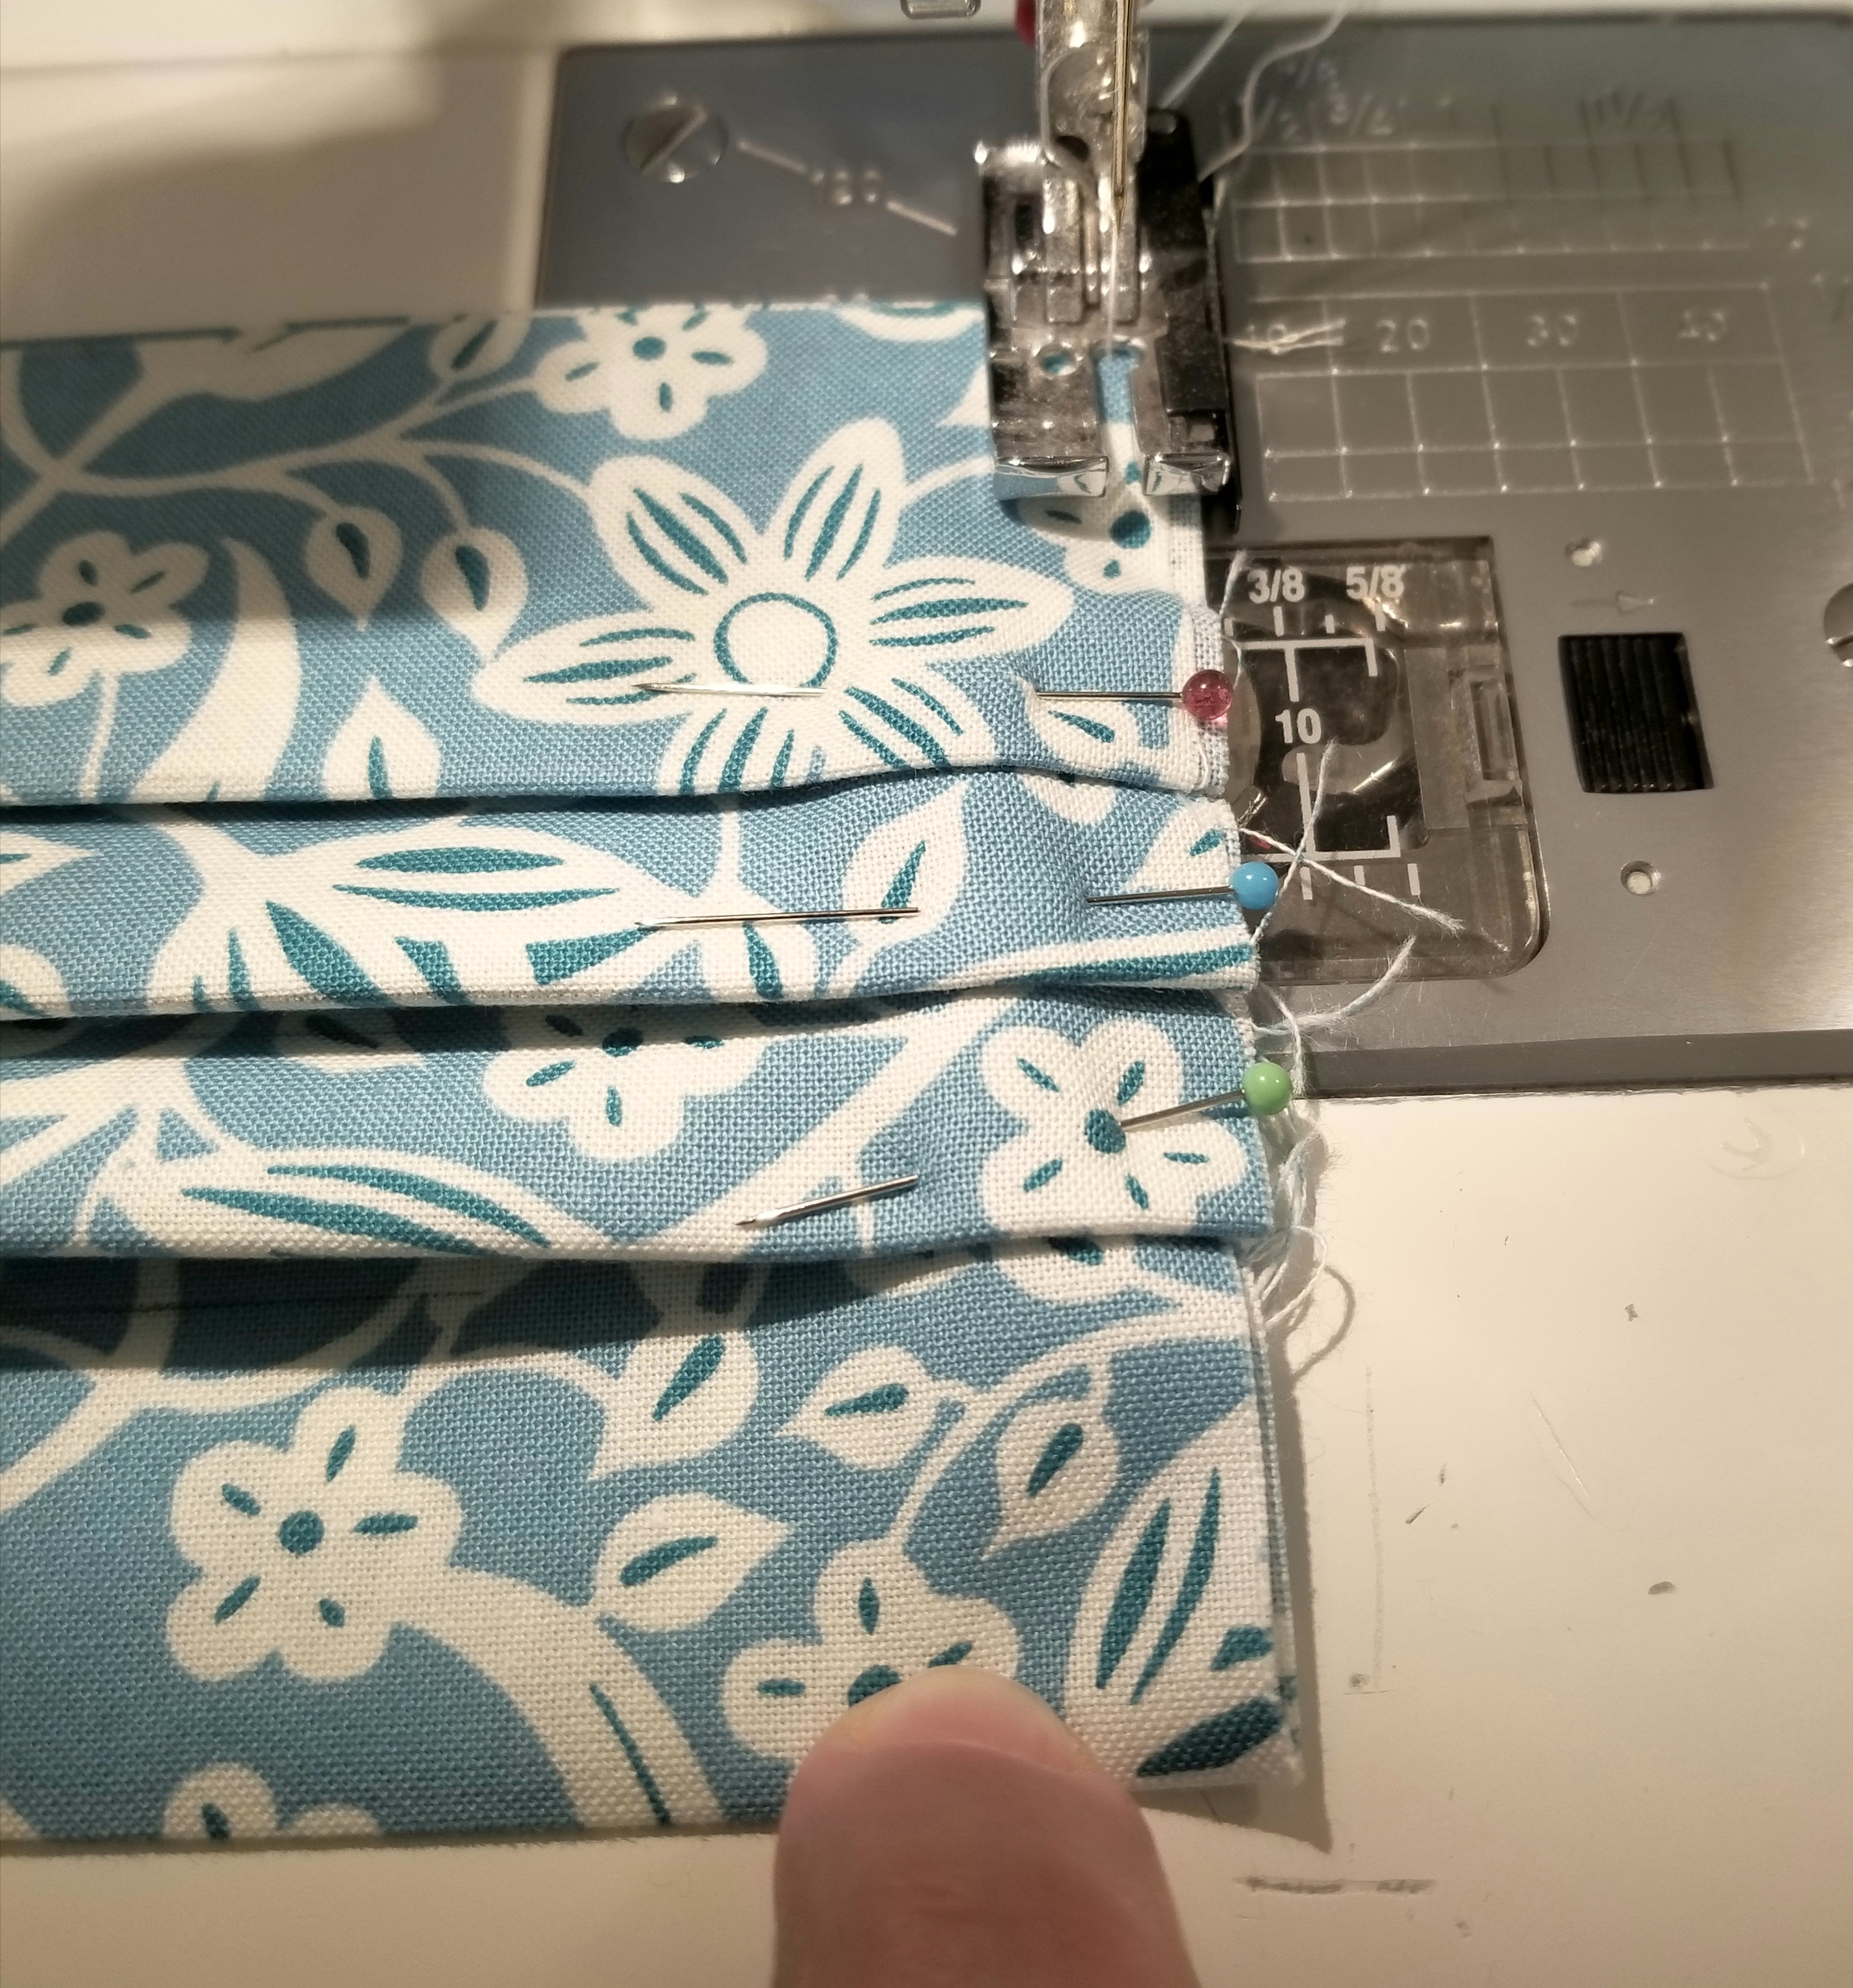
Now you will mark the lines for the second pleat. Mark a line measuring 1/2” from the top crease of the last pleat, (or 2″ from the bottom seam edge). It was difficult to see the top of the crease in this picture, so look at the finger indicator above.
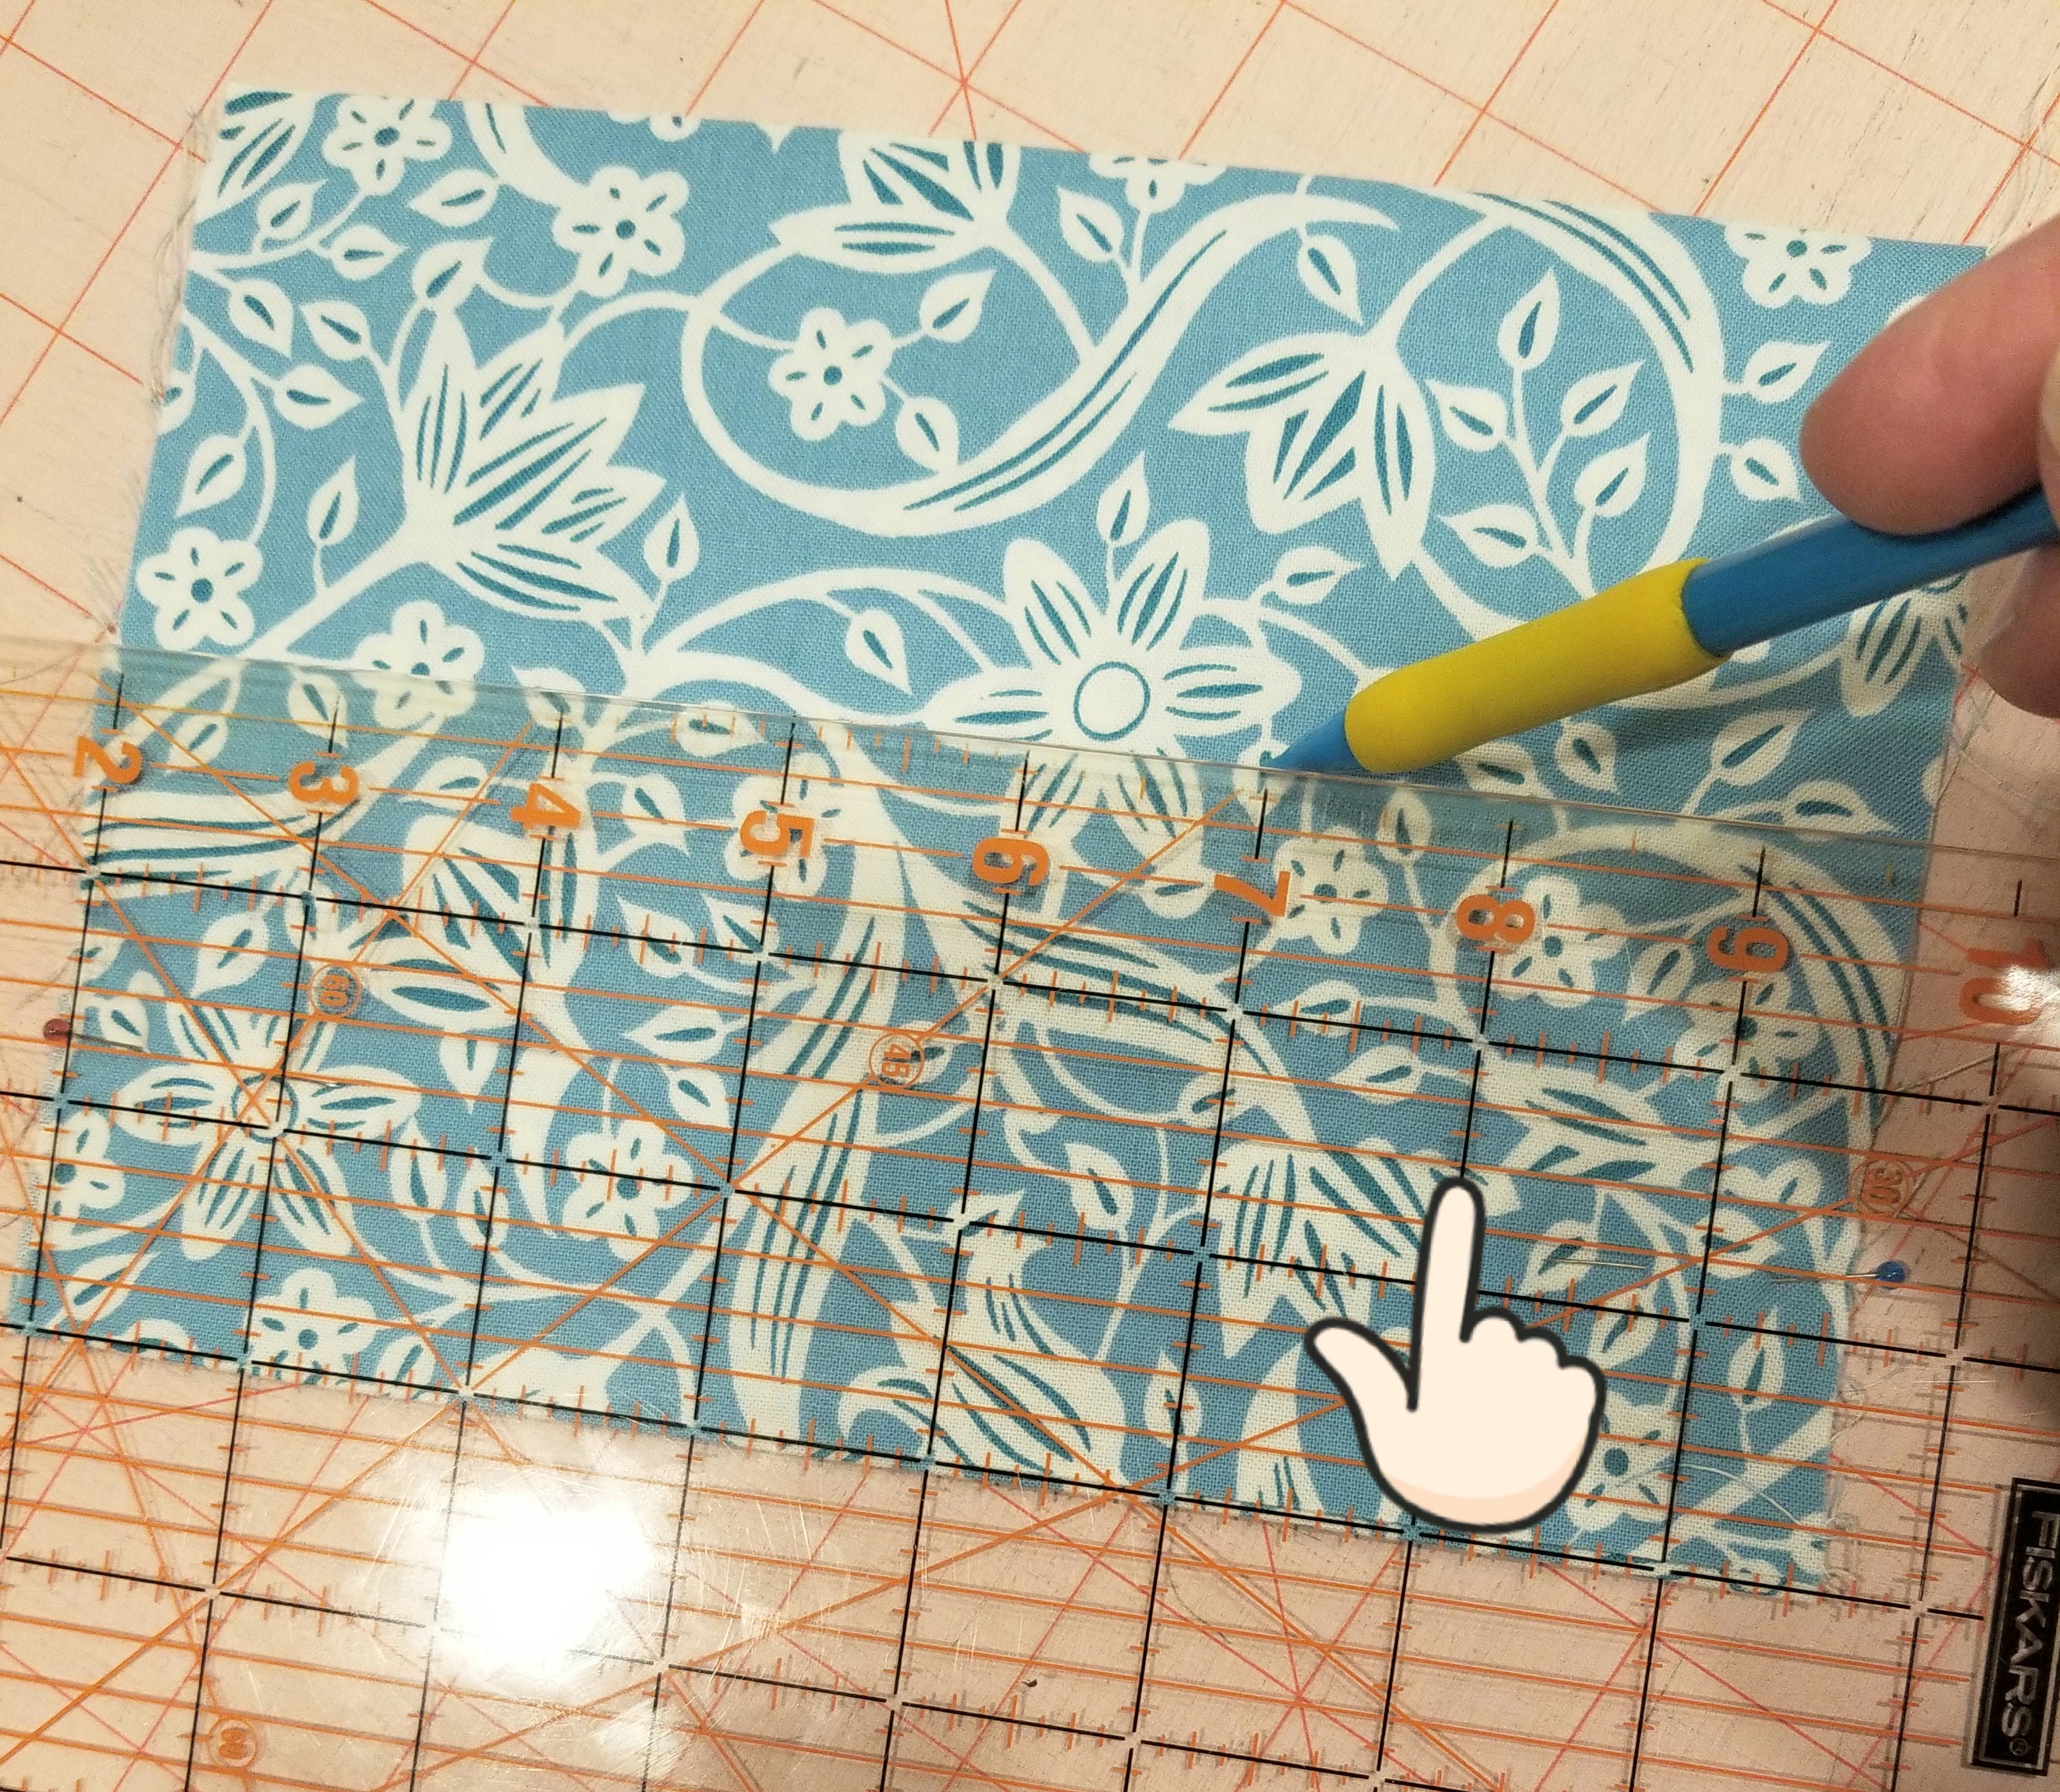
Now mark another line one inch above the last line that you made (or 3 inches above the seam edge). Using these lines as your guide, repeat the steps that you followed to make the first pleat.
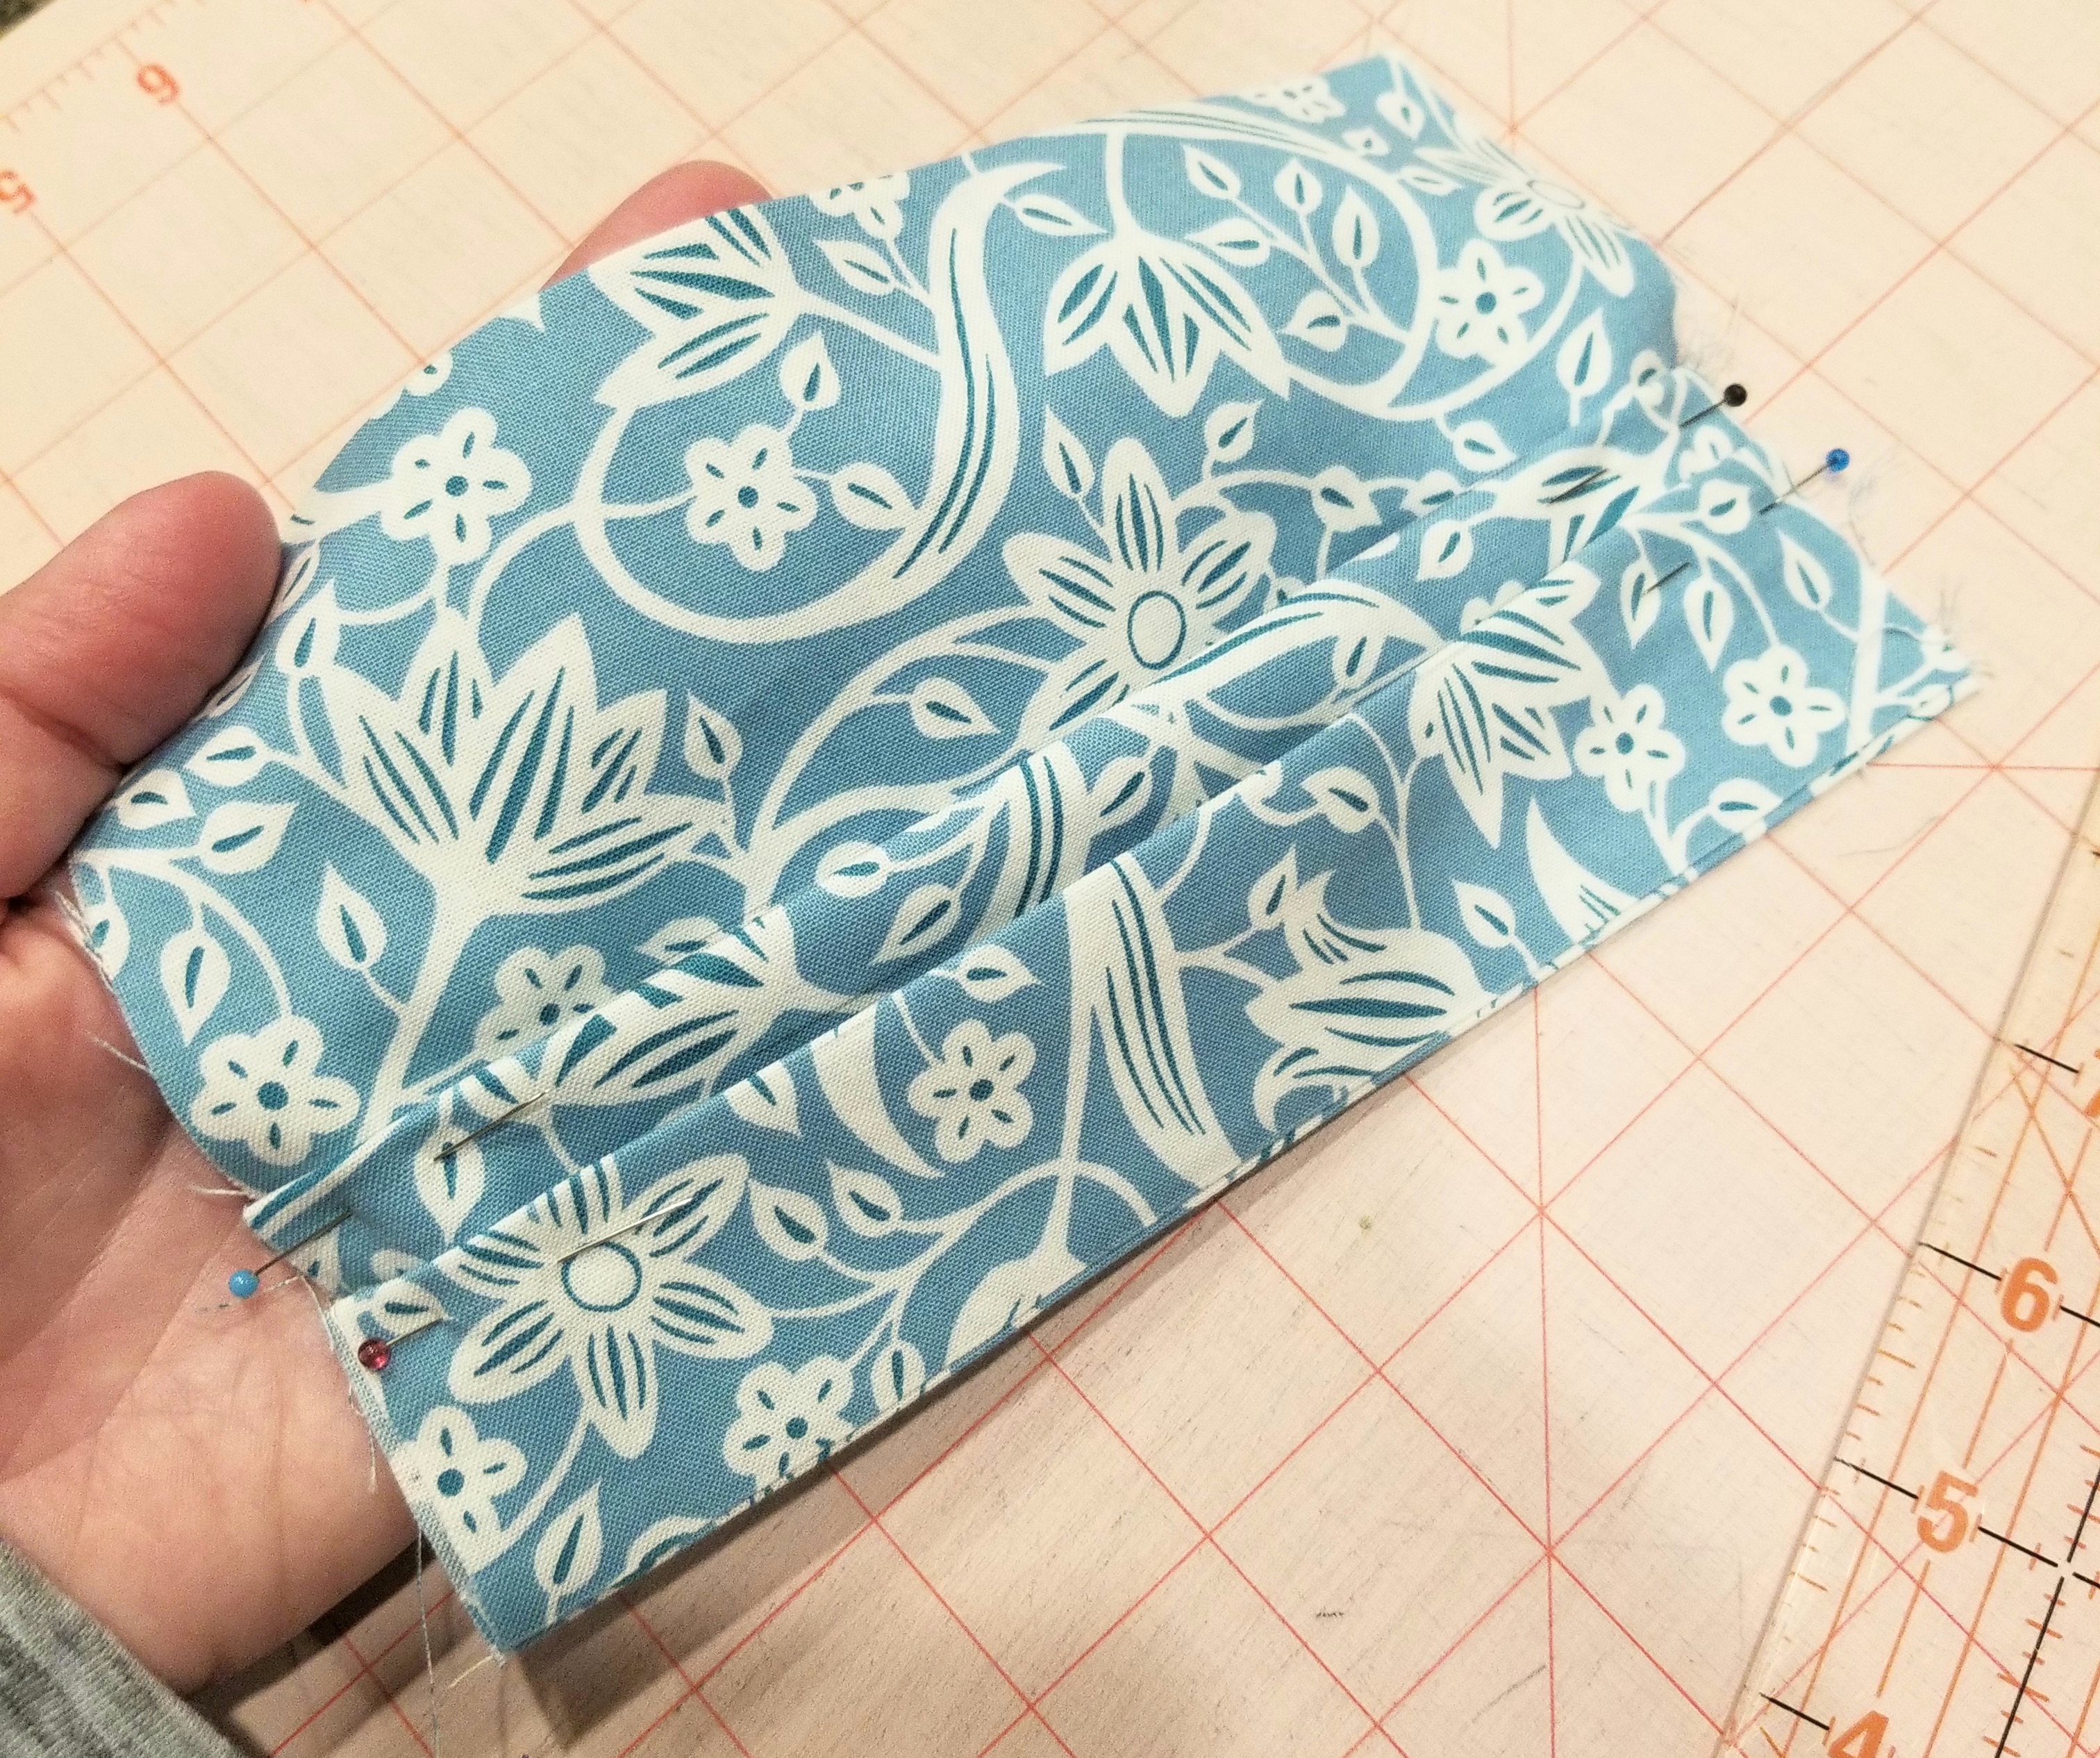
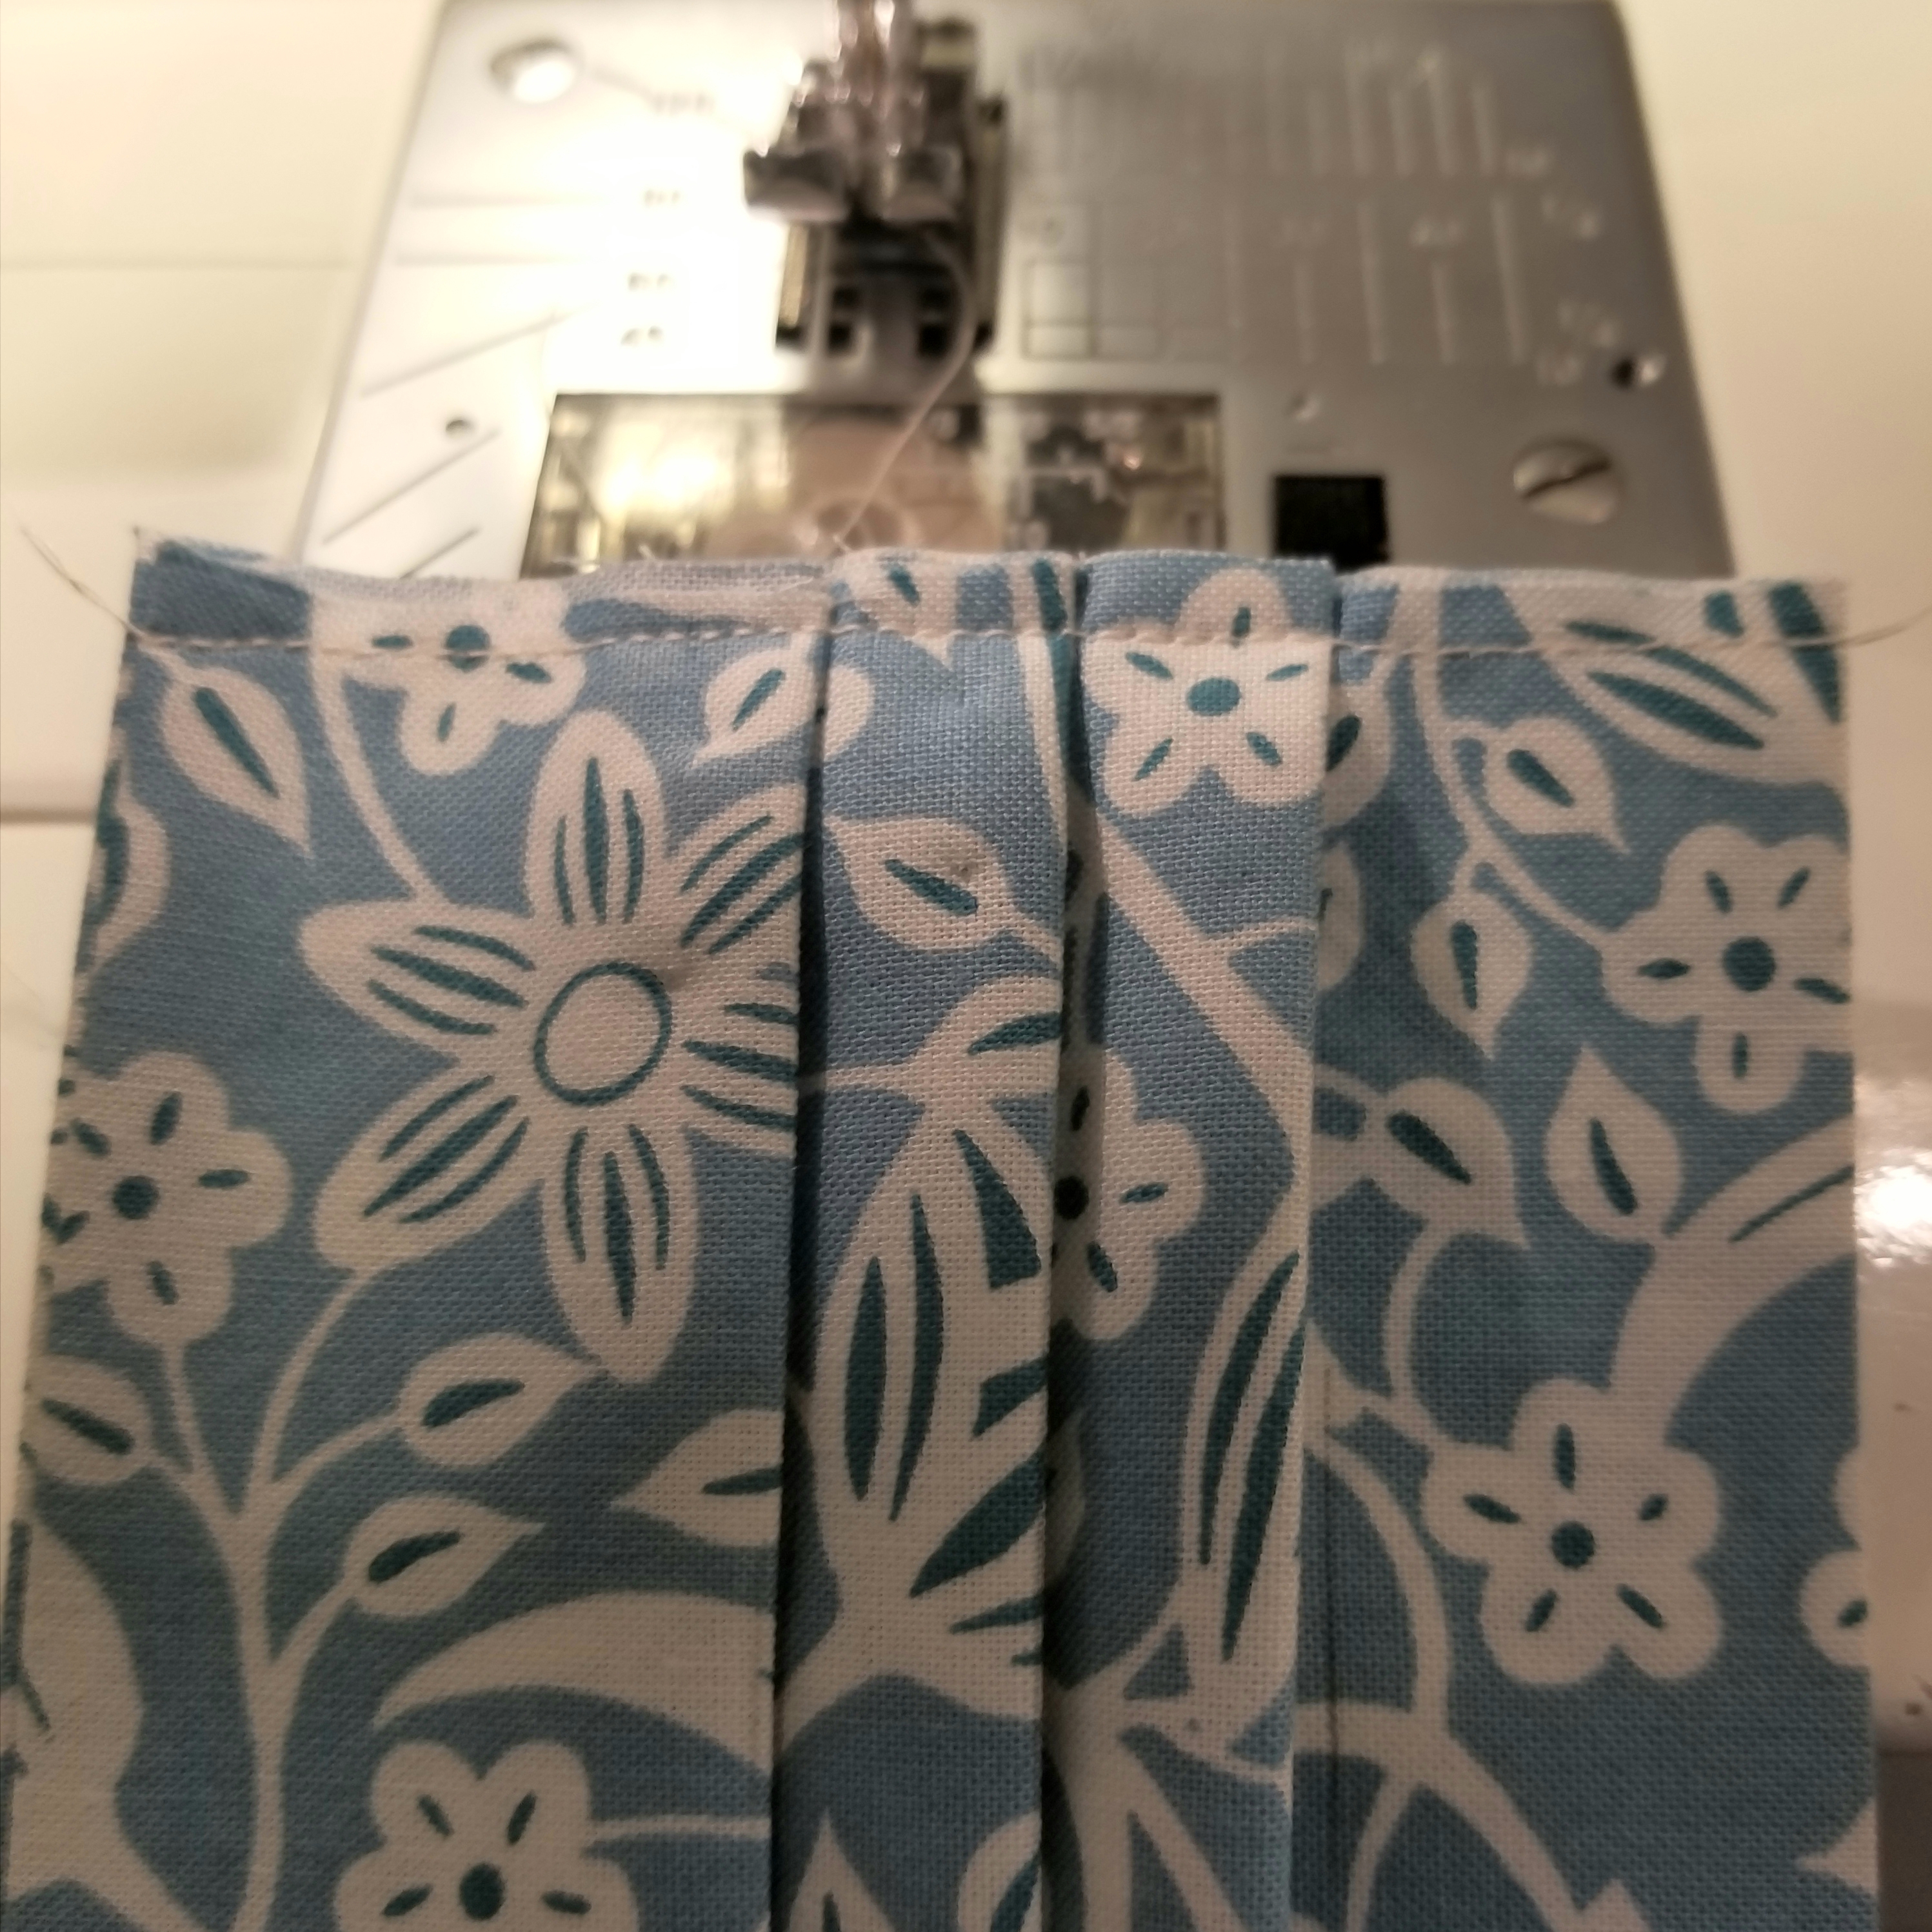
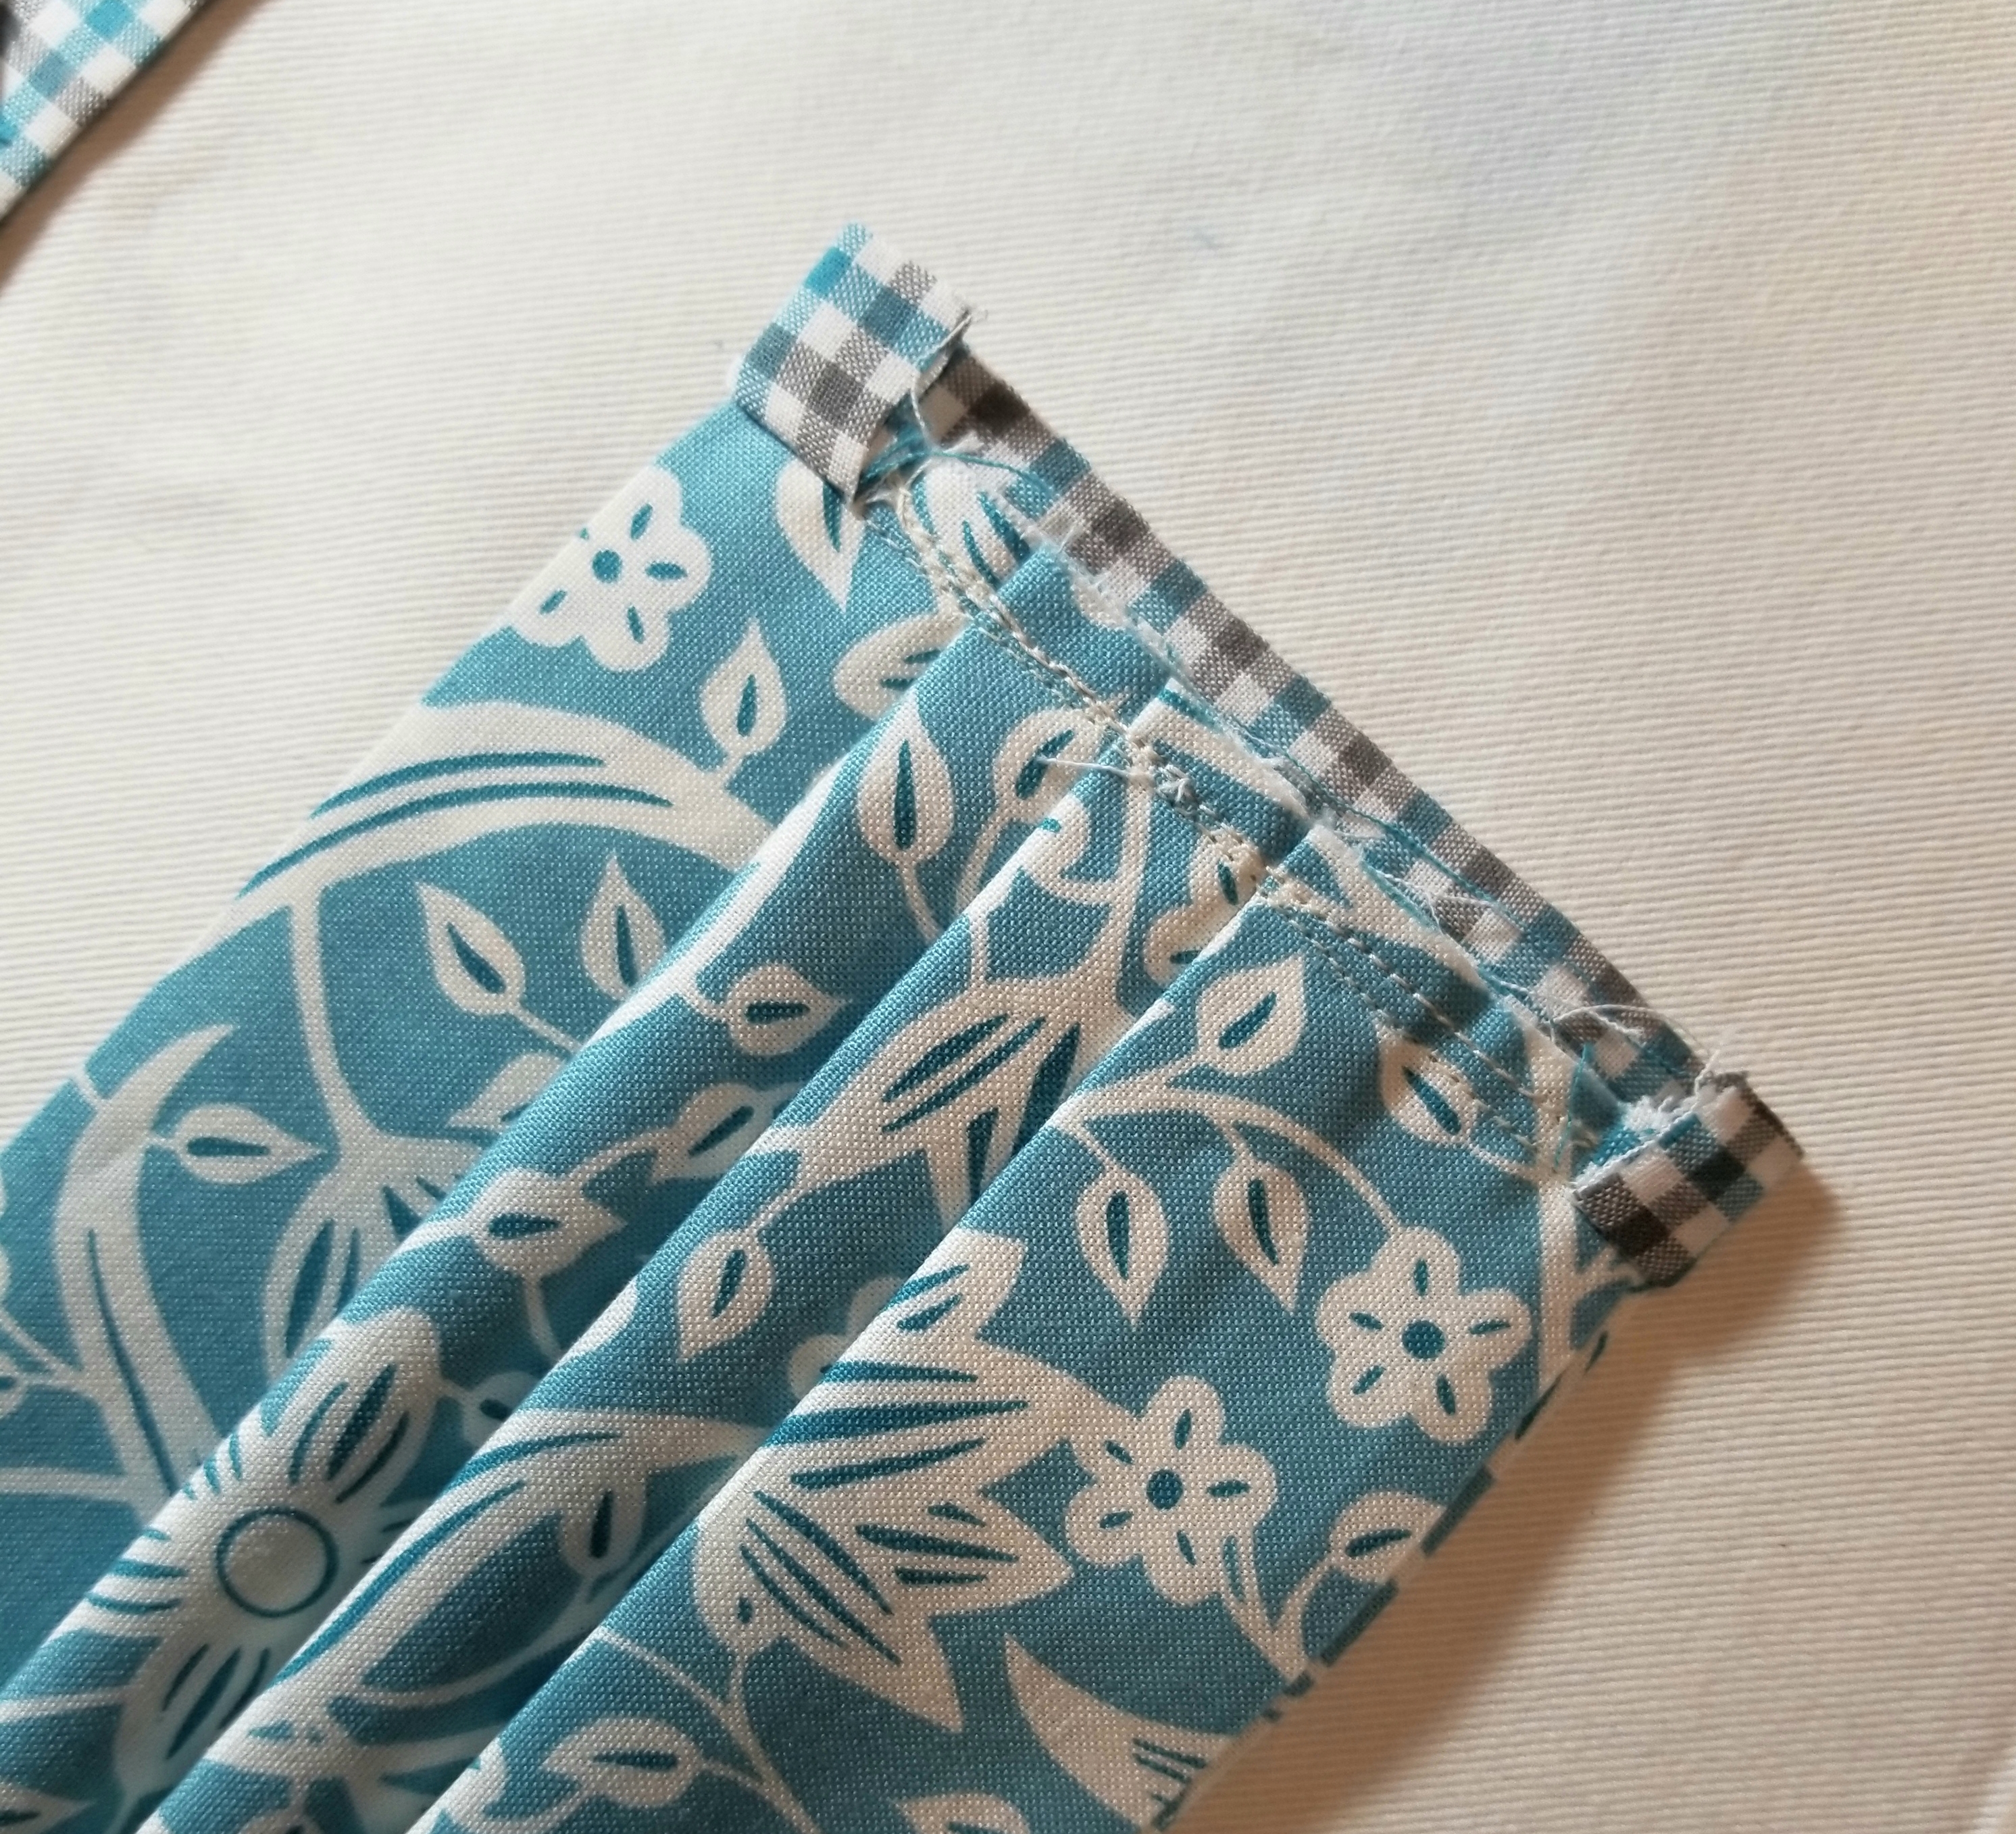
You should now have two pleats, each one being 1/2 inch deep. Repeat the steps you used to make the second pleat, so that you end up with three pleats total. Press.
This is what your main piece should look like at this point.
Using a 1/8” seam allowance, baste stitch the raw edges.
Repeat this step so that both raw edges are basted as shown in the picture above.
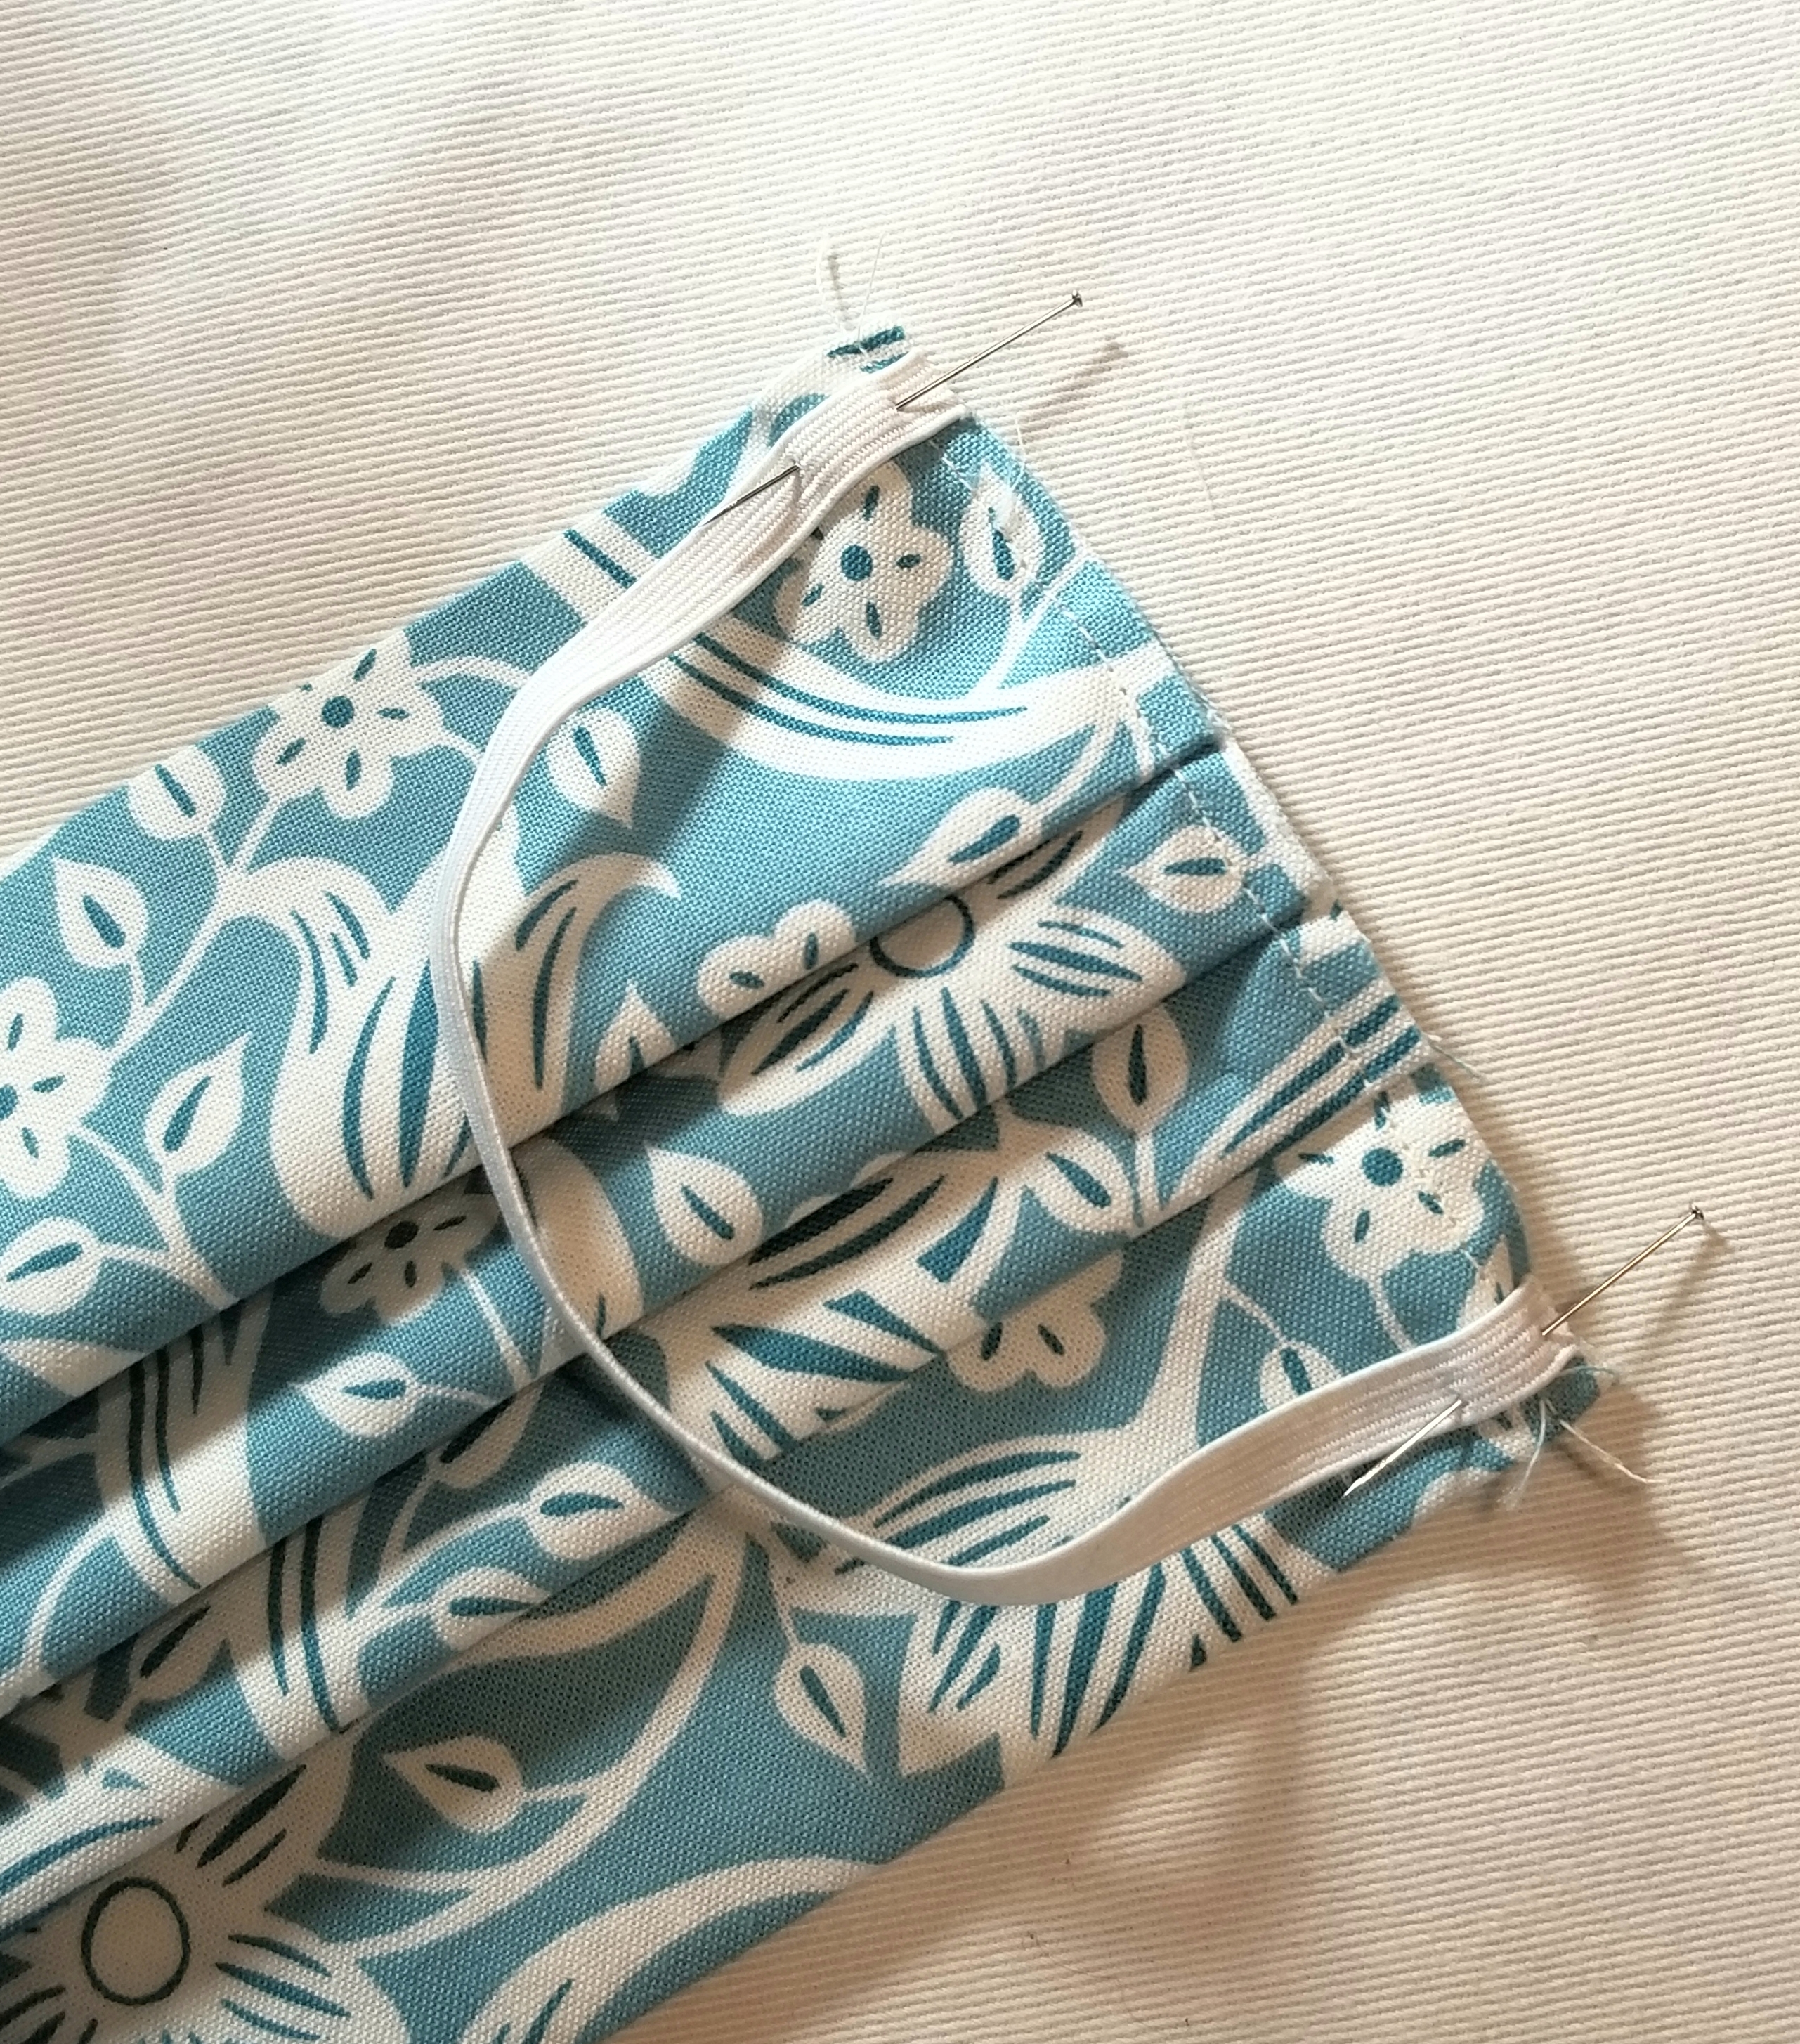
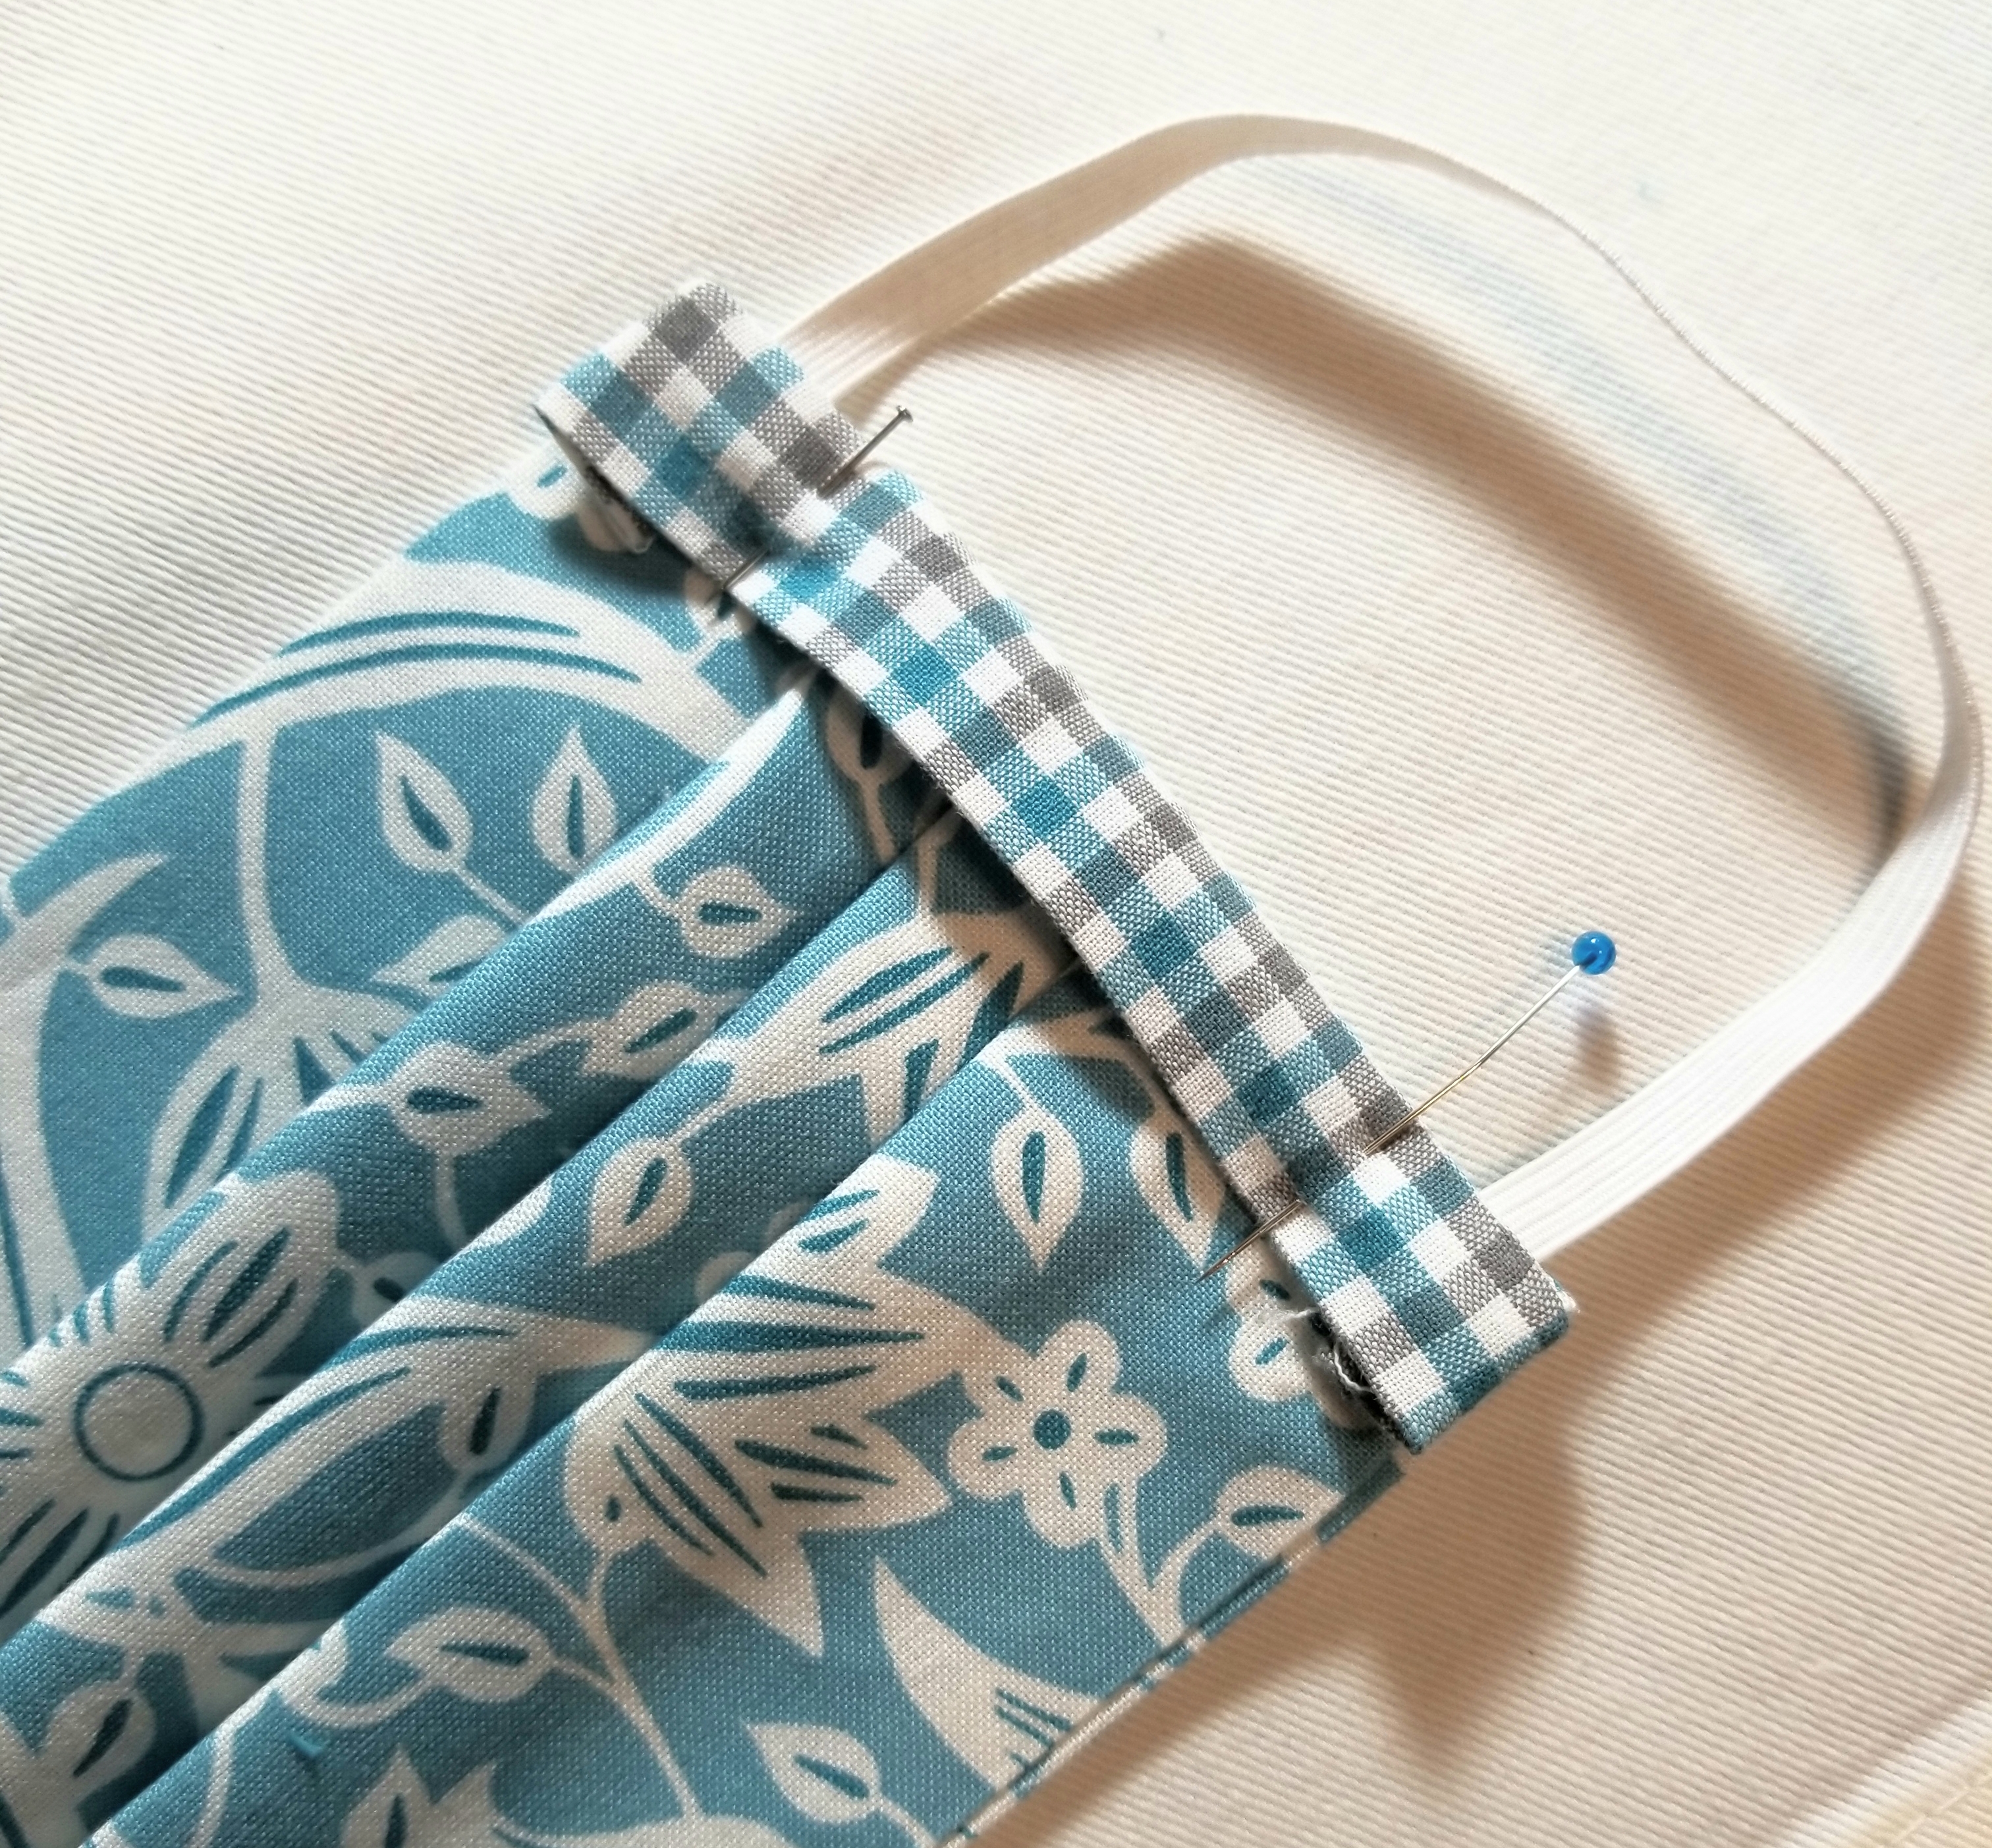
Pin one elastic piece to the raw edge, making sure not to twist it before baste stitching it to the edge at both ends. I placed mine 1/8” from the top and bottom edge of the main pleated piece. Baste elastic in place 1/8” inch from raw edge. Repeat, to attach remaining elastic piece to the other raw edge.
Your pleated piece should now resemble the picture above.
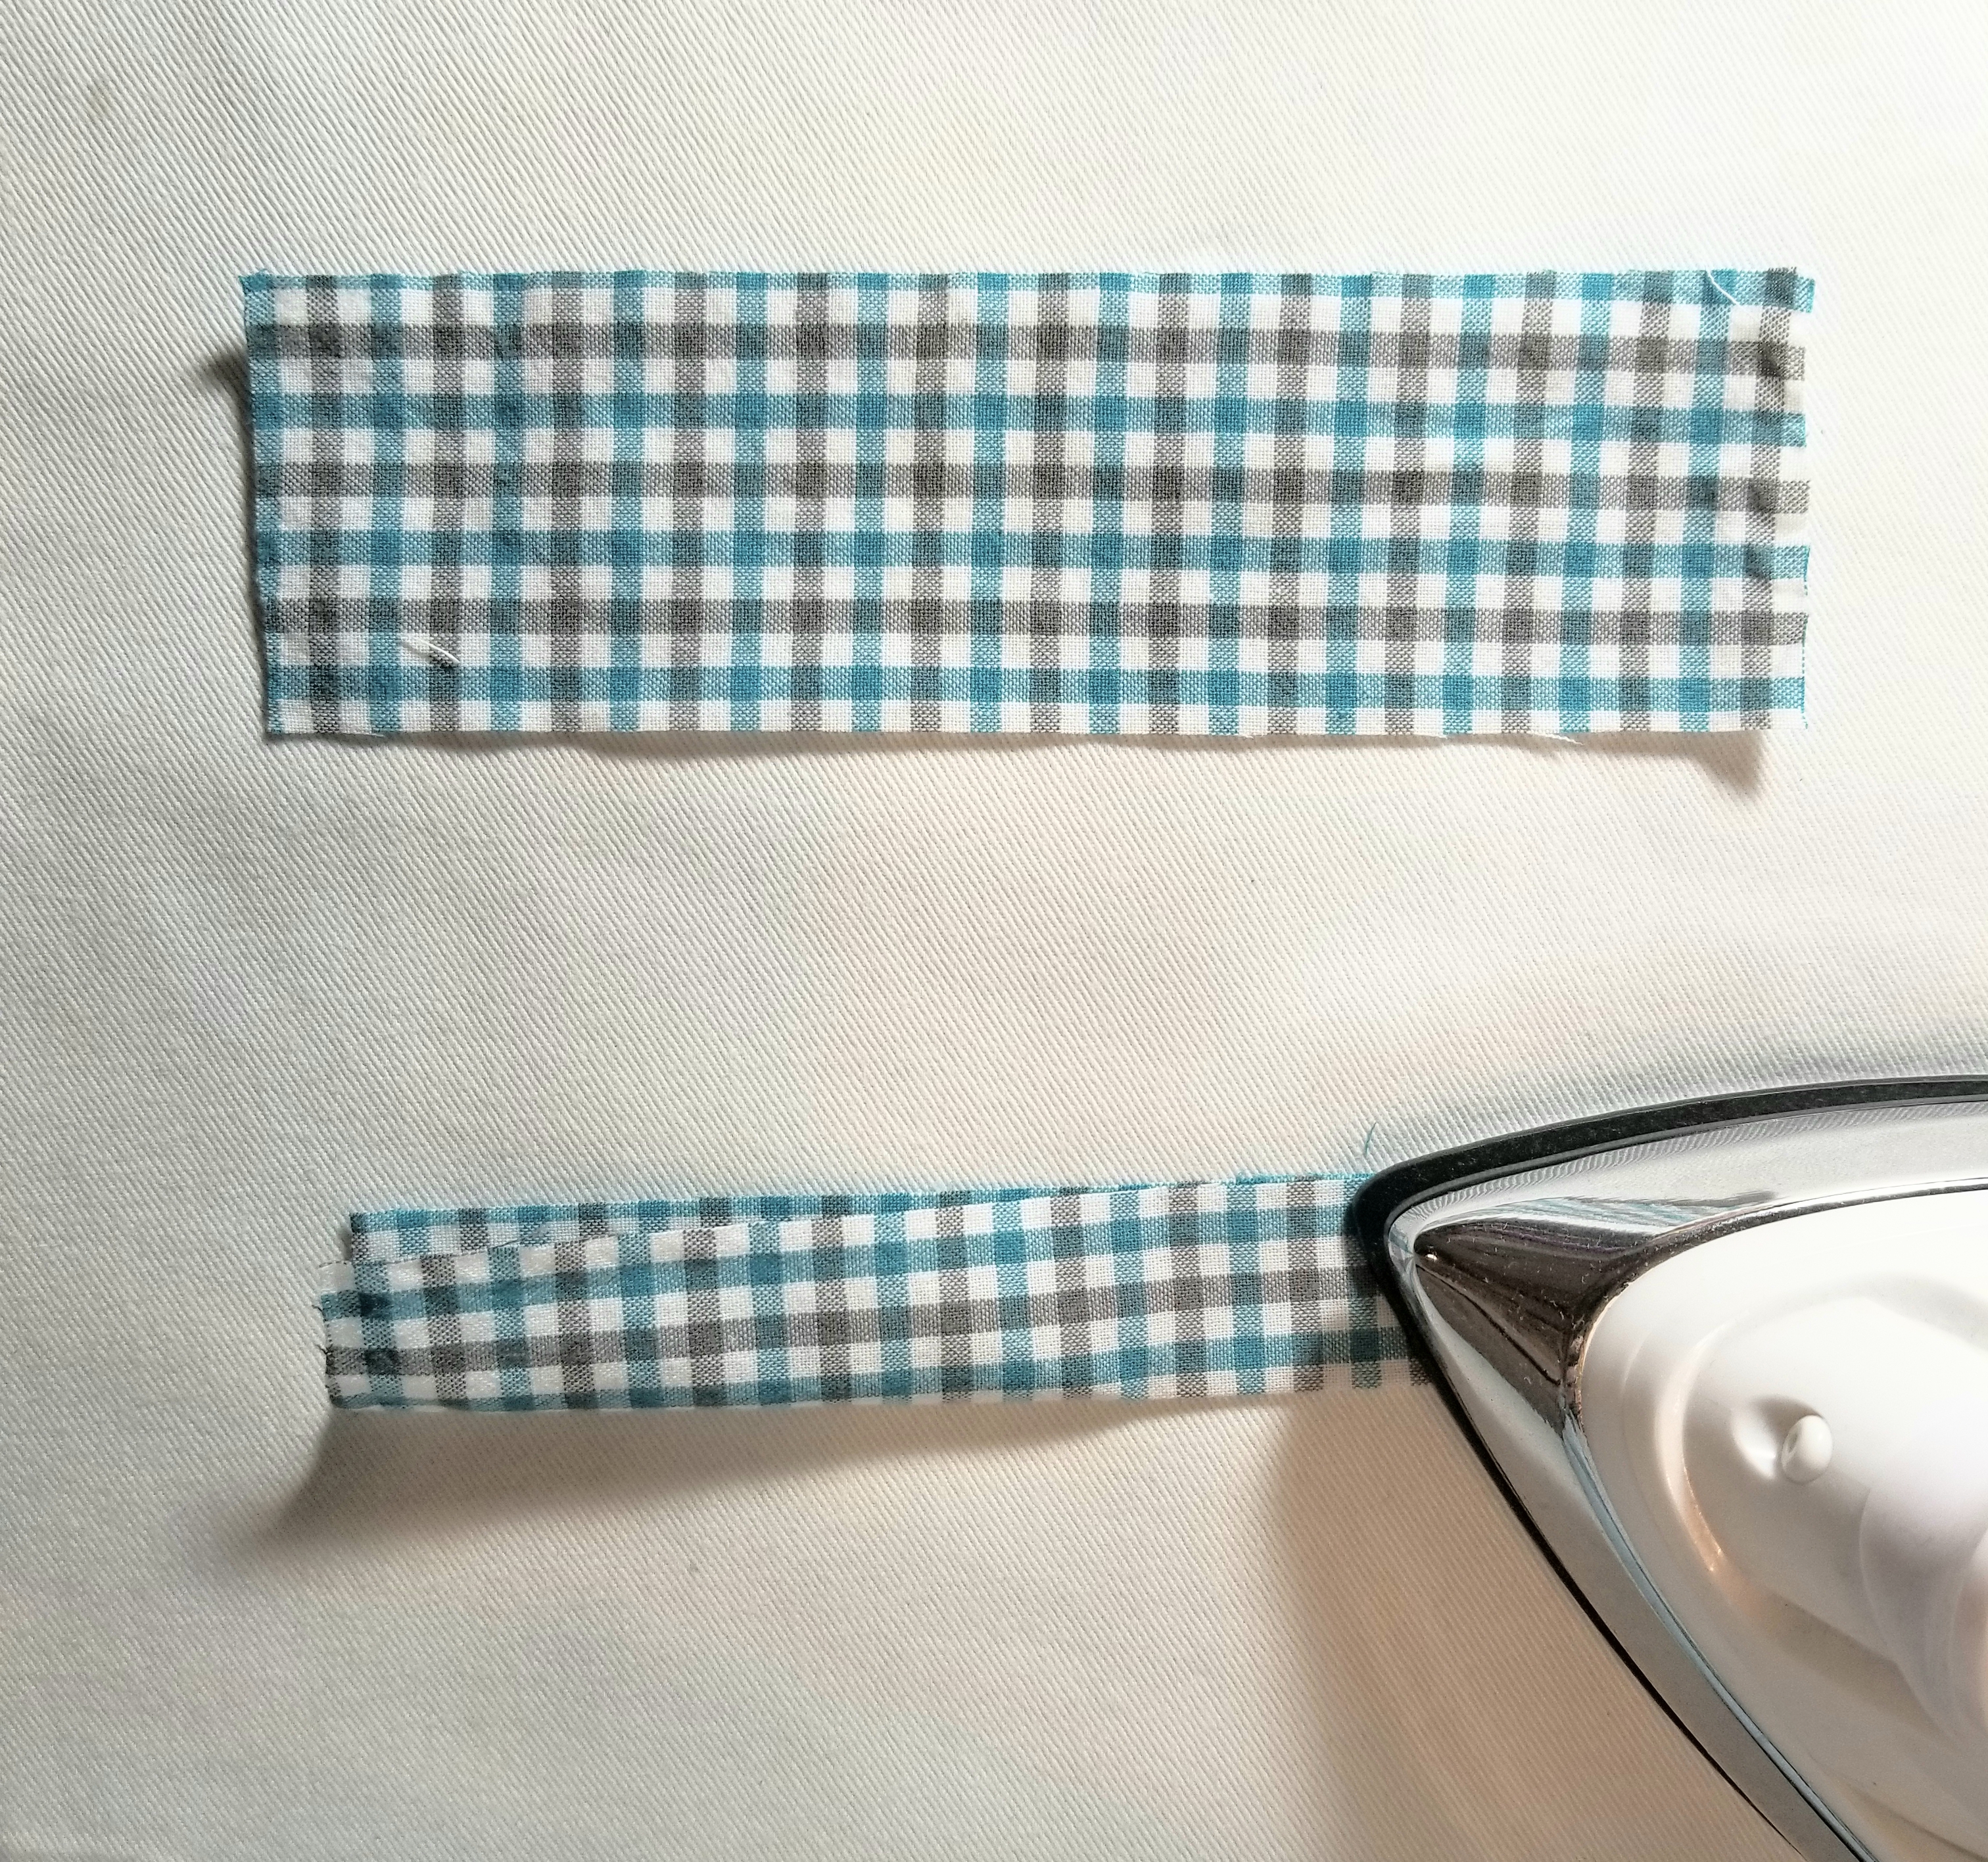
Fold each accent strip of fabric lengthwise in half, matching raw edges, as shown in the picture above. Press.
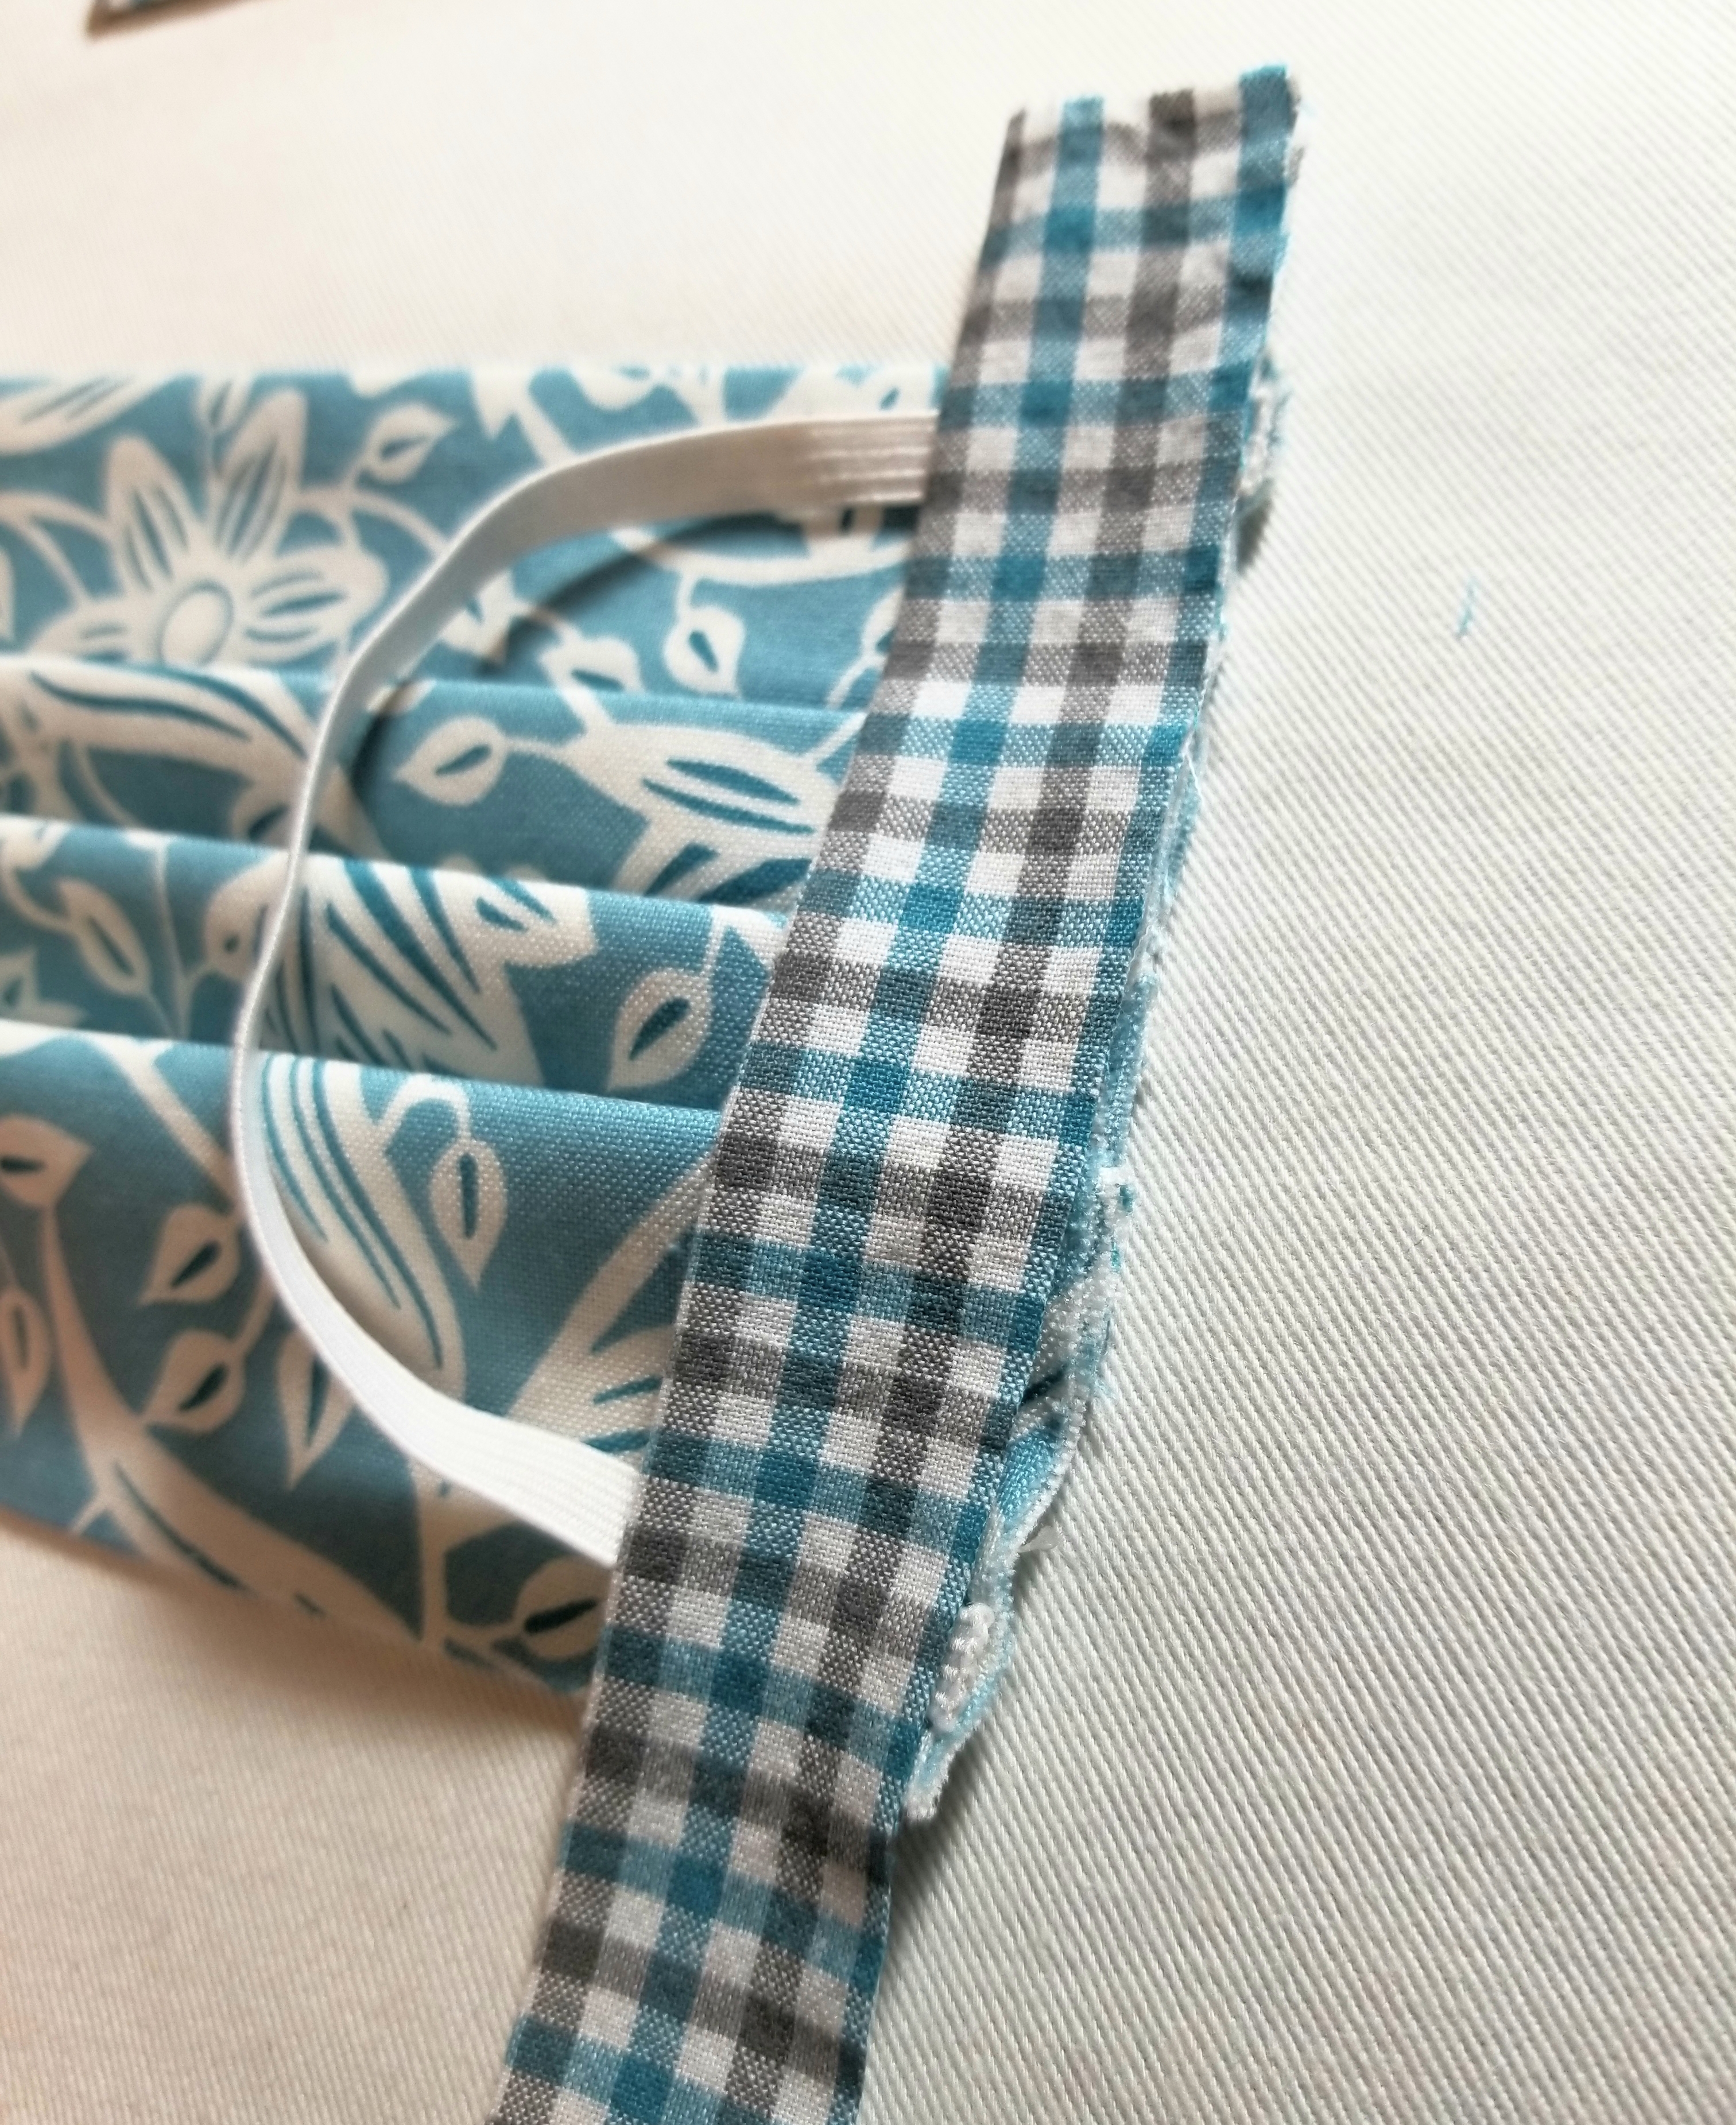
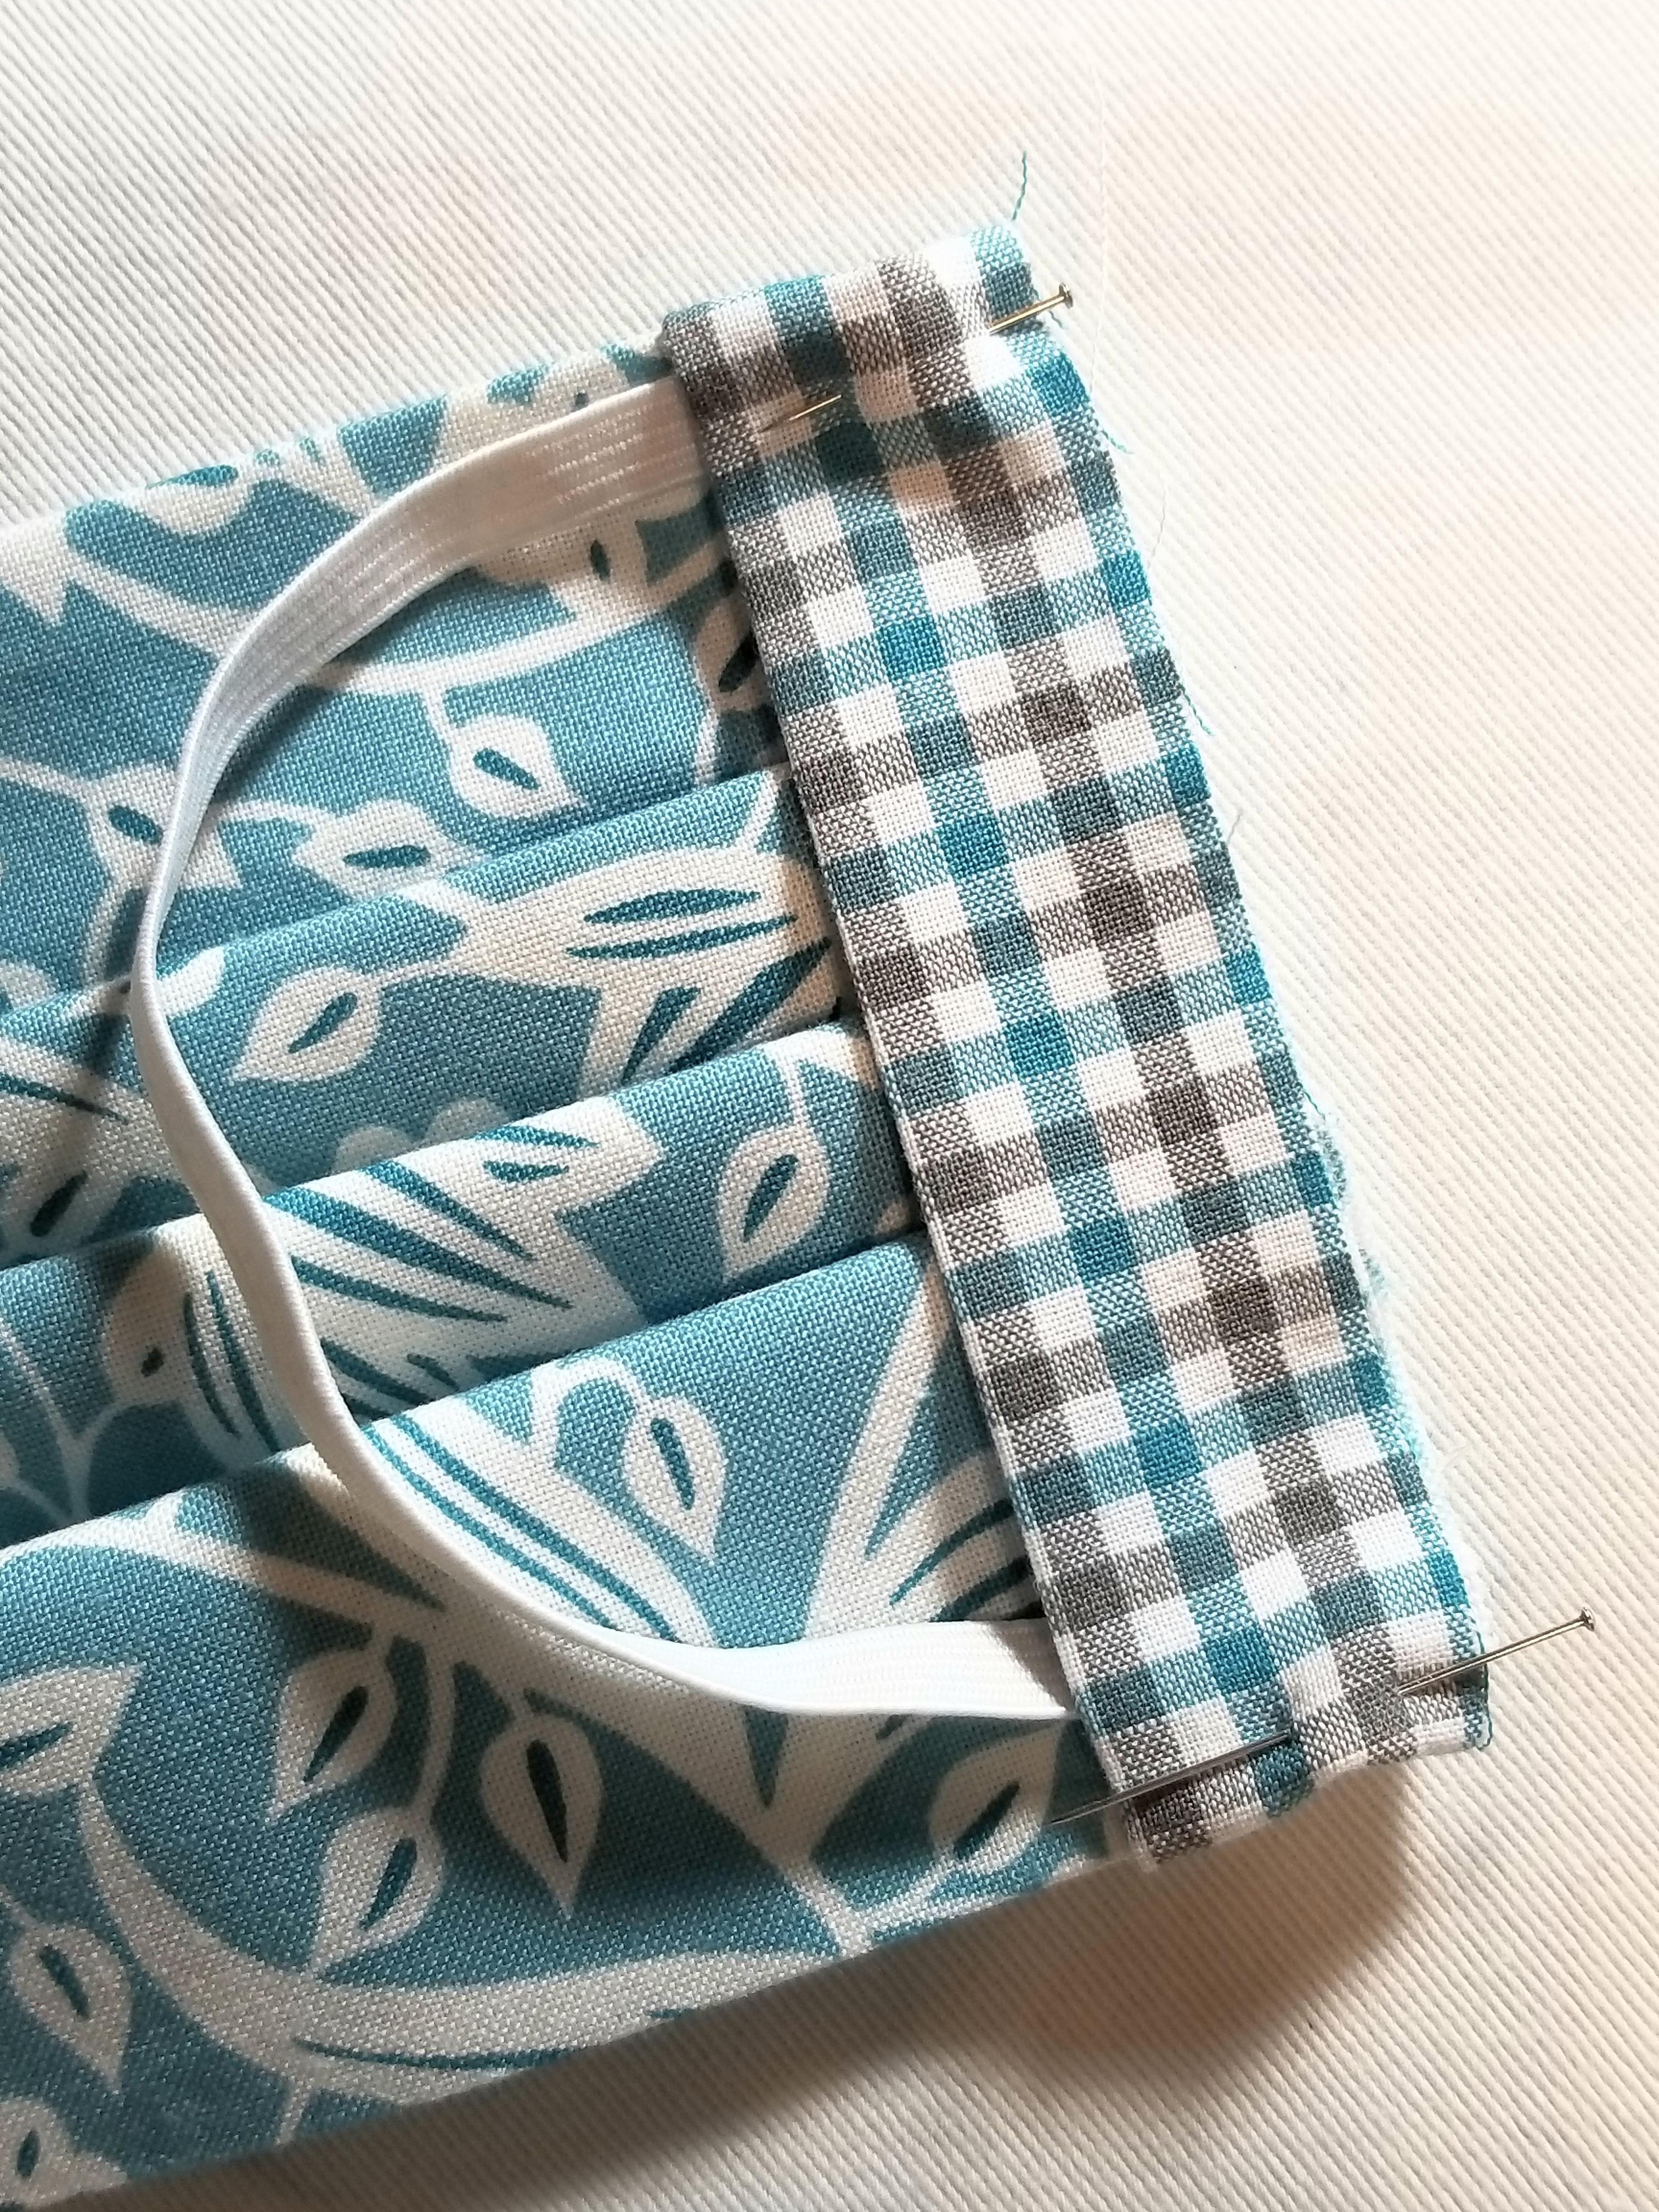
Place the strip on top of the elastic. Make sure the raw edge is facing outward, and the creased edge is facing the main body of the pleated piece. It will be a little longer on the top and bottom and that is okay, as we are going to fold some of that to the back.

Tuck about 1/2” of the top edge to the back as shown in the picture above.
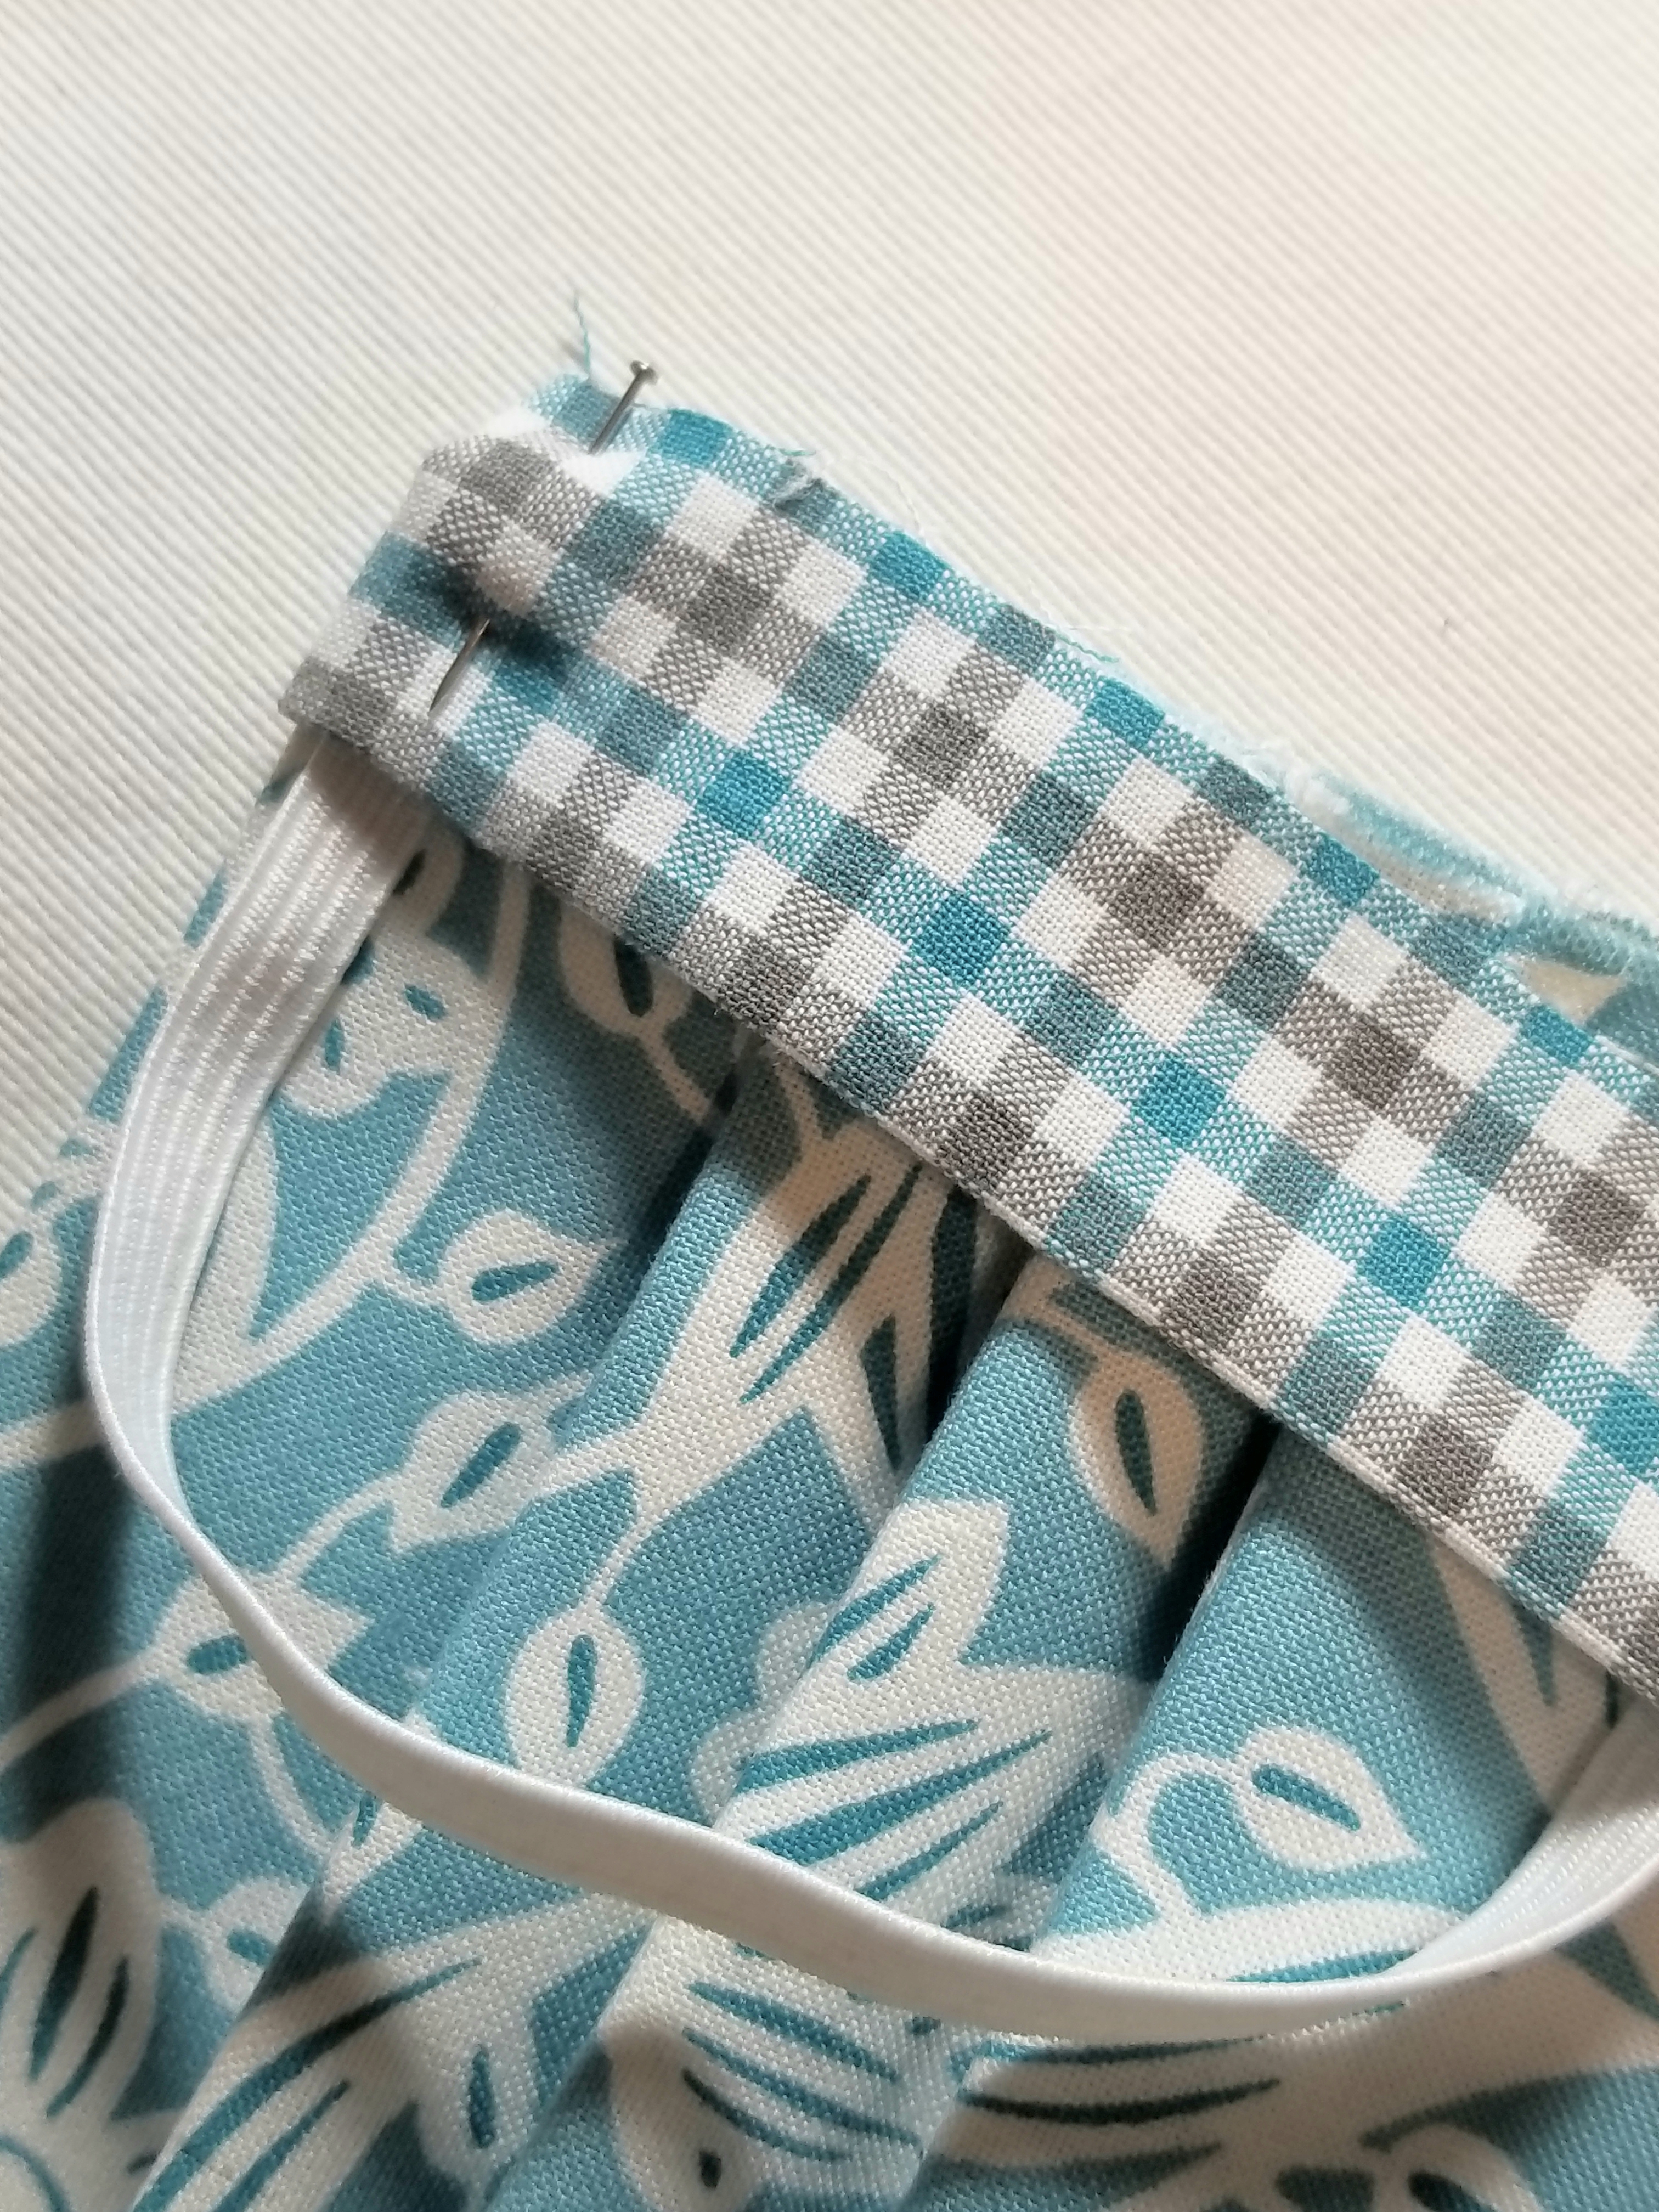
Pin all layers in place.
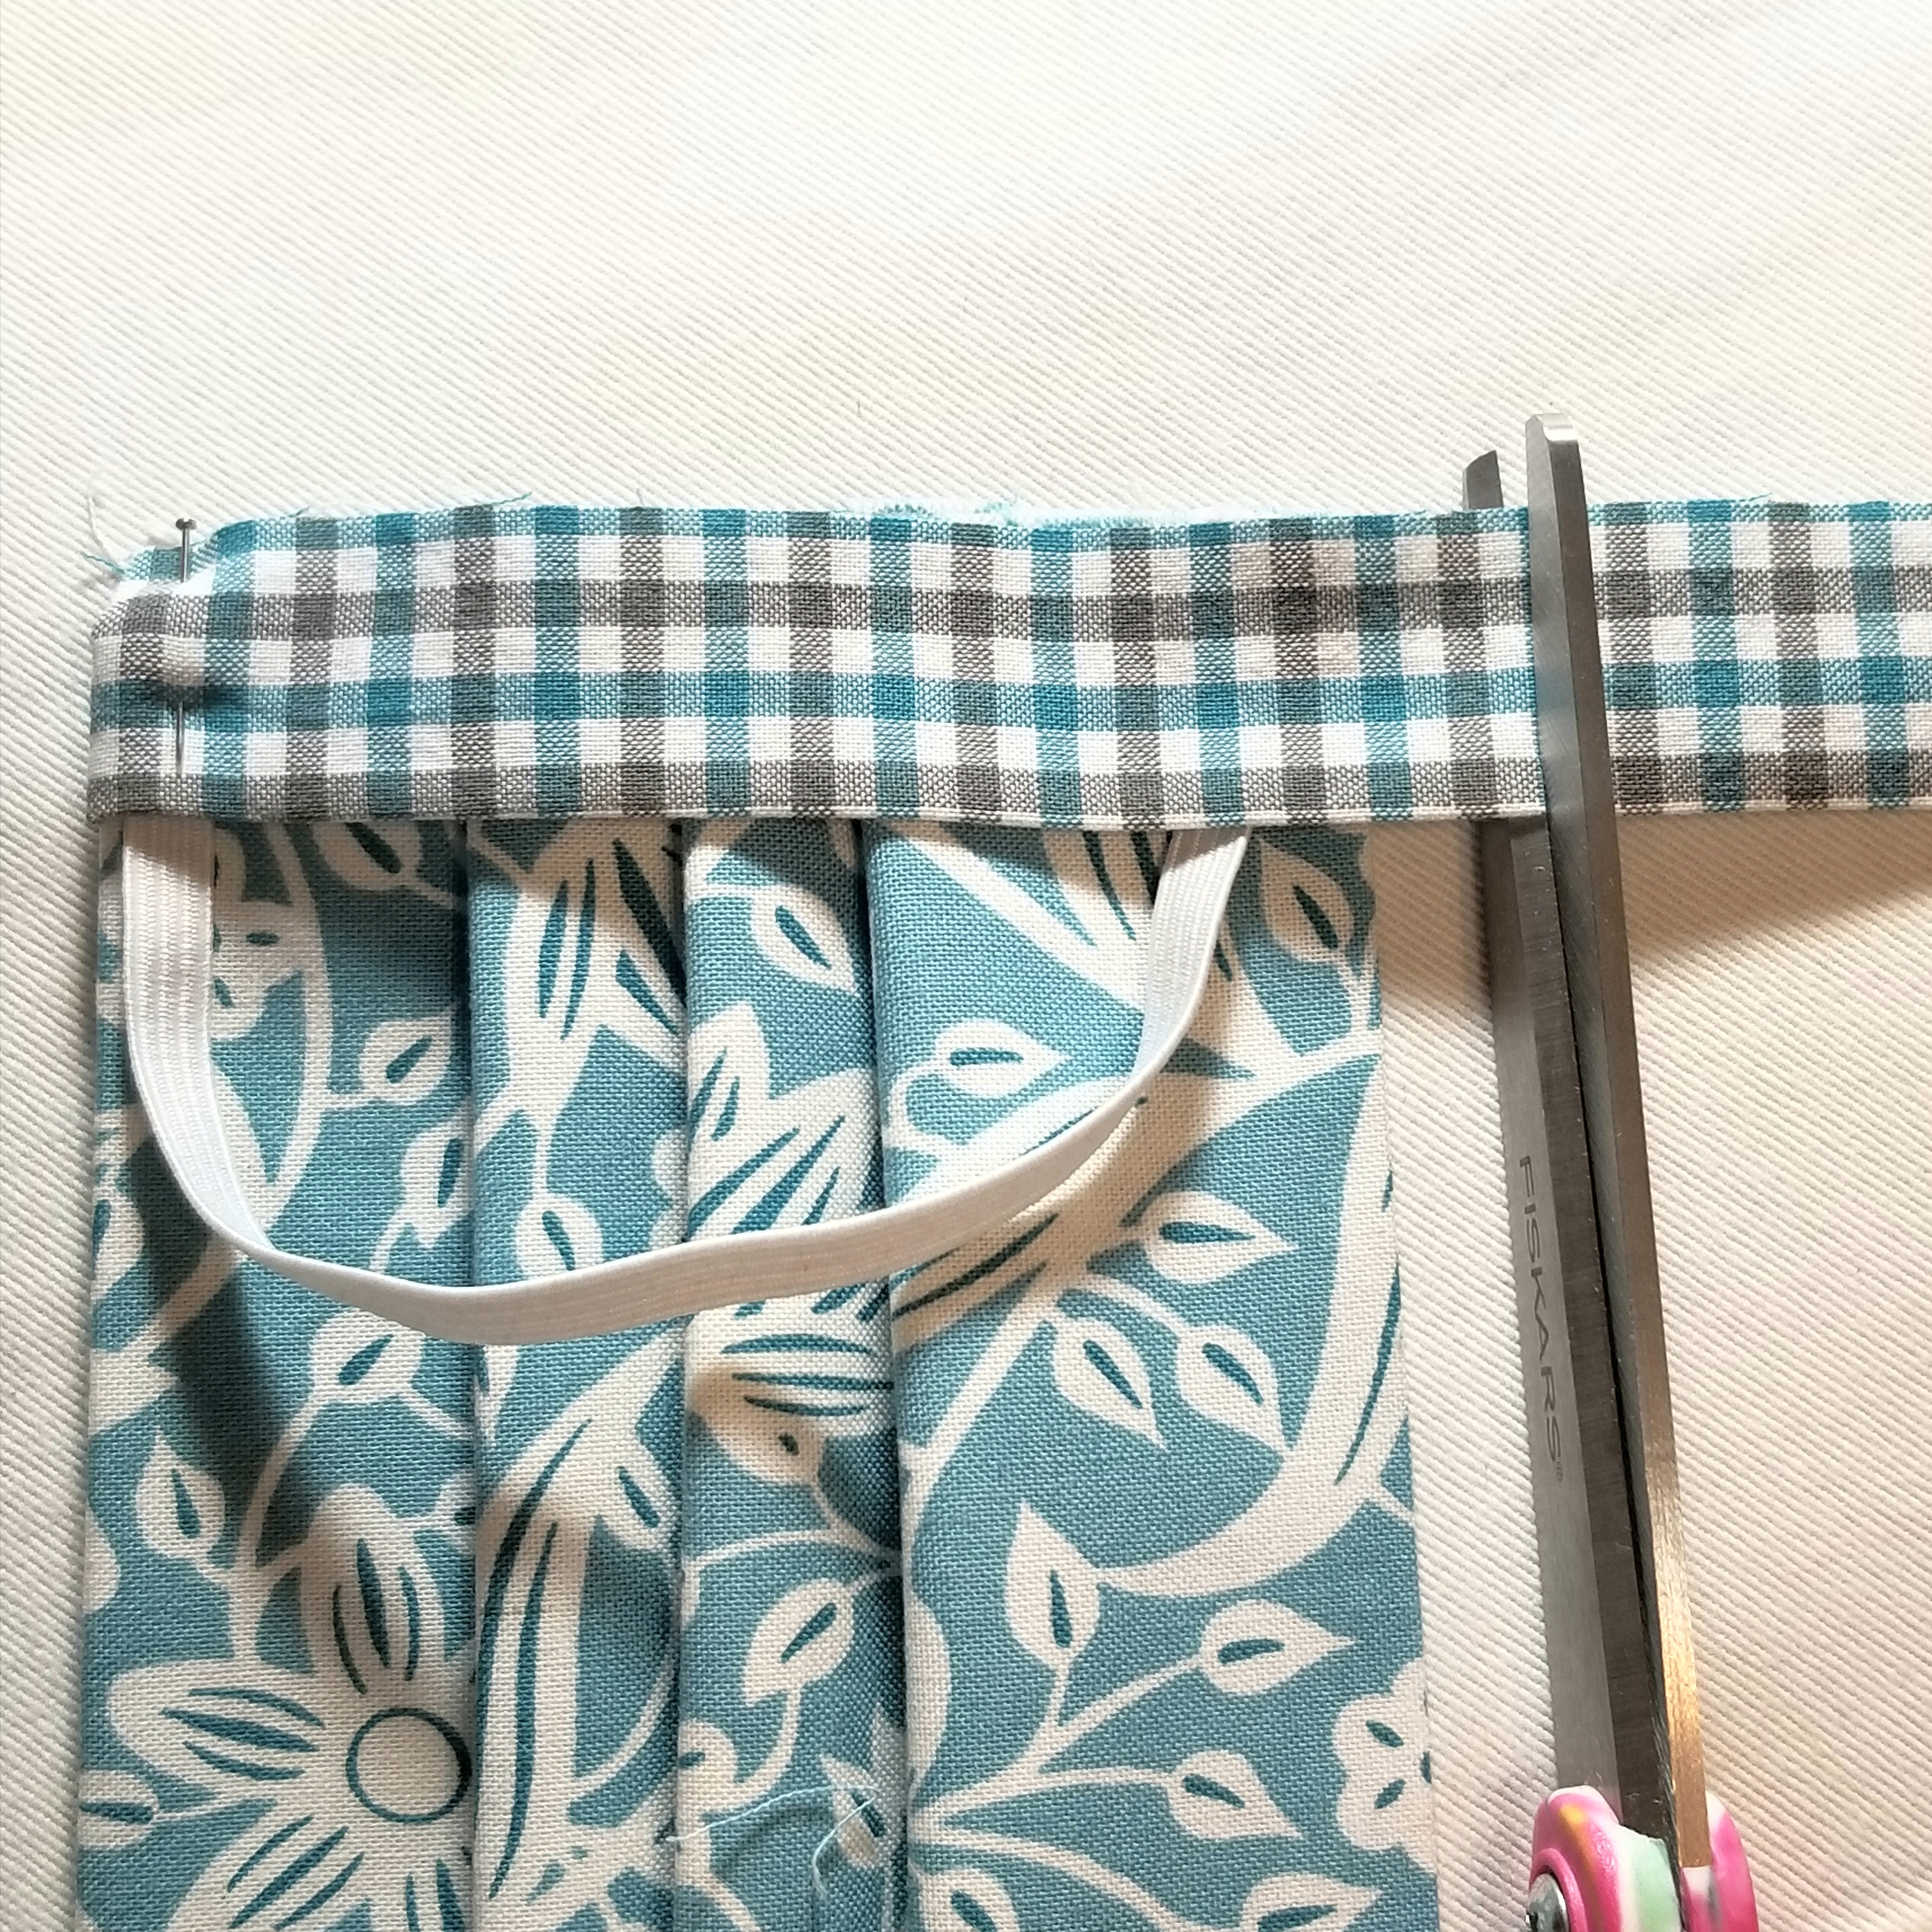
Trim the other end of the accent strip, so that it is about 1/2” longer than the bottom edge of the main pleated piece.

Fold the bottom edge of the accent fabric strip to the back, just as you did with the top edge.
Pin both ends in place.
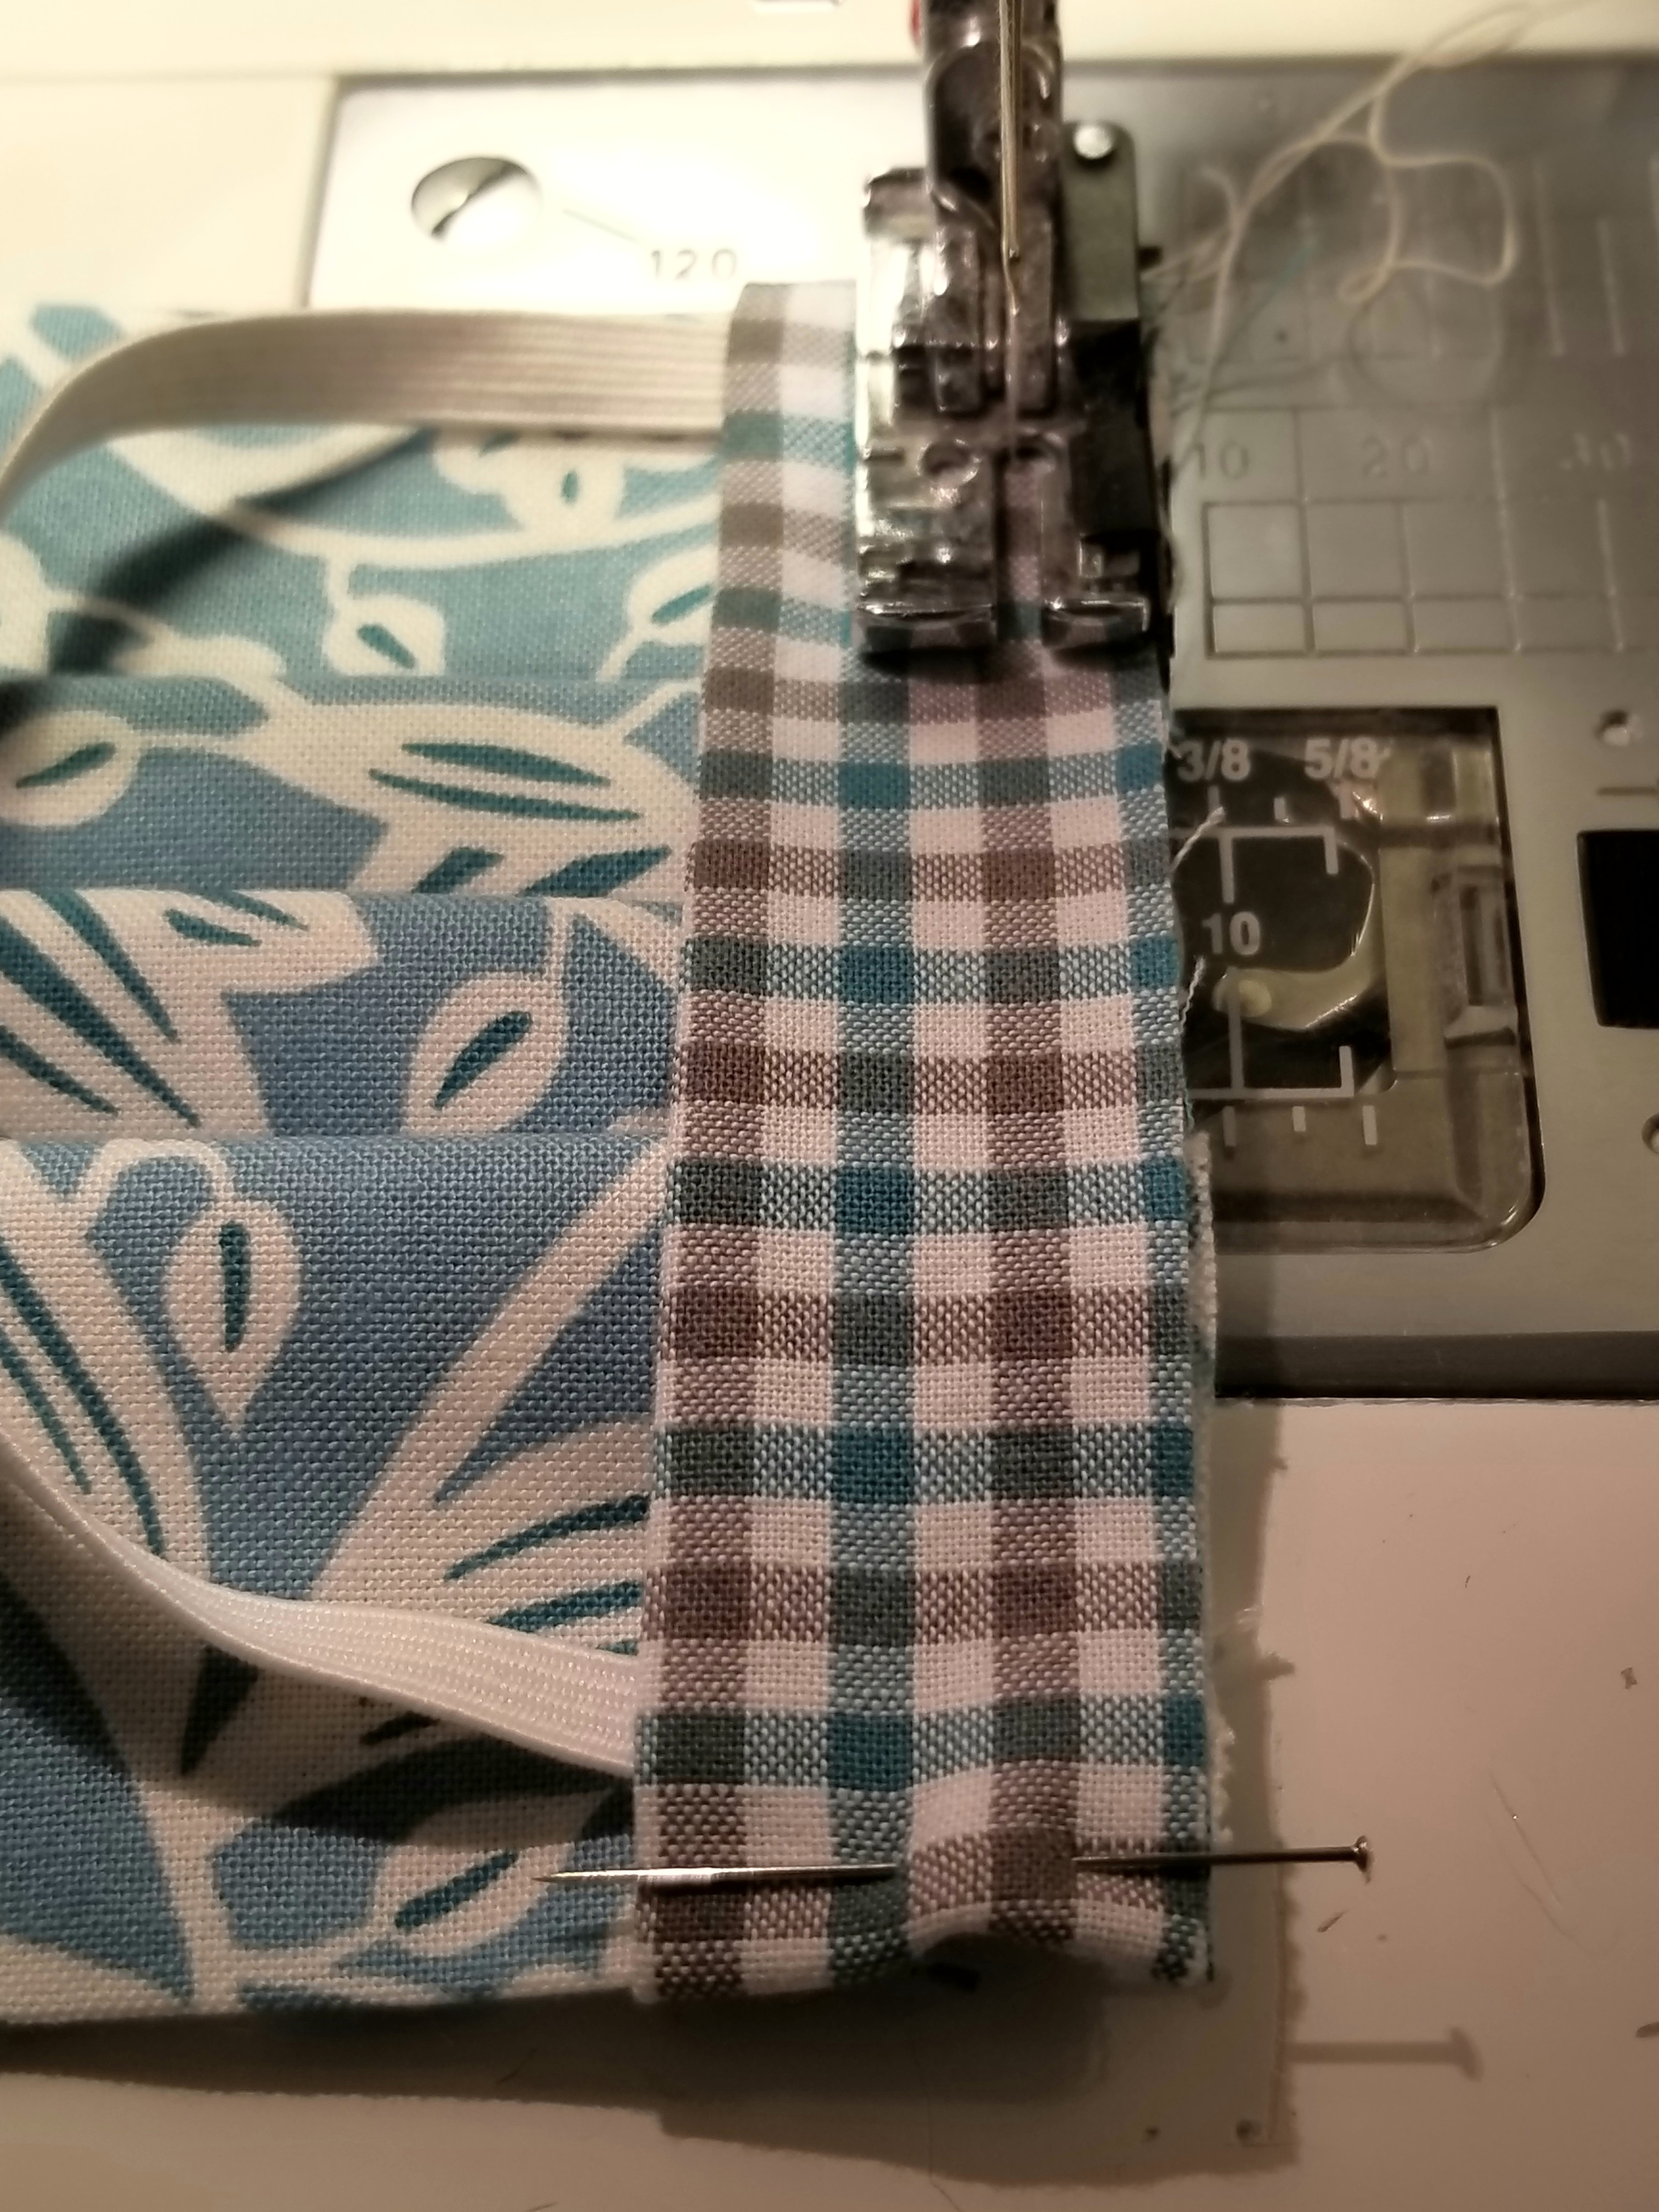
Using a 1/4 inch seam allowance, stitch the length of the entire edge, making sure to back stitch at the beginning and end.
Open the the accent fabric strip seam by flipping it outward away from the main pleated piece, then press.
This is what the mask should look like if you flip it over.
fold the ENTIRE accent piece down toward the main pleated piece, encasing the raw seam. You will now see the accent piece on this side, but not at all on the flip side. Press. Pin edge down.
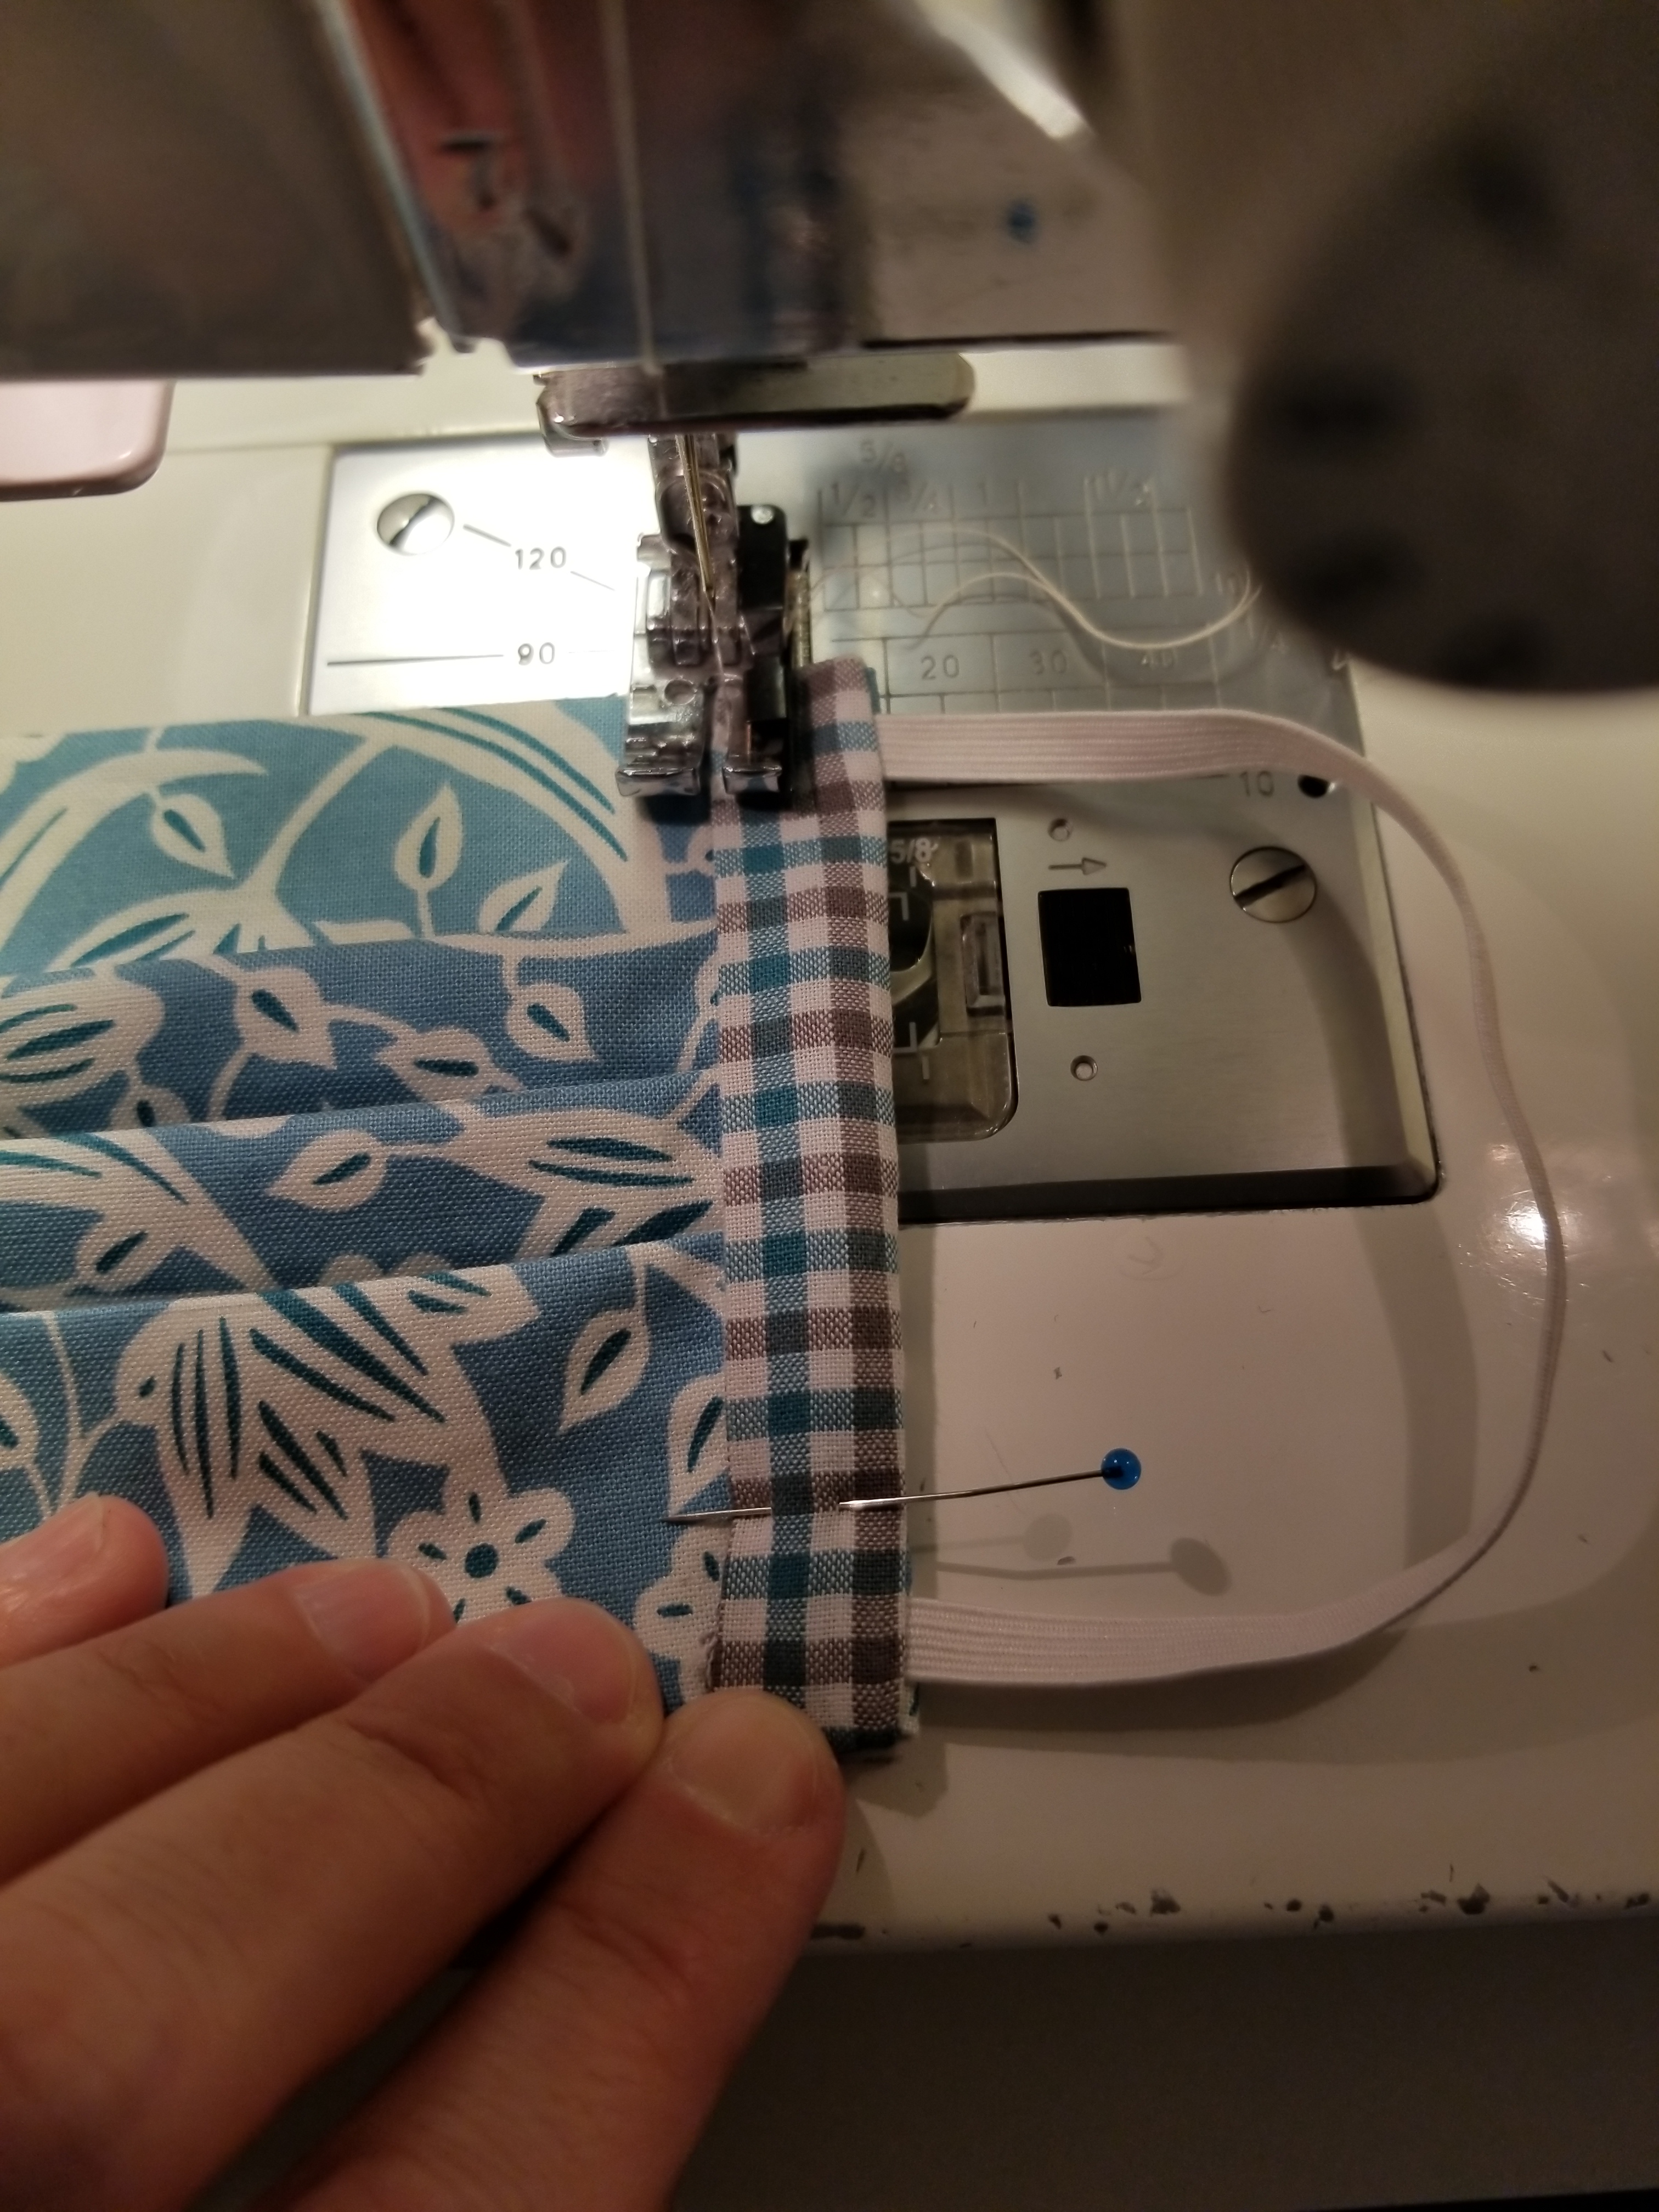
If you are a good sewist, you will change out your presser foot to a straight stitch foot. If you are lazy, like me, you will keep that 1/4″ presser foot on your machine and struggle your way through this next step. 😀 Stitch this accent strip down to the main body of the mask, sewing along the edge, making sure to back stitch at the beginning and end.
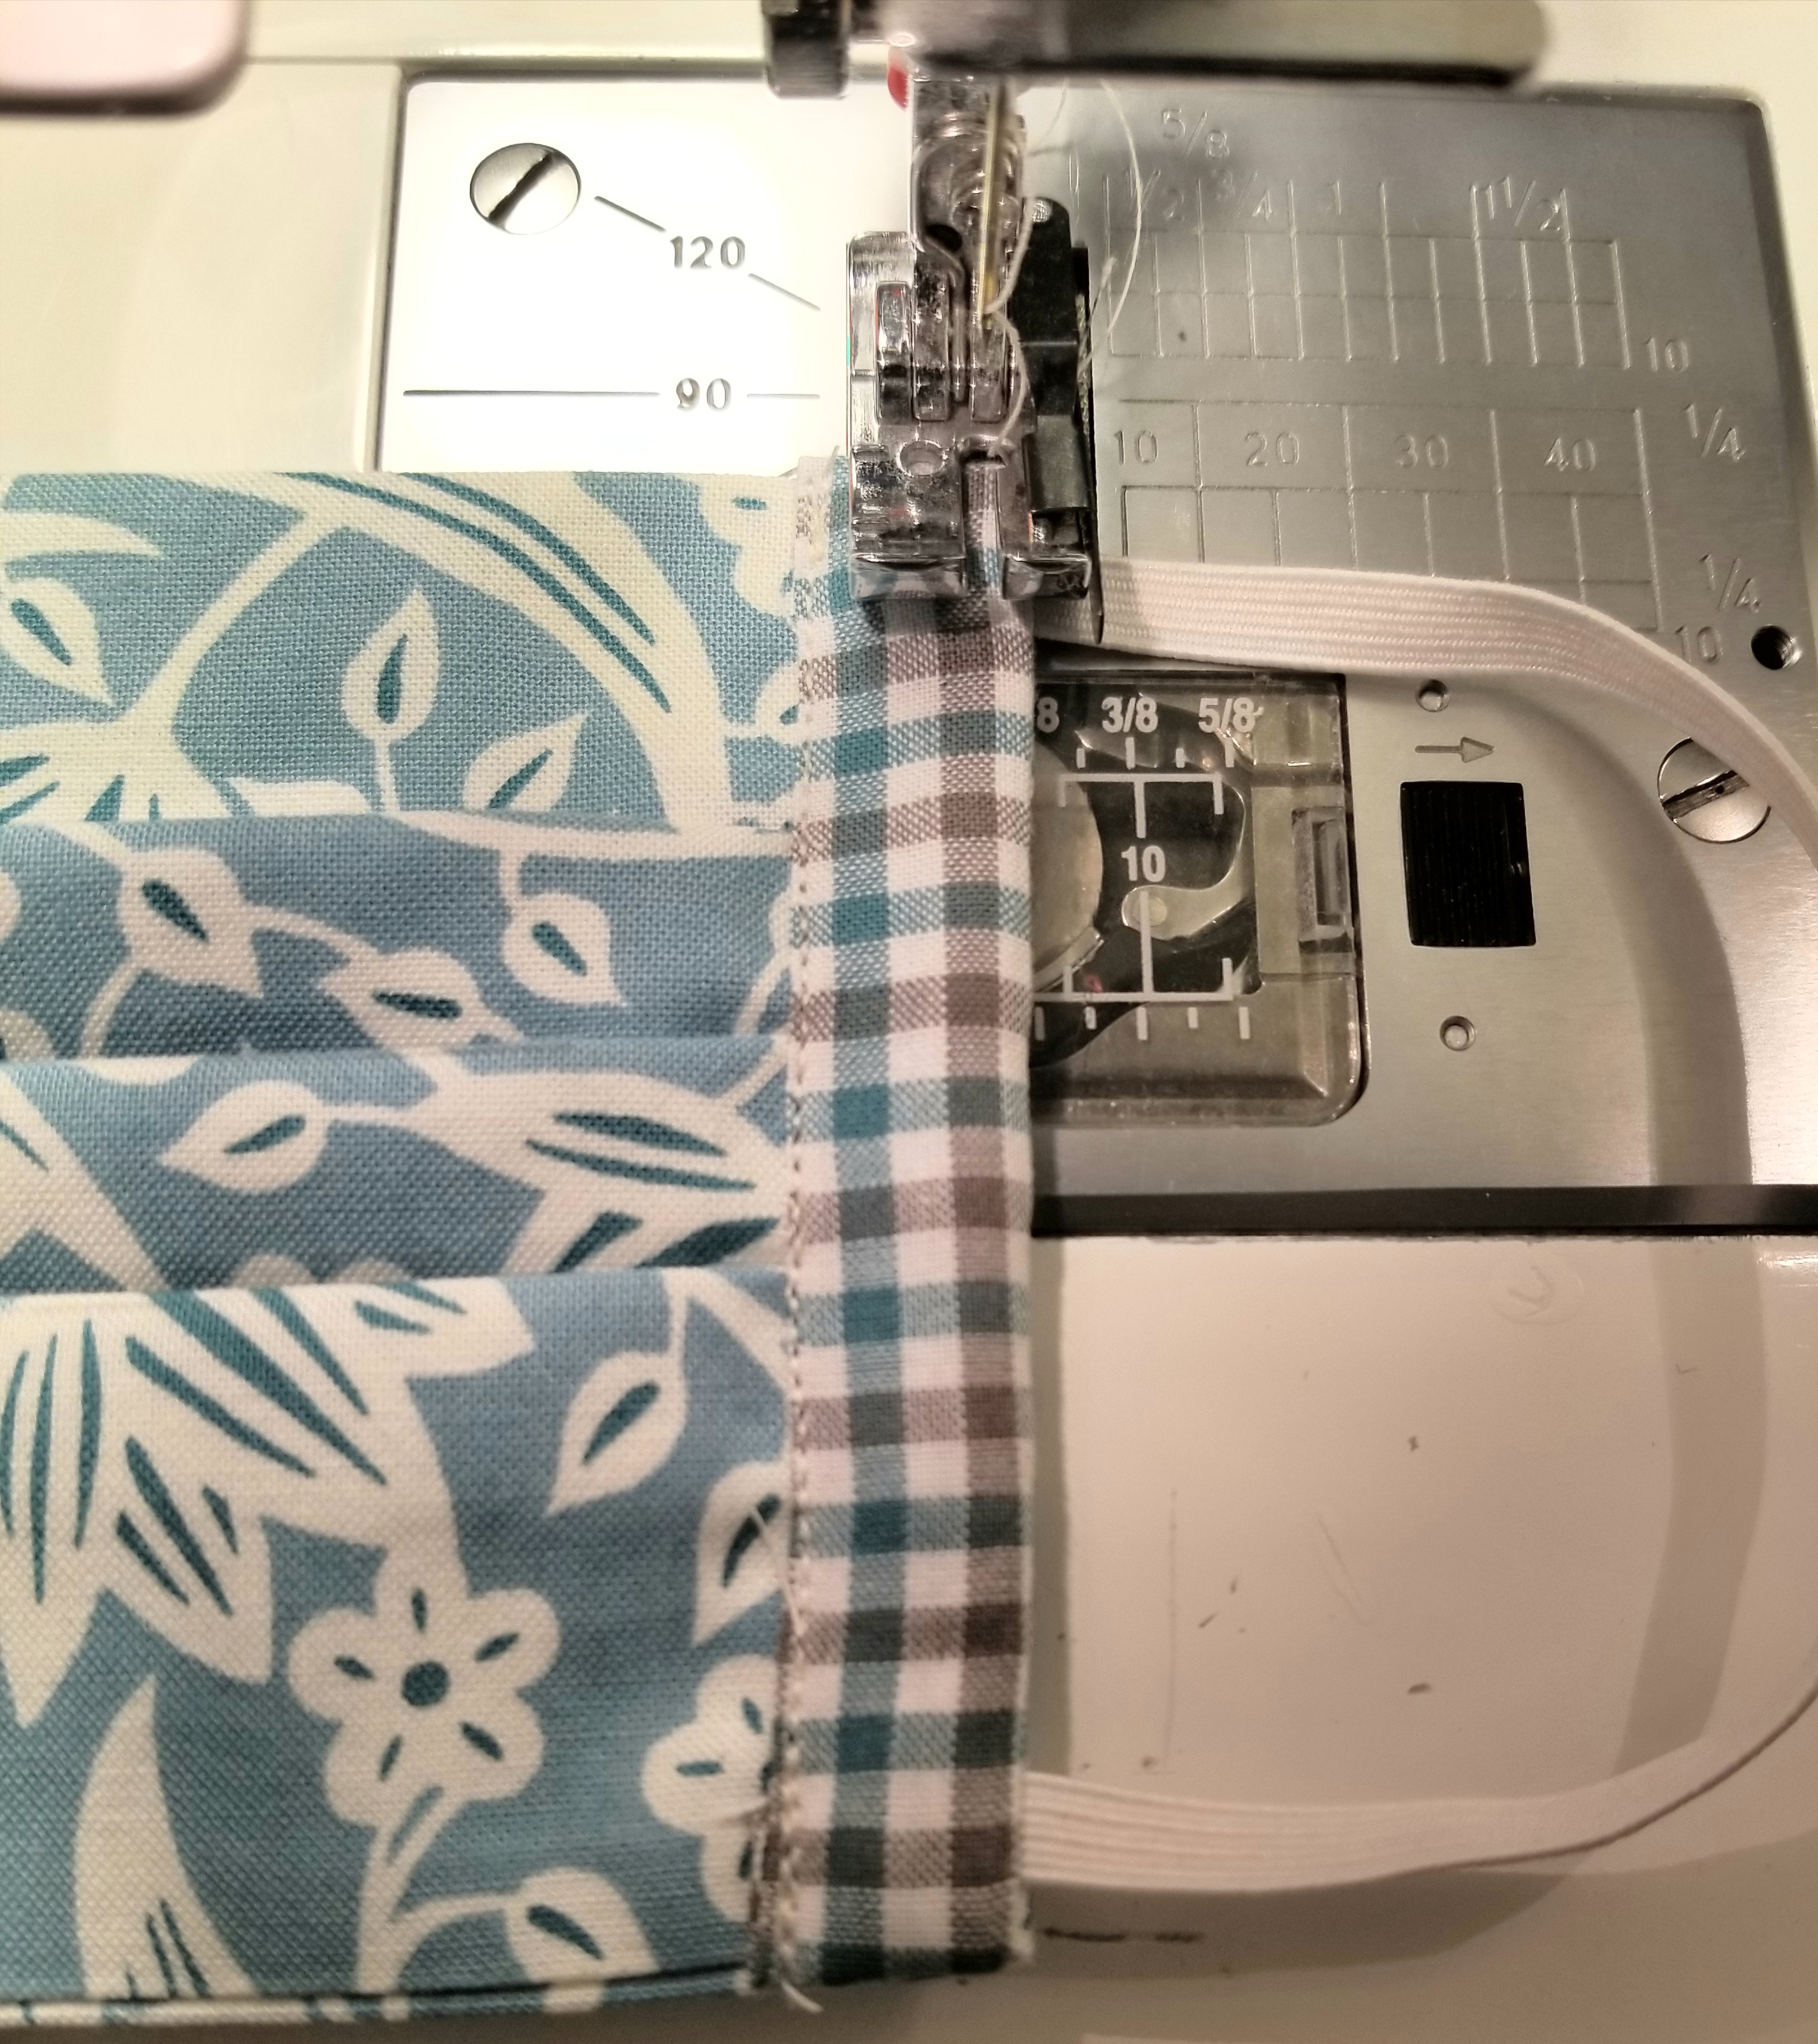
This step isn’t necessary. It just gives it a nice finished look, and helps to give that elastic a little extra stability. Stitch down the edge of the mask close to the elastic side.
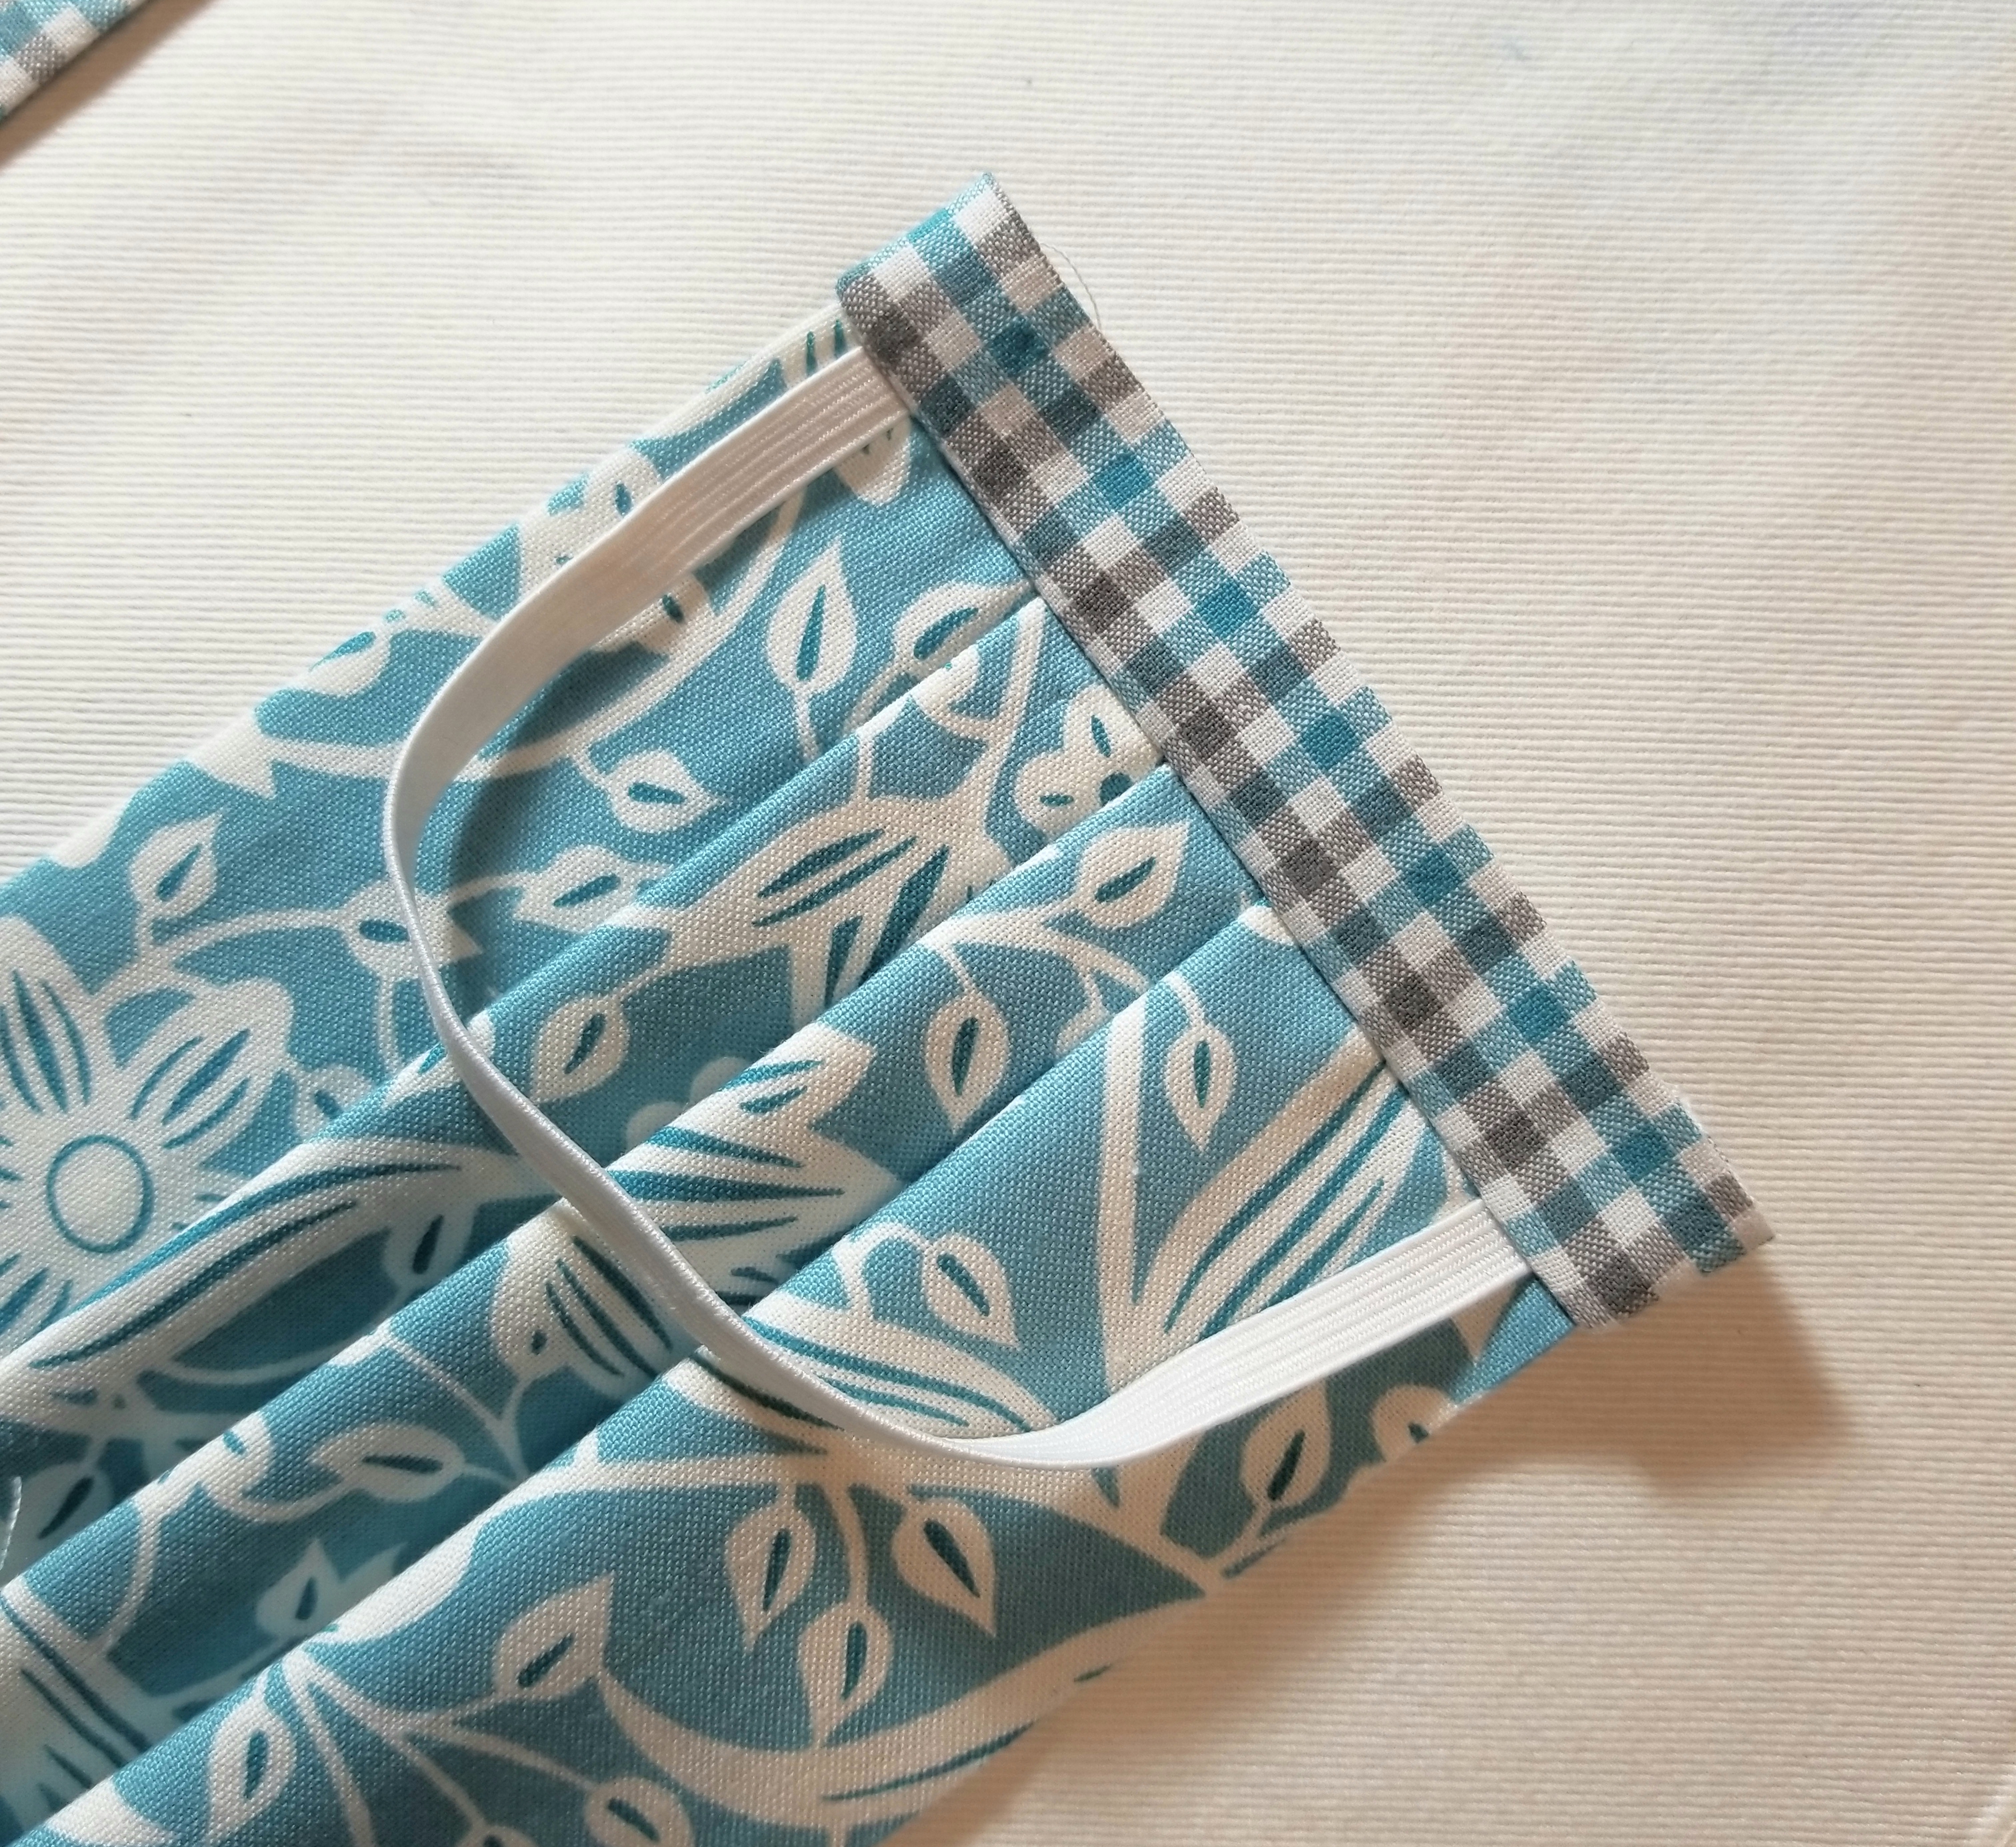
The front of your mask should now resemble the above picture.

The back of your mask should look like this. Following the previous steps, attach the remaining accent fabric piece to the other end of the mask.

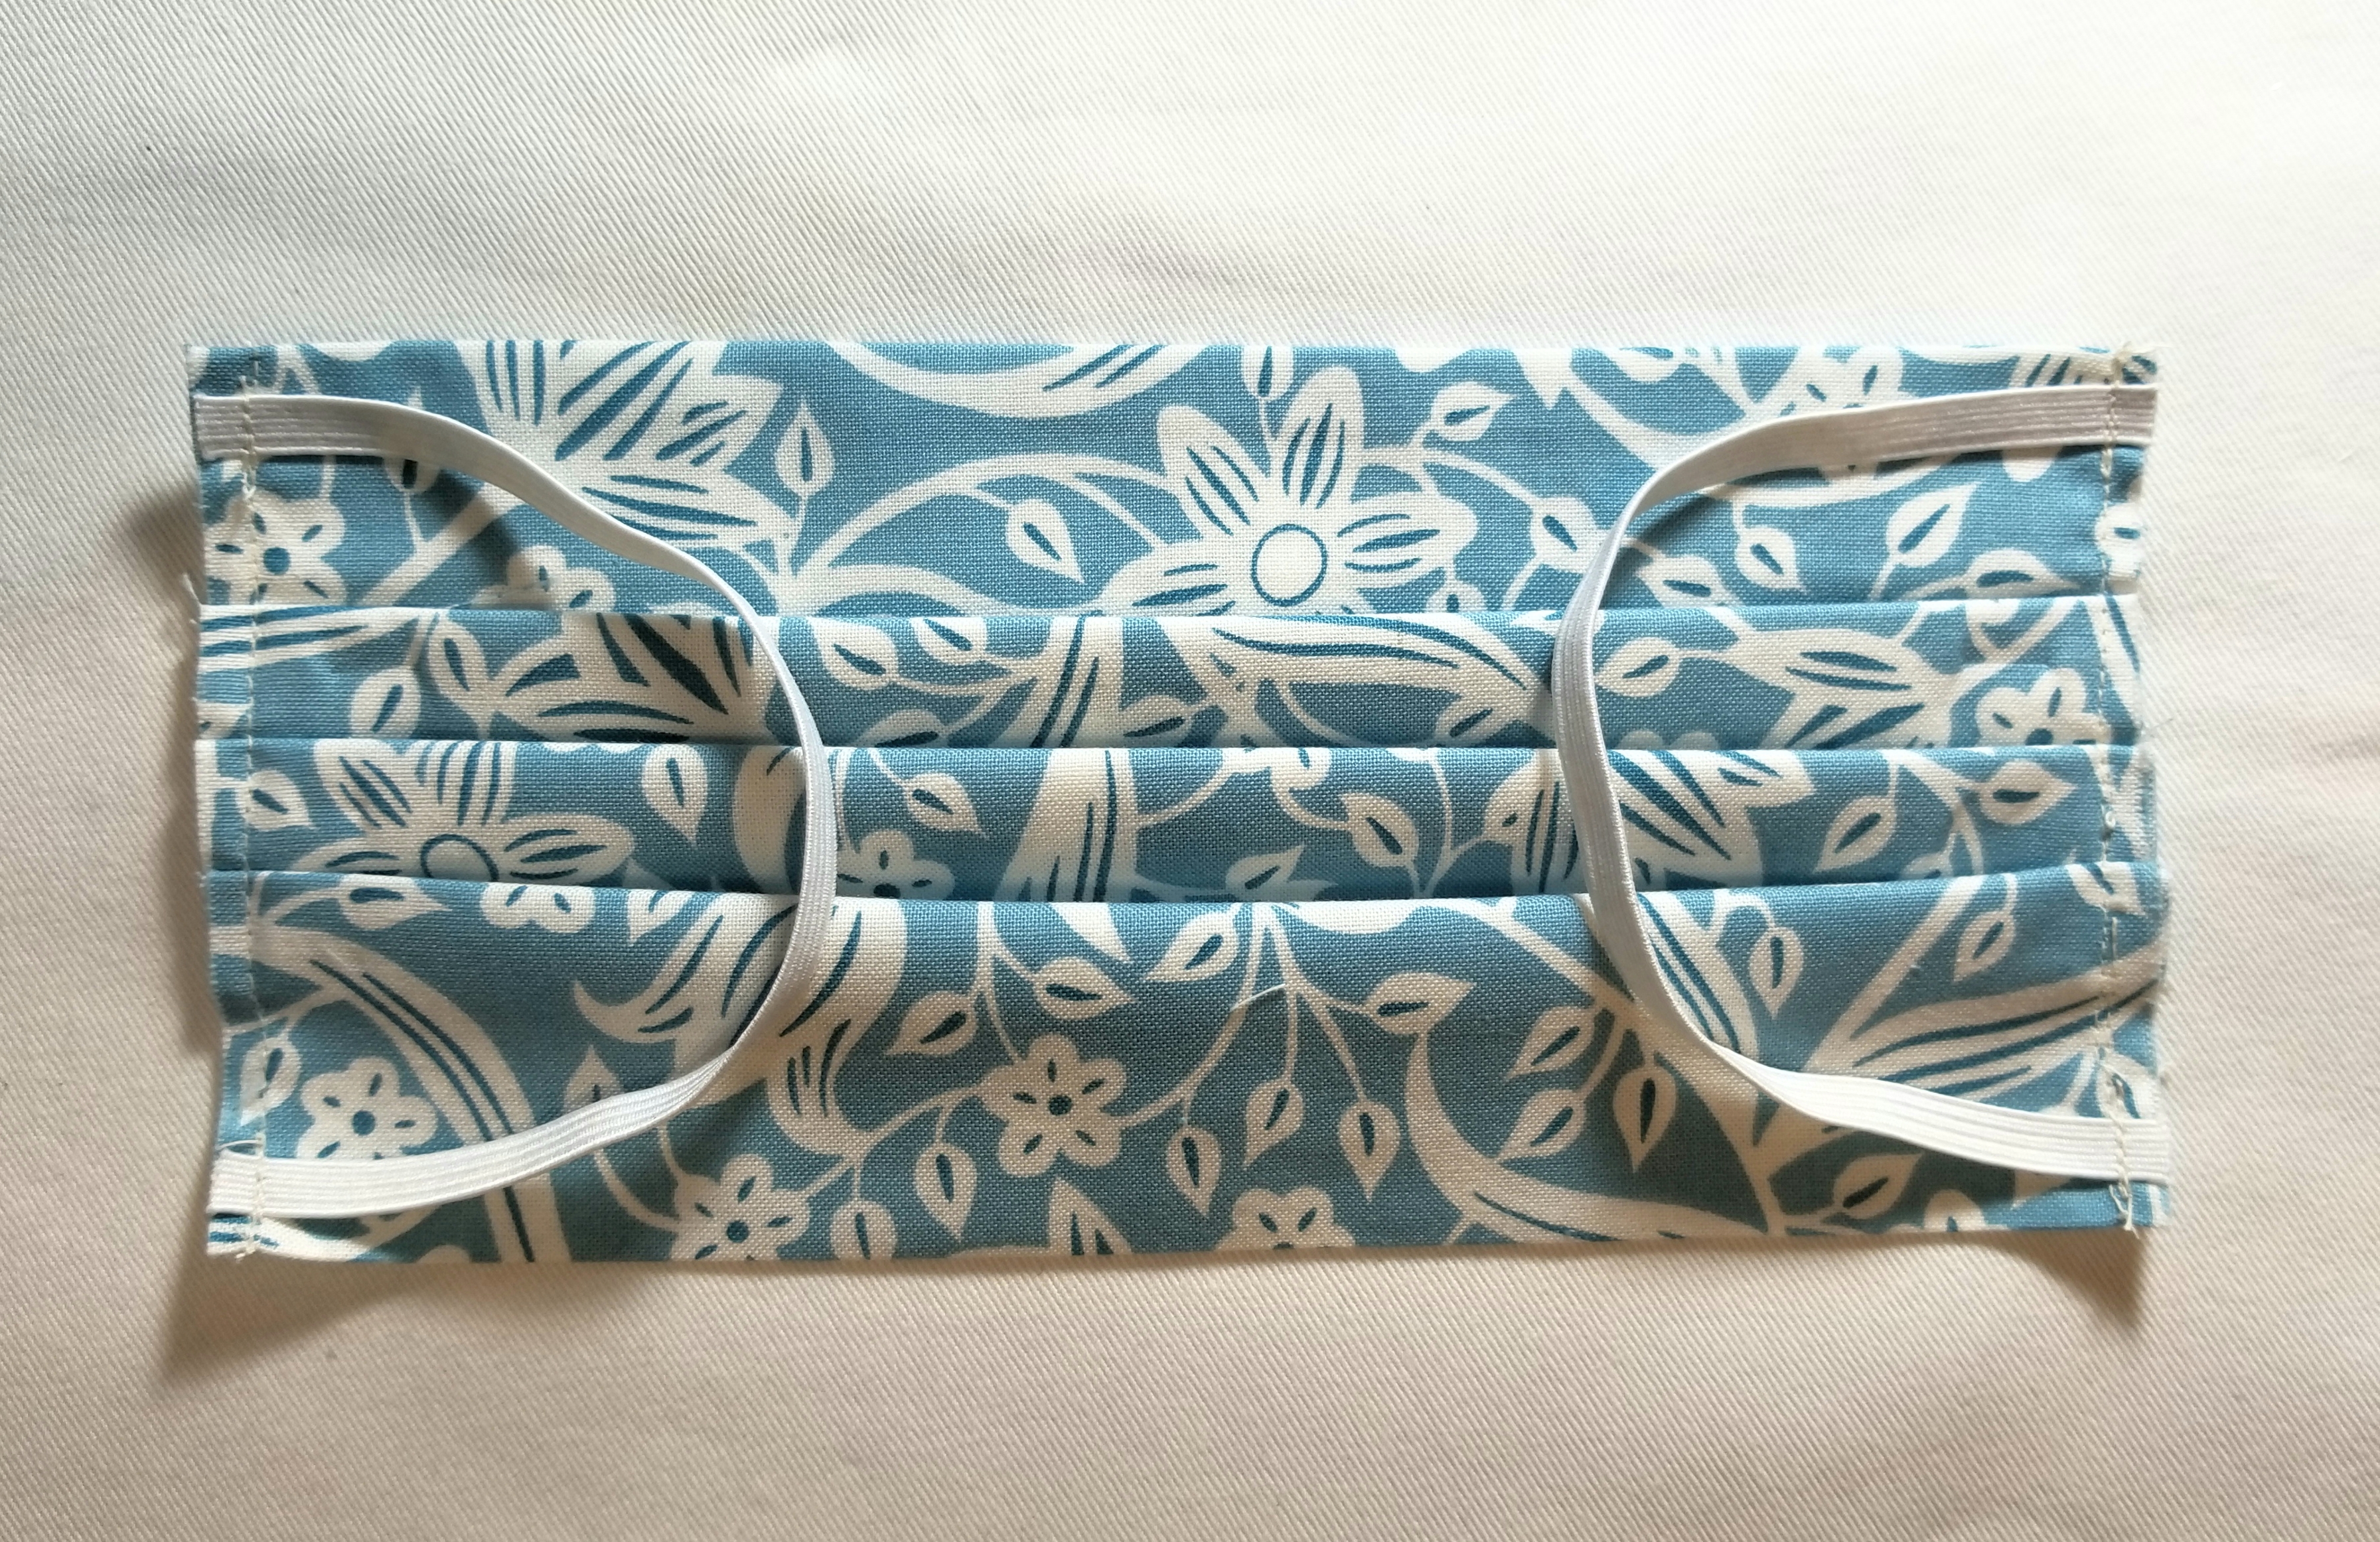
You should now have a reusable, washable mask that measures approximately 4″ x 7″ (unopened).
It took a few hours to put this free tutorial together for you. For this reason, I am greatly appreciative for any mentions that you can give me if you should use this tutorial. If you post a picture on social media, you can use the hashtag: #buttoncountermask. Feel free to share this page, and please tag me in your pictures so that I can see your beautiful creations. Last, I appreciate constructive criticism, so if you notice something that doesn’t look right, or does not make sense, bring it to my attention. I am happy to clarify any steps where you may have questions.
Enjoy!
P.S. Obviously, the elastic length can be adjusted to your facial measurements.
EDIT (March 24 2020): Because this tutorial has recently been used on a large scale, I will be adding a few things here as frequently asked and answered questions, suggestions, and reminders.
- This tutorial was happily shared by me over a year ago. This is not a new tutorial created in light of the current virus pandemic. I am not in charge, nor affiliated with any organization or entity requesting masks to be made. There are multiple organizations that are using this tutorial for their requests. If you have any question regarding what their requirements are, you really, really, really need to ask them. Please understand that I cannot and will not tell you what you should use, or how you should make your mask different from my tutorial.
- Keep in mind also that there are multiple entities that are using this tutorial for their requests. One entity may have completely different requests regarding features than another entity. (for example one organization is requesting a 4 layer mask, while another is fine with the two layer, as their thoughts are that they can be doubled up or used as a cover or liner to another kind of mask.) So, there is no correct or incorrect mask. Who are you making your mask for? Those are the people to whom you direct your questions.
- CHILD OR BABY MASK: After much thought, I have decided that it is in my best interest to NOT supply a mask tutorial for anyone other than an adult. One of my reasons for this is that I feel that a mask could pose as a choking hazard, and I do not want to have any part of that scenario. My suggestion is that you really should ask each individual child’s doctor or provider what their guidelines are, and go from there.
- I will not be held responsible for any mask misuse or malfunction.
- ELASTIC OR TIES? The main reason why my tutorial uses elastic is so I don’t have to tie it behind my head and mess up my hair. That’s it. So, if you are making the tutorial, and you don’t like the elastic, or if the person who you are making your mask for, requests ties; by all means put ties in yours. My pattern is very easily adapted to your preferences. There are organizations specifically asking for elastic, and some that are asking for ties only.
- ELASTIC LENGTH: I have read that a few of you recommend longer elastic; however, mine ended up being slightly loose. Therefore, I will not alter my pattern. I have stated in the tutorial that elastic length will need to vary due to the fact that human heads are not uniform (Thank goodness).
- I don’t have a PDF or printable version of my tutorial. If I decide to do that, I will; but it will be in my own time. I have received many hateful comments (that I deleted) demanding that I provide this. I need to remind those few sour apples that I am under zero obligation to do so. If my absolutely free visual tutorial isn’t to your liking, I invite you to go find one that makes you happy. If you are a person who often finds themselves using the words ”I need you to…”, you might fall into this category.
- I am completely honored that many of you are using my tutorial, or even certain aspects of it to help people in need. Even if you are using a completely different tutorial or pattern and just stopped by to check this one out, I applaud you for being a maker during this time. I cannot express enough how happy it makes me feel to see so many humans getting together to do something for the greater good. Please continue being that human. Those are the best ones.
I am signing off now to take care of my family, who needs me now more than ever. Thank you all for your kindness and understanding. God Bless.

Hi, thank you so much for sharing your tutorial and your tips. I was wondering what dimensions you would recommend for a larger size? (eg men size?)
Caroline, for a larger mask I would try making the cutting dimensions 9” x 14” instead of 8” x 14”. You will continue to follow all of the directions exactly. If this turns out to be a bit too big, then cutting the piece 8 1/2” x 14” is the answer. You can likely get away with checking the width of the fabric piece by having this person hold both sides up to check for coverage, before you make the pleating steps, to save you time and effort. Thank you for your question. Good luck.
Just wanted to give Thanks to you for such an easy format to follow! Im an art teacher who dabbles in everything and not really a sewist by trade….you make this so much simpler….many thanks…..using for food delivery, supply runs for dropping off to students, an run arounds…my mom, sister and I are all making them for family and friends! You rock!
Kim, Thank you for your wonderful feedback. This is so awesome that you were able to introduce this to your mom and your sister. Thank you for being essential. You are greatly appreciated. Stay safe.
Thank you sooo much for this tutorial. With Covid-19 requirement of wearing masks I needed something quick and some thing my kiddos would wear. They picked out fabric from my scraps for themselves, me and Daddy. The smallest one I took off an inch or so due to my youngest’s small size. Instead of elastic I used the elastic straps I’d saved from buying shoes at store. Tried to post photo but failed.
Janel, this is excellent feedback. I hope that some of my readers here can use your information for their own needs. Thank you for visiting me.
Thank you so much for making this tutorial! I’m the only one in my family who can sew and I want to contribute while I have time between college online classes. Quick question: do you pin the pleats down through all the fabric or just pin the pleats themselves? Just wanna make sure I’m doing this correctly. Thanks!
Camille, I pin the pleats down through all layers. My pins are glass head, so I can iron right over them, but if yours are not, you can just iron over all the parts except those pin heads. Now for full disclosure: I have made so dang many of these babies, that I don’t even use pins. I just press each pleat and jog over to my sewing machine. I am so glad that you are taking this on. Great job, and thank you very much.
Hi-thank you for posting. What kind of material did you use? It looks nice and thick.
I used regular ol’ quilter’s cotton. It is a medium weight woven cotton that is used in many projects, but most commonly, quilts. It is slightly heavier than a shirting fabric, but with a slightly looser weave than that. I personally chose cotton, because it can withstand higher temperatures for cleaning and drying, and synthetic material harbors bacteria more readily. This was a personal preference, so I don’t necessarily recommend one fiber over the other for other people. Thank you, Sandy, for stopping by.
Thank you for generous and thoughtful tutorial. I’ve been looking for a written pattern for a while – I need to be able to look at a still picture to figure out what to do next – and yours is perfect. I appreciate the time you spent making it, and I hope you are rewarded by learning how much you have contributed to the goodness of the world. Thanks again.
Jan, Your words are so kind and so much appreciated. Thank you for them. It makes my day. I am also glad to hear that my pictures are helpful. When I made the tutorial, I thought ‘Oh, my…this is a bit long, but thorough.’ Then I decided to go with my gut, and that was ‘Thorough is always best’. Have a great week ahead.
Thank you for this tutorial and especially the photos! There are many versions of the pleated face mask out there but your tutorial seems to encompass the best ideas in an easy to understand way. I’ll add a metal nose piece and maybe a pocket, but your tutorial removed any doubts I had about the basic construction. Thanks!
Nancy, so great to hear! Yes, back when I made the tutorial, I had a hard time finding anything that I could use to make my own, so I just looked at a cheap disposable one, then worked out the measurements. Now you pretty much have to wade through a ton of mask tutorials, patterns, pictures, diagrams, warnings, and contradictions before you even dare to cut your fabric. You are a daring soul. :D. Thank you so much for stopping in. Happy sewing.
Thank you so much! I’ve barely gotten into sewing but have lots of supplies so I’m going to try my hand at this! These directions are PERFECT for me!!!
Lisa, you can do this. You really can. Go slow the first time, then blaze through the next 20. ha, ha. I am so happy that you are here. Thank you for visiting.
Im going to be one of those people that says, ” you need to”… Followed by, give yourself a huge hug from me thanking you for everything you are doing and continue to do. And to the others…
Don’t let the door but ya,where the good Lord split ya!
Terri, that is some pretty darn good advice. :D. I might try making pot holder tutorials next…something a bit less controversial. lol! Thank you so much.
Is it normal that I kind of struggled with the last step (not including your finished edge), where I fold the fabric over and see through lots of layers? My stitching wasn’t great and I had some trouble getting it to stay in a nice line. I took off the 1/4 inch presser and used a straight one, but I’m new to this and wasn’t sure if I had done something wrong toward the end.
Jessica, It’s completely normal, especially if you are somewhat new to sewing, which is absolutely fantastic, by the way! Sewing through multiple layers brings out the best of cuss words in my honest opinion. Also, you will notice that it is easier for either older (heavier, durable) sewing machines, or newer ones that are not entry level, to sew through multiple layers easier. Do not let this discourage you, but if you do have an entry level sewing machine, try testing out a good used one that is older (I’m talking…you can find good old singers from the fifties and sixties that are next to nothing cost wise), or try out a mid priced or used Juki or Janome, just to see the difference in ease of use. I am not affiliated with any sewing machine company, so my feedback here is not biased. I hope this is helpful information. Keep sewing girl, and don’t worry about those ‘nice lines’. They will come.
Thank you so much ❤️
Thank you for taking your time away from your family to create such a wonderfully made tutorial. This is a lovely mask and tutorial. I am using it to help make mask for a local church to give out to its congregation when they resume services in May. This is the perfect patern to be able to produce several very quickly. Thank you again.
Adrienne, thank you for your kind feedback. I hope you enjoy making this; so that you are able to put it to good use for your congregation. Just know that these are not covid-19 level N-95 masks, so you will know to use them with some caution. Just putting that out there for your protection. They certainly are better than not wearing one at all. Good luck to you.
Thank you so much for putting the time in to make this tutorial and answer all of the questions. I will be using your pattern for my next round of masks. Your easy to follow pictures are a blessing!
Susan, thank you very much. I hope that you are able to tweak the pattern to accommodate making multiple masks at once. Good luck, and don’t forget to take breaks.
In searching for a mask style for no medical people, I like yours the best. Have been home mostly and have used a scarf when grocery shopping. It will get warm soon and I will need a mask. And I agree, I can not stand tying stuff in my hair.
Clara, Yes, I really prefer the elastic, personally. It is just so much easier to take off once I am finished using it, and much easier to put on when I am in a hurry. I do keep a few of them in rotation, switching them out as often as possible, and tossing the used ones in the wash right away. I mostly need mine for allergies and cleaning, but I am not going to pass up using them in today’s circumstances, even if they aren’t a high level of protection. I am so glad that you find this one comfortable. Thank you for trying it out.
Thank you so much! I really appreciate your thoughtful instructions and photos. : )
Elizabeth, You are welcome. I hope my tutorials in the future are as well liked. Sew on!
I LOVE this tutorial with pictures! I’m sure it helps many of those unfamiliar with sewing. It was easy to follow. I think I’ll go make one, as the pleated one I made left a lot to be desired. I had trouble with thickness and my machine made messy stitches at both ends when sewing over elastic. I think when I go back to SD (we’re in AZ) and can use my Viking sewing machine with movable needle position, it should go much better… Thank you SO much and pay no attention to those who take time only to criticize you.
Bonnie, I just love hearing about new sewers being able to tackle a project with ease instead of anxiety. I hope that you were able to make one of these, somewhat easily. I have a good plenty family from SD. It is a beautiful place that holds my native roots. Thank you for visiting my humble blog. Take care.
Waow..I really love this…
Thanks so very much ma’am
God bless you too
Rahmah, You are welcome, and good blessings in return.
Thank you so much for explaining the pleats. I have been making masks, and my pleats only look like tiny folds on the side of the mask….it’s been driving me crazy. Thanks for such an easy tutorial to follow – and best to you and your family!!! (Also, you’ll find that friend one day 🙂 )
Zizi, You are welcome. The pleats make a huge difference in how well a mask fits the face. I hope this turned out to be the case for you. I am glad to hear that it was somewhat easy to follow. Thank you for that feedback…and yes, I think a good friend is around the corner, it can only be a matter of time. 🙂
Thanks for posting this. I’m
Not great with sewing but will give this a go.
If I can make just one on my own I will be happy.
Gail, I am not a racehorse sewist, but more of a Clydesdale. Slow, strong, and steady always has a good finish. Good luck.
Hi Monica,
I’m a nurse working in the midst of this unbelievable pandemic. In my humble opinion, any mask is a helpful mask at this point. I plan to make them for my family, friends, neighbors and for myself. We can wear them while running errands as we begin to go out in public more and more in the near future. The N95 masks we wear at work make it so hard to breathe but I’m so very grateful I am protected at work!
I am not very experienced with sewing but I came across your tutorial and I’m planning to try this one. You made the mask sound so easy and your instructions appear very detailed (which will be a saving grace for me)!
Thank you for sharing your expertise!!! I plan to use the sewing time as a little therapy!!! Something that is creative, useful and has a good outcome no matter what will be a welcome change in my world!
I find it sad that people “demand” things from others they don’t even know. I wonder what kind of lives these people have? I hope they wake up as a result of this pandemic and see that life is too short to be hateful. Being kind sure makes the life we have a little sweeter!!!
Thank you again for your tutorial!!! Take care and I pray you and your family stay well!!!
Kim, My sister is a nurse as well, and has the same thoughts. A mask is always better than not. I think that there is way too much overthinking of things to the point that we over educate our common sense, and by doing so, end up completely confused about what the right decision or answer should be. Good ol’ gut instinct is usually right.
I hope that you had good luck with this. Thank you very much.
I am so glad that this tutorial is beneficial to you and your family/friends. It makes me feel good to know that this has been helpful during this time (or any).
Thank you so much! Very easy, simple and friendly user pattern and instructions. Pictures were of great help!
Lourdes. You are ever so welcome!
Thank you so much for this tutorial. I added a pocket and copper wire to mine but your pattern got me going. So far I’ve donated 150 to essential workers and I’m still going. I love your pattern because it withstands many washings. It may be a bit more work than the simpler patterns out there but these last abuse.
Jenny, 150! that is amazing! I am sure you don’t need my humble pattern any longer, as you can probably do this with your eyes closed. 😀 Thank you for your kind feedback.
This is a wonderfully detailed, comprehensive, and easy to follow tutorial. I did find that my fat head required different measurements for the material. I started with 15″ x 9 1/2″ and used a 2 inch piece for each side bar. But this is a wonderful and well appreciated guide for making masks for this very weird time in which we live. Thank you very much for taking the time to create and post it.
Deborah, I am quite sure that your head is beautiful and just the right size. One of my favorite things about this mask pattern, is that it is so easily adaptable, by any range of sewers, be they seasoned, or novice. I am glad that you were able to make this one comfortable with some minor adjustments. Thank you for your comment. Happy sewing!
i am a novice sewer… and this part right here is throwing me off i cant seem to get the pleats correct please help
Flip the tube piece over. Match the crease edge to the second line that you made earlier. Press. The pleat that you just created will be 1/2 inch deep. Pin the pleat down on each raw edge end.
Victoria, Were you able to figure out how to get these pleats done? If you think of it like a paper fan, it might make sense. First you press a fold into the mask, then you take that crease that you just made by folding it, then place that crease on the second line. Press it down. Now, you have a pleat. One pleat, and it will be 1/2 inch deep from that first crease you made to the second one you made when you pressed it the second time. From here, you basically repeat this by following the measurements that I provided in the tutorial.
I have tried many times to print this tutorial out so I can refer to it as I am sewing but I can’t get it to print. Is it me our have you prevented this option?
Karen, I have not prevented this from occurring on your end, but I have not provided a PDF. That may be provided on future tutorials, but you shouldn’t have any problem printing anything on your end, as I don’t have control of that.
Pingback: 7 Easy To Make DIY Face Mask Patterns - Saving & Simplicity
Thank you for the pattern. Easy to follow directions
Jane, You are welcome. Thank you for trying this out. I wish you success with it. Enjoy.
Thank you so very much for your detailed pattern! My husband has a wood shop & saw-dust is constantly everywhere! This will help in the shop & with the pollens!!
Bless you & be well,
Perri & Joe
Perri, Oh yes, I have used mine while sanding shelves. It was much better than when I wasn’t wearing one at all. I hope he gets good use of the ones that you make for him. Thank you for your comment.
Thanks so much for this detailed guide. Works well and quite straightforward to produce masks which can be as quirky as the fabric available. So sorry to hear that you have had abuse, so inappropriate.
Carol, Thank you very much. I also found that even different qualities of woven cotton behaved differently with this pattern. I have yet to use it for other fabric types, but might try one eventually with t-shirt knit, just to see how it feels. Take care.
Pingback: Tea Packaging and DIY Face Masks - The Tea House | Loose Leaf Tea Specialists
Thank you for the tutorial but I do have one question. When pinning the elastic are you suppose to pin it to the right side of the mask or pin to wrong side. I’m having a difficult time figuring that part out. I guess the whole side bands are a little confusing to me.
Robin, it really doesn’t matter, because the mask is reversible, so there isn’t a wrong or right side, per se; however, when your mask is complete, your accent fabric will show on one side, and not at all on the flip side.
God’s Richest Blessings to You and your family Monica!
I just wanted to check in on you and see how you and your beautiful family are doing.
The last time I was on your blog, the comments were becoming very heated and unkind.
Your heart has been on my heart and I have been praying for the Lord to Bless you with His Peace & Strength during this time.
Thank you for your service and support to all of us trying to protect our loved ones.
God Bless. ❤
Hi Monica,
Thank you for the instructions and pictures of your mask! I am extremely visual and the pictures really helped when reading the instructions. I have made a few masks using another pattern that includes pipe cleaners in the fold area to crimp the mask a little around the nose. I wear glasses and this helps keep the mask tight. With your pattern, when would you insert the pipe cleaner? I’m thinking when I baste down the pleats, insert the pipe cleaner at the fold so the basting holds the pipe cleaner in place? Any suggestions?
Thanks again for your time to make this pattern available! Stay safe.
Noel, Thank you so much for your feedback. My tutorial doesn’t have a sheath to hold a wire of any kind. There are comments that were made about adapting the pattern to accommodate one, but I am leaving that up to you all to decide. I leave my pattern simple, so that you all can adapt it to your own needs and specifications. Good luck.
Sorry people have been mean towards you. I for one want to say thanks. Stay safe!
Jules, Thank you very much. Take care.
Thank you for being so generous to give a free tutorial like this. At this difficult time, it is so appreciative that people go out of their way to do something so kind and helpful. My wife and I sincerely thank you.
Andrew, I really wish that I could claim that I shared this during this time of viral pandemic, but in truth, I created the tutorial over 2 years ago. Either way, I am beyond happy that it has been beneficial to so many people. I hope that it made a difference in some small way for the general good. Thank you for your comment.
Thank you so much for sharing your tutorial with me. I love the way you patiently explain the procedure. I am definitely going to give it a try.
Once again, thank you!
Thank you fir making such a easy toi understand tutorial. Very nice
Ginger, You are welcome! Enjoy.
Love the detail of this tutorial. Easy to follow and reference. I wear glasses, so elastic is the best for me. PS I cut my 1/4 elastic in half lengthwise – since nobody has 1/8 size for sale. The smaller size fits my ears better with glasses. And this mask style fits the bill. ANY protection is better then none.
Stephen, That is a fantastic idea. Yep, elastic is really scarce right now, but it should start showing up again soon, hopefully. It’s good to hear that you were able to make this pattern work for you. Thank you for your comment and information. Happy sewing.
get 1/8 elastic from Etsy!!
As a teacher, I have had to work with my school to distribute hundreds of computers, books, packets, etc. Gratefully, we had one of our retired staff members donate some masks for us to use to keep safe. She used your pattern, and I am so grateful to you for sharing that. It has been such a blessing. Today, my girls and I are using your pattern to keep others safe. Thank you again for your willingness to share and help us all.
Elizabeth, This is such a wonderful thing to read. I am appreciative to your former co-worker, and to yourself and your girls, for taking your time out of the craziness to sew up a few masks using my tutorial. I hope it was simple, and still fun as well. Happy sewing.
thanks so much for this tutorial,I have several hundred masks to sew.iv been sewing elastic inside it’s taking longtime,is it ok to see my elastic n ties to outside of the mask,I don’t want to do the end pieces as my masks are colored fronts ,white backs ..
Patricia, You are welcome to modify my tutorial in any way that benefits your needs. I hope that makes things simple for you. Thank you so much for making such a high number of masks. That is amazing to hear. Good luck.
Thank you SO MUCH for this easy mask tutorial! My sewing skills are pretty basic, and I had no problem following your instructions. These turn out so cute that even my teenager and my twenty-year-old don’t mind wearing them. I can’t wait to make more!
Jen, Good news. Your sewing skills are no longer basic! You are making pleats now for crying out loud. Great job! I am so dang happy to hear that you are doing this, and enjoying it. Sew on.
I am having brain fart. Can’t figure out how to get the last part to be that way.
When I go to turn contrast piece over not only is elastic on wrong side but very very little material and there IS the back part showing.
I’m just not getting it. Help me
Rebecca, you are not folding that accent strip at the correct place. Keep pulling that accent strip to the other side until you don’t see it anymore on the other side. this means that the elastic will be coming out of the edge of the mask, instead of the back. Your accent material showing on one side when done should be aprox. 1/2 inch wide, and zero on the other. Take another good look at my pictures. Good luck!
Thanks for answering this in a way that made sense and got me unstuck, Monica!
Thank you as well for giving your time and talent to creating this tutorial that’s helping so many!
Does this mean that the back of the mask up to this point becomes the front of the mask now? I know it shouldn’t matter, but I have some selvage edges I didn’t trim off because I didn’t think they’d be seen 😂
Thanks so much for the tutorial! Much appreciated.
Great question Rebecca, thanks for asking it—I got a little stuck in exactly the same spot!
OMG! Me, too! I’m making this for a second time and still getting the elastic attachment wrong. I just don’t get this at all.
Thank you so much for taking the time to write this tutorial, the directions are much easier to follow than the ones I saw on YouTube without any written instructions just music playing in the background. My first mask has a few mistakes but the 2nd one will be so much easier to make. Thanks again!
Flo, Believe it or not many of the tutorials that you see have been made within the last month or two, so they may not be perfect yet, and might be going through some adaptations in the near future with any feedback that they are given. My tutorial was made two years ago, so with the help of you all, I have simply worked through those improvements already. 🙂 My first mask was a little funny too, but all of the following ones after that (and there have been many) worked out perfectly, so I hope for the same results for you. Thank you so much for your comment and kind feedback. Enjoy it!
I just finished making this mask and it turned out great if I do say so myself, very easy to follow instructions
thanks
Lindsay, Super news! I love that it was simple enough, and hopefully fun to do as well. Take Care.
I am having a difficult time with the accent piece and the elastic for the ears and I’m wondering if someone would be so kind to give me some advice. I can’t tell if I am overthinking this, reading it wrong or not understanding so I would be so grateful for someone to give me any tips.
When I get to the steps for the accent piece, I’m not understanding the flipping the folded piece away from the body of the mask.( in the step listed: Open the the accent fabric strip seam by flipping it outward away from the main pleated piece, then press.) and then in the other step listed with the instructions: fold the ENTIRE accent piece down toward the main pleated piece, encasing the raw seam. You will now see the accent piece on this side, but not at all on the flip side.) When I try to do this, I cannot get the ear elastic (I am using jersey fabric as elastic) to now be on the outside of the mask, and the accent piece to not show on the opposite end.
I hope I am making sense with this description. Did anyone else find they had difficulties or is it just me? haha. I am not a pro sewer, but I do know my way around a sewing machine. This has just stumped me.
Wonderful tutorial. I’m working with a couple different patterns and found this one to be really crafted beautifully with the accent piece. I just cant figure out that one step which is of course the part that I find truly unique and more polished than other masks without it!
Truly appreciate any advice that any other sewers who had success might have. Thank you all! Stay safe everyone and thanks for this tutorial.
Amanda, I am thinking that you were successful with sewing the accent strip down on top of the elastic, yes? Well after this, you simply flip that accent strip away from the back of the mask. I use the word ‘open’ because the small top and bottom of the accent strip has to be flipped away from the mask too. Press this with an iron during this step. Now, fold that whole entire accent strip to the front of the mask. All of the accent fabric will only show on the front side now, and your elastic will be coming out of the edge of the mask and not one side or the other (neither front or back, but the edge) Sew that entire accent strip down, encasing the raw edge. I hope this helps you. Good luck.
Amanda, did you get it figured out? I’m having the same problem. I just can’t see how the elastic will come out sandwiched between the trim and front. Can you let me know if you solved this?! Thanks.
I think I figured it out! Make sure that you pin the elastic to the inner side. After you sew your seam you turn the trim right side out and over the raw edges and, wala! It works beautifully! I had it backwards.
Thank you for your tutorial! I am not very experienced at sewing, but your model was easy to make and looks great. At first my eyeglasses kept fogging up when I wore the mask, but I took a large paperclip, reshaped it to follow the contour of the upper part of my nose, and inserted it into a channel I built into the top of the mask. Your time spent creating the tutorial was so worthwhile when you consider all of the people you have helped!
Monique, I am so glad that this tutorial has served you well. I am hoping that soon, people won’t need it as much as they currently do. Thank you for your kind words and feedback, it is greatly appreciated.
Pingback: Member of the Month: Frederick Health – Frederick Chamber Insights
If I was wanting to make two masks and my fabric was only 27 inches long for the main fabric. Would it be ok to just take a 1/2 inch off of both masks? So the original fabric would be 8″ x 13 1/2″?
Short answer: I think it would be fine, just make the first marking line at 1 1/4″ instead of 1 1/2″. Especially if they’re for personal use, you should be fine.
Longer answer: On my second mask, I sewed the first seam on 5/8 instead of 1/4 inch allowance (I know better, always read your directions first!). I did a bit of math to make sure the pleats still sat in the middle and continued as usual. I lost 3/4 of an inch in height with my mistake, you’ll only lose 1/2 inch. It results in a shorter mask (unless you make the pleats shallower), but that works for me as I’m a small person, as are my family members I’m making them for.
Thank YOU! I made a bunch for nurses at Emory Hosp. I like how your elastic was applied on top, had the cute end pieces. I was cranking out as many as poss. so that was an extra step. However the placement of the elastic on the insides of mine was tricky, depending on the elastic. Loved how you addressed the naysayers too. God bless you!
Teri,
Yes, that elastic can be tricky or not depending on the kind used. I ran out of elastic a long time back, and have been putting ties in instead, and by the time I am able to get more elastic, this will already be over (hopeful thinking). Thank you for your feedback. I am sure the nurses at Emory appreciate you too. Kind blessings in return.
Pingback: Flattening the Curve Vs. Staying Ahead of the Curve
Thank you for your tutorial. My sisters and I have been making masks for our families and anyone who asks for one. God bless you and keep you safe!
Evelyn,
You are welcome! And a big thank you to you and your sister for being makers during all of this. You are very much appreciated, I am sure.
I looked at a ton of mask tutes and just keep coming back to yours. I modified the pattern a bit for my wants and needs. I have given away probably 50 so far, and people really like them. I also sold a few, and just now am thinking to ask you if this is permissible.
Amelia,
I am glad that you are able to use the pattern and modify it to your specific needs. I think that in legal jargon, if you have modified it more than 10 percent, it isn’t anything that you need my permission for, as you have changed it to be your own. If you are selling masks using my tutorial without changes, I only ask that this tutorial be referenced as the pattern origin, and nothing more. Take care, and happy sewing.
Monica, I am happy to give you credit for inspiring my masks. Thanks again!